By Dmitri Zimine
Build a real-world serverless application on AWS with Serverless framework and ready-to-use functions from StackStorm Exchange open-source catalog.
Episode One | Episode Two | Episode Three | Episode Four
Read on if you are:
- A serverless developer using Serverless framework who wants to check out ready-to use functions from the StackStorm Exchange open-source catalog,
- A StackStorm user who lives in AWS and misses the breadth of StackStorm Exchange integrations there.
- Anyone who has 2 hours to follow-along and learn serverless with something more elaborate and real-life than a Hello-world example.
If you only got 8 minutes to spare, skim the text and examples, spend an extra 30 seconds browsing StackStorm Exchange to see the potential, and bookmark this post to get back to it when you need it.
Intro
When I explored Serverless with Python, StepFunctions, and Web Front-end, one thing I missed is a catalog of reusable integrations. Something like 200 connectors for Azure Logic apps. Or 130 integration packs for StackStorm.
When we need to wire in Slack, Jira, Stripe, or Nest, could we skip digging into their APIs and authentication intrinsics, and just grab a ready-to-use function?
Now we can do exactly that: StackStorm just announced a plugin for Serverless framework that turns integrations from StackStorm Exchange into AWS Lambda functions.
In this tutorial, I’ll show how to use the plugin and Exchange integrations, in the context of building a serverless community on-boarding application from a ground-up. Let’s make this conversational and fun.
I assume no familiarity with either Serverless framework nor StackStorm. But you should know how to code, and be smart to compensate for mistakes and omissions I’ll inevitably make.
We will be going slow, with excruciating details, thus it is going to be four episodes.
In this first episode, I’ll set everything up and deploy my first StackStorm Exchange action.
In the next episode, we’ll add more actions.
In the third episode I’ll wire them together with a AWS StepFunction.
In the fourth episode we’ll add Web Front-end with the Reflection and Summary. Each episode will take about an hour to follow.
Ready? Let’s rock.
The application
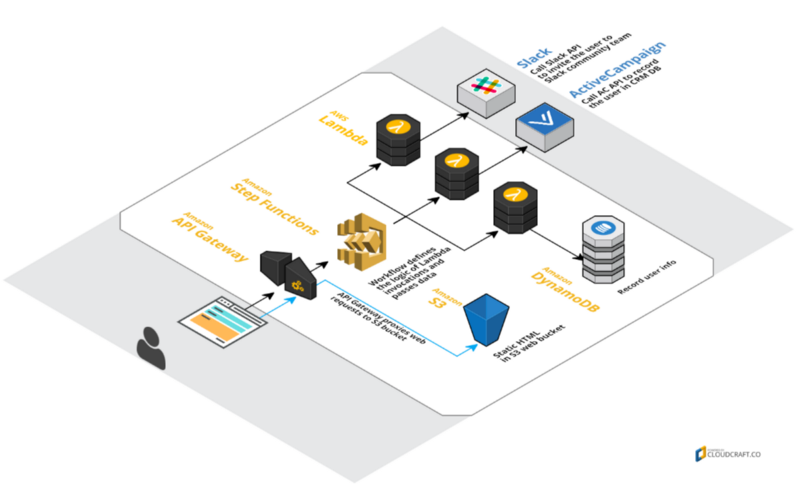
We will build a community on-boarding application. Actually, rebuilding from scratch the one we run at StackStorm. It’s like SlackIn with a multi-step customizable on-boarding workflow. The app presents a registration web-form, which passes new user info through API Gateway to the StepFunction workflow that carries on-boarding steps.
In my case, the steps are 1) invite users to Slack 2) create contact record in ActiveCampaign CRM tool and 3) put a user record into internal DynamoDB table. Here is how it looks:
You can find the previous implementation on github, or use it and join StackStorm community on Slack for questions about StackStorm Exchange integration.
Getting Ready
First, you’ll need AWS account, NodeJS, Docker, and Serverless framework. And Slack! As our first action will be inviting users to Slack.
- Make sure Node.JS is installed, and it’s version is
8.4.0or higher. - Install Serverless framework, and setup AWS credentials for it following this guide.
- Install Docker. The plugin uses it for build environment to make the lambdas binary compatible to AWS execution environment no matter what OS you’re using for development. There is a way to make it work without Docker but don’t take chances.
- Slack! Our action will require admin access and will be using undocumented Slack API (docs here, pun intended) to invite new users. The easiest is to just go ahead create a new team. Takes 4 min. Slack won’t mind — they’ll show growth to their VC.
- Once the workspace is created, time to get an authentication token. Go to api.slack.com/custom-integrations/legacy-tokens. Fear not the “Legacy Warnings”: this tutorial will turn legacy before they do. Do what they say, get your token.
PRO TIP: Use this quick hack to get and use your own user’s auth token. Much faster, good for playing and debugging. But please never, never use it for production!
Create a project, add a first action
Try sls --help to make sure that at least something works. sls is a shorthand for serverless, the Serverless framework CLI. Now put your coffee aside, time to create a project. Some folks like using templates that come with serverless: sls create --template. I prefer to start from scratch:
mkdir slack-signup-serverless-stormlesscd slack-signup-serverless-stormless
npm init
# Once you answer questions, the project is set up.
Next, install [serverless-plugin-stackstorm](https://github.com/StackStorm/serverless-plugin-stackstorm), the one that plugs in the StackStorm Exchange actions.
npm install --save-dev serverless-plugin-stackstorm
… and create a minimal serverless.ym file so that sls command will pick up the plugin:
Now, create the first action. I’ll use a battle-tested Slack pack from StackStorm Exchange. Which action, you say? Ok, StackStorm Exchange is not smart enough yet to show pack’s action list, but sls stackstorm will rescue us.
sls stackstorm info --pack slack
Oh my! There’re so many! what are they? I guess I need a PR to print action description. Meantime, | grep admin will get us the one we need: slack.users.admin.invite. Let's query the action for it's parameters:
$ sls stackstorm info --action slack.users.admin.inviteslack.users.admin.invite ...... Send an invitation to join a Slack OrgParameters attempts [integer] ......... description is missing channels [string] .......... Channels to auto join. email [string] (required) ... Email address to send invitation to. first_name [string] ........ Users first name set_active [boolean] ....... Should the user be active. token [string] ............. Slack API token.Config action_token [string] ...... Slack Action token. admin [object] ............. Admin-action specific settings. post_message_action [object] Post message action specific settings. sensor [object] ............ Sensor specific settings.
Awesome! We can see that there is only one required parameter, email, but I'll add first_name to stay conversational. The token can be passed as parameters, or as config. And if I choose to use config, my prior tribal knowledge hints that the admin [object] requires only admin_token. The very one I asked you to remember when you were setting up Slack workspace.
PRO TIP: While we are still polishing the plugin to expose all the Config details, you can find it out by exploring StackStorm Exchange pack config schema in config.schema.yaml file. For example, here is config.example.yaml for our Slack pack.
Now we have all we need to create the heart of any Serverless project: the serverless.yml. Here it comes:
This is a good time to learn a bit of Serverless. Take a quick break to skim Core Concepts and bookmark Serverless.yml Reference.
I threw in the events section in lines 9:12 so that we can invoke the function with REST call through AWS API Gateway endpoint. Serverless framework will do all the Gateway magic.
Note that this default configuration instructs API Gateway to pass the REST POST call with POST body under the body key (details here. When we POST {"first_name": "Santa", "email": "santa@mad.russian.xmas.com"}, the event passed to the Lambda is:
..."body": { "first_name": "Santa", "email": "santa@mad.russian.xmas.com"}
Knowing the input data structure is important to map it to the action input parameters. It’s intuitive: input represents event parameter of AWS Lambda programming model(BTW should we call it event? Vote with a PR!).
Jinja is used to map the inputs; our JavaScript friends who're less familiar with this common Python tool find it intuitive enough in simple cases; and Stack-overflow is full of magic Jinja tricks.
In lines 16:17 of serverless.yml I map the two parameters from input body to desired action input parameters. Optionally, you can also form a function output from action results. I’ll keep it simple for now (line 20:22) and save more tricks for later.
To keep the config separate, I created a file env.yml that and put my config parameters in it:
# ./env.yml# WARNING: Don't commit to Github :)slack: admin_token: "xoxs-111111111111-..." organization: "my-team"
Then I used it in serverless.yml like this: admin: ${file(env.yml):slack}. Note how this syntax puts the object from the key in the file to the key in serverless.yml.
Ok, that’s it! The function is ready to fly to AWS with sls deploy. But I take it sloooow. Step by step. First, I’ll package it locally.
sls package
The very first time takes a long time as this is the time when the plugin installs its runtime dependencies. It pulls the Docker images from the Hub. It installs StackStorm runners — the code that knows how to run StackStorm Exchange packs. It pulls the slack pack from Exchange. It installs slack pack python dependencies. It does a lot of work for us, and it takes time. Good news: it's only the first time.
Oh, did I mention that you must be connected? Or do we assume internet connection a basic commodity like breathing air and electric power? At least before FCC repeals Network Neutrality? So yes, you need internet connection to live in the serverless world.
Now let’s run this locally.
sls stackstorm docker run --function InviteSlack --verbose \--data \'{"body": {"first_name": "Santa", "email": "santa@mad.russian.xmas.com"}}'
Local runs happen in a container — you’ll see Spin Docker container to run a function CLI output. It takes a bit longer, but ensures that the execution environment matches AWS lambda very closely, so better safe than sorry.
When I debug input and output parameter transformations, I may not want to call the actual function, like in case of Slack rate-limiting API. Use --passthrough parameter that tells the plugin to do the dry-run and skip the action invocation.
Now we are really ready. Let’s deploy the function to AWS, and run it “serverless”.
sls deploy
It will take some while — now it’s serverless (and honestly, our bundle is a bit bloated, patience! plugin developers are currently busy solving other problems, we will optimize it as soon as we can)
PRO TIP: if something goes wrong at this point, most likely something is not right with your AWS setup. Go back to “Getting Ready, step 2”. Read Serverless Installation doc. Google, Stack-overflow, Serverless Gitter channel or Forum.
You might be curious to see how it looks in the AWS console. If the PRO in you is saying “no, you should stay cool and use CLI”, don’t listen. Go indulge yourself, open a browser and take a good look at your Lambda. While there, you might also inspect the API Gateway endpoint that sls created for you.
But to test it, we’ll go back to terminal. Here is how to run your Lambda with sls:
sls invoke --function InviteSlack --log --data '{"body": {"first_name": "Santa", "email": "santa@mad.russian.xmas.com"}}'
Finally, let’s POST to the API endpoint. The endpoint was printed at the end of sls deploy and you should have taken notice, but it's OK if you didn't: you can always get it by typing sls info.
You curl lovers go ahead use it to POST; be sure to set Content-Type=application/json header. Me - I'll show off with httpie, aka CURL for humans:
# DON'T copy-paste! Use YOUR endpoint!
http --json POST https://YOUR-ENDPOINT.amazonaws.com/dev/invite \email=test@example.com first_name=Dmitri
How did it go? Everything worked, at least for me. Let’s fire yet another most useful slscommand to check the CloudWatch logs:
sls logs --function InviteSlack
Success! And the end of the first episode. Enough for now: Christmas time is here, take it slow, enjoy!
The code example so far is on Github at 1-add-first-action.
Episode 2: Adding more actions
Hope this helped you learn something new, find something interesting, or provoked some good thoughts. Please share your thoughts in the comments here, or tweet me @dzimine.