
By JeB Barabanov
Have you ever thought about having your own open source project? I bet you have — you’re reading this article.
Maybe you are thinking about it right now. Maybe you came here to learn what to expect, what challenges you’re going to face, and how to deal with them. Well, you’ve come to the right place.
The following guide is based on my personal experience in owning an open source project. And I do mean owning – not just contributing to – an open source project. There is a big difference, and we’re going to learn why.
So let's get started with...The Ultimate Owners Guide to Open Source

Table of contents
- Intro
- What is Open Source
- Why Start an Open Source Project
- How to Start an Open Source Project
- How To Write Documentation
- How to Publicize Your Open Source Project
- How to Manage Issues and Pull Requests
- How to Automate Your Process
- Version management

First, A Bit About Me
My name is Jeb and I’ve been maintaining a few open source projects for a couple of years. The most popular one and the one from which I’ve learnt the most is @angular-builders. At the moment of writing it has ~900 stars on Github and about 1M monthly downloads.
Yes, it’s not even close to huge projects like Angular or React – but I feel that I have enough experience to share with you to help you avoid the same mistakes I made. And more importantly, to help you understand the cost of owning an open source project.
So What is Open Source?
Let’s first establish a common language and align on key terms and definitions.
What is open source? Here is a very generic definition from a well known Open Source Encyclopedia (aka Wikipedia):
Open source is the concept of the information allowing the replication or modification of something being open to the public.
or, in terms of software development models:
The open-source model is a decentralized software development model that encourages open collaboration.
A main principle of open-source software development is peer production, with products such as source code, blueprints, and documentation freely available to the public.
In the case of Wikipedia, we have those who edit the articles (contributors) and those who approve the edits (more experienced members, moderators).
If we project it onto the software world, the editors would form a core team of an open source project and the contributors would be, well, contributors.
Wikipedia is a huge open source project but it all started from something small. Wikipedia was born from Nupedia and it was created for a reason:
Despite its mailing list of interested editors, and the presence of a full-time editor-in-chief, Larry Sanger, a graduate philosophy student hired by Wales, the writing of content for Nupedia was extremely slow, with only 12 articles written during the first year.
So here’s where the first question comes into play...
Why Should You Bother With Open Source?
As you can imagine, one of the main reasons for opening something to the wider audience is to gain collaborators.
Together we’re strong.
(Zarya, 2016)
At the moment of writing this article, Wikipedia has 37,899,499 registered accounts of which 134,022 are actively editing.
Just think of it… 134,022 active collaborators. Oh, and it has 6M content pages!
Would the numbers have been the same if Nupedia didn’t move to an open source model? I highly doubt it.
Nothing is different when it comes to software. In order to solve a certain problem you have to write code. In order to solve a big problem you have to write a lot of code. And in order to solve it properly, you have to write high quality code, make a high quality design, and so on.
All this requires resources, which, let’s be honest, you probably don't have. You have a rent to pay, after all.
Why Start an Open Source Project?
While gaining collaborators is a reasonable incentive, almost no one starts a new open source project solely because of that. Your reasons might be different, but let’s talk about most popular ones.
#1 You want to solve a problem for which no free solution exists
You face a problem, but there is nothing out there that solves it for you (or there is something, but it costs money) so you have to solve it yourself. You manage to solve it, you’re really excited about your work, and you think others can benefit from it. So you open source the project.
#2 You want to be a founder
You want to be recognized as a founder of an open source project, and you want that fancy line in your CV. You have an ego (we’re all human, after all). If this is the main reason for you, then I promise you – after reading this guide you’ll reconsider. It’s likely not worth it.
#3 You want to solve a problem better than someone else does
You face a problem, and there is an open source project that actually solves it for you but it’s not good enough (in your opinion) or doesn’t have the exact feature you need.
If you create a new open source project solely because of this, then most probably you’re at #2 (ego). Make yourself a contributor, and create a PR to the existing project instead.
If the existing project has a different vision and making a PR is not an option, you should consider either extending it by reusing its functionality in your project or forking it. It may save you a lot of headache later.
#4 You want to solve a problem by creating an open source project
You face a problem and there is nothing out there that solves it for you. So you think that starting the solution as open source from the very beginning is a very good idea.
In my opinion, it’s not.
Solve the problem, make sure it works for you, and after that go to #1.
These are the four incentives I most commonly find for people creating a new open source project. But in this guide we’re going to focus mainly on scenario #1.
The reason is simple — I believe that if your main reason for starting an open source project is anything other than eagerness to share and contribute what you've made, then this won’t hold.
For quite a long time the fact that you’re helping someone might be the only reward you get. And if this is not the kind of satisfaction you’re looking for, then maybe you should stop here and not waste your time.
There is another quite popular scenario which is worth mentioning: there are companies that open part of their code to the community. Examples of this are Angular (maintained by Google), React (maintained by Facebook), VSCode (maintained by Microsoft) and more.
Their reasons may vary, but gaining collaborators and contributing to community are surely among them.
While I can’t argue with the importance of this practice, this scenario is quite different from the others because employees that maintain such projects get paid for their job.
If you work at a company that considers the possibility of creating an open source project, the majority of the content here will be still relevant for you, however the incentives might be different.
So should you create an open source project?
If I had to summarize this part in one sentence it would be:
Make sure your intentions match your expectations.
Believing that you want to have an open source project is not the same as actually having one, as you will see in the following chapters.

How to Start an Open Source Project
So you’re in scenario #1 – you have a solution for a specific problem and you’re eager to share it with the world. Let’s emphasize it again:
- It’s not about your ego
- You’re not hoping to benefit from it
- You truly want to help others with the same problem
If you answered yes to all of these things, then here is a quick checklist for you to make sure you’re doing the right thing:
- Make sure that open source is the right format. If it’s something small that you want to share with the world, then a blog post might be just enough.
- Double check that a similar project doesn’t exist already. Maybe your solution makes a perfect PR for an established open source project.
Be prepared for what’s coming
As I mentioned, owning an open source project carries with it a lot of challenges.
One that stands out is that it requires a lot of your time. Everything that you do for your project requires time, whether it’s writing code, managing issues, updating dependencies, talking to people, answering questions, and so on.
Every minute that you invest into your open source is a minute that you could have but didn’t invest in your family, your hobby, your health and what not.
The only thing that you can do to make this better is to start delegating. When (or should I say “if”) you have enough collaborators, you can outsource part of your responsibilities to the people you trust.
Code separation
So here we go, you have a solution for your specific problem and you think others can benefit from it. It is still integrated within your code base and you probably don’t want to make the whole code base open source (unless you do).
First you have to separate this code from the rest of your code base.
…which will eventually mean that all the code that is going to be opened will reside in a separate directory.
Make the code generic
Make sure that the code in the new directory is generic and is not bound to your specific problem. Make an abstraction layer if needed.
As an example, I started angular-builders with a very specific need (coming from one of my other open source projects) of adding a custom loader for native modules to Angular build.
I could have created native-module-builder which would serve only this very purpose. However, I realized that at a relatively low cost I could create a more generic solution that would solve similar (but not the same!) problems.
This is how custom-webpack builder was born.
Keep it simple
Generic is great, but be careful not to get too excited about that.
Premature optimization and over-generalization are two very well known problems in software engineering. You should find this sweet spot where your solution solves problems other than yours but not all the problems in the world.
If you build a scale where the solution for your specific problem is 1 and a solution for all the world problems is 100 then you should start with 2.
Your generic code should be able to solve a a few more problems than your specific code.
Eat your own dog food
Keep using this generic code in your code base at every step — doing so makes sure you eliminate the unnecessary parts and leave only what’s needed. It also ensures that the code you’re going to open is working properly.
Remember, you are the very first user of your open source project.
Don’t get sued
If you’re extracting the code from your company code base, consult with your superiors and if needed with the legal department. Make sure that they support your initiative and that the code you’re going to open is not subject to the IP (intellectual property) of your company.
This will also help you to decide which open source license is more suitable for your project.
When everything is working, the code is separated and is generic enough, and you have all the approvals (if needed), then it is time to open it to the world.

Once your open source code is separated and generalized it’s time to disconnect it completely from your code base.
Go public with your code
First, you have to open the source code of your project (at the end of the day that is what makes it an Open Source Project!).
There are different options for hosting source code online, but we’ll go with the default — GitHub.
- Create a new repo on GitHub
- Clone the repository
- Move the sources from the directory you previously created (don’t remove the directory yet).
- Commit & push — voilà it’s now an open source project.
Or is it?
Create a package
Your project is publicly available, but no one is using it (including you, since you’re using a copy of this code within your larger code base). And no one is aware of its existence.
Furthermore the only format in which your project is publicly available on the web is the source code. And the only way to consume it is copy-pasting the code into a code base. Not a very convenient way, right?
In order to properly distribute your project, you have to:
- Create a package out of the source code
- Make this package available on one of the public package registries (depends on your ecosystem, for example, for Java it might be Maven Central Repository, in the case of JavaScript it might be Npm Package Registry and so on)
This is when you add a build chain to your new shiny repository, define your project's name, and more.
I’m not going to break down the whole process because it is very dependent on your ecosystem, set of tools and language you are using.
You might be an all around person to whom defining a new project as well as adding a build chain and publishing the package is a piece of cake. If this is the case — good for you!
You also might be a person that is used to only writing code but has never faced all these definitions, configurations, artifacts and stuff like that. It might be a whole new world to you.
If you're that person, it's time to learn. Not going to be quick, I promise you that, but we'll get there.
In any case...
When you’re done filling in all the missing puzzle pieces in your head, you’ve learned everything about the relevant package registry, and your package is actually published, then and only then can you truly consider your project open source.
At this point you can actually tell people: “Hey, I already have a solution to your problem, just add this package to your project and use it!”
Perform a sanity check
Before your project goes viral, make sure it works.
A sanity check for your package would be actually removing the generic directory from your larger code base and use the publicly available package instead.
After all, you’re the very first user of your open source project.
How to Handle Further Development on your Code Base
When you start using the package in your code base, the development flow is likely to change. Previously, the now-open-source-code was part of your code base – you could consume the changes right away.
But now it’s as much of an external package as any other 3rd party package used in your code.
Thus, when you develop a new feature in your shiny new open source project, you’ll have to publish it first in order to be able to consume it in your larger code base. However you cannot publish it if you aren’t positive it works, because once published it might affect other users.
So here are a few things you can do in order to avoid publishing broken versions:
- Cover your code with tests, both unit tests and end-to-end tests.
I don’t think I have to convince you how important the tests are. - Package and install the new version of the package locally, into your larger code base.
Once verified that everything works as expected, you may publish it. - Publish a beta version which is available only to those who explicitly want it rather than to the whole world.
For example in the npm package registry there are dist tags that can be used for this purpose.
The default tag is_latest_and when you run_npm install mypackage_it effectively runs_npm install mypackage@latest_. When you publish a new version under another tag, for instance_beta_, people will have to explicitly install from this tag in order to get the latest version:_npm install mypackage@beta_.
Wrapping it up
Unlike the previous part, which was completely theoretical, this part actually requires some work from you. Depending on your experience and learning abilities it might take you a few days or even weeks to complete this mandatory step. And we haven't even started yet.
This is why it is my duty to ask you again:
Are you fully prepared to give a decent amount of your precious time to the community?

How to Write Documentation for your Open Source Project
The first two parts of this article were targeted to those who are considering creating an open source project. I wanted to let them know what to expect and give them a head start in the open source world.
This part, as well as the upcoming ones, will also be relevant to people who already maintain an open source project and want to improve at what they do.
The baseline for this part:
You already have an open source project, it is available on GitHub, and it can be consumed easily via one of the package registries.
Why Do You Need Documentation, and What Should It Contain?
An open source project without documentation is a dead project
It is dead because no one will dive into your code to find out how it should be used. And even before how, no one will even know what your code is supposed to do.
So these are basically the two things that your documentation should contain — what and how. These are the corner stones, the must-haves of documentation.
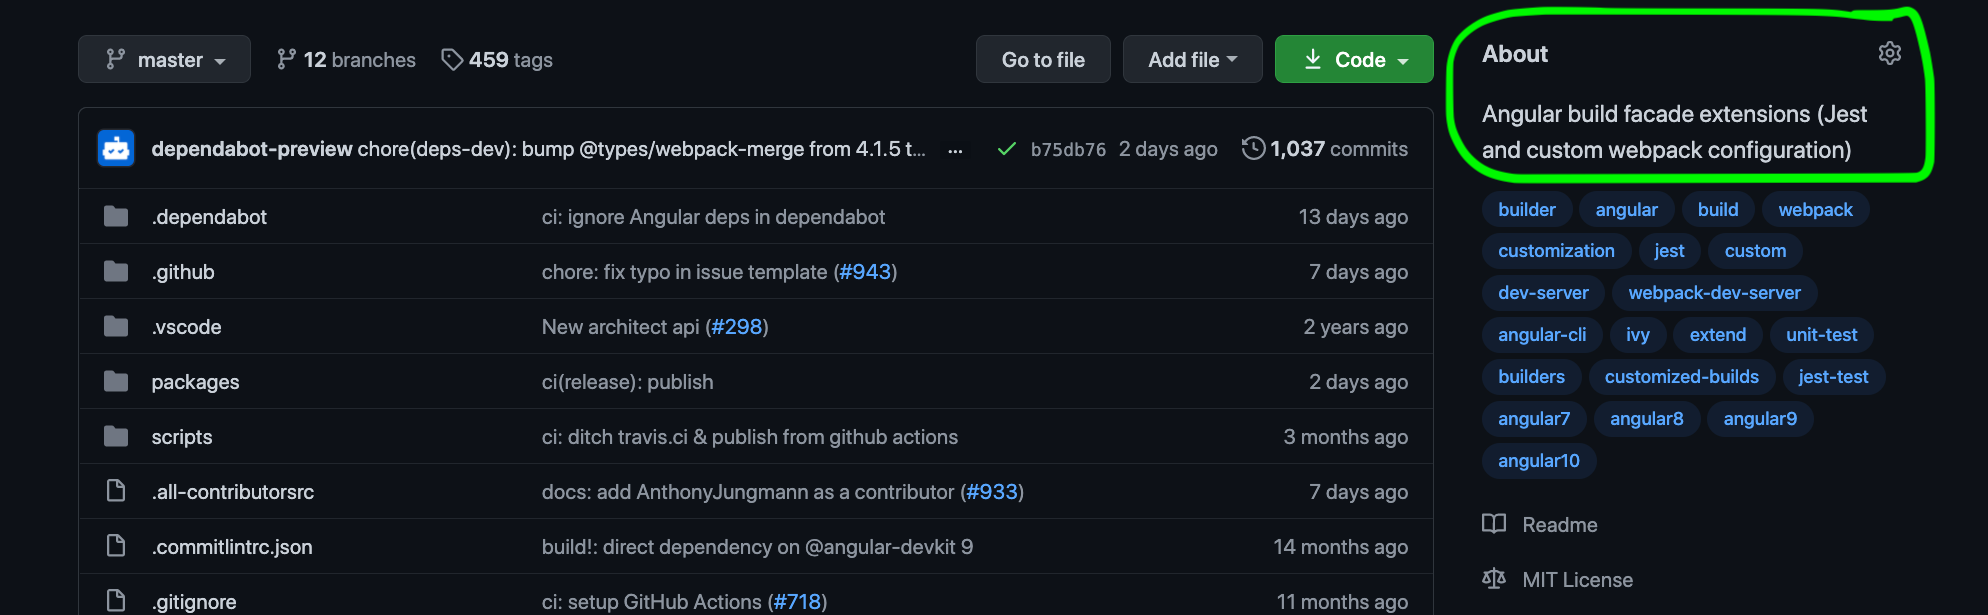
How to Write a Description of Your Project
The description is the first thing everyone sees when they enter a GitHub repository. Therefore a good description should answer in a short and informative manner the what question. For example:
A declarative, efficient, and flexible JavaScript library for building user interfaces. https://reactjs.org
Parse, validate, manipulate, and display dates in J_ava_Script. http://momentjs.com
Angular builders (this one is mine):
Angular build facade extensions (Jest and custom webpack configuration)
You can edit description in the About section of your repository:
How to Write a README.MD File
README.MD is a file in the root directory of your project, written with Markdown syntax, which contains all the information someone needs to know about your project.
The README file should contain a detailed description (which expands on the what question) and very detailed instructions on how to use you project.
The instructions should cover every single piece of public API, preferably with usage examples.
Here are a few points for writing a good API documentation:
- Keep it simple – The simpler the API and the example, the easier for a user to understand what it does on how to use it
- Keep it structured – Use the same template and visual structure for every API method. This way you’ll define your own language for communicating the API to the user.
- Be a user – Always write API description from the user's perspective. Assume that you know nothing about the internals and this documentation is all you have.
- Keep it up to date – As your project evolves, the APIs might change. Make sure that your README file always contains the most current APIs and examples.
The README can (but doesn’t have to) contain the following things:
- Link to a contribution guide
- List of contributors
- Link to a change log
- Latest version
- License
- Build status
- Downloads counter
- Link to a chat for fast feedback
Here is a an example for what a good README could look like.
What Are Badges?
Badges are a fairly good way to visually expose the essential info about your project, such as: build status, version, license and various tools used by your project.
There are quite a few options, but I’d recommend you use shields.io badges.
They have a badge for literally everything.
Adding a badge to your README file is really simple:
- Go to shields.io
- Choose the appropriate category
- Click on a badge you’d like to add to your README
- Fill in the required information (if any)
- Choose Copy Markdown from a drop down menu
- Paste the markdown into your README file

The badges are usually put at the top of the README file right before the detailed description. This is what it looks like:

Make Sure You Have Tests
API reference is great, but nothing compares to real code using your public APIs.
One of the best ways to complement your documentation is having good code coverage with descriptive tests. Sometimes tests explain the code better than any documentation.
Wrapping it up
In this part we’ve only covered the basics of documentation. There's a lot more than just a README or a description, for example. As your project grows and issues arise, they become an integral part of the documentation.
However, having a README file that covers the public API is the bare minimum for any decent open source project

How to Publicize Your Open Source Project
We’ve already discussed what it means to start a project, how to do it optimally, and how to write good documentation for it.
Now let's talk about drawing the public's attention to your project and optimizing it to both attract and correctly manage contributions.
The baseline for this part is:
You already have an open source project, it is available on GitHub, it's well-documented and can be consumed easily via one of the package registries.
How to Spread the Word About Your Project
Let’s address the elephant in the room: as your project grows, you simply wont be able to handle everything by yourself. So you'll need more people to work on the project if you want it to live long and prosper.
To get more people involved in your project you need more people to know about it and above all else to believe in it.
From my experience the best way to expose your open source to the right audience is to use one of the well known resources and write a blog post about your project.
The resource might be purely dev-oriented (like dev.to) or not (like Medium).
One commonality between all these resources is that they have an established audience and it is the relevant audience.
You can also cross-post your article between various online resources so that you cover an even larger audience. But be aware – cross-posting has a few downsides:
- Each of these platforms may have a different mark up language and you’ll have to redo all the formatting
- Maintenance — if something changes (and things will change) you’ll need to update your blog post across all of the resources.
If you go for Medium, I’d highly recommend you submit your article to one of the large publications. It will require additional effort on your end, since you’ll have to align your article with the publication's requirements. But it will also ensure that your article is exposed to a large and, which is even more important, relevant audience.
You can also decide to go behind a metered paywall (you can earn money from doing this!):
Stories that are part of the paywall are also eligible for distribution to Medium readers through topics, which power recommendations on Medium on our home page, on our topic pages, in our Daily Digest and in our apps
I can’t tell you which one is better, but my personal preference is publications because it ensures your article is exposed, instead of the vague “eligible for distribution” term.
If your blog post goes viral then it can create a cascading effect and add even more leads to your open source project.
For example, if after publishing the article your Github project received a few dozens of stars in one day it can get to the Github Trending page which is in itself another source of exposure.
A few points to make your blog post great:
- Start with a problem statement. It might even be the title of the blog post.
Usually people are looking for a solution to a specific problem and before they decide to invest the time to read your post they should have an idea whether it’s what they’re looking for. Here's an example of an article I wrote.
As you can see it clearly states the problem that it solves in the title.
If you google “Customizing Angular build” this is one of the first _result_s you’ll get and right from the search page you can see which problem it addresses. - Describe why and how exactly your project solves this problem
- Provide a detailed step-by-step guide, starting with installation and finishing with a working example.
- Create an example project that uses your open source and link to the sources in the blog post.
There are lots of developers who prefer a working example to any blog post. - Get some feedback before publishing it.
Make your friends go over it without telling them what it’s about and see if they can figure it out themselves. If they can’t then probably it’s not that clear and you need to elaborate.
After you’ve published your blog post, make sure you share it on social media, with your friends, your family, and strangers on the street.
This will increase your project’s exposure – but you also have to make people want to contribute to your project.
How to Make your Project Attractive to Contributors
The best thing is to start an open source with other people. This way from the very beginning you have a team with which you can split the burden.
However, that’s not always the case.
If you started alone, you have to attract contributors. And in my experience there are two types:
- Someone who wants to make an impact and looks for a project to contribute to (these are rare but still exist).
- Someone that uses your package and found either a bug or lack of certain functionality.
In both cases just having your source code shared on Github and a single blog post on how to use it are not enough. Here are a coupe of things that can make people want to contribute:
Have a pending implementation list.
It might contain known bugs, planned features, or something else. This list will make it simpler for contributors of type #1 to pick the right item and issue a PR.
It can be a standalone list or you can (and probably should) use issues and labels on GitHub.
Have a contributors guide.
A very basic contributors guide should explain the repository structure and have a step-by-step guide for building and running your project and tests. The expanded guide can contain architecture, design decisions, code of conduct and more.
A good example is Atom’s contributors guide. Don’t underestimate it’s value! It’s something that takes a decent amount of time to make when the project has grown, and I wish I created it at the very beginning and updated it gradually as the project evolved.
Unfortunately, I didn’t have someone to point out its importance, and today my project has no contributors guide. It’s always on my TODO list but there is always something more urgent than that.
Recognize your contributors.
Listing your contributors on the main page of the project will give them additional incentive to make a contribution.
Just adding user names can be enough, but I’d recommend that you use All Contributors. Apart of creating a fancy section with profile images and badges for your all your contributors, it automates the addition of new contributors by creating PRs that add contributors to this section.
Wrapping it up
In this part we’ve discussed several things that will increase your project’s exposure and provide people with an initial incentive to open a PR or an issue.
But this won’t keep them as contributors, nor will it make sure they will finish the work they started.

How to Manage Issues and Pull Requests in Your Open Source Project
Now that we've explored sharing information and making your open source project more attractive, let's discuss contributions, the holy grail of every open source project.
What are open source contributions?
A contribution to an open-source project is any change that’s done by a person other than the owner. In practice it comes in two forms:
Issues
Here’s what Github says about issues:
You can collect user feedback, report software bugs, and organize tasks you'd like to accomplish with issues in a repository. Issues can act as more than just a place to report software bugs.
In a nutshell, an issue is any piece of information that requires some sort of action.
Pull requests (PRs)
Here’s what Github says about pull requests:
Pull requests let you tell others about changes you’ve pushed to a branch in a repository on GitHub. Once a pull request is opened, you can discuss and review the potential changes with collaborators and add follow-up commits before your changes are merged into the base branch.
In a nutshell, a pull request is an actual change to the project.
How to Work with Issues and PRs
So how do you actually work with issues and PRs, and how do you approach issues and PRs created by contributors?
Use a Personal Example
The best advice I can give you is to use a personal example to incorporate a certain work method. This means that when you’re working on a new feature you should create a PR for this and merge it once it meets all your standards.
And when you find a bug or think of some missing functionality you should create an issue.
Not only will this method organize your work and bring order to your project, it will also provide contributors with a reference from which they can learn and adapt their issues and PRs accordingly.
Additionally, if you have high standards (meaning that you believe that every PR should come with proper documentation, test coverage, and so on) then you should treat yourself just like you would any other contributor. You can’t demand from others something what you’re not doing yourself.
Moreover, sometimes you should be even more lenient towards the contributors than to yourself. Especially if your project is at an early stage and doesn’t have a lot of contributors. This brings us to the following point.
All Work is Appreciated
Collaborating with others is all about mutual respect. You should respect your contributors. Be patient when answering their questions (even ones that seem simple) and be polite when providing constructive criticism.
Remember: it’s vital to appreciate your contributors’ work. If someone just created an issue (even without thorough research, even without reproduction) — thank them. They bothered to move their chair a bit closer to the table, they sat up straight and typed something they thought could be beneficial to you. Thank them and if needed, ask for additional details in a polite and respectful manner.
If someone created a PR that doesn’t meet your high standards — thank them. Thank them and ask politely to make code changes/write tests/add documentation and so on. Give them a link to one of your PRs for reference or provide them with a link to the contribution guide.
A constructive and positive conversation will give those contributors additional incentive to continue their work. Or it won’t…
Quality Versus Quantity
Eventually, there’s almost always a tradeoff (unless you own a huge open source project, like Angular or React). You can decide that you’re not easing up your standards, not even for a little bit, and most probably you’ll end up implementing all of the work yourself.
Or, you can decide that you’re lowering the standards for contributors (but this would make your standards futile as they’re not applied).
I’ve learned that every contributor requires a different approach. It really depends on the person and their personal interest in their contribution.
You should take into account such factors as the urgency of the issue, the experience of the contributor, the complexity of your code, the complexity of the required fix or feature, the contributor’s motivation, and more.
Usually, I politely ask for changes, wait for a few days, and if nothing happens I make the changes myself, given of course that the issue is considerably important.
As for less important (nice-to-have) fixes or features — I usually leave them entirely to the community.
Over time as the number of issues and PRs grows it becomes an ambitious task to keep track of, prioritize, and categorize them. This means that labels become incredibly important.
Use Helpful Labels
Github labels is a great tool for keeping your issues and PRs prioritized and organized. While this allows you to search and filter by labels, what I find most helpful here is it’s ability to aid in the visualization of the overall state of your project.
Thus, you can enter the “Issues” page and see that most of your issues are labeled as bug(meaning that you should stop pushing forward and instead focus on fixing them.)
Alternatively, you can see that most of the issues are labeled as enhancement or required features. priority is another useful label that helps you focus on the significant things first.
Additionally, your contributors can (and will) benefit from you using labels. For example, going back to Getting collaborators, someone can enter the “Issues” page and visually identify the issues that require the help of the community (help-wanted, pr-welcome, and so on.)
Aside from the labels with single responsibility (like bug or enhancement ), I recommend using labels for scoping an issue/PR or putting it on a certain scale. For example:
priority:low,priority:highrequired:investigation,required:tests,required:docs- Or in the case of mono repo:
packages:package1,packages:package2etc.
Here is an example of the labeled issues page from my project:

Labels make it pretty easy to distinguish at a quick glance what the issues are that require your (or your contributors’) attention, to which component these issues are related, and what is required in order to proceed.
Use PR and Issue Templates
I highly recommend that you spend a few minutes of your time and define templates for Issues and PRs.
With issue and pull request templates, you can customize and standardize the information you’d like contributors to include when they open issues and pull requests in your repository.
This will save you a lot of time since you won’t have to respond to each issue or PR with a request for additional information or changes. You’ll still have to do it sometimes (because there are contributors that simply don’t pay attention to the templates) but it will happen far less often than it would if you didn’t create templates.
Here is an example of a default issue that you see when the corresponding template is defined in your repository:

Use Github Apps and Actions
There are quite a few Github apps and actions that can help you manage PRs and Issues. The list constantly grows, but I personally find these to be most useful:
Make Sure You're Responsive
If I open an issue or a PR to another open-source project and it takes an eternity to get a response, then I switch. Here is one example:
- The initial response was quite quick, taking only two days
- The discussion was pretty fruitful
- The PR is still open with no updates on what exactly is missing/wrong
As a result, I switched to another package.
The same will hold true for your project if you’re not responsive: if it takes you two weeks to respond to PRs that are waiting for you, instead of pending for contributor’s changes required by you, then you’ll lose users (i.e. potential contributors).
So do yourself a favor — be responsive. It doesn’t have to be an immediate solution to someone's problem but even letting the user know that you’ll look into their issue next week already gives them some certainty and time frames.
The bad news is that you should stand by your promises. If these get away from you from time to time, don’t worry — we all have personal lives and it’s understandable if you had some urgent matters which postponed your work on the open-source.
If this occurs then give a short update — it’s not a big deal, just write a word or two to let people know that the feature they’ve been waiting for has been postponed.
How to Prioritize your Issues
There are a few methods that can help you prioritize your most important issues.
First, how should someone identify the most important issues? As I see it, the most important issues are the ones that users want the most, whether it's a new feature, a bug-fix, or something else.
Sometimes a user will express their interest in the issue but most likely they won’t. Therefore, I present to you quite a simple way to know what users are interested in:
Every project on Github has an “Insights” tab, with a “Traffic” section:
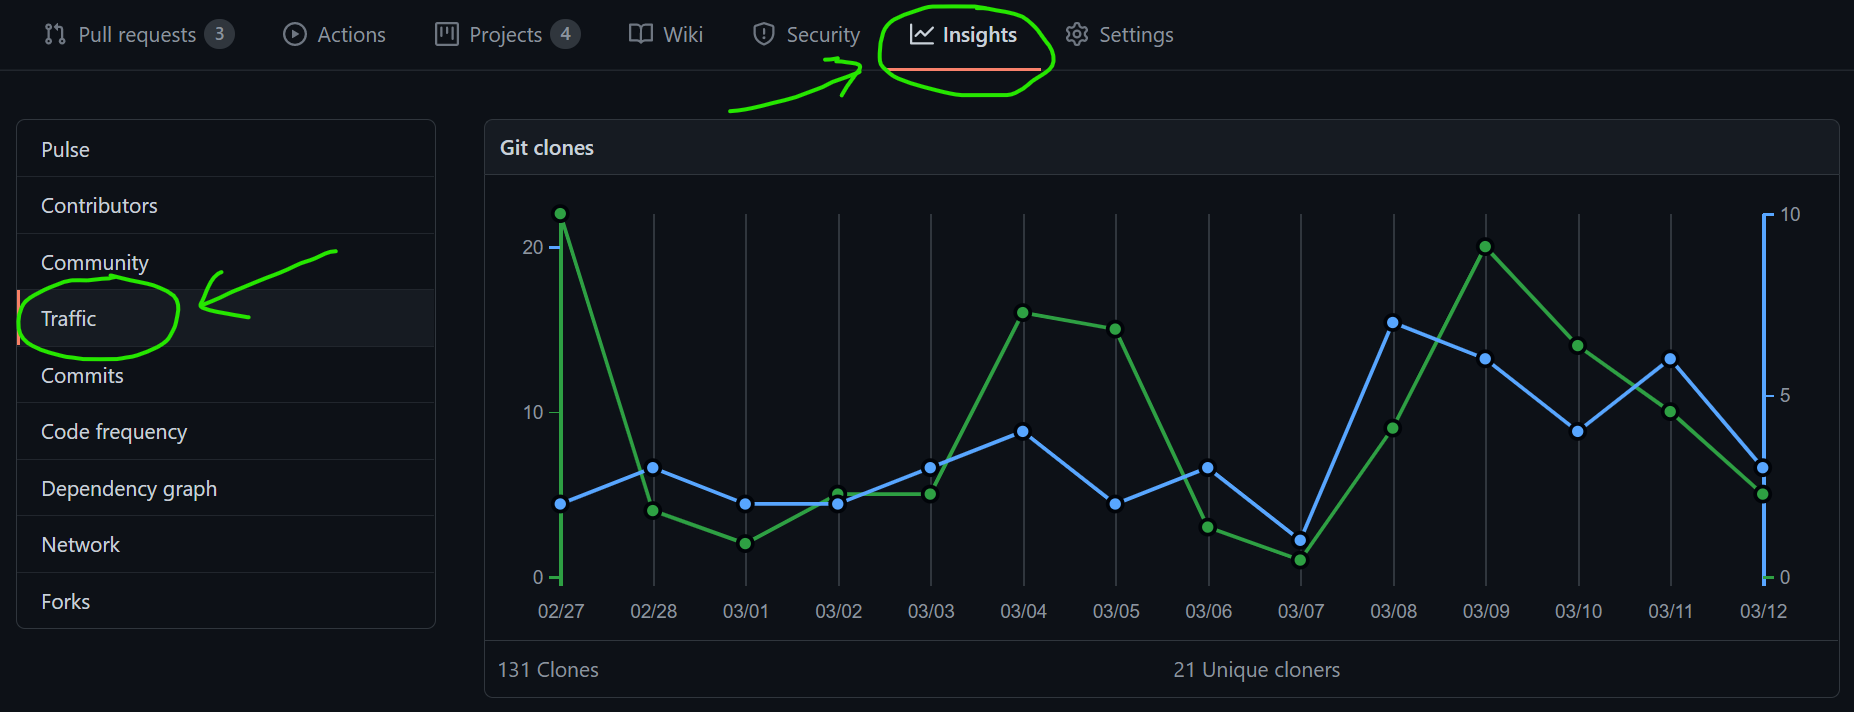
At the bottom of this section you can find the Popular Content table which gives you insights into which pages are most viewed by your visitors:

The issues listed in this table are the most visited issues and therefore are most like to be important to the users.
When you have identified the most important issues you need to highlight them on the issues page. Here are a few ways to do that:
Pin the issue
You can have up to three pinned issue per repository. Pinned issues appear at the top of your issues page so it’s nearly impossible to miss them:

Add a label
We already talked about using the labels, and this is an excellent example for applying the help-wanted as well as priority:high labels. Those labels will let the potential contributors know that this issue is important and that any help is appreciated.
Continuous Integration
Having every Pull Request built and tested before it is merged into the master will give you a decent amount of confidence in the code you’re about to merge into your master branch (depending on the test coverage).
While I couldn’t but mention it as a part of the PR management process, it’s an automation of a task that otherwise you’ll have to do yourself, therefore it is not directly related to PR management.
You can still check out every PR, build it locally, run the tests, and merge if everything is green (therefore Continuous Integration is not directly related to the PRs management). Don’t worry though, we’ll cover it in detail in the next section.
Wrapping it up
It’s very important to keep your project clean and organized because — as we all know — cleanliness is next to godliness. Not only does it make the management process more effective, but it also improves the overall impression of your project.
PRs and issues (along with the codebase) are integral parts of your open source projects facade. Don’t underestimate their value.
How to Automate Your Process
A natural part of managing contributions (that is, issues and PRs) is automation — probably one of the most important aspects of OSS project management.
Why automate?
If there is anything I’ve learned over the years of owning an open-source system, it’s that the less routine work you have to do yourself the more free time you have for actual work (like fixing bugs and developing new features). Therefore, I seek to automate whatever I can.
Here’s how I’d like us to approach this aim: let’s first examine both workflows, (the non-automated and the fully-automated) to see how much of your time is actually put into routine tasks. We’ll then go into how we can achieve an improved workflow leading to more time to fix bugs.
Worst case — no automation
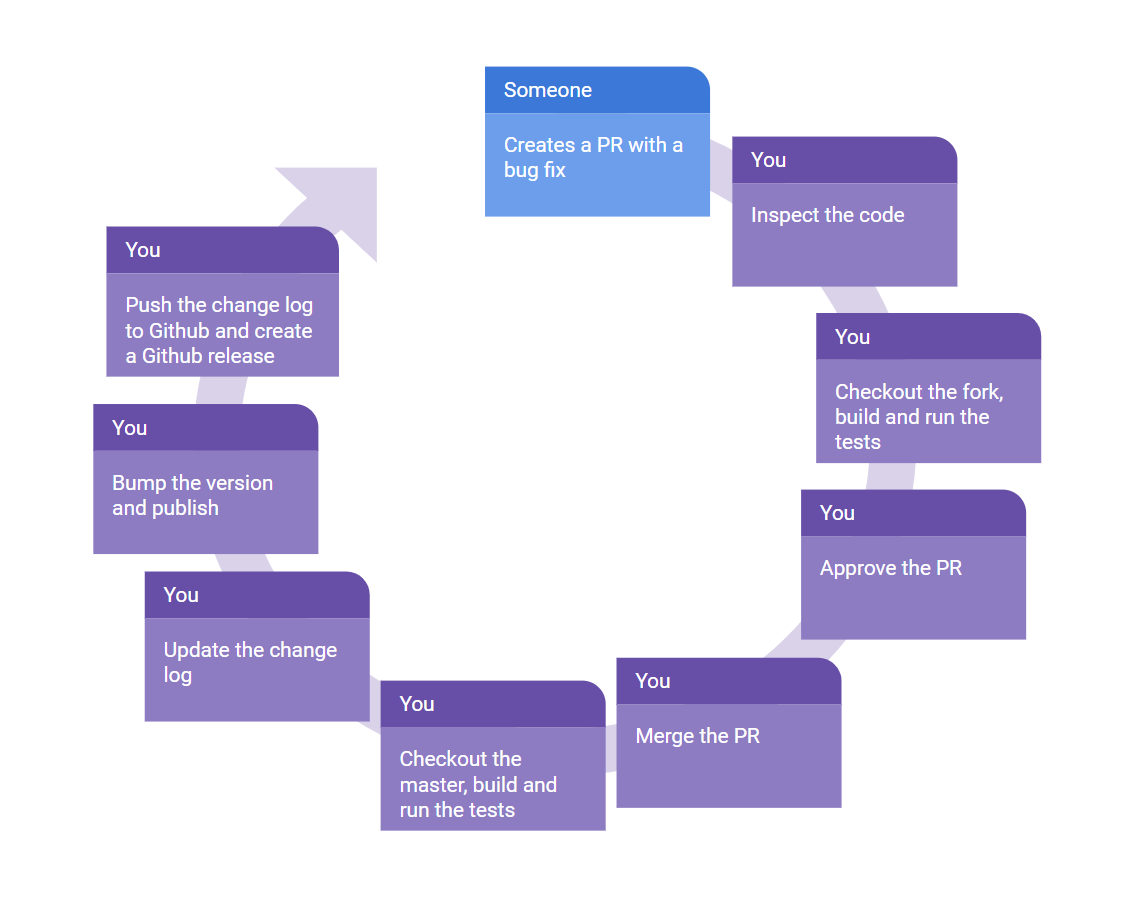
As you can see, in a case where nothing is automated, you do all the work. It is a lot of work just for a bug fix, and on top of that, this is the work that you’ll have to do every time there is a bug fix or a new feature!
Now let’s take a look at an alternate scenario.
Best case — everything is automated
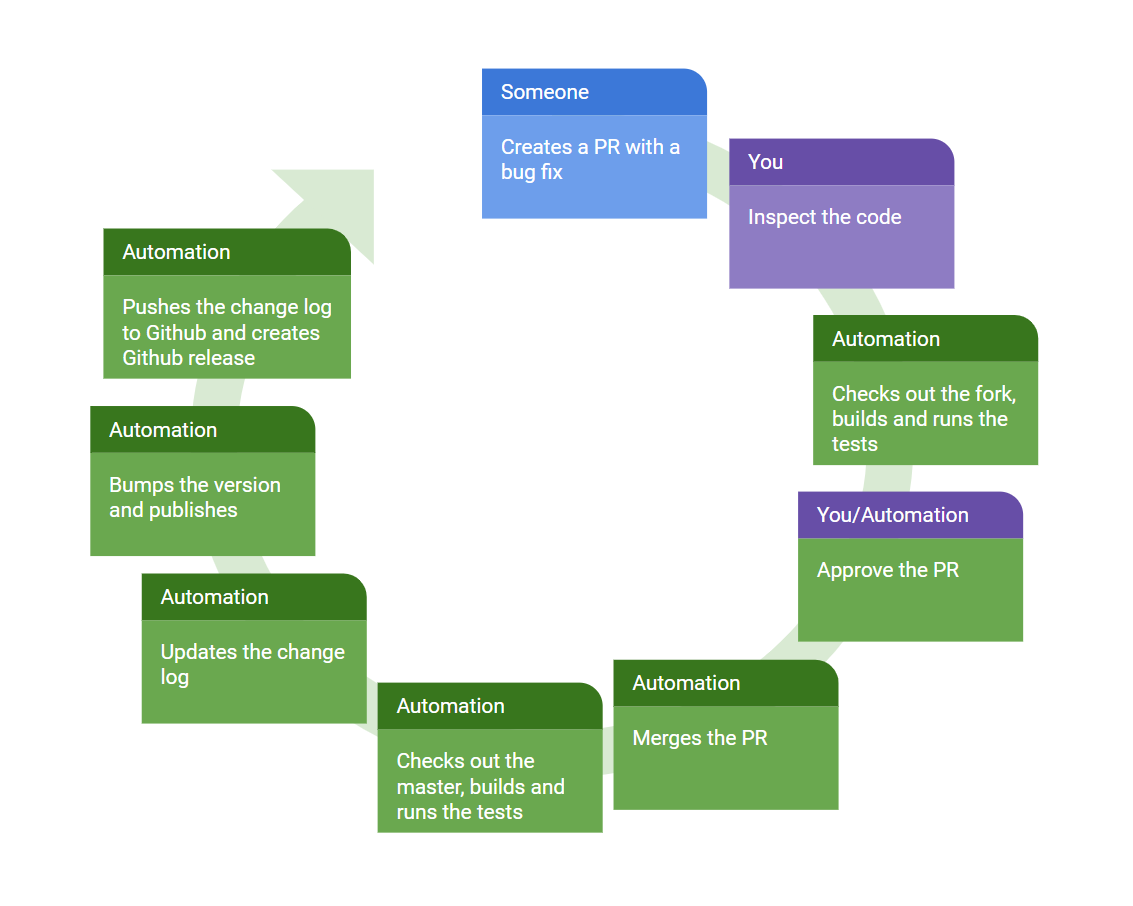
In this case you only do what you have to do — inspect the code and (sometimes) approve the pull request. Everything else is done automatically.
Science fiction? No, it’s called continuous integration and continuous deployment. We’re not going to get into the details of building scripts and system-specific configurations here. Instead we’ll review the tools you need to make it work and I’ll let you decide on the specifics yourself.
What is Continuous integration (CI)?
Continuous integration (CI) is the practice of automating the integration of code changes from multiple contributors into a single software project. The CI process is comprised of automatic tools that assert the new code’s correctness before integration.
A very basic CI run would include build and unit tests, however it is not limited to these two. It might also include all kinds of static code analysis tools, linters, and so on. This is where you define your standards.
Why You Should Use End-to-End Tests
Build and unit tests provide you with quick feedback for code changes, take a relatively short time, and fail quickly if something goes wrong. But end-to-end (E2E) tests have a special place in CI.
E2E tests should cover not just the correctness of the code but also your deployment flow, package integrity, and so on.
I myself realized this when I accidentally published a new version of a package that didn’t contain any code. The build has passed, the unit tests were green as well as E2E tests (those at a time were installed by linking the build output directory from the test project). Where did it fail? In the packaging phase.
A key takeaway here: E2E tests should test your packages as if it was used by a real user.
In order to achieve this I recommend the following:
- During your CI run, start up a local package registry. Each language/ecosystem has a few options, for example for Java or Scala projects you have the Nexus Repository, and for JavaScript there is Verdaccio (which I’m using in @angular-builders)
- Have a separate project that makes use of your package (this can reside in the same repo). The tests in this project should test your package’s functionality.
- Configure this project to use the local package registry.
- After your package is built, publish it to the local package registry (started up in your CI system).
- Install the latest version of the package (that you’ve just published) into your test project.
- Run the tests.
Not only will it test your package integrity and reliability, but it will also save you some work when it comes to continuous deployment.
How a CI System Works
There are plenty of CI systems that have a free plan for open source projects, among them Travis CI, CircleCI, AppVeyor, Github Actions, and others.
They are all more of the same and do basically the same in that they check out your code to a virtual machine, run a script that you define (usually run build and tests), and then report either a success or a failure to GitHub.
All of these systems have an app for integration with GitHub and the integration flow is pretty similar in all of them:
- Register on the platform.
- Install the corresponding app in your GitHub account.
- Configure access to the selected repositories.
- Create a configuration file (like
travis.yaml) that defines the build matrix, required build chain, and CI script. - Push it to the master
This will make your CI run on every PR and report the status to GitHub – but this isn’t enough. What you really want is to block the merge to the master branch until the PR has passed all the checks.
This is done by defining the branch protection rules. In order to define those, you should go to the “Branches” section in your repository “Settings” and press the “Add rule” button:

Then check the “Require status checks to pass before merging” checkbox:

As you can see, the corresponding Github Apps checkboxes already appear here, so the only thing that’s left is to enable them.
The exact build script really depends on your ecosystem, the language your project is written in, the frameworks you’re using, and more. Therefore we won’t cover it here — you’ll have to check out the documentation of the CI system yourself to get into specifics. However, you now have a pretty good idea of what CI is and how it automates your PRs, so let’s move on.
How Continuous Deployment (CD) Works
Continuous Deployment (CD) is a software release process that uses automated testing to validate if changes to a codebase are correct and stable for immediate autonomous deployment to a production environment.
In our case, the production environment is when a package is publicly available in a package registry. This is a point-of-no-return phase, as once you have published it you cannot un-publish it since this is publicly available (and hence potentially in use).
There are multiple strategies for continuous deployment which really depend on the project and its complexity. But in my opinion, releases should be made solely from a master branch as this makes the workflow pretty easy. Here’s how:
- Each PR represents either a bug fix or a new feature.
- The code is tested (including E2E) before it even gets to the master.
- The master is a protected branch so as long as you don’t merge failing PRs the master stays stable.
- Every PR merge to a master triggers a master CI run which eventually releases a new version.
This will ensure that all the releases are sequential and will make it really easy to associate certain PR with specific versions.
To automate package releases, we’ll need a few things:
- Automatic version advancement based on commit messages.
- Automatic CHANGELOG updates based on commit messages.
- Automatic package publishing to a public package repository.
- Automatic release on Github.
Good news everyone: all of these are already supported by semantic-release. Bad news: you’ll have to invest some time to make it work (but eventually it pays off).
How Semantic-release Works
semantic-release automates the whole package release workflow including: determining the next version number, generating the release notes and publishing the package.
This removes the immediate connection between human emotions and version numbers, strictly following the Semantic Versioning specification.
We won’t be covering the whole integration process here as they have very good documentation and there is no reason to recapitulate it here. I will mention a few points though:
- Make sure that you understand semantic versioning specification and the conventional commits format before you start with Semantic Release.
- To make semantic-release work well, you should enforce certain commit message formats. To do so you can run commitlint as a husky precommit hook. It will enforce conventional commits when someone creates a local commit, but it can’t do anything about commits that are performed directly from the GitHub web UI (which often happens when someone wants to make a quick fix to their PR). Therefore I recommend that you back it up by commitlint Github Action.
After you set up the semantic release as part of your workflow, you’re pretty much done and you no longer have to spend your time on these routine processes. Although there is one more optimization you can do.
How to Keep the Project Up to Date
If your project has no external dependencies — skip this part. However, most projects depend on other packages, and other packages tend to change.
Keeping your project up to date with its dependencies is important but it is time-consuming. Luckily for us, there is a solution. In fact, there are a few of them such as Greenkeeper, Renovate, and Dependabot.
The idea is pretty much the same in all of them so I’ll just quote Dependabot’s “How it works” section:
1. Dependabot checks for updates
Dependabot pulls down your dependency files and looks for any outdated or insecure requirements.2. Dependabot opens pull requests
If any of your dependencies are out-of-date, Dependabot opens individual pull requests to update each one.3. You review and merge
You check that your tests pass, scan the included changelog and release notes, then hit merge with confidence.
As you may have noticed it only makes sense when you have a working CI.
Wrapping it up
If you have a fully automated CI/CD cycle and a new issue is opened in your OSS repository, you can provide a bug fix within minutes.
In fact, you can enter the mobile Github version from your phone, fix the buggy line or two, and commit the code. The rest is done automatically, and your customers are provided with a new version right away.
I myself was able to quickly and painlessly get a fixed version to my customers multiple times.
Having great automation is not about freeing up some time for leisure, it’s about dedicating your time to really important things and increasing your responsiveness.

Version Management
To conclude the guide I'd like to talk about Versions Management, an aspect that always becomes relevant for any OSS project that has a decent number of users.
You’ll learn about version notations, breaking changes, back-ports, and more.
What is Software Versioning?
Let’s see what Wikipedia has to say about software versioning.
Software upgrade versioning is the process of assigning either unique version names or unique version numbers to unique states of computer software.
_Modern computer software is often tracked using two different software versioning schemes — internal version number that may be incremented many times in a single day, such as a revision control number, and a release version that typically changes far less often, such as semantic versioning[1] or a project code name._
Indeed, there are multiple ways of uniquely identifying your software product version.
The most widely known way is by giving it a name.
The vast majority of people on Earth, even those indirectly connected to technology, have probably heard of Android Ice Cream Sandwich and Marshmallow or Mac OS Leopard, its frozen cousin Snow Leopard, and Big Sur.
Programmers have probably heard about Eclipse with its celestial bodies Luna, Mars, and Photon.
All these are major versions of software products.
Though names are great for marketing, they can also be confusing sometimes.
In fact, Google has dropped the usage of candies in their Android version names because they:
Heard feedback over the years from users that the names weren’t always intuitively understandable by everyone in the global community
And rightfully so, yet perhaps we just haven’t evolved enough to extrapolate version numbers from animal species, even though Snow Leopard is much cooler than Leopard.
Celestial bodies and candies are a bit easier concepts to grasp, but only if you name them alphabetically (as Android and Eclipse do). But one thing is certain — there is no better way to determine succession than numbers.
Thus, if you name the first version of your software product “Product 1” and the second version “Product 2” it’s pretty intuitive to say that the second version is the more recent, isn’t it?
However, unlike standalone software products that don’t expose APIs, software that is consumed by other software (like the majority of OSS products) needs better versioning than just a sequence of numbers.
For example, if we used a simple numbers sequence for versioning, how would the user distinguish between a bug fix and a change that is breaking the existing API?
The answer is…semantic versioning.
What is Semantic Versioning?
Semantic version (also known as SemVer) is a widely adopted version scheme that uses a sequence of 3 digits in the following format: MAJOR.MINOR.PATCH .
The rules are simple — given a version number MAJOR.MINOR.PATCH, increment the:
MAJORversion when you make incompatible API changesMINORversion when you add functionality in a backwards compatible mannerPATCHversion when you make backwards compatible bug fixes.
Additional labels for pre-release and build metadata are available as extensions to the MAJOR.MINOR.PATCH format.

It provides a clear and concise way to communicate the changes in your software product to your users.
But most importantly, it is widely adopted by all kinds of package managers and build tools (like NPM and Maven), which allows users to depend on a specific range of versions rather than on a specific version.
For example, specifying the version range ^2.2.1 rather than an explicit version 2.2.1would let the user accept any backwards compatible bug fixes or new features that will be released on top of version 2.2.1.
That said, build tools and package managers rely on a contract between a user and a package owner — a contract that is defined by SemVer.
That means the responsibility is yours— you’re the one who defines what a breaking change is and what a minor change is. You can accidentally release a breaking change as a bug fix (patch version) and it will break builds that depend on a range.
Breaking builds is a horrible thing to do so I’d recommend you use semantic-release with a predefined message format together with a commits format enforcement tool.
You can find more info about Semantic Versioning on the official website, semver.org.
Now, that we learned about identifying the breaking changes, let’s talk about introducing them.
How to Manage Breaking Changes
Breaking changes are changes to your public API that remove, rename, or change your contracts with the user in an incompatible way.
Ideally, you would maintain backward compatibility in your code and wouldn’t introduce any breaking changes ever. But then you wake up to a harsh reality.
Software is evolving and so does your code. The needs of the users change and so does your API. You grow as a developer and so does your product.
Therefore, especially as an open-source developer who doesn’t get paid for their job, you just can’t allow yourself to maintain all the legacy code that exists in your project. Sometimes, you need to get rid of it.
The question is how?
As always, it is a tradeoff. You would know better how this change or another impacts the users.
You don’t have to maintain backward compatibly at any cost, nor do you have to implement all the new features in every old version. But it is certainly something that you should take into account.
If the migration cost is relatively low for the user, then it’s fine to make a breaking change and it’s quite reasonable to not support this feature in older versions.
However, if the migration cost is high and the vast majority of users cannot afford this effort, you should probably consider making this change backward compatible at first and releasing a deprecation warning.
A deprecation warning is often released together with a new API, while the old API is still supported. This way the users have time to migrate. Once they do, in the next major version, the deprecation warning and the old API can be safely removed.
In any case whenever you introduce a breaking change make sure you have a migration guide that has step-by-step instructions for the migration.
In addition, as an act of courtesy, it would be very nice of you to give users the time to prepare for a breaking change, especially if it doesn’t have a grace period (where both old and new APIs are supported).
A little heads-up that explains the breaking change, the reasoning behind it, and the expected time frame is very helpful. It can be a tweet, a blog post, or even a new minor version of your product with a deprecation warning.
Remember that while a breaking change is essentially a negative experience, a sudden breaking change is an extremely negative experience.
Automatic Migration
We can divide breaking changes into two categories — non-deterministic and deterministic.
Non-deterministic are the ones in which you can’t predict the outcome of the migration effort, for example when you completely remove a certain portion of an API.
In this case, it’s up to the user to decide whether they want to replace it with some other 3rd party library, implement it themself, or depreciate it as well.
Deterministic changes are the ones that, given code X and user input I, allow you to transform it into code Y. For example, changing a function name or an import statement.
If you introduce a deterministic breaking change you can write an automation that will change the user’s codebase and adjust it to the new API.
With this automation in place, you won’t have to care about backward compatibility and detailed migration guides. You provide the user with a way to upgrade their code with zero effort from their side, which is crucial in software updates.
However, there is an inherent tradeoff here as well. Writing code takes time, just as writing a migration guide does. And naturally, writing code that migrates a complex code flow into a new API will take more time than writing code that replaces a function name with a new one.
Sometimes you just can’t afford this kind of effort.
In case you do decide to go for it, there are tools that can help you achieve what you want.
The most widely known and language agnostic one is Codemode by Facebook.
codemod is a tool/library to assist you with large-scale codebase refactors that can be partially automated but still require human oversight and occasional intervention.
There are also more sophisticated tools that use AST and can be used for more complicated tasks than just Find & Replace.
For example, another Facebook library (JS/TS specific) called JSCodeShift.
Or code-migrate — a tool (again JS/TS specific) that allows you to write a guided migration relatively easy and provides a user with nice CLI based prompts.

Some big OSS projects even have a solution of their own. One example for such a solution is Angular schematics — a template-based code generator that supports complex logic.
Automatic code migration can be published as a separate package (like my-cool-oss-migrate-v4-v5 ) and mentioned as a step in the migration guide.
Alternatively, the migration can be a part of your major version that contains breaking changes and be executed upon installation of this version in the user’s codebase. The choice is yours.
Back-porting
Another common practice is back-porting important changes to previous versions. For example, a critical bug has been found after a major release (with a breaking change) but it also applies to a previous version.
In this case, you can’t expect your users to perform a tedious migration because of a single bug. On the other hand, checking out the older revision, implementing the fix on top of it, and releasing it as a minor bump of an older version might be cumbersome.
The solution: have a protected branch per major version.
Every time you plan to release a major version you create a branch from the main branch named c.x.x where c is the current major version number.
You make all such branches protected (just as the main branch) so that you don't accidentally break them. Then, anytime you have to back-port a feature or a bug fix from a newer major version, you either reimplement it on this branch or (if possible) cherry-pick the commits from the main branch.
In addition, a strategy that is worth mentioning is having a separate branch for the next major version as well (as opposed to only having branches for previous major versions).
This is usually relevant for large scale projects (like Webpack or Babel) that have a lot of changes in every new major version.
Having a separate branch for the upcoming major version allows working on it and having it published for testing, while still keeping the most relevant version (and working on it) in the main branch.
Once the new major version is published, its branch becomes a main branch and a new branch is created for the next major version.
Final Thoughts
I hope you enjoyed this guide, and have a pretty good understanding now of what it means to own an open source project.
In the end I’d like to share with you one thing that you should always keep in mind while owning an open-source project.
Listen to Your Users
It might sound counter-intuitive, but that is the truth — you’re not the only one who defines the road map, users define it too. In fact, users define most of it.
If you own an open-source project then you do it to help others, not yourself.
Have multiple channels for feedback. There are users that only have a quick question to which you can provide an answer within a second.
There are potential contributors that would like to discuss the roadmap but don’t want to do this in public. Give them a way to contact you. Provide a link to Slack or Discord, share your Twitter account, and so on. The more channels the better.
Speaking of channels, you're always welcome to DM me on Twitter in case you have any questions or thoughts.
You can also read more articles like this on my blog.