

Images and videos are examples of huge files that might be stored in your database. And this might impact the performance of your applications because of the amount of space that those files can take up.
Also, it expands the database, which makes backups larger and slower. Because of this, it's not regarded as a best practice. Instead, using a distributed system to save files and adding a reference to such files to our database is a good choice.
In this article you will learn how to upload these files to Azure cloud distributed services and delete them from Azure using NestJS, a popular Node framework.
Table of Contents
What is a Cloud Distributed System?
A distributed system is made up of a number of independent parts that are spread across several devices. They communicate with one another via messages to accomplish shared objectives.
As a result, to the end user the distributed system will look like a single interface or computer. Together, the system is expected to maximize information and resource usage while preventing errors because, even if one system fails, the service will still be available.
What is Azure?
Azure is a platform for public cloud computing that offers solutions for analytics, virtual computing, storage, networking, and much more.
These solutions include Infrastructure as a Service (IaaS), Platform as a Service (PaaS), and Software as a Service (SaaS). You can supplement or replace your on-premise servers with it.
Blobs, tables, and queues are the three main data services provided by Azure. These services are all widely distributed, highly scalable, and reliable. We will be utilizing one of this services in this article.
Getting Started
Before you start following along with this tutorial, make sure you have the following things ready:
An Azure Subscription – You can sign up for a free Azure account if you don’t already have one.
Basic Knowledge and installations of NestJS and MySQL server database. Learn more from the NestJS documentation.
How to Connect to Azure
One of Microsoft's Cloud Storage's cloud-based object storage solution is called a Blob. Large-scale unstructured data storage is best suited for blob storage. Unstructured data, such as text or binary data, is data that does not follow a specific data model or description.
How to create a blob storage
Step 1: The Azure dashboard is visible once you create an account and log in to the Azure site. Select Storage Accounts from the menu or use the search bar.
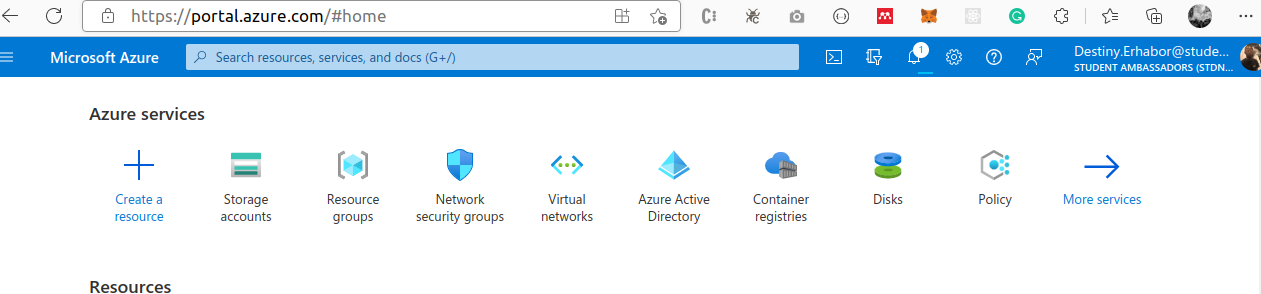
Creating blob storage step 1
Step 2: Choose create or Create storage account if you do not have an existing storage account from the menu in the following box.

Creating blob storage step 2
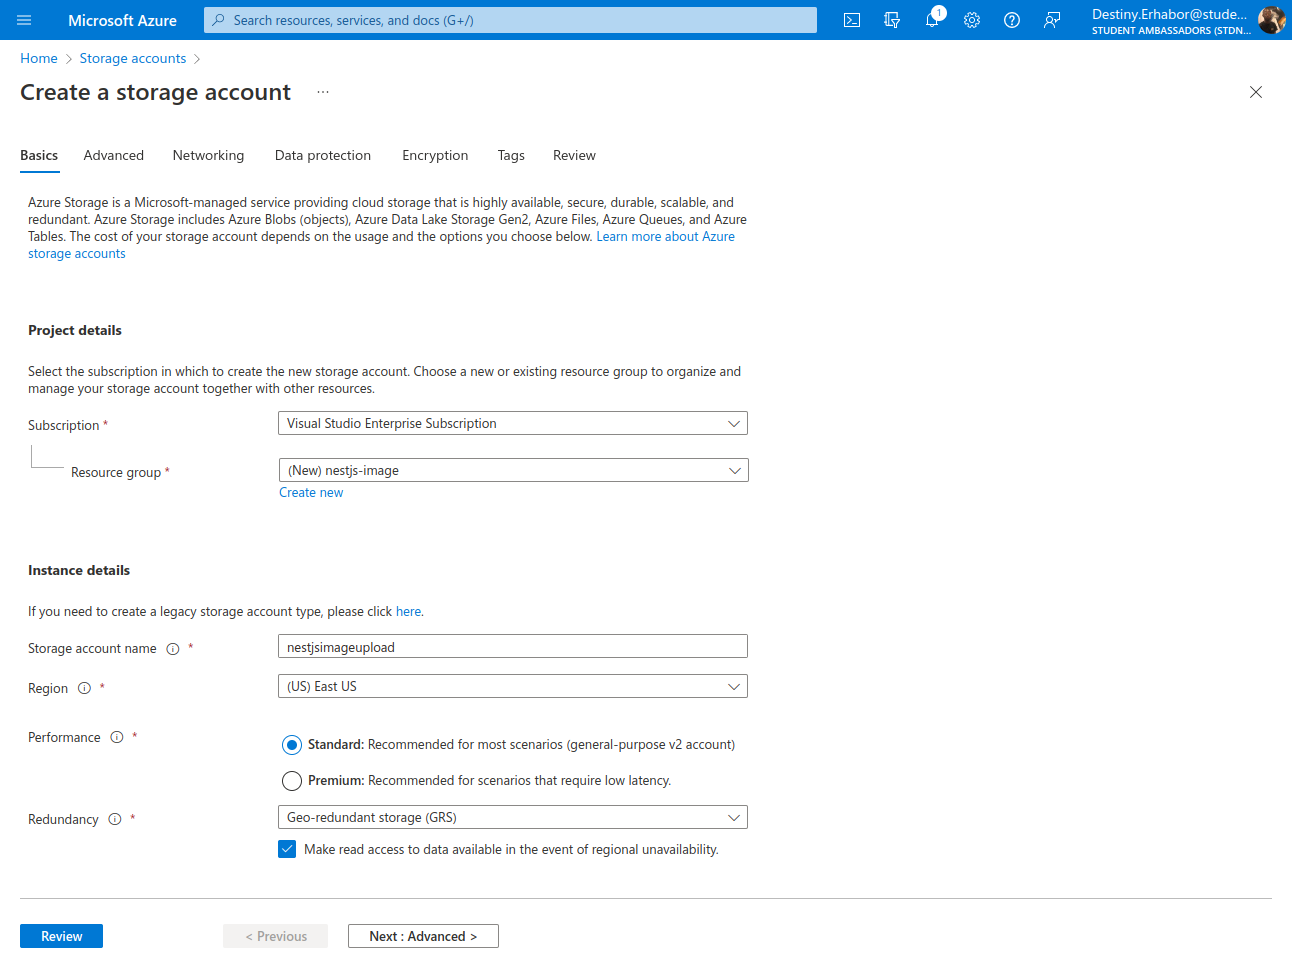
Step 3: In this window, we need to fill in subscription, resource group, storage account name, region, performance, and redundancy.
Creating blob storage step 3
The
Subscriptionallows Azure keep track of where to charge for the resource used. You can use your free subscription here.A
resource groupis a central grouping for your resource(s). It helps you structure and organize your Azure resources based on your wants.The
Storage account namemust be a unique name globally.Performancegives you different storage types such as HDD and SSD. Here, we are using Standard.Redundancyhelps protect your storage from data center or region failures by duplicating your resource to other regions.
Step 4: Then click review to validate your options. After completing validation, you can click the Create button to create the Storage account. (Note here that we left every other option as default.)

Creating blob storage step 4
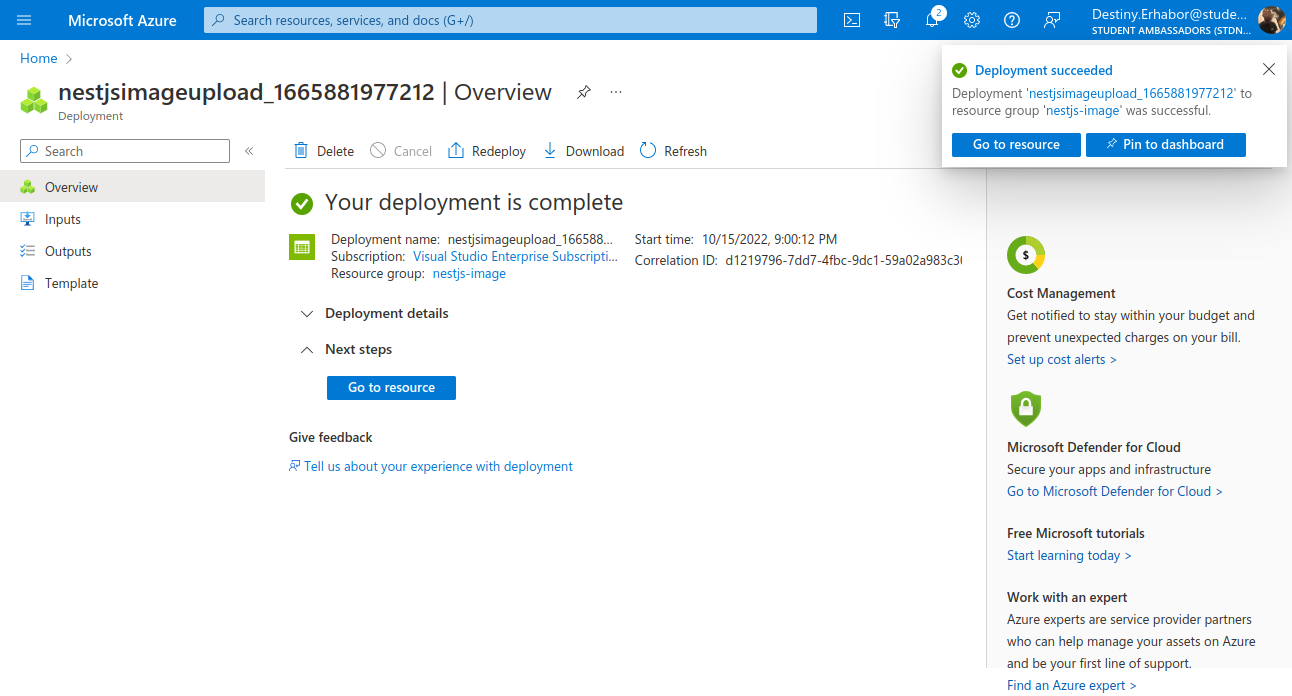
When successfully created, the following windows should show up:
Creating blob storage step 5
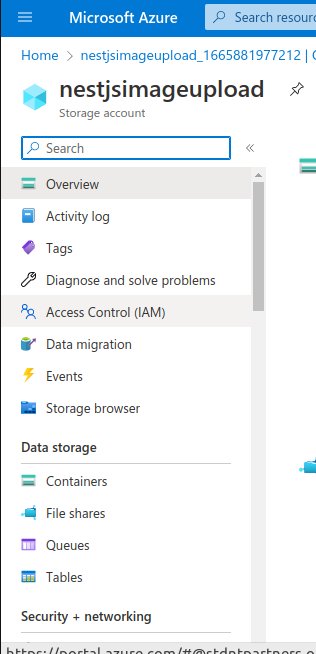
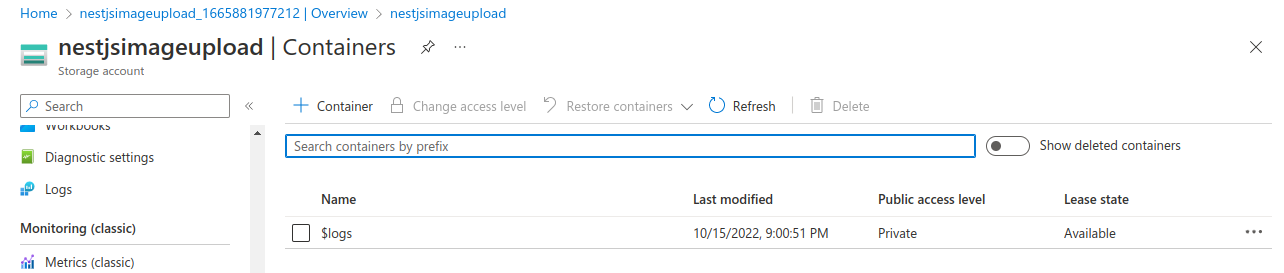
Step 5: Next, select Go to resource to be sent to the storage account dashboard. The left sidebar is then visible and has a number of options. Choose the containers option there, which is in the Data Storage section.
Creating blob storage step 5
Step 6: in the Containers dashboard, now click on + Container, then a form will appear on the right side. Fill out the form by giving the name and public access level (you can use any option according to your requirements) for the container. You can create any number of containers under one storage account
Creating blob storage step 6
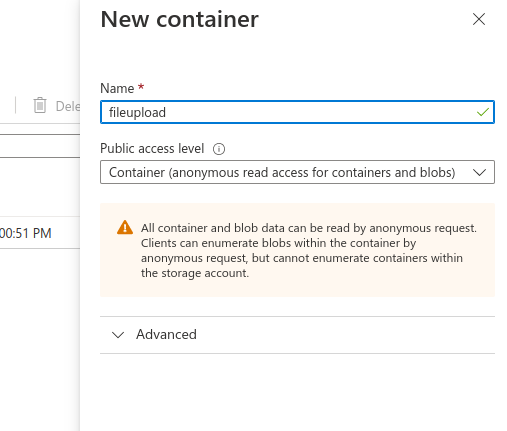
Creating blob storage step 6
Click the create button once you've finished filling out the form.
Step 7: Copy the Credentials from the Azure portal.
You should have authorization before sending requests to Azure storage. Azure offers two keys for that purpose, each of which contains a connection string. As a result, you will need these credentials as a connection string to the NestJS application.
One of the connection strings is available for copying in the Access keys area of the Security + networking menu on the left. (We will add these to our NestJS .env file.)
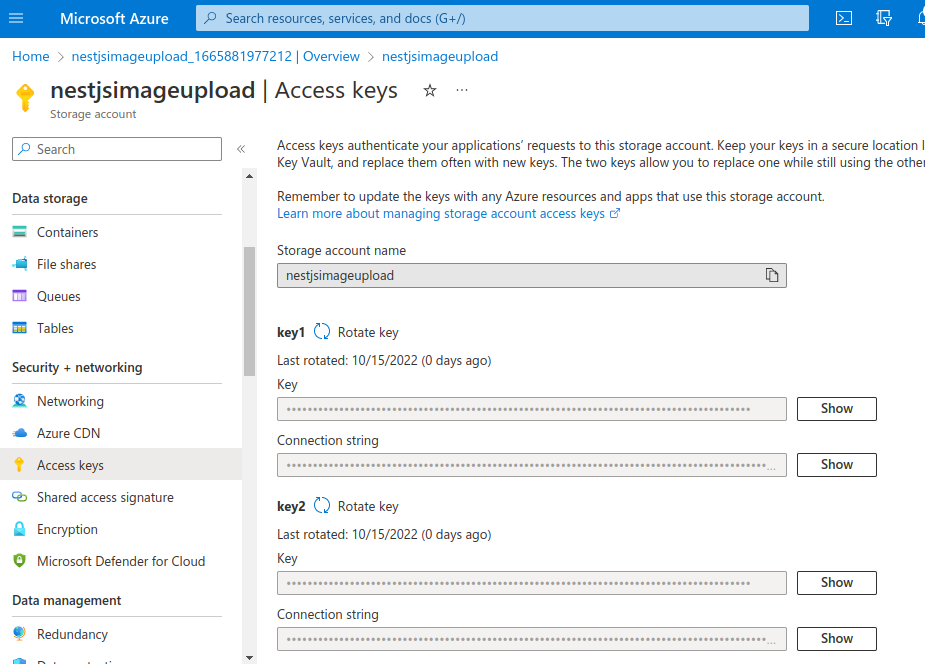
Creating blob storage step 7
Cool! You've configured your Azure blob storage. The next step is to setup and link your NestJS application with the blob storage.
How to Set Up NestJS and MySQL DB
As mentioned earlier, we will be using NestJS as our server and the MySQL database to save a reference to the file saved on the Azure distributed system.
Firstly you need to have NestJS and MySQL server installed on your system. Then run the following NestJS command to start a new project. Let's call our project nestjs-file-upload-azure:
nest new nestjs-file-upload-azure
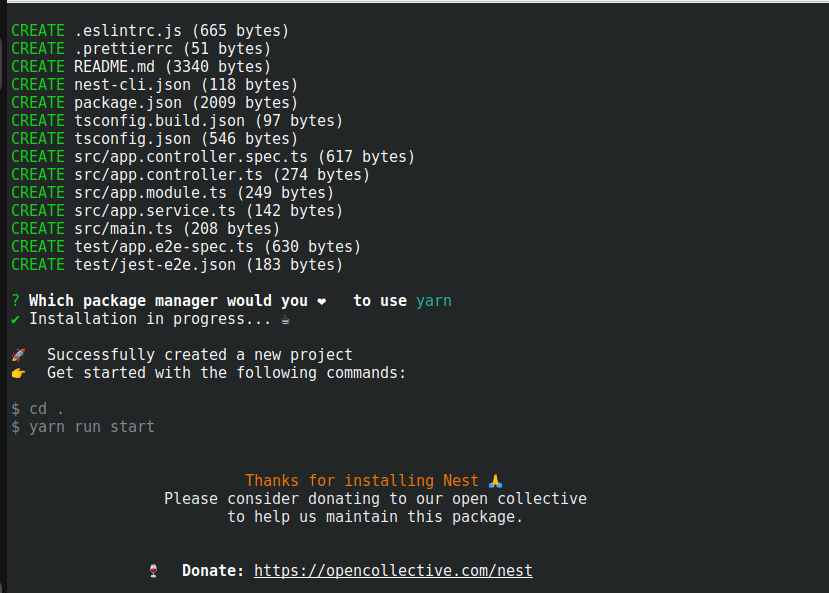
How to create a new project in Nestjs
Before we get started in creating out resources, let's install the necessary dependencies needed:
yarn add mysql2 @nestjs/typeorm @nestjs/config typeorm
To setup your MySQL database with NestJS, open the app.module.ts inside the src folder and add the following code:
import { Module } from '@nestjs/common';
import { ConfigModule, ConfigService } from '@nestjs/config';
import { TypeOrmModule } from '@nestjs/typeorm';
import { FileModule } from './modules/files/file.module';
import { UserModule } from './modules/users/user.module';

@Module({
    imports: [
        ConfigModule.forRoot({
            envFilePath: '.env',
            isGlobal: true,
        }),
        TypeOrmModule.forRootAsync({
            imports: [ConfigModule],
            inject: [ConfigService],
            useFactory: (config: ConfigService) => ({
                type: 'mysql',
                host: 'localhost',
                port: 3306,
                username: config.get('DB_USERNAME'),
                password: config.get('DB_PASSWORD'),
                database: 'azure_upload',
                entities: [__dirname + '/**/*.entity{.ts,.js}'],
                synchronize: true,
            }),
        }),
        UserModule,
        FileModule,
    ],
    controllers: [],
    providers: [],
})

export class AppModule {}
Inside the imports, configure a simple MySQL database with the TypeOrmModule.forRootAsync() called azure_upload locally. It injects ConfigService to allow us to use environment variables (in this case your database name and password).
For a production-based application, you should set synchronize to false and use migration so as to keep your database data safe.
Now the database is connected successfully, thanks to the TypeORM package we installed. You can check by running yarn start:dev on your terminal or npm run start:dev if you are using npm as your package manager.
How to Connect to the Azure Blob through SDK
Using the @azure/storage-blob storage we can connect to Azure. We are still going to need the Multer package for managing file handling operations, and we'll use UUID to generate a unique name for each blob.
Let’s install them first.
yarn add @azure/storage-blob uuidv4 @types/multerornpm install @azure/storage-blob uuidv4 @types/multer
Now, let's add the connection string we saved earlier to our .env file

How to Upload the Image through the API
Since we’ve got the Azure connection set up, we can proceed with uploading our files. For starters, let’s create a file entity and service.
How to Create an Azure Service
The Azure service will help us in mapping out the logic to upload, download, and delete files from our Azure storage account we created.
To generate a service, we will use the NestJS CLI. Open the terminal and run nest g service files modules/files --no-spec --flat.
Add the following to the service files generated:
src/modules/files/files.service.ts
import { BlobServiceClient, BlockBlobClient } from '@azure/storage-blob';
import { Injectable } from '@nestjs/common';
import { ConfigService } from '@nestjs/config';
import { uuid } from 'uuidv4';

@Injectable() export class FilesAzureService {
    constructor(private readonly configService: ConfigService) {}
    private containerName: string;

    private async getBlobServiceInstance() {
        const connectionString = this.configService.get('CONNECTION_STRING');
        const blobClientService = await BlobServiceClient.fromConnectionString( connectionString, );
        return blobClientService;
    }

    private async getBlobClient(imageName: string): Promise<BlockBlobClient> {
        const blobService = await this.getBlobServiceInstance();
        const containerName = this.containerName;
        const containerClient = blobService.getContainerClient(containerName);
        const blockBlobClient = containerClient.getBlockBlobClient(imageName);

        return blockBlobClient;
    }

    public async uploadFile(file: Express.Multer.File, containerName: string) {
        this.containerName = containerName;
        const extension = file.originalname.split('.').pop();
        const file_name = uuid() + '.' + extension;
        const blockBlobClient = await this.getBlobClient(file_name);
        const fileUrl = blockBlobClient.url;
        await blockBlobClient.uploadData(file.buffer);

        return fileUrl;
    }
}
The private functions create an instance of our Azure blob storage with the connection strings using the azure-sdk methods BlobServiceClient.fromConnectionString(). It also expects the container name we gave our blob container earlier during azure storage creation using getContainerClient and getBlockBlobClient().
The uploadFile() is a public function that user service can call to make image upload to azure. This function uses the azure instance and the private functions to upload the file and returns the file url.
How to Create an Endpoint for Uploading Images
It's time to create our user resources that provide an endpoint for us to create (upload) images to Azure, view the image, and delete the image.
How to Create a User Resource
The NestJS CLI is a powerful tool that helps scaffold our resource by creating basic component as you know them. To easily create a resource, on the terminal type the following command and follow the prompt for REST APIs:
nest generate resource users modules/users --no-spec --flat
The --no-spec ignores test files and the --flat creates the resource directly in a modules/users folder.
The above command added the folders dto and entities and files user.controller.ts, user.module.ts and user.service.ts inside the src file. It also performed all necessary updates to sync with app.module.ts.

User resources created
How to Create a User Entity
By saving the image URL directly in the database, we can access the public file very quickly.
src/modules/users/users.entity.ts
import { Column, Entity, PrimaryGeneratedColumn } from 'typeorm';

@Entity() export class User {
    @PrimaryGeneratedColumn()
    id: number;

    @Column()
    image_url: string;
 }
How to Create a User Service
The user service helps connect with the database and save the upload image_url, hence the saveUrl() function.
src/modules/users/users.service.ts
import { Injectable } from '@nestjs/common';
import { InjectRepository } from '@nestjs/typeorm';
import { Repository } from 'typeorm';
import { User } from './entities/user.entity';

@Injectable() export class UserService {
    constructor(
        @InjectRepository(User) private readonly userRepository: Repository<User>,
    ) {}

    async saveUrl(file_url: string) {
        await this.userRepository.save({ image_url: file_url });
    }
}
How to Create a User Controller
This defines the endpoint for a public user to make a file upload. To do that, we follow the NestJS documentation and use the FileInterceptor that utilizes multer under the hood.
src/modules/users/users.controllers.ts
import { Controller, Post, UseInterceptors, UploadedFile, } from '@nestjs/common';
import { UserService } from './user.service';
import { FilesAzureService } from '../files/file.azure.service';
import { FileInterceptor } from '@nestjs/platform-express';

@Controller('user') export class UserController {
    constructor(
        private readonly userService: UserService,
        private readonly fileService: FilesAzureService
    ) {}

    @Post('upload')
    @UseInterceptors(FileInterceptor('image'))
    async create(@UploadedFile() file: Express.Multer.File) {
        const containerName = 'fileupload';
        const upload = await this.fileService.uploadFile(file, containerName)
        this.userService.saveUrl(upload);
        return { upload, message: 'uploaded successfully' }
    }
}
We can test with Postman:
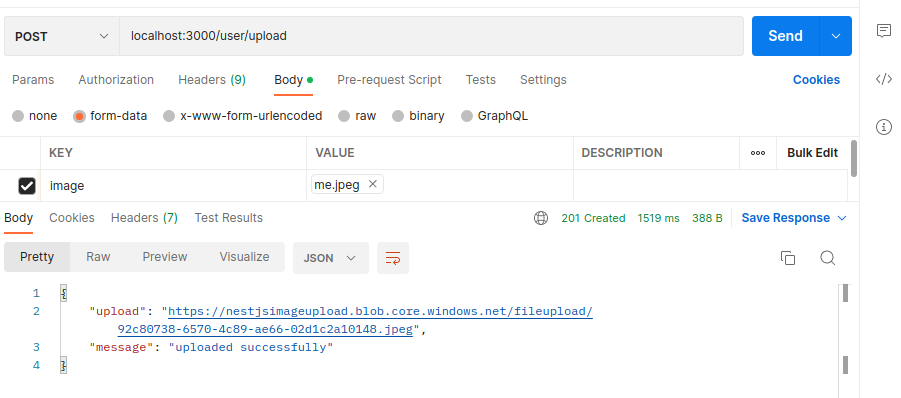
Test upload endpoint from Postman
And confirm on Azure:
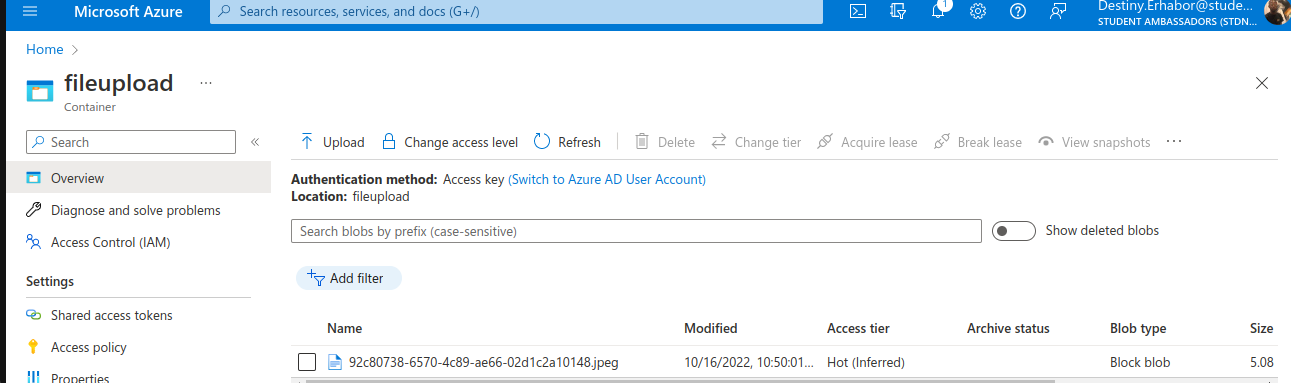
Confirm image on the Azure portal
How to Delete Files
We also need a means to delete files after submitting them. We'll remove the files from both locations to maintain consistency between our database and Azure storage. Adding the method to the Files Service first:
src/modules/files/files.service.ts
async deleteFile(file_name: string, containerName: string) {
    try {
        this.containerName = containerName;
        const blockBlobClient = await this.getBlobClient(file_name);
        await blockBlobClient.deleteIfExists();
    } catch (error) {
        console.log(error);
    }
}
We must now apply it to our Users Service. A crucial addition is that we remove the previous file when a user uploads one while already having one and making an upload endpoint by user id.
src/modules/users/users.service.ts
import { Injectable } from '@nestjs/common';
import { InjectRepository } from '@nestjs/typeorm';
import { Repository } from 'typeorm';
import { FilesAzureService } from '../files/file.azure.service';
import { User } from './entities/user.entity';

@Injectable()
export class UserService {
  constructor(
    @InjectRepository(User) private readonly userRepository: Repository<User>,
    private readonly fileService: FilesAzureService,
  ) {}

  async saveUrl(id, file_url: string, containerName: string): Promise<void> {
    const user = await this.userRepository.findOne({
      where: { id },
    });
    const file_image = user?.image_url;
    let getfile = '';

    if (file_image) {
      getfile = file_image.split('/').pop();
    }
    await this.userRepository.save({
      ...user,
      image_url: file_url,
    });
    await this.fileService.deleteFile(getfile, containerName);
  }

  async getimage(id: number): Promise<any> {
    const user = await this.userRepository.findOne({
      where: { id },
    });

    return user;
  }

  async remove(id: number, containerName: string): Promise<User> {
    try {
      const user = await this.userRepository.findOne({
        where: { id },
      });
      const file_url = user?.image_url;
      if (file_url) {
        await this.userRepository.update(id, {
          ...user,
          image_url: '',
        });

        const file_ = file_url.split('/').pop();

        await this.fileService.deleteFile(file_, containerName);
      }

      return user;
    } catch (error) {
      console.log(error);
      return error;
    }
  }
}
Including an endpoint where users can send an image is the final component. To accomplish that, we use the FileInterceptor, which internally makes use of multer, in accordance with the NestJS documentation.
src/modules/users/users.controller.ts
Controller('user')
export class UserController {
  constructor(
    private readonly userService: UserService,
    private readonly fileService: FilesAzureService
  ) {}

  @Post('/:id/upload')
  @UseInterceptors(FileInterceptor('image'))
  async create(@UploadedFile() file: Express.Multer.File, @Param('id') id) {
    const containerName = 'fileupload';
    const upload = await this.fileService.uploadFile(file, containerName)
    this.userService.saveUrl(id, upload, containerName);
    return {
      upload,
      message: 'uploaded successfully'
    }
  }

  @Get('/:id')
  async getimage(@Param('id') id) {
    const image = await this.userService.getimage(id);
    return {
      image,
      message: 'get image successfully'
    }
  }

  @Delete('remove/:id')
  @UseInterceptors(FileInterceptor('image'))
  async remove(@UploadedFile() file: Express.Multer.File , @Param('id') id) {
    const containerName = 'fileupload';
    const user = await this.userService.remove(id, containerName);
    return {
      user,
      message: 'deleted successfully'
    }
  }
}
These sync with your Azure storage to delete unused file uploads.
You can find the full code repository Link on GitHub.
Cleaning Up
To avoid paying for the underlying Azure storage cost, you should clean up your resources if they're not being used.
To clean up your Azure resources, in the Azure portal go to or search for resources group, find the one you just created, and delete it. This will delete all resources in the resource group.
Summary
In this article, we've learnt the fundamentals of Azure Blob storage and how to use it in our NestJS API.
To accomplish that, we've given the required credentials to Azure SDK, and as a result, we've been able to upload and remove files to Azure.
To track our files, we've also kept our MySQL database synchronized with an Azure blob container. We used the FileInterceptor, which is powered by Multer, to upload files using the API.
As always, I hope you enjoyed the article and learned something new. If you want, you can also follow me on LinkedIn or Twitter.