

Nodemailer is a Node.js module that allows you to send emails from your server with ease. Whether you want to communicate with your users or just notify yourself when something has gone wrong, one of the options for doing so is through mail.
There are many articles out there explaining how to use Nodemailer in barebones form, but this article is not one of them. Here, I will show the most common practice of sending an email from your Node.js backend using Nodemailer and Gmail.
How to Get Started with Nodemailer
First, we need to set up our Node.js boilerplate using Express. To make sure you have Node and npm installed, you can run the following commands:
node -v
npm -v
If both of these commands show a version, you are good to go. Otherwise, install what is missing.
Create a directory for your project. We’ll use nodemailerProject.
mkdir nodemailerProject
Go inside the newly created directory and run
npm init
This will initialize our project with a pacakge.json file.
Next, we will need to install Express using:
npm install express
Depending which file you pointed to as your entry point (the default is index.js), open it and paste the following code:
const express = require('express')
const app = express()
const port = 3000


app.listen(port, () => {
  console.log(`nodemailerProject is listening at http://localhost:${port}`)
})
Above is what is needed to start a simple server using Express. You can see that it is working properly by running:
node index.js
How to Install Nodemailer
Install nodemailer using the following command:
npm install nodemailer
Nodemailer’s API is pretty simple and requires us to do the following:
- Create a Transporter object
- Create a MailOptions Object
- Use the Transporter.sendMail method
To create a transporter object, we do the following:
let transporter = nodemailer.createTransport({
      service: 'gmail',
      auth: {
        type: 'OAuth2',
        user: process.env.MAIL_USERNAME,
        pass: process.env.MAIL_PASSWORD,
        clientId: process.env.OAUTH_CLIENTID,
        clientSecret: process.env.OAUTH_CLIENT_SECRET,
        refreshToken: process.env.OAUTH_REFRESH_TOKEN
      }
    });
✋ Pay attention, as apart from the user and the pass keys, which are your own credentials for your gmail account, the other three keys need to be retrieved after setting up OAuth.
As we stated in the beginning of this article, we will be using Gmail for our mail sending needs. As you may have guessed, Gmail has a high level of security when it comes to mail sent by/to a user’s account.
There are a number of ways we can overcome this obstacle (some better than others), and we will choose the one that requires us to set up a project in the Google Cloud Platform. We need to do that in order to have credentials for the OAuth security enabled by Gmail.
If you want to read more about the complexities of using Gmail with nodemailer, go here.
The next steps will require some configurations instead of coding, so brace yourselves.
 _Photo by [Unsplash](https://unsplash.com/@d_mccullough?utm_source=ghost&utm_medium=referral&utm_campaign=api-credit">Daniel McCullough / <a href="https://unsplash.com/?utm_source=ghost&utm_medium=referral&utmcampaign=api-credit)
Google Cloud Platform Configurations
If you don’t have a Google Cloud Platform account, be sure to set one up as a prerequisite. Once you have that set up, create a new project by clicking on the dropdown menu in the upper left corner.

Select the New Project option:

In the next window, we will have to give our project a name. Pick whatever you like, but we will continue with out NodemailerProject name. For the location property, you can leave it as No organization.
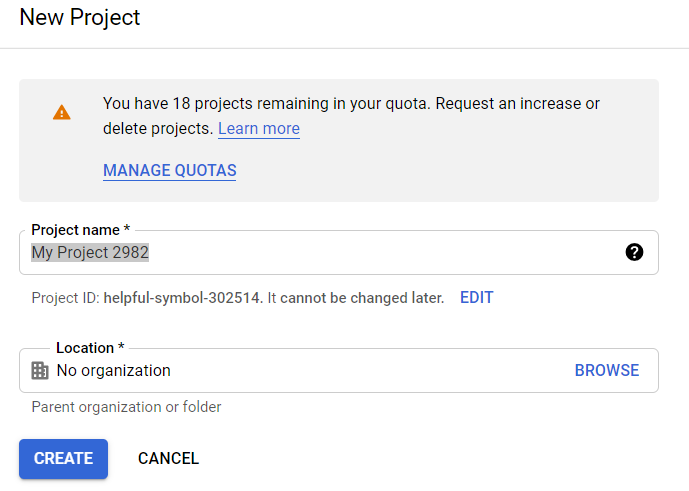
It may take a few seconds to for the project to be set up, but after that you will be able to see this screen:

Open up the navigation menu by clicking the three dashed lines in the top left corner and select APIs and Services:

In order to be able to use Nodemailer and Gmail we will have to use OAuth2. If you aren’t familiar with OAuth, it is a protocol for authentication. I won’t get into the specifics here as it is not necessary, but if you want to understand more about it, go here.
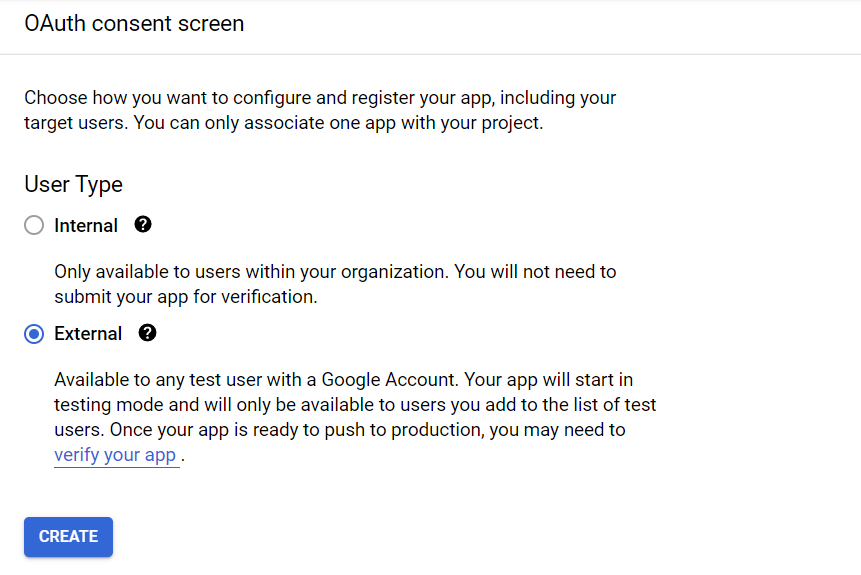
First we will have to configure our OAuth Consent Screen:

If you are not a G-Suite member, the only option available will be External for User Type.
After clicking create, the next screen requires us to fill out the application’s information (our server):
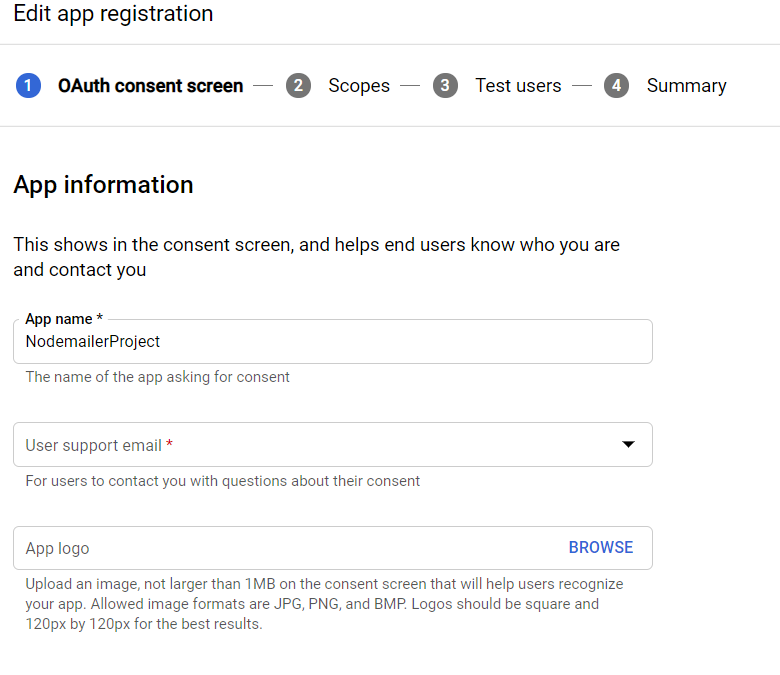
Fill in your email in the User support email field and also in the Developer contact information field. Clicking Save and Continue will bring us to the Scopes phase of this configuration. Skip this phase, as it is not relevant for us, and head into the Test Users phase.

Here, add yourself as a user and click Save and continue.
How to Configure Your OAuth Settings
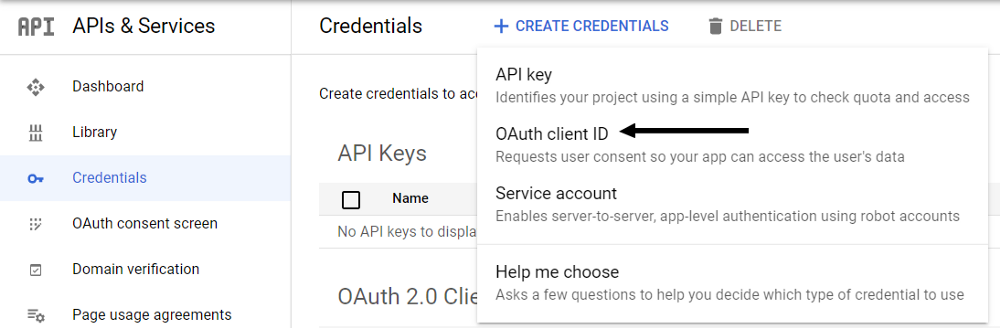
In this phase will we create OAuth credentials to be used with Nodemailer. Head over to the Credentials tab above OAuth Consent Screen. Click on the plus (➕) sign that has the text Create Credentials and choose OAuth Client ID.
In the Application type dropdown menu, choose Web Application:
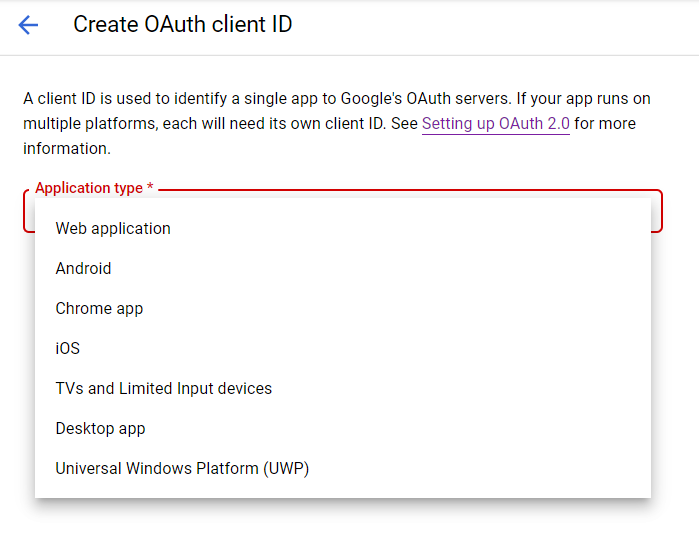
In the Authorized Redirect URIs section, make sure to add OAuth2 Playground (https://developers.google.com/oauthplayground) as we will use it to get one of the keys that was mentioned in the beginning of this article.

After clicking create, you will be presented with your client id and client secret. Keep these to yourself and never expose them in any way, shape, or form.
 _Photo by [Unsplash](https://unsplash.com/@welipower?utm_source=ghost&utm_medium=referral&utm_campaign=api-credit">Power Lai / <a href="https://unsplash.com/?utm_source=ghost&utm_medium=referral&utmcampaign=api-credit)
Get Your OAuth Refresh Token
To get the refresh token, which we will use within the transporter object in Nodemailer, we need to head over to the OAuth2 Playground. We approved this URI for this specific purpose in an earlier stage.
- Click on the gear icon to the right (which is OAuth2 Configuration) and check the checkbox to use your own OAuth2 Credentials:

- Look over to the left side of the website and you will see a list of services. Scroll down until you see Gmail API v1.

- Click Authorize APIs
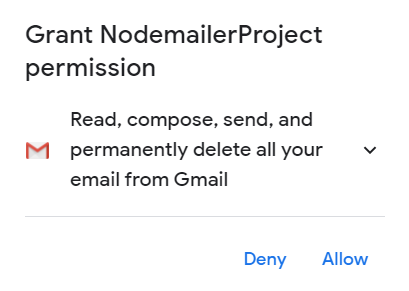
You will be presented with a screen to login to any of your Gmail accounts. Choose the one you listed as a Test user.
- The next screen will let you know that Google still hasn’t verified this application, but this is ok since we haven’t submitted it for verification. Click continue.

- In the next screen, you will be asked to grant permission to your project to interact with your gmail account. Do so.
- Once that is done, you will be redirected back to the OAuth Playground and you can see that there is an authorization code in the menu to the left. Click on the blue button labelled Exchange authorization code for tokens.
The fields for the refresh token and the access token will now be filled.
Back to the Server
After doing all of those configurations, we can return to our application and input all that data into the transporter creation. In order to keep all your credentials private, you can use the dotenv package. Don’t forget to also add the .env file you will create to .gitignore.
So, now we have this:
let transporter = nodemailer.createTransport({
      service: 'gmail',
      auth: {
        type: 'OAuth2',
        user: process.env.MAIL_USERNAME,
        pass: process.env.MAIL_PASSWORD,
        clientId: process.env.OAUTH_CLIENTID,
        clientSecret: process.env.OAUTH_CLIENT_SECRET,
        refreshToken: process.env.OAUTH_REFRESH_TOKEN
      }
    });
Next, we will create the mailOptions object, which holds the details of where to send the email and with what data.
let mailOptions = {
      from: tomerpacific@gmail.com,
      to: tomerpacific@gmail.com,
      subject: 'Nodemailer Project',
      text: 'Hi from your nodemailer project'
    };
This object can have many more fields and even multiple recipients, but we won’t go into that here.
Finally, we will use the sendMail method:
transporter.sendMail(mailOptions, function(err, data) {
      if (err) {
        console.log("Error " + err);
      } else {
        console.log("Email sent successfully");
      }
    });
Run your application and you will see your inbox being populated with a new email.
This article was inspired from a project I created that uses Nodemailer. If you want to check it out, go here.