By Jess Wilk
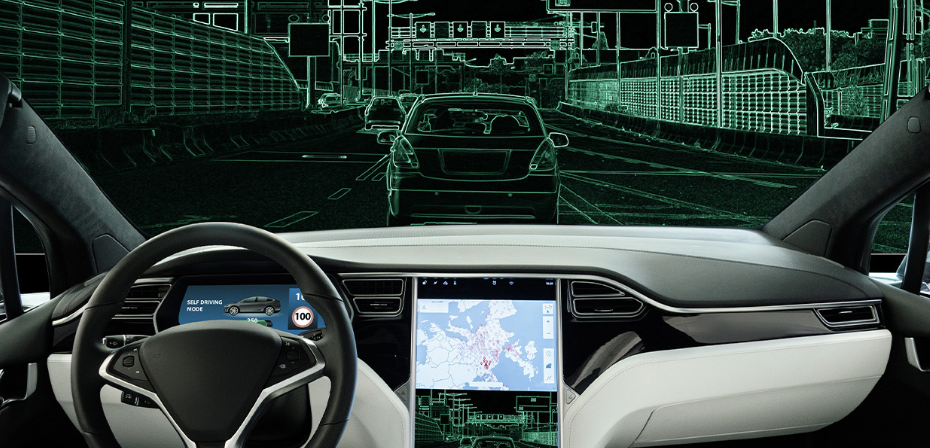
Hey there! So, you know that buzz about Tesla's autopilot being all futuristic and driverless? Ever thought about how it actually does its magic? Well, let me tell you – it's all about image segmentation and object detection.
What is Image Segmentation?
Image segmentation, basically chopping up an image into different parts, helps the system recognize stuff. It identifies where humans, other cars, and obstacles are on the road. That's the tech making sure those self-driving cars can cruise around safely. Cool, right? 🚗
During the past decade, Computer Vision has made massive strides, especially in crafting super-sophisticated segmentation and object detection methods.
These breakthroughs have found diverse uses, like spotting tumors and diseases in medical images, keeping an eye on crops in farming, and even guiding robots in navigation. The tech's really branching out and making a significant impact across different fields.
The main challenge lies in getting and prepping the data. Building an image segmentation dataset demands annotating heaps of images to define the labels, which is a massive task. This requires a ton of resources.
So, the game changed when the Segment Anything Model (SAM) came into the scene. SAM revolutionized this field by enabling anyone to create segmentation masks for their data without relying on labeled data.
In this article, I’ll guide you through understanding SAM, its workings, and how you can utilize it to make masks. So, get ready with your cup of coffee because we're diving in! ☕
Prerequisites:
The prerequisites for this article include a basic understanding of Python programming and a fundamental knowledge of machine learning.
Additionally, familiarity with image segmentation concepts, computer vision, and data annotation challenges would also be beneficial.
What is the Segment Anything Model?
SAM is a Large Language Model that was developed by the Facebook research team (Meta AI). The model was trained on a massive dataset of 1.1 billion segmentation masks, the SA-1B dataset. The model can generalize well to unseen data because it is trained on a very diverse dataset and has low variance.
SAM can be used to segment any image and create masks without any labeled data. It is a breakthrough, as no fully automated segmentation was possible before SAM.
What makes SAM unique? It is a first-of-its-kind, promptable segmentation model. Prompts allow you to instruct the model on your desired output through text and interactive actions. You can provide prompts to SAM in multiple ways: Points, Bounding Boxes, texts, and even base masks.
How Does SAM Work?
SAM uses a transformer-based architecture, like most Large Language Models. Let’s look at the flow of data through different components of SAM.
Image Encoder: When you provide an image to SAM, it is first sent to the Image Encoder. True to its name, this component encodes the image into vectors. These vectors represent the low-level (edges, outlines) and high-level features like object shapes and textures extracted from the image. The encoder here is a Vision Transformer (ViT), which has many advantages over traditional CNNs.
Prompt Encoder: The prompt input the user gives is converted to embeddings by the prompt encoder. SAM uses positional embeddings for points, bounding box prompts, and text encoders for text prompts.
Mask Decoder: Next, SAM maps the extracted image features and prompt encodings to generate the mask, which is our output. SAM will generate 3 segmented masks for every input prompt, providing the users with choices.
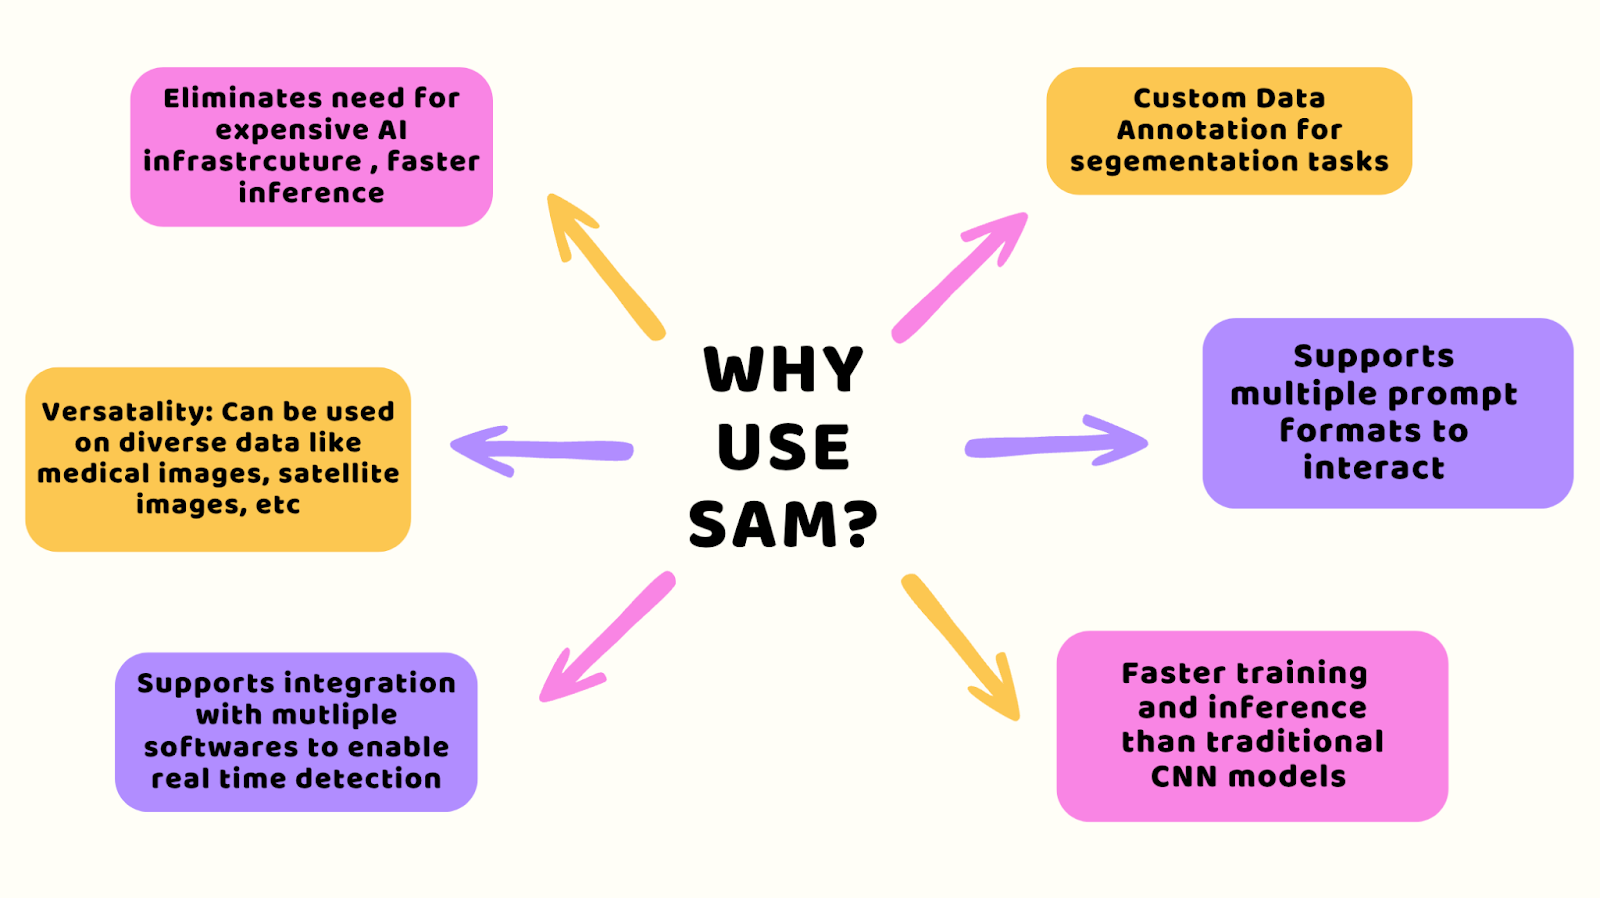
Why use SAM?
With SAM, you can skip the expensive setup usually needed for AI, and still get fast results. It works well with all sorts of data, like medical or satellite images, and fits right into the software you already use for quick detection tasks.
You also get tools tailored for specific jobs like image segmentation, and it’s straightforward to interact with, whether you're training it or asking it to analyze data. Plus, it’s quicker than older systems like CNNs, saving you both time and money.
How to Install and Set up SAM
Now that you know how SAM works, let me show you how to install and set it up. The first step is to install the package in your Jupyter notebook or Google Colab with the following command:
pip install 'git+https://github.com/facebookresearch/segment-anything.git'
/content Collecting git+https://github.com/facebookresearch/segment-anything.git Cloning https://github.com/facebookresearch/segment-anything.git to /tmp/pip-req-build-xzlt_n7r Running command git clone --filter=blob:none --quiet https://github.com/facebookresearch/segment-anything.git /tmp/pip-req-build-xzlt_n7r Resolved https://github.com/facebookresearch/segment-anything.git to commit 6fdee8f2727f4506cfbbe553e23b895e27956588 Preparing metadata (setup.py) ... done
The next step is to download the pre-trained weights of the SAM model you want to use.
You can choose from three options of checkpoint weights: ViT-B (91M), ViT-L (308M), and ViT-H (636M parameters).
How do you choose the right one? The larger the number of parameters, the longer the time needed for inference, that is mask generation. If you have low GPU resources and fast inference, go for ViT-B. Otherwise, choose ViT-H.
Follow the below commands to set up the model checkpoint path:
!wget -q https://dl.fbaipublicfiles.com/segment_anything/sam_vit_h_4b8939.pth
CHECKPOINT_PATH='/content/weights/sam_vit_h_4b8939.pth'


import torch
DEVICE = torch.device('cuda:0' if torch.cuda.is_available() else 'cpu')
MODEL_TYPE = "vit_h"
The model weights are ready! Now, I’ll show you different methods through which you can provide prompts and generate masks in the upcoming sections. 🚀
How SAM Can Generate Masks Automatically
SAM can automatically segment the entire input image into distinct segments without a specific prompt. For this, you can use the SamAutomaticMaskGenerator utility.
Follow the below commands to import and initialize it with the model type and checkpoint path.
from segment_anything import sam_model_registry, SamAutomaticMaskGenerator, SamPredictor


sam = sam_model_registry[MODEL_TYPE](checkpoint=CHECKPOINT_PATH).to(device=DEVICE)


mask_generator = SamAutomaticMaskGenerator(sam)
For example, I have uploaded an image of dogs to my notebook. It will be our input image, which has to be converted into RGB (Red-Green-Blue) pixel format to be input to the model.
You can do this using the OpenCV Python package and then use the generate() function to create a mask, as shown below:
# Import opencv package
import cv2
# Give the path of your image
IMAGE_PATH= '/content/dog.png'
# Read the image from the path
image= cv2.imread(IMAGE_PATH)
# Convert to RGB format
image_rgb = cv2.cvtColor(image, cv2.COLOR_BGR2RGB)
# Generate segmentation mask
output_mask = mask_generator.generate(image_rgb)
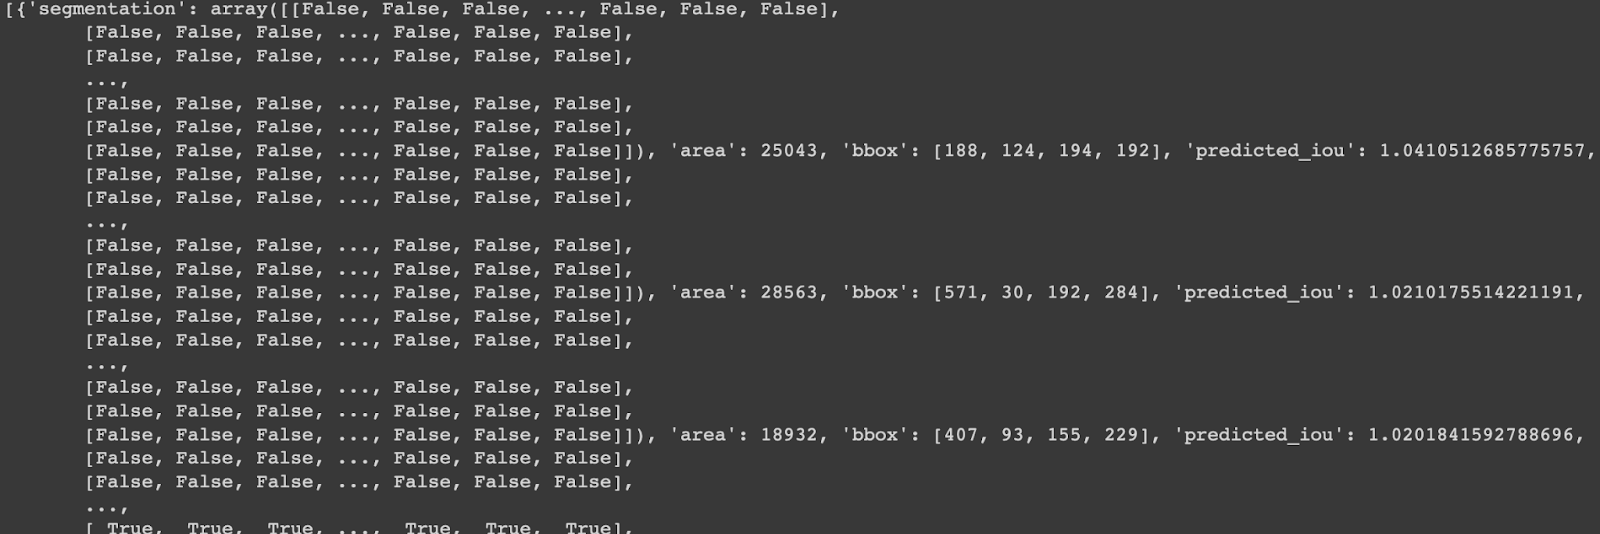
print(output_mask)
The generated output is a dictionary with the following main values:
Segmentation:An array that has a mask shapearea:An integer that stores the area of the mask in pixelsbbox:The coordinates of the boundary box [xywh]Predicted_iou:IOU is an evaluation score for segmentation
So how do we visualize our output mask?
Well, it's a simple Python function that will take the dictionary generated by SAM as output and plot the segmentation masks with the mask shape values and coordinates.
# Function that inputs the output and plots image and mask
def show_output(result_dict,axes=None):
     if axes:
        ax = axes
     else:
        ax = plt.gca()
        ax.set_autoscale_on(False)
     sorted_result = sorted(result_dict, key=(lambda x: x['area']),      reverse=True)
     # Plot for each segment area
     for val in sorted_result:
        mask = val['segmentation']
        img = np.ones((mask.shape[0], mask.shape[1], 3))
        color_mask = np.random.random((1, 3)).tolist()[0]
        for i in range(3):
            img[:,:,i] = color_mask[i]
            ax.imshow(np.dstack((img, mask*0.5)))
Let’s use this function to plot our raw input image and segmented mask:
_,axes = plt.subplots(1,2, figsize=(16,16))
axes[0].imshow(image_rgb)
show_output(sam_result, axes[1])
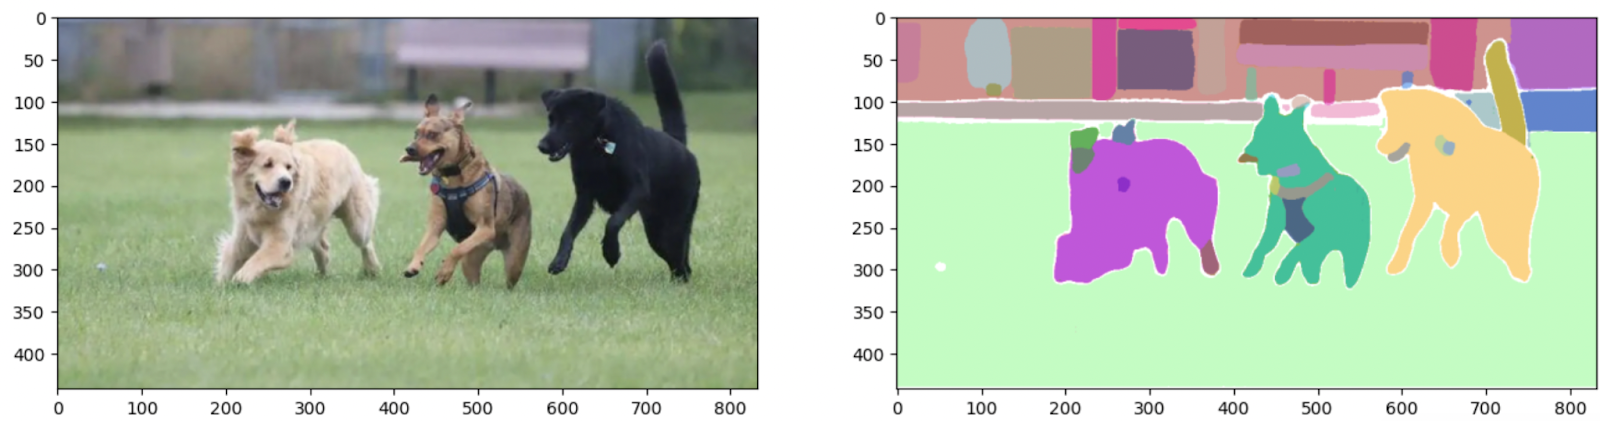
As you can see, the model has segmented every object in the image using a zero-shot method in one single go! 🌟
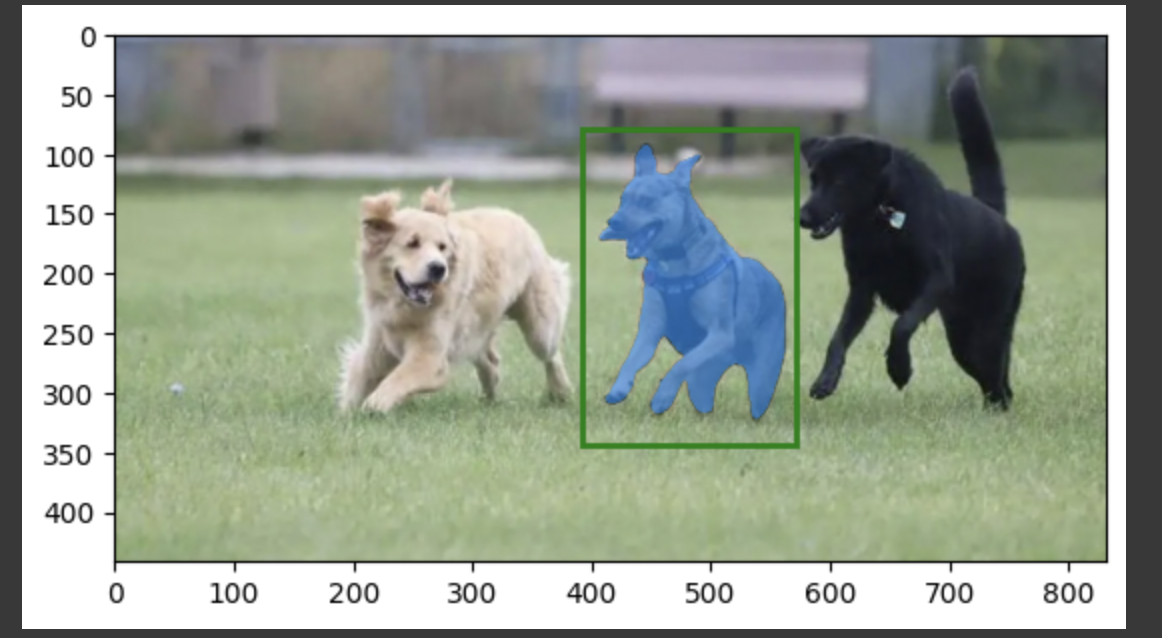
How to Use SAM with Bounding Box Prompts
Sometimes, we may want to segment only a specific portion of an image. To achieve this, input rough bounding boxes to identify the object within the area of interest, and SAM will segment it accordingly.
To implement this, import and initialize the SamPredictor and use the set_image() function to pass the input image. Next, call the predict function, providing the bounding box coordinates as input for the parameter box as shown in the snippet below. The bounding boxes prompt should be in the [X-min, Y-min, X-max, Y-max] format.
# Set up the SAM model with the encoded image
mask_predictor = SamPredictor(sam)
mask_predictor.set_image(image_rgb)


# Predict mask with bounding box prompt
masks, scores, logits = mask_predictor.predict(
box=bbox_prompt,
multimask_output=False
)


# Plot the bounding box prompt and predicted mask
plt.imshow(image_rgb)
show_mask(masks[0], plt.gca())
show_box(bbox_prompt, plt.gca())
plt.show()
How to Use SAM with Points as Prompts
What if you need the object's mask for a certain point in the image? You can provide the point’s coordinates as an input prompt to SAM. The model will then generate the three most relevant segmentation masks. This helps in case of any ambiguity on the main object of interest.
The first steps are similar to what we did in previous sections. Initialize the predictor module with the input image. Next, provide the input prompt as [X,Y] coordinates to the parameter point_coords.
# Initialize the model with the input image
from segment_anything import sam_model_registry, SamPredictor
sam = sam_model_registry[MODEL_TYPE](checkpoint=CHECKPOINT_PATH).to(device=DEVICE)
mask_predictor = SamPredictor(sam)
mask_predictor.set_image(image_rgb)
# Provide points as input prompt [X,Y]-coordinates
input_point = np.array([[250, 200]])
input_label = np.array([1])


# Predict the segmentation mask at that point
masks, scores, logits = mask_predictor.predict(
point_coords=input_point,
point_labels=input_label,
multimask_output=True,
)
As we have set the multimask_output parameter as True, there would be three output masks. Let’s visualize it by plotting the masks and their input prompt.
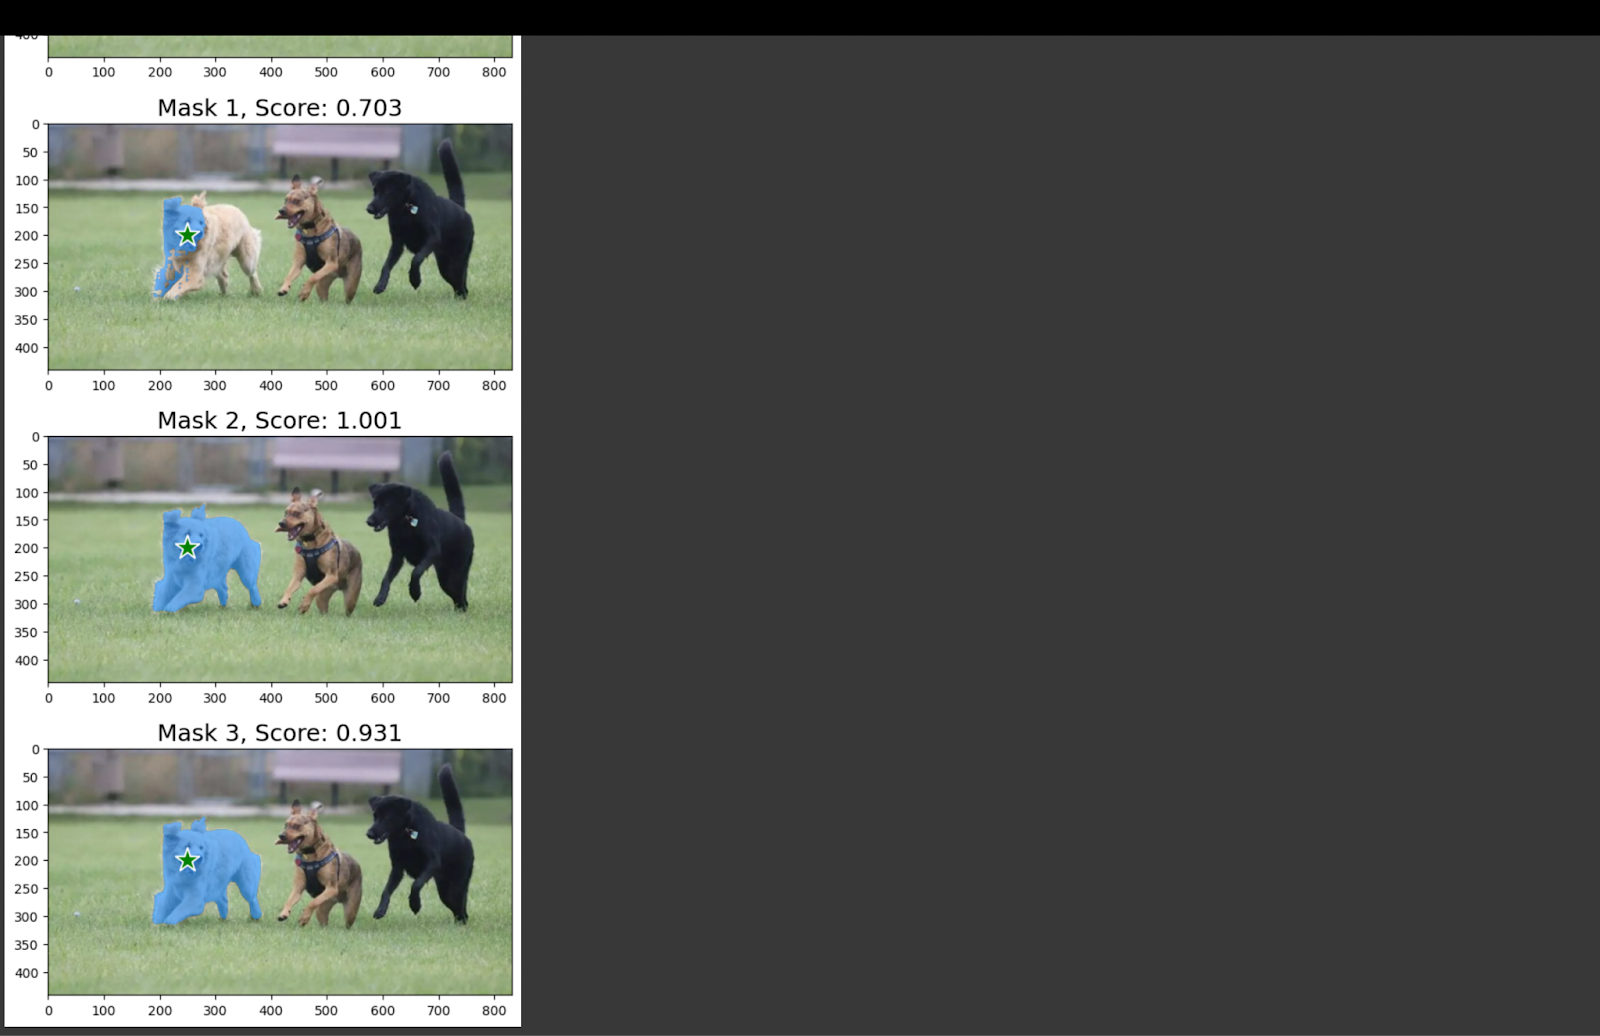
I have also printed the self-evaluated IOU scores for each mask. IOU stands for Intersection Over Union and measures the deviation between the object outline and mask.
Conclusion
You can build a tailored segmentation dataset for your field by gathering raw images and utilizing the SAM tool for annotation. This model has shown consistent performance, even in tricky conditions like noise or occlusion.
In the upcoming version, they're making text prompts compatible, aiming to enhance user-friendliness.
Hope this info proves helpful for you!
Thank you for reading! I'm Jess, and I'm an expert at Hyperskill. You can check out our ML courses on the platform.