
By Brandon Wallace
Configuring your .vimrc file lets you use the full power of Vim. With a customized .vimrc file you can increase your Vim powers tenfold.
In this article I will show you a few ways you can customize your .vimrc file.
I will go over:
- Basic Settings
- Plugins
- Folding
- Vimscript
- Status line
First create the following directory structure in your home directory.
.vim/
 ├── autoload/
 ├── backup/
 ├── colors/
 └── plugged/
$ mkdir -p ~/.vim ~/.vim/autoload ~/.vim/backup ~/.vim/colors ~/.vim/plugged
Create a .vimrc file in your home directory.
$ touch ~/.vimrc
How to Update Basic Settings in Vim
First let's add some basic settings that will improve your editing experience. I use double quote characters to comment out lines.
Add the following lines to your .vimrc file:
" Disable compatibility with vi which can cause unexpected issues.
set nocompatible

" Enable type file detection. Vim will be able to try to detect the type of file in use.
filetype on

" Enable plugins and load plugin for the detected file type.
filetype plugin on

" Load an indent file for the detected file type.
filetype indent on
Syntax highlighting is very useful. The next line we add will enable syntax highlighting and make your code easier to read.
" Turn syntax highlighting on.
syntax on
This is what it looks like before:
And after:
You can also choose to display line numbers to make navigating the file easier.
" Add numbers to each line on the left-hand side.
set number

You can pinpoint exactly where the cursor is located by highlighting the line it is on horizontally and vertically.
Add these lines to enable this feature.
" Highlight cursor line underneath the cursor horizontally.
set cursorline

" Highlight cursor line underneath the cursor vertically.
set cursorcolumn
Here are some more common setting that enhance the editing experience.
Each line contains a comment above it explaining what it does.
Add the following lines to the .vimrc file.
" Set shift width to 4 spaces.
set shiftwidth=4

" Set tab width to 4 columns.
set tabstop=4

" Use space characters instead of tabs.
set expandtab

" Do not save backup files.
set nobackup

" Do not let cursor scroll below or above N number of lines when scrolling.
set scrolloff=10

" Do not wrap lines. Allow long lines to extend as far as the line goes.
set nowrap

" While searching though a file incrementally highlight matching characters as you type.
set incsearch

" Ignore capital letters during search.
set ignorecase

" Override the ignorecase option if searching for capital letters.
" This will allow you to search specifically for capital letters.
set smartcase

" Show partial command you type in the last line of the screen.
set showcmd

" Show the mode you are on the last line.
set showmode

" Show matching words during a search.
set showmatch

" Use highlighting when doing a search.
set hlsearch

" Set the commands to save in history default number is 20.
set history=1000
Bash completion is a great feature which saves keystrokes by auto completing what you type. Vim has a similar feature called wildmenu.
Add the following lines to enable the wildmenu feature. You will see a list of files matching the file you are searching for. You can also enable auto completion to Vim.
" Enable auto completion menu after pressing TAB.
set wildmenu

" Make wildmenu behave like similar to Bash completion.
set wildmode=list:longest

" There are certain files that we would never want to edit with Vim.
" Wildmenu will ignore files with these extensions.
set wildignore=*.docx,*.jpg,*.png,*.gif,*.pdf,*.pyc,*.exe,*.flv,*.img,*.xlsx
Type :help <command> for more information on specific commands.
Example:
:help nocompatible
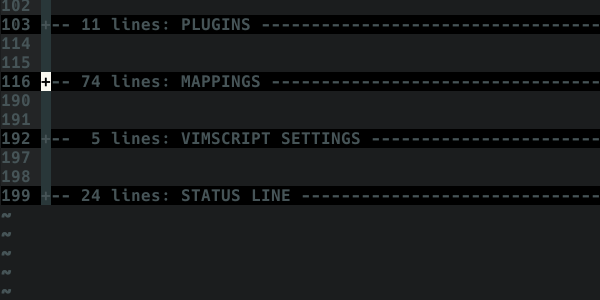
How to Fold Long Files in Vim
The .vimrc file can get long so organizing it into sections is a smart idea.
Vim will allow you to fold long files to hide sections of text.
Add the following lines to the bottom of your .vimrc to organize the file into sections.
" PLUGINS ---------------------------------------------------------------- {{{

" Plugin code goes here.

" }}}


" MAPPINGS --------------------------------------------------------------- {{{

" Mappings code goes here.

" }}}


" VIMSCRIPT -------------------------------------------------------------- {{{

" This will enable code folding.
" Use the marker method of folding.
augroup filetype_vim
    autocmd!
    autocmd FileType vim setlocal foldmethod=marker
augroup END

" More Vimscripts code goes here.

" }}}


" STATUS LINE ------------------------------------------------------------ {{{

" Status bar code goes here.

" }}}
Save the .vimrc file with :w and source the .vimrc file like this :source ~/.vimrc to make the changes take effect. Now, once you move your cursor on a fold you can press:
zo to open a single fold under the cursor.
zc to close the fold under the cursor.
zR to open all folds.
zM to close all folds.
Type :help folding for more information.
How to Add Plugins to Vim
You can add plugins to Vim to add extra functionality. Most people use a plugin manager to make plugin installation easy.
There are a variety of plugin managers we can use. I will show you how to install and use the vim-plug plugin manager.
To install the vim-plug plugin, run this command:
On Linux or Mac OS.
$ curl -fLo ~/.vim/autoload/plug.vim --create-dirs \
    https://raw.githubusercontent.com/junegunn/vim-plug/master/plug.vim
On Windows with Powershell.
$ iwr -useb https://raw.githubusercontent.com/junegunn/vim-plug/master/plug.vim |`
    ni $HOME/vimfiles/autoload/plug.vim -Force
Add the call plug#begin('~/.vim/plugged') and call plug#end() lines in the plugins section. The plugins we install will be added between the two function calls.
" PLUGINS ---------------------------------------------------------------- {{{

call plug#begin('~/.vim/plugged')


call plug#end()

" }}}
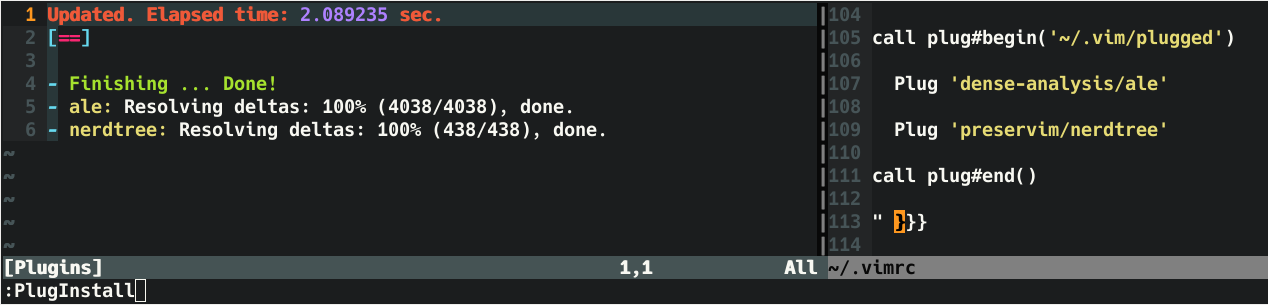
Now installing plugins is as easy as adding the Plug 'username/plugin-name' string you find on GitHub in between the function calls.
This is how I install NERDTree and Asynchronous Lint Engine (ALE).
Add these two lines in between the two call plug#... lines:
" PLUGINS ---------------------------------------------------------------- {{{

call plug#begin('~/.vim/plugged')


  Plug 'dense-analysis/ale'

  Plug 'preservim/nerdtree'


call plug#end()

" }}}
Save the .vimrc file with the command :w and source the .vimrc file with this command :source ~/.vimrc to make the changes take effect.
Now type :PlugInstall to download and install the two plugins.
How to Map Keyboard Shortcuts in Vim
In the mapping section we will add shortcuts to making typing longer commands easier. This will save you key strokes and lots of time, especially for long commands.
Key mapping syntax is like this:
map_mode <what_you_type> <what_is_executed>
Popular Mapping Modes in Vim
Here are a few popular mapping modes and probably the most useful and important.
nnoremap– Allows you to map keys in normal mode.inoremap– Allows you to map keys in insert mode.vnoremap– Allows you to map keys in visual mode.
A common mapping example is to map 'jj' to the escape key. You will be pressing the escape key a lot. The escape key is in the far corner of the keyboard.
The letter 'j' is in the middle of the keyboard so it is easier to press 'jj' instead of reaching for the escape key.
This is how you would map the escape key to jj.
inoremap jj <esc>
How to Use Mapleader in Vim
Mapleader will allow you set a key unused by Vim as the <leader> key.
The leader key, in conjunction with another key, will allow you to create new shortcuts.
The backslash key is the default leader key but some people change it to a comma ",".
let mapleader = "\"
With the leader key mapped to backslash, I can use it like this:
Turn off search highlighting by pressing \\.nnoremap <leader>\ :nohlsearch<CR>
Here are some common mappings that people use. See the comments above each line for the explanation.
Add this code in the mappings section:
" MAPPINGS --------------------------------------------------------------- {{{

" Set the backslash as the leader key.
let mapleader = "\"

" Press \\ to jump back to the last cursor position.
nnoremap <leader>\ ``

" Press \p to print the current file to the default printer from a Linux operating system.
" View available printers:   lpstat -v
" Set default printer:       lpoptions -d <printer_name>
" <silent> means do not display output.
nnoremap <silent> <leader>p :%w !lp<CR>

" Type jj to exit insert mode quickly.
inoremap jj <Esc>

" Press the space bar to type the : character in command mode.
nnoremap <space> :

" Pressing the letter o will open a new line below the current one.
" Exit insert mode after creating a new line above or below the current line.
nnoremap o o<esc>
nnoremap O O<esc>

" Center the cursor vertically when moving to the next word during a search.
nnoremap n nzz
nnoremap N Nzz

" Yank from cursor to the end of line.
nnoremap Y y$

" Map the F5 key to run a Python script inside Vim.
" I map F5 to a chain of commands here.
" :w saves the file.
" <CR> (carriage return) is like pressing the enter key.
" !clear runs the external clear screen command.
" !python3 % executes the current file with Python.
nnoremap <f5> :w <CR>:!clear <CR>:!python3 % <CR>

" You can split the window in Vim by typing :split or :vsplit.
" Navigate the split view easier by pressing CTRL+j, CTRL+k, CTRL+h, or CTRL+l.
nnoremap <c-j> <c-w>j
nnoremap <c-k> <c-w>k
nnoremap <c-h> <c-w>h
nnoremap <c-l> <c-w>l

" Resize split windows using arrow keys by pressing:
" CTRL+UP, CTRL+DOWN, CTRL+LEFT, or CTRL+RIGHT.
noremap <c-up> <c-w>+
noremap <c-down> <c-w>-
noremap <c-left> <c-w>>
noremap <c-right> <c-w><

" NERDTree specific mappings.
" Map the F3 key to toggle NERDTree open and close.
nnoremap <F3> :NERDTreeToggle<cr>

" Have nerdtree ignore certain files and directories.
let NERDTreeIgnore=['\.git$', '\.jpg$', '\.mp4$', '\.ogg$', '\.iso$', '\.pdf$', '\.pyc$', '\.odt$', '\.png$', '\.gif$', '\.db$']

" }}}
Type help: map-modes for more information.
How to Add Some Vimscripting
Vimscript is a scripting language that lets you create scripts using variables, if else statements, and functions. Auto commands are waiting for events to occur in order to trigger a command.
" VIMSCRIPT -------------------------------------------------------------- {{{

" Enable the marker method of folding.
augroup filetype_vim
    autocmd!
    autocmd FileType vim setlocal foldmethod=marker
augroup END

" If the current file type is HTML, set indentation to 2 spaces.
autocmd Filetype html setlocal tabstop=2 shiftwidth=2 expandtab

" If Vim version is equal to or greater than 7.3 enable undofile.
" This allows you to undo changes to a file even after saving it.
if version >= 703
    set undodir=~/.vim/backup
    set undofile
    set undoreload=10000
endif

" You can split a window into sections by typing `:split` or `:vsplit`.
" Display cursorline and cursorcolumn ONLY in active window.
augroup cursor_off
    autocmd!
    autocmd WinLeave * set nocursorline nocursorcolumn
    autocmd WinEnter * set cursorline cursorcolumn
augroup END

" If GUI version of Vim is running set these options.
if has('gui_running')

    " Set the background tone.
    set background=dark

    " Set the color scheme.
    colorscheme molokai

    " Set a custom font you have installed on your computer.
    " Syntax: set guifont=<font_name>\ <font_weight>\ <size>
    set guifont=Monospace\ Regular\ 12

    " Display more of the file by default.
    " Hide the toolbar.
    set guioptions-=T

    " Hide the the left-side scroll bar.
    set guioptions-=L

    " Hide the the right-side scroll bar.
    set guioptions-=r

    " Hide the the menu bar.
    set guioptions-=m

    " Hide the the bottom scroll bar.
    set guioptions-=b

    " Map the F4 key to toggle the menu, toolbar, and scroll bar.
    " <Bar> is the pipe character.
    " <CR> is the enter key.
    nnoremap <F4> :if &guioptions=~#'mTr'<Bar>
        \set guioptions-=mTr<Bar>
        \else<Bar>
        \set guioptions+=mTr<Bar>
        \endif<CR>

endif

" }}}
Read Learn Vimscript the Hard Way for more information on Vimscript.
Type :help autocmd for more information on auto commands.
How to Add Color Schemes to Vim
You can easily add color schemes to Vim to change the default colors. Do a search for Vim color schemes and you will find many, many choices.
Installing a color scheme is a simple as adding a <colorscheme>.vim file to the ~/.vim/colors/ directory.
I will add the popular color scheme molokai:
$ cd ~/.vim/colors

$ curl -o molokai.vim https://raw.githubusercontent.com/tomasr/molokai/master/colors/molokai.vim
  % Total    % Received % Xferd  Average Speed   Time    Time     Time  Current
                                 Dload  Upload   Total   Spent    Left  Speed
100  7558  100  7558    0     0   150k      0 --:--:-- --:--:-- --:--:--  150k
To set the color scheme, type this command:
:colorscheme molokai
Example color schemes:
 color schemes: molokai, base16-tomorrow, blue, one
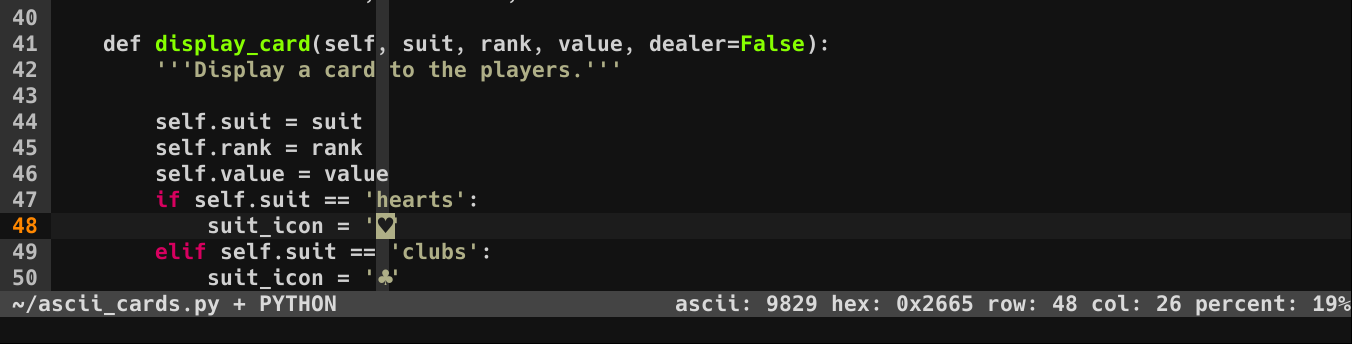
How to Configure the Status Bar in Vim
You can configure your Vim status bar with useful information. For example, configure the file type, total number of lines in the file, path to the file, column number, row number, percentage through file, and much more.
Add this code in the status line section:
" STATUS LINE ------------------------------------------------------------ {{{

" Clear status line when vimrc is reloaded.
set statusline=

" Status line left side.
set statusline+=\ %F\ %M\ %Y\ %R

" Use a divider to separate the left side from the right side.
set statusline+=%=

" Status line right side.
set statusline+=\ ascii:\ %b\ hex:\ 0x%B\ row:\ %l\ col:\ %c\ percent:\ %p%%

" Show the status on the second to last line.
set laststatus=2

" }}}
%F – Display the full path of the current file.
%M – Modified flag shows if file is unsaved.
%Y – Type of file in the buffer.
%R – Displays the read-only flag.
%b – Shows the ASCII/Unicode character under cursor.
0x%B – Shows the hexadecimal character under cursor.
%l – Display the row number.
%c – Display the column number.
%p%% – Show the cursor percentage from the top of the file.
Type help: statusline for more information.
This is the complete .vimrc file.
"""""""""""""""""""""""""""""""""""""""""""""""""""""""""""""""""""""""""""
"
"               ██╗   ██╗██╗███╗   ███╗██████╗  ██████╗
"               ██║   ██║██║████╗ ████║██╔══██╗██╔════╝
"               ██║   ██║██║██╔████╔██║██████╔╝██║
"               ╚██╗ ██╔╝██║██║╚██╔╝██║██╔══██╗██║
"                ╚████╔╝ ██║██║ ╚═╝ ██║██║  ██║╚██████╗
"                 ╚═══╝  ╚═╝╚═╝     ╚═╝╚═╝  ╚═╝ ╚═════╝
"
"""""""""""""""""""""""""""""""""""""""""""""""""""""""""""""""""""""""""""

" Disable compatibility with vi which can cause unexpected issues.
set nocompatible

" Enable type file detection. Vim will be able to try to detect the type of file is use.
filetype on

" Enable plugins and load plugin for the detected file type.
filetype plugin on

" Load an indent file for the detected file type.
filetype indent on

" Turn syntax highlighting on.
syntax on

" Add numbers to the file.
set number

" Highlight cursor line underneath the cursor horizontally.
set cursorline

" Highlight cursor line underneath the cursor vertically.
set cursorcolumn

" Set shift width to 4 spaces.
set shiftwidth=4

" Set tab width to 4 columns.
set tabstop=4

" Use space characters instead of tabs.
set expandtab

" Do not save backup files.
set nobackup

" Do not let cursor scroll below or above N number of lines when scrolling.
set scrolloff=10

" Do not wrap lines. Allow long lines to extend as far as the line goes.
set nowrap

" While searching though a file incrementally highlight matching characters as you type.
set incsearch

" Ignore capital letters during search.
set ignorecase

" Override the ignorecase option if searching for capital letters.
" This will allow you to search specifically for capital letters.
set smartcase

" Show partial command you type in the last line of the screen.
set showcmd

" Show the mode you are on the last line.
set showmode

" Show matching words during a search.
set showmatch

" Use highlighting when doing a search.
set hlsearch

" Set the commands to save in history default number is 20.
set history=1000

" Enable auto completion menu after pressing TAB.
set wildmenu

" Make wildmenu behave like similar to Bash completion.
set wildmode=list:longest

" There are certain files that we would never want to edit with Vim.
" Wildmenu will ignore files with these extensions.
set wildignore=*.docx,*.jpg,*.png,*.gif,*.pdf,*.pyc,*.exe,*.flv,*.img,*.xlsx

" PLUGINS ---------------------------------------------------------------- {{{

call plug#begin('~/.vim/plugged')

  Plug 'dense-analysis/ale'

  Plug 'preservim/nerdtree'

call plug#end()

" }}}

" MAPPINGS --------------------------------------------------------------- {{{

" Set the backslash as the leader key.
let mapleader = "\"

" Press \\ to jump back to the last cursor position.
nnoremap <leader>\ ``

" Press \p to print the current file to the default printer from a Linux operating system.
" View available printers:   lpstat -v
" Set default printer:       lpoptions -d <printer_name>
" <silent> means do not display output.
nnoremap <silent> <leader>p :%w !lp<CR>

" Type jj to exit insert mode quickly.
inoremap jj <Esc>

" Press the space bar to type the : character in command mode.
nnoremap <space> :

" Pressing the letter o will open a new line below the current one.
" Exit insert mode after creating a new line above or below the current line.
nnoremap o o<esc>
nnoremap O O<esc>

" Center the cursor vertically when moving to the next word during a search.
nnoremap n nzz
nnoremap N Nzz

" Yank from cursor to the end of line.
nnoremap Y y$

" Map the F5 key to run a Python script inside Vim.
" We map F5 to a chain of commands here.
" :w saves the file.
" <CR> (carriage return) is like pressing the enter key.
" !clear runs the external clear screen command.
" !python3 % executes the current file with Python.
nnoremap <f5> :w <CR>:!clear <CR>:!python3 % <CR>

" You can split the window in Vim by typing :split or :vsplit.
" Navigate the split view easier by pressing CTRL+j, CTRL+k, CTRL+h, or CTRL+l.
nnoremap <c-j> <c-w>j
nnoremap <c-k> <c-w>k
nnoremap <c-h> <c-w>h
nnoremap <c-l> <c-w>l

" Resize split windows using arrow keys by pressing:
" CTRL+UP, CTRL+DOWN, CTRL+LEFT, or CTRL+RIGHT.
noremap <c-up> <c-w>+
noremap <c-down> <c-w>-
noremap <c-left> <c-w>>
noremap <c-right> <c-w><

" NERDTree specific mappings.
" Map the F3 key to toggle NERDTree open and close.
nnoremap <F3> :NERDTreeToggle<cr>

" Have nerdtree ignore certain files and directories.
let NERDTreeIgnore=['\.git$', '\.jpg$', '\.mp4$', '\.ogg$', '\.iso$', '\.pdf$', '\.pyc$', '\.odt$', '\.png$', '\.gif$', '\.db$']

" }}}

" VIMSCRIPT -------------------------------------------------------------- {{{

" Enable the marker method of folding.
augroup filetype_vim
    autocmd!
    autocmd FileType vim setlocal foldmethod=marker
augroup END

" If the current file type is HTML, set indentation to 2 spaces.
autocmd Filetype html setlocal tabstop=2 shiftwidth=2 expandtab

" If Vim version is equal to or greater than 7.3 enable undofile.
" This allows you to undo changes to a file even after saving it.
if version >= 703
    set undodir=~/.vim/backup
    set undofile
    set undoreload=10000
endif

" You can split a window into sections by typing `:split` or `:vsplit`.
" Display cursorline and cursorcolumn ONLY in active window.
augroup cursor_off
    autocmd!
    autocmd WinLeave * set nocursorline nocursorcolumn
    autocmd WinEnter * set cursorline cursorcolumn
augroup END

" If GUI version of Vim is running set these options.
if has('gui_running')

    " Set the background tone.
    set background=dark

    " Set the color scheme.
    colorscheme molokai

    " Set a custom font you have installed on your computer.
    " Syntax: <font_name>\ <weight>\ <size>
    set guifont=Monospace\ Regular\ 12

    " Display more of the file by default.
    " Hide the toolbar.
    set guioptions-=T

    " Hide the the left-side scroll bar.
    set guioptions-=L

    " Hide the the left-side scroll bar.
    set guioptions-=r

    " Hide the the menu bar.
    set guioptions-=m

    " Hide the the bottom scroll bar.
    set guioptions-=b

    " Map the F4 key to toggle the menu, toolbar, and scroll bar.
    " <Bar> is the pipe character.
    " <CR> is the enter key.
    nnoremap <F4> :if &guioptions=~#'mTr'<Bar>
        \set guioptions-=mTr<Bar>
        \else<Bar>
        \set guioptions+=mTr<Bar>
        \endif<CR>

endif

" }}}

" STATUS LINE ------------------------------------------------------------ {{{

" Clear status line when vimrc is reloaded.
set statusline=

" Status line left side.
set statusline+=\ %F\ %M\ %Y\ %R

" Use a divider to separate the left side from the right side.
set statusline+=%=

" Status line right side.
"set statusline+=\ ascii:\ %b\ hex:\ 0x%B\ row:\ %l\ col:\ %c\ percent:\ %p%%

" Show the status on the second to last line.
set laststatus=2

" }}}
Conclusion
In this article, I have only scratched the surface of how you can customize Vim.
There are thousands of ways to configure and customize a .vimrc to your liking.
You can even write your own plugins and color schemes and share them with the world.
I hope that you have learned a new trick or two by reading this article. So if you use Vim, don't leave home without a .vimrc file!
By the way, I used Vim to write this article.