

When performing external penetration testing or bug bounty hunting, security experts explore the targeted system from various angles to collect as much information as possible and identify potential attack vectors. This involves identifying all the available assets, domains, and subdomains.
During the testing reconnaissance phase, testers spend time on virtual host enumeration, which is the process of discovering all the virtual hosts associated with a particular IP address or domain. This helps them find hidden or undocumented assets that might be vulnerable or misconfigured.
For example, they might find a virtual host that can be accessed without authentication. This could result in unauthorized access to sensitive data.
In this article, we will discuss different ways to enumerate virtual hosts and gather information from them. We will use the HTB Academy exercise in the “Information Gathering — Web Edition” module to demonstrate the enumeration steps.
Note that this tutorial is for educational purposes only. Don't use this info to do harm – use it for good so you can make your projects more secure.
Table of Contents
- Virtual Hosting Overview
– IP-based Hosting
– Name-based Hosting - Virtual Hosts Enumeration
– Ffuf
– Gobuster
– Curl - Post Enumeration
– hakcheckurl
– Eyewitness
Pre-requisites
Before we start enumerating virtual hosts, we need to install some tools to help us. Most of these tools run on Linux, such as Ubuntu and Kali Linux:
- Ffuf
- Gobuster
- Eyewitness
- hakcheckurl
If you don't have these installed, I'll cover the steps below.
Virtual Hosting Overview
Virtual hosting is a feature that allows a single web server to host multiple websites and have them appear as if they are hosted on separate, individual servers. This is usually done to reduce resource overhead and running costs.
There are two types of virtual hosting: IP-based and Name-based.
IP-based Hosting
This type of hosting involves configuring a web server to host multiple websites on a single server. Each hosted site is associated with a unique IP address, which can either be dedicated or shared based on the hosting configuration.
When a user tries to access a website, the server listens for the request, resolves the incoming hostname to its corresponding IP address, and then routes the request to the appropriate website based on that IP address.
Once the server identifies the intended website based on that IP address, it serves the content associated with that website to the user.
Name-based Hosting
This type of hosting involves configuring a web server to host multiple websites on a single IP address using different domain names. Each hosted website is typically associated with a unique hostname, but multiple hostnames can be related to a single website.
When a user requests to access a website, the server checks the “Host” header in the HTTP request to figure out which website the user is trying to reach. Based on the hostname provided in the Host header, the server identifies the specific website and serves the content associated with that website to the user.
Virtual Hosts Enumeration
Ffuf
Ffuf is a tool written in Go that can be installed on Kali Linux by running sudo apt-get install ffuf or downloaded from GitHub. This tool allows you to customize your fuzzing approaches.
To start searching for virtual hosts, we need to pass the IP address of the target using the -u flag and the associated domain name with the -H flag, which refers to the Host header.
Then, place the word FUZZ at the beginning of the domain to indicate the fuzzing position.
We can use different wordlists to identify virtual hosts with the -w flag. One popular wordlist is the namelist list in the Seclists wordlists, while another is the Kiterunner wordlist in Assetnotes.
ffuf -w namelist.txt -u http://10.129.184.109 -H "HOST: FUZZ.inlanefreight.htb".
Fuzzing can generate numerous results that sometimes are hard to identify as valid or invalid. Filtering down the results can save you time sifting through the output.
You can filter one response size or a list of sizes using commas to separate them with the -fs flag — like -fs 109, 208,, and so on.
fuf -w namelist.txt -u http://10.129.184.109 -H "HOST: FUZZ.inlanefreight.htb" -fs 10918
 Figure 01 — Shows Ffuf finding virtual hosts with the provided wordlists.
After the fuzzing is complete, we save the output to a file. Then, we can use the grep utility to search the result for lines that contain the word “FUZZ” in the text. Below is an example of using grep to find the lines with the identified subdomains.
cat vhosts | grep

FUZZFUZZ:ap
FUZZ:app
FUZZ:citrix
Then, we can pipe the grep output with the awk utility to extract only the identified subdomains using the print command, followed by a dollar sign and the column number. This entire command can be written in one line.
cat vhosts | grep FUZZ | awk '{print $3}'
Using a short bash script, we append our original domain name to the identified subdomains, as seen in Figure 02.
for i in $(cat vhost1); do echo $i.inlanefreight.htb ; done > vhost1
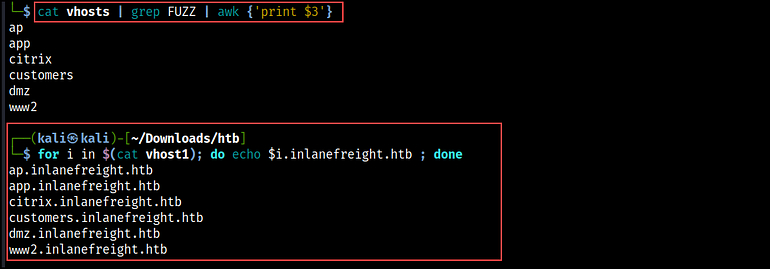 Figure 02 — Shows bash output used to append the domain name to subdomains.
Gobuster
Another way to enumerate virtual hosts is with the Gobuster tool using the vhost option. The tool can be installed in Kali by running sudo apt-get install gobuster or downloaded from GitHub.
To begin the enumeration process, we first need to provide the IP address using the -u flag and specify a wordlist with the -w flag. After that, we define the domain name and the position where the fuzzing starts.
In Gobuster, we define this information in a text file, called a pattern file, that gets passed with the -p flag. You can see an example of a pattern file in Figure 03 below.
{GOBUSTER}.inlanefreight.htb
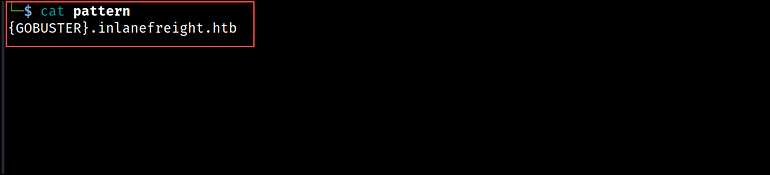 Figure 03 shows the pattern file that specifies where to start fuzzing with Gobuster.
For filtering the output, we use the --exclude-length flag to sift through the response sizes. Multiple response sizes can be separated by commas.
gobuster vhost -u http://10.129.118.153 -w namelist.txt -p pattern --exclude-length 301 -t 10
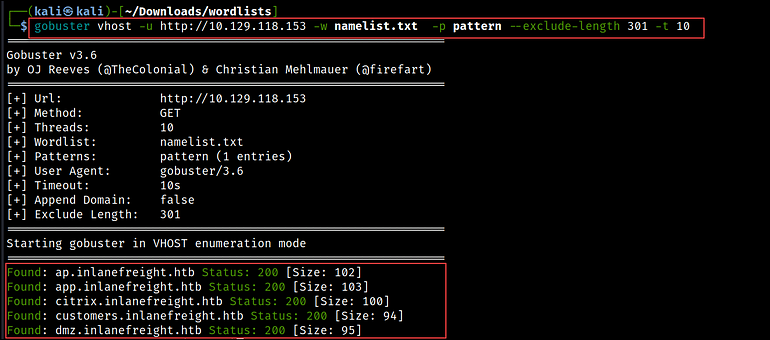 Figure 04 — Shows using Gobuster to enumerate virtual hosts.
Curl
We can achieve the same thing with Curl and some bash scripting. The script below reads the content of the namelist file, which serves as our wordlist, and prints the message “Found Subdomain” for each subdomain it reads from the file.
cat namelist.txt | while read vhost; do echo "\n========\nFound Subdomain: ${vhost}\n=========";
Then, the curl command makes HTTP HEAD requests to the specified IP address (http://10.129.141.252), passing the subdomains from the wordlist in the Host header.
The output is piped to grep to extract the Content-length of the responses and save it in a file.
curl -s -I http://10.129.141.252 -H "HOST: ${vhost}.inlanefreight.htb" | grep "Content-Length: "; done > output
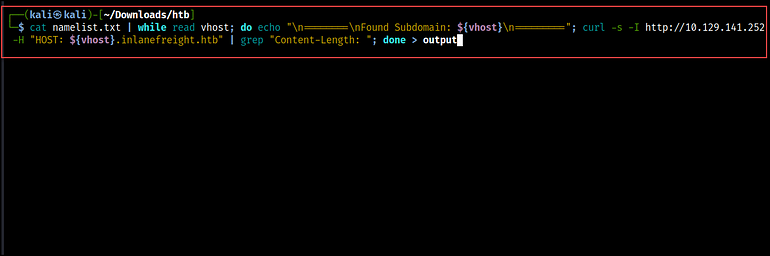 Figure 05 — shows identifying subdomains with Curl.
To search the output, we utilize the grep command again and filter for the lines that contain the text “Content-Length:”. Then, we use the uniq command to remove any duplicate lines in a text file, and the -c flag to count the number of times each unique line occurs.
cat output | grep "Content-Length:" | uniq -c
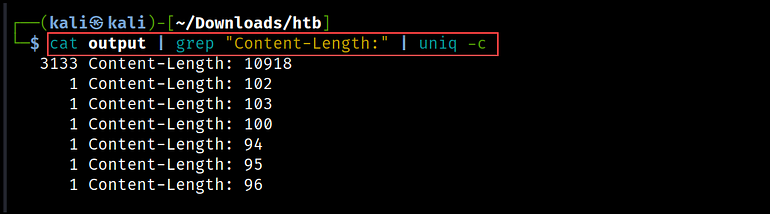 Figure 06 — shows how to use the grep and uniq commands to clean up the Curl output.
If we want to extract subdomains from the content, we can use the -B flag to display a few lines before the match. In this command, we used 4 lines to retrieve the subdomain names.
cat output | grep -B 4 "Content-Length: 103"
 Figure 07 — shows the extracted subdomains with the grep command and the -B flag.
Post Enumeration
After identifying the virtual hosts, we append HTTP or HTTPS to generate a list of URLs. We can use a one-liner bash script to do that.
for i in $(cat vhost2); do echo "https://"$i; done > vhosts3
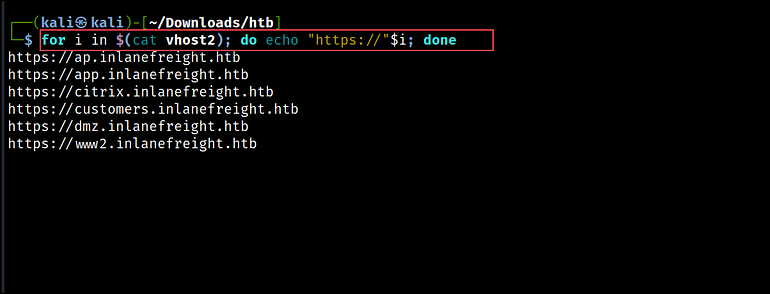 Figure 08—shows the use of a bash script to append HTTP/s to the list of identified subdomains.
This list can then be used with other tools like hakcheckurl or Eyewitness to retrieve the HTTP response codes to check for available web pages and capture screenshots.
hakcheckurl
hakcheckurl is a tool written in Go by hakluke and is available on GitHub here. The tool takes a list of URLs and returns their corresponding HTTP response codes.
To run the tool, you'll need to have Go installed. Follow the steps on Go's official site for installing it on a Linux environment.
After installation, clone the hakcheckurl repository, build the tool with go build, and rename it to hakcheckurl.
git clone https://github.com/hakluke/hakcheckurl.git

go build ./main.go

# rename the tool to hakcheckurl instead of main
mv main hakcheckurl
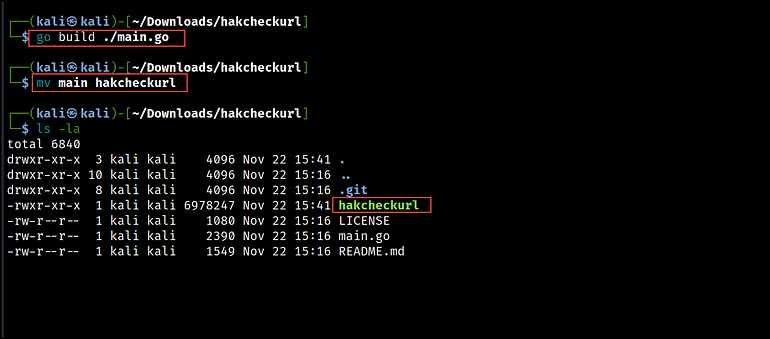 Figure 09 — shows the hakcheckurl tool after running the build command.
Next, we use the hakcheckurl tool to determine the HTTP response codes for each URL. In the below results, you can see that the URLs that used the HTTPS protocol were unreachable, while those that used the HTTP protocol returned 200 response codes. This indicates that the web pages using HTTP are up and running.
cat vhosts | ./hakcheckurl
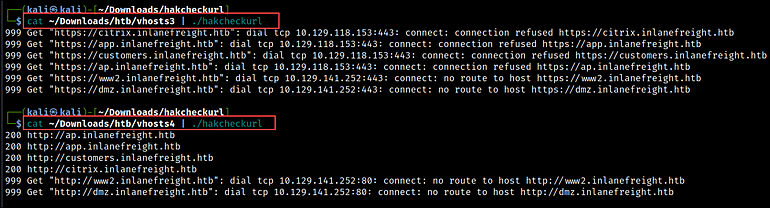 Figure 10 — shows the output of the hakcheckurl tool.
Eyewitness
Once we have identified the web pages that we want to inspect, we can use Eyewitness to gather more information about the underlying infrastructure and the technologies associated with the targeted websites.
Eyewitness is a tool created by RedSiege that can capture screenshots, retrieve header information, and identify default credentials, if any are known. We can install it on Kali with sudo apt-get install eyewitness or download it from GitHub.
To run Eyewitness, we need to pass the list of URLs using the -f flag. Then, we can set a custom User-Agent string for the HTTP requests with the --user-agent flag. This can be useful for simulating requests from different browsers or client applications.
We can also, specify additional ports to check with the http and https protocol using the --add-http-ports and --add-https-ports flag. This instructs Eyewitness to connect to these ports and capture screenshots, if applicable.
eyewitness -f vhost2 --user-agent "Mozilla/5.0 (Windows NT 6.1; WOW64) AppleWebKit/537.36 (KHTML, like Gecko) Chrome/47.0.2526.111 Safari/537.36" --add-http-ports 8080,8000,8088 --add-https-ports 8443,4433,4343
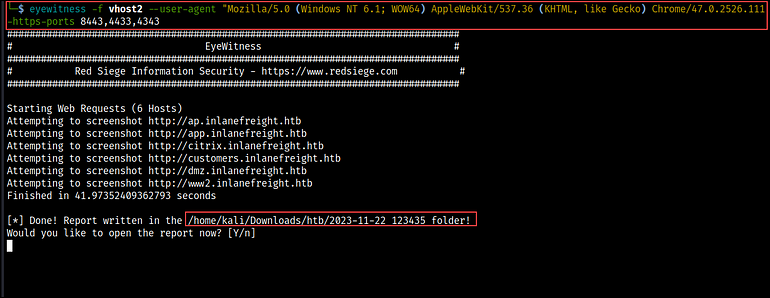 Figure 11 —shows Eyewitness running against a list of provided URLs.
After it runs, we get prompted to choose whether or not to open the report that has been created. If you select ‘Y’, the default web browser will open the report. If you choose ‘N’, the report will be saved to your local device.
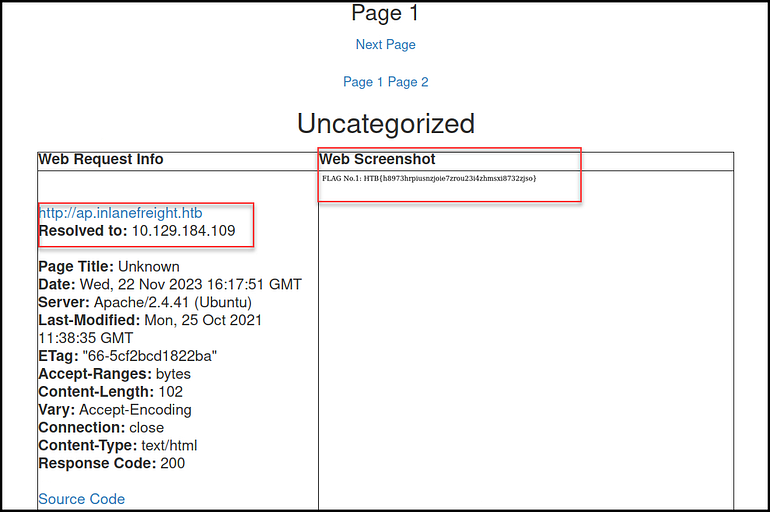 Figure 12 — shows the Eyewitness generated HTML report.
Wrapping Up
With that we have reached the end of today’s tutorial. Throughout the article, you have discovered and explored various tools to enumerate virtual hosts. We also discussed how to use the results from these tools to expand the attack surface and gain valuable insights into the target’s infrastructure.
Thank you for taking the time to read this post. I also created a cheatsheet for you on Notion that lists all the commands we used in this post.