

When starting to integrate 3rd party services into your application or website, you'll start to find it useful to have different environments, such as a development and production environment.
How can we configure this so we don't have to directly edit our code to change our environment?
- What are environment variables?
- How can environment variables be useful?
- How can I keep these files secure?
- Gatsby and environment variables
- Netlify and environment variables
- Step 1: Creating a "Hello, world" website
- Step 2: Creating a local environment variable with Gatsby
- Step 3: Deploying the website to Netlify
- Where can you add or update more variables in Netlify?
What are environment variables?
Environment variables are predetermined values that are typically used to provide the ability to configure a value in your code from outside of your application.
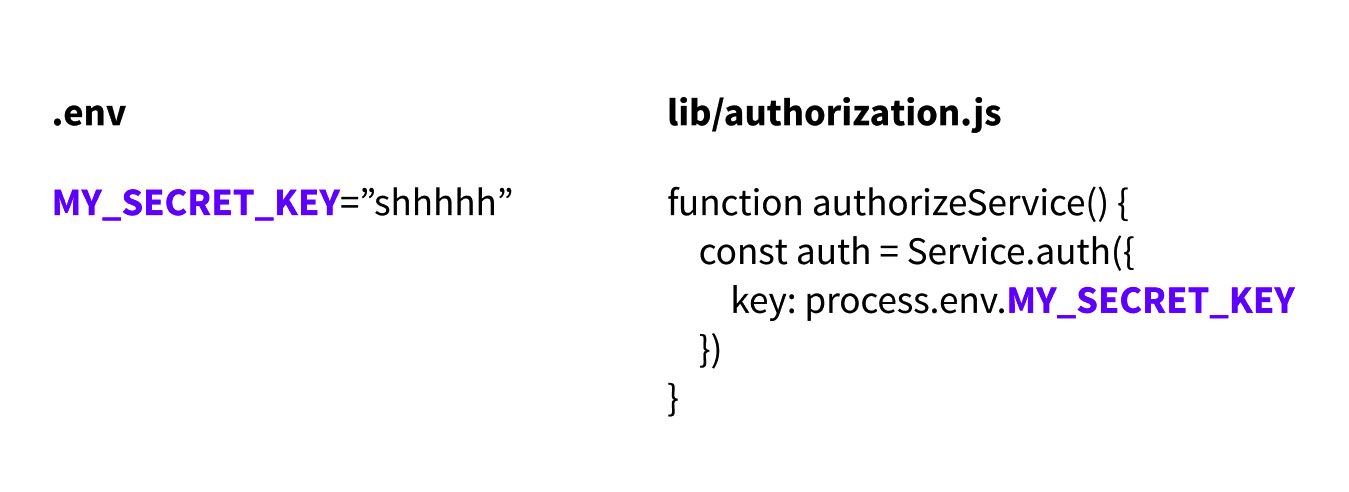
When developing locally, or sometimes even in a deployment pipeline, you'll oftentimes find these variables stored in a file named with some kind of variation of .env.
How can environment variables be useful?
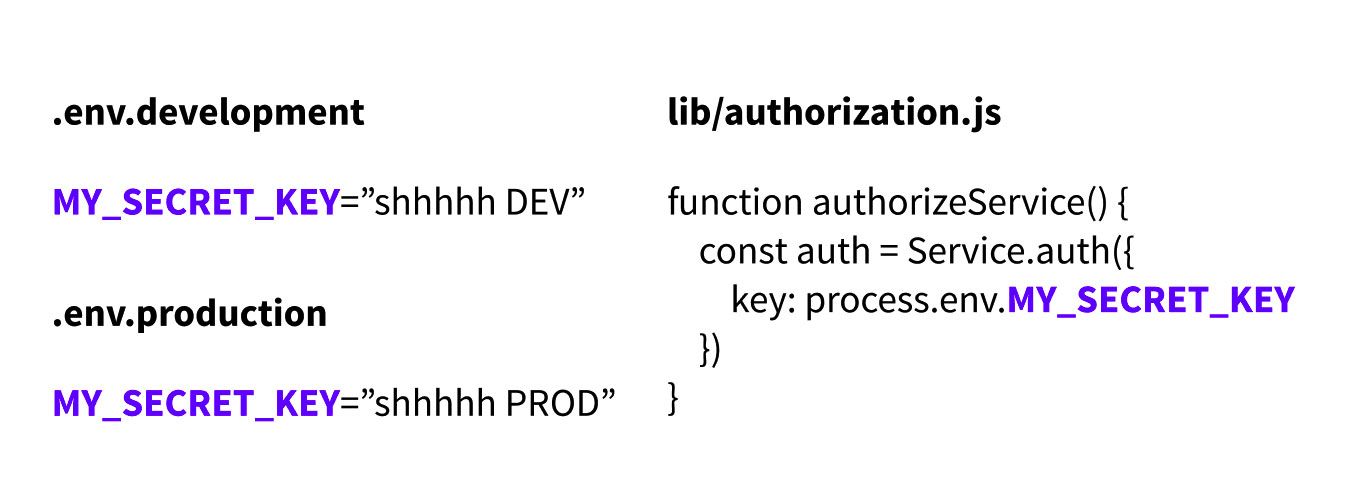
Probably the most common use case for environment variables is being able to set up different configuration options for different environments. Often when developing against third party services, you want to have a development version or sandbox available to make test requests against, that way it doesn't impact real production data.
Environment variables are helpful because they allow you to change which of your environments use which third party service environment by changing an API key, endpoint, or whatever the service uses to distinguish between environments.
The code you deploy should be predictable, so by not having to change any code, just the configuration outside of the code, you can maintain that predictability.
How can I keep these files secure?
This is probably one of the more important points here – you need to ensure you're handling these files with care and not checking them into a git repository. By exposing these keys by inadvertently uploading them to a public location, the internet could easily find these keys and abuse them for their own gains.
For instance, AWS keys are a valuable source. People run bots with the sole purpose of trying to scan Github for keys. If someone finds an AWS key, they could use this key to access resources such as running a bitcoin operation at your expense. This isn't to scare you, its to make you aware so you avoid your keys getting compromised.
So how can we keep these secure? The easiest way is to add the environment file where you keep these keys to your .gitignore file.
To do this, simply open your existing .gitignore file or create a new one at the root of your repository and add the filename as a new line:
# Inside .gitignore
.env
If you want to get more advanced and make sure this never happens to a repository, you can check out some tools like git-secrets from AWS Labs or GitLeaks that even has a Github Action to make it easy to integrate with Github.
Gatsby and environment variables
Gatsby by default makes two files available as part of its environment variable workflow that makes these values available in the client: .env.development and .env.production. These correlate to the gatsby develop and gatsby build scripts to either develop or build your site.
To make use of these files within the Gatsby development and build process, Gatsby requires you to prefix these variables with GATSBY_. This also works if you'd like to have them available from an OS process level.
Though you could integrate dotenv if you have more advanced needs or don't want to use the GATSBY_ prefix, your path of least resistance is probably to just follow the Gatsby way when working in Gatsby.
Netlify and environment variables
Netlify provides the ability to add environment variables as part of its Build & deploy settings which gets picked up as part of the build processes.
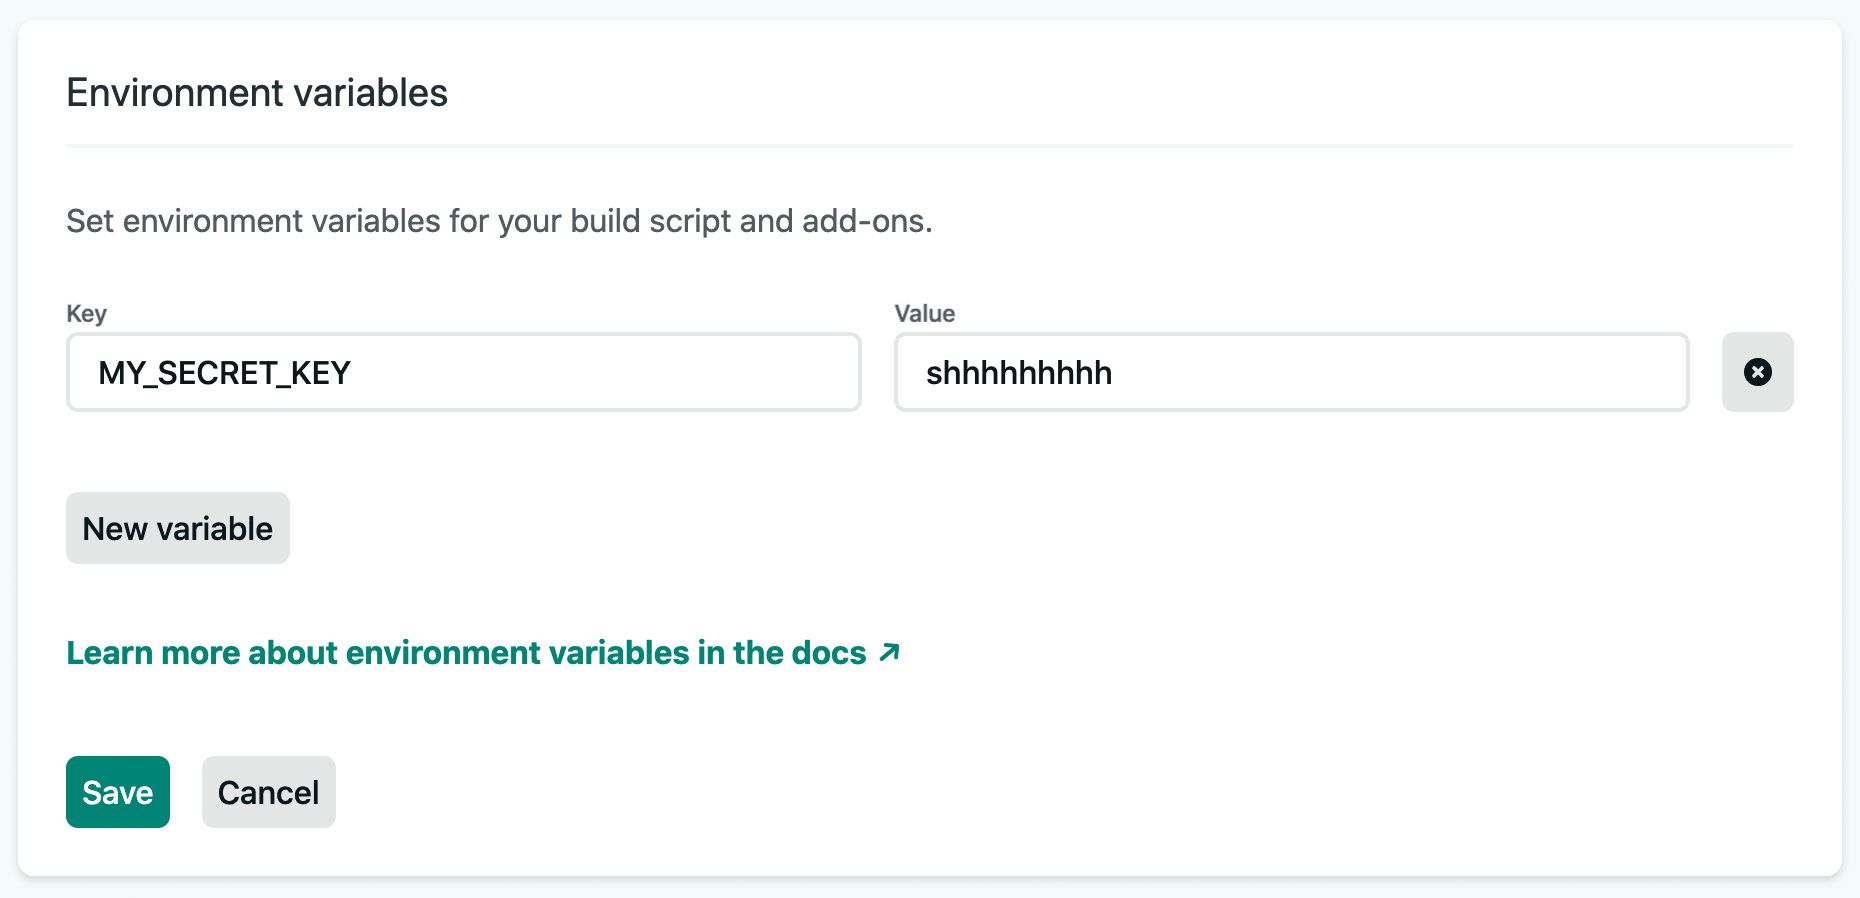
Luckily, Netlify makes it easy to add whatever environment variable you'd like to the build process! To add one, you can simply navigate to the Environment section of your project's Build & deploy settings page and add a variable under Environment variables.
We'll walk you through this process a little later.
Step 1: Creating a "Hello, world" website
For our walkthrough, we're going to set up a really basic example of a Gatsby website just for the purposes of testing this out.
Though this isn't really a common use case of environment variables, where normally you would use them for things like API keys and service configurations, this will give you a great idea of how it fundamentally works.
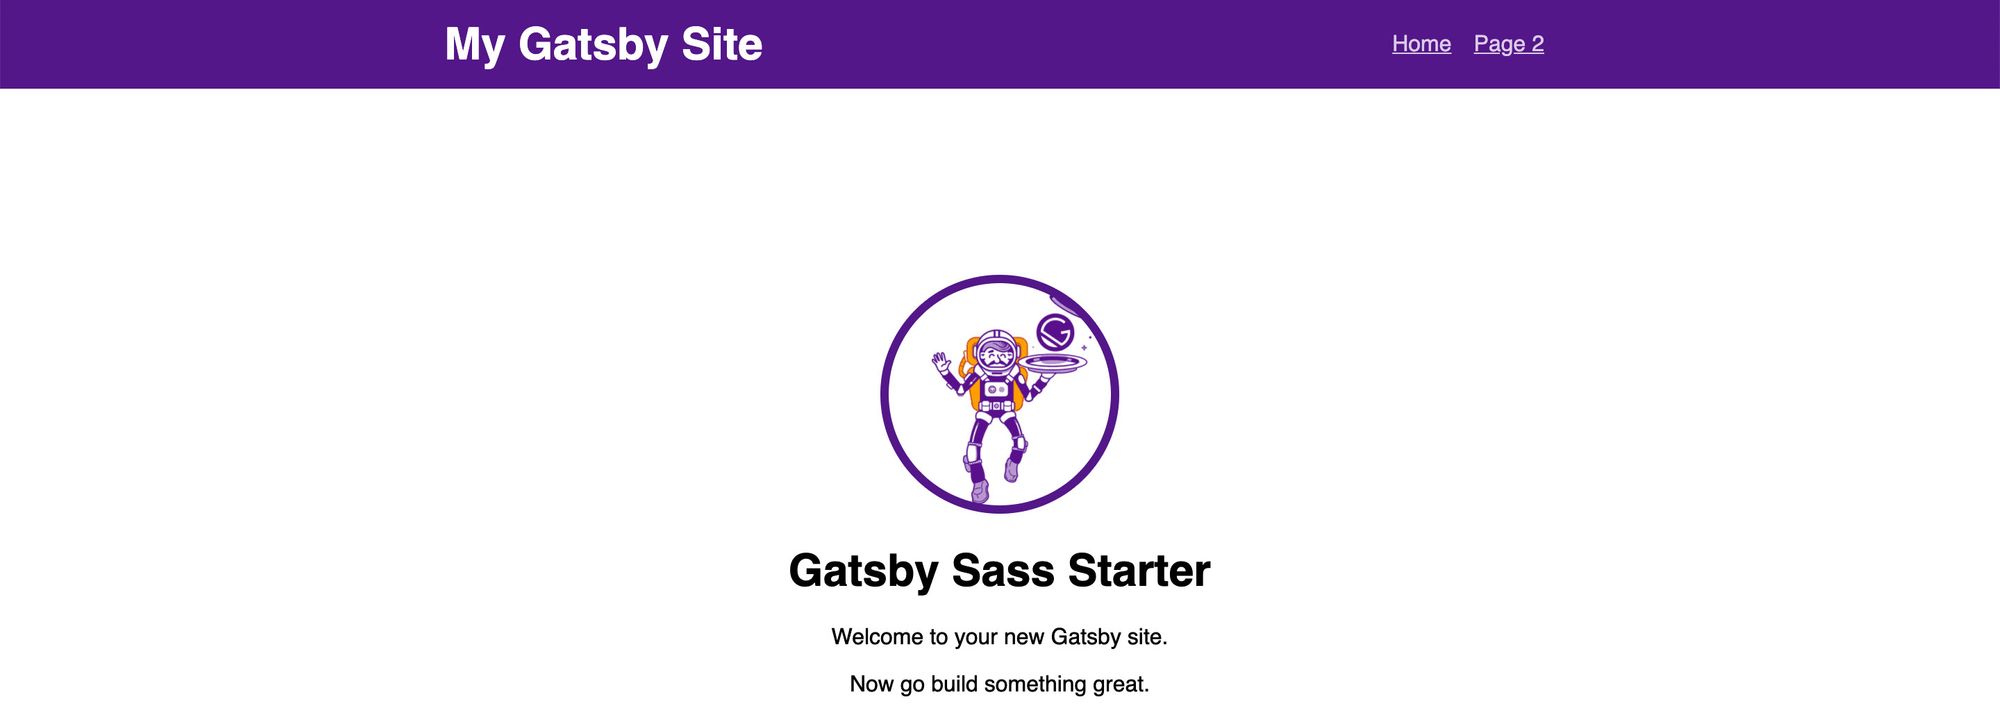
We're going to use this Gatsby Sass Starter I created which will give us a starting point and add "Hello, [Environment]" depending on where it's running.
To get started, let's create our local project by using the Gatsby CLI. Navigate to where you'd like to store this project and run:
gatsby new my-env-project https://github.com/colbyfayock/gatsby-starter-sass
You can change my-env-project to whatever directory you'd like this project created in, but once you run this command, you'll now have a project in that new directory.

To get started, once inside that directory, run yarn develop to make changes locally or yarn build to compile your new site.
Once you're ready to go, you'll want to add this project to Github. If you're not familiar with how to do this, you can learn how to add an existing project to Github here.
Step 2: Creating a local environment variable with Gatsby
Our next step is to create a local environment and add a change that will let us see that it works.
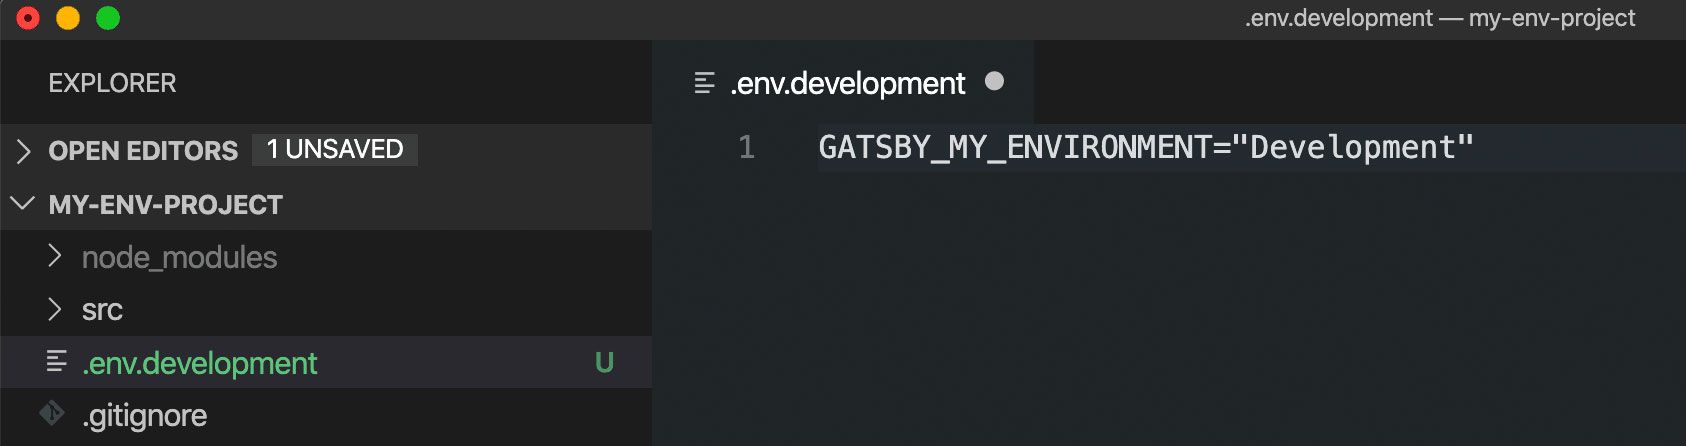
To get started, let's first create a new file at the root of our project called .env.development. It might ask you if you really want to use the . prefix, make sure you say yes!
Inside that file, let's add:
# Inside .env.development
GATSBY_MY_ENVIRONMENT="Development"
Next, to make sure we don't forget to do this, let's also add this .env.development file to our .gitignore so we don't accidentally commit this to our git history. If you don't already have a .gitignore file, make sure you create it at the root of your project.

Finally, to check that this works, let's open pages/index.js and let's replace our <h1> tag's content with a "Hello, world!" variation:
<h1>Hello, {process.env.GATSBY_MY_ENVIRONMENT}</h1>
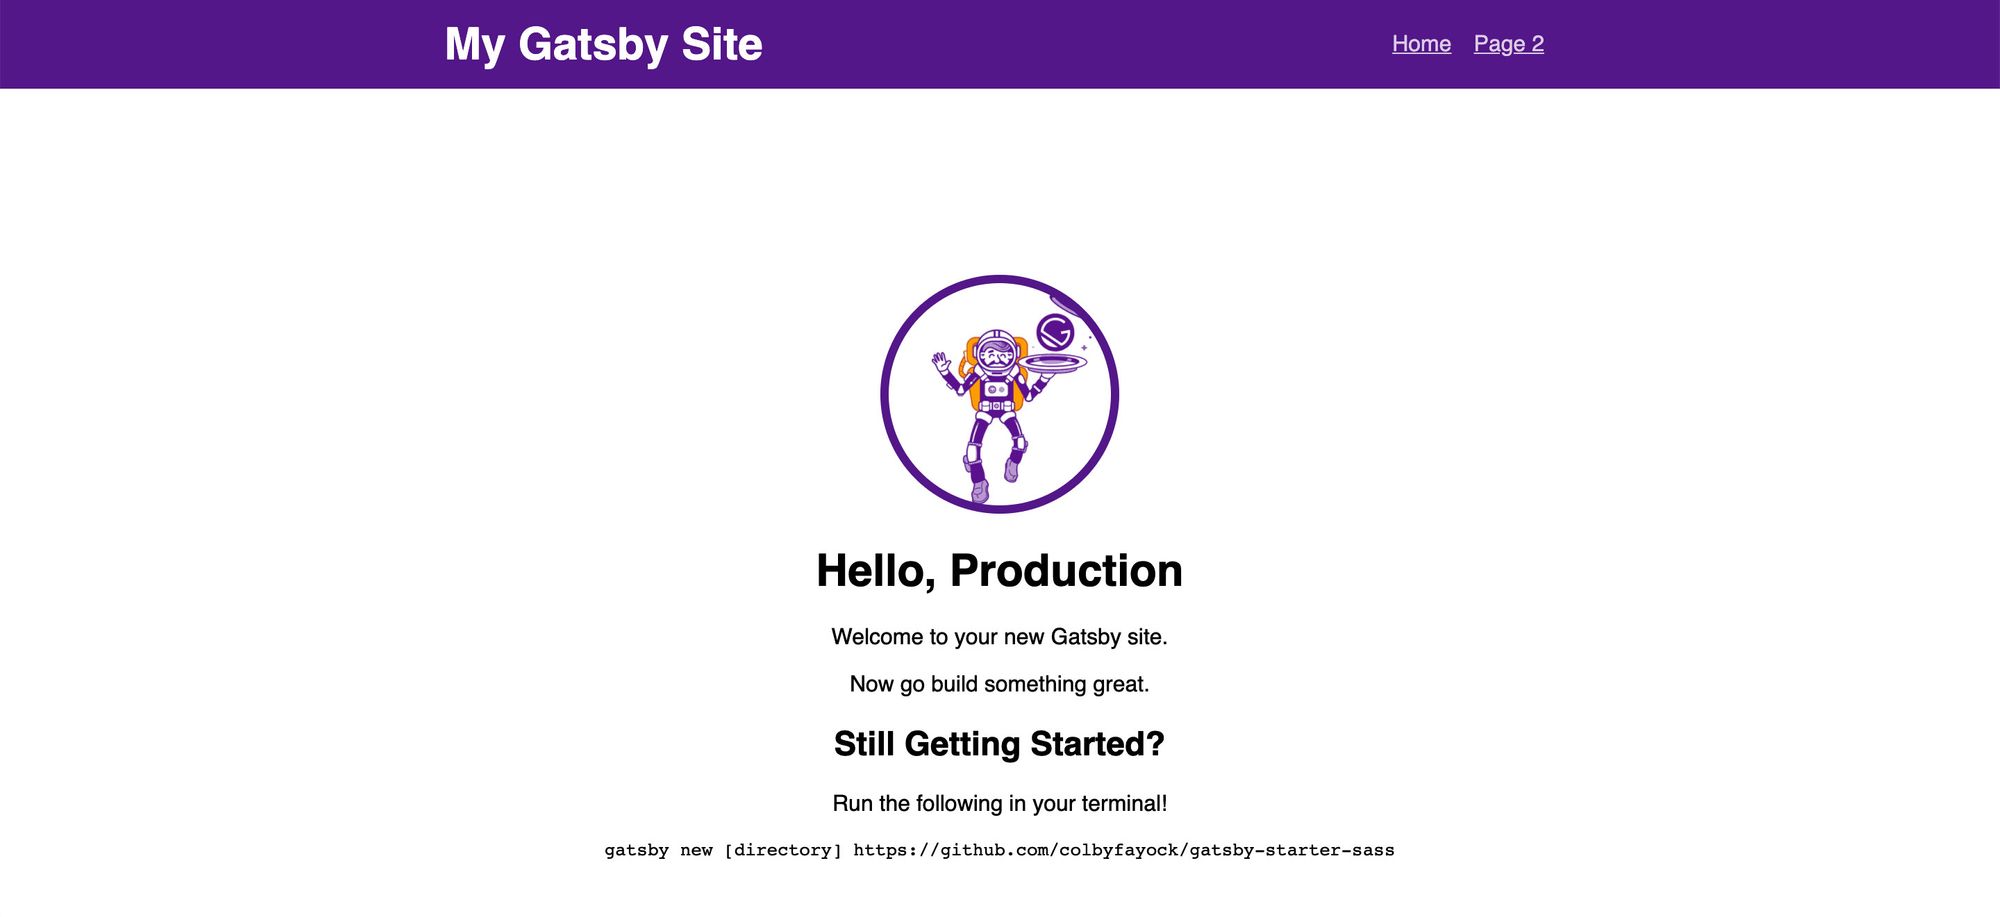
And if we save that change and open it in our browser, we should see "Hello, Development"!

Step 3: Deploying the website to Netlify
So we have our website created using a simple environment variable. Next we'll want to actually deploy that site to Netlify. If you haven't already, we'll need to add our website to Github or another Git provider. Make sure to have that set up before continuing on.
After creating an account and logging in to Netlify, let's click the New site from Git button the main dashboard, follow the instructions for connecting your Github or other Git provider to Netlify, and then find your new repository.
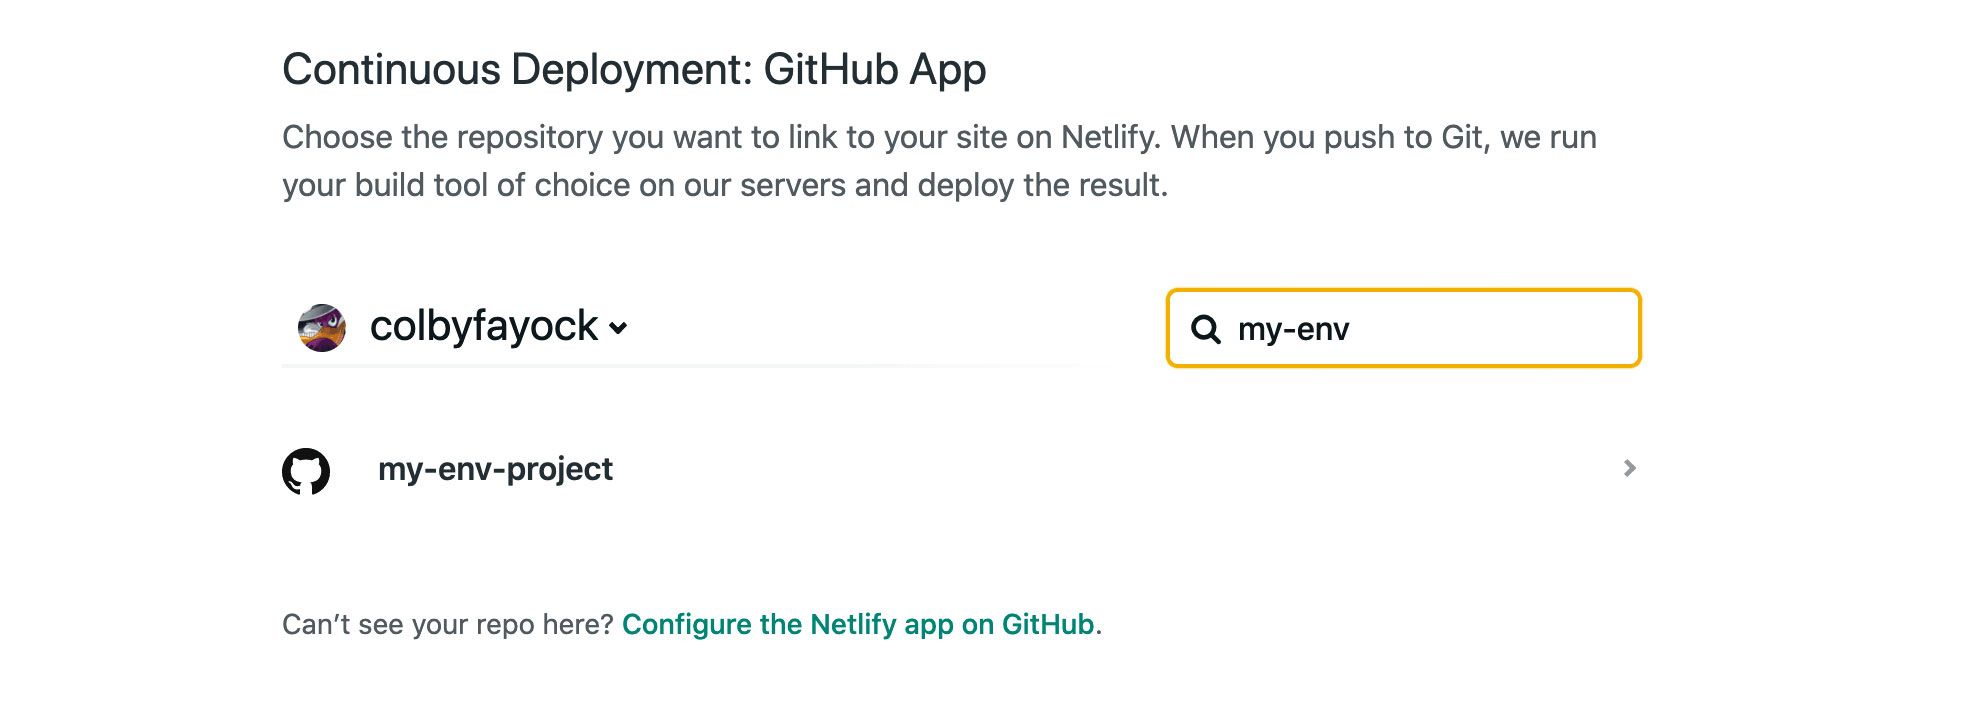
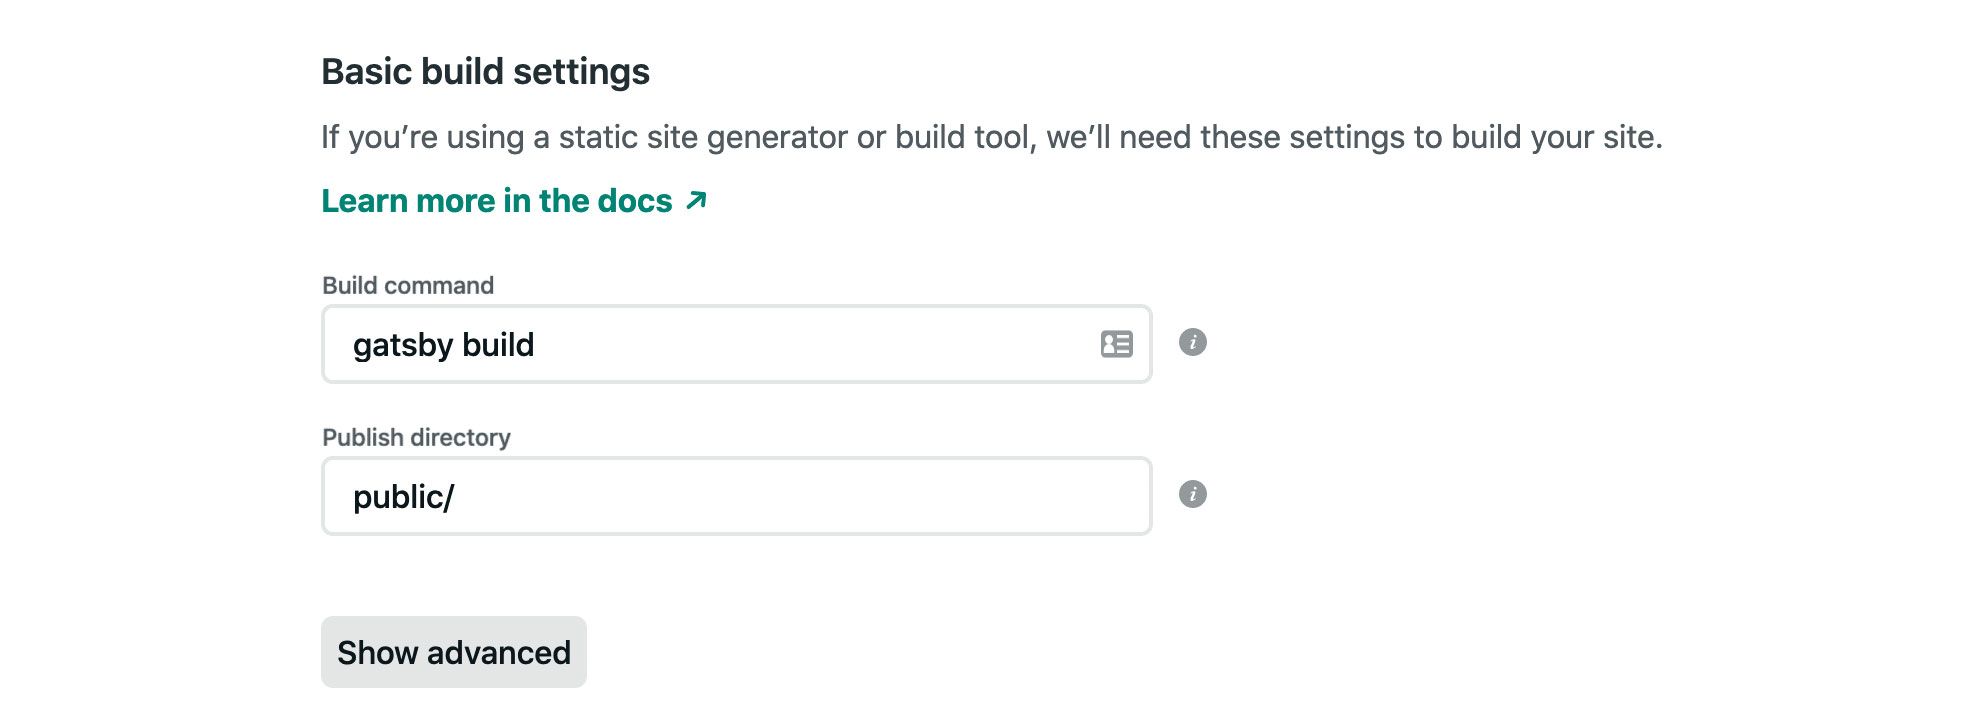
Once you select your repository, you'll be asked to configure your build process. Luckily, Netlify can detect that we're using a Gatsby site and has it pre-filled for us. Unless you've added something special, keep the basic configuration to use gatsby build to build your project and public/ for the output.
Now before we hit Deploy, there's one thing we want to add, and that's our environment variable!
Right above the Deploy site button there's an Advanced button. Click that and you'll see a new dropdown with an additional New variable button.
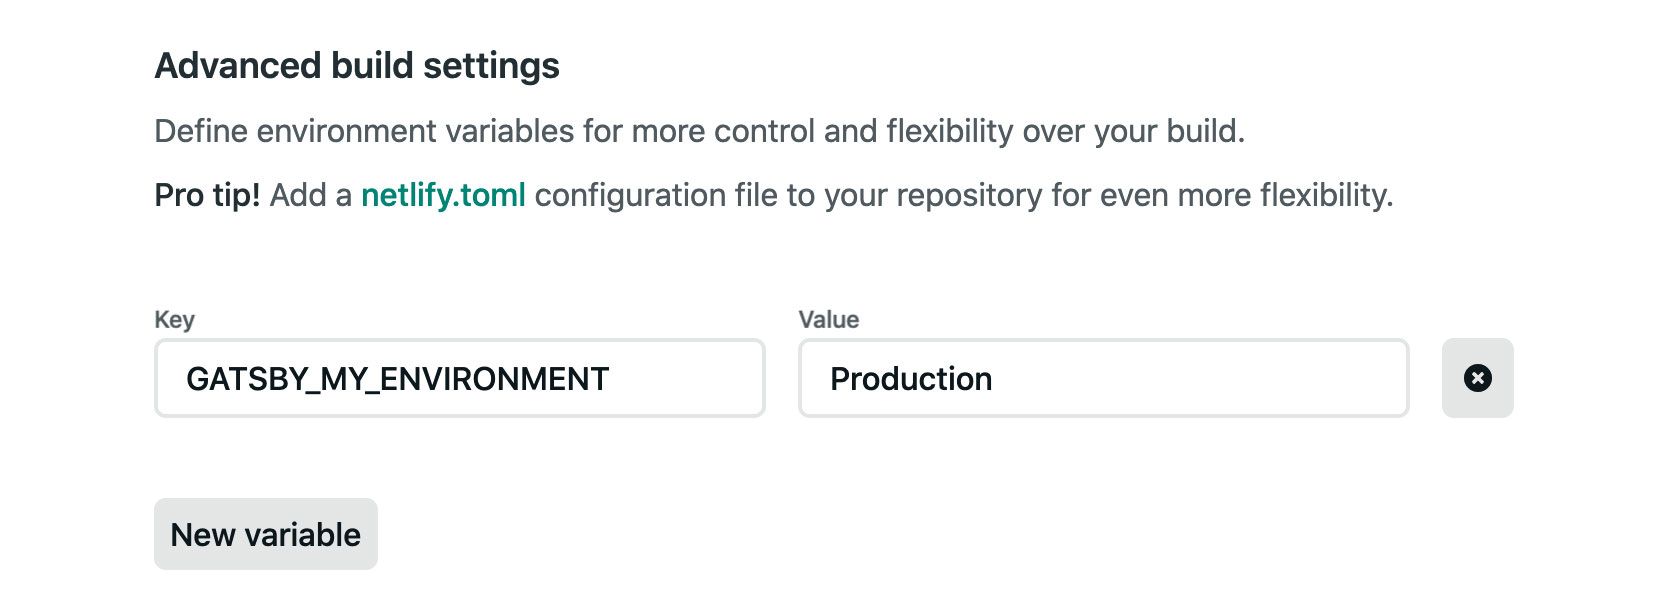
Click that New variable button, add our GATSBY_MY_ENVIRONMENT as a new variable and add Production as the value. And finally, hit Deploy site!
From here, you should be able to watch your website deploy and once finished, you'll see your new site with "Hello, Production"!
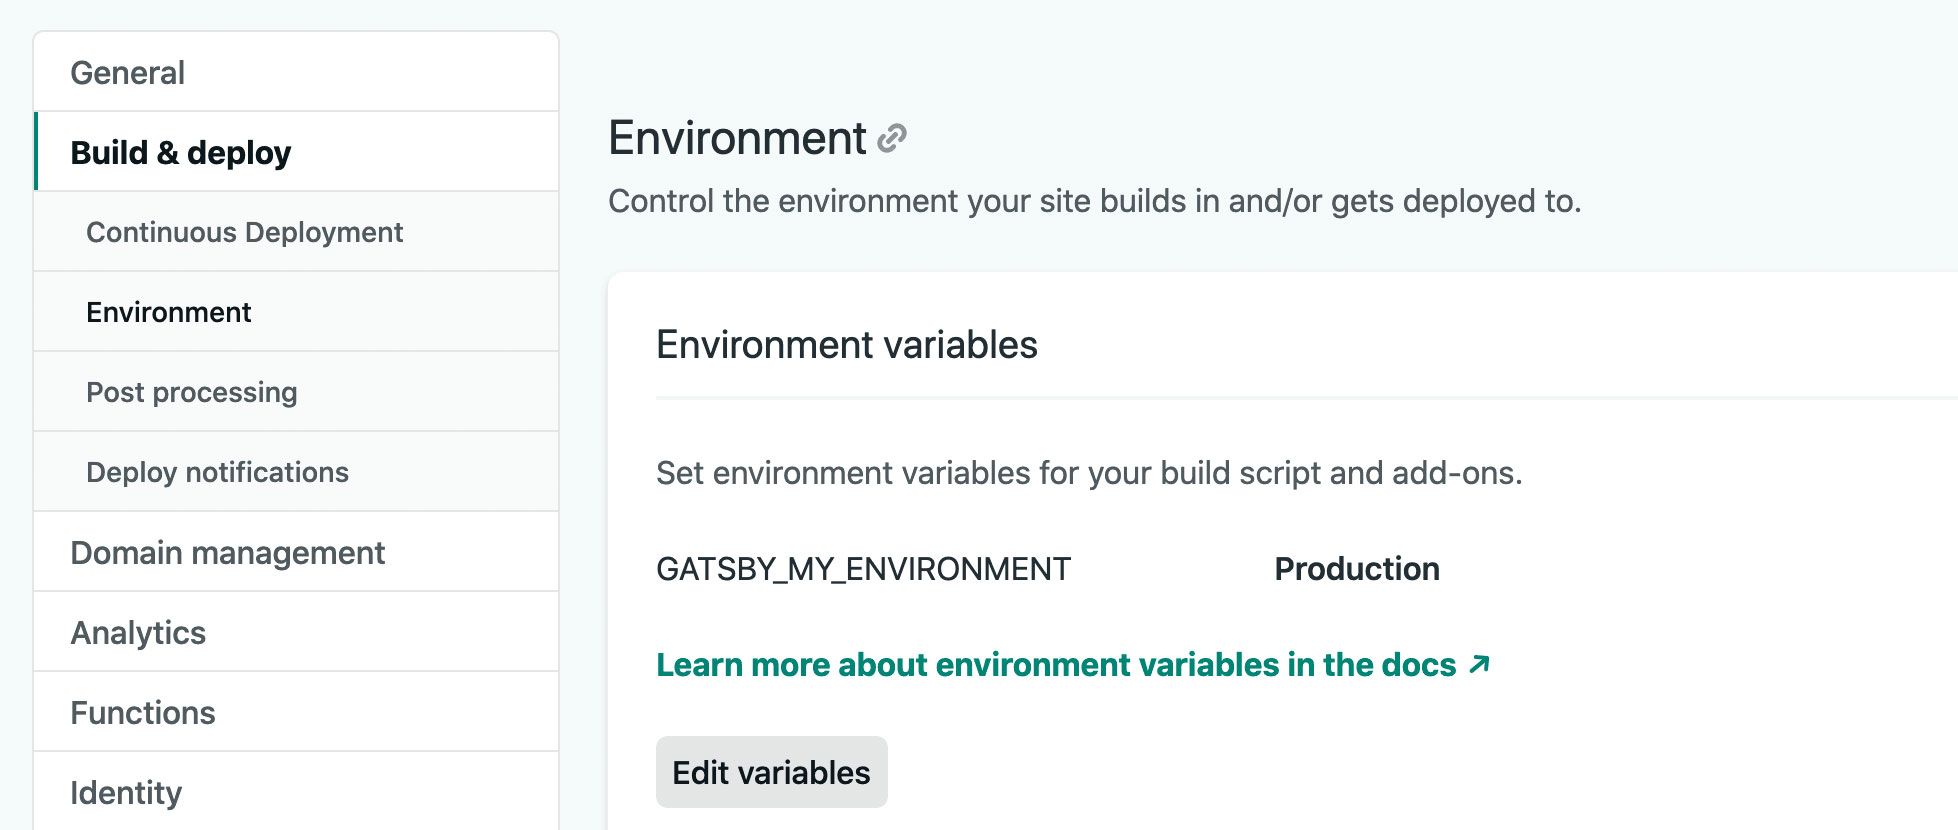
Where can you add or update more variables in Netlify?
With our example, we only added one variable during the setup. But Netlify lets you add or update any other variables you'd like.
If you'd ever like to change that variable or add more, you can navigate to the Environment section of the Build & deploy settings, where you can edit and add any other variables in the Environment variables section.
Looking to learn more?
Here are a few other things to help you get started with development fundamentals!
