
Understanding how the DOM and events work in JavaScript is key if you want to be an effective front end developer.
In this article, you'll learn what the DOM is and how it works.
What is the DOM?
DOM stands for Document Object Model. It's the interface between JavaScript and the web browser.
With the help of the DOM, you can write JavaScript to create, modify, and delete HTML elements, set styles, classes and attributes, and listen and respond to events.
The DOM tree is generated from an HTML document, which you can then interact with. The DOM is a very complex API which has methods and properties to interact with the DOM tree.
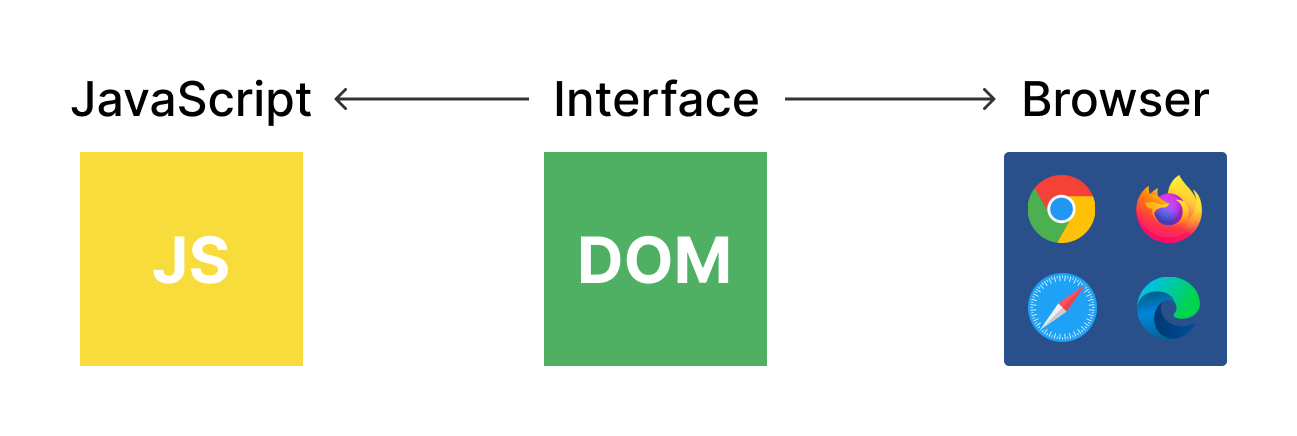
Illustration of the DOM
You can visualize the DOM tree here.
How the DOM Works – Behind the Scenes
The DOM is organized in a really clever manner. The parent element is called the EventTarget. You can understand better how it works with the help of the below diagram:
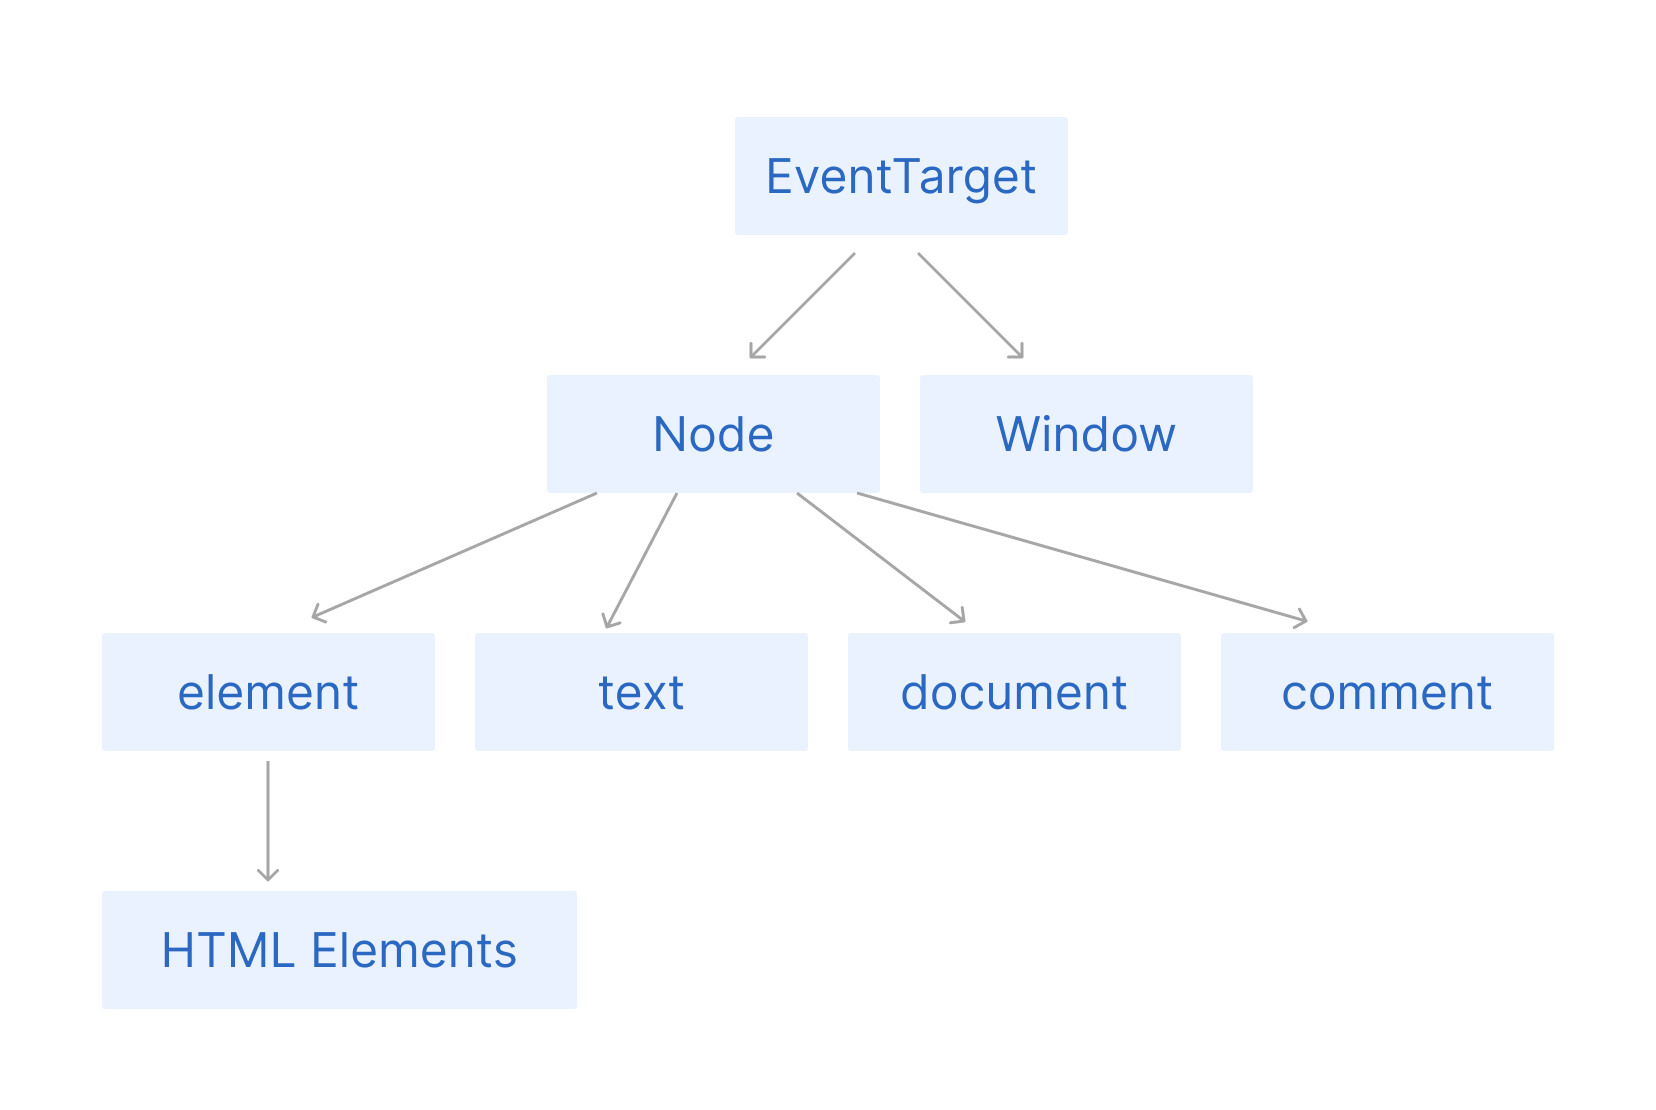
The EventTarget interface is implemented by objects which can receive events and may have listeners for them. In other words, any target of events implements the three methods associated with this interface. Element, and its children, as well as Document and Window are the most common event targets, but other objects can be event targets, too.
Window represents the browser's window. All global JavaScript objects, functions, and variables automatically become members of the window object. Global variables are properties of the window object. Global functions are methods of the window object. Even the document object (of the HTML DOM) is a property of the window object.
window.document.getElementById("header");

// Both are same

document.getElementById("header");
Nodes are in the DOM aka Document Object model. In the DOM, all parts of the document, such as elements, attributes, text, and so on are organized in a hierarchical tree-like structure that consists of parents and children. These individual parts of the document are known as nodes.
The Node in the above diagram is represented by a JavaScript object. We mostly work with the document which has most commonly used methods like document.queryselector(), document.getElementBy Id(), and so on.
Now we will take a look at the document.
How to Select, Create, and Delete Elements Using the DOM
With the help of the DOM, we can select, delete, and create element in JavaScript.
How to Select Elements
There are multiple ways we can select HTML elements in JavaScript. These are the methods we'll look at here:
document.getElementById();
document.getElementByClassName();
document.getElementByTagName();
document.querySelector();
document.querySelectorAll();
How to use the document.getElementById() method
The getElementById() method returns an element whose id matches a passed string. Since the ids of HTML elements are supposed to be unique, this is a faster way to select an element with ids.
Example:
const ele = document.getElementById("IDName");
console.log(ele); // This will log the whole HTML element
How to use the document.getElementByClassName() method
The document.getElementByClassName() method returns an HTMLCollection of elements that match the passed class's name. We can search for multiple class names by passing the class names separated by whitespaces. It will return a live HTMLCollection.
So what does it mean that the HTMLCollection is "live"? Well, it means that once we get the HTMLCollection for a class name, if we add an element with the same class name, then the HTMLCollection gets updated automatically.
Example:
const ele = document.getElementByClassName("ClassName");
console.log(ele); // Logs Live HTMLCollection
How to use the document.getElementByTagName(); method
The document.getElementByTagName() method returns the HTMLCollection of elements that match the passed tag name. It can be called on any HTML element. It returns an HTMLCollection which is a live collection.
Example:
const paragraph = document.getElementByTagName("p");
const heading = document.getElementByTagName("h1");

console.log(paragraph); // p element HTMLCollection
console.log(heading); // h1 element HTMLCollection
How to use the document.querySelector() method
The document.querySelector() method returns the first element that matches the passed selector. Now here, we can pass classname, id, and tagname. Take a look at the below example:
const id = document.querySelector("#idname"); // using id
const classname = document.querySelector(".classname"); // using class
const tag = document.querySelector("p"); // using tagname
Rules for selection:
When selecting using class, use (.) at the start. For example (".classname")
When selecting using id, use (#) at the start. For example ("#id")
When selecting using a tag, simply select directly. For example ("p")
How to use the document.querySelectorAll() method
The document.querySelectorAll() method is an extension of the querySelector method. This method returns all the elements that match the passed selector. It returns the Nodelist collection which is not live.
const ele = document.querySelectorAll("p");
console.log(ele); // return nodelist collection of p tag
NOTE: HTMLCollection is a live collection, while the Nodelist collection is a static collection.
How to Create Elements
You can create HTML elements in JavaScript and add them to HTML dynamically. You can create any HTML element with document.createElement() by passing the tag name in parenthesis.
After you create the element, you can add the classname, attributes and textcontent to that element.
Here's an example:
const ele = document.createElement("a");
ele.innerText = "Click Me";
ele.classList.add("text-left");
ele.setAttribute("href", "www.google.com");

// update to existing element in HTML
document.querySelector(".links").prepend(ele);
document.querySelector(".links").append(ele);
document.querySelector(".links").befor(ele);
document.querySelector(".links").after(ele);

// Simalar to below anchor tag
// <a href="www.google.com">Click Me</a>
In the above example, we created an anchor tag in JavaScript and added attributes and a classname to that anchor tag. We have four methods in the above example to update the created element in the HTML.
prepend(): inserts the data at the top of its first child element.
append(): inserts the data or content inside an element at the last index.
before(): inserts the data before the selected element.
after(): puts the element after the specified element. Or you can say that it inserts data outside an element (making the content its sibling) in the set of matched elements.
How to Delete Elements
We know how to create elements in JavaScript and push them to the HTML. But what if we want to delete existing elements in the HTML? It's easy – we just need to use the remove() method on that element.
Here's an example:
const ele = document.querySelector("p");

// This will remove ele when clicked on
ele.addEventListner('click', function(){
    ele.remove();
})
How to Manipulate CSS from JavaScript
We know how to manipulate HTML from JavaScript. Now we will learn how to manipulate CSS from JavaScript. This can help you change the styling of your web pages dynamically.
For example, if you click on an element, its background color should change. This is possible by manipulating CSS from JavaScript.
Here's some example syntax:
const ele = document.querySelector("desired element");

ele.style.propertyName = value;

// E.g -
ele.style.color = red;
When changing CSS properties using JavaScript, you need to make sure whenever there is a - in the CSS, you capitalize the next letter. For example, in CSS you would write background-color, but in JavaScript, backgroundColor (with a capital C).
Here's an example:
const ele = document.querySelector("div");
ele.style.backgroundColor = "red";
Now suppose you already wrote CSS for your project and you wanted to add classes using JavaScript. We can do that using classList in JavaScript.
Here's an example:
const ele = document.querySelector(".link");
ele.classList.add("bg-red"); // add class bg-red to existing class list
ele.classList.remove("pb-4");// remove class bg-red from existing class list
ele.classList.toggle("bg-green"); // toggle class bg-red to existing class list which means if it already exists then it will be removed, if it doesn't exist it will be added.
When we use classList it adds, removes, or toggles classes directly to the element. It's like updating with existing classes.
Unlike element.className it removes all existing classes and adds the given class.
Here's an example:
const ele = document.querySelector(".link");
ele.classList.add("bg-red"); // add class bg-red to existing class list
ele.classList.remove("pb-4");// remove class bg-red from existing class list

ele.className = "p-10"; // Now this will remove all existing classes and add only "p-10 class to element."
How to Use Event Handlers
The change in the state of an object is known as an Event. The process of reacting to the events is called Event Handling.
Events happen when a user does something like click, hover over an element, press a key, and so on. So when an event happens and you want to do a certain thing or manipulate anything, you use event handlers to trigger that event.
We use event handlers to execute certain code when that particular event happens. There are multiple event handlers in JavaScript (here's a quick list of them), but you use the same process to add event handlers to any element.
Here's the syntax:
const ele = document.querySelector("a");

ele.addEventListner("event", function(){
    // callback function
});
Some events you can use:
click
mouseover
mouseout
keypress
keydown
And here's an example of using the "click" event:
const ele = document.querySelector("a");

ele.addEventListner("click", function(){
    ele.style.backgroundColor = "pink";
});
Event Propagation: Bubbling and Capturing
Event Propagation determines in which order the elements receive the event(s). There are two ways to handle this event propagation order in the DOM: Event Bubbling and Event Capturing.
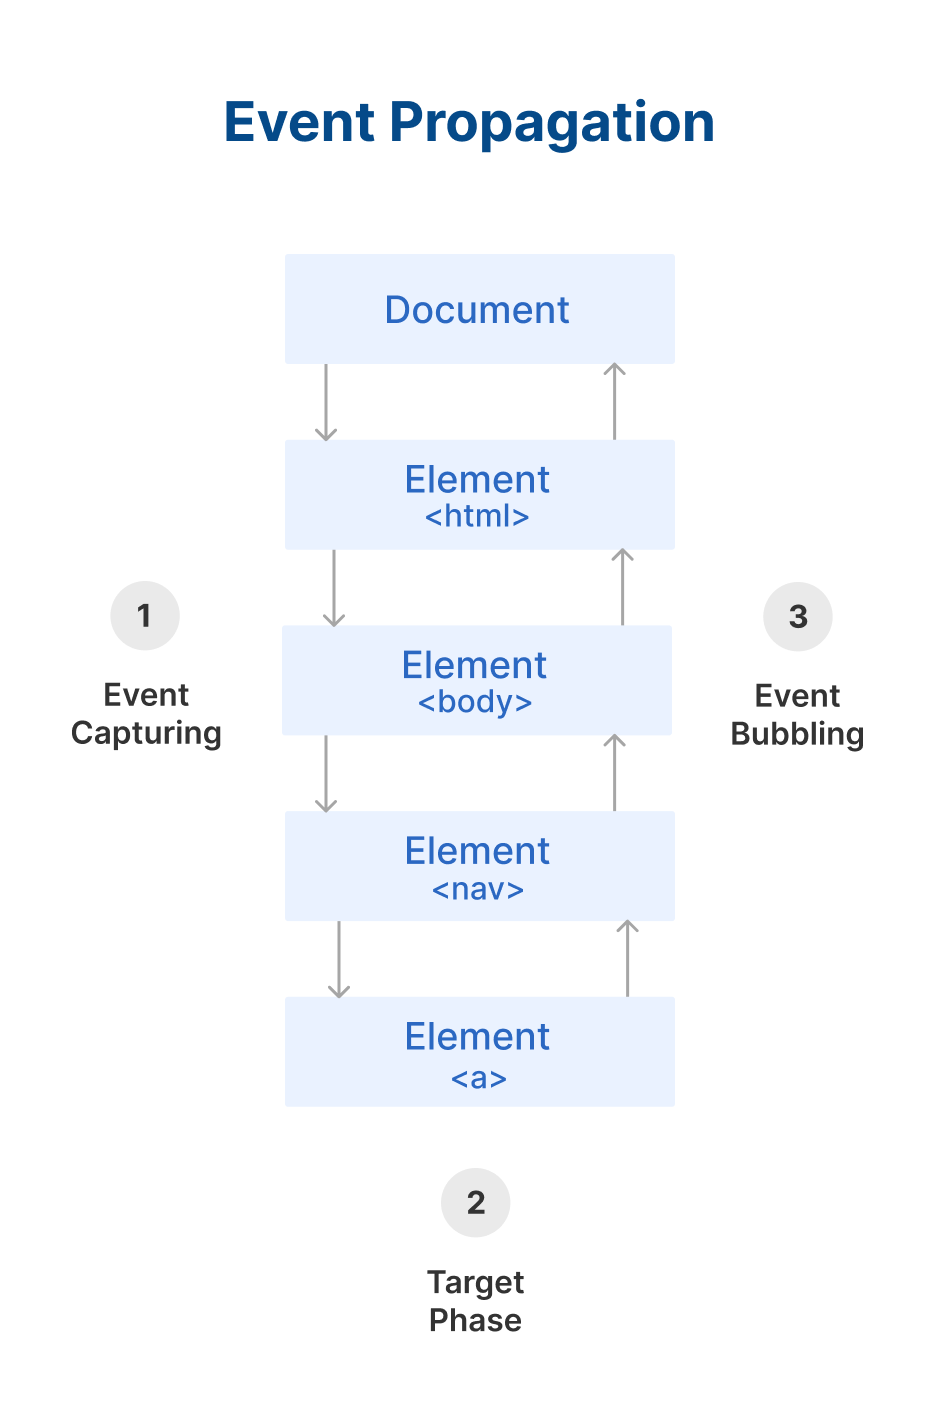
What is Event Bubbling?
When an event happens on a component, it first runs the event handler on it, then on its parent component, then all the way up on the other ancestors’ components.
By default, all event handlers move through this order from center component event to outermost component event.
What is Event Capturing?
This is the opposite of bubbling. The event handler acts first on its parent component and then on the component where it was actually meant to fire.
In short, this means that the event is first captured by the outermost element and propagated to the inner elements. It is also called trickle down.
Let's try the below example:
<!DOCTYPE html>
<html lang="en">
<head>
    <meta charset="UTF-8">
    <meta http-equiv="X-UA-Compatible" content="IE=edge">
    <meta name="viewport" content="width=device-width, initial-scale=1.0">
    <title>Example</title>
    <style>
        nav{
            display: flex;
            justify-content: center;
            padding: 30px;
        }

        nav li{
            list-style: none;
            padding: 5px;
        }

        nav li a{
            text-decoration: none;
            padding: 20px;
        }
    </style>
</head>
<body>

    <div>
        <nav>
            <li><a href="#">Home</a></li>
            <li><a href="#">About</a></li>
            <li><a href="#">Contact</a></li>
        </nav>
    </div>

    <script>
        const navbar = document.querySelector("nav");
        navbar.addEventListener('click', function(){
            navbar.style.backgroundColor="green"
        });

        const anchor = document.querySelector("a");
        anchor.addEventListener("click", function(){
            anchor.style.backgroundColor="pink";
        })
    </script>
</body>
</html>
This code gives us the following:

Now study above example carefully. I have added an event listener to the nav tag and to the anchor tag. When you click on nav, the background color changes to green. When you click on the anchor tag, the background color changes to pink.
But when you click on the anchor tag, the background color of anchor as well as nav changes. This is because of event bubbling.
This is what happens when you only click on the nav element:
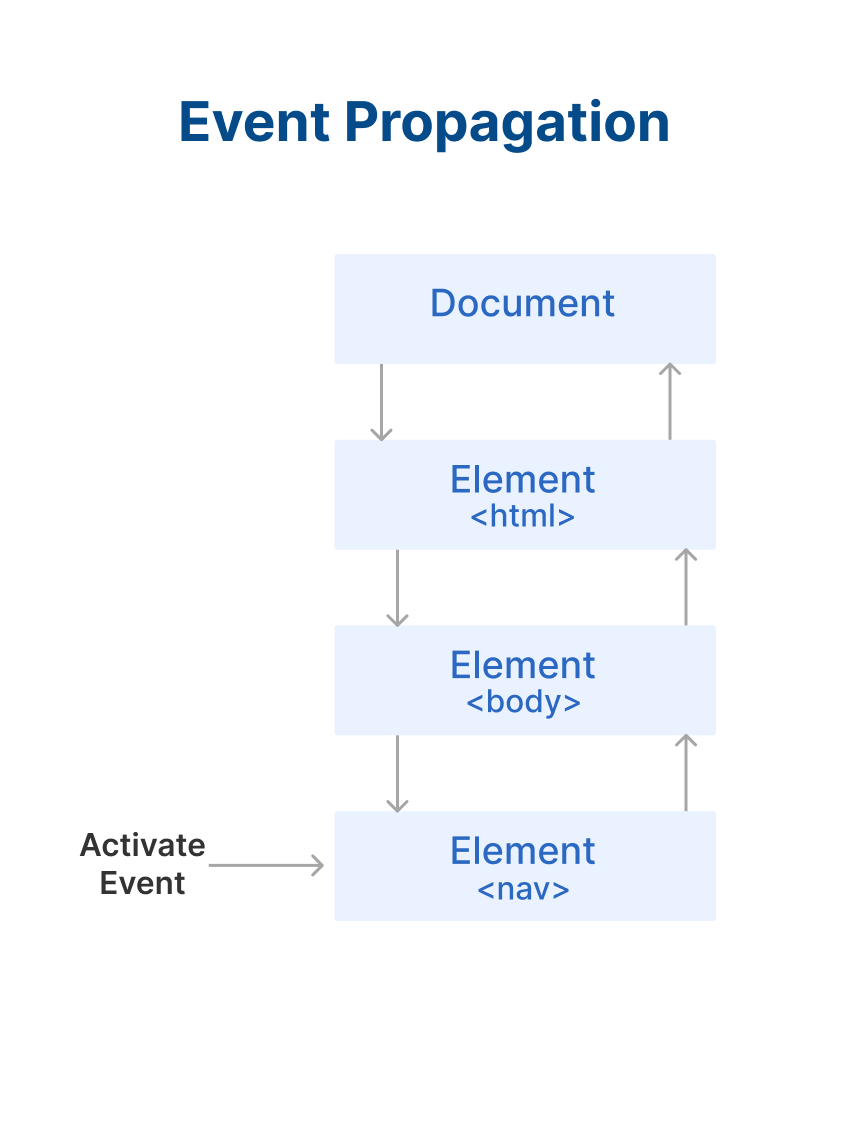
This is what happens when you only click on the nav element.
This is what happens when you only click on the anchor element:
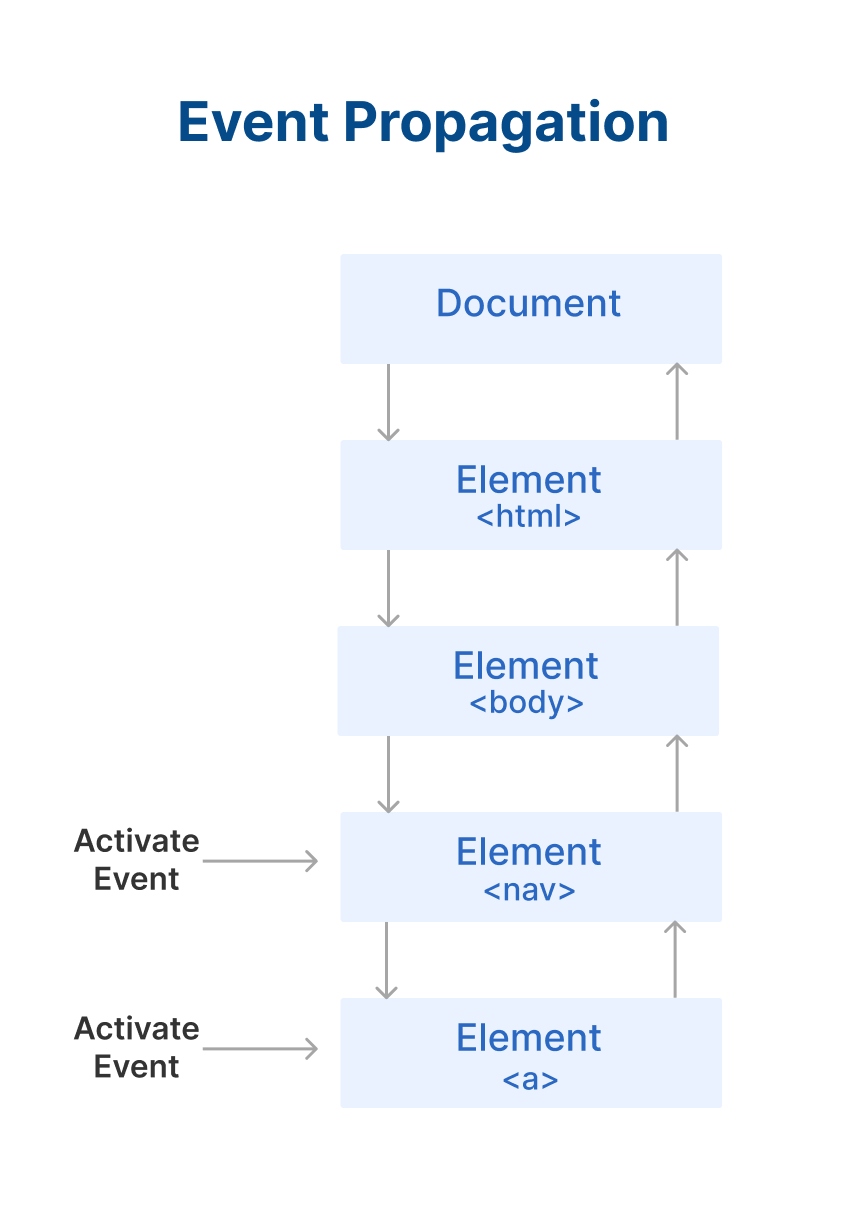
This is what happens when you only click on the anchor element
To stop event propagation, we can use stoppropagation() on the event listener because of which the event propagation is happing. It will prevent the nav element event listener from getting activated in the above example.
<!DOCTYPE html>
<html lang="en">
<head>
    <meta charset="UTF-8">
    <meta http-equiv="X-UA-Compatible" content="IE=edge">
    <meta name="viewport" content="width=device-width, initial-scale=1.0">
    <title>Example</title>
    <style>
        nav{
            display: flex;
            justify-content: center;
            padding: 30px;
        }

        nav li{
            list-style: none;
            padding: 5px;
        }

        nav li a{
            text-decoration: none;
            padding: 20px;
        }
    </style>
</head>
<body>

    <div>
        <nav>
            <li><a href="#">Home</a></li>
            <li><a href="#">About</a></li>
            <li><a href="#">Contact</a></li>
        </nav>
    </div>

    <script>
        const navbar = document.querySelector("nav");
        navbar.addEventListener('click', function(){
            navbar.style.backgroundColor="green"
        });

        const anchor = document.querySelector("a");
        anchor.addEventListener("click", function(e){
            e.stopPropagation();
            anchor.style.backgroundColor="pink";
        })
    </script>
</body>
</html>
How to Traverse the DOM
"A good JavaScript developer needs to know how to traverse the DOM— it’s the act of selecting an element from another element. " – Zell Liew
Now we are going to see why traversing the DOM is better than using the document.querySelector() method, and how to traverse like a pro.
There are 3 ways to traverse the DOM:
Upward
Downward
Sideways
How to traverse the DOM upward
There are two methods which help you traverse the DOM upward:
parentElement
closest
parentElement is a property that selects the parent element, like this:
const ele = document.querySelector("a");
console.log(ele.parentElement); // <div>
The parentElement is great for selecting one level upwards. But closest lets you find an element that can be multiple levels above the current element. closest lets you select the closest ancestor element that matches a selector.
Here's an example of using closest:
<article id="target">
    <h1 id="heading">This is the main heading</h1>
    <div id="outer-div">
        This is the outer div
        <div id="inner-div">This is the inner div</div>
    </div>
</article>
const innerDiv = document.querySelector("#inner-div");
console.log(innerDiv.closest("#target")); // article#target
In above code we are trying to get closest element to .heading which has a class of .demo.
How to traverse the DOM downward
We can traverse downward using the children method on a selector. With children you can select direct child of selected element.
Here's an example:
<div>
    <a href="#">Link-1</a>
    <a href="#">Link-2</a>
    <a href="#">Link-3</a>
    <a href="#">Link-4</a>
</div>
const ele = document.querySelector("div");
const child = ele.children;

console.log(child); // gives HTMLCollection
// 4 element inside div
How to traverse the DOM sideways
It's very interesting to traverse the DOM sideways. There are mainly two methods we can use:
previousElementSibling
nextElementSibling
With the help of the previousElementSibling method, we can select previous elements in the HTML like this:
<div>
    <a href="#">Link-1</a>
    <h1>Heading</h1>
</div>
const ele = document.querySelector("h1");
console.log(ele.previousElementSibling); // <a href="#">Link-1</a>
With the help of nextElementSibling, we can select the next element in the HTML like this:
<div>
    <a href="#">Link-1</a>
    <h1>Heading</h1>
</div>
const ele = document.querySelector("a");
console.log(ele.nextElementSibling); // <h1>Heading</h1>
Wrapping Up
I hope you now understand how the DOM works in JavaScript. Thank you for reading!
You can follow me on: