
![What is HTML? What Does HTML Stand For? [Solved]](https://www.freecodecamp.org/news/content/images/size/w2000/2022/04/pexels-pixabay-270404.jpg)
HTML is one of the fundamental technologies you can learn when starting out in web development. HTML code is present in every single webpage online.
Once you have a good grasp of the fundamental concepts of the language, you will be well equipped to move on to the two other technologies present in almost all websites - CSS and JavaScript.
In this article, you will learn the basics of HTML.
You will start by learning what the acronym stands for. Then, you will understand its purpose by going over a brief history of the evolution of the language over the years.
You will also learn some of the most commonly used tags and some of the best modern practices to follow.
Here is what we'll cover in this article:
- Introduction to HTML for beginners
- An overview of HTML syntax
- An overview of HTML elements
- What is semantic HTML and why it's important
What Does HTML Stand For and What Is It Used For? An Introduction to HTML
Documents of any kind, whether printed or digital, need structure.
The structure allows users to navigate the document easily and in a way that is not confusing.
At the top of most documents, there is typically a large heading.
This top-level heading conveys the general message of the page, explains what the content is all about, and sets the tone for what is to follow.
Next, there is some introductory text and more headlines that are smaller in size.
The different levels of headings create a hierarchical structure for the information.
Some paragraphs of text generally follow each headline.
When it comes to web documents, images, videos, and hyperlinks (or links) accompany the textual content. The links help users navigate to a different section in the page or a different web page altogether. These elements bring more life to the document.
There can also be forms for users to enter data, checkboxes to tick off, or even radio buttons to select an option out of a group of items.
To create structure, format content, and display it in web browsers, you need to use HTML.
HTML is short for HyperText Markup Language, and it is the language of the World Wide Web.
Since its creation, it has gone through many revisions, changes, and developments.
In the section below, you will see how HTML came into existence, along with the changes it went through until it developed into the most recent and standardized version, HTML5, which is the version we use today.
A Brief History of HTML
In 1989, a British scientist named Sir Tim Berners Lee was working at CERN (the European Council for Nuclear Research) in Geneva, Switzerland.
As a researcher, he thought of creating an interlinked, distributed system. With such a system in place, sharing and organizing information could be achieved at a faster rate and in a much more effortless and convenient way.
Scientists and academics from all around the world would be able to exchange resources and research findings with one another.
The goal was to click from one reference document to another and allow users to easily navigate from one page to another by providing those links.
From this idea, the World Wide Web was born.
In 1990, he developed HTTP (an acronym for HyperText Transfer Protocol), a communication protocol that defines how resources are exchanged and transferred.
He also developed HTML, a server, and a browser.

SGML (short for Standard Generalized Markup Language) already existed, and was the basis for HTML. But it was much simpler.
Instead of creating HTML from scratch, Berners-Lee adopted certain pre-established concepts from SGML.
One such feature of SGML incorporated in HTML is structural elements – otherwise known as tags.
Tags in SGML went in pairs (with an opening and a closing tag).
Another adopted feature was the angle bracket notation for tags.
Sir Tim Berners Lee included some of the pairs of tags that already existed in SGML. For example, he included the heading tag (<h1>, </h1>) and the paragraph tag (<p>, </p>) and incorporated a hypertext reference tag of his own (<a>, </a>).
In 1991, he released the first proposal for HTML.
However, the first official version of HTML was HTML 2.0, developed by IETF (short for Internet Engineering Task Force), with many more additional features incorporated.
One of them specifically was the ability to embed images in documents using the <img> tag.
Mosaic, the leading browser of that time, initially included this ability, and the IETF made it a standard.
During that time, the so-called browser wars were in full swing.
Browser companies, such as Netscape Communications Corporation with the browser name of Netscape Navigator, manipulated HTML and created a browser-specific proprietary version of HTML tags.
Other browsers tried to replicate them but without any success – webpages looked good on one browser but were not usable on another.
The W3C (an abbreviation for World Wide Web Consortium) was founded, which took charge of creating much-needed standards.
The W3C took over the task of furthering the development of HTML.
During the rest of the ‘90s, different versions of HTML were published, such as HTML 3.0 and HTML 3.2.
The successive standard recommended by W3C was HTML 4, which focused on internationalization.
Documents could now be written in any other language from around the world, instead of just English.
In 1999, there were more updates to HTML, with the new release of HTML 4.01.
Following the release of HTML 4.01, HTML’s development took a turn and went in a different direction.
The W3C created XHTML 1.0, a branch of HTML that incorporated XML (short for eXtensible Markup Language). This time, there were stricter coding rules and less freedom for code to be able to work in a browser.
The next version of XHTML 1.0, XHTML 1.1, further resembled XML to the point where Internet Explorer, the most popular browser at the time, did not support documents.
W3C's focus was on XML, so they started working on creating XHTML 2.0. But there was no progress, and they realized they were not going down the right path. W3C abandoned the project.
While W3C was working on developing XHTML 2.0, another working group formed called the WHATWG (short for Web Hypertext Application Technology Working Group).
WHATWG consisted of representatives from different companies, such as Mozilla and Apple, that were working on creating a new HTML version geared towards web applications.
In 2006, Sir Tim Berners Lee announced the collaboration of both groups, the W3C and WHATWG, to work together on the new version of HTML - HTML5.
HTML5 is the standard recommended version of HTML in use up to this day.
An Overview of HTML Syntax
Let’s take a closer look at HTML, specifically HTML tags, and discover the basic syntax.
As you saw in the section above, tags are a syntactical structure inherited from SGML.
Take the following HTML code as an example:
<a> freeCodeCamp </a>
Let’s break this down:
- There are two kinds of tags. An opening tag (
<a>) and a closing tag (</a>) - A tag consists of one left angle bracket, a right angle bracket, and a character between them.
- Closing tags have a forward slash (
/) after the left angle bracket and before the character. - The character in the tag lets us know more about the content between the tags. In this case, the character
a, which stands foranchor, indicates that this is a link to a place on the web namedfreeCodeCamp. - Between the opening and closing tags, there is some content – in this case it is the text
freeCodeCamp. - Altogether, the opening tag, the content, and the closing tag, make up a HTML element.
It’s worth mentioning that, in the example above, you saw an element that consists of both an opening and a closing tag.
That said, some elements consist of only a self-closing tag, such as the <img> tag. In such cases, the forward-slash (such as <img />) is entirely optional.
In the example above, there is something wrong with the HTML element.
It’s supposed to point to a resource, hence the character a, but there is no indication of a linked resource available anywhere.
For this, you need to use an HTML attribute. Attributes provide additional information about the element.
So, let’s correct the code:
<a href="https://www.freecodecamp.org/"> freeCodeCamp </a>
Now, let’s break it down:
href="https://www.freecodecamp.org/"is the attribute that accompanies the element. Most of the time, specific elements accept and are paired with certain attributes.- Attributes are placed only on the opening tag, before the right angle bracket. Take note of the space right after the character.
- Attributes are made of name and value pairs. With
href="https://www.freecodecamp.org/", thenameishrefand thevalueishttps://www.freecodecamp.org/. - The name and value pair is separated by the assignment operator
=. - The value is always enclosed in double quotation marks
"".
Now that you’ve learned the basics of HTML elements, how do you set up an HTML document for your project?
In the following section, you will learn how to create an HTML5 boilerplate. A boilerplate serves as a kind of formula for all your HTML projects.
How to Create an HTML5 Boilerplate
When setting up new HTML projects, you will find that you have to include the same few elements every single time.
These elements are essential, and you will need them to get your HTML site up and running properly, following best practices and standards.
Some code editors offer shortcuts to automatically fill out and enter the elements used in every new HTML project, which is something that saves you considerable time.
This is otherwise known as HTML boilerplate.
A boilerplate is a basic skeleton and fundamental structure that every new HTML document needs.
To create a boilerplate, execute the following steps:
- First, make sure to install the Visual Studio Code editor.
- Create a file with a
.htmlextension. Files that contain HTML code should end with this extension. - Inside the empty file, type an exclamation mark,
!.
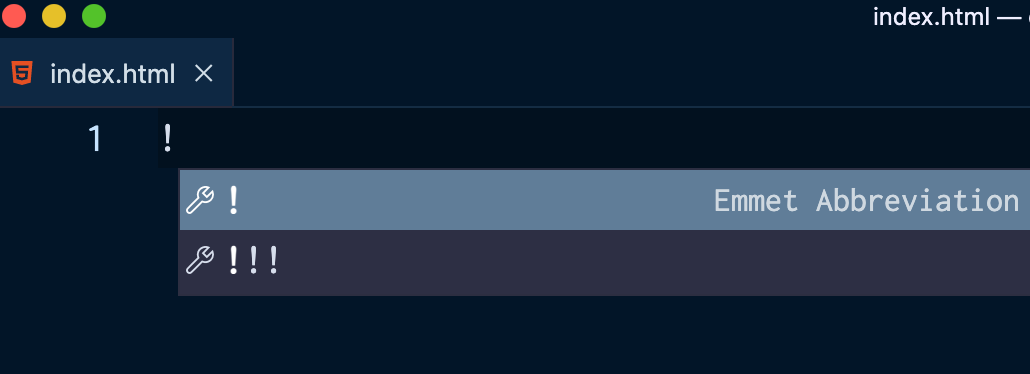
Hit Enter, or click on the exclamation mark which mentions that the following is an Emmet Abbreviation. Emmet is a plugin for code editors that's built into Visual Studio Code by default, and it helps you optimise your HTML workflow.
You will then see the following code:
<!DOCTYPE html>
<html lang="en">
    <head>
        <meta charset="UTF-8">
        <meta http-equiv="X-UA-Compatible" content="IE=edge">
        <meta name="viewport" content="width=device-width, initial-scale=1.0">
        <title>Document</title>
    </head>

    <body>

    </body>
</html>
Let's break it down:
<!DOCTYPE html>is the first line of code that needs to be present at the top of all modern HTML documents. You may notice that it has a different color than the rest of the code. This is because it’s not an HTML element but a document type declaration instead. It lets browsers know what document to expect. It also instructs them on the HTML version being used. In this case, this declaration informs browsers that the document contains HTML5 code.- The
<html>element is the first element in every HTML document and is considered the root element. The opening<html>indicates the start of all HTML code, and the closing</html>the end of all HTML code. Thelangattribute denotes the language of the document. Insidehtmlthere are always two elements nested: theheadand thebodyelements. - The
<head>element contains metadata and configurations. Metadata is information about the page. This information is hidden from users and not visible in the browser. The only visible information is the content in thetitleelement, which is the title of the page. The title appears at the browser tab, at the top of the browser window. - The
<body>element contains all the content that will be visible in the browser window. Here is where you will add your HTML code for your project.
An Overview of Basic HTML Elements
How to Create Code Comments
Comments help clarify your code and the logic behind it. Think of them as notes to your future self or to colleagues.
This is the syntax for creating comments:
<!-- I am a comment -->
Anything between <!-- and --> will not appear on your webpage as it is ignored by browsers.
How to Create Headings
There are six levels of headings in HTML:
<h1>Level 1</h1>
<h2>Level 2</h2>
<h3>Level 3</h3>
<h4>Level 4</h4>
<h5>Level 5</h5>
<h6>Level 6</h6>
As the number contained in the tag increases, the level of significance decreases. An <h1> heading has more significance than an <h6> heading.
How to Create Lists
There are two types of lists in HTML:
<!-- unordered (or bulleted) list -->
<ul>
    <li> An item </li>
    <li> Another item </li>
</ul>

<!-- ordered (or numbered) list -->
<ol>
    <li> Item 1 </li>
    <li> Item 2 </li>
</ol>
Notice that in both unordered and ordered lists, the way to create list items is by using the <li> element.
How to Create Paragraphs
To create a block of text, use the <p> element:
<p> I am a paragraph </p>
How to Create Links
You saw the <a> element in a previous section.
<a href="https://www.freecodecamp.org/"> freeCodeCamp </a>
Typically there will be an underline under the text between the opening and closing <a> tag. The cursor also changes when you hover over it. This text indicates the page / or resource linked.
The href attribute is the destination, since it contains the address of the link.
Another thing to keep in mind, is that you can nest certain elements inside others.
For example, you can add create a link out of some text in a paragraph, like so:
<p>Learn to code for free with <a href="https://www.freecodecamp.org/"> freeCodeCamp </a>!</p>
Make sure to close the nested tag first. For example, be aware to not make this common beginner mistake:
<!-- don't do this! -->

<p>Learn to code for free with <a href="https://www.freecodecamp.org/"> freeCodeCamp </p>!</a>
You can also link to different sections within the same page.
First, you need to include the id attribute to the section you want to link to, and assign it a value.
Say you want to link to a paragraph:
<p id="resource"> I have some content worth reading and linking to. I am in another part of the page! </p>
When you create a link (the same way you saw previously), include the pound sign (#) in front of the value assigned to the id attribute:
<a href="#resource">Read more about the topic on this different part of the same page</a>
How to Create a Container
The <div> element creates a generic container to hold some content.
It is commonly used with CSS to achieve different layouts on the page.
<div></div>
How to Create Images
To create an image, use the <img> element. You saw this element in a previous section. As a reminder, it is a self closing element.
Use the src attribute, which specifies the image source (which is either a URL, or a path to the image), and the alt attribute. The alt attribute is text that will display if the image fails to load for some reason.
It is also important to always include an alt attribute for accessibility purposes, as screenreaders will read the content out loud to visually impaired users.
<img src="path-to-image" alt="Text describing the image">
How to Create Forms
Forms are a necessary aspect of almost every webpage. It's how users can submit information and how you can collect that data.
You create a form by using the <form> element:
<form></form>
That said, a lot of attributes are involved when creating a form.
Give the following resources a read to get started with HTML forms:
- Your first form - MDN Docs
- A step-by-step guide to getting started with HTML forms
- Text Box in HTML – The Input Field HTML Tag
What is Semantic HTML and Why It's Important
Semantic HTML is one of the most important features of HTML5.
The word semantic refers to HTML elements describing the content they hold, rather than just being generic containers with no meaning.
Instead of using <div> elements which are generic, empty containers with no semantic meaning and are just used to store content, you can use semantic HTML5 elements.
Semantic HTML is also about creating a better structure for the site.
For example, you can use the <header> element for information located at the top of the page. Here, you can include a logo and a top level heading for the page. Inside <header> you can nest another semantic element, <nav>, to create a navigation bar with links to different pages.
For the main content of the page, you can use the <main> element.
You can store information at the bottom of the page in a <footer> element. This usually includes a site map, social media links, answers to common questions users may have, or contact information.
Semantic HTML doesn't focus on how content looks.
For example, there are two HTML elements,<b> and i, for making text bold and italic, respectively.
However, these elements focus on presentation and how the content appears - that should be the role of CSS (Cascading Style Sheets) and not HTML.
Use <strong> to signal that a piece of text is of strong importance. Browsers will render the text bold.
And use <em> to signal that text needs emphasis. Browsers will render the text italic.
These elements don't focus on how the text looks but instead provide more information on the kind of text they hold.
As you have seen so far, all the elements mentioned provide information on the markup and the type of content they contain and thus create more meaningful pages and better structure.
Why write semantic HTML? For a few reasons:
- It improves accessibility. When designing and developing websites, you need to keep in mind that you are creating websites for everyone. People with visual impairments rely on assistive technologies such as screen readers to read the content out loud. People with other disabilities may depend on keyboard-only navigation. So, learning to write accessible HTML will lead you to create more user-friendly web pages.
- It improves SEO (Search Engine Optimisation). Using elements that correctly describe the content will help your website rank higher in Google searches since the purpose of your website will be clearer. Search engines will help your site reach its target audience that is searching for that specific content.
To learn more about semantic HTML, check out the following resources:
Conclusion
This marks the end of our introduction to HTML. I hope you found this overview helpful.
The best place to start learning HTML (and CSS!) is with freeCodeCamp's Responsive Web Design Certification.
It's a free, structured, and well thought-out interactive curriculum. You learn in a practical way by 20 building projects. You will learn HTML and modern CSS techniques alongside the best accessibility practices.
Thank you for reading!