

What is Infrastructure as Code?
In this article you will learn all about Infrastructure as Code. I will start with an overview of the general concepts, and then I will show you how to implement Infrastructure as Code with three different labs. The labs use Python and AWS but the concepts will apply to other programming languages and cloud providers.
There is also a video version of this article. You can watch the video on the freeCodeCamp.org YouTube channel (1-hour watch).
Let’s start by talking about what infrastructure as code is. To put it simply, it is setting up your infrastructure as code.
By infrastructure, I mean all the different things needed to deploy your software into a cloud environment. That can mean things like virtual machines, containers, or serverless functions.
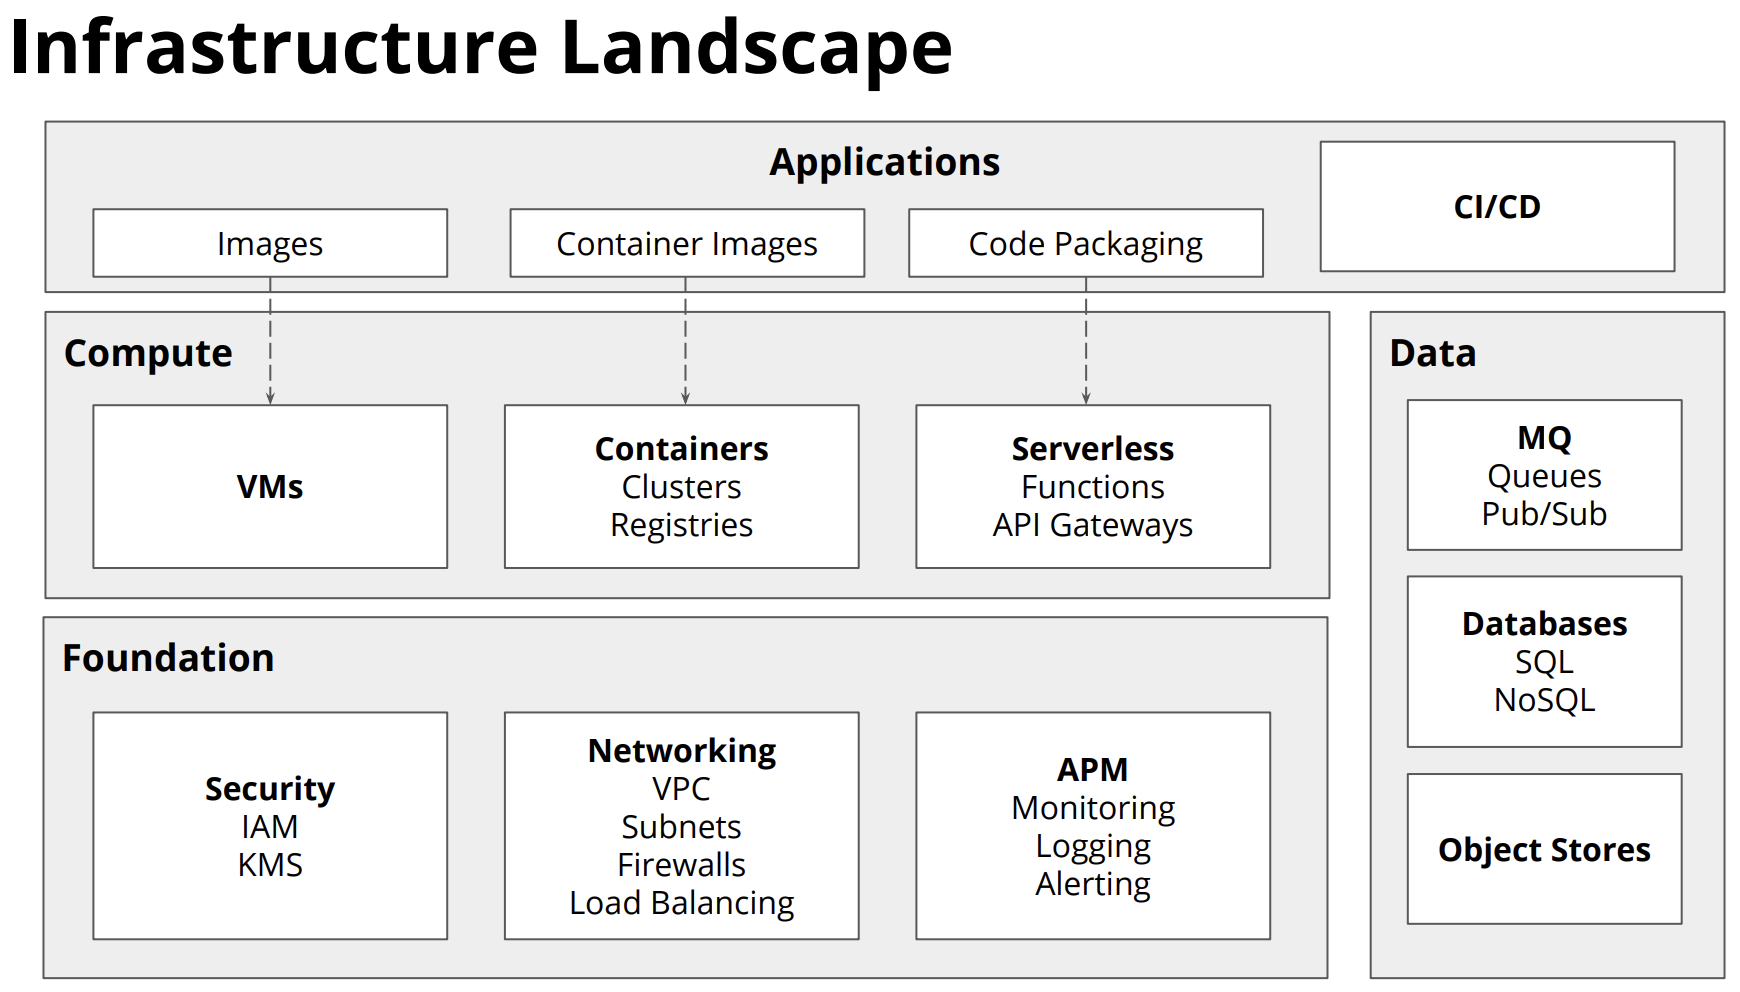
Infrastructure also means all the other pieces of infrastructure you need to set up to make that successful. That can be security like IAM and KMS, or networking, or some of the monitoring and logging capabilities.
You can also use code to configure and set up data stores. These are the things that your application needs to store and manage data.
The last piece of the infrastructure landscape is the applications themselves and getting the applications that we're building into the infrastructure.
All of these different pieces of infrastructure can be set up using code.
It is becoming more and more important to automate infrastructure because applications can be deployed to production up to a hundred times per day. You don't want to have to do that manually.
Also, it is helpful to automate infrastructure to be provisioned or deprovisioned in response to load.
Infrastructures as code is is all about finding a way to describe using code what pieces of our infrastructure need to do.

Over the years there has been a transition with how people are using cloud infrastructure within their organizations.
In the first wave, it was relatively simple. The infrastructures were fairly static. It was often a single virtual machine that you just accessed through SSH.
It got a little more complex in the second wave. There were more containers and people started using provisioning tools to specify the application behaviors. People used Docker and DataDog.
Modern cloud infrastructure has added way more complexity. It uses containers, serverless, and more managed services as part of the applications. There are now way more different pieces involved in how people build the infrastructure.
Infrastructure as code is becoming a more important part of how people build and deliver applications because infrastructure as code is what what describes the glue between all the different edges on these diagrams.
 Modern Infrastructure
The diagram for the modern infrastructure may look more complicated than the previous ones but it can actually be easier to maintain. A key benefit is that the dark grey squares in the diagram is the only part which is the code that you own. And that part is smaller that the previous ways of doing things. So a lot of the operational burden has been decreased compared to how it used to be done.
With infrastructure as code, you hand off some of the operational burden to AWS, Azure, Kubernetes, or some other system. Now the focus is on the glue between the different services that are being managed by a cloud provider.
Infrastructure code takes on an increasingly more important role in how you manage everything in the modern cloud.
So here are the three main ways that can be used to manage all the resources:
- manual: point and click to create/modify resources in the console.
- ad-hoc automation: CLI commands or scripts to create/modify resources.
- infrastructure as code:
○ provisioning: declaratively create/modify resources.
○ configuration: change state of an existing resource post-provisioning.
Infrastructure as code gives us the ability to write down what we want the desired state of our infrastructure to be. I'll be showing you exactly how to do these things later.
Writing Infrastructure as Code
One approach to infrastructure as code is to use JSON. Here is an example:
{
  "AWSTemplateFormatVersion": "2010-09-09",
  "Resources": {
    "EC2Instance": {
      "Type": "AWS::EC2::Instance",
      "Properties": {
        "InstanceType": "t2.micro",
        "SecurityGroups": [
          {
            "Ref": "InstanceSecurityGroup"
          }
        ],
        "ImageId": "ami-0080e4c5bc078760e"
      }
    },
    "InstanceSecurityGroup": {
      "Type": "AWS::EC2::SecurityGroup",
      "Properties": {
        "GroupDescription": "Enable HTTP over port 80",
        "SecurityGroupIngress": [
          {
            "IpProtocol": "tcp",
            "FromPort": "80",
            "ToPort": "80",
            "CidrIp": "0.0.0.0/0"
          }
        ]
      }
    }
  }
}
The above is a way to tell AWS what resources you want to have.
Another method is to use a domain specific language (DSL). This is a custom method specific to the tool or cloud provider you are using. Here is an example:
provider aws {
    region = "eu-central-1"
}
resource "aws_security_group"
"web_sg" {
    description = "Enable HTTP over port 80"
    ingress {
        protocol = "tcp"
        from_port = 80
        to_port = 80
        cidr_blocks = ["0.0.0.0/0"]
    }
}
resource "aws_instance"
"web" {
    ami = "ami-0080e4c5bc078760e"
    instance_type = "t2.micro"
    security_groups = ["$(aws_security_group.web_sg.id)"]
}
Yet another way of defining infrastructure using code is to use a well-known programming language. For instance, Pulumi can be used to write infrastructure as code using TypeScript, JavaScript, Python, Go, and .NET.
Here is an example using TypeScript (and later we'll be using Python).
import * as aws from "@pulumi/aws";
let group = new aws.ec2.SecurityGroup("web-sg", {
    description: "Enable HTTP over port 80",
    ingress: [{
        protocol: "tcp",
        fromPort: 80,
        toPort: 80,
        cidrBlocks: ["0.0.0.0/0"]
    }, ],
});
for (let az in aws.getAvailabilityZones().names) {
    let server = new aws.ec2.Instance(`web-${az}`, {
        instanceType: "t2.micro",
        securityGroups: [group.id],
        ami: "ami-0080e4c5bc078760e",
        availabilityZone: az,
    });
}
Using code gives the ability to do things that are not possible in some of the other methods. In the example above, there is a for loop that creates in Instance for each Availability Zone. Code gives the ability to use loops, conditionals, classes, packages, and more. Using popular programming languages also allows the use common IDEs, linters, and test frameworks.
Labs
There are a few different services that allow you to use popular languages to create infrastructure as code. In this article, we'll be using Pulumi.
This article (and the video course) was made possible through a grant from Pulumi.
Pulumi is an open source infrastructure as code tool for creating, deploying, and managing cloud infrastructure. Pulumi works with traditional infrastructure like VMs, networks, and databases, in addition to modern architectures, including containers, Kubernetes clusters, and serverless functions. Pulumi supports dozens of public, private, and hybrid cloud service providers.
We'll be using Python and deploying on AWS, though it can be done with other programming languages and cloud providers.
Lab 1: Provisioning Infrastructure with an S3 Bucket
We'll start out with a simple example. This will show an end-to-end experience of working with Pulumi using very simple resources.
In this first example we will do the following:
- Create a New Project
- Configure AWS
- Provision Infrastructure
- Update Infrastructure
- Make Your Stack Configurable
- Create a Second Stack
- Destroy Your Infrastructure
We will use an S3 bucket and then work through the life cycle with a simple set of resources. Then in future examples you will learn how to implement more complex things.
With Pulumi, infrastructure is organized into projects. Each project is a single program that, when run, declares the desired infrastructure for Pulumi to manage.
Before we start the first lab, make sure Pulumi is installed. The way to install is different depending on your operating system.
If you have MacsOS and Homebrew, you can use the command brew install pulumi.
If you have Windows and Chocolatey, you can use the command choco install pulumi.
This page will give you additional ways of installing Pulumi.
AWS
For this example, we are using AWS. You'll have to make sure you have an AWS account and have the CLI set up and authenticated. (There is also a method that does not use the CLI.)
You can sign up for a free AWS account here: https://aws.amazon.com/free/
Learn how to install the AWS CLI for your operating system here: https://docs.aws.amazon.com/cli/latest/userguide/install-cliv2.html
For MacOS, you can use these commands:
curl "https://awscli.amazonaws.com/AWSCLIV2.pkg" -o "AWSCLIV2.pkg"
sudo installer -pkg AWSCLIV2.pkg -target /
For Windows there are a few extra steps and you should just follow the instructions here.
Next, you need to get an Access key ID and secret access key from AWS. Follow the instructions from Amazon to get these.
Now run the following in the command line:
aws configure
Enter your Access Key ID and Secret Access Key when prompted. You can keep the "Default region name" and "Default output format" as None.
Step 1: Create a Directory
Each Pulumi project lives in its own directory. Create one now and change into it:
mkdir iac-lab1 cd iac-lab1
Step 2: Initialize Your Project
A Pulumi project is just a directory with some files in it. It's possible for you to create a new one by hand. The pulumi new command, however, automates the process:
pulumi new python -y
If this is the first time you have used Pulumi, you will be directed to enter an access code or login. To get an access code, go to https://app.pulumi.com/account/tokens
This command has created all the files we need, initialized a new stack named dev (an instance of our project). We now need to install our dependencies as part of our virtualenv.
Step 3: Setup Virtual Environment
We now need to create a virtual environment and install the required Python packages. The Python module used to create and manage virtual environments is called venv. Run the following commands:
python3 -m venv venv
source venv/bin/activate
pip3 install -r requirements.txt
Step 4: Inspect Your New Project
Our project is comprised of multiple files:
__main__.py: your program's main entry point filerequirements.txt: your project's pip dependency informationPulumi.yaml: your project's metadata, containing its name and language
If you look in the __main__.py file you will notice a single line of code:
import pulumi
Configuring AWS
Now that you have a basic project, let's configure AWS support for it.
Step 5: Install the AWS Package
Run the following command to install the AWS package:
pip3 install pulumi-aws
Step 6: Import the AWS Package
Now that the AWS package is installed, add the following line to __main__.py to import it:
import pulumi_aws as aws
Step 7: Configure an AWS Region
Configure the AWS region you would like to deploy to by running the following on the command line.
pulumi config set aws:region us-east-1
You can choose a different AWS region if you like. (See this table for a list of available regions.)
Optional Step: Configure an AWS Profile
If you're using an alternative AWS profile, you can tell Pulumi which to use in one of two ways:
- Using an environment variable:
export AWS_PROFILE=<profile name> - Using configuration:
pulumi config set aws:profile <profile name>
Provisioning Infrastructure
Now that you have a project configured to use AWS, you'll create some basic infrastructure in it. We will start with a simple S3 bucket.
Step 8: Declare a New Bucket
Add the following to your __main__.py file:
bucket = aws.s3.Bucket("my-bucket")
So the full file should look like this:
import pulumi
import pulumi_aws as aws

bucket = aws.s3.Bucket("my-bucket")
Step 9: Preview Your Changes
Now preview your changes:
pulumi up
This command evaluates your program, determines the resource updates to make, and shows you an outline of these changes:
Previewing update (dev)

View Live: https://app.pulumi.com/beaucarnes/iac-lab1/dev/previews/827f9488-cc23-441f-946a-9852090ab0e3

     Type                 Name          Plan
 +   pulumi:pulumi:Stack  iac-lab1-dev  create
 +   └─ aws:s3:Bucket     my-bucket     create

Resources:
    + 2 to create

Do you want to perform this update?  [Use arrows to move, enter to select, type to filter]
  yes
> no
  details
This is a summary view. Select details to view the full set of properties:
+ pulumi:pulumi:Stack: (create)
    [urn=urn:pulumi:dev::iac-lab1::pulumi:pulumi:Stack::iac-lab1-dev]
    + aws:s3/bucket:Bucket: (create)
        [urn=urn:pulumi:dev::iac-lab1::aws:s3/bucket:Bucket::my-bucket]
        [provider=urn:pulumi:dev::iac-lab1::pulumi:providers:aws::default_4_22_1::04da6b54-80e4-46f7-96ec-b56ff0331ba9]
        acl         : "private"
        bucket      : "my-bucket-185b4e1"
        forceDestroy: false

Do you want to perform this update?  [Use arrows to move, enter to select, type to filter]
  yes
> no
  details
The stack resource is a synthetic resource that all resources your program creates are parented to.
Step 10: Deploy Your Changes
Now that we've seen the full set of changes, let's deploy them. Select yes:
Updating (dev)

View Live: https://app.pulumi.com/beaucarnes/iac-lab1/dev/updates/1

     Type                 Name          Status
 +   pulumi:pulumi:Stack  iac-lab1-dev  created
 +   └─ aws:s3:Bucket     my-bucket     created

Resources:
    + 2 created

Duration: 5s
Now our S3 bucket has been created in our AWS account. If you view your buckets on the AWS website, you will see the new bucket. If you go to the URL shown in the output you will be taken to the Pulumi Console, which records your deployment history.
Step 11: Export Your New Bucket Name
To inspect your new bucket, you will need its physical AWS name. Pulumi records a logical name, my-bucket, however the resulting AWS name will be different.
Programs can export variables which will be shown in the CLI and recorded for each deployment. Export your bucket's name by adding this line to the end of __main__.py:
pulumi.export('bucket_name', bucket.bucket)
Now deploy the changes with:
pulumi up
You will now notice a new Outputs section in the output displaying the bucket's name:
Outputs:
  + bucket_name: "my-bucket-25cb812"
You can select "Yes" to perform the update.
Step 12: Inspect Your New Bucket
You can see all of the output by running pulumi stack output.
The result should look something like this:
Current stack outputs (1):
    OUTPUT       VALUE
    bucket_name  my-bucket-25cb812
Then you can run the aws CLI to list the objects in this new bucket (getting the bucket name using the command from above):
aws s3 ls $(pulumi stack output bucket_name)
There currently will not be any result from that command since the bucket is still empty.
Updating Your Infrastructure
We just saw how to create new infrastructure from scratch. Next, let's make a few updates:
- Add an object to your bucket.
- Serve content from your bucket as a website.
- Programmatically create infrastructure.
This demonstrates how declarative infrastructure as code tools can be used not just for initial provisioning, but also subsequent changes to existing resources.
Step 13: Add an Object to Your Bucket
Create a directory site/ and add a new index.html file with the following contents:
<html>
    <body>
        <h1>Hello everybody!</h1>
    </body>
</html>
Now update your __main__.py file so that it looks like this:
import pulumi
import pulumi_aws as aws
import os

bucket = aws.s3.Bucket("my-bucket")

filepath = os.path.join("site", "index.html")
obj = aws.s3.BucketObject("index.html",
    bucket=bucket.bucket,
    source=pulumi.FileAsset(filepath)
)

pulumi.export('bucket_name', bucket.bucket)
Deploy the changes:
pulumi up
This will give you a preview and selecting yes will apply the changes:
Previewing update (dev)

View Live: https://app.pulumi.com/beaucarnes/iac-lab1/dev/previews/35a07205-2889-403c-b01d-0342eb01ed85

     Type                    Name          Plan
     pulumi:pulumi:Stack     iac-lab1-dev
 +   └─ aws:s3:BucketObject  index.html    create

Resources:
    + 1 to create
    2 unchanged

Do you want to perform this update?  [Use arrows to move, enter to select, type to filter]
  yes
> no
  details
A single resource is added and the 2 existing resources are left unchanged. This is a key attribute of infrastructure as code — such tools determine the minimal set of changes necessary to update your infrastructure from one change to the next.
Now, list again the contents of your bucket:
aws s3 ls $(pulumi stack output bucket_name)
You will notice that the index.html file has been added:
2019-10-22 16:50:54 68 index.html
Step 14: Serve Content From Your Bucket as a Website
To serve content from your bucket as a website, you'll need to update a few properties.
First, your bucket needs a website property that sets the default index document to index.html. That can be achieved by updating __main__.py file with the following:
bucket = aws.s3.Bucket("my-bucket",
    website={
        "index_document": "index.html"
})
Next, your index.html object will need two changes: an ACL (Access Control List) of public-read so that it can be accessed anonymously over the Internet, and a content type so that it is served as HTML. You will also need to export the resulting bucket's endpoint URL so we can easily access it.
Combining everything, the file should now look like this:
import pulumi
import pulumi_aws as aws
import os
import mimetypes

bucket = aws.s3.Bucket("my-bucket",
    website={
        "index_document": "index.html"
})

filepath = os.path.join("site", "index.html")
mime_type, _ = mimetypes.guess_type(filepath)
obj = aws.s3.BucketObject("index.html",
        bucket=bucket.bucket,
        source=pulumi.FileAsset(filepath),
        acl="public-read",
        content_type=mime_type
)

pulumi.export('bucket_name', bucket.bucket)
pulumi.export('bucket_endpoint', pulumi.Output.concat("http://", bucket.website_endpoint))
Now deploy the changes:
pulumi up
The preview will look something like this:
Previewing update (dev)

View Live: https://app.pulumi.com/beaucarnes/iac-lab1/dev/previews/50730def-0493-4667-83b8-fcedc4408f3a

     Type                    Name          Plan       Info
     pulumi:pulumi:Stack     iac-lab1-dev
 ~   ├─ aws:s3:Bucket        my-bucket     update     [diff: +website]
 ~   └─ aws:s3:BucketObject  index.html    update     [diff: ~acl,contentType]

Outputs:
  + bucket_endpoint: output<string>

Resources:
    ~ 2 to update
    1 unchanged

Do you want to perform this update?  [Use arrows to move, enter to select, type to filter]
  yes
> no
  details
Selecting details during the preview has a lot more information this time:
  pulumi:pulumi:Stack: (same)
    [urn=urn:pulumi:dev::iac-lab1::pulumi:pulumi:Stack::iac-lab1-dev]
    ~ aws:s3/bucket:Bucket: (update)
        [id=my-bucket-25cb812]
        [urn=urn:pulumi:dev::iac-lab1::aws:s3/bucket:Bucket::my-bucket]
        [provider=urn:pulumi:dev::iac-lab1::pulumi:providers:aws::default_4_22_1::032fffef-7448-4be3-97d2-3198f149eb39]
      + website: {
          + indexDocument: "index.html"
        }
    --outputs:--
  + bucket_endpoint: output<string>
    ~ aws:s3/bucketObject:BucketObject: (update)
        [id=index.html]
        [urn=urn:pulumi:dev::iac-lab1::aws:s3/bucketObject:BucketObject::index.html]
        [provider=urn:pulumi:dev::iac-lab1::pulumi:providers:aws::default_4_22_1::032fffef-7448-4be3-97d2-3198f149eb39]
      ~ acl        : "private" => "public-read"
      ~ contentType: "binary/octet-stream" => "text/html"

Do you want to perform this update?  [Use arrows to move, enter to select, type to filter]
  yes
> no
  details
Now just select yes to deploy all of the updates. The result will show the URL that can be used to access your index.html file.
Updating (dev)

View Live: https://app.pulumi.com/beaucarnes/iac-lab1/dev/updates/4

     Type                    Name          Status      Info
     pulumi:pulumi:Stack     iac-lab1-dev
 ~   ├─ aws:s3:Bucket        my-bucket     updated     [diff: +website]
 ~   └─ aws:s3:BucketObject  index.html    updated     [diff: ~acl,contentType]

Outputs:
  + bucket_endpoint: "http://my-bucket-25cb812.s3-website-us-east-1.amazonaws.com"
    bucket_name    : "my-bucket-25cb812"

Resources:
    ~ 2 updated
    1 unchanged

Duration: 6s
Step 15: Access Your Website
Besides going to the URL in a web browser (from the results shown above), you can also access the website with this command in the terminal:
curl $(pulumi stack output bucket_endpoint)
This will fetch and print our index.html file:
<html>
    <body>
        <h1>Hello Pulumi</h1>
    </body>
</html>
Making Your Stack Configurable
Right now, the bucket's contents are hard-coded. Next, you'll make the location of the contents configurable, and add support for populating the bucket with an entire directory's worth of contents.
Step 16: Adding a Config Variable
Instead of hard-coding the "site" directory, we will use configuration to make it easy to change the location without editing the program.
Add this to your __main__.py file right below the imports:
config = pulumi.Config()
site_dir = config.require("siteDir")
Step 17: Populating the Bucket Based on Config
And replace the hard-coded "site" parameter with this imported siteDir variable:
filepath = os.path.join(site_dir, "index.html")
mime_type, _ = mimetypes.guess_type(filepath)

obj = aws.s3.BucketObject("index.html",
    bucket=bucket.bucket,
    source=pulumi.FileAsset(filepath),
    acl="public-read",
    content_type=mime_type
)
Now let's see how this can be helpful. Using the terminal rename the site directory to www:
mv site www
Step 18: Deploying the Changes
Now, deploy your changes. To do so, first configure your stack. If you don't, you'll get an error:
pulumi up
This results in an error like the following:
    error: Missing required configuration variable 'iac-lab1:siteDir'
        please set a value using the command `pulumi config set iac-lab1:siteDir <value>`
    error: an unhandled error occurred: Program exited with non-zero exit code: 1
Configure the iac-workshop:siteDir variable similar to how the aws:region variable was configured:
pulumi config set iac-lab1:siteDir www
Then run:
pulumi up
This detects that the path has changed and will perform a simple update.
Step 19: Add More Files
Instead of hard-coding the set of files, you will now change the program to read the entire contents of the www directory.
Add a new file named about.html to the www directory and add some HTML. Here is one option:
<html>
    <p>I am not a cat.</p>
</html>
Now replace the object allocation code with the code below. You will notice that there is now a for loop to loop through every file in the site directory:
for file in os.listdir(site_dir):
    filepath = os.path.join(site_dir, file)
    mime_type, _ = mimetypes.guess_type(filepath)
    obj = aws.s3.BucketObject(file,
          bucket=bucket.bucket,
          source=pulumi.FileAsset(filepath),
          acl="public-read",
          content_type=mime_type
    )
Deploy:
pulumi up
You will see a single new object created for the about.html file:
Updating (dev)

View Live: https://app.pulumi.com/beaucarnes/iac-lab1/dev/updates/5

     Type                    Name          Status
     pulumi:pulumi:Stack     iac-lab1-dev
 +   └─ aws:s3:BucketObject  about.html    created
You can now go to the URL from before and add "/about.html" to the end.
You can also get the file in the terminal with the command:
curl $(pulumi stack output bucket_endpoint)/about.html
Creating a Second Stack
It is easy to create multiple instances of the same project. In Pulumi, each instance is called a stack. This is useful if you have multiple development or test environments, staging versus production, and scaling a given infrastructure across many regions.
Step 20: Create and Configure a New Stack
Create a new stack named 'prod':
pulumi stack init prod
Next, configure its two required variables:
pulumi config set aws:region eu-west-1
pulumi config set iac-lab1:siteDir wwwprod
You can see the list of stacks for your current project with the command:
pulumi stack ls
It will print all stacks for this project that are available to you:
NAME   LAST UPDATE     RESOURCE COUNT  URL
dev    12 minutes ago  5               https://app.pulumi.com/beaucarnes/iac-lab1/dev
prod*  n/a             n/a             https://app.pulumi.com/beaucarnes/iac-lab1/prod
Step 21: Populate the New Site Directory
We could have used the existing www directory for the siteDir. But for this example you will use a different wwwprod directory to demonstrate how it can be configured.
So create this new directory:
mkdir wwwprod
Add a new index.html file to it. It can contain any HTML but here is a suggestion:
<html>
    <body>
        <h1>Hello universe.</h1>
        <p>(in production)</p>
    </body>
</html>
Step 22: Deploy the New Stack
Now deploy all of the changes:
pulumi up
This will create an entirely new set of resources from scratch, unrelated to the existing dev stack's resources.
Updating (prod)

View Live: https://app.pulumi.com/beaucarnes/iac-lab1/prod/updates/1

     Type                    Name           Status
 +   pulumi:pulumi:Stack     iac-lab1-prod  created
 +   ├─ aws:s3:Bucket        my-bucket      created
 +   └─ aws:s3:BucketObject  index.html     created

Outputs:
    bucket_endpoint: "http://my-bucket-0d2f29a.s3-website-eu-west-1.amazonaws.com"
    bucket_name    : "my-bucket-0d2f29a"

Resources:
    + 3 created

Duration: 14s
You will notice a new URL in the output. You can access that URL in a browser to see the new website.
Also you can get it using this command in the terminal:
curl $(pulumi stack output bucket_endpoint)
Destroying Your Infrastructure
The final thing we'll cover in this first lab is to destroy all of the resources from the two stacks created.
Step 23: Destroy Resources
First, destroy the resources in your current stack:
pulumi destroy
This will show you a preview, much like the pulumi up command does:
     Type                    Name           Plan
 -   pulumi:pulumi:Stack     iac-lab1-prod  delete
 -   ├─ aws:s3:BucketObject  index.html     delete
 -   └─ aws:s3:Bucket        my-bucket      delete

Outputs:
  - bucket_endpoint: "http://my-bucket-0d2f29a.s3-website-eu-west-1.amazonaws.com"
  - bucket_name    : "my-bucket-0d2f29a"

Resources:
    - 3 to delete

Do you want to perform this destroy?  [Use arrows to move, enter to select, type to filter]
  yes
> no
  details
To proceed, select yes.
Destroying (prod)

View Live: https://app.pulumi.com/beaucarnes/iac-lab1/prod/updates/2

     Type                    Name           Status
 -   pulumi:pulumi:Stack     iac-lab1-prod  deleted
 -   ├─ aws:s3:BucketObject  index.html     deleted
 -   └─ aws:s3:Bucket        my-bucket      deleted

Outputs:
  - bucket_endpoint: "http://my-bucket-0d2f29a.s3-website-eu-west-1.amazonaws.com"
  - bucket_name    : "my-bucket-0d2f29a"

Resources:
    - 3 deleted

Duration: 3s

The resources in the stack have been deleted, but the history and configuration associated with the stack are still maintained.
If you want to remove the stack completely, run 'pulumi stack rm prod'.
Step 24: Remove the Stack
The AWS resources for this stack have been destroyed. You may have noticed the message printed at the end that the history and configuration associated with the stack are still maintained. This means all past history is still available and you can perform subsequent updates on this stack.
Now, fully remove the stack and all history:
pulumi stack rm
This is irreversible and so asks to confirm that this is your intent:
This will permanently remove the 'prod' stack!
Please confirm that this is what you'd like to do by typing ("prod"):
Type the name of the stack and hit enter. The stack is now gone.
Step 24: Select Another Stack, Rinse and Repeat
After destroying prod, you still have the dev stack. To destroy it too, first select it:
pulumi stack select dev
Now, go back and repeat the previous two steps to destroy it.
Step 25: Verify That Stacks are Gone
Verify that all of this project's stacks are now gone:
pulumi stack ls
Conclusion of Lab 1
Congratulations! You have completed the first lab. The next few labs are a little shorter and demonstrate some more advanced tasks.
Lab 2: Provisioning EC2 Virtual Machines
Amazon Elastic Compute Cloud (Amazon EC2) is a web service that provides secure, resizable compute capacity in the cloud. It is designed to make web-scale cloud computing easier for developers. Amazon EC2’s simple web service interface allows you to obtain and configure capacity with minimal friction.
In this second lab, you'll first create a single EC2 virtual machine (VM). Afterwards, you'll scale that out to a VM per availability zone in your region, and then add a load balancer to spread load across the entire fleet.
Step 1: Create a Directory
We could use the same project and directory as before. But we'll create a new one to get more practice.
Create a new directory that is not inside the directory of used in the last lab.
cd ..
mkdir iac-lab2
cd iac-lab2
Step 2: Initialize Your Project
Remember, a Pulumi project is just a directory with some files in it. It’s possible for you to create a new one by hand. The pulumi new command, however, automates the process:
pulumi new aws-python -y
This command has created all the files we need, initialized a new stack named dev (an instance of our project), and installed the needed package dependencies from PyPi. The "aws" part of the command made sure our __main__.py file started with samle code to create an AWS bucket.
Step 3: Configure an AWS Region
Configure the AWS region you would like to deploy to:
pulumi config set aws:region us-west-2
Step 4: Declare the EC2 Instance
Remove any existing code here from the bootstrapping of your project. Then, import the AWS package in an empty __main__.py file:
from pulumi import export
import pulumi_aws as aws
Now dynamically query the Amazon Linux machine image. Doing this in code avoids needing to hard-code the machine image (a.k.a., its AMI - An Amazon Machine Image provides the information required to launch an instance):
ami = aws.ec2.get_ami(
    most_recent="true",
    owners=["137112412989"],
    filters=[{"name":"name","values":["amzn-ami-hvm-*-x86_64-ebs"]}])
We also need to grab the default Virtual Private Cloud is a service that lets you launch AWS resources in a logically isolated virtual network that you define) that is available in our AWS account:
vpc = aws.ec2.get_vpc(default=True)
Next, create an AWS security group. This enables ping over ICMP and HTTP traffic on port 80:
group = aws.ec2.SecurityGroup(
    "web-secgrp",
    description='Enable HTTP access',
    vpc_id=vpc.id,
    ingress=[
        { 'protocol': 'icmp', 'from_port': 8, 'to_port': 0, 'cidr_blocks': ['0.0.0.0/0'] },
        { 'protocol': 'tcp', 'from_port': 80, 'to_port': 80, 'cidr_blocks': ['0.0.0.0/0'] }
])
Create the server. Notice it has a startup script that spins up a simple Python webserver:
server = aws.ec2.Instance(
    'web-server',
    instance_type="t2.micro",
    vpc_security_group_ids=[group.id],
    ami=ami.id,
    user_data="""
#!/bin/bash
echo "Hello, World!" > index.html
nohup python -m SimpleHTTPServer 80 &
    """,
    tags={
        "Name": "web-server",
    },
)
For most real-world applications, you would want to create a dedicated image for your application, rather than embedding the script in your code like this.
Finally export the EC2 instances’s resulting IP address and hostname:
pulumi.export('ip', server.public_ip)
pulumi.export('hostname', server.public_dns)
After this change, your __main__.py should look like this:
import pulumi
import pulumi_aws as aws


ami = aws.ec2.get_ami(
    most_recent="true",
    owners=["137112412989"],
    filters=[{"name": "name", "values": ["amzn-ami-hvm-*-x86_64-ebs"]}],
)

vpc = aws.ec2.get_vpc(default=True)

group = aws.ec2.SecurityGroup(
    "web-secgrp",
    description="Enable HTTP Access",
    ingress=[
        {
            "protocol": "icmp",
            "from_port": 8,
            "to_port": 0,
            "cidr_blocks": ["0.0.0.0/0"],
        },
        {
            "protocol": "tcp",
            "from_port": 80,
            "to_port": 80,
            "cidr_blocks": ["0.0.0.0/0"],
        },
    ],
)

server = aws.ec2.Instance(
    "web=server",
    instance_type="t2.micro",
    vpc_security_group_ids=[group.name],
    ami=ami.id,
    user_data="""
#!/bin/bash
echo "Hello, World!" > index.html
nohup python -m SimpleHTTPServer 80 &
    """,
    tags={
        "Name": "web-server",
    },
)

pulumi.export("ip", server.public_ip)
pulumi.export("hostname", server.public_dns)
Step 5: Provision the EC2 Instance and Access It
To provision the VM, run:
pulumi up
After confirming, you will see output like the following:
Updating (dev)

View Live: https://app.pulumi.com/beaucarnes/iac-lab2/dev/updates/3

     Type                 Name          Status
     pulumi:pulumi:Stack  iac-lab2-dev
 ~   └─ aws:ec2:Instance  web=server    updated

Outputs:
    hostname: "ec2-52-13-25-152.us-west-2.compute.amazonaws.com"
    ip      : "52.13.25.152"

Resources:
    ~ 1 updated
    2 unchanged

Duration: 8s
If you get an error, try running pulumi up again and confirming. The first time I ran it there was a race condition which required re-running the command.
You can now try accessing the URL from the output in a web browser.
Alternatively, you can use this command:
curl $(pulumi stack output hostname)
Either way you should see a response from the Python webserver:
Hello, World!
Step 6: Add more EC2 instances
Now you will create multiple EC2 instances, each running the same Python webserver, across all AWS availability zones in your region. Replace the part of your code that creates the webserver and exports the resulting IP address and hostname with the following:
...
ips = []
hostnames = []
for az in aws.get_availability_zones().names:
    server = aws.ec2.Instance(f'web-server-{az}',
      instance_type="t2.micro",
      vpc_security_group_ids=[group.id],
      ami=ami.id,
      availability_zone=az,
      user_data="""#!/bin/bash
echo \"Hello, World -- from {}!\" > index.html
nohup python -m SimpleHTTPServer 80 &
""".format(az),
      tags={
          "Name": "web-server",
      },
    )
    ips.append(server.public_ip)
    hostnames.append(server.public_dns)

pulumi.export("ips", ips)
pulumi.export("hostnames", hostnames)
After this change, your __main__.py should look like this:
"""An AWS Python Pulumi program"""

import pulumi
import pulumi_aws as aws


ami = aws.ec2.get_ami(
    most_recent="true",
    owners=["137112412989"],
    filters=[{"name": "name", "values": ["amzn-ami-hvm-*-x86_64-ebs"]}],
)

vpc = aws.ec2.get_vpc(default=True)

group = aws.ec2.SecurityGroup(
    "web-secgrp",
    description="Enable HTTP Access",
    vpc_id=vpc.id,
    ingress=[
        {
            "protocol": "icmp",
            "from_port": 8,
            "to_port": 0,
            "cidr_blocks": ["0.0.0.0/0"],
        },
        {
            "protocol": "tcp",
            "from_port": 80,
            "to_port": 80,
            "cidr_blocks": ["0.0.0.0/0"],
        },
    ],
)


ips = []
hostnames = []

for az in aws.get_availability_zones().names:
    server = aws.ec2.Instance(
        f"web-server-{az}",
        instance_type="t2.micro",
        vpc_security_group_ids=[group.id],
        ami=ami.id,
        user_data="""#!/bin/bash
echo \"Hello, World -- from {}!\" > index.html
nohup python -m SimpleHTTPServer 80 &
""".format(
            az
        ),
        tags={
            "Name": "web-server",
        },
    )
    ips.append(server.public_ip)
    hostnames.append(server.public_dns)

pulumi.export("ips", ips)
pulumi.export("hostnames", hostnames)
Now run a command to update your stack with the new resource definitions:
pulumi up
You will see output like the following:
Updating (dev)

View Live: https://app.pulumi.com/beaucarnes/iac-lab2/dev/updates/4

     Type                 Name                   Status
     pulumi:pulumi:Stack  iac-lab2-dev
 +   ├─ aws:ec2:Instance  web-server-us-west-2a  created
 +   ├─ aws:ec2:Instance  web-server-us-west-2b  created
 +   ├─ aws:ec2:Instance  web-server-us-west-2c  created
 +   ├─ aws:ec2:Instance  web-server-us-west-2d  created
 -   └─ aws:ec2:Instance  web=server             deleted

Outputs:
  - hostname : "ec2-52-13-25-152.us-west-2.compute.amazonaws.com"
  + hostnames: [
  +     [0]: "ec2-34-222-148-4.us-west-2.compute.amazonaws.com"
  +     [1]: "ec2-54-69-196-240.us-west-2.compute.amazonaws.com"
  +     [2]: "ec2-54-186-64-129.us-west-2.compute.amazonaws.com"
  +     [3]: "ec2-52-25-211-116.us-west-2.compute.amazonaws.com"
    ]
  - ip       : "52.13.25.152"
  + ips      : [
  +     [0]: "34.222.148.4"
  +     [1]: "54.69.196.240"
  +     [2]: "54.186.64.129"
  +     [3]: "52.25.211.116"
    ]

Resources:
    + 4 created
    - 1 deleted
    5 changes. 2 unchanged

Duration: 1m55s
Notice that your original server was deleted and new ones created in its place, because its name changed.
To test the changes, curl any of the resulting IP addresses or hostnames (or access the URLs in a web browser):
for i in {0..2}; do curl $(pulumi stack output hostnames | jq -r ".[${i}]"); done
The count of servers depends on the number of AZs in your region. You may need to adjust the {0..2} .
The pulumi stack output command emits JSON serialized data — hence the use of the jq tool to extract a specific index. If you don’t have jq, don’t worry; simply copy-and-paste the hostname or IP address from the console output and curl that.
Note that the webserver number is included in its response:
Hello, World -- from us-west-2a!
Hello, World -- from us-west-2b!
Hello, World -- from us-west-2c!
Add a loadbalancer
Needing to loop over the webservers isn’t very realistic. You will now create a load balancer over them to distribute load evenly.
Step 7: Update our Security Group
We need to add an egress rule to our security group. Whenever you add a listener to your load balancer or update the health check port for a target group used by the load balancer to route requests, you must verify that the security groups associated with the load balancer allow traffic on the new port in both directions.
...
group = aws.ec2.SecurityGroup(
    "web-secgrp",
    ingress=[
        { 'protocol': 'icmp', 'from_port': 8, 'to_port': 0, 'cidr_blocks': ['0.0.0.0/0'] },
        { 'protocol': 'tcp', 'from_port': 80, 'to_port': 80, 'cidr_blocks': ['0.0.0.0/0'] },
    ],
    egress=[
        { 'protocol': 'tcp', 'from_port': 80, 'to_port': 80, 'cidr_blocks': ['0.0.0.0/0'] },
    ]
)
...
This is required to ensure the security group ingress rules don’t conflict with the load balancer’s.
Step 8: Define the ALB
Now right after the security group creation, and before the EC2 creation block, add the load balancer creation steps:
...
vpc = aws.ec2.get_vpc(default=True)
vpc_subnets = aws.ec2.get_subnet_ids(vpc_id=vpc.id)

lb = aws.lb.LoadBalancer(
    "loadbalancer",
    internal=False,
    security_groups=[group.id],
    subnets=vpc_subnets.ids,
    load_balancer_type="application",
)

target_group = aws.lb.TargetGroup(
    "target-group", port=80, protocol="HTTP", target_type="ip", vpc_id=vpc.id
)

listener = aws.lb.Listener(
    "listener",
    load_balancer_arn=lb.arn,
    port=80,
    default_actions=[{"type": "forward", "target_group_arn": target_group.arn}],
)
...
Here, we’ve defined the ALB, its TargetGroup and some Listeners, but we haven’t actually added the EC2 instances to the ALB.
Step 9: Add the Instances to the ALB
Replace the EC2 creation block with the following:
...
ips = []
hostnames = []
for az in aws.get_availability_zones().names:
    server = aws.ec2.Instance(f'web-server-{az}',
      instance_type="t2.micro",
      security_groups=[group.name],
      ami=ami.id,
      user_data="""#!/bin/bash
echo \"Hello, World -- from {}!\" > index.html
nohup python -m SimpleHTTPServer 80 &
""".format(az),
      availability_zone=az,
      tags={
          "Name": "web-server",
      },
    )
    ips.append(server.public_ip)
    hostnames.append(server.public_dns)

    attachment = aws.lb.TargetGroupAttachment(f'web-server-{az}',
        target_group_arn=target_group.arn,
        target_id=server.private_ip,
        port=80,
    )

export('ips', ips)
export('hostnames', hostnames)
export("url", lb.dns_name)
After this change, your main.py should look like this:
"""An AWS Python Pulumi program"""

import pulumi
import pulumi_aws as aws


ami = aws.ec2.get_ami(
    most_recent="true",
    owners=["137112412989"],
    filters=[{"name": "name", "values": ["amzn-ami-hvm-*-x86_64-ebs"]}],
)

vpc = aws.ec2.get_vpc(default=True)
vpc_subnets = aws.ec2.get_subnet_ids(vpc_id=vpc.id)

group = aws.ec2.SecurityGroup(
    "web-secgrp",
    description="Enable HTTP Access",
    vpc_id=vpc.id,
    ingress=[
        {
            "protocol": "icmp",
            "from_port": 8,
            "to_port": 0,
            "cidr_blocks": ["0.0.0.0/0"],
        },
        {
            "protocol": "tcp",
            "from_port": 80,
            "to_port": 80,
            "cidr_blocks": ["0.0.0.0/0"],
        },
    ],
    egress=[
        {
            "protocol": "tcp",
            "from_port": 80,
            "to_port": 80,
            "cidr_blocks": ["0.0.0.0/0"],
        }
    ],
)

lb = aws.lb.LoadBalancer(
    "loadbalancer",
    internal=False,
    security_groups=[group.id],
    subnets=vpc_subnets.ids,
    load_balancer_type="application",
)

target_group = aws.lb.TargetGroup(
    "target-group", port=80, protocol="HTTP", target_type="ip", vpc_id=vpc.id
)

listener = aws.lb.Listener(
    "listener",
    load_balancer_arn=lb.arn,
    port=80,
    default_actions=[{"type": "forward", "target_group_arn": target_group.arn}],
)


ips = []
hostnames = []

for az in aws.get_availability_zones().names:
    server = aws.ec2.Instance(
        f"web-server-{az}",
        instance_type="t2.micro",
        vpc_security_group_ids=[group.id],
        ami=ami.id,
        user_data="""#!/bin/bash
echo \"Hello, World -- from {}!\" > index.html
nohup python -m SimpleHTTPServer 80 &
""".format(
            az
        ),
        tags={
            "Name": "web-server",
        },
    )
    ips.append(server.public_ip)
    hostnames.append(server.public_dns)

    attachment = aws.lb.TargetGroupAttachment(
        f"web-server-{az}",
        target_group_arn=target_group.arn,
        target_id=server.private_ip,
        port=80,
    )


pulumi.export("ips", ips)
pulumi.export("hostnames", hostnames)
pulumi.export("url", lb.dns_name)
This is all the infrastructure we need for our load balanced webserver. Let’s apply it.
Step 10: Deploy your Changes
Deploy these updates:
pulumi up
This should result in a fairly large update and, if all goes well, the load balancer’s resulting endpoint URL:
Updating (dev)

View Live: https://app.pulumi.com/beaucarnes/iac-lab2/dev/updates/5

     Type                             Name                   Status      Info
     pulumi:pulumi:Stack              iac-lab2-dev
 +   ├─ aws:lb:TargetGroup            target-group           created
 ~   ├─ aws:ec2:SecurityGroup         web-secgrp             updated     [diff: ~egress]
 +   ├─ aws:lb:LoadBalancer           loadbalancer           created
 +   ├─ aws:lb:TargetGroupAttachment  web-server-us-west-2a  created
 +   ├─ aws:lb:TargetGroupAttachment  web-server-us-west-2b  created
 +   ├─ aws:lb:TargetGroupAttachment  web-server-us-west-2c  created
 +   ├─ aws:lb:TargetGroupAttachment  web-server-us-west-2d  created
 +   └─ aws:lb:Listener               listener               created

Outputs:
    hostnames: [
        [0]: "ec2-34-222-148-4.us-west-2.compute.amazonaws.com"
        [1]: "ec2-54-69-196-240.us-west-2.compute.amazonaws.com"
        [2]: "ec2-54-186-64-129.us-west-2.compute.amazonaws.com"
        [3]: "ec2-52-25-211-116.us-west-2.compute.amazonaws.com"
    ]
    ips      : [
        [0]: "34.222.148.4"
        [1]: "54.69.196.240"
        [2]: "54.186.64.129"
        [3]: "52.25.211.116"
    ]
  + url      : "loadbalancer-c9a1e24-965935136.us-west-2.elb.amazonaws.com"

Resources:
    + 7 created
    ~ 1 updated
    8 changes. 5 unchanged

Duration: 3m28s
Step 11: Verify
Now we can curl the load balancer:
for i in {0..10}; do curl $(pulumi stack output url); done
Observe that the resulting text changes based on where the request is routed:
Hello, World -- from us-west-2a!
Hello, World -- from us-west-2a!
Hello, World -- from us-west-2d!
Hello, World -- from us-west-2b!
Hello, World -- from us-west-2b!
Hello, World -- from us-west-2c!
Hello, World -- from us-west-2b!
Hello, World -- from us-west-2a!
Hello, World -- from us-west-2c!
Hello, World -- from us-west-2d!
Hello, World -- from us-west-2a!
Step 12: Destroy Everything
Finally, destroy the resources and the stack itself:
pulumi destroy
pulumi stack rm
Lab 3: Deploying Docker images to ECS & Fargate
In this lab, you will use Pulumi to deploy a Docker Image to ECS with Fargate.
Let's start from the beginning again to get more practice.
Step 1: Create a Directory
Create a new directory and change into it:
cd ..
mkdir iac-lab3
cd iac-lab3
Pulumi will use the directory name as your project name by default. To create an independent project, simply name the directory differently.
Step 2: Initialize Your Project
A Pulumi project is just a directory with some files in it. It’s possible for you to create a new one by hand. The pulumi new command, however, automates the process:
pulumi new aws-python -y
This command has created all the files we need, initialized a new stack named dev (an instance of our project), and installed the needed package dependencies from PyPi.
Step 3: Inspect Your New Project
Our project is comprised of multiple files (these are the same as before so this is a review):
__main__.py: your program’s main entrypoint filerequirements.txt: your project’s Python dependency informationPulumi.yaml: your project’s metadata, containing its name and languagevenv: a virtualenv for your project
Run cat __main__.py to see the contents of your project’s empty program:
"""An AWS Python Pulumi program"""

import pulumi
from pulumi_aws import s3

# Create an AWS resource (S3 Bucket)
bucket = s3.Bucket('my-bucket')

# Export the name of the bucket
pulumi.export('bucket_name', bucket.id)
Feel free to explore the other files, although we won’t be editing any of them by hand.
Step 4: Configure an AWS Region
Configure the AWS region you would like to deploy to:
pulumi config set aws:region us-west-2
Step 5: Create an ECS Cluster
Remove all the boilerplate from the project bootstrap.
Import the AWS and Pulumi packages in an empty __main__.py file:
import pulumi
import pulumi_aws as aws
And now create a new ECS cluster. You will use the default values, so doing so is very concise:
After this change, your __main__.py should look like this:
import pulumi
import pulumi_aws as aws

cluster = aws.ecs.Cluster("cluster")
Step 6: Create a Load-Balanced Container Service
Next, allocate the application load balancer (ALB) and listen for HTTP traffic port 80. In order to do this, we need to find the default VPC and the subnet groups for it:
...
vpc = aws.ec2.get_vpc(default=True)
vpc_subnets = aws.ec2.get_subnet_ids(vpc_id=vpc.id)

group = aws.ec2.SecurityGroup(
    "web-secgrp",
    vpc_id=vpc.id,
    description='Enable HTTP access',
    ingress=[
        { 'protocol': 'icmp', 'from_port': 8, 'to_port': 0, 'cidr_blocks': ['0.0.0.0/0'] },
        { 'protocol': 'tcp', 'from_port': 80, 'to_port': 80, 'cidr_blocks': ['0.0.0.0/0'] }
    ],
    egress=[
        { 'protocol': "-1", 'from_port': 0, 'to_port': 0, 'cidr_blocks': ['0.0.0.0/0'] }
    ])

alb = aws.lb.LoadBalancer(
    "app-lb",
    internal="false",
    security_groups=[group.id],
    subnets=vpc_subnets.ids,
    load_balancer_type="application",
)

atg = aws.lb.TargetGroup(
    "app-tg",
    port=80,
    deregistration_delay=0,
    protocol="HTTP",
    target_type="ip",
    vpc_id=vpc.id,
)

wl = aws.lb.Listener(
    "web",
    load_balancer_arn=alb.arn,
    port=80,
    default_actions=[{"type": "forward", "target_group_arn": atg.arn}],
)
After this change, your __main__.py should look like this:
import pulumi
import pulumi_aws as aws

cluster = aws.ecs.Cluster("cluster")

vpc = aws.ec2.get_vpc(default=True)
vpc_subnets = aws.ec2.get_subnet_ids(vpc_id=vpc.id)

group = aws.ec2.SecurityGroup(
    "web-secgrp",
    vpc_id=vpc.id,
    description="Enable HTTP access",
    ingress=[
        {
            "protocol": "icmp",
            "from_port": 8,
            "to_port": 0,
            "cidr_blocks": ["0.0.0.0/0"],
        },
        {
            "protocol": "tcp",
            "from_port": 80,
            "to_port": 80,
            "cidr_blocks": ["0.0.0.0/0"],
        },
    ],
    egress=[
        {
            "protocol": "-1",
            "from_port": 0,
            "to_port": 0,
            "cidr_blocks": ["0.0.0.0/0"],
        }
    ],
)

alb = aws.lb.LoadBalancer(
    "app-lb",
    internal="false",
    security_groups=[group.id],
    subnets=vpc_subnets.ids,
    load_balancer_type="application",
)

atg = aws.lb.TargetGroup(
    "app-tg",
    port=80,
    deregistration_delay=0,
    protocol="HTTP",
    target_type="ip",
    vpc_id=vpc.id,
)

wl = aws.lb.Listener(
    "web",
    load_balancer_arn=alb.arn,
    port=80,
    default_actions=[{"type": "forward", "target_group_arn": atg.arn}],
)
Run your program with pulumi up:
Updating (dev)

View Live: https://app.pulumi.com/beaucarnes/iac-lab3/dev/updates/1

     Type                      Name          Status
 +   pulumi:pulumi:Stack       iac-lab3-dev  created
 +   ├─ aws:ecs:Cluster        cluster       created
 +   ├─ aws:ec2:SecurityGroup  web-secgrp    created
 +   ├─ aws:lb:TargetGroup     app-tg        created
 +   ├─ aws:lb:LoadBalancer    app-lb        created
 +   └─ aws:lb:Listener        web           created

Resources:
    + 6 created

Duration: 3m36s
We’ve fleshed out our infrastructure and added a LoadBalancer we can add infrastructure to, in the next steps we’ll run a container.
Step 7: Create ECS FargateService
In order to create a Fargate service, we need to add an IAM Role and a Task Definition and Service. The ECS Cluster will run the "nginx" image from the Docker Hub.
Firstly, we need to add a new import at the top of our file
import json
Now let’s define our IAM Role and attach a policy. You should define this at the end of your __main__.py:
...
role = aws.iam.Role("task-exec-role",
    assume_role_policy=json.dumps({
        "Version": "2008-10-17",
        "Statement": [{
            "Sid": "",
            "Effect": "Allow",
            "Principal": {
                "Service": "ecs-tasks.amazonaws.com"
            },
            "Action": "sts:AssumeRole"
        }]
    }))

rpa = aws.iam.RolePolicyAttachment("task-exec-policy",
    role=role.name,
    policy_arn="arn:aws:iam::aws:policy/service-role/AmazonECSTaskExecutionRolePolicy"
)
...
Then we can define a task definition for our ECS service:
task_definition = aws.ecs.TaskDefinition("app-task",
    family="fargate-task-definition",
    cpu="256",
    memory="512",
    network_mode="awsvpc",
    requires_compatibilities=["FARGATE"],
    execution_role_arn=role.arn,
    container_definitions=json.dumps([{
        "name": "my-app",
        "image": "nginx",
        "portMappings": [{
            "containerPort": 80,
            "hostPort": 80,
            "protocol": "tcp"
        }]
    }])
)

service = aws.ecs.Service("app-svc",
    cluster=cluster.arn,
    desired_count=1,
    launch_type="FARGATE",
    task_definition=task_definition.arn,
    network_configuration={
        "assign_public_ip": "true",
        "subnets": vpc_subnets.ids,
        "security_groups": [group.id]
    },
    load_balancers=[{
        "target_group_arn": atg.arn,
        "container_name": "my-app",
        "container_port": 80
    }],
    opts=pulumi.ResourceOptions(depends_on=[wl])
)

pulumi.export("url", alb.dns_name)
After these changes, your __main__.py should look like this
import pulumi
import pulumi_aws as aws
import json

cluster = aws.ecs.Cluster("cluster")

vpc = aws.ec2.get_vpc(default=True)
vpc_subnets = aws.ec2.get_subnet_ids(vpc_id=vpc.id)

group = aws.ec2.SecurityGroup(
    "web-secgrp",
    vpc_id=vpc.id,
    description="Enable HTTP access",
    ingress=[
        {
            "protocol": "icmp",
            "from_port": 8,
            "to_port": 0,
            "cidr_blocks": ["0.0.0.0/0"],
        },
        {
            "protocol": "tcp",
            "from_port": 80,
            "to_port": 80,
            "cidr_blocks": ["0.0.0.0/0"],
        },
    ],
    egress=[
        {
            "protocol": "-1",
            "from_port": 0,
            "to_port": 0,
            "cidr_blocks": ["0.0.0.0/0"],
        }
    ],
)

alb = aws.lb.LoadBalancer(
    "app-lb",
    internal="false",
    security_groups=[group.id],
    subnets=vpc_subnets.ids,
    load_balancer_type="application",
)

atg = aws.lb.TargetGroup(
    "app-tg",
    port=80,
    deregistration_delay=0,
    protocol="HTTP",
    target_type="ip",
    vpc_id=vpc.id,
)

wl = aws.lb.Listener(
    "web",
    load_balancer_arn=alb.arn,
    port=80,
    default_actions=[{"type": "forward", "target_group_arn": atg.arn}],
)

role = aws.iam.Role("task-exec-role",
    assume_role_policy=json.dumps({
        "Version": "2008-10-17",
        "Statement": [{
            "Sid": "",
            "Effect": "Allow",
            "Principal": {
                "Service": "ecs-tasks.amazonaws.com"
            },
            "Action": "sts:AssumeRole"
        }]
    }))

rpa = aws.iam.RolePolicyAttachment("task-exec-policy",
    role=role.name,
    policy_arn="arn:aws:iam::aws:policy/service-role/AmazonECSTaskExecutionRolePolicy"
)

task_definition = aws.ecs.TaskDefinition("app-task",
    family="fargate-task-definition",
    cpu="256",
    memory="512",
    network_mode="awsvpc",
    requires_compatibilities=["FARGATE"],
    execution_role_arn=role.arn,
    container_definitions=json.dumps([{
        "name": "my-app",
        "image": "nginx",
        "portMappings": [{
            "containerPort": 80,
            "hostPort": 80,
            "protocol": "tcp"
        }]
    }])
)

service = aws.ecs.Service("app-svc",
    cluster=cluster.arn,
    desired_count=1,
    launch_type="FARGATE",
    task_definition=task_definition.arn,
    network_configuration={
        "assign_public_ip": "true",
        "subnets": vpc_subnets.ids,
        "security_groups": [group.id]
    },
    load_balancers=[{
        "target_group_arn": atg.arn,
        "container_name": "my-app",
        "container_port": 80
    }],
    opts=pulumi.ResourceOptions(depends_on=[wl])
)

pulumi.export("url", alb.dns_name)
Step 8: Provision the Cluster and Service
Deploy the program to stand up your initial cluster and service:
pulumi up
This will output the status and resulting load balancer URL:
Updating (dev)

View Live: https://app.pulumi.com/beaucarnes/iac-lab3/dev/updates/2

     Type                             Name              Status      Info
     pulumi:pulumi:Stack              iac-lab3-dev
 +   ├─ aws:iam:Role                  task-exec-role    created
 ~   ├─ aws:lb:TargetGroup            app-tg            updated     [diff: ~deregistrationDelay]
 +   ├─ aws:iam:RolePolicyAttachment  task-exec-policy  created
 +   ├─ aws:ecs:TaskDefinition        app-task          created
 +   └─ aws:ecs:Service               app-svc           created

Outputs:
  + url: "app-lb-e92ae89-2123599743.us-west-2.elb.amazonaws.com"

Resources:
    + 4 created
    ~ 1 updated
    5 changes. 5 unchanged

Duration: 10s
You can access the URL from the output above in a web browser. Also, you can now curl the resulting endpoint:
curl $(pulumi stack output url)
And you’ll see the Nginx default homepage:
<!DOCTYPE html>
<html>
<head>
<title>Welcome to nginx!</title>
...
Step 9: Update the Service
Now, also update the desired container count from 1 to 3:
...
    desiredCount: 3,
...
Next update the stack:
pulumi up
The output should look something like this:
Updating (dev)

View Live: https://app.pulumi.com/beaucarnes/iac-lab3/dev/updates/3

     Type                 Name          Status      Info
     pulumi:pulumi:Stack  iac-lab3-dev
 ~   └─ aws:ecs:Service   app-svc       updated     [diff: ~desiredCount]

Outputs:
    url: "app-lb-e92ae89-2123599743.us-west-2.elb.amazonaws.com"

Resources:
    ~ 1 updated
    9 unchanged

Duration: 6s
Step 10: Destroy Everything
Finally, destroy the resources and the stack itself:
pulumi destroy
pulumi stack rm