

One of the biggest challenges in software development is time. It’s something we can’t easily get more of, but linting can help us make the most out of the time we have.
So what is linting?
lint, or a linter, is a tool that analyzes source code to flag programming errors, bugs, stylistic errors, and suspicious constructs. https://en.wikipedia.org/wiki/Lint(software)
Simply put, a linter is a tool that programmatically scans your code with the goal of finding issues that can lead to bugs or inconsistencies with code health and style. Some can even help fix them for you!
 Michael Scott - Tell me more
Take for instance, the following example:
const test = 'I am a test';
console.log(`Test: ${test}`);
const test = 'Another one.';
We’re declaring the constant test twice, which our javascript engine won’t be happy about. With the proper linter settings and watch configuration, instead of getting caught later as an error when the code runs, you’ll immediately get an error through your linter running in the background:
  10:9  error  Parsing error: Identifier 'test' has already been declared

   8 |   const test = 'I am a test';
   9 |   console.log(`Test: ${2}`);
> 10 |   const test = 'Another one.';
     |         ^
It might be pretty obvious that you have 2 of the same const declarations given this is only 3 lines, but in a more complex application, this can save tons of time having to hunt down a pesky bug that’s not always obvious.
What all can linting help with?
Lots of things, including but not limited to:
- Flagging bugs in your code from syntax errors
- Giving you warnings when code may not be intuitive
- Providing suggestions for common best practices
- Keeping track of TODO’s and FIXME’s
- Keeping a consistent code style
Most things you can think of probably already exist in one form or another, and if not, you can even create custom rules that fit your needs!
How is this actually helping or why should I care?
Probably the biggest overlying theme of the list above is the fact that these issues will be called out immediately. No longer will these issues creep up on you in the middle of running your app or give someone anxiety during a code review. No longer will you and your reviewer endlessly fight passive aggressively through the comments about whether or not to include a semicolon at the end of JS statements (you should ?).
 Grandma looking for a semicolon
All of those moments that stop you from being productive because of a silly syntax error or the micro-interactions you and your teammates have during a review take time. They add up and end up taking away the time you can spend fixing another bug or developing the next great feature of your product.
So how do I actually get started?
Even though there are linters for most, if not all, other mainstream languages, for the purpose of this post, I’m going to focus on Javascript. The same principles apply, but the tooling may be a bit different.
I’m going to run through how you can get set up for basic linting in a React app. You can easily follow along by spinning up your own React app or using my Gatsby starter: https://github.com/colbyfayock/gatsby-starter-sass#starting-from-scratch
Your Linter
To get started, we first need a linter. Probably the most popular in the Javascript world is ESLint. Your linter will actually be the engine for defining rules and parsing your files to test against. ESLint is available as an npm package by itself and once installed, out of the box it allows you to set up a basic configuration file and hit the ground running with some command line tools.
Let’s first add our ESLint dependency:
yarn add eslint -D
We’re installing this as a devDependency (hence the -D flag), because this isn’t something our application needs to run. After it’s successfully installed, let’s add it to our package.json as a script:
...
"scripts": {
  ...
  "lint": "eslint .  --ext .js"
  ...
},
...
In the above, we’re running our linter on the entire project directory on any file that has an extension of .js. If you're working with a large project with many file types, maybe even some you don't want linted, you can change that flag or be more specific with other options.
To support ESLint, we’ll need to do one more thing. Let’s add a file at the root of our project (probably where your package.json is) called .eslintrc.js and make the contents of the file simply:
module.exports = {};
Once you’re ready, you can run yarn lint and… get an error.
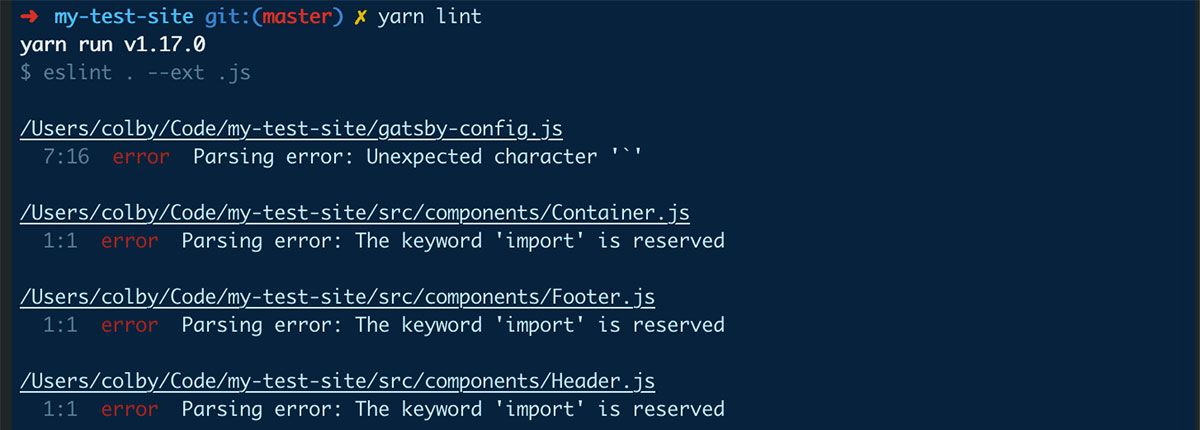 Lint results - Import errors
This is okay, and expected in our project, so let’s move on.
Your Parser
A common tool in the chain for Javascript developers is Babel, which allows you to write code with features that may not be supported in all browsers, such as using arrow functions, that are available in ES6, and other conventions like importing files via import.
The code you write may already run through Babel to work in a browser, but that doesn’t apply to ESLint by default, so ESLint allows you to specify a parser that allows the linting processing to look at the same code as your browser sees. In this case we’ll want to use Babel’s ESLint parser that’s made available to us.
To set that up, we’ll want to first install our dependency:
yarn add babel-eslint -D
Typically if you're using babel-eslint you'll want to make sure babel is installed next to it, but in our case, Gatsby already uses babel, so we don’t necessarily need to add it. After that’s set up, we’ll want to update our .eslintrc.js config file with some new options:
module.exports = {
    "env": {
        "browser": true,
        "node": true,
        "es6": true
    },
    "parser": "babel-eslint"
};
Here, we’re letting ESLint know that our environment will be run in node (Gatsby’s precompiling), inside the browser (the app), and it will use ES6. This helps ESLint know how to run your code. Additionally, we want to set up our parser to be babel-eslint.
Once we’re ready to go, run yarn lint again and… well nothing really happened.
 Lint results - Nothing happened
This is still expected, as we don’t have any rules set up!
Plugins for your code
Writing a React app? The Babel parser may help you transform your code, but you might have a hard time being productive, as ESLint needs to understand how it should work to lint your React files.
Part of the beauty of ESLint is that it allows you to configure plugins that have the opportunity to create and set rules for you. Luckily, along with our Babel parser above that does some of the heavy lifting, we have a React plugin available that does just that and takes care of linting the JSX for us.
Let’s first install our dependency:
yarn add eslint-plugin-react -D
Further, let’s update our .eslintrc.js file again:
module.exports = {
    "settings": {
        "react": {
            "version": "detect"
        }
    },
    "env": {
        "browser": true,
        "node": true,
        "es6": true
    },
    "plugins": [
        "react"
    ],
    "parser": "babel-eslint"
};
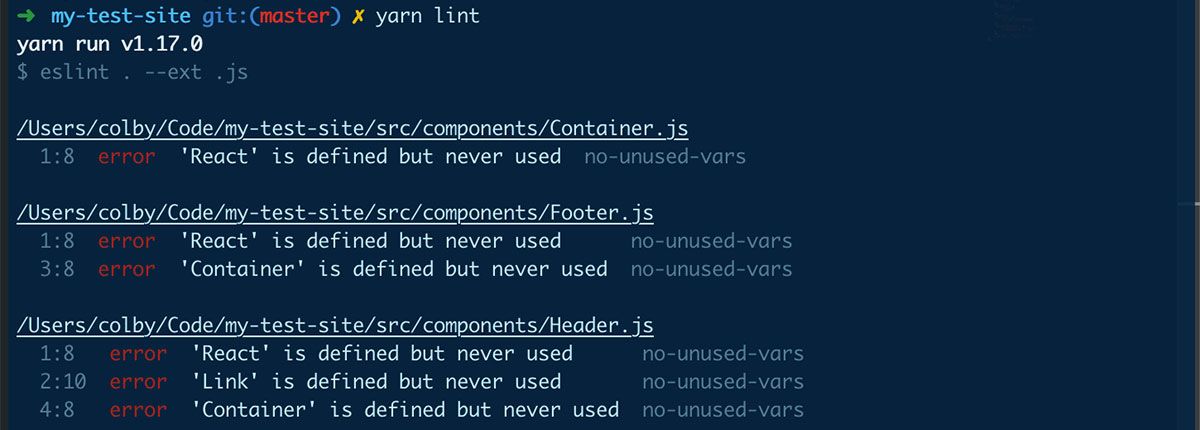
What we’re adding here is a setting that automatically detects what React version you’re using, which is helpful to let your linting get parsed properly, and then set up our react plugin that we installed above.
For one last final time, we will run our lint script and get nothing:
 Lint results - Nothing happened
Rules defined by others’s opinions
If you’re not really sure where to get started or just want to quickly get up and running, it’s recommend that you enable ESLint’s own recommended rules. Let’s add this to our .eslintrc.js config file:
module.exports = {
    "settings": {
        "react": {
            "version": "detect"
        }
    },
    "env": {
        "browser": true,
        "node": true,
        "es6": true
    },
    "plugins": [
        "react"
    ],
    "extends": [
        "eslint:recommended"
    ],
    "parser": "babel-eslint"
};
And let’s run our yarn lint.
Woah! This will immediately give you a lot errors, it seems like something’s wrong.
 Lint results - React errors
Since we’re running a React app, we also want to make sure our linter understands the rules it should follow, so let’s also add our React plugin to the .eslintrc.js config setup:
    "extends": [
        "eslint:recommended",
        "plugin:react/recommended"
    ],
Now if you run yarn lint, you get something a little more logical.
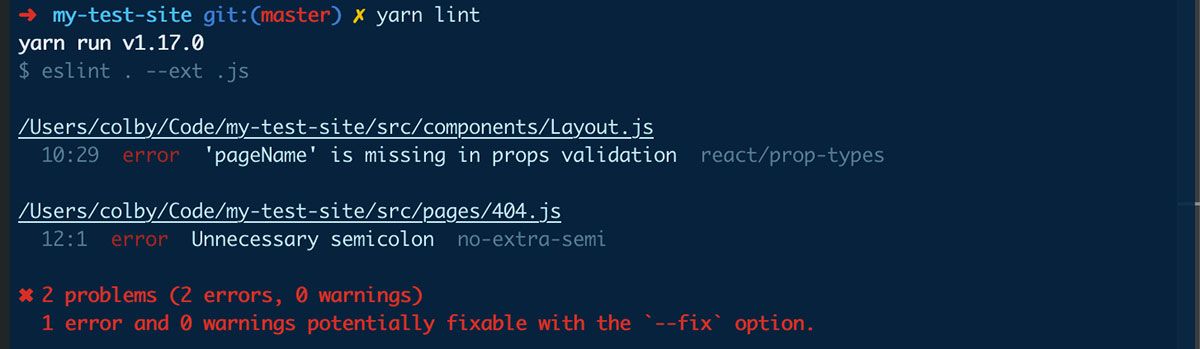 Lint results - Normal errors
If you’re following along, it looks like our starter app had a misplaced semicolon and a missing prop in our propTypes validation for Layout.js. Writing this helped me fix my own repo! ?
Going further, if those don’t seem to fit your needs, lots of developers and teams have published their own configurations that ESLint allows you to easily tap into.
Some popular ones include:
Not happy with the options available? You can even create and publish your own to either layer on top of others as a starting point or give it a go from scratch.
Let it do the work (most of it)
You don’t think I’m going to make you fix all of those thing yourself do you? Well, you may have to fix some, but let’s try to get ESLint to fix some of it for us.
If you noticed after we ran the command above, ESLint gave us an extra message:
 Lint results - Option to fix
So let’s give it a try! Let’s run:
yarn lint --fix
And what do you know, it now only gives us 1 linting error.
 Lint results - 1 error
Turns out ESLint was able to fix our semicolon issue automatically, but we’ll still have to add pageName to our Layout’s propTypes manually, not too much of a lift.
Running one more time and finally nothing again! But this time because everything's looking good.
 Lint results - No errors
Go forth and write messy code!
 Bruce Almighty - Typing
Kidding ? The good news here, is now you can easily take a look at the general health of your codebase as well as hopefully fix most of it automatically. This is going to save a lot of headaches as you work with others on your team, and generally, it’s nice to have all of your code neat and tidy.
This post is just getting started. ESLint is a wide open book with tons of plugins and rules, and it’s not the only linting tool in the game. Play around and find what fits best for you and your team. The little time spent configuring it to your app will save you lots more time in the long run.
Other linting tools to check out
- JSHint: an alternative to ESLint
- Stylelint: a linting tool for CSS and CSS-like syntaxes like Sass
- Awesome ESLint: a simple list of awesome configs, parsers, plugins, and other tools to boost your ESLint game
- Webhint: linting tool for accessibility, speed, and more website best practices
- A11y JSX Plugin: ESLint plugin for checking accessibility rules on JSX elements

Originally published at https://www.colbyfayock.com/2019/10/what-is-linting-and-how-can-it-save-you-time