

State is the most complex thing in React, and it's something both beginners and experienced developers struggle to understand. So in this article, we'll explore all the basics of state in React.
Before understanding state, let's first understand some fundamentals so it's easy to wrap your head around state later.
How to Render Data in the UI in React
To render anything on the screen, we use the ReactDOM.render method in React.
It has the following syntax:
ReactDOM.render(element, container[, callback])
elementcan be any HTML element, JSX or a component that returns JSXcontaineris the element on the UI inside which we want to render the datacallbackis the optional function we can pass which gets called once something is rendered or re-rendered on the screen
Take a look at the below code:
import React from "react";
import ReactDOM from "react-dom";

const rootElement = document.getElementById("root");

ReactDOM.render(<h1>Welcome to React!</h1>, rootElement);
Here's a Code Sandbox Demo.
Here, we're just rendering a single h1 element to the screen.
To render multiple elements we can do it as shown below:
import React from "react";
import ReactDOM from "react-dom";

const rootElement = document.getElementById("root");

ReactDOM.render(
  <div>
    <h1>Welcome to React!</h1>
    <p>React is awesome.</p>
  </div>,
  rootElement
);
Here's a Code Sandbox Demo.
We can also take out the JSX and put it in a variable which is the preferred way of rendering content if it gets larger, like this:
import React from "react";
import ReactDOM from "react-dom";

const rootElement = document.getElementById("root");

const content = (
  <div>
    <h1>Welcome to React!</h1>
    <p>React is awesome.</p>
  </div>
);

ReactDOM.render(content, rootElement);
Here's a Code Sandbox Demo.
Here, we've also added an extra pair of round brackets to align the JSX properly and to make it a single JSX expression.
If you want to understand JSX in detail and its various important features, check out my article here.
Now, let's display a button and some text on the screen:
import React from "react";
import ReactDOM from "react-dom";

const rootElement = document.getElementById("root");

let counter = 0;

const handleClick = () => {
  counter++;
  console.log("counter", counter);
};

const content = (
  <div>
    <button onClick={handleClick}>Increment counter</button>
    <div>Counter value is {counter}</div>
  </div>
);

ReactDOM.render(content, rootElement);
Here's a Code Sandbox Demo.
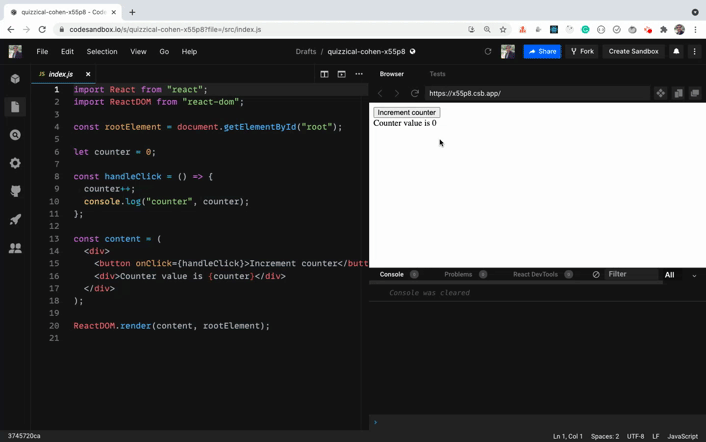
As you can see, when we click on the button, the counter value is incremented as you can see in the console. But on the UI it's not getting updated.
This is because we're rendering the content JSX only once using the ReactDOM.render method when the page is loaded. And we're not calling it again – so even though the value of counter is updating, it's not getting displayed on the UI. So let's fix this.
import React from "react";
import ReactDOM from "react-dom";

const rootElement = document.getElementById("root");

let counter = 0;

const handleClick = () => {
  counter++;
  console.log("counter", counter);
  renderContent();
};

const renderContent = () => {
  const content = (
    <div>
      <button onClick={handleClick}>Increment counter</button>
      <div>Counter value is {counter}</div>
    </div>
  );

  ReactDOM.render(content, rootElement);
};

renderContent();
Here's a Code Sandbox Demo.
Here, we've moved the content JSX and ReactDOM.render method call inside a renderContent function. Then once it's defined, we're calling the function so it will render the content on the UI on page load.
Note that we've also added the renderContent function call inside the handleClick function. So every time we click on the button, the renderContent function will be called and we'll see the updated counter on the UI.
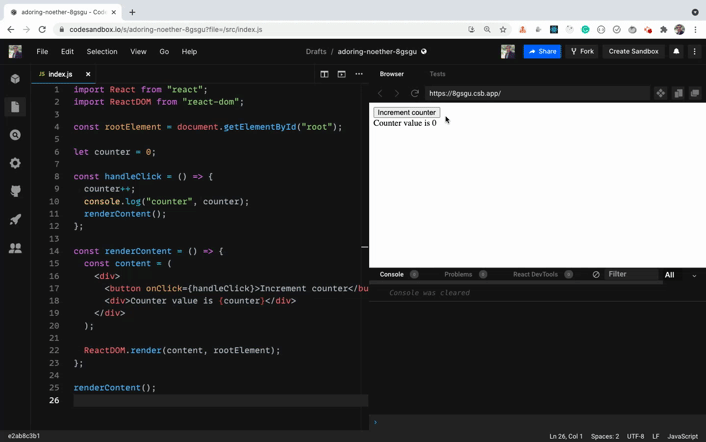
As can you see, it's working as expected and the counter value is correctly getting displayed on the UI.
You might think that it's costly to re-render the entire DOM again on every button click – but it's not. This is because React uses a Virtual DOM algorithm where it checks what has been changed on the UI and only re-renders the elements which were changed. So the entire DOM is not re-rendered again.
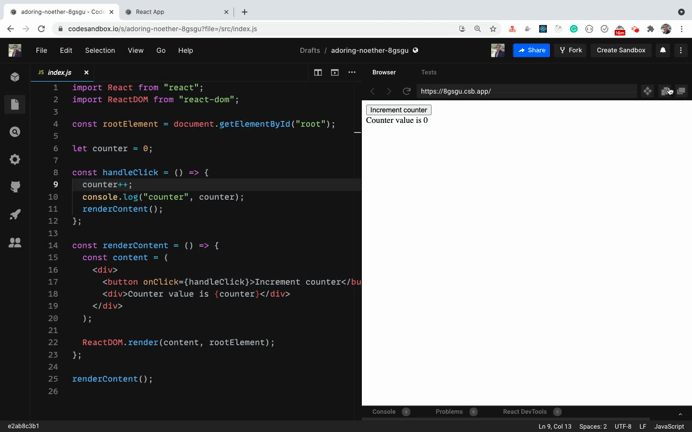
Here's a Preview link for the Code Sandbox to try it yourself.
As you can see in the HTML structure, only the counter value is re-rendered as it's the only thing flashing in the HTML structure. This is the reason React is so fast and the virtual DOM makes React more useful.
But still, it's not feasible to call the renderContent function every time we want to update the UI. So React added the concept of State.
Introduction to State in React
State allows us to manage changing data in an application. It's defined as an object where we define key-value pairs specifying various data we want to track in the application.
In React, all the code we write is defined inside a component.
There are mainly two ways of creating a component in React:
- class-based component
- functional component
We'll start with class-based components now. Later in this article, we will see a functional component way of creating components.
You should know how to work with class-based components as well as functional components, including hooks.
Instead of directly learning functional components with React hooks, you should first understand class-based components so it's easy to clear the basics.
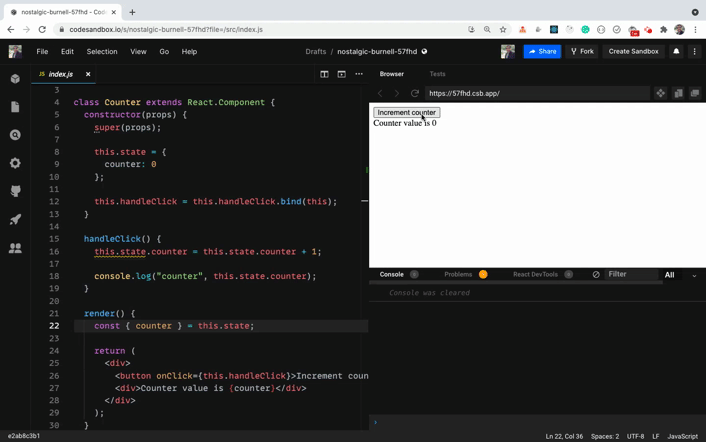
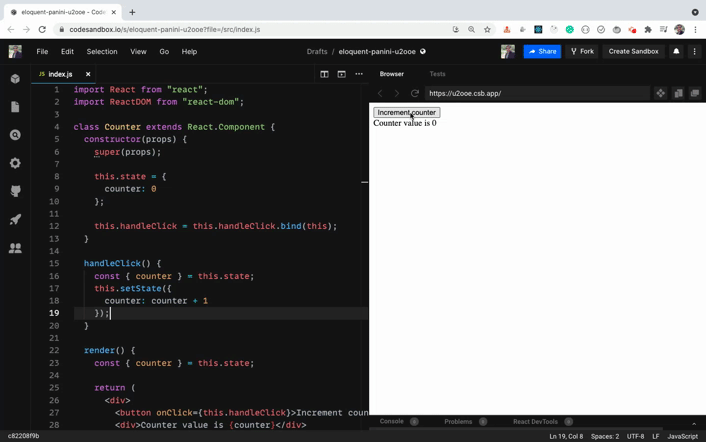
You can create a component by using an ES6 class keyword and by extending the Component class provided by React like this:
import React from "react";
import ReactDOM from "react-dom";

class Counter extends React.Component {
  constructor(props) {
    super(props);

    this.state = {
      counter: 0
    };

    this.handleClick = this.handleClick.bind(this);
  }

  handleClick() {
    this.state.counter = this.state.counter + 1;

    console.log("counter", this.state.counter);
  }

  render() {
    const { counter } = this.state;

    return (
      <div>
        <button onClick={this.handleClick}>Increment counter</button>
        <div>Counter value is {counter}</div>
      </div>
    );
  }
}

const rootElement = document.getElementById("root");
ReactDOM.render(<Counter />, rootElement);
Note that the name of the component starts with a capital letter (
Counter).
Here's a Code Sandbox Demo.
Let's explore what we're doing here.
- Inside the constructor function, we're first calling
superby passingpropsto it. Then we've defined the state as an object withcounteras a property of the object. - We're also binding
this's context to thehandleClickfunction so inside thehandleClickfunction we get the correct context forthis. - Then inside the
handleClickfunction, we're updating thecounterand logging it to the console. - And inside the
rendermethod, we're returning the JSX that we want to render on the UI.
The counter is correctly getting updated as you can see in the console – but it's not getting updated on the UI.
This is because we're directly updating the state inside the handleClick function as:
this.state.counter = this.state.counter + 1
So React does not re-render the component (and it's also a bad practice to directly update state).
Never ever directly update/mutate state in React, as it's a bad practice and it will cause issues in your application. Also, your component will not be re-rendered on state change if you make a direct state change.
Syntax of setState
To make the state change, React gives us a setState function that allows us to update the value of the state.
The setState function has the following syntax:
setState(updater, [callback])
updatercan either be a function or an objectcallbackis an optional function that gets executed once the state is successfully updated
Calling
setStateautomatically re-renders the entire component and all its child components. We don't need to manually re-render as seen previously using therenderContentfunction.
How to Use a Function to Update State in React
Let's modify the above Code Sandbox to use the setState function for updating the state.
Here's an updated Code Sandbox Demo.
If you check the updated handleClick function, it looks like this:
handleClick() {
  this.setState((prevState) => {
    return {
      counter: prevState.counter + 1
    };
  });

  console.log("counter", this.state.counter);
}
Here, we're passing a function as a first argument to the setState function and we're returning a new state object with counter incremented by 1 based on the previous value of counter.
We're using the arrow function in the above code, but using a normal function will also work.
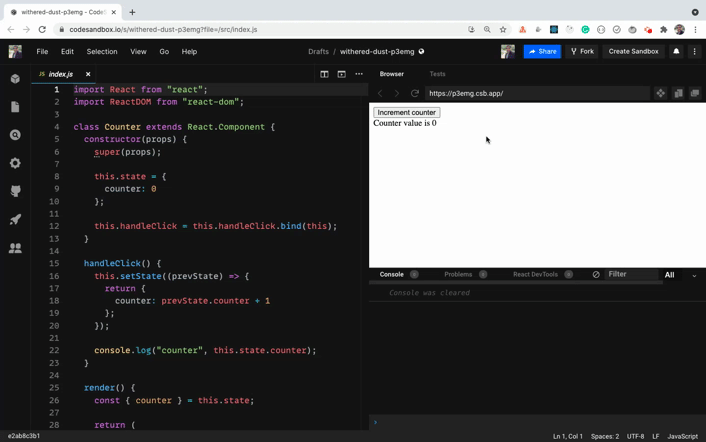
If you notice, we're correctly getting the updated value of the counter on the UI. But in the console, we're getting the previous counter value even though we've added console.log after the this.setState call.
This is because the
setStatefunction is asynchronous in nature.
This means that even though we called setState to increment the counter value by 1, it does not happen immediately. This is because when we call the setState function, the entire component gets re-rendered – so React needs to check what all needs to be changed using the Virtual DOM algorithm and then perform various checks for an efficient update of the UI.
This is the reason you may not get the updated value for counter immediately after the call to setState.
This is a very important thing to keep in mind in React, as you will encounter difficult to debug issues if you don't write your code keeping in mind that
setStateis asynchronous in React.
If you want to get the updated value of the state immediately after the setState call, you can pass a function as the second argument to the setState call which will be executed once the state is updated.
Here's a Code Sandbox Demo with that change.
As you can see, we're getting the correct value of counter in the console as soon as it's updated on the UI.
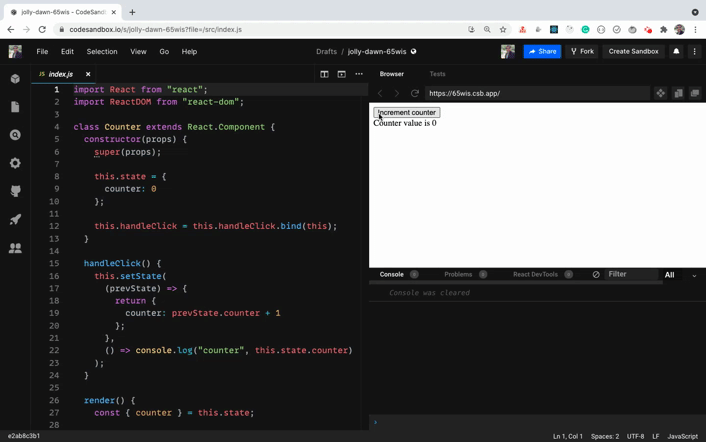
In the above demo, the handleClick function looks like this:
handleClick() {
  this.setState(
    (prevState) => {
      return {
        counter: prevState.counter + 1
      };
    },
    () => console.log("counter", this.state.counter)
  );
}
So here, for the setState function call, we're passing two arguments. The first is a function that returns a new state and the second is a callback function that will be called once the state is updated. We're just logging the updated counter value to the console in the callback function.
Even though React provides a callback function to get the updated state value immediately, it's recommended that you use it only for quick testing or logging.
Instead, React recommends that you use the componentDidUpdate method, which is a React life cycle method that looks like this:
componentDidUpdate(prevProps, prevState) {
  if (prevState.counter !== this.state.counter) {
    // do something
    console.log("counter", this.state.counter);
  }
}
Here's a Code Sandbox Demo.
You can find more information about why to use the componentDidUpdate instead of setState callback here.
How to Simplify State and Method Declaration
If you see the constructor code in the above Code Sandbox demos, you will see that it looks like this:
constructor(props) {
  super(props);

  this.state = {
    counter: 0
  };

  this.handleClick = this.handleClick.bind(this);
}
To use the this keyword inside the handleClick event handler, we have to bind it in the constructor like this:
this.handleClick = this.handleClick.bind(this);
Also, to declare the state, we have to create a constructor, add a super call inside it, and then we can declare the state.
This is not just cumbersome but also makes the code unnecessarily complicated.
As the number of event handlers increases, the number of .bind calls also increases. We can avoid doing this using the class properties syntax.
Here's an updated Code Sandbox Demo with the class properties syntax.
Here, we've moved the state directly inside the class like this:
state = {
   counter: 0
};
and the handlerClick event handler is changed to arrow function syntax like this:
handleClick = () => {
  this.setState((prevState) => {
    return {
      counter: prevState.counter + 1
    };
  });
};
As arrow functions do not have their own this context, it will take the context as the class so there is no need to use the .bind method.
This makes the code a lot simpler and easier to understand as we don't need to keep binding every event handler.
create-react-app already has in-built support for it and you can start using this syntax right now.
We'll be using this syntax from now onwards, as it is the more popular and preferred way to write React components.
If you want to learn more about this class properties syntax, check out my article here.
How to Use ES6 Shorthand Syntax
If you check the setState function call in the above code sandbox, it looks like this:
this.setState((prevState) => {
  return {
    counter: prevState.counter + 1
  };
});
It's a lot of code. Just for returning an object from a function, we're using 5 lines of code.
We can simplify it to a single line as below:
this.setState((prevState) => ({ counter: prevState.counter + 1 }));
Here, we've wrapped the object in round brackets to make it implicitly return. This works because if we have a single statement in an arrow function we can skip the return keyword and curly brackets like this:
const add = (a, b) => {
 return a + b;
}

// the above code is the same as below code:

const add = (a, b) => a + b;
But as the opening curly bracket is considered the start of the function body, we need to wrap the object inside round brackets to make it work properly.
Here's an updated Code Sandbox Demo with this change.
How to Use an Object as a State Updater in React
In the above code, we've used a function as the first argument for setState but we can also pass an object as an argument.
Here's a Code Sandbox Demo.
The component code looks like this:
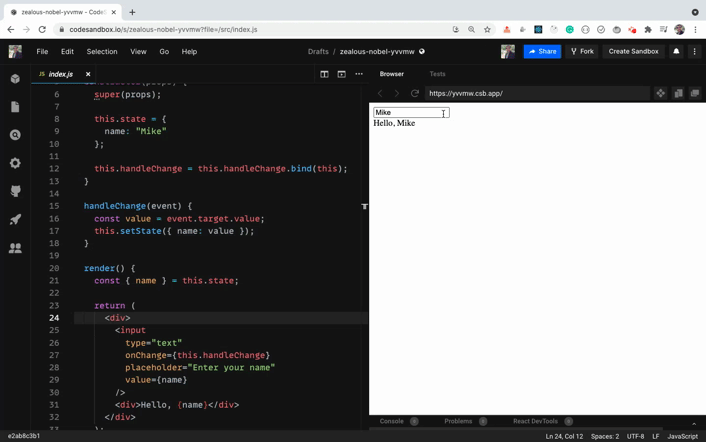
class User extends React.Component {
  state = {
    name: "Mike"
  };

  handleChange = (event) => {
    const value = event.target.value;
    this.setState({ name: value });
  };

  render() {
    const { name } = this.state;

    return (
      <div>
        <input
          type="text"
          onChange={this.handleChange}
          placeholder="Enter your name"
          value={name}
        />
        <div>Hello, {name}</div>
      </div>
    );
  }
}
Here, we've added an input textbox where the user types their name and it's displayed below the textbox as the user types into the textbox.
In the state, we've initialized the name property to Mike and we've added an onChange handler to the input textbox like this:
state = {
  name: "Mike"
};

...

<input
  type="text"
  onChange={this.handleChange}
  placeholder="Enter your name"
  value={name}
/>
So when we type anything in the textbox, we're updating the state with the value typed by passing an object to the setState function.
handleChange = (event) => {
  const value = event.target.value;
  this.setState({ name: value });
}
But which form of
setStateshould we use – what's preferred? We have to decide whether to pass an object or a function as a first argument to thesetStatefunction.
The answer is: pass an object if you don't need the prevState parameter to find the next state value. Otherwise pass the function as the first argument to setState.
But you need to be aware of one issue with passing an object as an argument.
Take a look at this Code Sandbox Demo.
In the above demo, the handleClick method looks like this:
handleClick = () => {
  const { counter } = this.state;
  this.setState({
    counter: counter + 1
  });
}
We're taking the current value of the counter and incrementing it by 1. It works fine, as you can see below:
Now, take a look at this Code Sandbox Demo which is a modified version of the previous Code Sandbox demo.
Our handleClick method looks like this now:
handleClick = () => {
  this.setState({
    counter: 5
  });

  const { counter } = this.state;

  this.setState({
    counter: counter + 1
  });
}
Here, we're first setting the counter value to 5 and then incrementing it by 1. So the expected value of counter is 6. Let's see if that's the case.
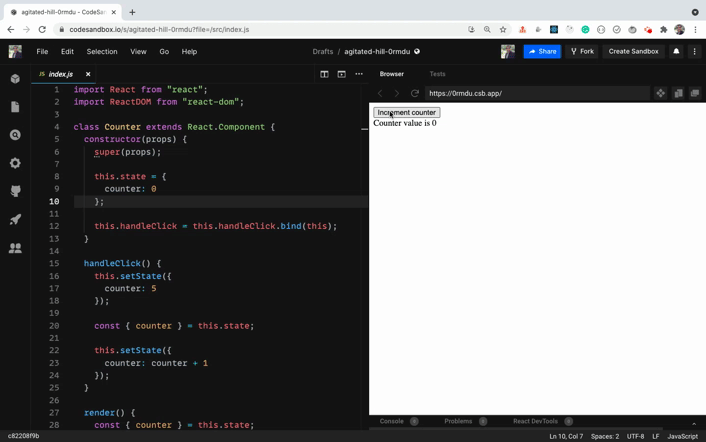
As you can see, when we click the button the first time, we expected the counter value to become 5 – but it becomes 1, and on every subsequent click it's incremented by 1.
This is because, as we have seen previously, the setState function is asynchronous in nature. When we call setState, the value of the counter does not become 5 immediately, so on the next line we're getting the counter value of 0 to which we've initialized the state in the beginning.
So it becomes 1 when we call setState again to increment the counter by 1, and it keeps on incrementing by 1 only.
To fix this issue, we need to use the updater syntax of setState where we pass a function as the first argument.
Here's a Code Sandbox Demo.
In the above demo, the handleClick method looks like this now:
handleClick = () => {
  this.setState({
    counter: 5
  });

  this.setState((prevState) => {
    return {
      counter: prevState.counter + 1
    };
  });

  this.setState((prevState) => {
    return {
      counter: prevState.counter + 1
    };
  });
}
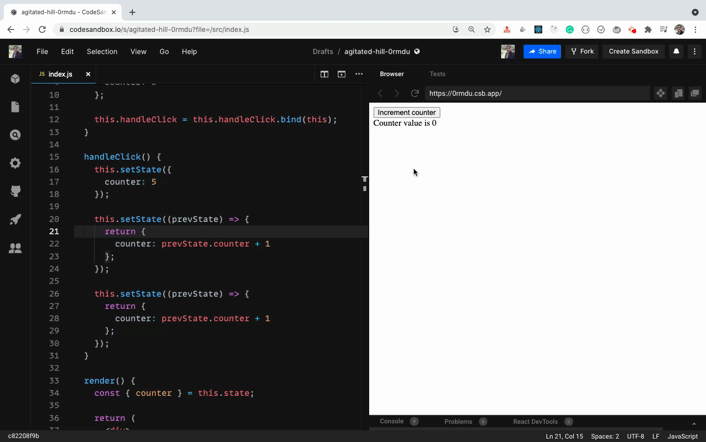
As you can see, when we first click on the button, the value of counter becomes 7. This is as expected, because first we set it to 5 and then incremented it by 1 twice so it becomes 7. And it remains at 7 even if we click the button multiple times, because on every click we're re-setting it to 5 and incrementing twice.
This is because inside the handleClick we're calling setState to set the counter value to 5 by passing an object as the first argument to the setState function. After that, we've called two setState calls where we're using the function as the first argument.
So how does this work correctly?
When React sees a setState call, it schedules an update to make a change to the state because it's asynchronous. But before it completes the state change, React sees that there is another setState call.
Because of this, React will not re-render immediately with a new counter value. Instead it merges all the setState calls and updates the counter based on the previous value of counter as we've used the prevState.counter to calculate the counter value.
And once all the setState calls are completed successfully, only then does React re-render the component. So even if there are three setState calls, React will re-render the component only once, which you can confirm by adding a console.log statement inside the render method.
So the point to remember is that you should be careful when using an object as the first argument to a
setStatecall, as it might result in an unpredictable outcome. Use the function as the first argument to get the correct result based on the previous result.
You might not call setState again and again as we've done in the above demo, but you might call it inside another function as shown below:
state = {
 isLoggedIn: false
};

...

doSomethingElse = () => {
 const { isLoggedIn } = this.state;
 if(isLoggedIn) {
   // do something different
 }
};

handleClick = () => {
  // some code
  this.setState({ isLoggedIn: true);
  doSomethingElse();
}
In the above code, we've defined an isLoggedIn state and we have two functions handleClick and doSomethingElse. Inside the handleClick function, we're updating the isLoggedIn state value to true and immediately we're calling the doSomethingElse function on the next line.
So inside doSomethingElse you might think that you're going to get the isLoggedIn state as true and the code inside the if condition will be executed. But it will not be executed because setState is asynchronous and the state might not be updated immediately.
That's why React added lifecycle methods like componendDidUpdate to do something when state or props are updated.
Keep an eye out to check if you're using the same
statevariable again in the next line or next function to do some operation to avoid these undesired results.
How to Merge setState Calls in React
Take a look at this CodeSandbox Demo.
Here, we have username and counter properties declared in the state like this:
state = {
  counter: 0,
  username: ""
};
and handleOnClick and handleOnChange event handlers declared like this:
handleOnClick = () => {
  this.setState((prevState) => ({
    counter: prevState.counter + 1
  }));
};

handleOnChange = (event) => {
  this.setState({
    username: event.target.value
  });
};
Check the setState calls in the above functions. You can see that inside the handleOnClick function, we're only setting the state for counter, and inside the handleOnChange function we're only setting the state for username.
So we don't need to set the state for both of the state variables at the same time like this:
this.setState((prevState) => ({
    counter: prevState.counter + 1,
    username: "somevalue"
}));
We can update only the one which we want to update. React will manually merge the other state properties so we don't need to worry about manually merging them ourselves.
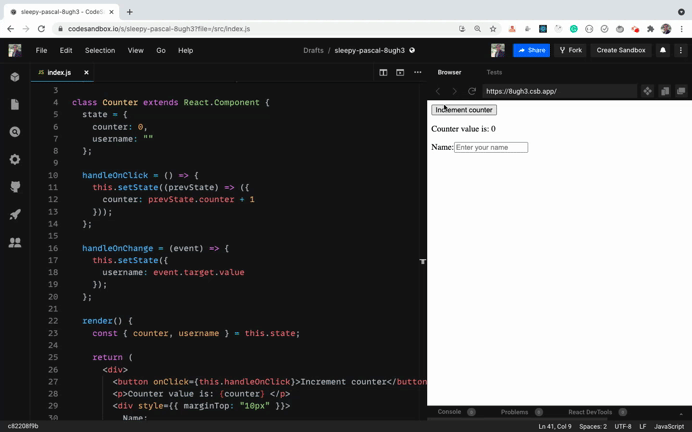
As you can see, we're successfully changing the counter and username independently of each other.
How to Use State in Functional Components in React
Up until now, we've seen how to use state in class-based components. Let's now see how to use it in functional components.
Functional components are similar to class components, except that they do not have state and lifecycle methods. This is why you may have heard them called stateless functional components.
These components only accept props and return some JSX.
Functional components make code shorter and easier to understand and test.
They're also a little faster to execute, as they don't have lifecycle methods. They also don't have the extra data brought by the React.Component class which we extend in class based components.
Take a look at this Code Sandbox Demo.
Here, we're loading a list of 20 random users from the random user generator API, when the component is loaded inside the componentDidMount method like this:
componentDidMount() {
  axios
    .get("https://randomuser.me/api/?page=0&results=20")
    .then((response) => this.setState({ users: response.data.results }))
    .catch((error) => console.log(error));
}
And once we've gotten those users, we're setting it to the users state and displaying it on the UI.
{users.map((user) => (
  <User key={user.login.uuid} name={user.name} email={user.email} />
))}
Here, we're passing all the data that we need to display to the User component.
The User component looks like this:
const User = (props) => {
  const { name, email } = props;
  const { first, last } = name;

  return (
    <div>
      <p>
        Name: {first} {last}
      </p>
      <p>Email: {email} </p>
      <hr />
    </div>
  );
};
This User component is a functional component.
A functional component is a function that starts with a capital letter and returns JSX.
Always remember to start your component name with a capital letter like User whether it's a class-based component or a functional component. That's how React differentiates it from normal HTML elements when we use them like <User />.
If we use <user />, React will check for the HTML element with the name user. Since there is no such HTML element, you'll not get the desired output.
In the above User functional component, we get the props passed to the component inside the props parameter of the function.
So instead of using this.props as in class components, we're using just props.
We never use the this keyword in functional components, so it avoids the various issues associated with this binding.
Therefore, functional components are preferred over class components.
Once we have props, we're using the object destructuring syntax to get the values out of it and display on the UI.
How to Use State in React Hooks
Starting with version 16.8.0, React introduced hooks. And they've completely changed the way we write code in React. Using React Hooks we can use state and lifecycle methods inside functional components.
React hooks are functional components with added state and lifecycle methods.
So now, there is very little to no difference between class-based components and functional components.
Both of them can have state and life cycle methods.
But React hooks are now preferred for writing React components because they make the code shorter and easier to understand.
You will rarely find React components written using class components nowadays.
To declare state using React Hooks, we need to use the useState hook.
The useState hook accepts a parameter which is the initial value of the state.
In class-based components, state is always an object. But when using useState, you can provide any value as the initial value like a number, string, boolean, object, array, null, and so on.
The useState hook returns an array whose first value is the current value of the state. The second value is the function which we will use to update the state similar to the setState method.
Let’s take an example of a class based component which uses state. We will convert it into a functional component using hooks.
import React from 'react';
import ReactDOM from 'react-dom';

class App extends React.Component {
  state = {
    counter: 0
  };

  handleOnClick = () => {
    this.setState(prevState => ({
      counter: prevState.counter + 1
    }));
  };

  render() {
    return (
      <div>
        <p>Counter value is: {this.state.counter} </p>
        <button onClick={this.handleOnClick}>Increment</button>
      </div>
    );
  }
}

ReactDOM.render(<App />, document.getElementById('root'));
Here's a Code Sandbox Demo which is written using class components.
Let’s convert the above code to use hooks.
import React, { useState } from "react";
import ReactDOM from "react-dom";

const App = () => {
  const [counter, setCounter] = useState(0);

  return (
    <div>
      <div>
        <p>Counter value is: {counter} </p>
        <button onClick={() => setCounter(counter + 1)}>Increment</button>
      </div>
    </div>
  );
};

ReactDOM.render(<App />, document.getElementById("root"));
Here's a Code Sandbox Demo which is written using React hooks.
As you can see, using React hooks makes the code a lot shorter and easier to understand.
Let’s understand the above code.
- To use the
useStatehook, we need to import it as we have done it in the first line. - Inside the App component, we are calling
useStateby passing0as the initial value and using destructuring syntax. We stored the array values returned byuseStateintocounterandsetCountervariables. - It's a common convention to prefix the function name used to update the state with the
setkeyword as insetCounter. - When we click the increment button, we are defining an inline function and calling the
setCounterfunction by passing the updated counter value. - Note that as we already have the counter value, we have used that to increment the counter using
setCounter(counter + 1) - Since there is a single statement in the inline on click handler, there is no need to move the code into a separate function. Though you can do that if the code inside the handler becomes complex.
If you want to learn more details about useState and other React hooks (along with examples), then check out my Introduction to React Hooks article.
Thanks for reading!
Want to learn all ES6+ features in detail including let and const, promises, various promise methods, array and object destructuring, arrow functions, async/await, import and export and a whole lot more from scratch?
Check out my Mastering Modern JavaScript book. This book covers all the pre-requisites for learning React and helps you to become better at JavaScript and React.
Check out free preview contents of the book here.
Also, you can check out my free Introduction to React Router course to learn React Router from scratch.
Want to stay up to date with regular content regarding JavaScript, React, Node.js? Follow me on LinkedIn.
