
By Leonardo Maldonado
So, you’ve studied HTML, you’ve created your first tags, learned about CSS, made beautiful forms, amazing buttons, responsive pages and have started to show everyone how amazing all that was.
But then you decide that you want to take another step in your learning, and you’ve started wonder to yourself: “How can I add animation to my page? I wish that button made some animation on my page when I clicked it!”
Well, that’s where the DOM comes to solve your problem. You’ve probably heard a lot about it, but you might not know yet what is it and what problems it solves. So let’s dig in.
So, what’s the DOM?
Do you know all those cool animations that you see around, that make you think to yourself, “Wow, I wish I could make something like that”? All of those animations are made by manipulating the DOM. I will now explain to you how to start manipulating it and making your websites look cooler.
The DOM (Document Object Model) is an interface that represents how your HTML and XML documents are read by the browser. It allows a language (JavaScript) to manipulate, structure, and style your website. After the browser reads your HTML document, it creates a representational tree called the Document Object Model and defines how that tree can be accessed.
Advantages
By manipulating the DOM, you have infinite possibilities. You can create applications that update the data of the page without needing a refresh. Also, you can create applications that are customizable by the user and then change the layout of the page without a refresh. You can drag, move, and delete elements.
As I said, you have infinite possibilities — you just need to use your creativity.
Representation by the browser

In the image above, we can see the representational tree and how it is created by the browser. In this example, we have four important elements that you’re gonna see a lot:
- Document: It treats all the HTML documents.
- Elements: All the tags that are inside your HTML or XML turn into a DOM element.
- Text: All the tags’ content.
- Attributes: All the attributes from a specific HTML element. In the image, the attribute class=”hero” is an attribute from the _<_p> element.
Manipulating the DOM
Now we’re getting to the best part: starting to manipulate the DOM. First, we’re gonna create an HTML element as an example to see some methods and how events work.
<!DOCTYPE html> <html lang="pt-br"> <head> <meta charset="UTF-8"> <meta name="viewport" content="width=device-width, initial-scale=1.0"> <meta http-equiv="X-UA-Compatible" content="ie=edge"> <title>Entendendo o DOM (Document Object Model)</title> </head> <body> <div class="container"> <h1><time>00:00:00</time></h1> <button id="start">Start</button> <button id="stop">Stop</button> <button id="reset">Reset</button> </div> </body> </html>
Very simple, right? Now we’re going to learn more about DOM methods: how to get our elements and start manipulating.
Methods
The DOM has a lot of methods. They are the connection between our nodes (elements) and events, something that we’ll learn more about later. I’m gonna show you some of the most important methods and how they’re used. There are a lot more methods that I’m not going to show you here, but you can see all of them methods here.
getElementById()
This method returns the element that contains the name id passed. As we know, id’s should be unique, so it’s a very helpful method to get only the element you want.
var myStart = document.getElementsById('start');
myStart: Our variable name that looks similar to our id passed.
start: id passed. And in case we do not have any id with that specific name, it returns null.
getElementsByClassName()
This method returns an HTMLCollection of all those elements containing the specific name class passed.
var myContainer = document.getElementsByClassName('container');
myContainer: Our variable name that looks similar to our class passed.
.container: our class passed. In case we do not have any class with that specific name, it returns null.
getElementsByTagName()
This works the same way as those methods above: it also returns an HTMLCollection, but this time with a single difference: it returns all those elements with the tag name passed.
var buttons = document.getElementsByTagName('button');
buttons: Our variable name that looks similar to our tag name passed.
button: tag name that we want to get.
querySelector()
It returns the first element that has the specific CSS selector passed. Just remember that the selector should follow the CSS syntax. In case you do not have any selector, it returns null.
var resetButton = document.querySelector('#reset');
resetButton: Our variable name that looks similar to our selector passed.
#reset: selector passed, and if you don’t have any selector that matches it returns null.
querySelectorAll()
Very similar to the querySelector() method, but with a single difference: it returns all the elements that match with the CSS selector passed. The selector should also follow the CSS syntax. In case you do not have any selector, it returns null.
var myButtons = document.querySelector('#buttons');
myButtons: Our variable name that looks similar to our selectors passed.
#buttons: selector passed, if you don’t have any selector that matches it returns null.
Those are some the most used DOM methods. There are several more methods that you can use, like the createElement(), which creates a new element in your HTML page, and setAttribute() that lets you set new attributes for elements HTML. You can explore them on your own.
Again, you can find all the methods here, on the left side in Methods. I really recommend you take a look at some of the others because you might need one of them sometime soon.
Now, we’re going to learn about Events — after all without them we can’t make animations in our pages.
Events
The DOM elements have methods, as we just discussed, but they also have events. These events are responsible for make interactivity possible in our page. But here’s one thing that you might not know: events are also methods.
click
One of the most used events is the click event. When the user clicks on a specific element, it will realize some action.
myStart.addEventListener('click', function(event) {
// Do something here.
}, false);
The addEventListener() parameters are:
- The type of the event that you want (in this case ‘click’).
- A callback function
- The useCapture by default is false. It indicates whether or not you want to “capture” the event.
select
This events is for when you want to dispatch something when a specific element is selected. In that case we’re gonna dispatch a simple alert.
myStart.addEventListener('select', function(event) {
alert('Element selected!');
}, false);
These are some of the most commonly used events. Of course, we have a lot of other events that you can use, like drag & drop events — when a user starts to drag some element you can make some action, and when they drop that element you can make another action.
Now, we’re gonna see how we can traverse the DOM and use some properties.
Traversing the DOM
You can traverse the DOM and use some properties that we’re gonna see now. With these properties, you can return elements, comments, text, and so on.
.childNodes
This property returns a nodeList of child nodes of the given element. It returns text, comments, and so on. So, when you want to use it, you should be careful.
var container = document.querySelector('.container');
var getContainerChilds = container.childNodes;
.firstChild
This property returns the first child of the given element.
var container = document.querySelector('.container');
var getFirstChild = container.firstChild;
.nodeName
This property returns the name of the given element. In this case, we passed a div, so it will return “div”.
var container = document.querySelector('.container');
var getName = container.nodeName;
.nodeValue
This property is specific for texts and comments, as it returns or sets the value of the current node. In this case, since we passed a div, it will return null.
var container = document.querySelector('.container')
var getValue = container.nodeValue;
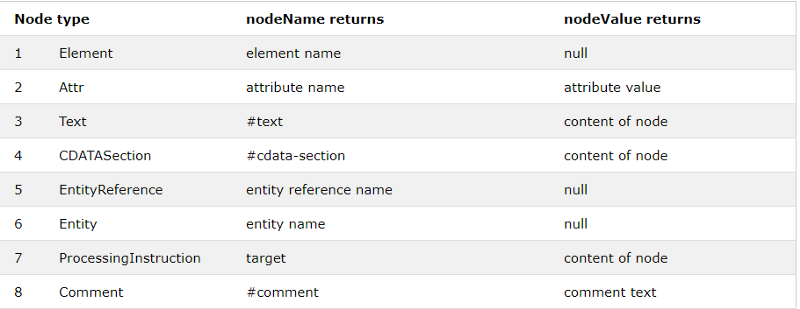
.nodeType
This property returns the type of the given element. In this case, it returns “1”.
var container = document.querySelector('.container')
var getValue = container.nodeType;
But, what does “1” mean anyway? It is basically the nodeType of the given element. In this case, it is an ELEMENT_NODE and returns null. If this were an attribute, it would be returned as “2” to us and the attribute value.
You can read more about nodeTypes here.
Elements
These properties, instead of those above, return to us only elements. They are more often used and recommended because they can cause less confusion and are easier to understand.
.parentNode
This property returns the parent of the node given.
var container = document.querySelector('.container')
var getParent = container.parentNode;
.firstElementChild
Returns the first child element of the given element.
var container = document.querySelector('.container')
var getValue = container.firstElementChild;
.lastElementChild
Returns the last child element of the given element.
var container = document.querySelector('.container')
var getValue = container.lastElementChild;
These are some of the many properties that the DOM has. It’s very important for you to know the basics about the DOM, how it works, and its methods and properties, because some day you may need it.
Conclusion
The DOM provides us with several important API's for creating fantastic and innovative applications. If you understand the basics of it you can create incredible things. If you want to read more about the DOM, you can click here and read all the MDN docs.
? Follow me on Twitter!
⭐ Follow me on GitHub!
I’m looking for a remote opportunity, so if have any I’d love to hear about it, so please contact me!