
JavaScript arrays are one of the most important data structures in the language, since everything is already an object in JavaScript.
They're useful in so many applications, and many other data structures build on top of JavaScript arrays and objects. While the language provides a lot of helpful array and object methods, you can take it even a step further using Collect.js.
This article takes you through:
What Is Collect.js?
The official docs of Collect.js describes it as a "Convenient and dependency free wrapper for working with arrays and objects."
A simpler way to explain this is that Collect.js is a JavaScript library for working with arrays and objects. It provides a layer on top of the built-in functions to make working with them easier.
Collect.js works how Laravel collections (where the inspiration came from) work. It makes it very easy for Laravel developers, when working with JavaScript, to develop as fast as they would if they were using PHP. But this doesn't mean a native JavaScript developer wouldn't find it really helpful, too.
Collect.js is growing gradually, as it currently has over 6k stars on GitHub and about 200k weekly downloads on NPM at the time of this writing.
How to Install Collect.js
To start using Collect.js in your projects, you have to install it first. Like other JavaScript libraries, you can easily install Collect.js using npm or yarn. You can also install it using a CDN. For this tutorial, we will install it using npm like this:
npm i collect.js
After installation, you can import it into the modules where you need it, like this:
import collect from 'collect.js';
And once it has been imported, you can begin making magic with Collect.js.
You can read about other installation methods on the official documentation website.
How to Use Collect.js
After installation and importation, to use Collect.js in your projects you'll need to convert your required data to a Collect.js collection.
A Collect.js collection is a JavaScript object that has functions not natively available to regular JavaScript arrays and objects.
To create a collection, simply use the collect method imported earlier on any array or object. It's that simple – here's an example:
const students = ['John', 'James', 'Ian', 'David'];

const studentsCollection = collect(students);
Now, using an IDE like WebStorm, you can see methods available to the simple collection you just created:
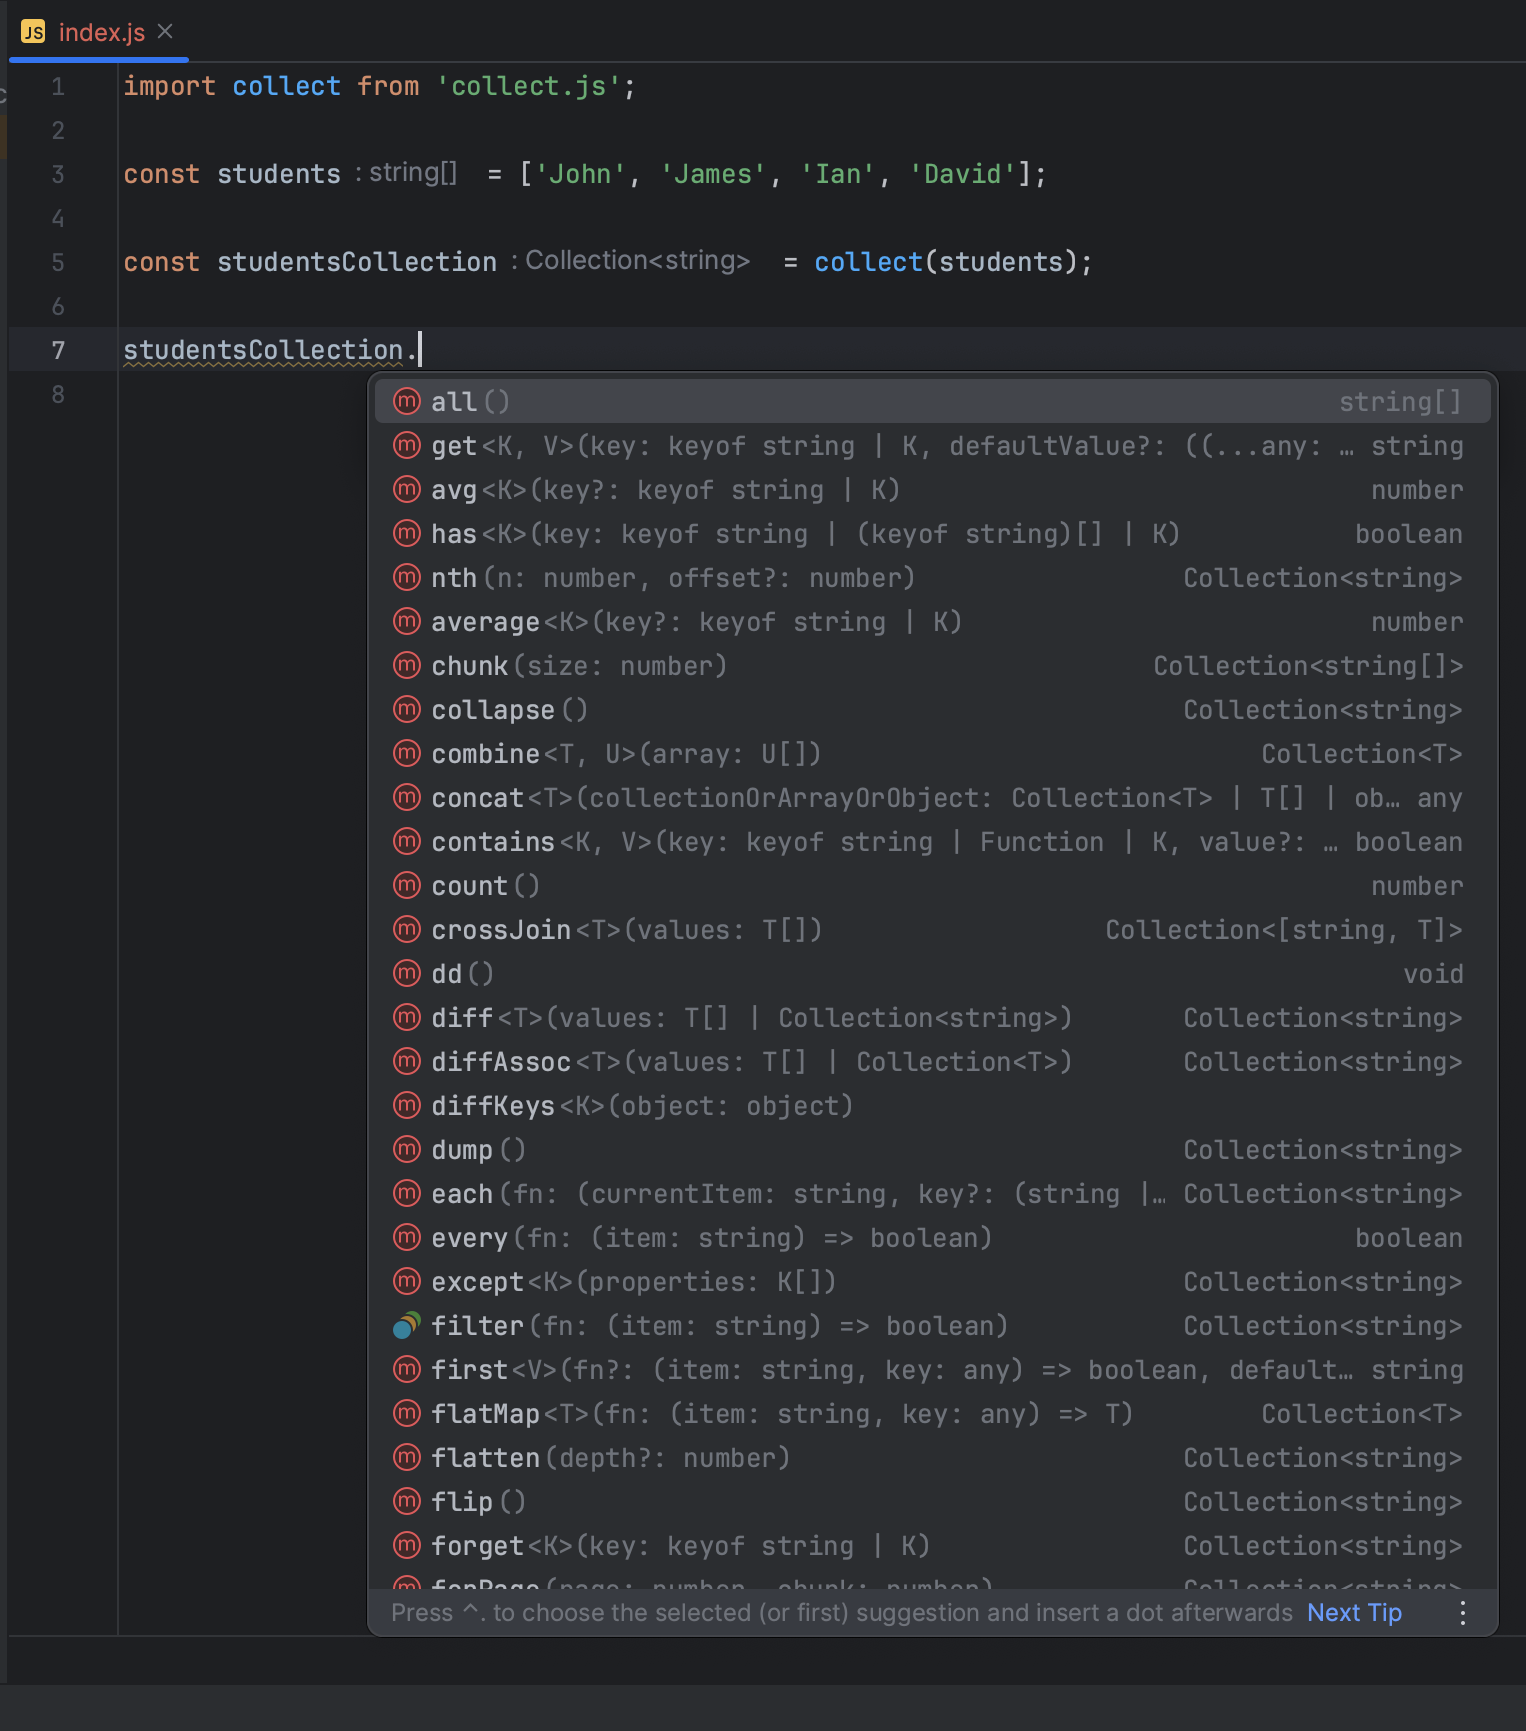 List of available methods
This article does not cover all of these functions, but you can see that you now have more than JavaScript originally offers through Collect.js.
Some Collect.js Methods
To help understand how much Collect.js simplifies common array and object methods, we'll now look at how to use some very useful Collect.js methods.
The average method (or avg)
This method, as you may assume, calculates an average of a collection of numbers. Here's how you use it:
const numbers = [1, 2, 3, 4, 5, 6, 7, 8, 9, 10];
const average = collect(numbers).avg();

console.log(average); // 5.5
In this example, we've create an array of numbers between 1 and 10, inclusive. Then we get the average of these numbers using Collect.js.
To do this in vanilla JavaScript, you would have to first sum the numbers using array.reduce or a loop, then get the length of the original array, and divide the sum by this length. See the below example implementation:
const sum = arr => arr.reduce( ( p, c ) => p + c, 0 );
const size = numbers.length;
const average = sum(numbers) / size;

console.log(average); // 5.5
You can see that it's way easier and more elegant using Collect.js.
You can also use the average method directly on more complex structures like an array of objects. Here's an example where the average score of a class of students, stored in an array of students details with a scores key, is calculated using Collect.js:
const studentsDetails = [
    { name: 'John', score: 40, subject: 'Maths' },
    { name: 'James', score: 70, subject: 'Science' },
    { name: 'Ian', score: 50, subject: 'Maths' },
    { name: 'David', score: 60, subject: 'Science' },
];

const studentsCollection = collect(studentsDetails);
const averageScore = studentsCollection.avg('score');
console.log(averageScore); // 55
Here the average is gotten in a very straightforward approach and takes less effort than doing it in vanilla JavaScript. And it uses the short hand avg instead of the longer average.
The chunk method
This method breaks an array into smaller bits based on a given size. This is a common operation when dealing with JavaScript arrays in real life. A common use case would be in pagination of records.
Using the same studentsDetails array created in the last example, I could break down the collection into groups of two using the chunk method, like this:
const studentsCollection = collect(studentsDetails);
const studentGroups = studentsCollection.chunk(2);
This breaks down the original studentsCollection array into two sub collections that look like this:
Collection {
  items: [
    { name: 'John', score: 40, subject: 'Maths' },
    { name: 'James', score: 70, subject: 'Science' }
  ]
}
Collection {
  items: [
    { name: 'Ian', score: 50, subject: 'Maths' },
    { name: 'David', score: 60, subject: 'Science' }
  ]
}
To achieve a similar result in vanilla JavaScript takes more effort as you would require a loop:
const chunkedArray = [];
for (let i = 0; i < studentsDetails.length; i += 2) {
    const chunk = studentsDetails.slice(i, i + 2);
    chunkedArray.push(chunk);
}

console.log(chunkedArray);
The contains method
You can use this method to check whether some key or value exists in a collection. This function allows you to check regardless of the shape or structure of the data.
For example, to check the existing studentDetails for the subject Physics, you can do this:
const studentsDetailsCollection = collect(studentsDetails);

console.log(studentsDetailsCollection.contains('Physics')); // false
To check if we have a student named Science instead of the subject, we could specify what field to check by passing in the field name as a first parameter before the search value:
const studentsDetailsCollection = collect(studentsDetails);

console.log(studentsDetailsCollection.contains('name', 'Science')); // false
You can even check to see if the collection contains values that match a certain condition. Like to see if any student scored more than 50:
const studentsDetailsCollection = collect(studentsDetails);

console.log(studentsDetailsCollection.contains((value, key) => value.score > 50)); // true
To perform any of these checks in vanilla JavaScript would involve using a loop to check each object in the array. You could also do it using the some method.
The diff method
This method is used to get the difference between two collections. The collections could be plain arrays or array of objects.
const numbers = collect([1, 2, 3, 4, 5, 6, 7, 8, 9, 10]);
const primeNumbers = collect([2, 3, 5, 7]);

console.log(numbers.diff(primeNumbers).all()); // [ 1, 4, 6, 8, 9, 10 ]
Here we get the numbers that are not prime between 1 and 10 inclusive by removing the array of primeNumbers from the array of those numbers using the diff method.
The get method
This method is used to get values from a collection. If the collection was created from an array, it can accept the array index to return the value at that position.
If the collection was created from an object, it can accept a key and return the value for that key. It returns null when no value is found. You can pass in a default value to prevent it from returning null.
Using the numbers collection created in the last example, you can get the first and twelfth elements, and return 10 if it doesn't exist, like this:
const firstNumber = numbers.get(0);
const twelfthNumber = numbers.get(11, 10);

console.log(firstNumber); // 1
console.log(twelfthNumber); // 10
The firstNumber returns 1 as expected, but the twelfthNumber returns 10, instead of returning null or throwing an error. This is very useful when dealing with user inputs and having optional parameters.
The all method
This method has already been used in a few examples, so you can probably guess it's usage already. You use it to get the object or array under the collection.
Using this method on the numbers collection just returns the original array of numbers:
console.log(numbers.all()); // [ 1, 2, 3, 4, 5, 6, 7, 8, 9, 10 ]
The groupBy() method
If you have any SQL experience, this method name will sound familiar. It works similarly to the SQL function, too: it groups data in a collection by a given key.
Using this method, we can group the students by the subject offered, like this:
const studentsGroupedBySubject = collect(studentsDetails).groupBy('subject');
console.log(studentsGroupedBySubject.all());
This will create two subcollections for the two subjects, maths and physics.
{
  Maths: Collection { items: [ [Object], [Object] ] },
  Science: Collection { items: [ [Object], [Object] ] }
}
The isEmpty and isNotEmpty methods
The isEmpty method checks is a collection is empty, and the isNotEmpty checks otherwise. These methods help prevent the object spoofing vulnerability.
console.log(numbers.isEmpty()) // false
console.log(numbers.isNotEmpty()) // true
The first and last methods
These method names are as descriptive as they can be. The first method gets the first element of a collection. It can also be used to get the first that matches a condition.
For example, to get the first student that scores more than 40 in the subject maths, you can use the first method like this:
console.log(studentsDetailsCollection.first((student) => student.score > 40 && student.subject === 'Maths'));
The last method is also very similar to the first method. It gets the last element of a collection when called with no condition. When a condition is specified, it gets the last element that matches that condition.
For example, to get the last student that fails maths in the studentsDetailsCollection, use this code:
console.log(studentsDetailsCollection.last((student) => student.score < 40 && student.subject === 'Maths'));
This last example returns undefined as no student fails maths.
To acheive these same results using vanilla JavaScript would involve a loop that checks each element and keeps track of the first and last that match the condition, like this:
const getFirstStudentThatPassesMaths = (studentDetails) => {
    let firstStudentThatPassesMaths = undefined;

    studentDetails.forEach((student) => {
        if (student.subject === 'Maths' && student.score > 40) {
            firstStudentThatPassesMaths = student;
            return false;
        }
    });

    return firstStudentThatPassesMaths;
}

const getLastStudentThatFailsMaths = (studentDetails) => {
    let lastStudentThatFailsMaths = undefined;

    studentDetails.forEach((student) => {
        if (student.subject === 'Maths' && student.score < 40) {
            lastStudentThatFailsMaths = student;
        }
    });

    return lastStudentThatFailsMaths;
}

console.log(getFirstStudentThatPassesMaths(studentsDetails));
console.log(getLastStudentThatFailsMaths(studentsDetails));
See how much simpler the Collect.js implementations are.
The macro method
This method is very useful, as it allows you even extend Collect.js further by adding your own methods. It has the following structure:
collect().macro('functionName', function () {
    // function body
});
Here, functionName is the name of the new function you're adding, and the function body is where your new logic goes.
For example, to assign grades to students using our studentsDetailsCollection, we can create a new method called grade. We can make it a bit more complex and have the function modify the collection by adding the calculated grade to each student object.
collect().macro('grade', function () {
    return this.map(item => {
        if (item.score >= 70) item.grade = 'A';
        else if (item.score >= 60) item.grade = 'B';
        else if (item.score >= 50) item.grade = 'C';
        else if (item.score >= 45) item.grade = 'D';
        else if (item.score >= 40) item.grade = 'E';
        else item.grade = 'F';

        return item;
    });
});
You can then call the method on the collection like any other built-in method like this:
studentsDetailsCollection.grade();
After modification, your collection will look like this:
[
  { name: 'John', score: 40, subject: 'Maths', grade: 'E' },
  { name: 'James', score: 70, subject: 'Science', grade: 'A' },
  { name: 'Ian', score: 50, subject: 'Maths', grade: 'C' },
  { name: 'David', score: 60, subject: 'Science', grade: 'B' }
]
Summary
I hope you now understand how to simplify your JavaScript development using simple Collect.js functions. This article only covers some of the most useful methods, but there are more available. To learn more, refer to the official documentation.
If you have any questions or relevant advice, please get in touch with me.
To read more of my articles or follow my work, you can connect with me on LinkedIn, Twitter, and Github. It’s quick, it’s easy, and it’s free!