

기사 원문: How to Search and Filter Components in React
리액트 앱을 만들다보면, 당신의 사용자가 검색을 해서 정확한 결과를 얻기를 원할겁니다. 그런데 만약 API에서 엄청난 양의 아이템을 받게 된다면 사용자들이 많은 아이템들을 쉽게 찾을 수 있는 방법을 찾아야할 거에요.
이번 튜토리얼에서는 예제로 Frontend Mentor’s free advanced API project를 사용할 것입니다.
목차
1. 시작하기
2. 리액트 셋팅하기
3. 데이터 받아오기
4. API에서 아이템 찾기
5. 지역에서 아이템 필터링하기
시작하기
이번 튜토리얼을 위해서 우리는 Apilayer가 제공하는 무료 API인 REST COUNTRIES API을 사용할 겁니다.
기본적으로 우리의 API의 엔드포인트인 https://restcountries.eu/rest/v2/all 에서 데이터를 가져올 겁니다. 그리고 사용자가 읽을 수 있는 형식으로 데이터를 표기할 겁니다.
그러고 나면 우리는 특정 나라를 이름과 수도로 사용자가 쉽게 사용할 수 있는 방법을 제공해보도록 합시다. 여기 어느 나라의 응답 예시를 드릴게요.
"name": "Colombia",
"topLevelDomain": [".co"],
"alpha2Code": "CO",
"alpha3Code": "COL",
"callingCodes": ["57"],
"capital": "Bogotá",
"altSpellings": ["CO", "Republic of Colombia", "República de Colombia"],
"region": "Americas",
"subregion": "South America",
"population": 48759958,
"latlng": [4.0, -72.0],
"demonym": "Colombian",
"area": 1141748.0,
"gini": 55.9,
"timezones": ["UTC-05:00"],
"borders": ["BRA", "ECU", "PAN", "PER", "VEN"],
"nativeName": "Colombia",
"numericCode": "170",
"currencies": [{
    "code": "COP",
    "name": "Colombian peso",
    "symbol": "$"
}],
"languages": [{
    "iso639_1": "es",
    "iso639_2": "spa",
    "name": "Spanish",
    "nativeName": "Español"
}],
"translations": {
    "de": "Kolumbien",
    "es": "Colombia",
    "fr": "Colombie",
    "ja": "コロンビア",
    "it": "Colombia",
    "br": "Colômbia",
    "pt": "Colômbia"
},
"flag": "<https://restcountries.eu/data/col.svg>",
"regionalBlocs": [{
    "acronym": "PA",
    "name": "Pacific Alliance",
    "otherAcronyms": [],
    "otherNames": ["Alianza del Pacífico"]
}, {
    "acronym": "USAN",
    "name": "Union of South American Nations",
    "otherAcronyms": ["UNASUR", "UNASUL", "UZAN"],
    "otherNames": ["Unión de Naciones Suramericanas", "União de Nações Sul-Americanas", "Unie van Zuid-Amerikaanse Naties", "South American Union"]
}],
"cioc": "COL"
}]
이 튜토리얼이 끝날 때 쯤이면 당신은 API를 통해 검색하는 법을 배우고 리액트를 통해 요청한 결과만을 반환하는 법을 배울 수 있으면 좋겠습니다!
리액트 셋팅하기
어떠한 설정 없이도 모던 빌드 환경을 제공하는 create-react-app 으로 우리 프로젝트를 셋팅 할 겁니다.
리액트를 셋팅하기 위해서 터미널을 실행(아니면 당신이 사용하는 시스템에서 제공하거나 VS Code와 같은 에디터에서 제공하는 터미널)하고 아래의 커맨드를 실행시키세요.
npx create-react-app my-app
cd my-app
npm start
만약 create-react-app 으로 프로젝트를 제대로 구성하는 것이 확신이 없다면 create-react-app-dev 이곳에서 공식 가디으 문서를 참조해보세요.
이번 튜토리얼에선 실시간 결과를 보여드리기 위해, 우리는 코드펜을 우리의 프로젝트에도 사용할 겁니다. Lathryx가 만든 코드펜 템플릿을 이용해보세요. 그렇게 했다면 우리는 코드펜에서 리액트 셋팅을 할 수 있습니다.
API 엔드포인트에서 데이터를 가져오기
지금 우리는 리액트 프로젝트 셋팅을 성공적으로 완료했고 이제 API에서 데이터를 가져와볼 시간입니다. 리액트에서 데이터를 가져오는 다양한 방법이 있는데 가장 유명한 두개는 Axios(프로미스 기반 HTTP 클라이언트)와 Fetch API(브라우저에 내장된 웹 API) 입니다.
우리는 브라우저에서 제공하는 Fetch API를 사용할 것이고 API 엔드포인트에서 데이터를 가져오는 것은 Ajax를 사용할 것입니다. 여기 React에서 Ajax와 API을 훅으로 사용하는 예시가 있습니다.
function MyComponent() {
      const [error, setError] = useState(null);
      const [isLoaded, setIsLoaded] = useState(false);
      const [items, setItems] = useState([]);

      // Note: the empty deps array [] means
      // this useEffect will run once
      // similar to componentDidMount()
      useEffect(() => {
        fetch("<https://api.example.com/items>")
          .then(res => res.json())
          .then(
            (result) => {
              setIsLoaded(true);
              setItems(result);
            },
            // Note: it's important to handle errors here
            // instead of a catch() block so that we don't swallow
            // exceptions from actual bugs in components.
            (error) => {
              setIsLoaded(true);
              setError(error);
            }
          )
      }, [])

      if (error) {
        return <div>Error: {error.message}</div>;
      } else if (!isLoaded) {
        return <div>Loading...</div>;
      } else {
        return (
          <ul>
            {items.map(item => (
              <li key={item.id}>
                {item.name} {item.price}
              </li>
            ))}
          </ul>
        );
      }
    }
10번째 줄에서 보면 엔드포인트에서 데이터를 가져오고 있고 데이터를 받아왔을 때 컴포넌트를 업데이트하기 위해 setState를 사용하고 있습니다.
27번째 줄에서는 에러메세지를 표시하고 있는데 이것은 우리가 API에서 데이터를 가져오기 실패했을 때 사용하기 위해서 입니다. 데이터가져오기에 실패하지 않는다면 데이터를 리스트로 보여줄 것입니다.
만약 리액트로 리스트를 표현하는 것이 익숙하지 않다면 저는 React Lists And Keys의 가이드를 보고 올 것을 추천드립니다.
이제 이 코드를 이용해서 REST COUNTRIES API에서 데이터를 가져오고 표시해보도록 합시다.
위의 예제 코드에서 React에서 useState를 가져오고 10번재 라인을 아래와 같이 바꿔보겠습니다.
fetch("<https://restcountries.eu/rest/v2/all>")
이것들을 모두 합치면 우리는 아래와 같은 코드를 갖게 됩니다.
import { useState, useEffect } from "<https://cdn.skypack.dev/react>";

    // Note: the empty deps array [] means
    // this useEffect will run once
    function App() {
        const [error, setError] = useState(null);
        const [isLoaded, setIsLoaded] = useState(false);
        const [items, setItems] = useState([]);

        useEffect(() => {
            fetch("<https://restcountries.eu/rest/v2/all>")
                .then((res) => res.json())
                .then(
                    (result) => {
                        setIsLoaded(true);
                        setItems(result);
                    },
                    // Note: it's important to handle errors here
                    // instead of a catch() block so that we don't swallow
                    // exceptions from actual bugs in components.
                    (error) => {
                        setIsLoaded(true);
                        setError(error);
                    }
                );
        }, []);
참고: "[<https://cdn.skypack.dev/react>](<https://cdn.skypack.dev/react>)"; 로부터 useState와 useEffect를 가져오고 있습니다. 이것은 우리가 Codepen에서 리액트를 CDN을 사용해서 가져오고 있기 때문입니다. 만약 당신이 리액트를 지역적으로 셋팅했다면 import { useState, useEffect } from "react"; 를 사용해야 할것입니다.
그리고 나서 우리는 받아온 데이터를 나라들을 목록으로 표시하려고 합니다. 최종적으로 코드는 아래와 같이 되겠지요 :
// Note: the empty deps array [] means
    // this useEffect will run once
    function App() {
        const [error, setError] = useState(null);
        const [isLoaded, setIsLoaded] = useState(false);
        const [items, setItems] = useState([]);

        useEffect(() => {
            fetch("<https://restcountries.eu/rest/v2/all>")
                .then((res) => res.json())
                .then(
                    (result) => {
                        setIsLoaded(true);
                        setItems(result);
                    },
                    // Note: it's important to handle errors here
                    // instead of a catch() block so that we don't swallow
                    // exceptions from actual bugs in components.
                    (error) => {
                        setIsLoaded(true);
                        setError(error);
                    }
                );
        }, []);

        if (error) {
            return <>{error.message}</>;
        } else if (!isLoaded) {
            return <>loading...</>;
        } else {
            return (
                /* here we map over the element and display each item as a card  */
                <div className="wrapper">
                    <ul className="card-grid">
                        {items.map((item) => (
                            <li>
                                <article className="card" key={item.callingCodes}>
                                    <div className="card-image">
                                        <img src={item.flag} alt={item.name} />
                                    </div>
                                    <div className="card-content">
                                        <h2 className="card-name">{item.name}</h2>
                                        <ol className="card-list">
                                            <li>
                                                population:{" "}
                                                <span>{item.population}</span>
                                            </li>
                                            <li>
                                                Region: <span>{item.region}</span>
                                            </li>
                                            <li>
                                                Capital: <span>{item.capital}</span>
                                            </li>
                                        </ol>
                                    </div>
                                </article>
                            </li>
                        ))}
                    </ul>
                </div>
            );
        }
    }

    ReactDOM.render(<App />, document.getElementById("root"));
여기 코드펜에서 실시간 미리보기를 참고하세요
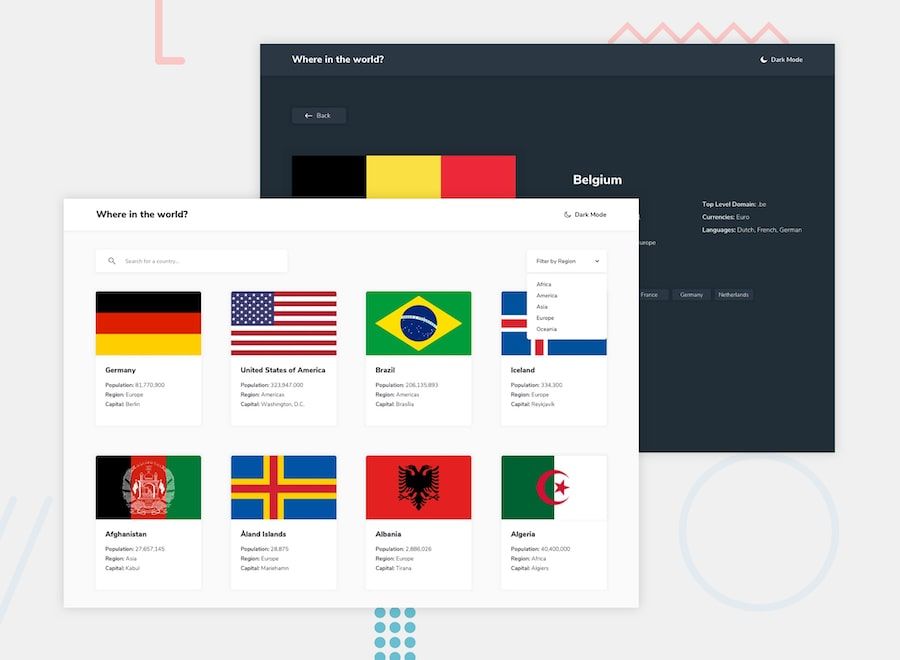
REST COUNTRIES API로부터 성공적으로 데이터를 받아오고 표시한 시점에서 우리는 표시되는 국가를 검색하는 데 집중할 수 있습니다.
그러나 시작하기 전에 위의 예제를 css로 스타일을 지정해보겠습니다. (왜냐면 이렇게 표시되면 이상하기 때문이죠)
위의 예제에 css를 더하게 되면 아래의 예시와 같은 것을 얻게 됩니다.
우리가 추가한 css가 완벽하진 않더라도 이전보다 깔끔한 방식으로 국가를 표시합니다. 그렇죠?
검색하는 컴포넌트를 생성하는 방법
우리는 APP 함수 내에서 쿼리 q를 빈 스트링 값으로 셋팅하기 위해 useState() 를 사용했습니다. 또한 우리는 setQ를 가지고 있는데 이건 검색 폼의 값을 바인딩할 때 사용할 거에요.
13번째 줄에서 useState를 사용하여 API에서 검색할 수 있는 배열의 기본값을 정의했습니다. 이것은 국가의 Capital(수도) 와 name(이름) 으로 모든 국가를 검색할 수 있기를 원한다는 것을 의미합니다. 당신의 선호에 따라서 이 배열을 더 길게 만들수 있겠습니다.
const [error, setError] = useState(null);
        const [isLoaded, setIsLoaded] = useState(false);
        const [items, setItems] = useState([]);

        //     set search query to empty string
        const [q, setQ] = useState("");
        //     set search parameters
        //     we only what to search countries by capital and name
        //     this list can be longer if you want
        //     you can search countries even by their population
        // just add it to this array
        const [searchParam] = useState(["capital", "name"]);

        useEffect(() => {
            // our fetch codes
        }, []);

     }
반환 함수 안에서는 검색 폼을 만들것이고 우리의 코드는 아마 아래와 같을 것입니다.
return <>{error.message}</>;
        } else if (!isLoaded) {
            return <>loading...</>;
        } else {
            return (
                <div className="wrapper">
                    <div className="search-wrapper">
                        <label htmlFor="search-form">
                            <input
                                type="search"
                                name="search-form"
                                id="search-form"
                                className="search-input"
                                placeholder="Search for..."
                                value={q}
                                /*
                                // set the value of our useState q
                                //  anytime the user types in the search box
                                */
                                onChange={(e) => setQ(e.target.value)}
                            />
                            <span className="sr-only">Search countries here</span>
                        </label>
                    </div>
                    <ul className="card-grid">
                        {items.map((item) => (
                            <li>
                                <article className="card" key={item.callingCodes}>
                                    <div className="card-image">
                                        <img src={item.flag} alt={item.name} />
                                    </div>
                                    <div className="card-content">
                                        <h2 className="card-name">{item.name}</h2>
                                        <ol className="card-list">
                                            <li>
                                                population:{" "}
                                                <span>{item.population}</span>
                                            </li>
                                            <li>
                                                Region: <span>{item.region}</span>
                                            </li>
                                            <li>
                                                Capital: <span>{item.capital}</span>
                                            </li>
                                        </ol>
                                    </div>
                                </article>
                            </li>
                        ))}
                    </ul>
                </div>
            );
        }
    }

    ReactDOM.render(<App />, document.getElementById("root"));
이제 우리는 검색을 담당할 함수를 만들고 우리의 반환 함수 위에 둘 겁니다.
return items.filter((item) => {
                return searchParam.some((newItem) => {
                    return (
                        item[newItem]
                            .toString()
                            .toLowerCase()
                            .indexOf(q.toLowerCase()) > -1
                    );
                });
            });
        }
이 함수는 응답받은 아이템들을 가져와서 searchParam 배열에 존재하는 indexOF()의 값이 -1보다 큰 모든 아이템들을 반환합니다.
함수가 만들어졌으므로 이걸 사용하기 위해 반환된 데이터를 검색 함수로 감쌉니다.
{serach(items).map((item) => ( <li> // card goes here </li> ))}
useState()에 저장된 데이터는 리스트 항목에 전달되기 전에 검색 함수에서 필터링 되어 작성한 쿼리와 일치하는 항목만 반환됩니다.
다음은 코드를 모두 합쳤을 때의 코드와 Codepen의 실시간 미리보기 입니다. 아래의 검색 폼으로 국가의 이름이나 수도로 어떠한 국가든지 검색해보세요.
지역으로 국가들을 필터링 하는 방법
이제 지역별로 국가를 필터링 할 수 있도록 더 만들어 봅시다. 모든 국가를 표기하지 않고, 아프리카 또는 아시아에만 있는 국가들을 검색하고 노출하고 싶다고 가정해보세요. 리액트에서 useState()를 사용하여 구현해낼 수 있습니다.
지역:
- 아프리카
- 아메리카
- 아시아
- 유럽
- 오세아니아
우리의 지역들을 알아보았으니 이제 필터 컴포넌트를 만듭시다. 첫번째로 필터의 useState를 아래와 같이 구성합니다.
const [filterParam, setFilterParam] = useState(["All"]);
지역이 지정되지 않은 경우 모든 국가를 표시하고 검색할 수 있기를 원하기 때문에 useState 기본값을 의도적으로 ALL로 설정했습니다.
<select
    /*
    // here we create a basic select input
    // we set the value to the selected value
    // and update the setFilterParam() state every time onChange is called
    */
      onChange={(e) => {
      setFilterParam(e.target.value);
       }}
       className="custom-select"
       aria-label="Filter Countries By Region">
        <option value="All">Filter By Region</option>
        <option value="Africa">Africa</option>
        <option value="Americas">America</option>
        <option value="Asia">Asia</option>
        <option value="Europe">Europe</option>
        <option value="Oceania">Oceania</option>
        </select>
        <span className="focus"></span>
        </div>
이제 필터를 만들었으므로 남은 것은 검색 기능을 수정하는 것입니다. 기본적으로 입력한 지역을 확인하고 해당 지역이 있는 국가만 반환해야 합니다.
function search(items) {
       return items.filter((item) => {
    /*
    // in here we check if our region is equal to our c state
    // if it's equal to then only return the items that match
    // if not return All the countries
    */
       if (item.region == filterParam) {
           return searchParam.some((newItem) => {
             return (
               item[newItem]
                   .toString()
                   .toLowerCase()
                   .indexOf(q.toLowerCase()) > -1
                        );
                    });
                } else if (filterParam == "All") {
                    return searchParam.some((newItem) => {
                        return (
                            item[newItem]
                                .toString()
                                .toLowerCase()
                                .indexOf(q.toLowerCase()) > -1
                        );
                    });
                }
            });
        }
Codepen에서 전체 코드와 실시간 미리보기를 찾을 수 있습니다. 국가를 필터링하고 결과를 보십시오.
CSS를 추가하면 이제 React 앱의 최종 미리보기를 볼 수 있습니다.
마무리
사용자에게 표시해야 하는 많은 양의 데이터를 처리할 때 검색 및 필터 기능을 사용하면 사용자가 중요한 정보를 빠르게 탐색하고 찾을 수 있습니다. 질문이 있는 경우 저에게 연락해 주시면 기꺼이 답변해드리겠습니다. 이 프로젝트의 전체 미리보기는 여기 earthly vercel 앱에서 찾을 수 있습니다. 트위터 @sprucekhalifa에서 저를 팔로우할 수 있습니다.