

In this article, you will learn how to use Supabase's auth package to quickly and efficiently add authentication functionality to your Flutter apps. We will go through the entire process, from setting up a Flutter project to configuring Email/Password, OAuth, and Magic link flows.
In the end, you'll have a complete authentication system with theming, localisation, and native support.
Table of Contents
- Prerequisites
- What is Supabase Auth UI
- Supported Authentication Methods
- How to Set Up a Flutter Project
- How to Connect to a Supabase Project
- How to Implement Auth in a Flutter App
- How to Set Up Supabase Email and OAuth Provider Authentication
- How to Sign in a User using the Auth UI Package
- How to Add Magic Link Auth
- Native Auth Support - How to Sign in with Google
- How to Theme Your Supabase Auth UI
- Summary
- Resources
##
Prerequisites
This article assumes that you have:
- A basic understanding of Flutter
- Flutter installed and ready to go
- A basic understanding of Backend-as-a-Service concepts
- A basic understanding of authentication
- An IDE (Integrated Developer Environment) or a text editor to work in
What is Supabase Auth UI?
Supabase Auth UI is an open-source community-supported Flutter package that offers pre-configured, theme-able widgets to simplify the process of creating authentication forms.
What's more? It's translation ready.
Supported Authentication Methods
The Supabase auth UI supports the following authentication methods out of the box:
- Magic links
- Email and Password auth
- OAuth/Social login auth
- Sign in with Google
- Sign in with Apple
How to Set Up a Flutter Project
The first thing you will need is a Flutter project set up. Open your preferred text editor to the location you'd like to keep the Flutter project, then open up the integrated terminal and run flutter create auth_example. This will create a folder called "auth_example" in the same location.
Open the newly created folder and paste the following in the pubspec.yaml file as part of the dependencies: supabase_auth_ui: ^0.4.4.
The file should look similar to this:
 _A code snippet showing a Flutter
 pubspec.yaml file with dependencies. The supabase_auth_ui dependency is highlighted with a pink arrow, indicating version ^0.4.4._
Back in the integrated terminal, run cd auth_example to change into the correct folder then run flutter pub get to get the auth dependency into your project.
How to Connect to a Supabase Project
Go to your Supabase dashboard or create an account if you don't have one. In the dashboard, go to Project settings at the bottom then click on API under configuration. Copy the URL and the project anon key from the right hand side of the page as illustrated below:
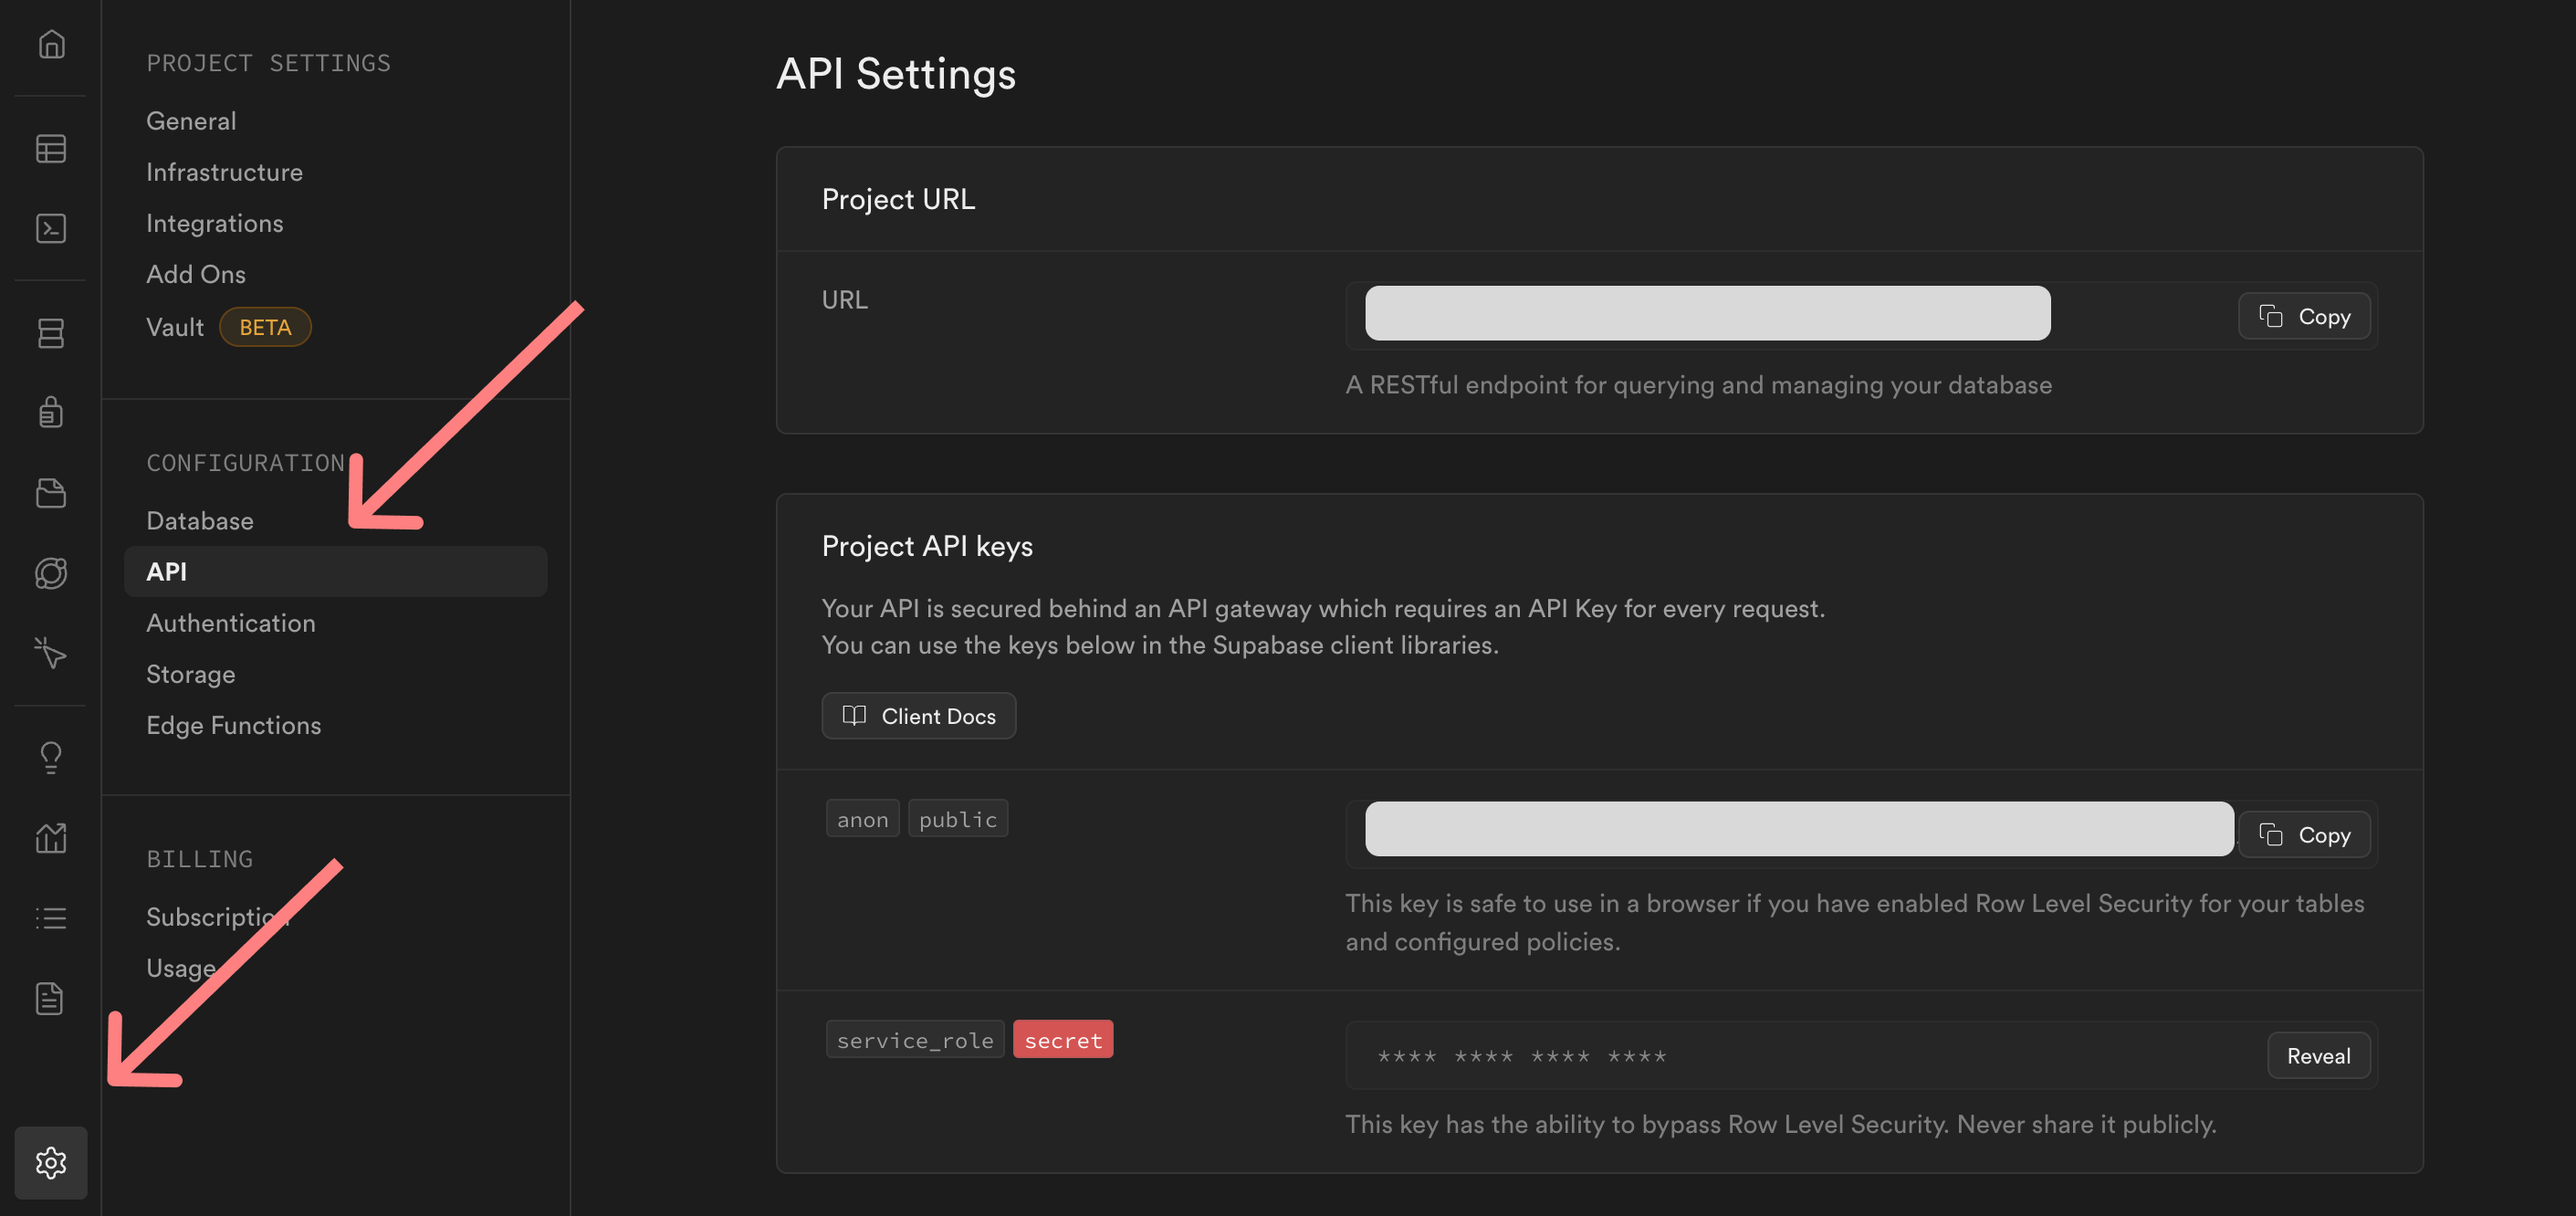 A screenshot of the API settings page in Supabase dashboard. The left sidebar shows various menu options under "Project Settings," "Configuration," and "Billing." The "API" option under "Configuration" is highlighted. The main section displays fields for "Project URL" and "Project API keys," with options to copy or reveal the keys.
Back in your Flutter app, create a .env file at the root of the folder and paste the following, replacing with the values you copied above:
SUPABASE_URL=your_url
SUPABASE_ANON_KEY=your_project_anon_key
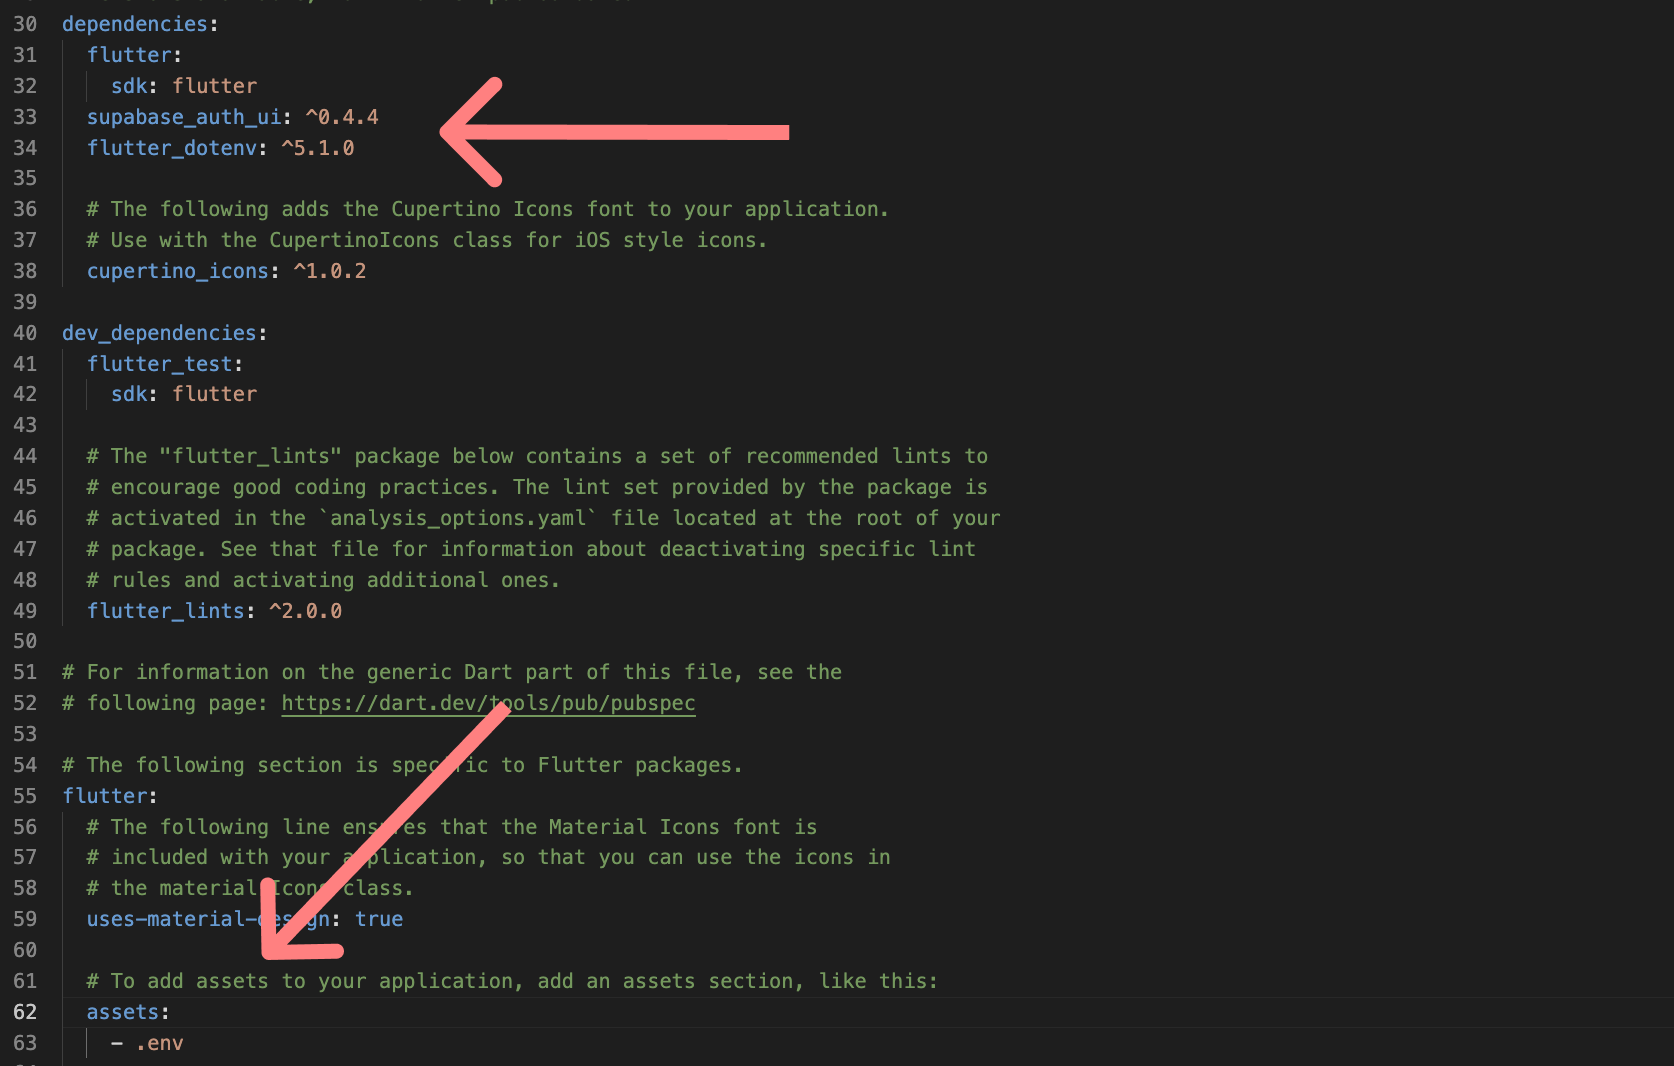
Add the environment file to the .gitignore file to keep it out of version control, then add the flutter_dotenv package to the list of dependencies right below supabase_auth_ui dependency. Finally add the .env file as a path under the assets key in the pubspec.yaml file.
The file should look like so:
 _A screenshot of a code editor displaying a
 pubspec.yaml file for a Flutter project. The file lists dependencies such as flutter, supabase_auth_ui, and flutter_dotenv. Two pink arrows point to the supabase_auth_ui: ^0.4.4 and flutter_dotenv: ^5.1.0 dependencies. The file also includes sections for dev_dependencies, flutter_lints, and assets._
In the main.dart file, replace the main function with the following code:
void main() async {
  await dotenv.load(fileName: ".env");
  await Supabase.initialize(
      url: dotenv.env['SUPABASE_URL']!,
      anonKey: dotenv.env['SUPABASE_ANON_KEY']!);
  runApp(
    const MyApp(),
  );
}
This loads the .env file and initialises Supabase.
How to Implement Auth in a Flutter App
Replace the rest of the code below the main function with the following:
class MyApp extends StatelessWidget {
  const MyApp({Key? key}) : super(key: key);

  @override
  Widget build(BuildContext context) {
    return MaterialApp(
      title: 'Supabase Auth UI',
      theme: ThemeData(
        colorScheme: ColorScheme.fromSeed(seedColor: Colors.purple),
      ),
      initialRoute: '/',
      routes: {
        '/': (context) => const SplashScreen(),
        '/auth': (context) => AuthScreen(),
        '/home': (context) => HomeScreen(),
      },
    );
  }
}
Create a splash_screen.dart file in the lib folder and paste the following in it:
import 'package:auth_ui_example/auth_screen.dart';
import 'package:auth_ui_example/home_screen.dart';
import 'package:flutter/material.dart';

import 'package:supabase_auth_ui/supabase_auth_ui.dart';

final activeSession = Supabase.instance.client.auth.currentSession;

class SplashScreen extends StatelessWidget {
  const SplashScreen({Key? key}) : super(key: key);

  @override
  Widget build(BuildContext context) {
    return Scaffold(
      body: Center(child: activeSession == null ? AuthScreen() : HomeScreen()),
    );
  }
}
This redirects the user to a different screen depending on whether or not the user has an active session.
Now create a new file in the lib folder called home_screen.dart and paste the following into it:
import 'package:flutter/material.dart';
import 'package:supabase_auth_ui/supabase_auth_ui.dart';

final supabase = Supabase.instance.client;
final activeSession = supabase.auth.currentSession;

class HomeScreen extends StatefulWidget {
  const HomeScreen({super.key});

  @override
  State<HomeScreen> createState() => _HomeScreenState();
}

class _HomeScreenState extends State<HomeScreen> {
  @override
  void initState() {
    super.initState();
    if (activeSession == null) {
      Navigator.pushNamed(context, '/auth');
    }
  }

  @override
  Widget build(BuildContext context) {
    return Scaffold(
      appBar: AppBar(title: const Text('Home')),
      body: Center(
        child: Column(
          mainAxisSize: MainAxisSize.min,
          children: [
            Text(
              'You are home - ${activeSession?.user.id}',
              style: const TextStyle(fontWeight: FontWeight.bold, fontSize: 18),
            ),
            const SizedBox(height: 24.0),
            ElevatedButton(
              onPressed: () async {
                await supabase.auth.signOut();
                Navigator.pushNamed(context, '/');
              },
              child: const Text('Sign out'),
            ),
          ],
        ),
      ),
    );
  }
}
This creates a stateful widget class that checks for an active session and redirects to the authentications screen if there is no active session. It also displays some text and a button that allows the user to sign out of the application.
Finally, create auth_screen.dart in the lib folder and paste the following into it:
import 'package:flutter/material.dart';
import 'package:supabase_auth_ui/supabase_auth_ui.dart';

class AuthScreen extends StatelessWidget {
  const AuthScreen({super.key});

  @override
  Widget build(BuildContext context) {
    return Scaffold(
      body: ListView(
        padding: const EdgeInsets.fromLTRB(24.0, 96.0, 24.0, 24.0),
        children: [
          Column(
            children: [
              const Text(
                'Supabase Auth UI',
                style: TextStyle(
                  fontWeight: FontWeight.bold,
                  fontSize: 18,
                ),
              ),
              const SizedBox(height: 24.0),
              SupaEmailAuth(
                redirectTo:
                    kIsWeb ? null : "myapptest://com.example.auth_ui_example",
                onSignInComplete: (res) => Navigator.pushNamed(context, '/home'),
                onSignUpComplete: (res) => Navigator.pushNamed(context, '/home'),
                onError: (error) => SnackBar(content: Text(error.toString())),
              ),
              SupaSocialsAuth(
                socialProviders: const [
                  OAuthProvider.google,
                  OAuthProvider.github,
                ],
                redirectUrl:
                    kIsWeb ? null : "myapptest://com.example.auth_ui_example",
                onSuccess: (session) => Navigator.pushNamed(
                  context,
                  '/home',
                ),
                onError: (error) => SnackBar(
                  content: Text(
                    error.toString(),
                  ),
                ),
              ),
            ],
          ),
        ],
      ),
    );
  }
}
This displays some text and special widgets from the supabase_auth_ui package that display a sign up/in form and some social login options.
In the integrated terminal, run flutter run to start the application. It will give you several platforms to run on, so just choose chrome for this case. You should see this beautiful interface out of the box 🎉:
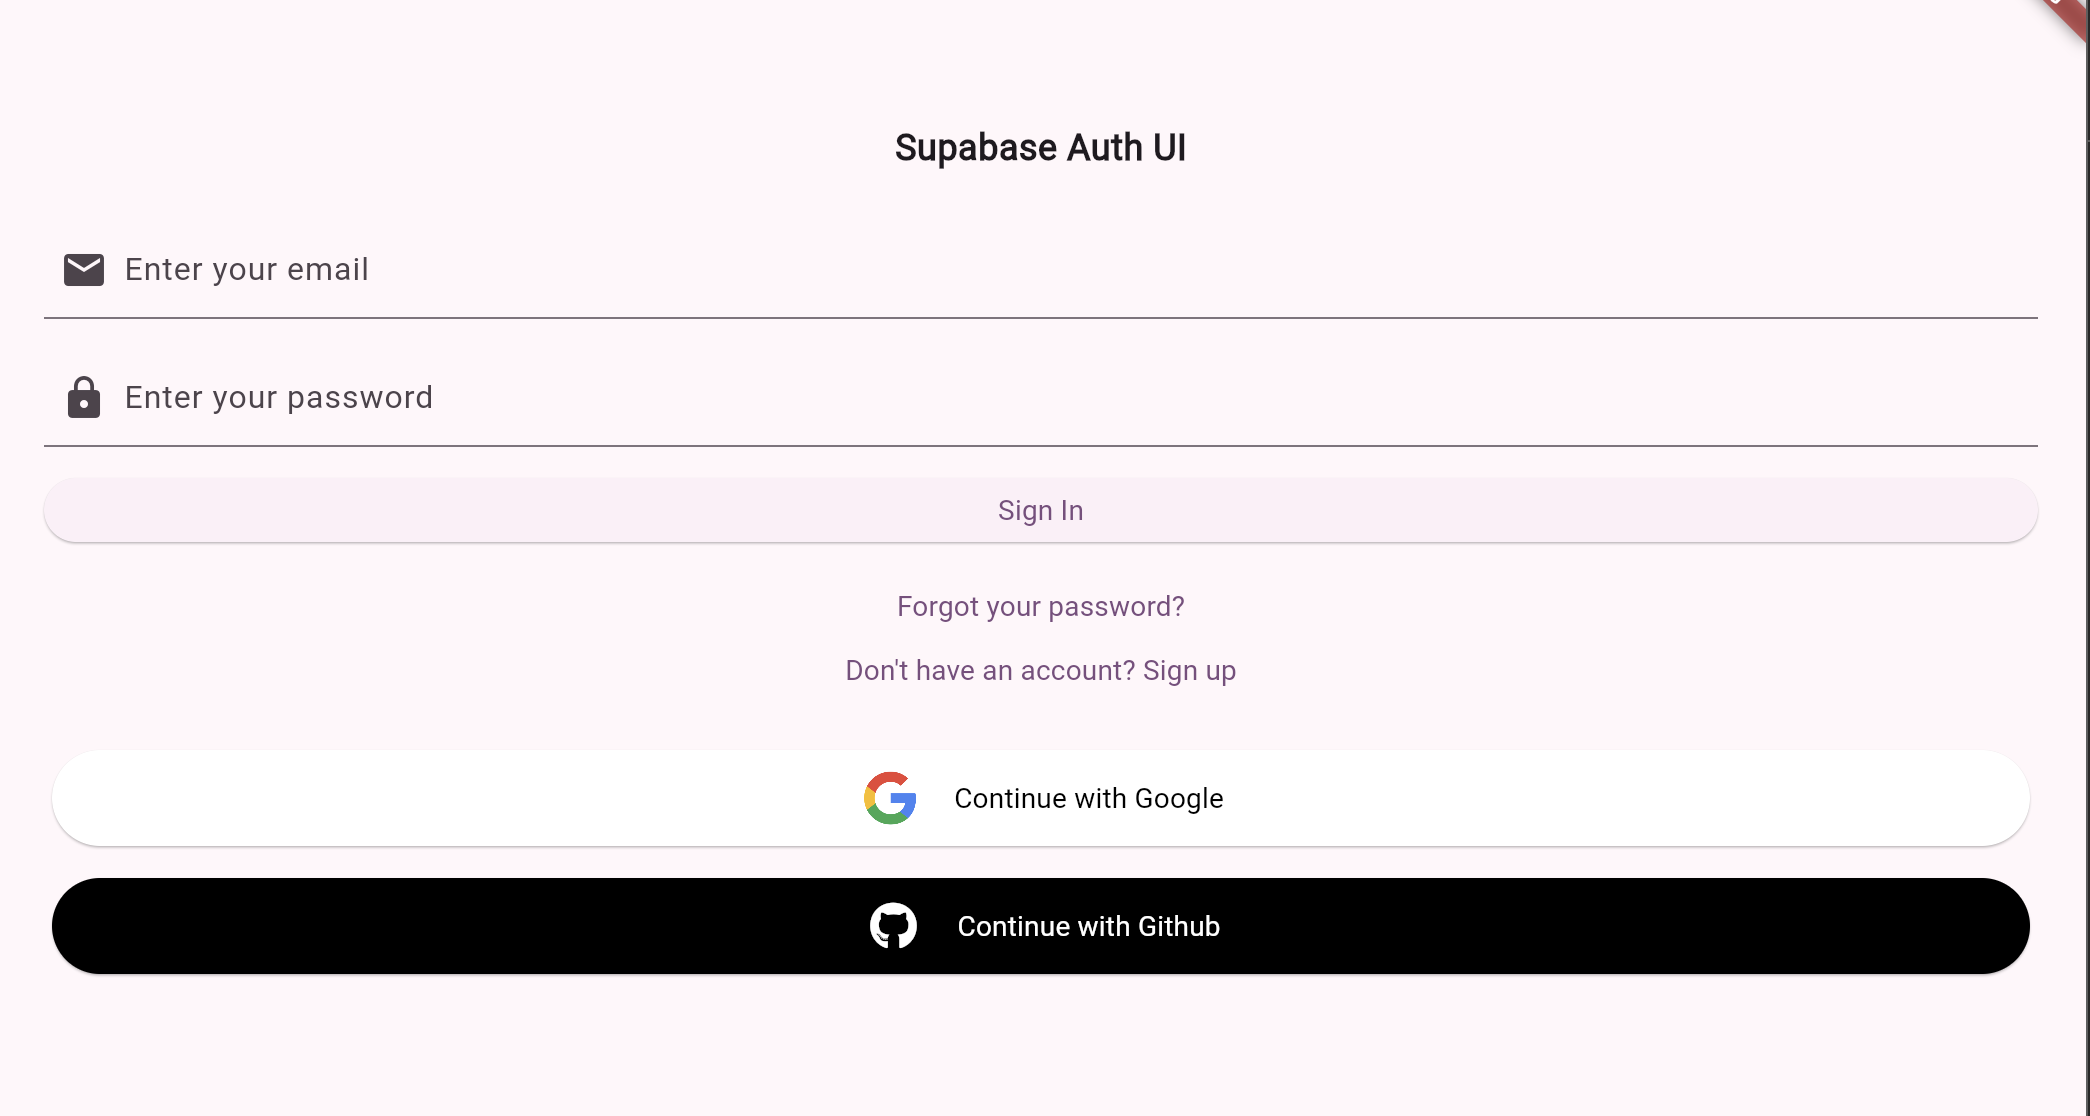 Supabase Auth UI login screen with fields for email and password, options to sign in, reset password, sign up, and buttons to continue with Google or GitHub.
Taking a closer look at the code in the auth screen file, you will see that we are using SupaEmailAuth and SupaSocialsAuth widgets to achieve this. The email auth widget takes in a callback telling it what to do on failure and on success of the authentication action. The social login widget takes the same, plus a list of OAuth providers you wish to use in your application.
How to Set Up Supabase Email and OAuth Provider Authentication
To have Supabase auth UI work properly on both mobile and web, you will need to set up deep links and a site URL.
Under authentication > URL configurations, add "http://localhost:3000/" as the site URL.
Then under "redirect URLs" add "YOUR_SCHEME://YOUR_HOSTNAME" as the value, where YOUR_SCHEME is a unique identifier that you decide for your app and YOUR_HOSTNAME is the package name in your build.gradle file as applicationID under android > src > build.gradle. Something like this: "myapptest://com.example.auth_ui_example".
Complete configuring Android by going to the AndroidManifest file under android > src > main > AndroidManifest.xml, and adding this code below the existing <intent-filter>, above the closing </activity> tag:
 <intent-filter>
                <action android:name="android.intent.action.VIEW" />
                <category android:name="android.intent.category.DEFAULT" />
                <category android:name="android.intent.category.BROWSABLE" />
                <data
                android:scheme="myapptest"
                android:host="com.example.auth_ui_example" />
 </intent-filter>
Complete the iOS configuration by pasting the following code at the bottom of the info.plist file, just above the closing </dict> tag, under ios > Runner > info.plist:
<key>CFBundleURLTypes</key>
<array>
    <dict>
        <key>CFBundleTypeRole</key>
        <string>Editor</string>
        <key>CFBundleURLSchemes</key>
        <array>
            <!-- Add your custom URL scheme here -->
            <string>myapptest</string>
        </array>
    </dict>
</array>
That completes the set up across web and mobile.
To set up email auth, in the Supabase dashboard, go to authentication > providers, and look for email. Make sure it is enabled. That's all for setting up email.
How to Set Up GitHub as an OAuth Provider
To enable GitHub as an authentication provider, scroll down the list of providers until you get to GitHub. Open the dropdown, enable it, and copy the callback URL. Then follow these steps:
- Create a new OAuth App here, fill in the required information, and add the copied URL under the authorization URL field.
- Add the homepage URL as "http://localhost:3000/".
- Copy the clientID from GitHub and add it to the Supabase GitHub provider settings.
- Generate a new secret and paste it into the client secret field in the Supabase GitHub provider settings.
Save it, and you are done with setting up GitHub as a provider.
How to Set Up Google as an OAuth Provider
Go back to the Supabase dashboard and enable the Google provider. Copy the callback URL, then follow these steps:
- Create a new Google cloud project.
- Go to Credentials, click on the create credentials button, and then choose OAuth client ID.
- Go on and configure the consent screen to external users.
- Go back to credentials, click create credentials, and choose web application in the application type field.
- Copy the callback URL from the Supabase settings, paste it in under the authorised URLs field, and leave the rest as is and save.
- A screen will pop up with the client ID and secret. Copy those over and paste them in the relevant fields in the Supabase Google provider settings.
Save it, and you are done with setting up Google as a provider.
How to Sign in a User using the Auth UI Package
To test that auth is working so far, go back to your application, run flutter run -d chrome --web-port=3000 in the integrated terminal window, and click one of the Social login buttons.
You should be presented with a window asking you to confirm permissions, after which the app will sign you in. Signing in via email/password should also work.
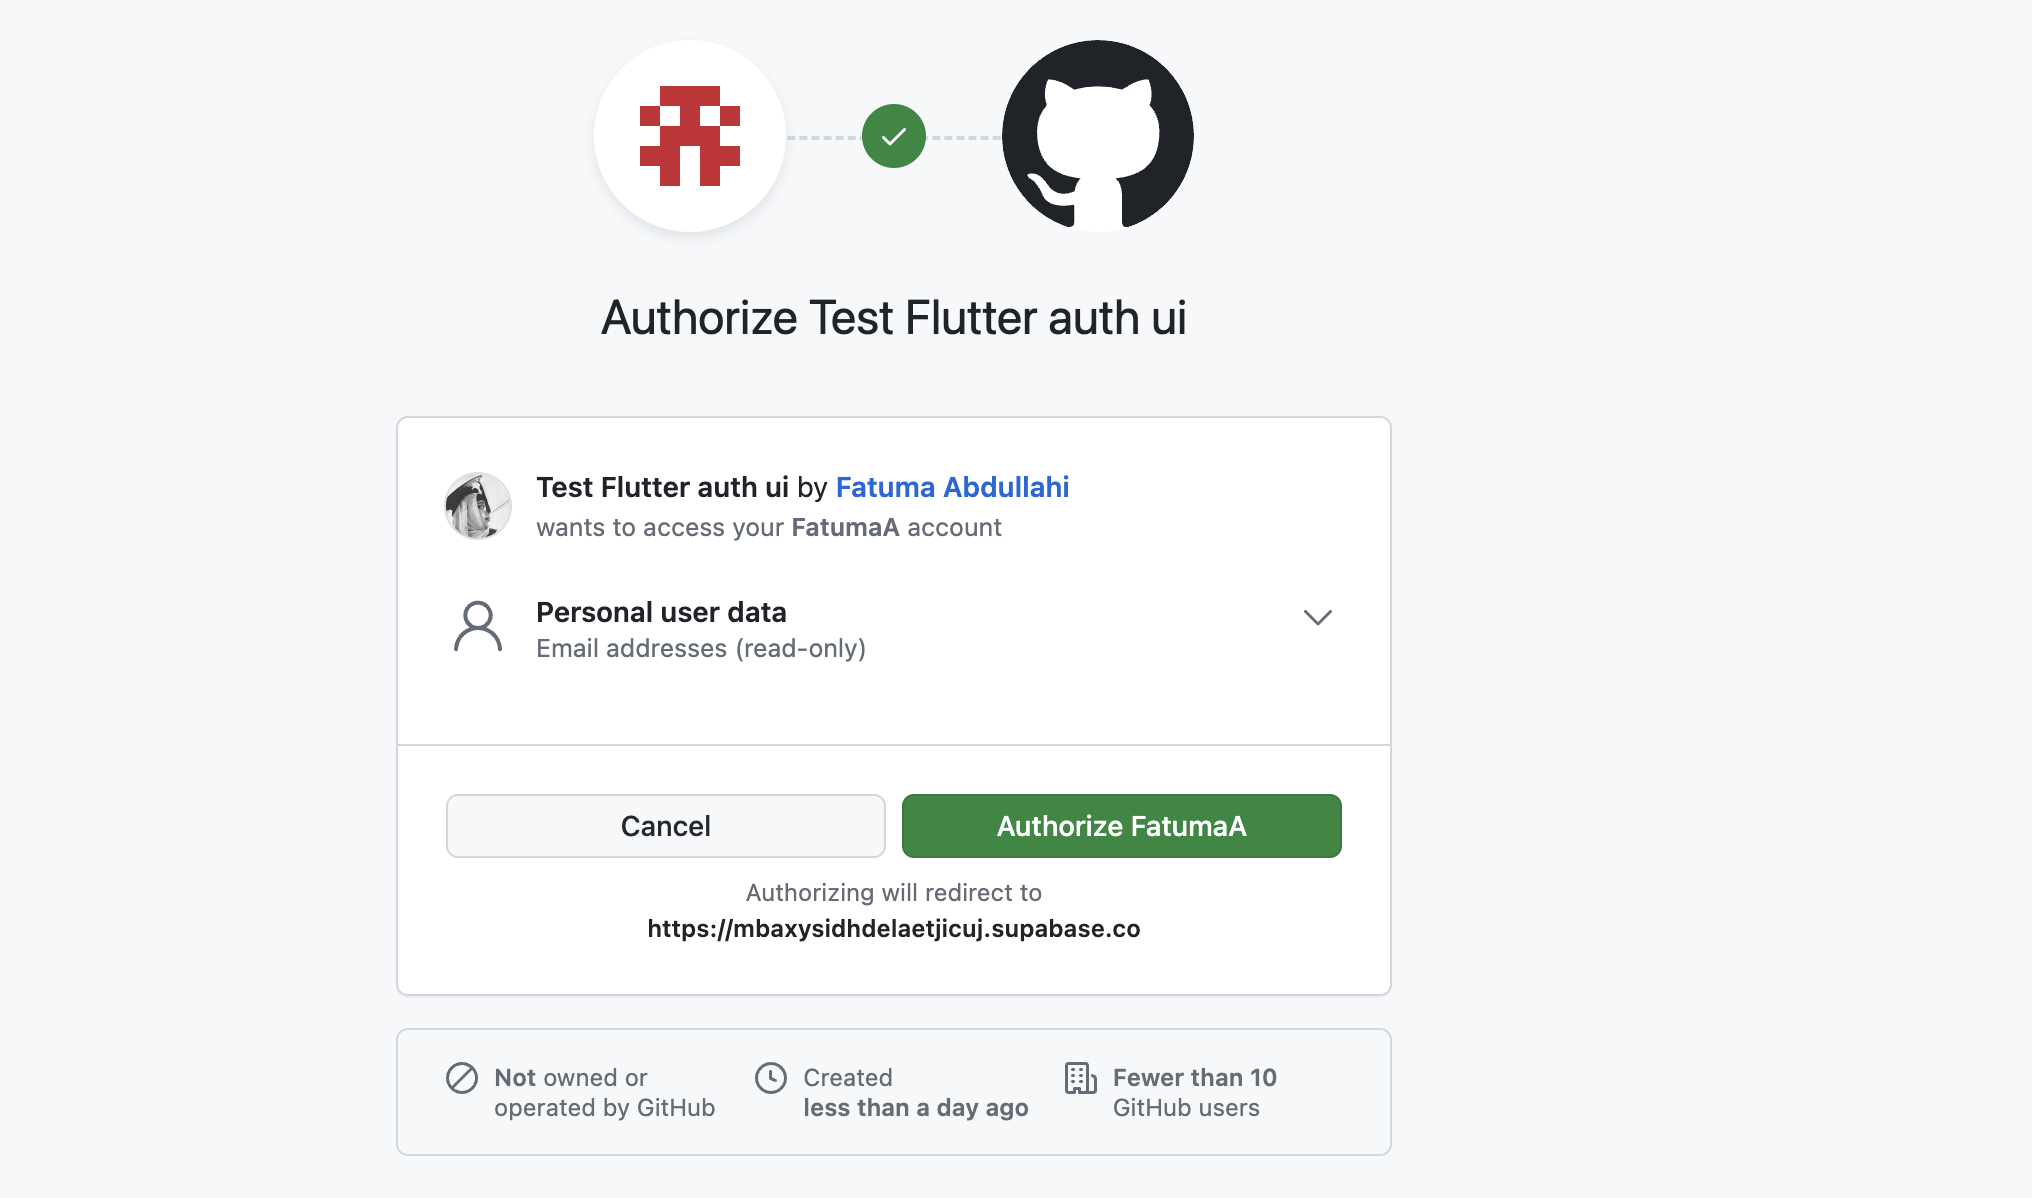 Authorization screen for "Test Flutter auth ui" requesting access to a GitHub account. Options to "Cancel" or "Authorize FatumaA" are available.
Now log out of the application and try to manually navigate to the home screen. It will redirect you back to the auth screen.
How to Add Magic Link Auth
If you only want to sign in a user using magic link, replace the contents in the auth_screen file with this:
import 'package:flutter/foundation.dart';
import 'package:flutter/material.dart';
import 'package:supabase_auth_ui/supabase_auth_ui.dart';

class AuthScreen extends StatelessWidget {
  const AuthScreen({super.key});

  @override
  Widget build(BuildContext context) {
    return Scaffold(
      body: ListView(
        padding: const EdgeInsets.fromLTRB(24.0, 96.0, 24.0, 24.0),
        children: [
          Column(
            children: [
              const Text(
                'Supabase Auth UI',
                style: TextStyle(
                  fontWeight: FontWeight.bold,
                  fontSize: 18,
                ),
              ),
              const SizedBox(height: 24.0),
              SupaMagicAuth(
                redirectUrl:
                    kIsWeb ? null : "myapptest://com.example.auth_ui_example",
                onSuccess: (session) => Navigator.pushNamed(context, '/home'),
              ),
            ],
          ),
        ],
      ),
    );
  }
}
Run the app and you should see this:
 Supabase authentication interface with an email input field and a 'Continue with magic Link' button.
Sign in and you should receive an email and be redirected back to the application.
Native Auth Support – How to Sign in with Google
To add native sign in with Google support across Android, Web, and iOS, you'll need to add a few more configurations.
Go back to your Google cloud project and create a new credential. Choose OAuth client ID. Click on Android from the application type dropdown.
Next, add the package name. You can find this in the AndroidManifest.xml file under android > src > main > AndroidManifest.xml or in the build.gradle file as applicationID under android > src > build.gradle.
To generate the SHA1 certificate fingerprint, paste the following code into a terminal window.
keytool -list -v \
-alias androiddebugkey -keystore ~/.android/debug.keystore
When prompted for a password, enter "android". Copy the generated SHA-1 certificate and paste it into the relevant field in your OAuth client ID set up above and create the project. Close the pop up with the Android client ID.
Go back and create a new OAuth client ID, but this time set it as an iOS app. Provide it the same value as the package name from before and create it. Close the pop up as before.
In your Flutter application, paste the following code above the custom URL scheme you previously added in the info.plist file. Replace the part in caps with the first part of the iOS client ID you created above minus the apps.google... part.
            <string>com.googleusercontent.apps.FIRST_PART_OF_IOS_CLIENT_ID_MINUS_apps.googleusercontent.com_PART</string>
            <!-- Leave rest untouched -->
            <!-- Add your custom URL scheme here -->
            <string>myapptest</string>
In the auth_screen file, replace the SupaSocialsAuth widget with this:
              SupaSocialsAuth(
                redirectUrl:
                    kIsWeb ? null : "myapptest://com.example.auth_ui_example",
                nativeGoogleAuthConfig: NativeGoogleAuthConfig(
                    iosClientId: dotenv.env['IOS_CLIENT_ID']!,
                    webClientId: dotenv.env['WEB_CLIENT_ID']!),
                socialProviders: const [
                  OAuthProvider.google,
                  OAuthProvider.github,
                ],
                onSuccess: (session) => Navigator.pushNamed(
                  context,
                  '/home',
                ),
                onError: (error) => SnackBar(
                  content: Text(
                    error.toString(),
                  ),
                ),
              ),
Add the iOS and Web client secret from Google cloud to your .env file and you are ready to test.
Start the Android or iOS emulator. Then back in your Flutter project, run flutter run in your integrated terminal. Something like this should show up:
 A mobile app screen displaying the Supabase Auth UI on an iOS emulator. The interface includes fields for entering an email and password, a "Sign In" button, options for password recovery, account sign-up, and login buttons for Google and GitHub.
Click on the Google icon and you should be logged in.
How to Theme Your Supabase Auth UI
Now that you have confirmed that the package actually works, it's time for the fun part. Supabase auth UI allows you to customise the look and the layout of the widgets.
In main.dart, replace the ThemeData widget under the MaterialApp with the following:
ThemeData(
        colorScheme: ColorScheme.fromSeed(seedColor: Colors.purple),
        inputDecorationTheme: const InputDecorationTheme(
          border: OutlineInputBorder(),
          focusedBorder: OutlineInputBorder(
            borderSide: BorderSide(color: Colors.purple, width: 2.0),
          ),
        ),
        elevatedButtonTheme: ElevatedButtonThemeData(
          style: ElevatedButton.styleFrom(
            backgroundColor: Colors.deepPurple,
            foregroundColor: Colors.white,
          ),
        ),
      ),
Notice how the sign up form responds to the theme changes:
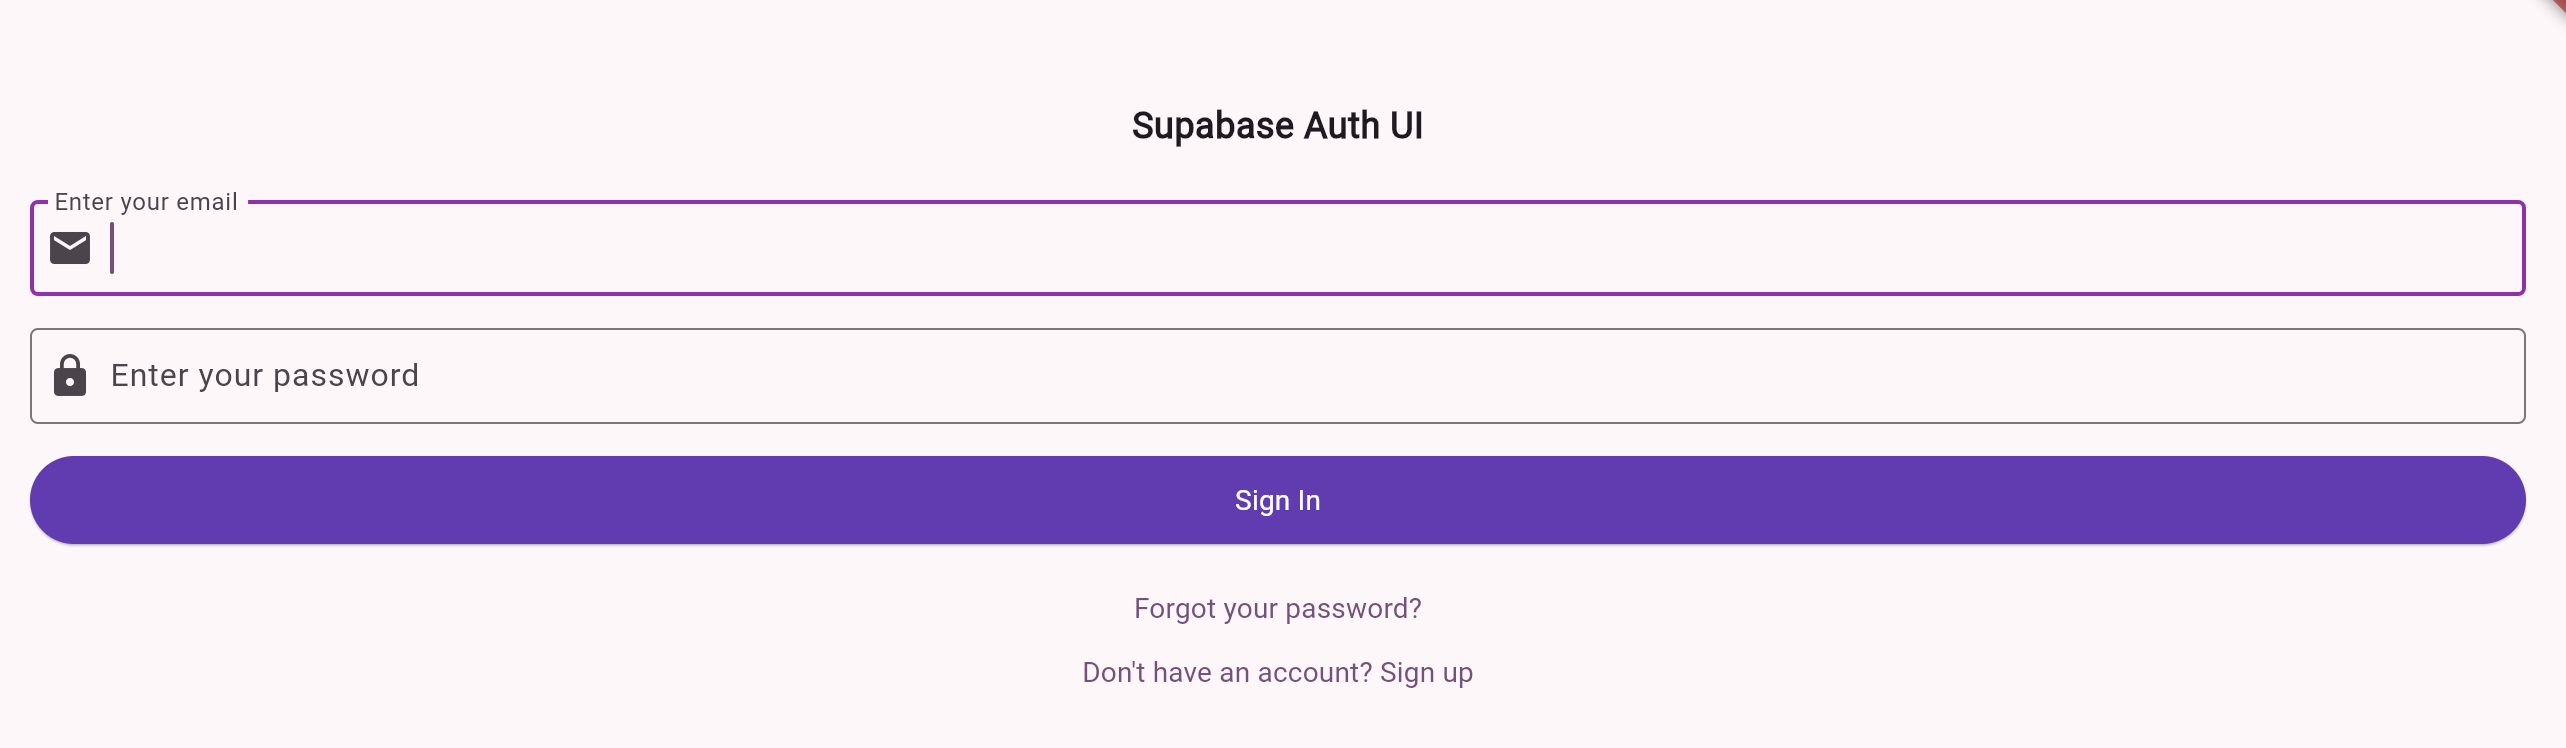 A login interface for Supabase Auth UI. It includes fields for entering an email and password, with icons indicating their respective purposes. Below the fields is a purple "Sign In" button. Links for "Forgot your password?" and "Don't have an account? Sign up" are located at the bottom.
Flexible Layout Options
Supabase auth UI allows you to layout the social login buttons vertically and horizontally. To see this in action, add the following line in the SupaSocialsAuth widget: socialButtonVariant: SocialButtonVariant.icon,. The layout should go from this:
 A login interface for Supabase Auth UI with fields for email and password, a "Sign In" button, options to reset the password or sign up, and buttons to continue with Google or GitHub layout vertically with text and icons.
To this:
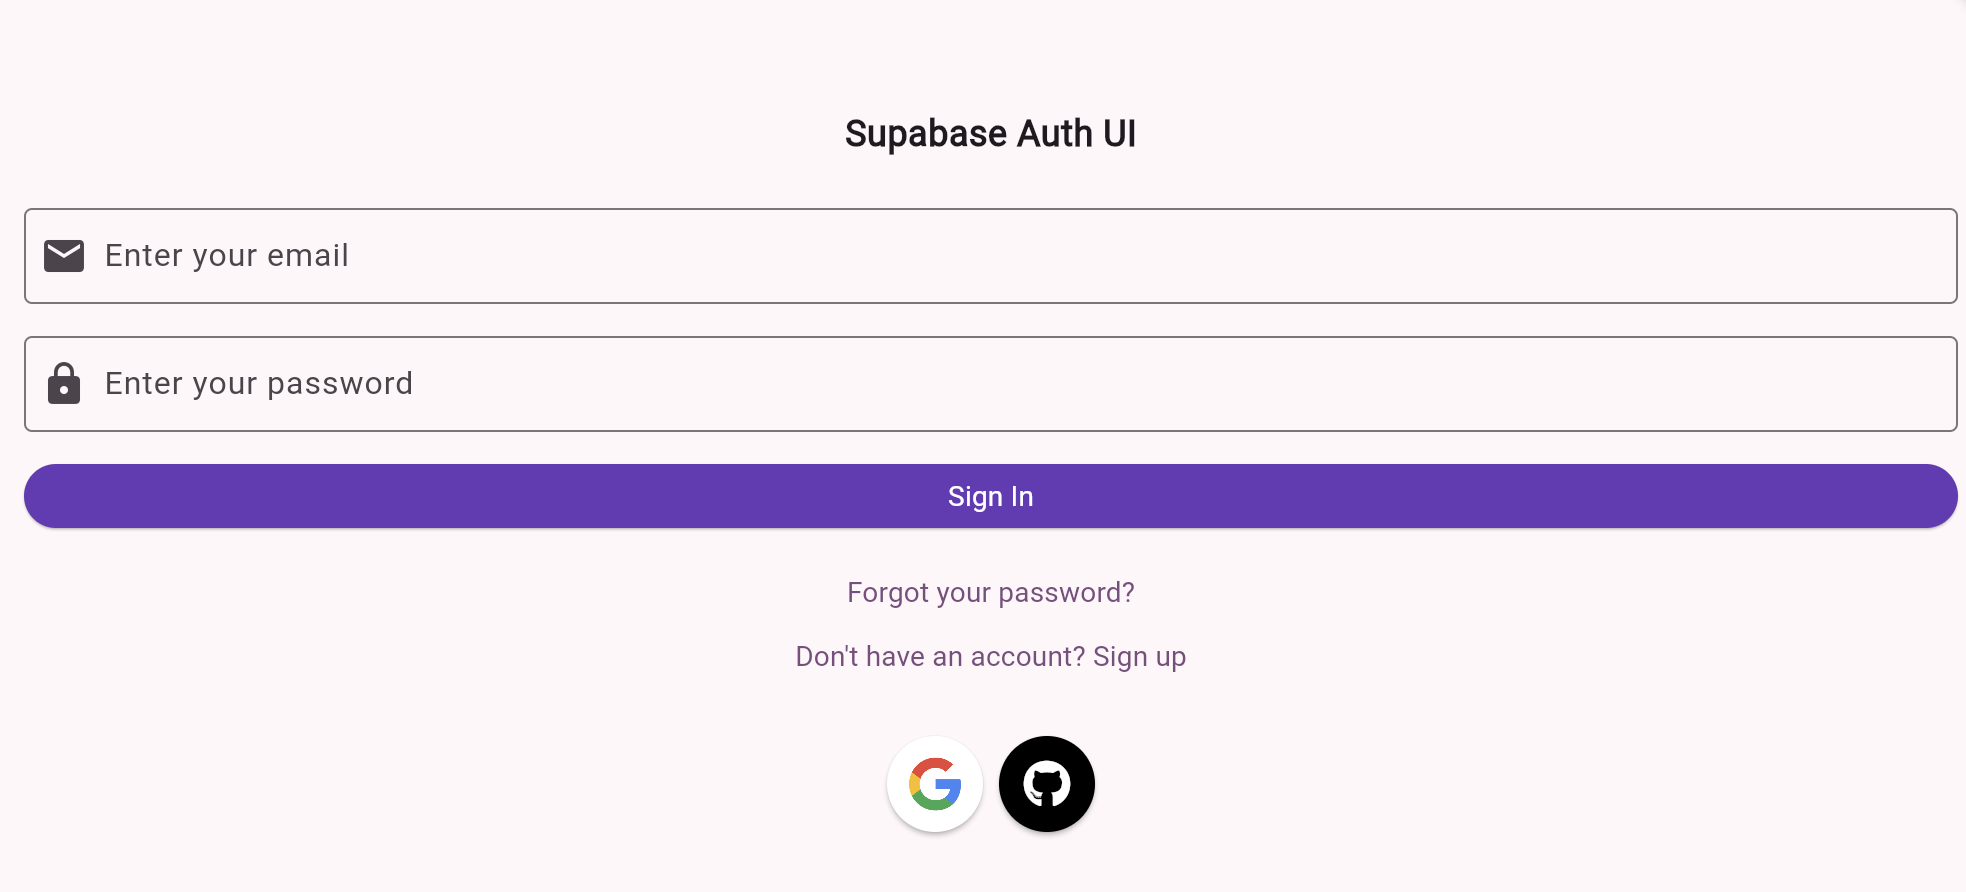 Login screen for Supabase Auth UI with fields for email and password, a "Sign In" button, options for password recovery, account creation, and login via Google or GitHub in circular icons layout horizontally
Localization and Translation Ready
Supabase auth UI is translation ready, and you can change the labels to any language you wish.
Replace the code in auth_screen with the following:
import 'package:flutter/material.dart';
import 'package:flutter_dotenv/flutter_dotenv.dart';
import 'package:supabase_auth_ui/supabase_auth_ui.dart';

class AuthScreen extends StatelessWidget {
  const AuthScreen({super.key});

  @override
  Widget build(BuildContext context) {
    return Scaffold(
      body: ListView(
        padding: const EdgeInsets.fromLTRB(24.0, 96.0, 24.0, 24.0),
        children: [
          Column(
            children: [
              const Text(
                'Supabase Auth UI',
                style: TextStyle(
                  fontWeight: FontWeight.bold,
                  fontSize: 18,
                ),
              ),
              const SizedBox(height: 24.0),
              SupaEmailAuth(
                redirectTo:
                    kIsWeb ? null : "myapptest://com.example.auth_ui_example",
                localization: const SupaEmailAuthLocalization(
                    enterEmail: "Ingiza barua pepe yako",
                    validEmailError: "'الرجاء إدخال عنوان بريد إلكتروني صالح",
                    enterPassword: "Ingresa tu contraseña",
                    passwordLengthError:
                        'Tafadhali ingiza nenosiri lenye herufi angalau 6',
                    signIn: 'تسجيل الدخول',
                    signUp: 'Registrarse',
                    forgotPassword: 'Umesahau nenosiri lako?',
                    dontHaveAccount: 'لا تملك حساب؟ سجل',
                    haveAccount: '¿Ya tienes una cuenta? Inicia sesión',
                    sendPasswordReset:
                        'Tuma barua pepe ya kurekebisha nenosiri',
                    backToSignIn: 'العودة إلى تسجيل الدخول',
                    unexpectedError: 'Se produjo un error inesperado'),
                onSignInComplete: (e) => Navigator.pushNamed(context, '/home'),
                onSignUpComplete: (e) => Navigator.pushNamed(context, '/home'),
                onError: (error) => SnackBar(content: Text(error.toString())),
              ),
            ],
          ),
        ],
      ),
    );
  }
}
The screen is now translated to Swahili, Arabic, and Spanish. Run flutter run -d chrome --web-port=3000 and you should see this:
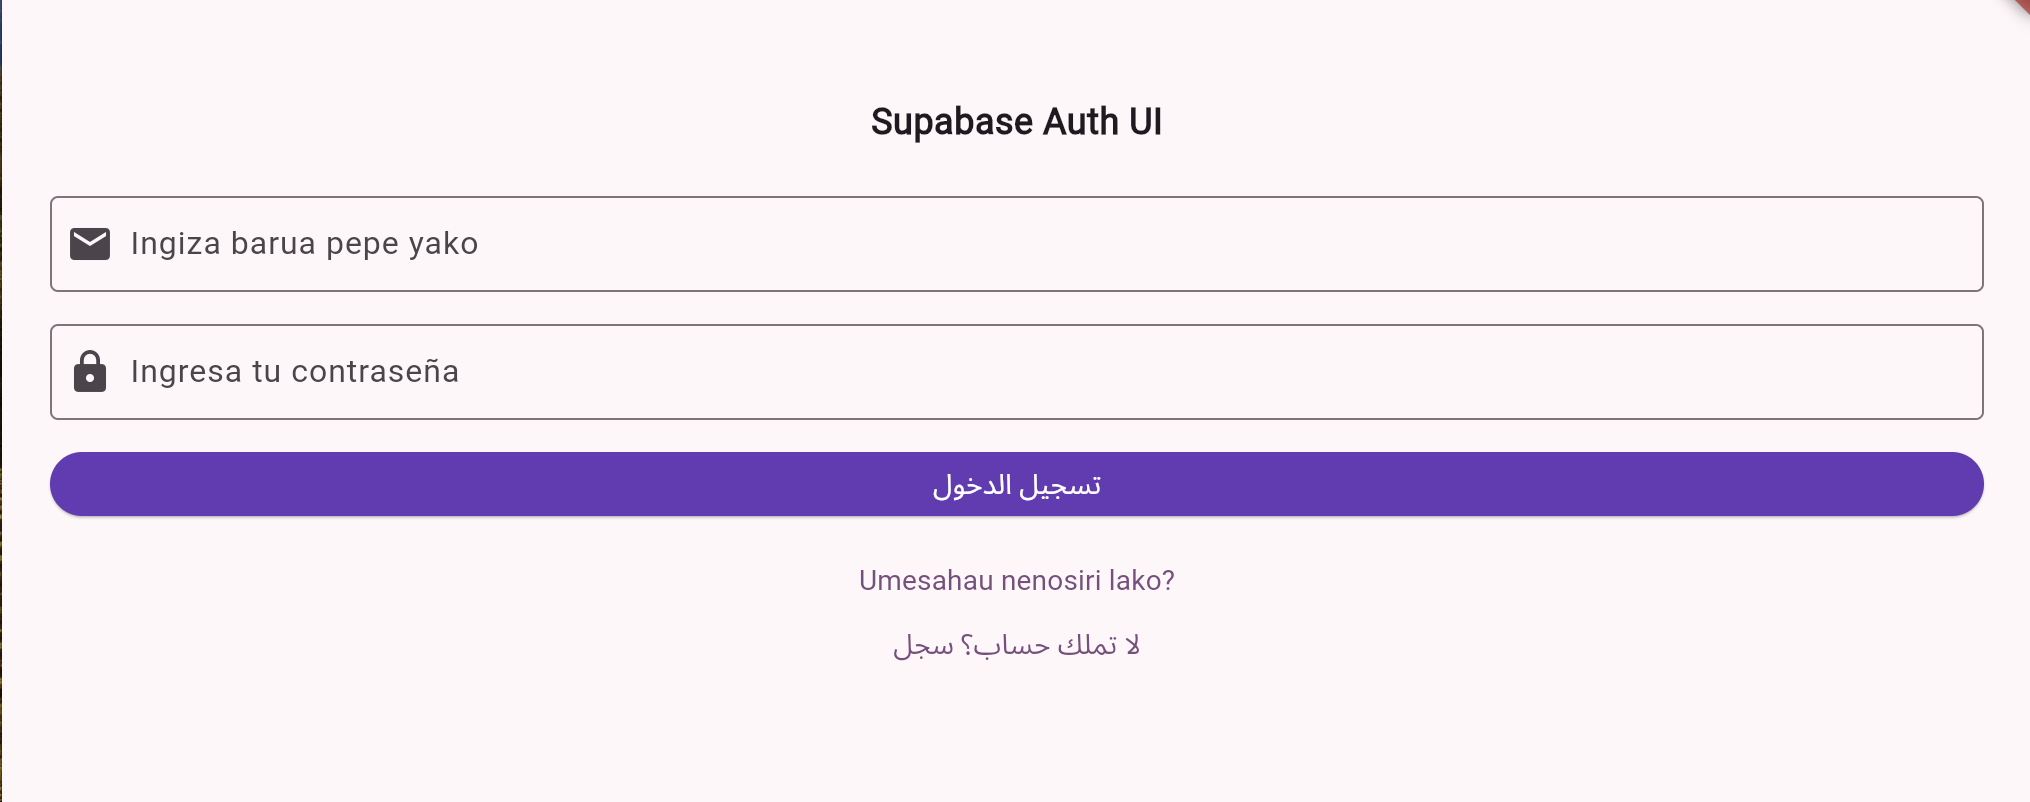 A login interface titled "Supabase Auth UI" with fields for entering email and password in different languages. The email field is labeled "Ingiza barua pepe yako" and the password field is labeled "Ingresa tu contraseña." There is a purple login button with Arabic text. Below the button, there are links for forgotten password and account registration in Swahili and Arabic.
Type a wrong email and press sign in button to trigger the error messages. Your app should now be a polyglot, as shown below:
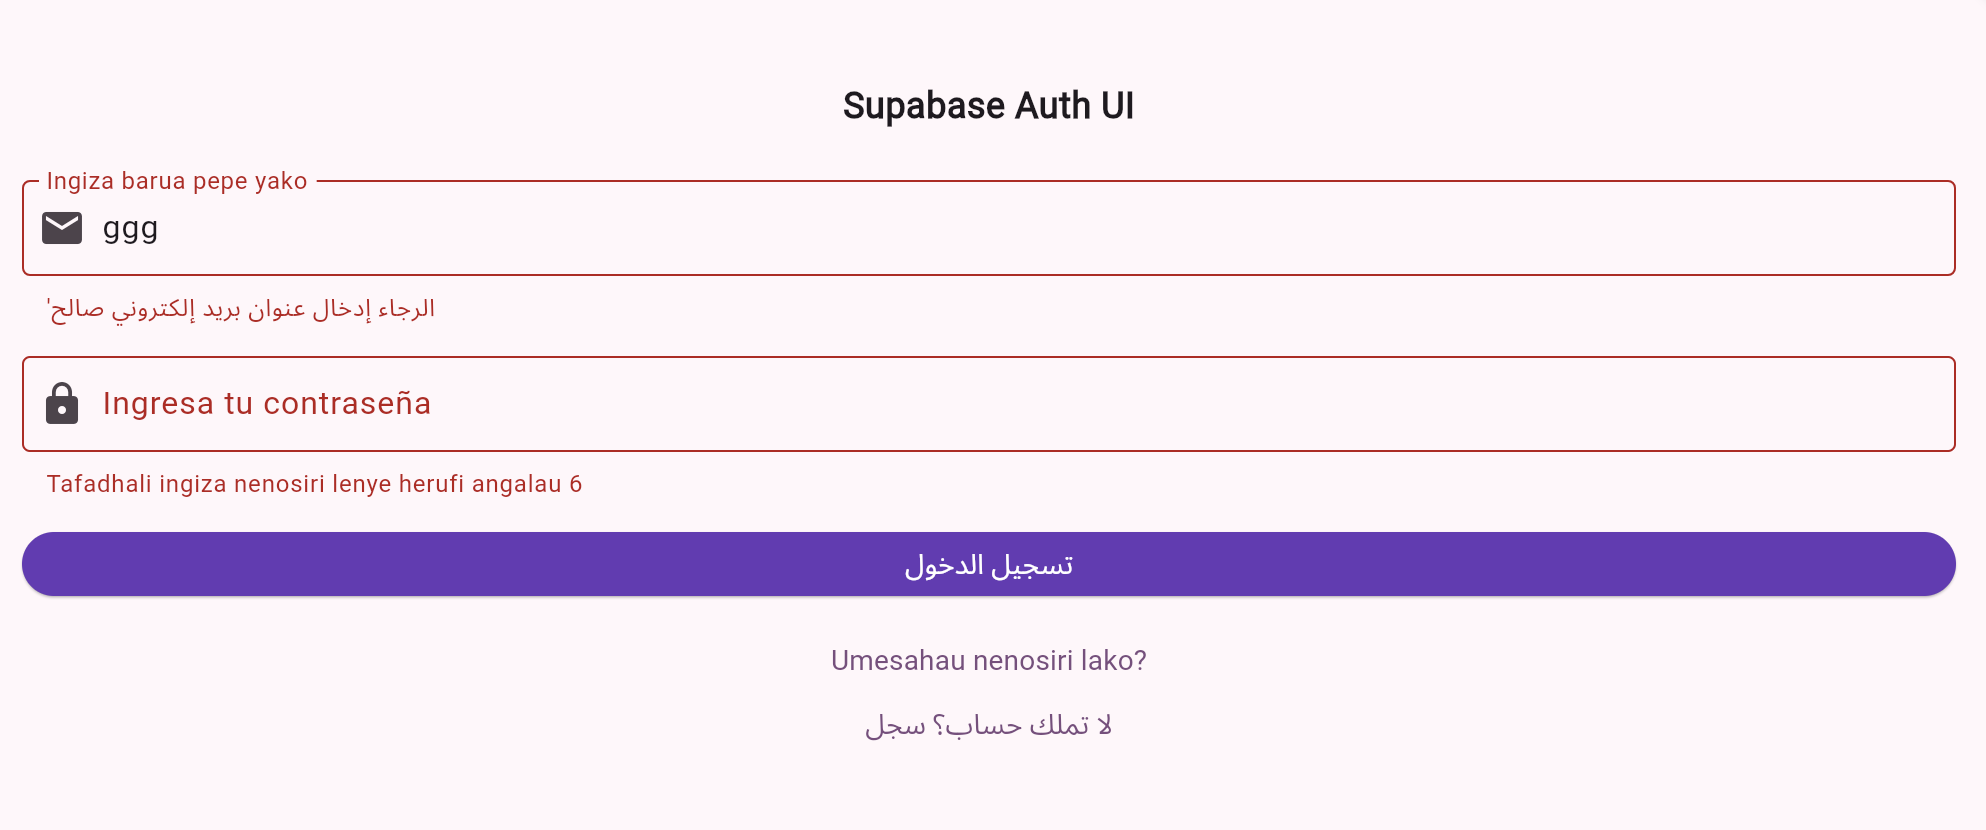 A login interface titled "Supabase Auth UI" with fields for email and password. The email field contains "ggg" and has an error message in multiple languages. The password field is empty with a placeholder in Spanish. Below, there is a purple login button with text in Arabic. Additional text in Swahili and Arabic is present below the button.
Summary
Supabase auth UI is a package that makes it exceptionally easy to get started with adding authentication flows in your flutter apps. It provides customizable, translation -ready widgets out of the box.
It is open-source and always looking for more contributions. Remember to leave a star on the repository.
Resources
Here are some links that might be useful: