

The 100 Days of Code challenge is very popular among new coders and developers looking to level up their skills. It's so popular that our Discord server has an entire channel dedicated to it.
By popular demand, we built a Discord bot that helps people track their progress in the challenge.
Today I am going to show you how to build your own 100 Days of Code bot.
Note that discord.js has released version 14, which includes breaking changes. For compatibility with this tutorial, you will want to ensure you are using discord.js 13 - you can install this with
npm install discord.js@13. If you have any questions, feel free to join my discord server.
Contents
Create a Discord Bot Application
Your first step is to set up a Discord bot application. Head over to the Discord Developer Portal, sign in if needed, and select "Applications" from the sidebar.
 Screenshot of the Developer Portal. If this is your first bot, you will not have any applications here.
Click the "New Application" button. Give it a name, and set it as a "Personal" application. You will now be taken to the application's settings. Here you can change the name, or give it an avatar.
Select "Bot" from the side bar, then click the "Add Bot" button. This will create a Discord Bot account for your application.
 Screenshot of the Bot settings page. If you did not set an avatar, you will see a default based on your bot's name.
This is the screen where you will get the bot token. It is very important to keep this token secret, as the token allows your code to connect to your bot. Keep it safe and do not share it with anyone.
Now you need to add the bot to a server to interact with it. Click the "OAuth2" option on the sidebar, then select "URL Generator".
Under "Scopes", select bot and application.commands. The bot scope allows your bot account to join the server, and the application.commands scope allows you to update the slash commands (more on this later).
When you select bot, a new section for "Bot Permissions" will appear. Select the following permissions:
- Send Messages
- Embed Links
- Read Messages/View Channels
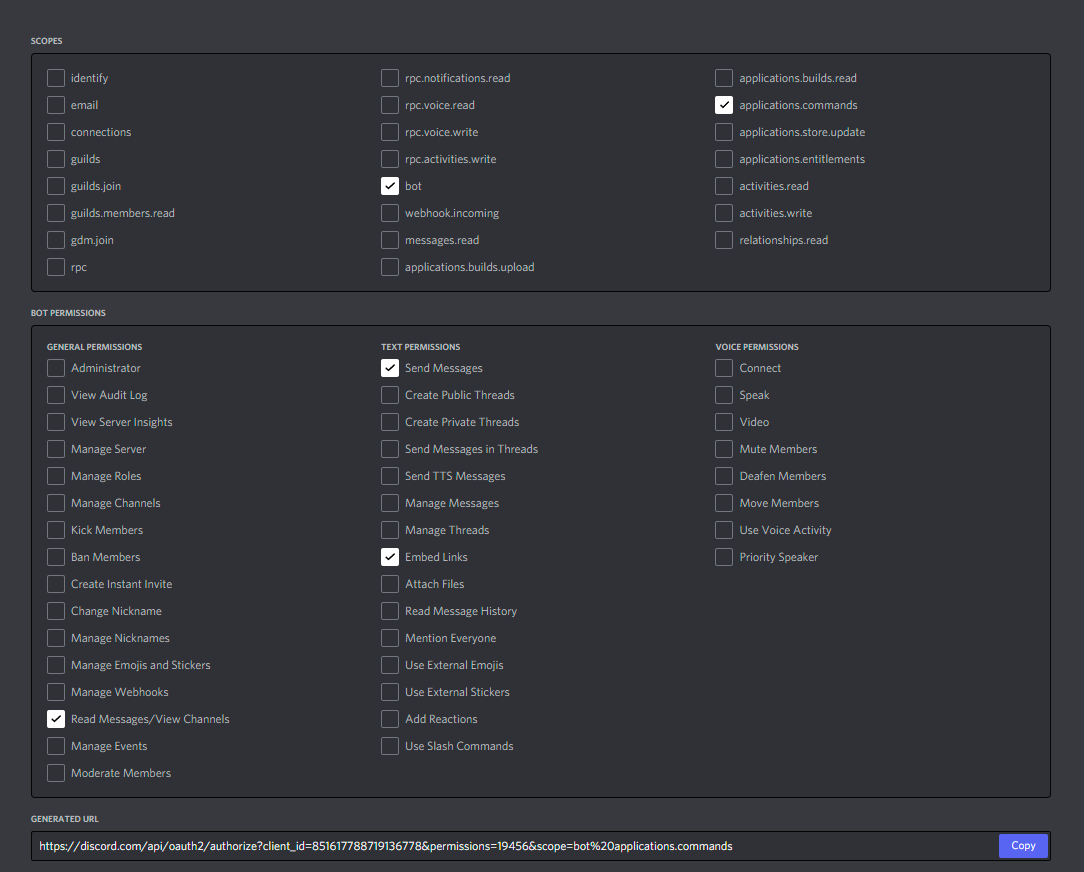 Screenshot of the OAuth screen with the required settings.
Copy the generated URL, and paste it into your browser. This will take you through Discord's process to add your new bot to a server.
Note that you must have the Manage Server permission in the server you want to add the bot to. If you do not have this permission, you can create a server to test your bot in.
Now you are ready to write some code!
Set Up Your Project
You will first need to set up the infrastructure and tooling for your project.
Ensure that you have Node.js version 16 and npm installed. Note that the packages you will use do not support earlier versions of Node.
Prepare the package.json
Create a directory, or folder, for your project. Open your terminal pointing to that new folder. Run the command npm init to set up your package.json file. For this tutorial, the default values are sufficient, but feel free to edit them as you wish.
You should end up with a package.json similar to this:
{
  "name": "100doc-tutorial",
  "version": "1.0.0",
  "description": "",
  "main": "index.js",
  "scripts": {
    "test": "echo \"Error: no test specified\" && exit 1"
  },
  "author": "",
  "license": "ISC"
}
Now you need to make a couple of changes to get ready for the TypeScript implementation.
First, replace the main value of index.js with ./prod/index.js – you will be setting your TypeScript to compile to a prod directory.
Then remove the test script and add the following two scripts:
"build": "tsc",
"start": "node -r dotenv/config ./prod/index.js"
The build script will compile your TypeScript into JavaScript so Node can run it, and the start script will run the index.js entrypoint file.
Adding the -r dotenv/config here will dynamically import and run the config method in the dotenv package, which loads your environment variables from the .env file.
Speaking of packages, your next step is to install dependencies. Using npm install, install these dependencies:
discord.js– this is the library that will handle connecting to the gateway and managing the Discord API calls.@discordjs/builders– the discord.js package for constructing application commands@discordjs/rest– a custom API client for interacting with the Discord REST API.discord-api-types– Type definitions and handlers for the Discord REST API.dotenv– a package that loads.envvalues into the Node process.mongoose– A wrapper for the MongoDB connection which offers tools for structuring your data.
Finally, install the development dependencies with npm install --save-dev. Development dependencies are packages that are required for working on your project in a development environment, but not required for running the codebase in production.
typescript– This is the package for the TypeScript language, which includes everything needed to write code in TypeScript and compile it into JavaScript.@types/node– TypeScript relies on type definitions to understand the code you write. This package defines the types for the Node.js runtime environment, such as theprocess.envobject.
With these packages installed, you should now have a package.json similar to this:
{
  "name": "100doc-tutorial",
  "version": "1.0.0",
  "description": "",
  "main": "./prod/index.js",
  "scripts": {
    "build": "tsc",
    "start": "node -r dotenv/config ./prod/index.js"
  },
  "author": "",
  "license": "ISC",
  "dependencies": {
    "@discordjs/builders": "^0.11.0",
    "@discordjs/rest": "^0.2.0-canary.0",
    "discord.js": "^13.6.0",
    "dotenv": "^14.2.0",
    "mongoose": "^6.1.7"
  },
  "devDependencies": {
    "@types/node": "^17.0.10",
    "typescript": "^4.5.4"
  }
}
Prepare TypeScript
TypeScript's compiler offers a number of different settings to maximise your control over the resulting JavaScript.
You can typically modify the compiler settings through a tsconfig.json file at the root of your project. You can generate the default boilerplate for this file with npx tsc --init, use an existing one if you set one up in another project, or even write one from scratch.
Because the compiler settings can significantly change the behaviour of TypeScript, it is best to use the same settings when following this tutorial. Here are the settings you should use:
{
  "compilerOptions": {
    "target": "ES6",
    "module": "CommonJS",
    "rootDir": "./src",
    "outDir": "./prod",
    "strict": true,
    "esModuleInterop": true,
    "skipLibCheck": true,
    "forceConsistentCasingInFileNames": true,
    "resolveJsonModule": true
  }
}
The most important settings here are the rootDir and outDir settings. These tell the compiler that all of your code will be in the src directory, and the resulting JavaScript should go in the prod directory.
If you would like to test your settings, create a src directory and place an index.ts file inside. Write some code (such as a console.log statement) and run npm run build in your terminal. You should see a prod directory get created, with an index.js containing your compiled code.
Additional Setup Notes
If you are using git as a version control, you want to avoid pushing secrets and unnecessary code to your repository. Create a .gitignore file in your root project directory, and add the following content:
/node_modules/
/prod/
.env
The .gitignore file tells git not to track files/folders that match the patterns you enter. Ignoring the node_modules folder keeps your repository from becoming bloated.
Pushing the compiled JavaScript is also unnecessary, as your project is typically compiled in production before runtime. .env files contain secret values, such as API keys and tokens, so they should not be committed to a repository.
Create the Discord Bot
Your next step is to prepare the initial bot connection. If you did not do so earlier, create a src directory and an index.ts file within.
Start with an anonymous immediately-invoked function expression (IIFE) to allow for top-level await use:
(async () => {

})();
Within this function you are going to instantiate your Discord bot. At the top of the file, import the Client class with import { Client } from "discord.js";. The Client class represents your Discord bot's session.
Inside your function, construct a new Client instance and assign it to a BOT variable with const BOT = new Client();. Now the BOT variable will represent your bot.
To connect your bot to the Discord gateway and begin receiving events, you will need to use the .login() method on your bot instance. The .login() method takes a single argument, which is the token for the bot application you created earlier.
Many of the methods in discord.js are asynchronous, so you will need to use await here. Add the line await BOT.login(process.env.BOT_TOKEN); to your IIFE.
Your index.ts file should now look like this:
import { Client } from "discord.js";

(async () => {
  const BOT = new Client();

  await BOT.login(process.env.BOT_TOKEN);
})();
If you try to run npm run build, you will see an error: An argument for 'options' was not provided.
In discord.js 13, you are required to specify Gateway Intents when you instantiate your bot. Gateway Intents tell Discord what events your bot should receive.
In your src folder, create a config folder - then in config, create an IntentOptions.ts file.
Within that new file, add the line export const IntentOptions = ["GUILDS"]. This will tell Discord your bot should receive the Guild events.
Then, back in your index.ts file, add an argument to your new Client() call: new Client({intents: IntentOptions}). You'll need to import it at the top of your file with import { IntentOptions } from "./config/IntentOptions;.
It seems you still have an error: Type 'string' is not assignable to type 'number |${bigint}| IntentsString | Readonly<BitField<IntentsString, number>> | RecursiveReadonlyArray<number |${bigint}| IntentsString | Readonly<...>>'.
TypeScript is inferring your IntentOptions array as a string, but the Client constructor is expecting more specific types.
Head back to your config/IntentOptions.ts file and add another import: import { IntentsString } from "discord.js". Then update your variable with the new type definition: export const IntentOptions: IntentsString[] = ["GUILDS"];.
Now npm run build should be successful. If you have added your new bot to a Discord server, running npm start will show your bot come online in that server. However, the bot is not going to respond to anything yet, because you have not started listening to events.
Gateway Events in Discord
Gateway "events" are generated when an action happens on Discord, and are typically sent to clients (including your bot) as JSON payloads. You can listen to those events with the .on() method, allowing you to write logic for your bot to follow when specific events occur.
The first event to listen to is the "ready" event. This event fires when your bot has connected to the gateway and is ready to process events. Above your .login() call, add BOT.on("ready", () => console.log("Connected to Discord!"));.
For your changes to take effect, use npm run build again to compile the new code. Now if you try npm run start, you should see "Connected to Discord!" print in your terminal.
Connect to the Database
You'll be using the mongoose package to connect to a MongoDB instance. If you prefer, you can run MongoDB locally, or you can use the MongoDB Atlas free tier for a cloud-based solution.
If you do not have a MongoDB Atlas account, freeCodeCamp has a great tutorial on setting one up.
Grab your connection string for your database and add it to your .env file as MONGO_URI="", with the connection string going between the quotes. For the database name, use oneHundredDays.
Create a directory called database to hold the files that contain your database logic. Within that directory, create a file called connectDatabase.ts. You will be writing your logic to initiate the database connection here.
Start with an exported function declaration:
export const connectDatabase = async () => {

}
mongoose offers a connect method for connecting to the database. Import it with import { connect } from "mongoose"; at the top of your file.
Then use the method inside your function with await connect(process.env.MONGO_URI);. Add a console.log statement after that so you can identify that your bot has connected to the database.
Your connectDatabase.ts file should now look something like this:
import { connect } from "mongoose";

export const connectDatabase = async () => {
    await connect(process.env.MONGO_URI);
    console.log("Database Connected!")
}
Now, within your index.ts file, import this function with import { connectDatabase } from "./database/connectDatabase" and add await connectDatabase() to your IIFE, just before the .login() method. Go ahead and run npm run build again.
 A compiler error, indicating that: Argument of type string or undefined is not assignable to parameter of type string.
Oh no – an error!
Environment Variable Validation
The problem with environment variables is that they can all be undefined. This often happens if you make a typo in your environment variable name, or mix the name up with another name (a mistake I made when writing this tutorial, using TOKEN instead of BOT_TOKEN in some places).
TypeScript is warning you that the connect method takes a string, and that an undefined value will break things. You can fix this, but first you will want to write a function to handle validating your environment variables.
Within your src directory, create a utils directory to contain your utility functions. Add a validateEnv.ts file there.
Create a function in the file called validateEnv. This function will be synchronous and does not need the async keyword. Within that function, add conditions to check for your two environment variables. If either one is missing, return false. Otherwise, return true.
Your code might look something like this:
export const validateEnv = () => {
  if (!process.env.BOT_TOKEN) {
    console.warn("Missing Discord bot token.");
    return false;
  }

  if (!process.env.MONGO_URI) {
    console.warn("Missing MongoDB connection.");
    return false;
  }
  return true;
};
Head back to your index.ts file and import this validation function with import { validateEnv } from "./utils/validateEnv". Then at the beginning of your IIFE, use an if statement to return early if the function returns false. Your index.ts should look like:
import { Client } from "discord.js";
import { connectDatabase } from "./database/connectDatabase";
import { validateEnv } from "./utils/validateEnv";

(async () => {
  if (!validateEnv()) return;

  const BOT = new Client();

  BOT.on("ready", () => console.log("Connected to Discord!"));

  await connectDatabase();

  await BOT.login(process.env.BOT_TOKEN);
})();
If you try npm run build again, you will see the same error message as before. This is because while we know the environment variable exists, TypeScript still cannot infer it. The validation function is set up to exit the process if the environment variable is missing, so we are going to tell TypeScript that it is definitely a string.
Back in your connectDatabase.ts file, within the connect function use process.env.MONGO_URI as string to coerce the type into string. The error should go away, and you can now run npm run build and npm start.
You should see the messages you wrote for both the Discord and MongoDB connections print in your terminal.
The "interaction" Event
While you are making great progress on your bot, it still does not do anything. In order to receive commands, you will need to create another event listener.
Discord rolled out slash commands, featuring a new UI and a new gateway event. The interactionCreate event is triggered when someone uses a slash command with your bot. This is the event you will want to listen to. Because the logic is a bit more complicated than the ready event, you will want to create a separate file.
Within your src directory, create an events directory, and an onInteraction.ts file in there. Start by defining an exported function onInteraction. This should be an asynchronous function, with a single parameter called interaction.
export const onInteraction = async (interaction) => {

};
To provide a type definition for your parameter, import the Interaction type from discord.js.
import { Interaction } from "discord.js";

export const onInteraction = async (interaction: Interaction) => {

};
The interaction event actually triggers on any command interaction, which includes things like button clicks and select menus, as well as the slash commands we want.
Because you will only be writing slash commands for this bot, you can filter out any other interaction type and help TypeScript understand the data you are working with.
In your new function, add a condition to check interaction.isCommand(). You will be writing logic within this block later.
import { Interaction } from "discord.js";

export const onInteraction = async (interaction: Interaction) => {
  if (interaction.isCommand()) {
  }
};
Now, back in your index.ts file, you can mount another listener. Next to your .on("ready") listener, add a BOT.on("interactionCreate") listener. For this event, the callback takes an interaction argument which you can pass to your new onInteraction function.
  BOT.on(
    "interactionCreate",
    async (interaction) => await onInteraction(interaction)
  );
Great! You can run npm run build to confirm that TypeScript doesn't throw any errors, but without actual commands to use you can't quite test this code yet.
Prepare for Commands
I maintain a few Discord bots, and one thing I've discovered that helps keep code maintainable and readable is making the components modular.
Define an Interface
You will first need to define a common structure for your commands. Create an interfaces folder in src. Then inside interfaces create a file called Command.ts.
Now you are going to create an interface. In TypeScript, an interface is often used to define the structure of an object, and is one of many tools available for declaring a variable's type.
In your Command.ts file, create an exported interface called Command:
export interface Command {

}
Your interface will have two properties – data, which will hold the command data to send to Discord, and run, which will hold the callback function and command logic.
For the data property, import SlashCommandBuilder and SlashCommandSubcommandsOnlyBuilder from @discordjs/builders. Define the data property as either one of those two types.
For the run property, import the CommandInteraction type from discord.js. Define run as a function which takes a CommandInteraction typed parameter and returns a void Promise.
import {
  SlashCommandBuilder,
  SlashCommandSubcommandsOnlyBuilder,
} from "@discordjs/builders";
import { CommandInteraction } from "discord.js";

export interface CommandInt {
  data: SlashCommandBuilder | SlashCommandSubcommandsOnlyBuilder;
  run: (interaction: CommandInteraction) => Promise<void>;
}
Create a Command List
Next you need a place to store all of your commands. Create a folder called commands in the src directory, and add a file called _CommandList.ts. The underscore here will keep this file at the top of the list.
The _CommandList.ts file will need two lines. First, import your Command interface, then declare a CommandList array. The array will be empty for now, but give it a Command[] type so TypeScript knows it will eventually hold your command objects. The file should look like:
import { Command } from "../interfaces/Command";

export const CommandList: Command[] = [];
The purpose of this file is to create an array of your bot's commands which you will iterate over in the interaction event listener. There are ways to automate this, but they tend to be unnecessarily complex for smaller bots.
Check for Commands
Back in your onInteraction.ts file, you should start working on the logic for finding and running a command.
In your interaction.isCommand() condition block, loop through the CommandList array (remember to import it!) with a for...of loop.
for (const Command of CommandList) {

}
The interaction payload received from Discord includes a commandName property, which you can use to find the command that a user has selected. To check this, compare interaction.commandName with the Command.data.name property.
if (interaction.commandName === Command.data.name) {

}
Now, if you have found the command the user has chosen, you need to run the logic for that command. This is achieved with a Command.run(interaction) call – passing the interaction payload into the command.
Your final file should look like this:
import { Interaction } from "discord.js";
import { CommandList } from "../commands/_CommandList";

export const onInteraction = async (interaction: Interaction) => {
  if (interaction.isCommand()) {
    for (const Command of CommandList) {
      if (interaction.commandName === Command.data.name) {
        await Command.run(interaction);
        break;
      }
    }
  }
};
Database Model
There's one more step before you are ready to start writing commands. This bot will track your community members' 100 Days of Code progress. And you need to store that progress in the database.
mongoose helps structure your MongoDB records to prevent you from passing malformed or incomplete data into your database.
Start by creating a models folder in your database directory. In that models folder, create a CamperModel.ts file. This will be your structure for the user objects.
You first need to import the necessary values from the mongoose library. Add import { Document, model, Schema } from "mongoose"; at the top of the file.
Because you are using TypeScript, you need to create a type definition for your database objects. Create another interface, like you did for your commands, named CamperInt.
export interface CamperInt extends Document {

}
Your database model will have four properties. Add these to your interface:
discordId: string;– Every user object in Discord has a unique identifier, called a Snowflake, which is used to distinguish them from other users. Unlike a username or discriminator (the four digit number after the username), theidvalue cannot be changed. This makes it the ideal value for linking your stored data to a Discord user.round: number;– This will represent the "round" the user is on in the challenge. When someone completes 100 days of the challenge, they may choose to undertake the challenge again. When they do, they often refer to it as "round 2", for example.day: number;– This represents the day the user is on in the challenge.timestamp: number;– You will use this value to track when the user last submitted a 100 Days of Code post.
Great! Now you need to define the Schema for your database entries. mongoose uses a Schema object to define the shape of the documents that go in to your database collection. The Schema import has a constructor, which you will assign to a variable.
export const Camper = new Schema();
This constructor takes an object as its argument, and that object defines the database keys and types. Go ahead and pass in an object similar to what your interface looks like.
export const Camper = new Schema({
    discordId: String,
    round: Number,
    day: Number,
    timestamp: Number,
})
Next you need to create the model. In mongoose, the model object serves to create, read, and update your documents in the MongoDB database. Add export default model(); at the bottom of your file.
The model function takes a few parameters. The first is a string, and is the name to use for the documents in your database. For this collection, use "camper". The second argument is the schema to use for the data – use your Camper schema there.
By default, mongoose will use the plural version of your model name for the collection. In our case, that would be "campers". If you want to change that, you can pass in a third argument of { collection: "name" } to set the collection to name.
If you were using JavaScript, this would be enough to get your database model set up. However, because you are using TypeScript, you should take advantage of the type safety. model() by default returns a Document type of any.
To resolve this, you can pass a generic type into the model function. Generic types serve as variables for type definitions, in a sense. You need to set the generic type for your model to use your interface. Add the generic type by changing model to model<CamperInt>.
Just one more step here. Your CamperInt interface only defines the properties you set in the MongoDB document, but doesn't include the standard properties.
Change your export interface CamperInt to export interface CamperInt extends Document. This tells TypeScript that your type definition is an extension of the existing Document type definition – you are essentially adding properties to that structure.
Your final file should look like this:
import { Document, model, Schema } from "mongoose";

export interface CamperInt {
  discordId: string;
  round: number;
  day: number;
  timestamp: number;
}

export const Camper = new Schema({
  discordId: String,
  round: Number,
  day: Number,
  timestamp: Number,
});

export default model<CamperInt>("camper", Camper);
As a safety check, use npm run build again. You should not see any errors in the terminal.
Write Bot Commands
You are finally ready to start writing some commands! As this is a 100 Days of Code bot, you should start with the command for creating a 100 Days of Code update.
100 Command
Within your commands folder, create a oneHundred.ts file. This will hold your 100 Days of Code command. Import your command interface with import { Command } from "../interfaces/Command;.
Now declare an exported variable oneHundred and give it the Command type:
import { Command } from "../interfaces/Command";

export const oneHundred: Command = {

};
First, create the data property. You will be using the @discordjs/builders package to build a slash command.
Start by importing the SlashCommandBuilder() from the @discordjs/builders package. Then, construct a new instance in the data property with new SlashCommandBuilder(). You're going to chain some methods here to pass the information you want into the builder.
The .setName() method allows you to set the name of your slash command. Set the name to "100". The setDescription() option allows you to display a description of the command in Discord's UI. Set the description to "Check in for the 100 Days of Code challenge.".
Slash commands can also accept option values. These are used to take arguments from the user, and come in various types. For this command, you'll want a string option with the addStringOption() method. Option methods take a callback function, with an option parameter.
You can then chain methods on the option parameter to configure the information for the argument. Use the .setName() method to give the option a name of "message", and the .setDescription() method to give it a description of "The message to go in your 100 Days of Code update.". Finally, use the .setRequired() method to set the option to be required.
Here's what you should have now:
import { SlashCommandBuilder } from "@discordjs/builders";
import { Command } from "../interfaces/Command";

export const oneHundred: Command = {
  data: new SlashCommandBuilder()
    .setName("100")
    .setDescription("Check in for the 100 Days of Code challenge.")
    .addStringOption((option) =>
      option
        .setName("message")
        .setDescription("The message to go in your 100 Days of Code update.")
        .setRequired(true)
    ),
};
If you are coding in an IDE with Intellisense enabled, you may have noticed that this will throw a type error on the data property. This is because the SlashCommandBuilder actually returns an Omit type! An Omit type is used to tell TypeScript that the type is almost the same as another type, but with specific properties removed.
Head over to your interfaces/Command.ts file to update the type. Replace the SlashCommandBuilder type with Omit<SlashCommandBuilder, "addSubcommandGroup" | "addSubcommand">. This will tell TypeScript that data should be a SlashCommandBuilder, but without those two specific properties.
import {
  SlashCommandBuilder,
  SlashCommandSubcommandsOnlyBuilder,
} from "@discordjs/builders";
import { CommandInteraction } from "discord.js";

export interface Command {
  data:
    | Omit<SlashCommandBuilder, "addSubcommandGroup" | "addSubcommand">
    | SlashCommandSubcommandsOnlyBuilder;
  run: (interaction: CommandInteraction) => Promise<void>;
}
Great! Now that your type error is resolved, head back over to your oneHundred.ts command file – it is time to write the command logic.
All of your bot's logic for responding to the command will go in the run property. As you did in your interface, start by creating an async function which takes an interaction argument. Then, let the first line of your function be await interaction.deferReply();.
Discord expects a bot to respond to a command within three seconds. Because this command may take longer to process, using the .deferReply() method sends an acknowledgement response that gives you a full 15 minutes to send the actual response.
Next, you need to extract some data from the command. First, destructure the user object out of the interaction payload with const { user } = interaction;. The user object represents the Discord user that called the command.
Then get the message option you sent with const text = interaction.options.getString("message", true);. With this line, you are accessing the options property of the interaction. The .getString() method specifically grabs a string option (remember that you created the option in data), and "message" is the name of the option. The true argument indicates that this is a required option, so TypeScript won't consider it nullable.
Your file should look like this:
import { SlashCommandBuilder } from "@discordjs/builders";
import { Command } from "../interfaces/Command";

export const oneHundred: Command = {
  data: new SlashCommandBuilder()
    .setName("100")
    .setDescription("Check in for the 100 Days of Code challenge.")
    .addStringOption((option) =>
      option
        .setName("message")
        .setDescription("The message to go in your 100 Days of Code update.")
        .setRequired(true)
    ),
  run: async (interaction) => {
    await interaction.deferReply();
    const { user } = interaction;
    const text = interaction.options.getString("message", true);
  },
};
The next step in this command would be to fetch data from your database. Because many of your commands will need to do this, you should create a module for it.
Handling the Database Logic
Create a src/modules directory, and add a getCamperData.ts file within. Create an exported async function named getCamperData, and give it a string parameter named id. Then, within the function, you can query the database.
Import your CamperModel from the database directory, and use the findOne() method to query by the camper's id: const camperData = await CamperModel.findOne({ discordId: id });.
import CamperModel from "../database/models/CamperModel";

export const getCamperData = async (id: string) => {
  const camperData = await CamperModel.findOne({ id });
};
We still have one more step here. If the camper has not used the bot before, they won't have an existing database record. findOne() would return null in this case – so you can add a fallback value.
import CamperModel from "../database/models/CamperModel";

export const getCamperData = async (id: string) => {
  const camperData =
    (await CamperModel.findOne({ discordId: id })) ||
    (await CamperModel.create({
      discordId: id,
      round: 1,
      day: 0,
      date: Date.now(),
    }));
};
Finally, you need to return your data. Add return camperData at the end of the function. For extra type safety, define the return type of your function as Promise<CamperData>.
import CamperModel, { CamperInt } from "../database/models/CamperModel";

export const getCamperData = async (id: string): Promise<CamperInt> => {
  const camperData =
    (await CamperModel.findOne({ discordId: id })) ||
    (await CamperModel.create({
      discordId: id,
      round: 1,
      day: 0,
      date: Date.now(),
    }));
  return camperData;
};
You now have a way to get camper data from the database, but you need a way to update it as well. Create another file in your /src/modules directory called updateCamperData.ts. This will handle the logic to increment a camper's progress.
Start with an exported async function called updateCamperData. It should take a Camper parameter, which would be the data you fetch from MongoDB.
import { CamperInt } from "../database/models/CamperModel";

export const updateCamperData = async (Camper: CamperInt) => {

};
The only time you will update data is within the /100 command – where you'll want to increment the camper's day count, check if they have started a new round, and update the timestamp.
First, increment the day count with Camper.day++;. With the way the 100 Days of Code challenge works, if a camper has passed day 100 then they have started a new "round". You'll need a condition to check if Camper.day > 100, and if so, reset the day to 1 and increment the round.
After that condition, update the timestamp with Camper.timestamp = Date.now(); and save the data with await Camper.save();. Finally, return the modified data object so you can use it in the command.
Your final file should look like:
import { CamperInt } from "../database/models/CamperModel";

export const updateCamperData = async (Camper: CamperInt) => {
  Camper.day++;
  if (Camper.day > 100) {
    Camper.day = 1;
    Camper.round++;
  }
  Camper.timestamp = Date.now();
  await Camper.save();
  return Camper;
};
100 Command Continued
Now that your database logic is ready, return to your oneHundred.ts file. As a reminder, that file should look like this:
import { SlashCommandBuilder } from "@discordjs/builders";
import { Command } from "../interfaces/Command";

export const oneHundred: Command = {
  data: new SlashCommandBuilder()
    .setName("100")
    .setDescription("Check in for the 100 Days of Code challenge.")
    .addStringOption((option) =>
      option
        .setName("message")
        .setDescription("The message to go in your 100 Days of Code update.")
        .setRequired(true)
    ),
  run: async (interaction) => {
    await interaction.deferReply();
    const { user } = interaction;
    const text = interaction.options.getString("message", true);
  },
};
Import your two new modules at the top of the file. Then, after your logic that extracts the values from the interaction object, fetch the camper's data from the database with const targetCamper = await getCamperData(user.id);. Update the data with const updatedCamper = await updateCamperData(targetCamper);.
import { SlashCommandBuilder } from "@discordjs/builders";
import { Command } from "../interfaces/Command";
import { getCamperData } from "../modules/getCamperData";
import { updateCamperData } from "../modules/updateCamperData";

export const oneHundred: Command = {
  data: new SlashCommandBuilder()
    .setName("100")
    .setDescription("Check in for the 100 Days of Code challenge.")
    .addStringOption((option) =>
      option
        .setName("message")
        .setDescription("The message to go in your 100 Days of Code update.")
        .setRequired(true)
    ),
  run: async (interaction) => {
    await interaction.deferReply();
    const { user } = interaction;
    const text = interaction.options.getString("message", true);

    const targetCamper = await getCamperData(user.id);
    const updatedCamper = await updateCamperData(targetCamper);
  },
};
Now you need to construct the response to send back to the camper when they use the command.
For this, you'll be using Discord's message embed feature. Start by importing the MessageEmbed constructor from discord.js, and creating a new embed with const oneHundredEmbed = new MessageEmbed();. The MessageEmbed class has a few methods to use for building the content of the embed.
Use the .setTitle() method to set the title of the embed to "100 Days of Code".
Use the .setDescription() method to set the description of the embed to the message the camper provided in the command (remember that you extracted this to the text variable earlier). The author of the embed can be set, and will display at the top of the embed.
Use the .setAuthor() method to pass an object with a name property set to user.tag (which will display the camper's username and discriminator, like nhcarrigan#0001), and an iconURL property set to user.displayAvatarUrl() (which will attach the camper's avatar to the embed).
Embeds also accept fields, which are smaller blocks of text that have their own title and description. The .addField() method takes two or three arguments, the first being the field title, the second being the field description, and the third being an optional boolean to set the field as inline.
Use the .addField() method to add two fields. The first should have the title set to "Round" and the description set to updatedCamper.round.toString(). The second should have the title set to "Day" and the description set to updatedCamper.day.toString(). Both fields should be inline.
For the last part of your embed, use the .setFooter() method to add small footer text. Pass an object with a text property set to "Day completed: " + new Date(updatedCamer.timestamp).toLocaleDateString() to show the time the camper reported their progress.
Finally, you need to send this new embed back to the camper. Because you have already sent a response with the interaction.deferReply() call, you cannot send another response. Instead, you need to edit the one you sent.
Use await interaction.editReply() to edit the response. The .editReply() method takes an object with various properties – in this case, you are sending an embed. Pass an object with an embeds property set to [oneHundredEmbed].
Note that this is an array containing your embed. Discord messages can contain up to 10 embeds, and the API expects an array of embed objects to match.
Your final command file should look like this:
import { SlashCommandBuilder } from "@discordjs/builders";
import { MessageEmbed } from "discord.js";
import { Command } from "../interfaces/Command";
import { getCamperData } from "../modules/getCamperData";
import { updateCamperData } from "../modules/updateCamperData";

export const oneHundred: Command = {
  data: new SlashCommandBuilder()
    .setName("100")
    .setDescription("Check in for the 100 Days of Code challenge.")
    .addStringOption((option) =>
      option
        .setName("message")
        .setDescription("The message to go in your 100 Days of Code update.")
        .setRequired(true)
    ),
  run: async (interaction) => {
    await interaction.deferReply();
    const { user } = interaction;
    const text = interaction.options.getString("message", true);

    const targetCamper = await getCamperData(user.id);
    const updatedCamper = await updateCamperData(targetCamper);

    const oneHundredEmbed = new MessageEmbed();
    oneHundredEmbed.setTitle("100 Days of Code");
    oneHundredEmbed.setDescription(text);
    oneHundredEmbed.setAuthor({
      name: user.tag,
      iconURL: user.displayAvatarURL(),
    });
    oneHundredEmbed.addField("Round", updatedCamper.round.toString(), true);
    oneHundredEmbed.addField("Day", updatedCamper.day.toString(), true);
    oneHundredEmbed.setFooter({
      text:
        "Day completed: " +
        new Date(updatedCamper.timestamp).toLocaleDateString(),
    });

    await interaction.editReply({ embeds: [oneHundredEmbed] });
  },
};
Registering Commands
If you run npm run build and npm start, everything starts up – but you have no way to actually use your new command. This is because Discord requires that commands be registered so they are made available in the application UI. There are a few steps we'll need to take to do this.
First, head over to your _CommandList.ts file and import your oneHundred command. Add this to your CommandList array so it's available elsewhere.
import { Command } from "../interfaces/Command";
import { oneHundred } from "./oneHundred";

export const CommandList: Command[] = [oneHundred];
Now it is time to add the logic to send the command information to Discord. In your src/events directory, add an onReady.ts file. We'll be using this with the "ready" event.
Create an exported async function named onReady, and give it a single parameter called BOT. Import the Client type from discord.js and set the BOT typedef to Client.
import { Client } from "discord.js";

export const onReady = async (BOT: Client) => {};
Now import the REST module from @discordjs/rest. This will allow you to instantiate an API client, which you'll use to send the commands. Construct a new instance with const rest = new REST();.
There are a couple of things you'll need to configure with your REST client. First, pass an object into the REST() constructor with a version property set to "9". This tells the client to use version 9 of Discord's API, which is currently the latest version.
Then, chain a .setToken() call on the constructor to set the API token to process.env.BOT_TOKEN – you'll have to coerce this to a string.
import { REST } from "@discordjs/rest";
import { Client } from "discord.js";

export const onReady = async (BOT: Client) => {
  const rest = new REST({ version: "9" }).setToken(
    process.env.BOT_TOKEN as string
  );
};
The API expects command data to be sent in a specific JSON format, but thankfully the slash command builder we are using has a method just for that. Import your CommandList, then create a new array and map your command data.
const commandData = CommandList.map((command) => command.data.toJSON());
Before you send the commands to Discord, it's important to note that there are two types of commands. "Global Commands" are available everywhere your bot is used, but take about an hour to update. "Guild Commands" are available only in a single server, but update immediately. Because this bot is designed to run in a single server, we're going to use guild commands.
You'll need to get the ID of the server you are using the bot in. To do this, make sure you have enabled developer mode in your Discord application, then right click on your server icon and select "Copy ID". In your .env file, add a GUILD_ID variable and assign it the ID you copied. It should look something like GUILD_ID="778130114772598785".
Back in your onReady.ts file, start your API call with await rest.put(). Sending a PUT request will update any existing commands, where a POST will attempt to create new commands and error if commands share a name. Import Routes from discord-api-types/v9, and within the rest.put() call pass a Routes.applicationGuildCommands() call. This will be used to construct the API endpoint to send the commands to.
The applicationGuildCommands() call will take two arguments.
The first is the application ID to associate the commands with. You can get this from the BOT.user.id value – but user is potentially undefined, so you'll need to optionally chain it. Use BOT.user?.id || "missing id" to add a fallback value that will error out – this will allow us to know if the bot's ID is missing.
The second argument is the server ID, which you set up as process.env.GUILD_ID (remember to coerce the type!).
The .put() call needs a second argument as well, which is the data you want to send. Pass this as { body: commandData } to match the expected format.
Finally, add a console.log("Discord ready!") at the end of the file to indicate your bot is online.
import { REST } from "@discordjs/rest";
import { Routes } from "discord-api-types/v9";
import { Client } from "discord.js";
import { CommandList } from "../commands/_CommandList";

export const onReady = async (BOT: Client) => {
  const rest = new REST({ version: "9" }).setToken(
    process.env.BOT_TOKEN as string
  );

  const commandData = CommandList.map((command) => command.data.toJSON());

  await rest.put(
    Routes.applicationGuildCommands(
      BOT.user?.id || "missing id",
      process.env.GUILD_ID as string
    ),
    { body: commandData }
  );

  console.log("Discord ready!");
};
Switch to your index.ts file and locate your "ready" event listener. Replace the console.log call with your new onReady function – remember to import it, and make the callback asynchronous.
import { Client } from "discord.js";
import { IntentOptions } from "./config/IntentOptions";
import { connectDatabase } from "./database/connectDatabase";
import { onInteraction } from "./events/onInteraction";
import { onReady } from "./events/onReady";
import { validateEnv } from "./utils/validateEnv";

(async () => {
  if (!validateEnv()) return;
  const BOT = new Client({ intents: IntentOptions });

  BOT.on("ready", async () => await onReady(BOT));

  BOT.on(
    "interactionCreate",
    async (interaction) => await onInteraction(interaction)
  );

  await connectDatabase();

  await BOT.login(process.env.BOT_TOKEN);
})();
Now run npm run build and npm start, and head to your server in Discord. If you type / you should see your new /100 command show up. Try using the command and checking the response.
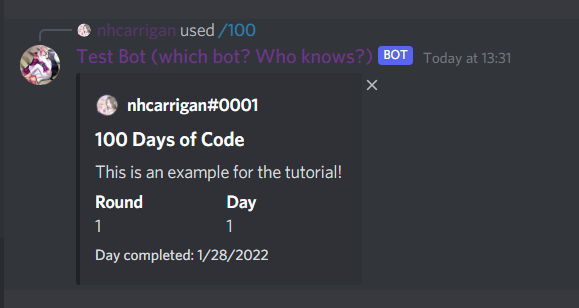 If you see this response, then you've successfully created your first command!
Congratulations! You have your first successful command. With all of the infrastructure you've built, adding additional commands will be much smoother. Let's go ahead and do that now.
Edit Command
What happens if a camper makes a typo in their /100 message? Because the bot sends the response, the camper cannot edit it (Discord does not allow you to edit messages you did not send). You should create a command that will allow a camper to do this.
Create an edit.ts file in your src/commands directory. Like you did with the /100 command, import your SlashCommandBuilder and Command interface, and export an edit object with the Command type.
Use the SlashCommandBuilder to prepare the data property. Give the command the name edit and the description Edit a previous 100 days of code post., then add two string options. The first string option should have a name embed-id and a description of ID of the message to edit., and the second should have a name of message and a description of The message to go in your 100 Days of Code update.. Both options should be required.
Your code should look like this:
import { SlashCommandBuilder } from "@discordjs/builders";
import { Command } from "../interfaces/Command";

export const edit: Command = {
    data: new SlashCommandBuilder()
    .setName("edit")
    .setDescription("Edit a previous 100 days of code post.")
    .addStringOption((option) =>
      option
        .setName("embed-id")
        .setDescription("ID of the message to edit.")
        .setRequired(true)
    )
    .addStringOption((option) =>
      option
        .setName("message")
        .setDescription("The message to go in your 100 Days of Code update.")
        .setRequired(true)
    ),
}
Create your run property with an async function and an interaction parameter. Destructure the channel and user from the interaction, and grab the embed-id and message options. Don't forget to defer the response!
    run: async (interaction) => {
        await interaction.deferReply();
        const { channel, user } = interaction;
        const targetId = interaction.options.getString("embed-id", true);
        const text = interaction.options.getString("message", true);
    }
The channel property is nullable (in cases where an interaction is sent via a DM, for example), so you'll want to check that it exists. If it does not, respond with a message that the command is missing parameters.
    if (!channel) {
      await interaction.editReply({
        content: "Missing channel parameter.",
      });
      return;
    }
Now that you know the channel exists, you can fetch the message that the camper wants to edit based on the ID they provided. Use channel.messages.fetch() to do this, passing in the targetId as the argument.
Because it is possible that the target message does not exist, you need to account for that in your code. Add a condition that checks for this, and if the message is not found respond with an explanation.
    const targetMessage = await channel.messages.fetch(targetId);

    if (!targetMessage) {
      await interaction.editReply({
        content:
          "That does not appear to be a valid message ID. Be sure that you are using this command in the same channel as the message.",
      });
      return;
    }
The last thing you need to check is that the message the camper is editing actually belongs to them. You can access the embed with the .embeds property – much like how you sent it, the property is returned as an array of embed objects.
Grab the first embed from the array, and then check that the embed author matches the user's tag. If not, let them know they cannot edit this post.
    const targetEmbed = targetMessage.embeds[0];

    if (targetEmbed.author?.name !== user.tag) {
        await interaction.editReply({
            content: "This does not appear to be your 100 Days of Code post. You cannot edit it."
        })
    }
Now that you have confirmed everything is correct, you can use .setDescription() on the embed to update the text. Then, edit the message with the new embed, and respond to the interaction with a confirmation.
Your full code should look like this:
import { SlashCommandBuilder } from "@discordjs/builders";
import { Command } from "../interfaces/Command";

export const edit: Command = {
  data: new SlashCommandBuilder()
    .setName("edit")
    .setDescription("Edit a previous 100 days of code post.")
    .addStringOption((option) =>
      option
        .setName("embed-id")
        .setDescription("ID of the message to edit.")
        .setRequired(true)
    )
    .addStringOption((option) =>
      option
        .setName("message")
        .setDescription("The message to go in your 100 Days of Code update.")
        .setRequired(true)
    ),
  run: async (interaction) => {
    await interaction.deferReply();
    const { channel, user } = interaction;
    const targetId = interaction.options.getString("embed-id", true);
    const text = interaction.options.getString("message", true);

    if (!channel) {
      await interaction.editReply({
        content: "Missing channel parameter.",
      });
      return;
    }

    const targetMessage = await channel.messages.fetch(targetId);

    if (!targetMessage) {
      await interaction.editReply({
        content:
          "That does not appear to be a valid message ID. Be sure that you are using this command in the same channel as the message.",
      });
      return;
    }

    const targetEmbed = targetMessage.embeds[0];

    if (targetEmbed.author?.name !== user.tag) {
      await interaction.editReply({
        content:
          "This does not appear to be your 100 Days of Code post. You cannot edit it.",
      });
    }

    targetEmbed.setDescription(text);
    await targetMessage.edit({ embeds: [targetEmbed] });
    await interaction.editReply({ content: "Updated!" });
  },
};
Add your new edit command to your CommandList array, then build and run your bot and you should see the new command. Try editing the embed you sent earlier.
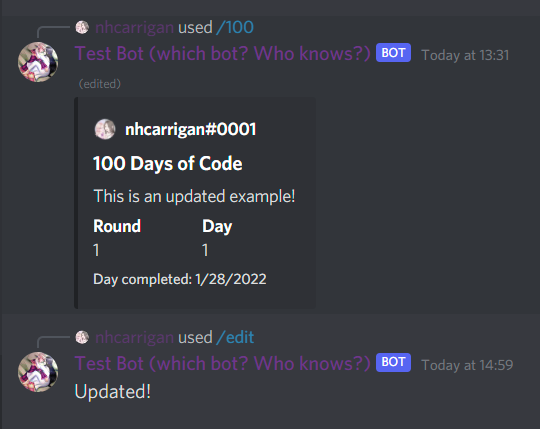 You should see your embed update, and a confirmation from the bot!
View Command
Campers should have a way to view their current progress, so we'll need to create a command to do so. By now, you should be comfortable with the command structure – we encourage you to follow these instructions but attempt to write the code without looking at the final result.
Create a view.ts file in your commands directory, and set up your command variable. Create the data property with a command that has the name view and the description Shows your latest 100 days of code check in. This command does not need any options.
Set up your async function in the run property, and defer the interaction response. Extract the user object from the interaction. Use your getCamperData module to fetch the camper's data from the database. Then, check if the data's day property has a non-zero value. If it does not, let the camper know that they have not started the 100 Days of Code challenge, and can do so with the /100 command.
Create an embed with a title set to My 100DoC Progress. Set the description to Here is my 100 Days of Code progress. I last reported an update on: and add the camper's timestamp. Add a Round and Day field, and set the author for the embed. Then send the embed in the interaction response.
Remember to add your new command to the CommandList, then try building and starting your bot. You should see the command available, and be able to get a response from it.

If you did not get the response, here is what your code should look like.
import { SlashCommandBuilder } from "@discordjs/builders";
import { MessageEmbed } from "discord.js";
import { Command } from "../interfaces/Command";
import { getCamperData } from "../modules/getCamperData";

export const view: Command = {
  data: new SlashCommandBuilder()
    .setName("view")
    .setDescription("Shows your latest 100 Days of Code check in."),
  run: async (interaction) => {
    await interaction.deferReply();
    const { user } = interaction;
    const targetCamper = await getCamperData(user.id);

    if (!targetCamper.day) {
      await interaction.editReply({
        content:
          "It looks like you have not started the 100 Days of Code challenge yet. Use `/100` and add your message to report your first day!",
      });
      return;
    }

    const camperEmbed = new MessageEmbed();
    camperEmbed.setTitle("My 100DoC Progress");
    camperEmbed.setDescription(
      `Here is my 100 Days of Code progress. I last reported an update on ${new Date(
        targetCamper.timestamp
      ).toLocaleDateString()}.`
    );
    camperEmbed.addField("Round", targetCamper.round.toString(), true);
    camperEmbed.addField("Day", targetCamper.day.toString(), true);
    camperEmbed.setAuthor({
      name: user.tag,
      iconURL: user.displayAvatarURL(),
    });

    await interaction.editReply({ embeds: [camperEmbed] });
  },
};
Help Command
The last thing you need to build is a help command, which will explain how campers can interact with the bot.
Create your help.ts file in the command directory, and create your data property. Give the command the name help and the description Provides information on using this bot.
Set up your run property with the async function, and remember to defer the reply. Create an embed, and use the description and fields to provide the information you would like to share with your campers. Send the embed in the interaction response.
Load your new help command into the CommandList, and build + start your bot to test it. You should see a response with the embed you created.
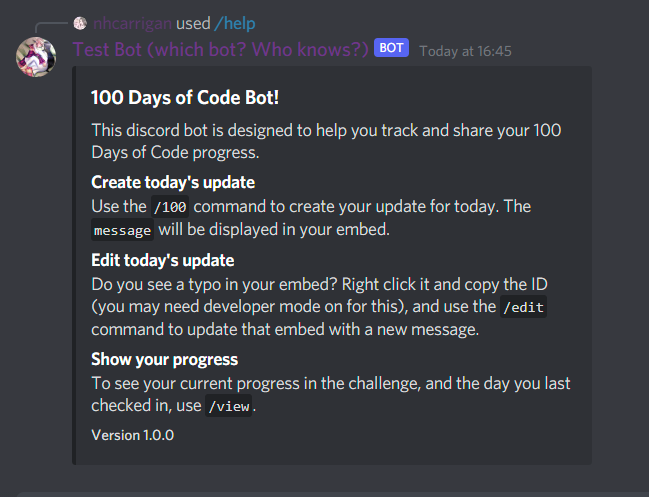
Your embed might look different, depending on what information you chose to share. Here's the code that we used for the above embed:
import { SlashCommandBuilder } from "@discordjs/builders";
import { MessageEmbed } from "discord.js";
import { Command } from "../interfaces/Command";

export const help: Command = {
  data: new SlashCommandBuilder()
    .setName("help")
    .setDescription("Provides information on using this bot."),
  run: async (interaction) => {
    await interaction.deferReply();
    const helpEmbed = new MessageEmbed();
    helpEmbed.setTitle("100 Days of Code Bot!");
    helpEmbed.setDescription(
      "This discord bot is designed to help you track and share your 100 Days of Code progress."
    );
    helpEmbed.addField(
      "Create today's update",
      "Use the `/100` command to create your update for today. The `message` will be displayed in your embed."
    );
    helpEmbed.addField(
      "Edit today's update",
      "Do you see a typo in your embed? Right click it and copy the ID (you may need developer mode on for this), and use the `/edit` command to update that embed with a new message."
    );
    helpEmbed.addField(
      "Show your progress",
      "To see your current progress in the challenge, and the day you last checked in, use `/view`."
    );
    helpEmbed.setFooter({ text: `Version ${process.env.npm_package_version}` });
    await interaction.editReply({ embeds: [helpEmbed] });
    return;
  },
};
Conclusion
Congratulations! You have successfully built a Discord bot for the 100 Days of Code challenge.
If you are interested in exploring further, you can view the source code for the live bot that inspired this tutorial, which includes custom error logging, external error reporting, and a documentation site.