

Tauri is a new Rust-based framework that builds an x86_64 cross-platform application for Windows, macOS, and Linux.
In this tutorial, we'll use Tauri and Next.js to build a desktop-based cross-platform application and publish it to the Snap store and AppImage.
So why is building a cross-platform app, that works on Windows, Mac, and Linux, important these days? Well, it helps companies target a larger audience and increase their revenue, without having to build three separate apps.
Many companies and developers use Next.js as a front-end when building a website. In this tutorial, we'll use Next and Tauri to build a desktop-based cross-platform application that'll be available on Windows, macOS, and Linux.
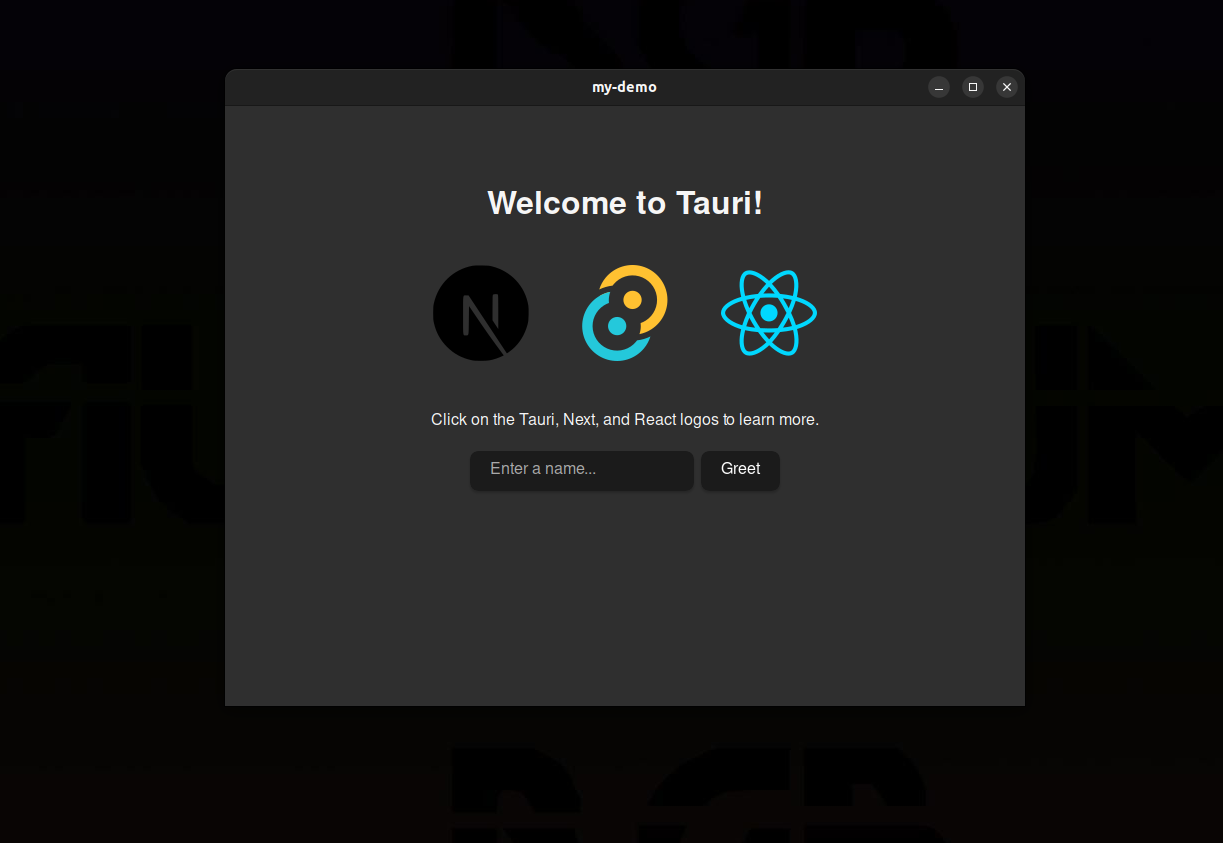
Demo of the project
To build this cross-platform application, you need Tauri, markdown, Contentlayer, pnpm, and Next.js. If you check how my application looks, you can install the application with snap-cli, AppImage, or download the application via the link and install it.
Let's see what these tools do:
- we'll use Next.js for building the frontend part of the website
- the markdown npm package helps convert markdown files into HTML
- the Contentlayer npm package helps us manage markdown files in the project.
- we'll use Tauri to build the cross-platform application binary
- and finally, we'll use pnpm as our Node package manager.
// Install with snap
snap install static-blog-app

or

// install with AppImage
https://github.com/officialrajdeepsingh/static-blog-app/releases/download/v0.0.2/static-blog-app_0.0.2_amd64.AppImage

or

// Install on macOS
https://github.com/officialrajdeepsingh/static-blog-app/releases/download/v0.0.2/static-blog-app_0.0.2_x64.dmg

or

// Install on Windows
https://github.com/officialrajdeepsingh/static-blog-app/releases/download/v0.0.2/static-blog-app_0.0.2_x64_en-US.msi
Table of contents:
- What is Next.js?
- What is Tauri?
- Computer Architecture
- How to Create a New Project with Next.js and Tauri
- How to Build an Application with Tauri
- How to Build an Application for the Snap Store or Snapcraft
- How to Build a Cross-Platform Application with GitHub Actions
- How to Publish the App
- FAQ
- Conclusion
What is Next.js?
Next is a framework base on React. It has many features that let you build a website and enhance the user experience.
To learn more about Next, you can read this helpful tutorial I found on freeCodeCamp written by Reed Barger.
What is Tauri?
Tauri is a new framework that helps you build cross-platform desktop applications. Tauri is built based on the Rust language. Rust is faster, more secure, and has fewer memory issues than other languages.
Tauri has many features, but I'll mention some of the important ones for a front-end developer.
- Tauri supports HTML, CSS, and JavaScript.
- Tauri supports a lot of front-end frameworks and libraries, for example, React.js, Next.js, Vite, and Svelte kit.
- With Tauri, you don't need to learn GTK, GJS, and app build commands or AppImage builder.
- Tauri provides JavaScript API support. You can use it inside JS easily. For example, the window API helps all tasks related to the window.
- You can quickly build a cross-application bundler size with one command.
- Tauri provides an update handler to update older Tauri versions to the newest. You do not need to use other services and libraries to achieve the self-update functionality.
- In Tauri, you call Rust functions within JavaScript.
Tauri improves the development experience by providing an inbuilt JavaScript, npm, and Rust CLI tool, plugins, and the tauri-action GitHub workflow.
All these tools help you write code faster and create a production-ready app in less time. But the big thing Tauri provides is beginner-ready, easily understandable documentation.
GTK is a free and open-source cross-platform widget toolkit for creating graphical user interfaces for applications.
GJS is a JavaScript library for Gnome to build application interfaces. GJS is built on the SpiderMonkey JavaScript engine.
Computer Architecture
Every operating system comes with different architecture. Building cross-platform applications or performing cross-compilation is not easy. Based on the architecture, you can understand where the application is run. In other words, which architecture requires running our applications like i386, ARM, or x86_64?
The most common architectures in the computer science world are ARM, i386, and AMD (x86_64). Less technical users might know it as 64 or 32-bit architecture.
Rust uses different types of architecture to install itself. In my case, my laptop hardware support x86_64 and I have Ubuntu installed. On Ubuntu x86_64, the default stable-x86_64-unknown-linux-gnu Rust toolchain is used to build Tauri applications.
The Rust toolchain builds AMD (x86_64) applications. That is why Tauri builds cross-platform application (for Windows, macOs, and Linux distros) but does not build cross-architecture ones (builds applications for all ARM, i386, and x86_67 architecture).
How to check your architecture in Linux by command:
cat /etc/debian_version

    or

dpkg --print-architecture

    or

uname -m

    or

arch
How to check which toolchain Tauri is using:
The toolchain is a utility provided by Rust itself. You can install different toolchains with the rustup command.
You can use different types of Rust toolchains according to your computer's architecture. You can easily check which toolchain is installed in your operating system with the tauri npm, yarn, or pnpm command.
In my project, I'm using pnpm to create a new project, so I use the pnpm command. Again, based on the toolchain, we build apps for different architectures.
The default Ubuntu (x86_64) is based on the stable-x86_64-unknown-linux-gnu toolchain. The Rust stable-x86_64-unknown-linux-gnu toolchain builds only AMD-based applications.
The Rust toolchain is different according to the operating system and distro you're using. The default Rust toolchain is installed when you install Rust on your computer.
Here are the commands to check your architecture:
pnpm tauri info

or

yarn tauri info

or

npm run tauri info
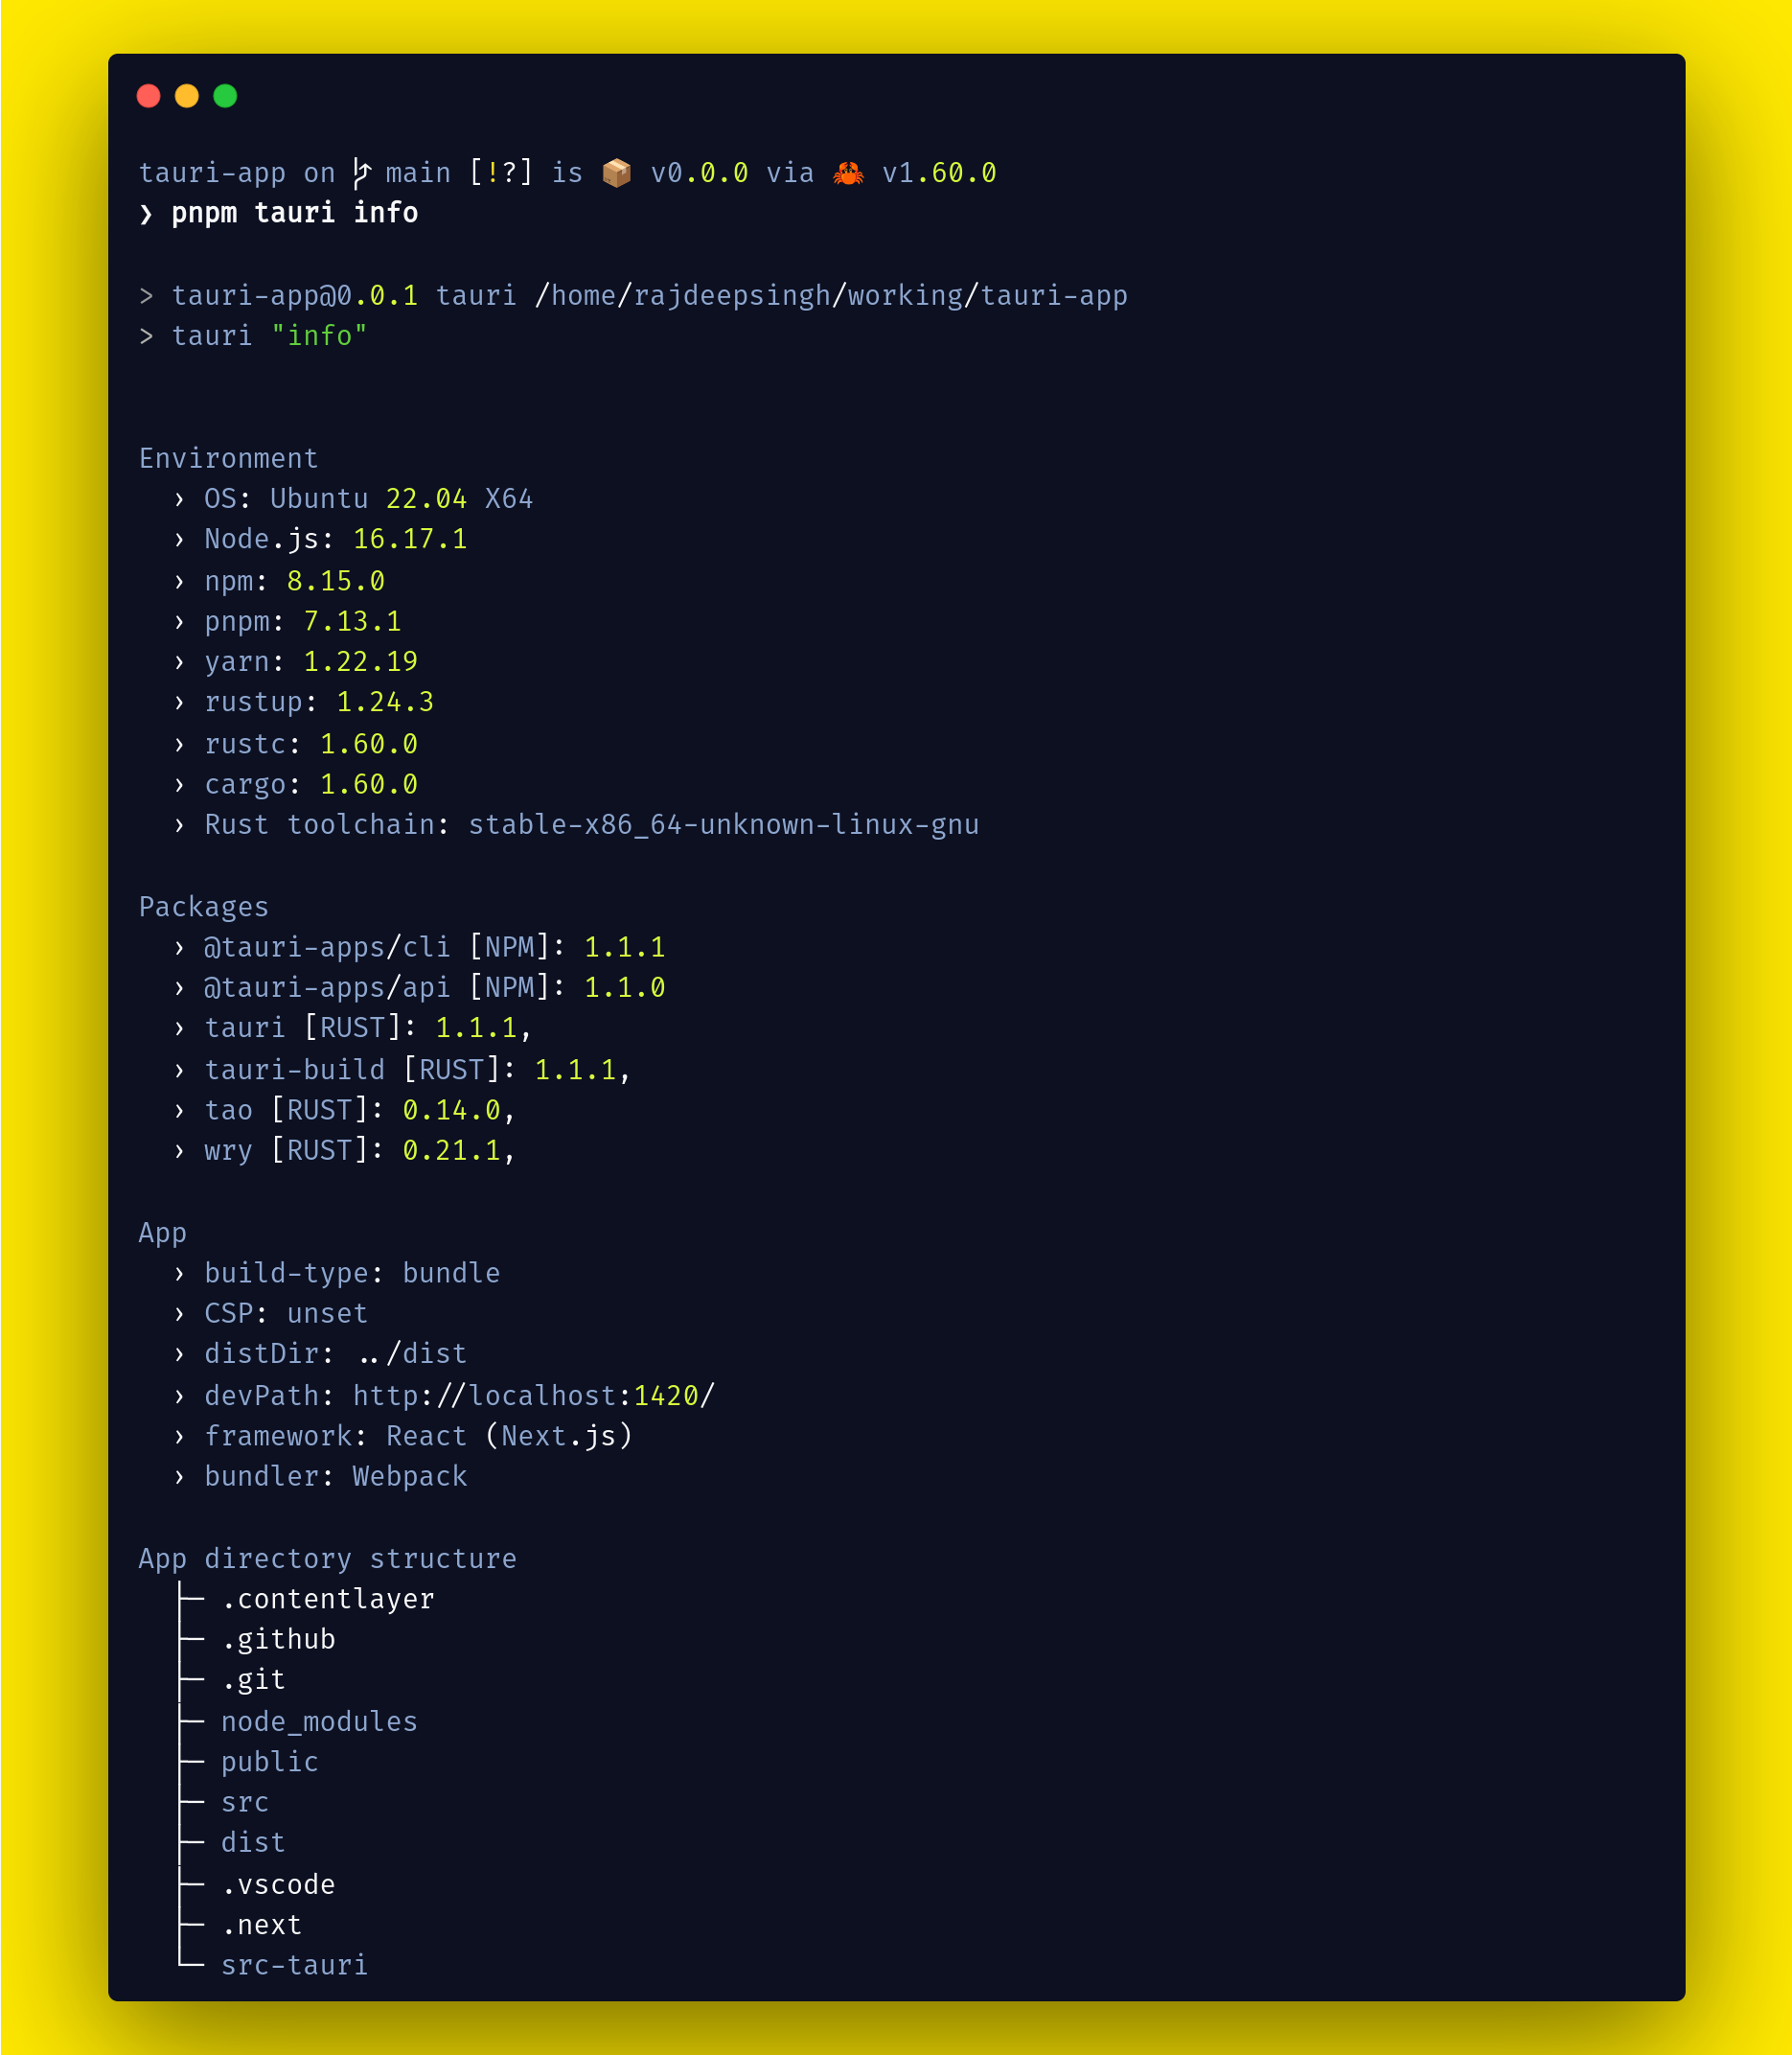 pnpm tauri info command output
Tauri officially supports macOS, Windows, and Linux distros and you can't build mobile applications with Tauri (you'll face lots of issues, and after resolving them all you'll end up building your mobile app directly).
I found a great tutorial on the Rust toolchain as well as cross-compilation. The tutorial guides you and provides you with a deeper understanding of the Rust toolchain.
You can use the rustup command to install a different type of toolchain if you'd like. To learn more about the Rust toolchain and the rustup command, I'd suggest starting with the Rust toolchain docs.
How to Create a New Project with Next.js and Tauri
You can create a Tauri app with bash, cargo, PowerShell npm, yarn, or pnpm. We'll use pnpm to create a new Tauri set-up in this tutorial. pnpm is the new package manager for Node.js.
Create the UI template in Tauri
You can use different types of front-end frameworks for the Tauri app, for example, Vue, React, Svelte, Solid, Next.js, Preact, Angular, and Svelte. I've chosen to use Nextjs as the front-end template for our Tauri app in this tutorial.
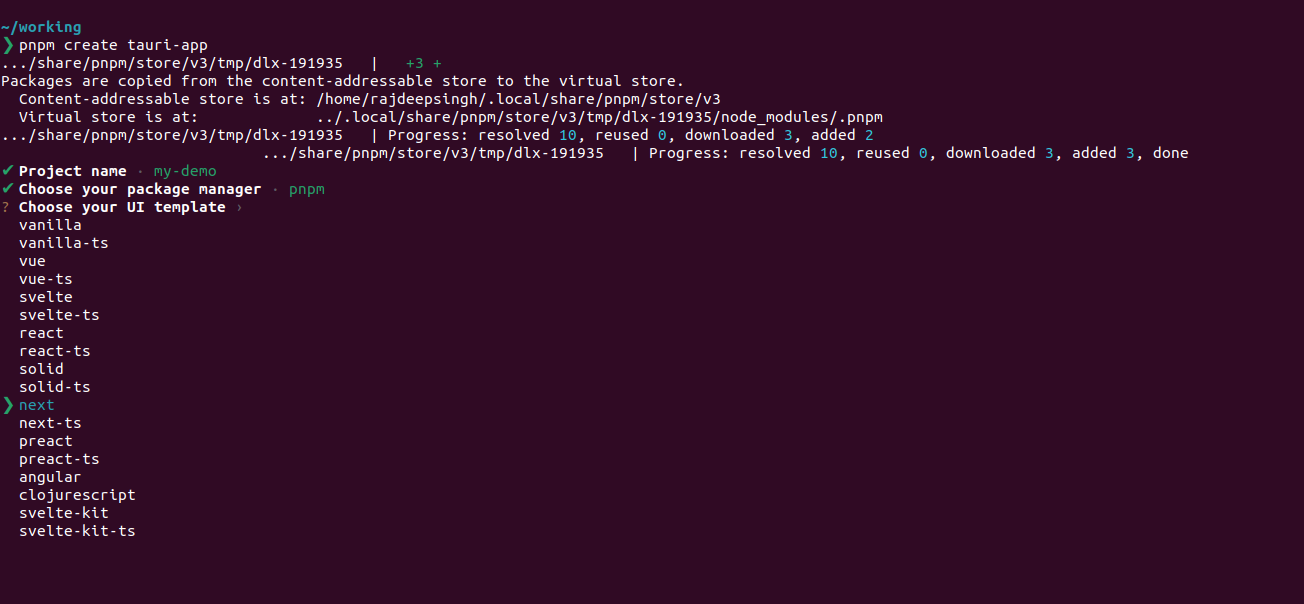 pnpm - choose your UI template
Create a new application with pnpm
You can use any other node package manager to create a new app like yarn or npm. I choose the pnpm node package manager, because pnpm is fast compared to yarn and npm.
pnpm create tauri-app
 Create tauri-app with nextjs
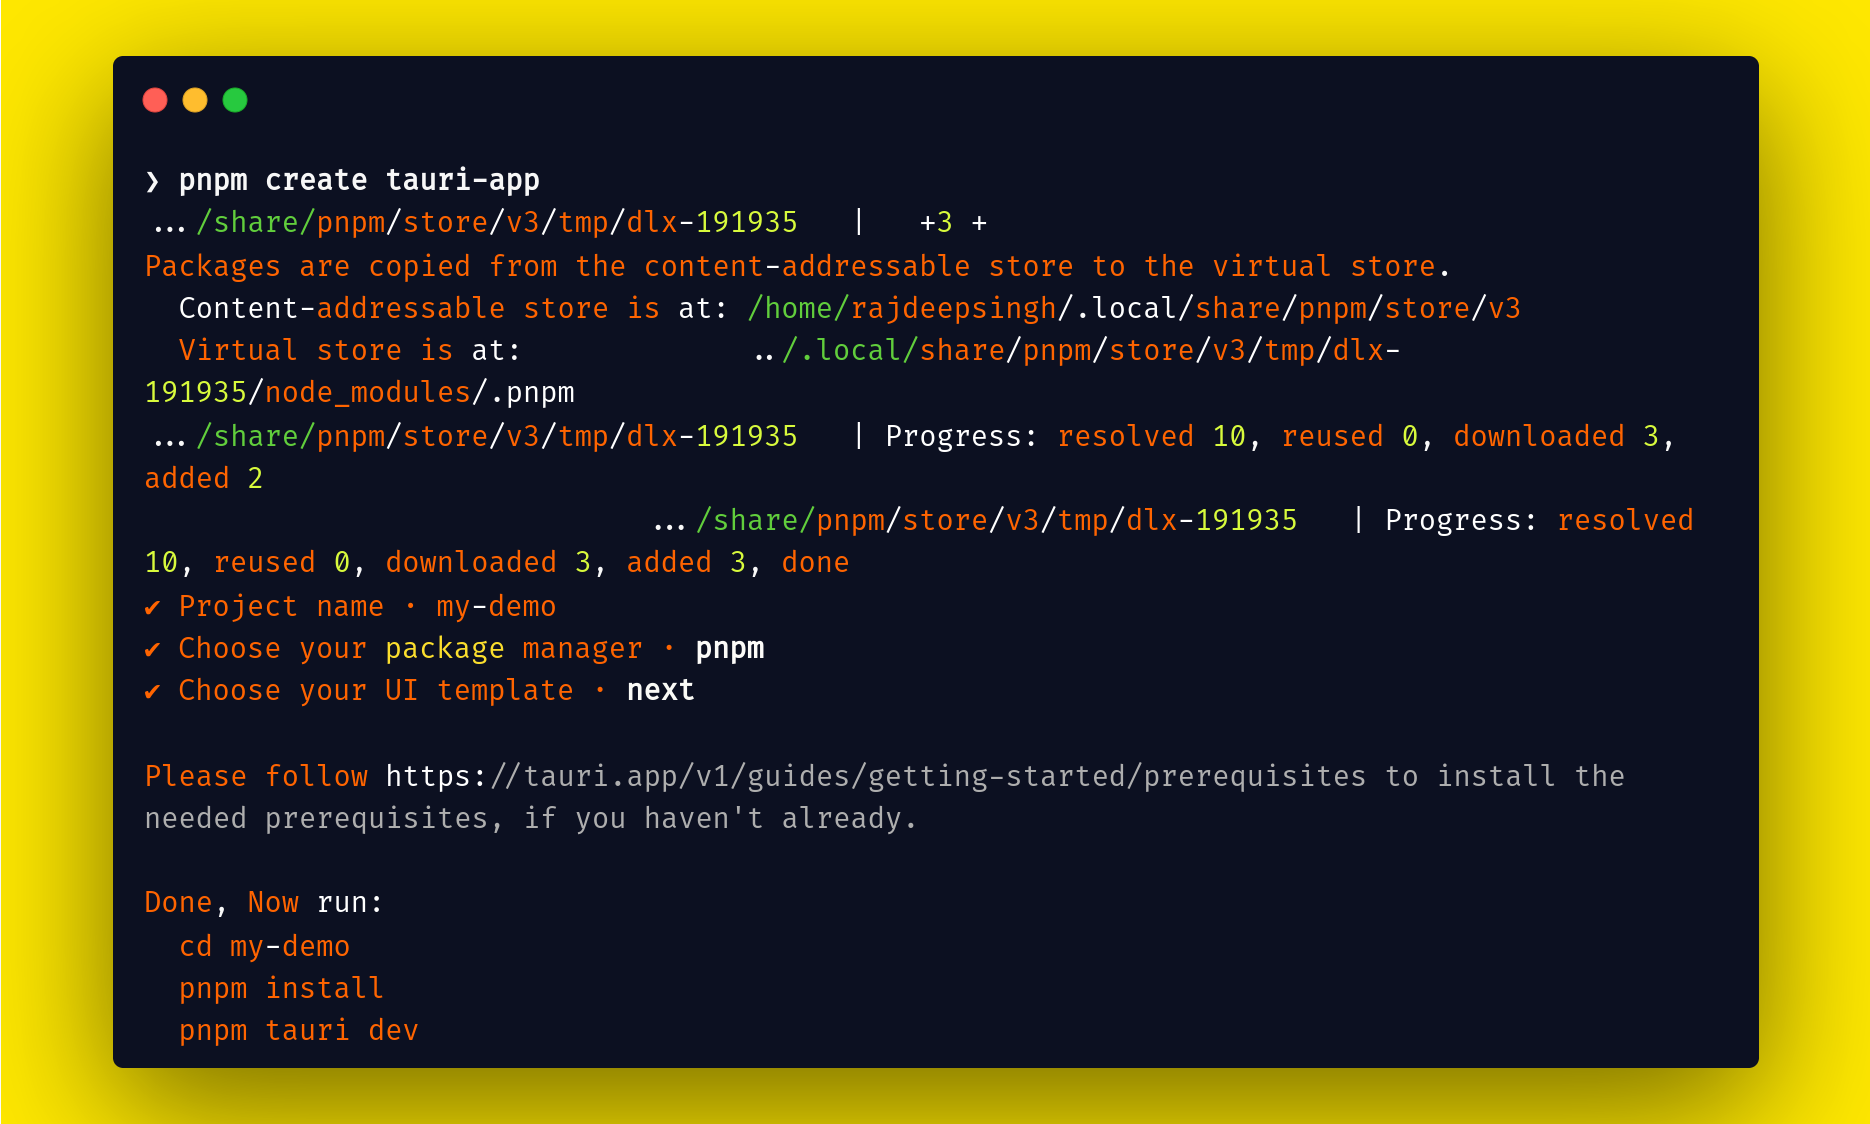
Now Tauri has created the my-demo app successfully. You can directly change the directory (folder) cd my-demo with the change directory (cd) command. Then you can run the pnpm install command to install all the dependencies required for the project. Finally, run the tauri dev command to lunch a new Tauri application window.
 Run local development server in tauri
After downloading and compiling the code, you can see a new window open in your system using the pnpm tauri dev command.
 Open a new window by tauri
The default Tauri folder structure comes with pnpm create tauri-app:
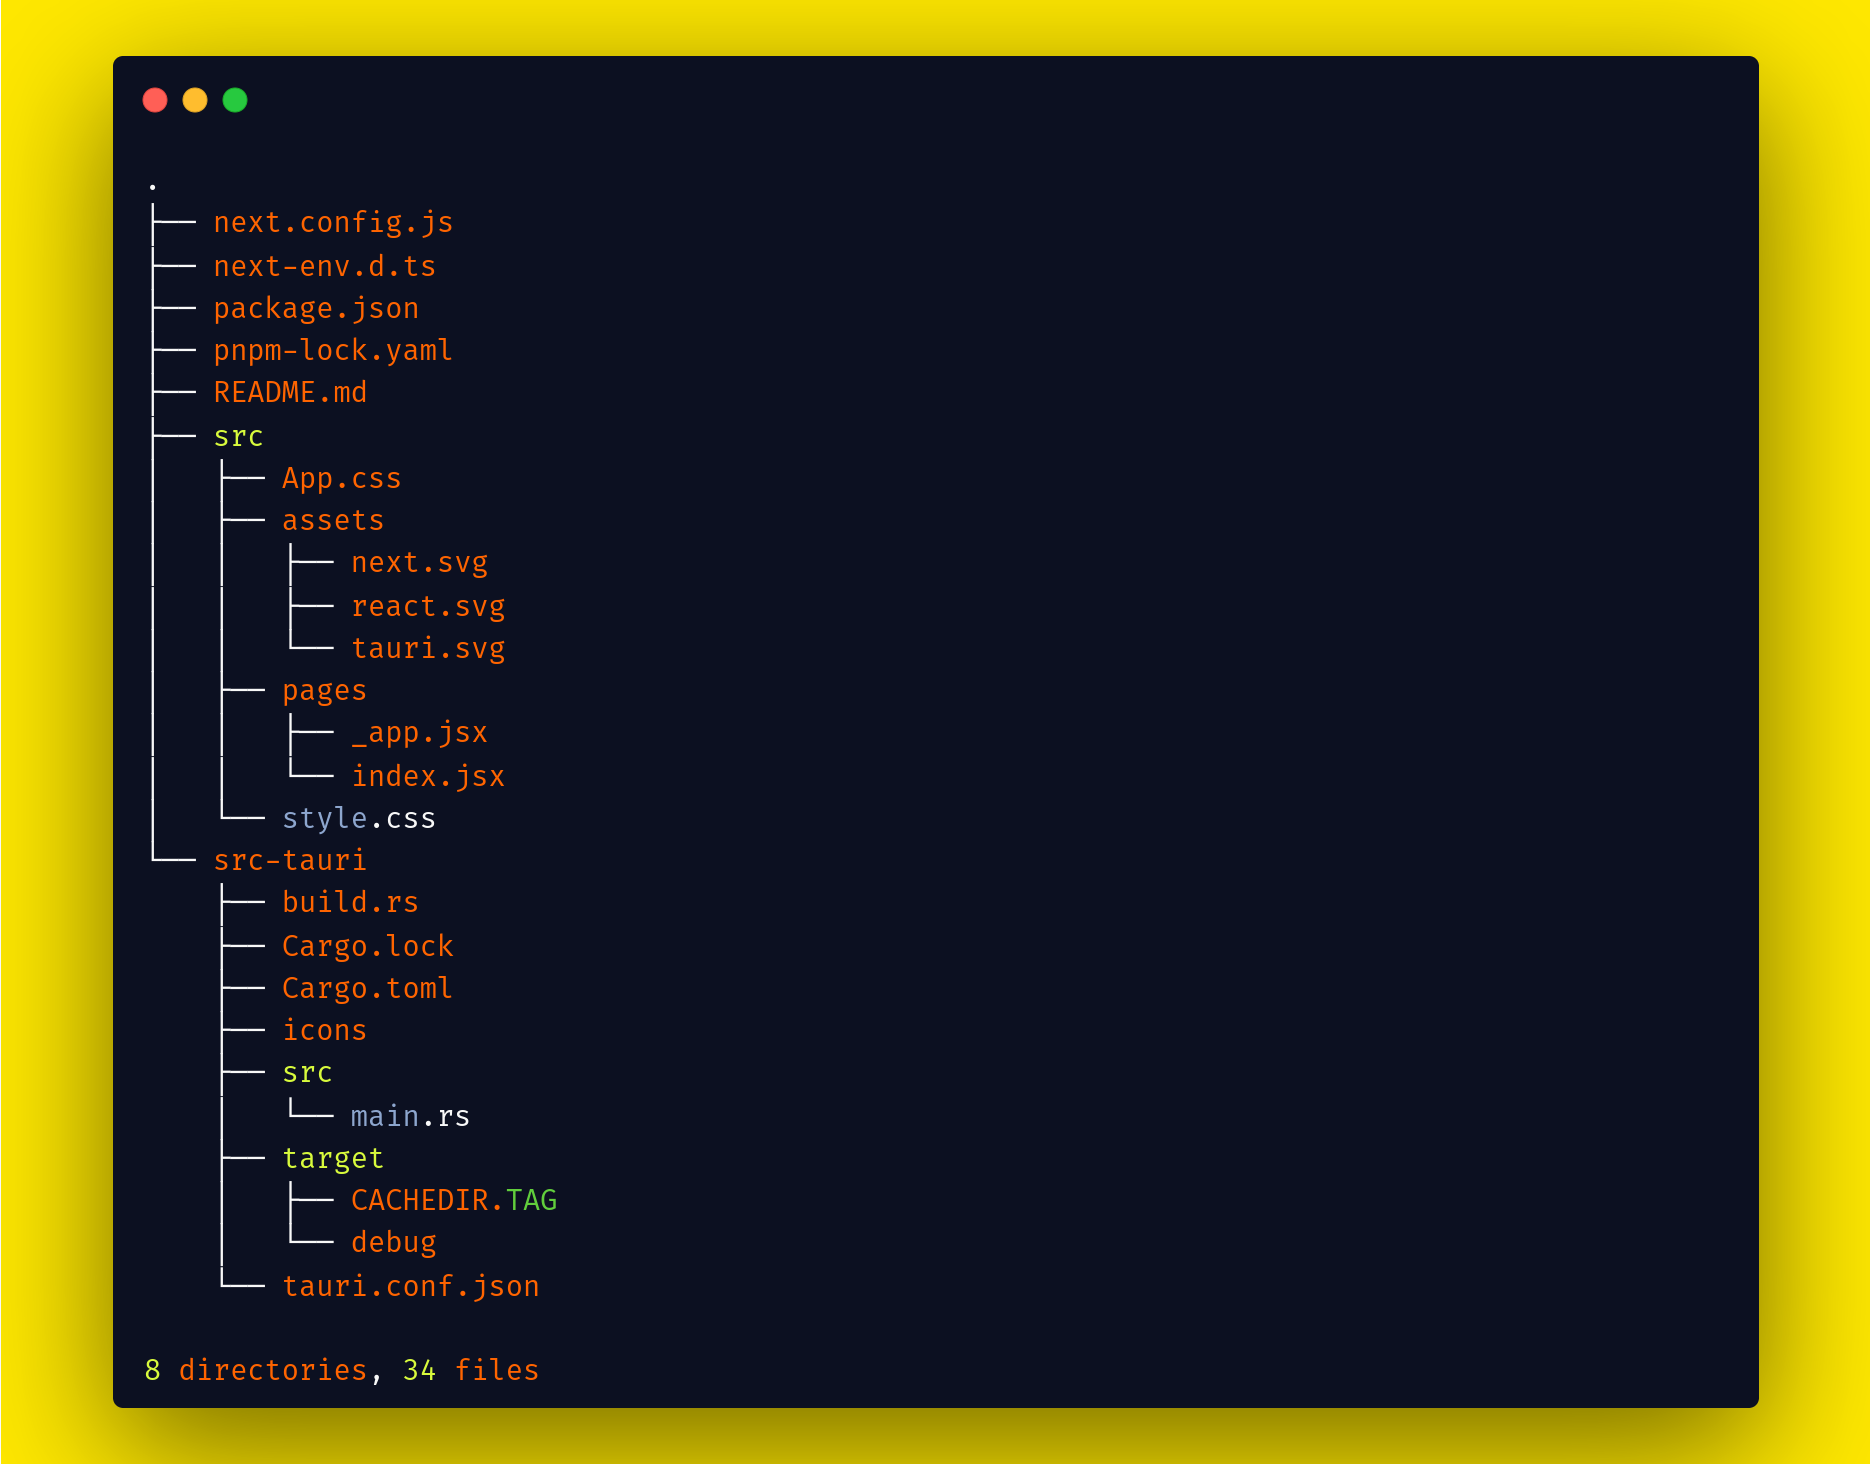 Tauri default folder structure
- You use the
next.config.jsfile for Next.js configuration. - The
next-env.d.tsfile automatically generates for TypeScript - The
package.jsonfile contains all information for npm, yarn, and pnpm. - The
pnpm-lock.yamlfile is created by pnpm to store all package information with the version. - The
README.MDfile contains all the information about the project. - The
srcfolder contains all the Next.js code with pages, components, and CSS files. - You use the
src-taurifolder for Rust and Rust configuration. src-tauri/iconscontains all icons for the app.src-tauri/Cargo.lockgenerated by cargo to store all package information.src-tauri/Cargo.tomlgenerated by cargo and store all packages and confirmation for the project.src-tauri/srcused to write the Rust code.src-tauri/targetgenerated by thepnpm tauri devcommand. It contains all the binary for the project.tauri.config.jsonfile used for Tauri configuration.
Create the UI for the app with Next.js
I'm using my old Next.js static site and I'll convert it into a desktop application. The Next static website code is available on GitHub so you can easily download it.
First, I need to copy my old posts along with the public, components, and pages folders and paste them into the new Tauri project. Then I'll remove the bootstrap CSS, and use Tailwind CSS to design the application's layout.
I already explained the process step-by-step on how to install TailwindCSS with Next in this article. You can read and follow the same setup to install Tailwind if you don't have it installed already.
Generate an icon for the application
The icon is important for the application. The user will click on the icon to open your application in Windows, macOS, and Linux.
 Ubuntu static-blog-app icon
Generating icons for applications with various types and sizes can be complicated. You need icons for Windows, macOS, and Linux. Every operating system has its own guidelines for icons.
Tauri comes with a CLI tool that generates cross-operating system icons for applications based on icon configuration in Tauri. Here's the command to generate the icons:
pnpm tauri icon path-of-image
![]() Generating icons
Generating icons
You can use an online website to generate icons for Tauri, and then add all icons into the tauri-app/src-tauri/icons folder.
You can change the icon configuration in the tauri-app/src-tauri/tauri.conf.json file:
"icon": [
        "icons/32x32.png",
        "icons/128x128.png",
        "icons/128x128@2x.png",
        "icons/icon.icns",
        "icons/icon.ico"
],
How to Build an Application with Tauri
To build the application in Tauri, you need to run only one command in the terminal. Tauri automatically generates the build applications.
The first application is for the .deb Debian-based distro and the second application is appImage. The application build file changes from operating system to operating system.
AppImage is a universal application distribution for the cross-Linux distro. So you create one AppImage and run your application on any distro.
pnpm tauri build
The first time you run the tauri build command, you may face a bundle identifier error in the terminal.
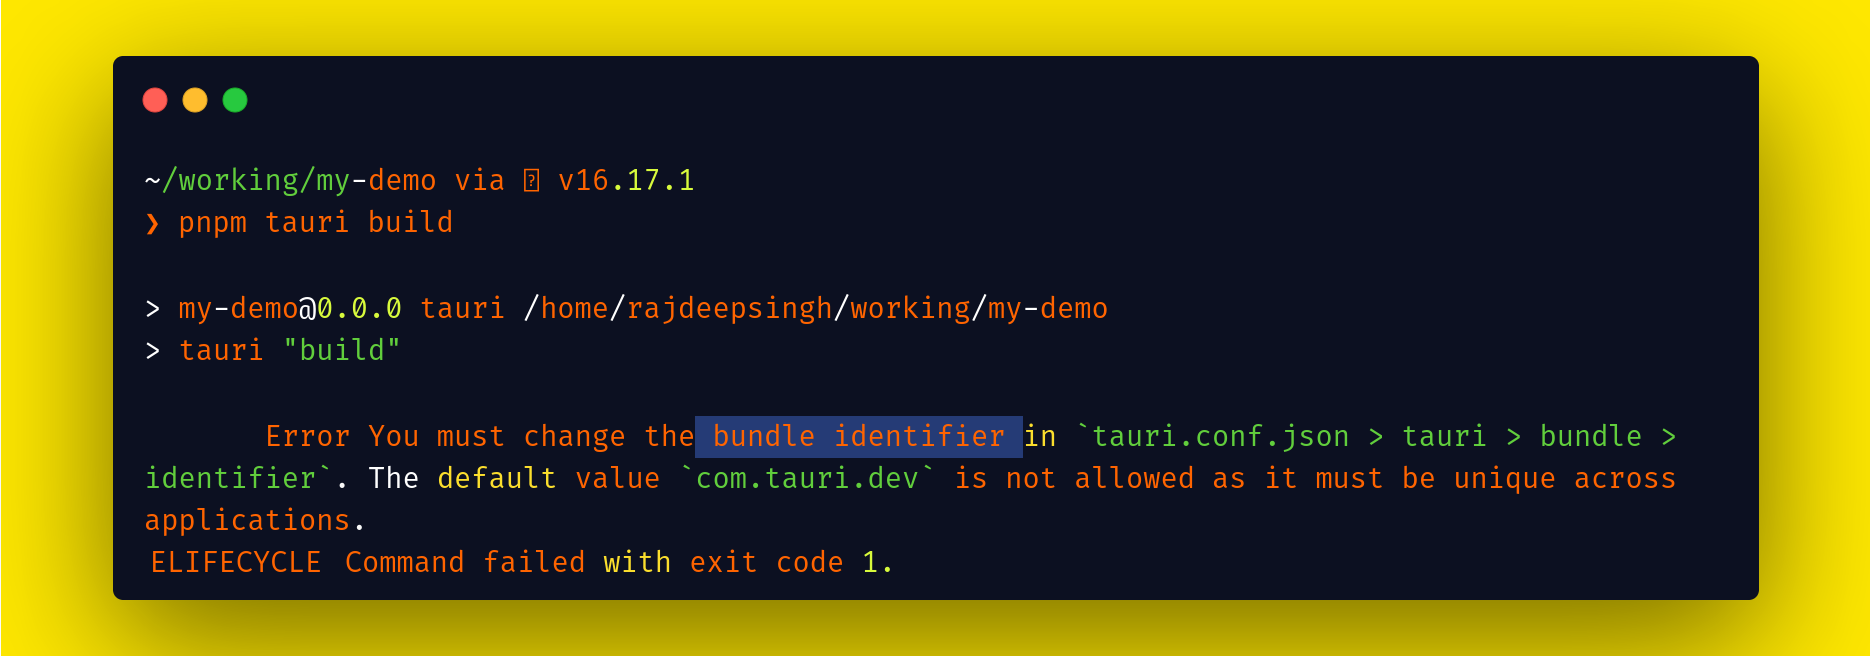 Bundle identifier error
To solve the bundle identifier error, first open the my-demo/src-tauri/tauri.conf.json file and find identifier. Then change the "identifier": "com.tauri.dev" value according to your app. Make sure the identifier value is unique across the application.
"identifier": "com.officialrajdeepsingh.blog",
After changing the identifier in the tauri.conf.json file, rerun the pnpm tauri build command.
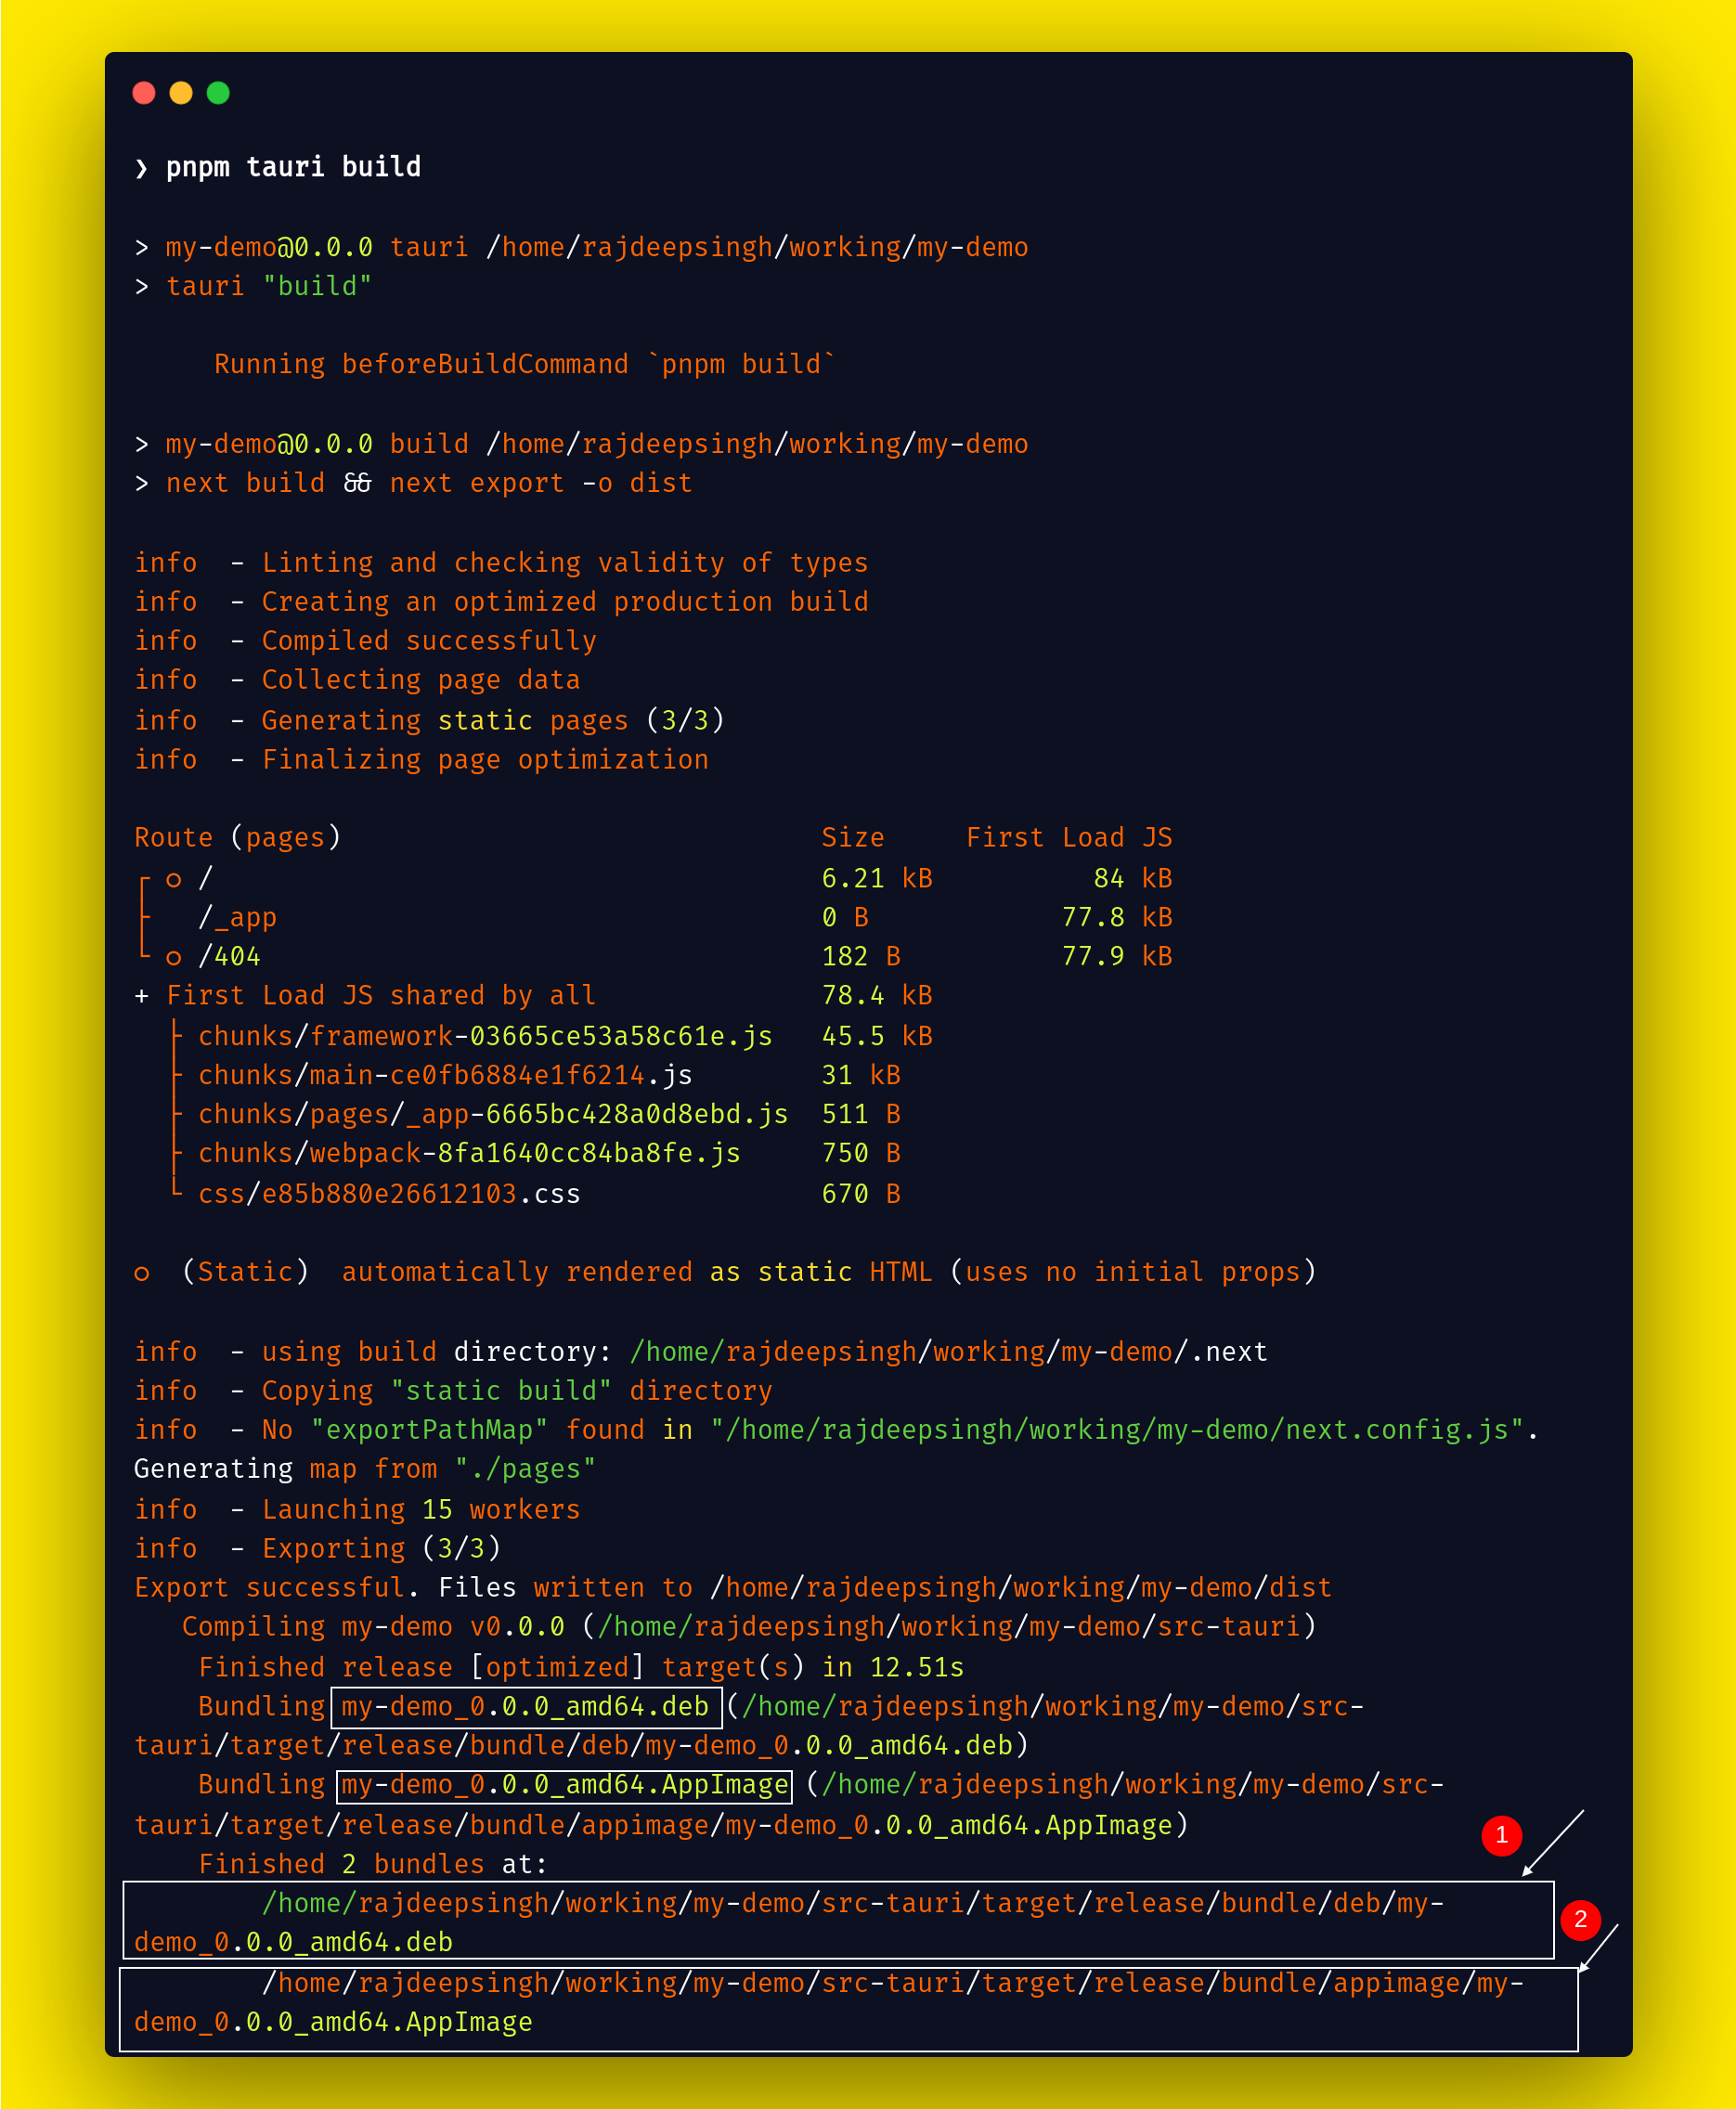 Run tauri build command
After successfully running the tauri build command, Tauri generates two files:
- my-demo_0.0.0_amd64.deb
- my-demo_0.0.0_amd64.AppImage
The bot file binary works only for the amd64 architecture and doesn't work on the arm and i386 architecture.
The file extension tells us where we use it.
.debfile extension is used for Debian..AppImagefile extension is used for all Linux distros to install the app..dmgfile extension is used for macOS..msifile extension is used for Windows..snapfile extension is used for the Linux distro.
Install .deb and .AppImage locally
To test for both binary my-demo_0.0.0_amd64.deb and my-demo_0.0.0_amd64.AppImage, first install them locally and check that everything is working fine.
.deb file
❯ dpkg -i static-blog-app_0.0.2_amd64
.AppImage file
Firstly add the file permission for executing and then run the file.
Step 1: run chmod +x my-demo_0.0.0_amd64.AppImage
Step 2: run ./my-demo_0.0.0_amd64.AppImage hit enter to run AppImage base binary.
Tauri automatically generates both .deb and .AppImage files with their own file names.
Both files use the same naming conversion syntax all around the world. This file name conversion is not for Tauri. The Flatpak builder and Snapcraft also use the same kind of file naming syntax.
Syntax

<name-of-appliciation> <version> <architecture> <File extension>

Example
1. my-demo_0.0.0_amd64.deb
2. my-demo_0.0.0_amd64.AppImage
How to Build an Application for the Snap Store or Snapcraft
Snapcraft or the Snap store is a Linux application distribution. It helps distribute your applications across Linux distros. Users can install your application with one click and the use of a command line (Terminal).
Snapcraft is maintained and built by Canonical (Ubuntu). Canonical provides all Linux application distributions and does not work for macOS and Windows.
Before building a snap, first you need to install Snapcraft.
sudo apt-get update
sudo snap install snapcraft --classic
How to build an application for the Snap store
I will guide you with a simple way to generate the snap file for Snapcraft. The snap file is a binary file, similar to the .deb file. The Snap store uses a special .snap extension for the file. That indicates that it's a snap application installed on a linux distro.
You can also develop your first snap app quickly if you are a beginner – simply follow these steps (we'll go through each one by one):
- Install the tauri-snap-packager npm package
- Add configuration in the
package.jsonfile - Build the snap
- Handle any errors
- How to fix the tauri-snap-packager takes too much time error
Install tauri-snap-packager npm package
Firstly install the tauri-snap-packager npm package in your project. The tauri-snap-packager npm package helps you create a snapcraft configuration file.
npm install --save-dev tauri-snap-packager

# Or with yarn

yarn add --dev tauri-snap-packager

# Or with pnpm

pnpm add tauri-snap-packager
Add configuration in the package.json file
After installation, complete the tauri-snap-package npm package. Now configure the "tauri-snap": "tauri-snap-packager" tauri-snap-package script in the package.json file.
"scripts": {
    "dev": "next dev -p 1420",
    "build": "next build && next export -o dist",
    "tauri": "tauri",
    "lint": "next lint",

    "tauri-snap": "tauri-snap-packager"

  },
Build the snap
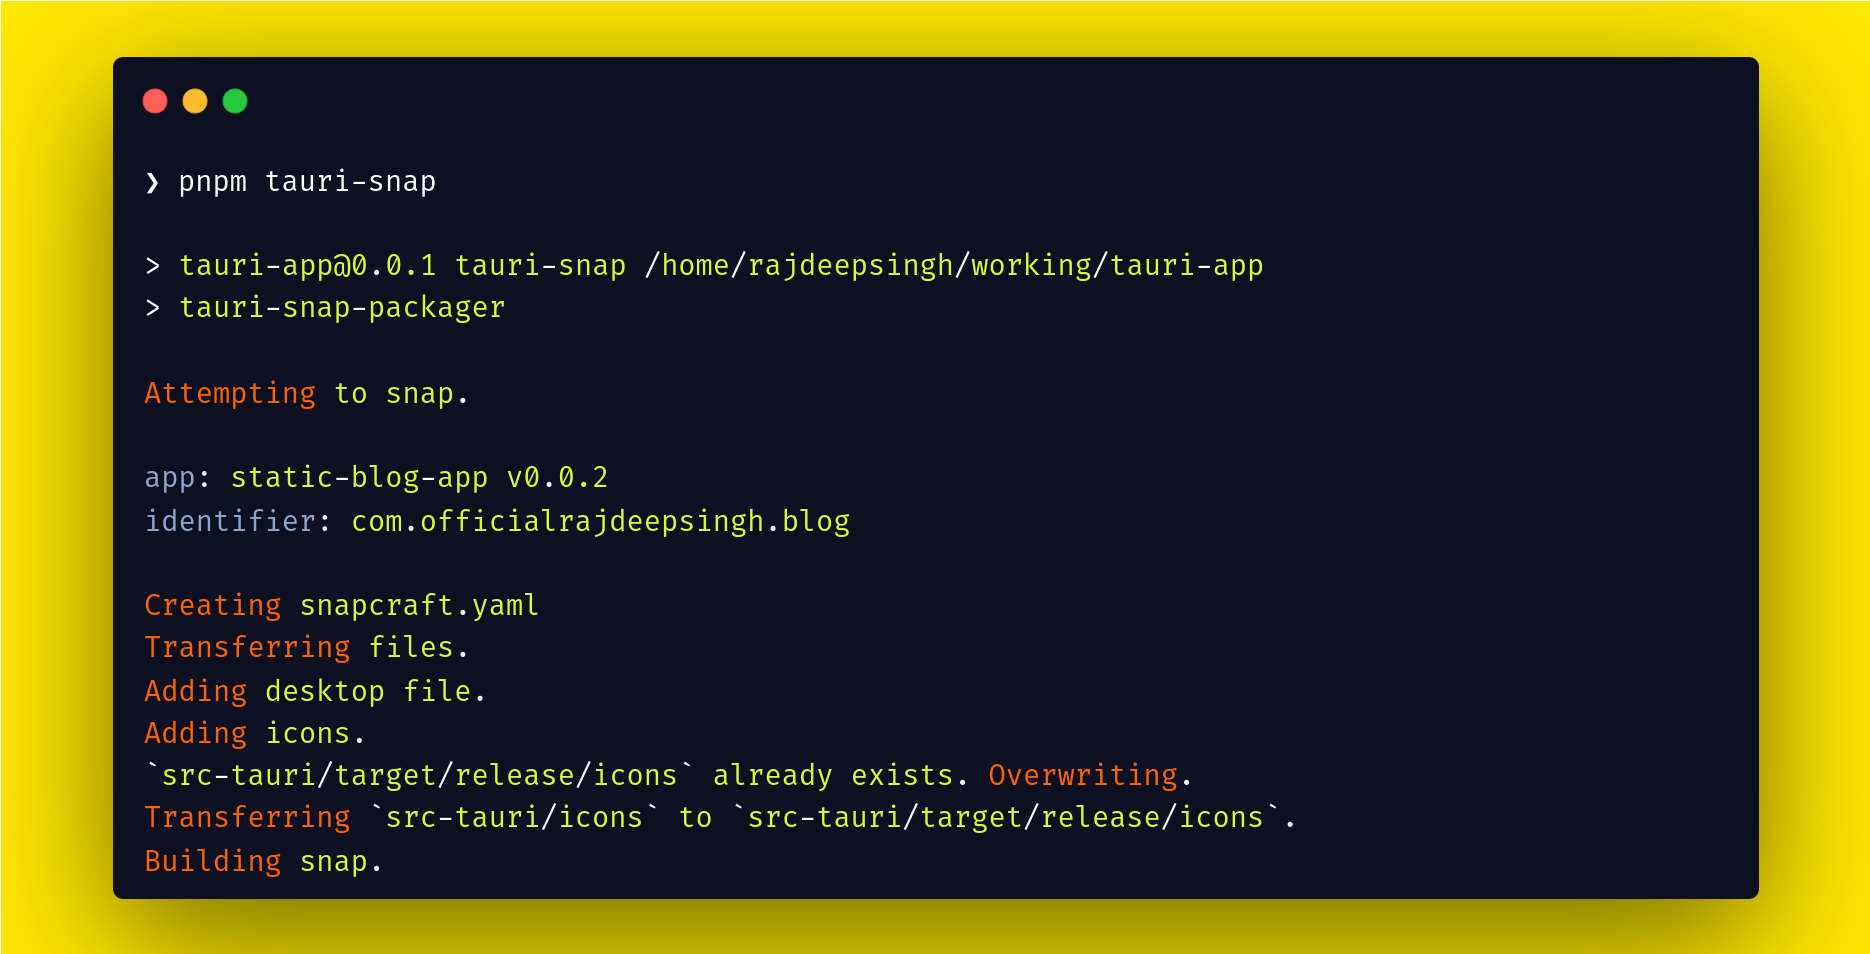
Now you run the pnpm tauri-snap command in your project folder. tauri-snap automatically creates a snap folder in src-tauri/target. Inside the snap folder pnpm tauri-snap creates a new snapcraft.yaml file with all the configurations. All the configuration is based on your Tauri configuration.
name: static-blog-app
base: core18
version: 0.0.2
summary: Tauri app.
description: Awesome Tauri app.
grade: devel
confinement: strict
source-code: https://github.com/officialrajdeepsingh/static-blog-app
apps:
  static-blog-app:
    command: static-blog-app
    extensions:
      - gnome-3-34
    desktop: static-blog-app.desktop
parts:
  dump-binary:
    plugin: dump
    source: ./target/release
    source-type: local
    stage:
      - lib
      - icons
      - static-blog-app
      - static-blog-app.desktop
    prime:
      - lib
      - icons
      - static-blog-app
      - static-blog-app.desktop
    stage-packages:
      - libc6
How to fix the errors
You'll get an error while validating snapcraft.yaml with the pnpm tauri-snap command.
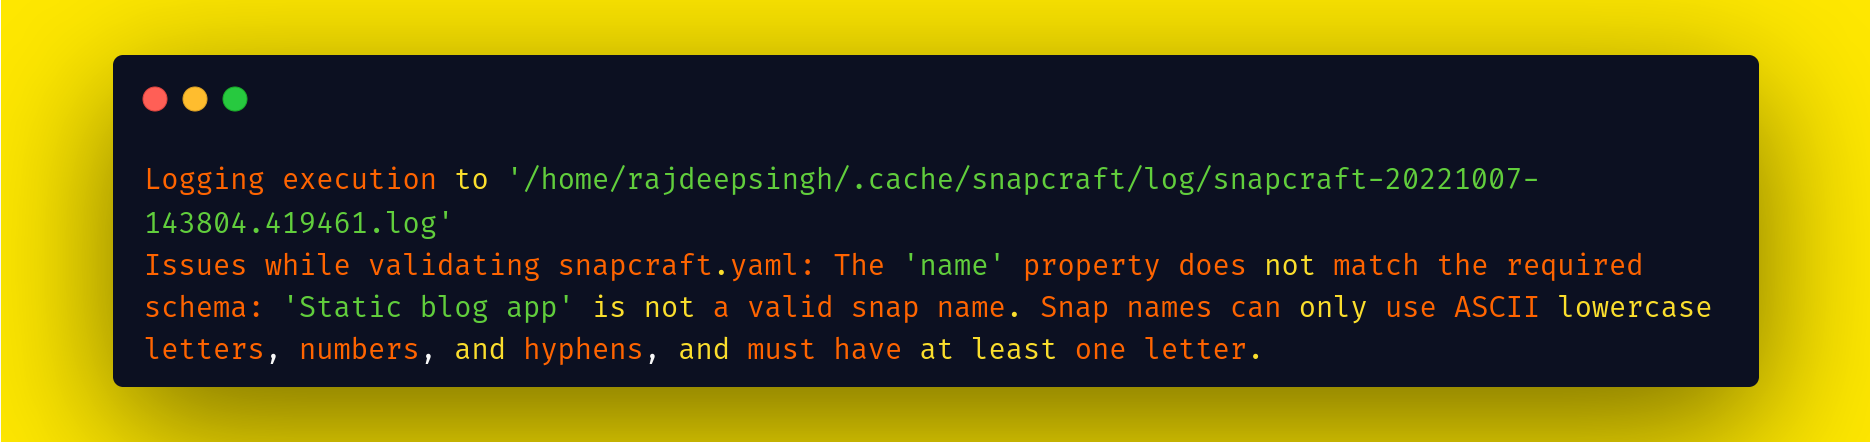 Issues while validating snapcraft.yaml
Your application name may contain some words that are not allowed, like spaces, numbers, uppercase letters, and so on. For example, Static-blog-website does not allow you to use your name with a capital letter. Simply use a small case word for a name like static-blog-website.
You might also see an error you need 'multipass' set-up to build snaps when running the pnpm tauri-snap --trace-warnings command.
The --trace-warnings Node.js flag helps debug or trace the error.
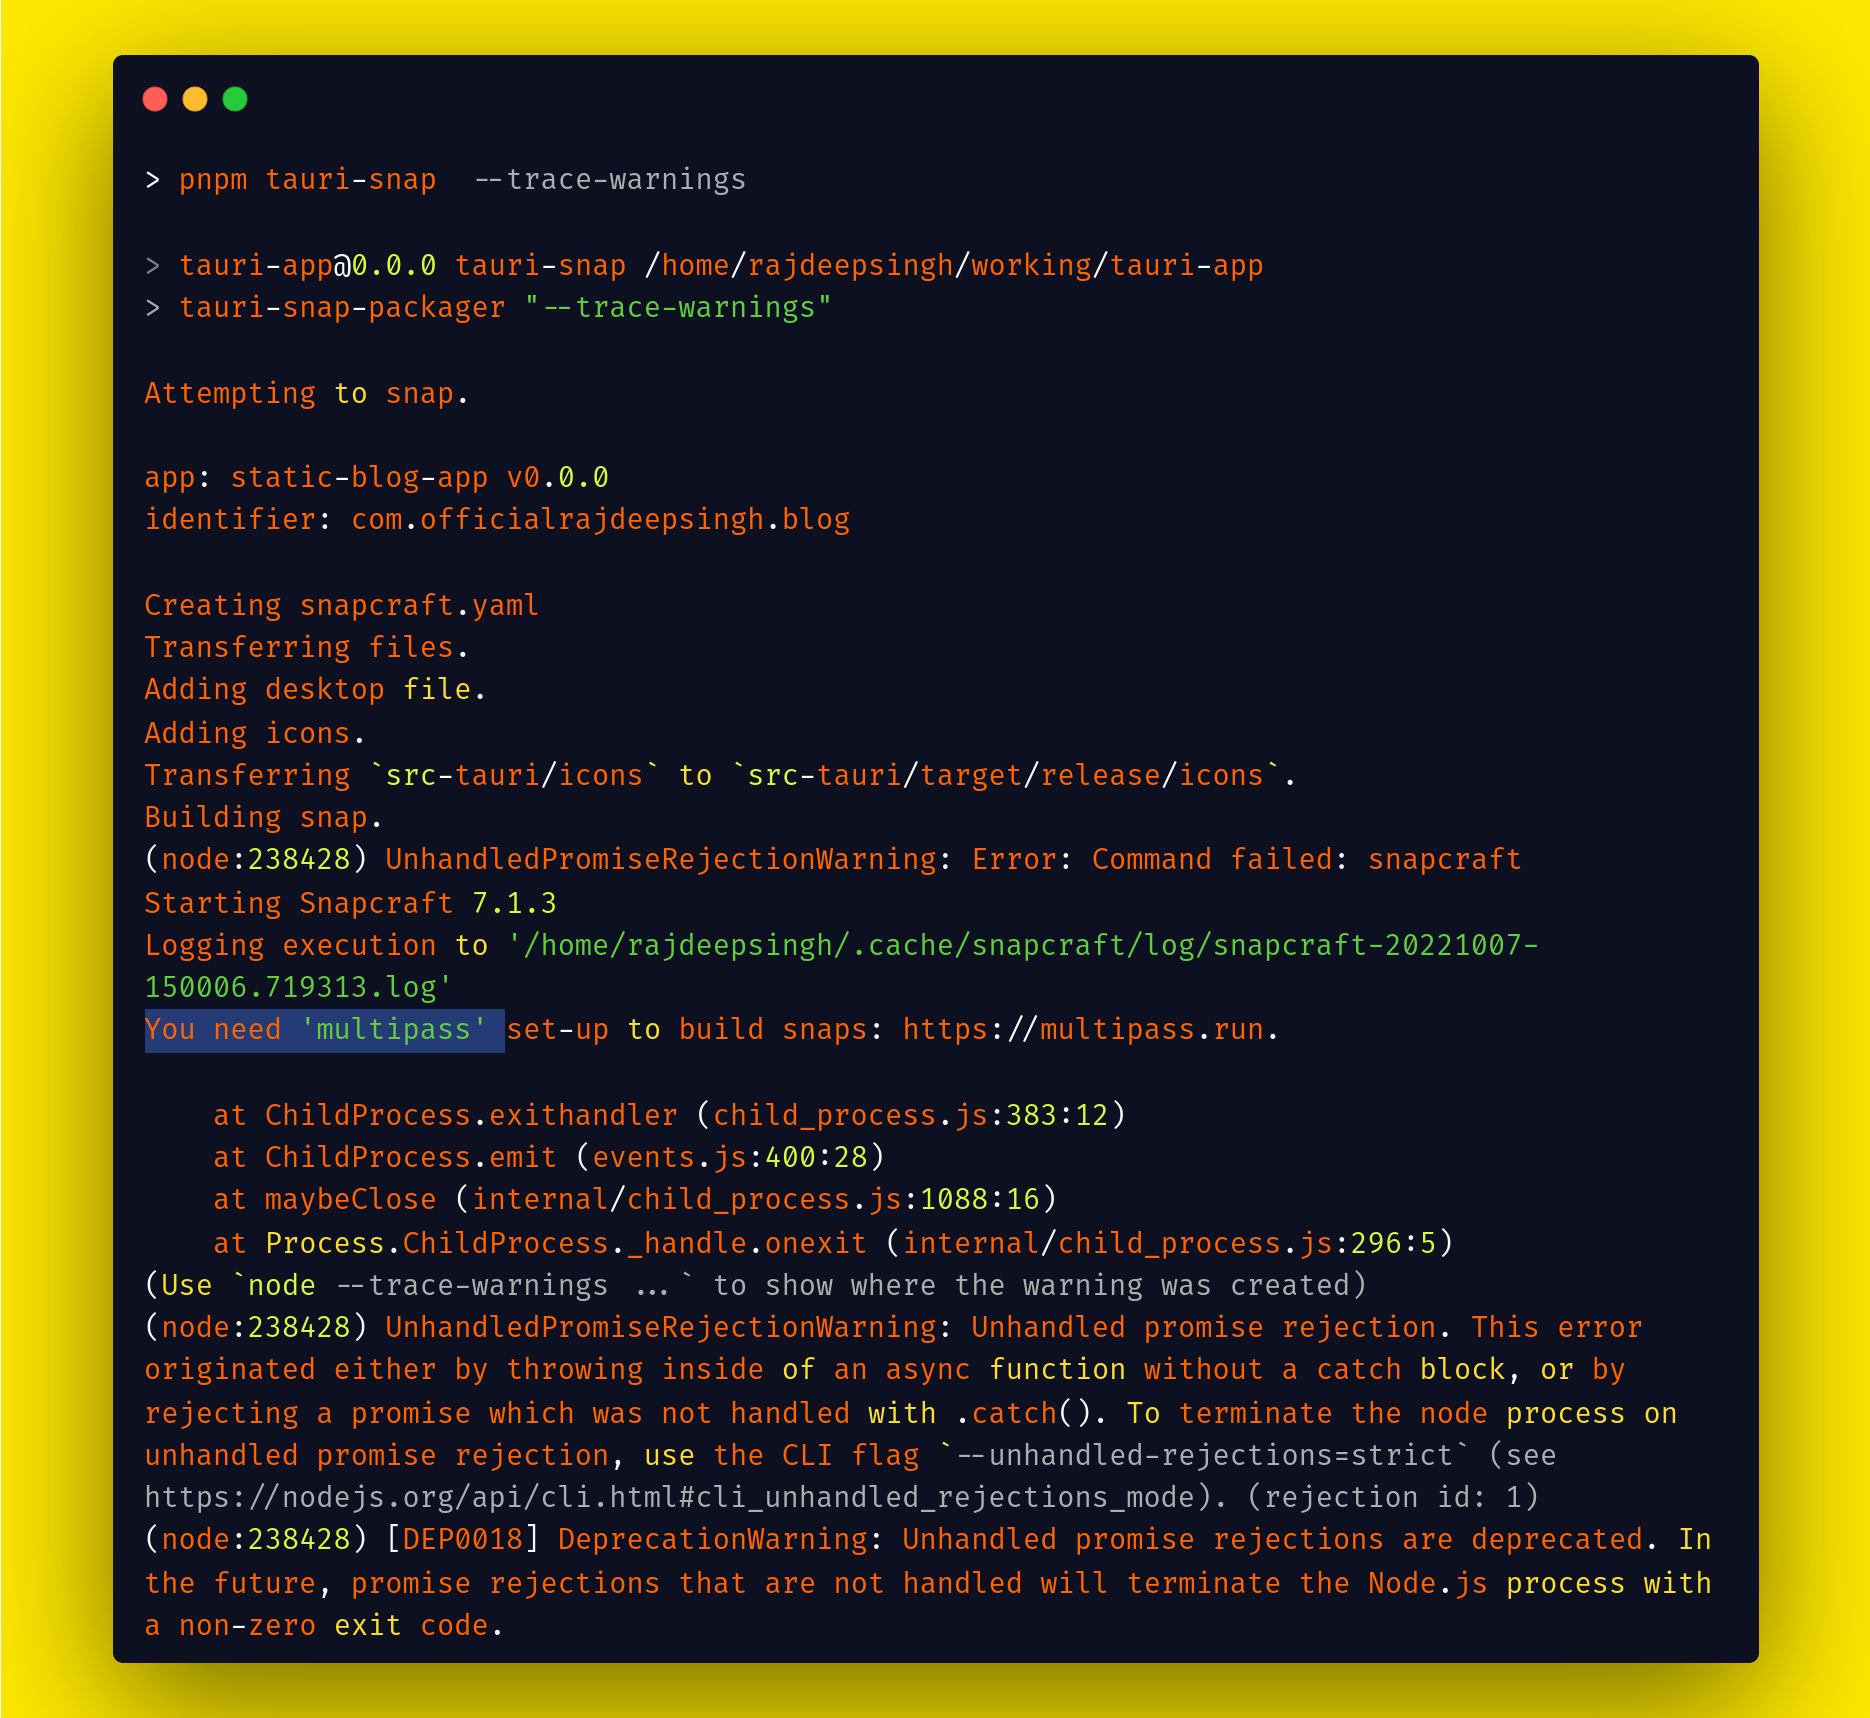 You need a multipass set-up to build snaps error.
To solve the error, you must install the multipass package in Ubuntu. The tauri-snap-package uses the Snapcraft command as a background to build a snap file. So Snapcraft requires multipass to build a snap package.
sudo snap install multipass
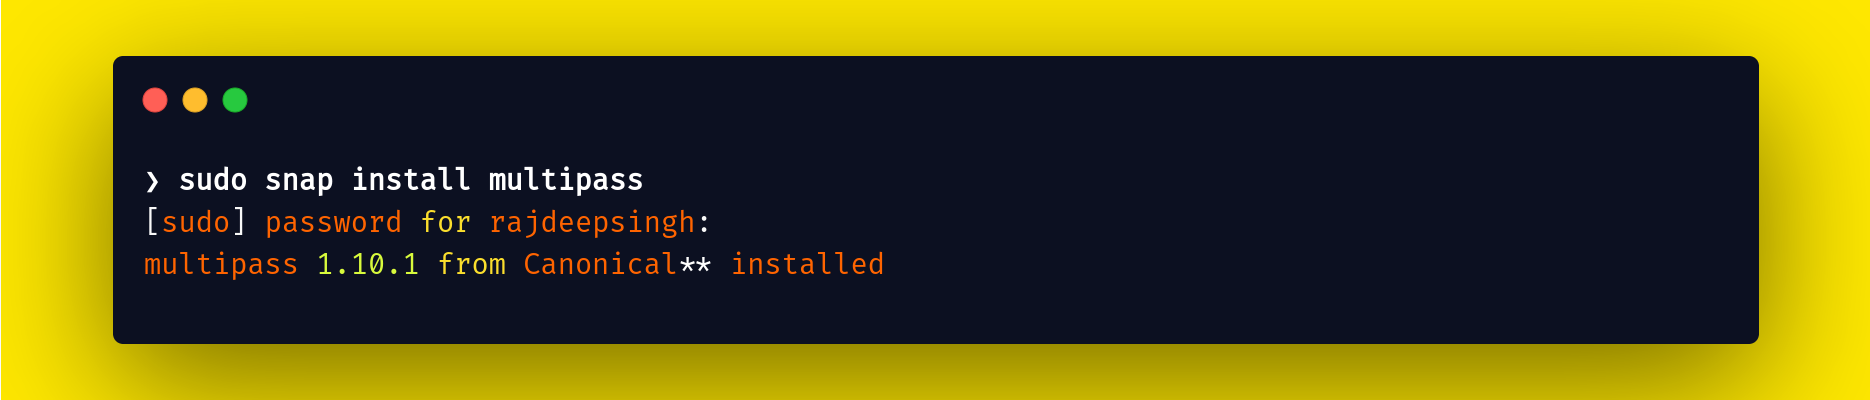 Install multipass in ubuntu
Tauri-snap-packager takes too much time.
If the tauri-snap-packager takes too much time to build the snap binary or you feel your application is stuck and does not show any output in the terminal, then just stop the command. The tauri-snap-packager isn't working for you, so you can use the snapcraft command.
 Create a snap configuration with Tauri-snap-packager
This error means that the pnpm tauri-snap the command is not working and it takes too much time. It's likely because the tauri-snap-package npm package isn't working correctly.
To solve this issue, run the snapcraft command in the same folder where your snap folder was created. Before running the snapcraft command, first, install the snapd command tool. Snapd is a REST API daemon for managing snap packages. To learn more about snapd, I found a great article written by Oyetoke Tobi Emmanuel.
snap install --channel stable snapd
After installation is complete, run the snapcraft command in the tauri-app/src-tauri/target folder. The target folder is generated by the pnpm tauri dev command.
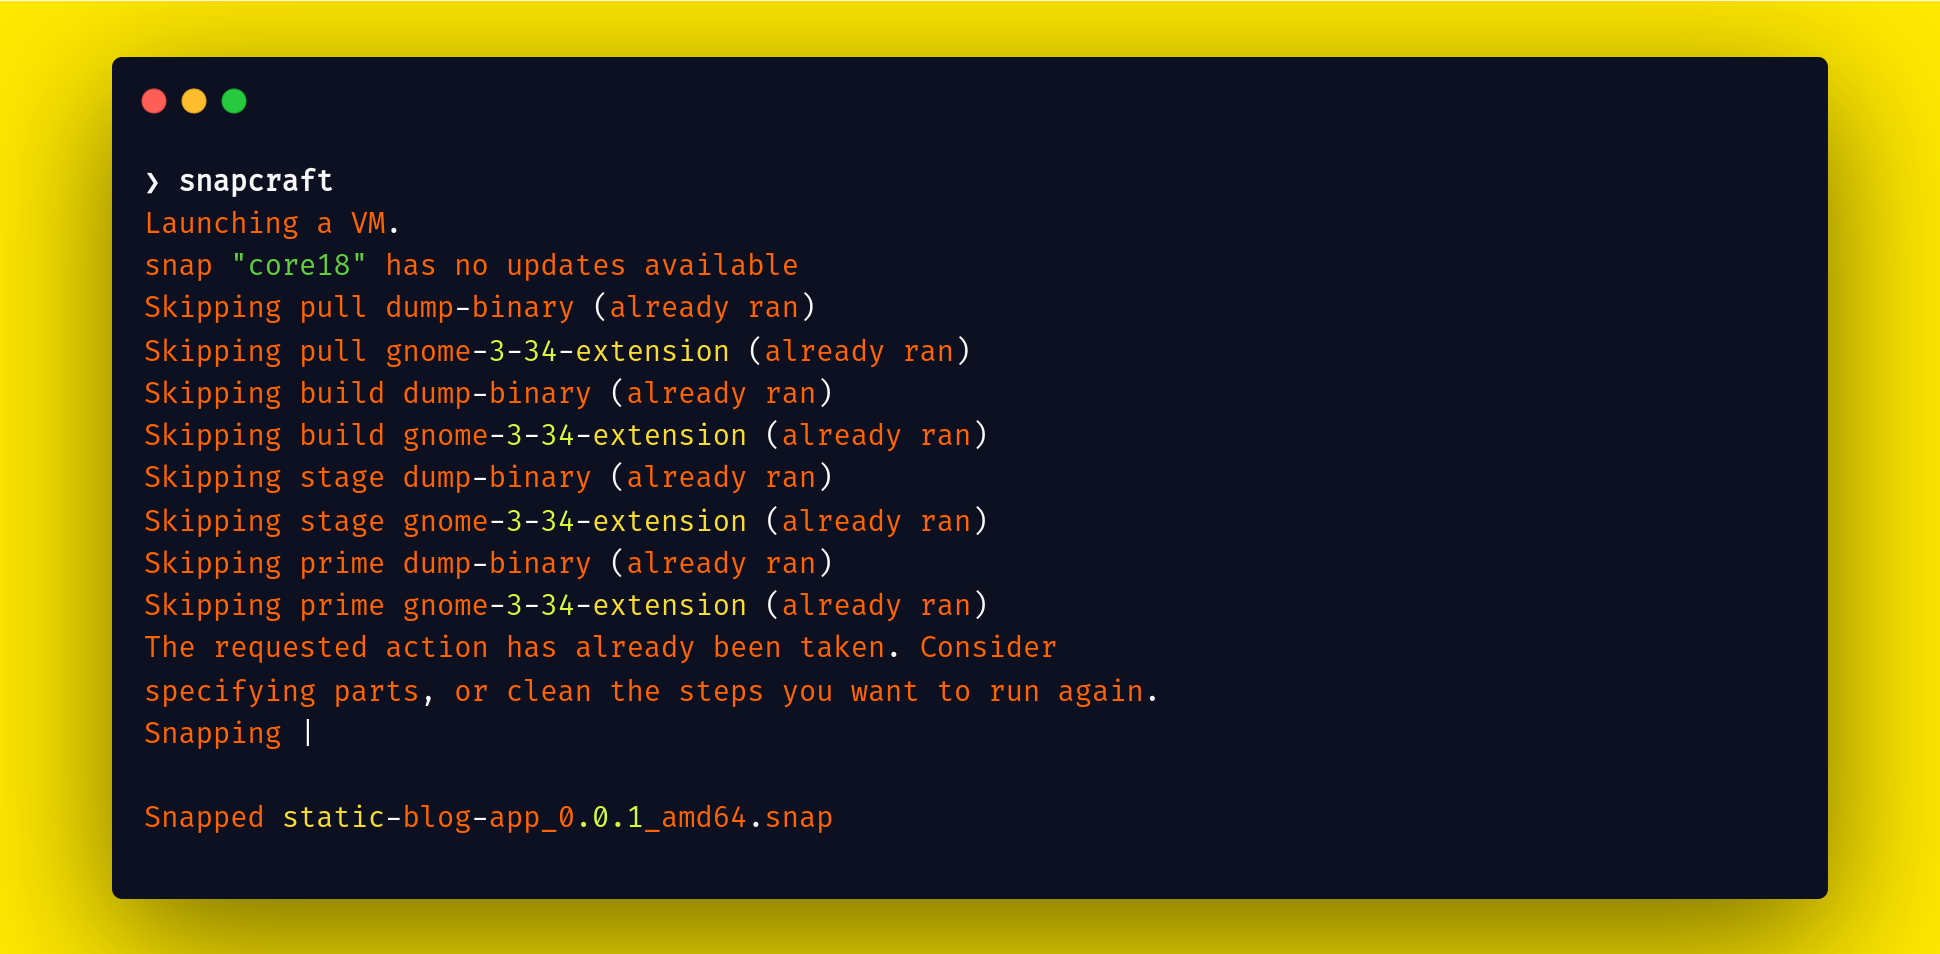
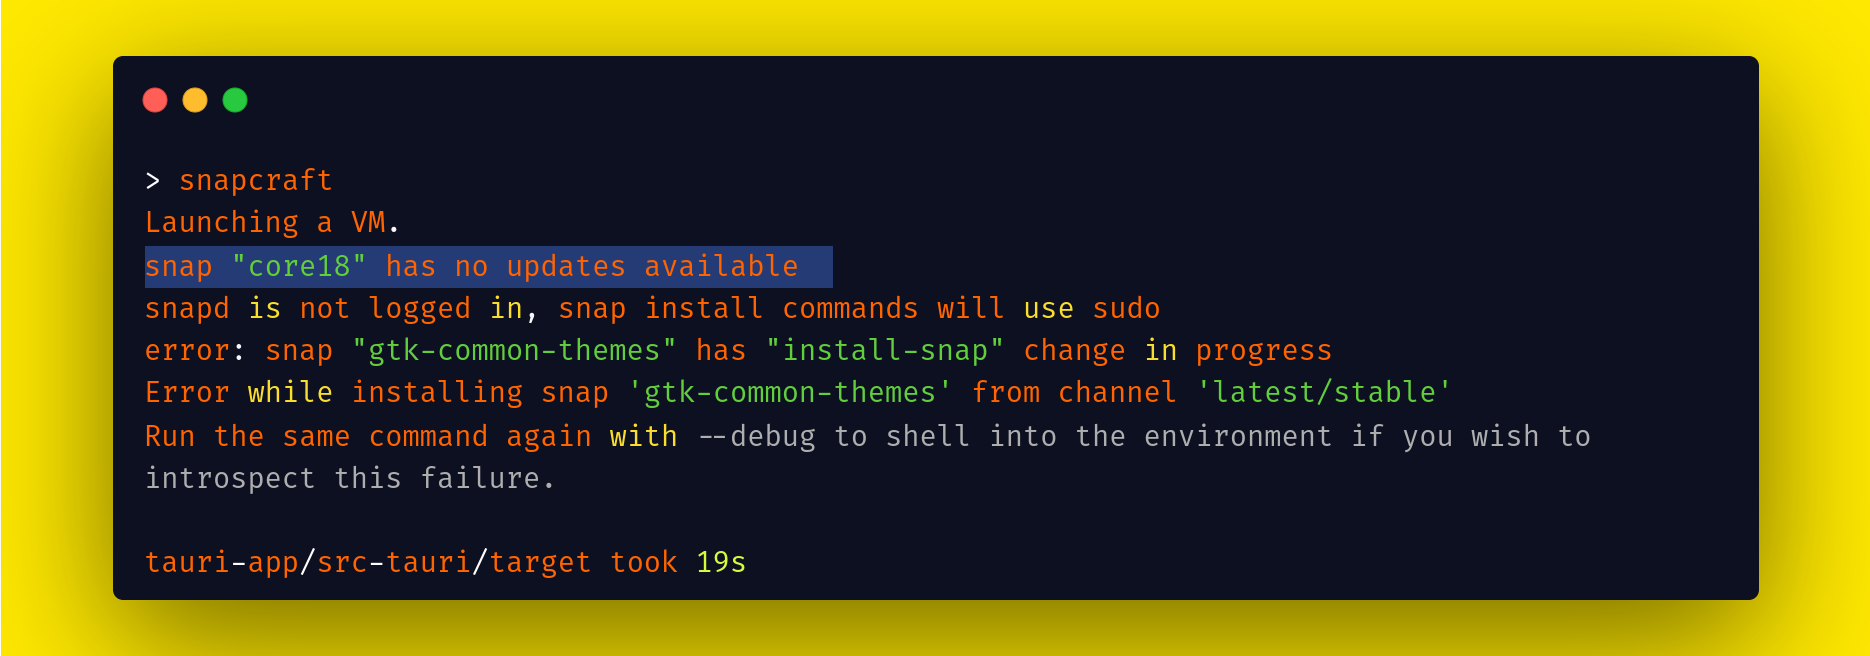 Face common error with snapcraft command
You may get a snap "core18" has no updates available error with Snapcraft. But the core18 is not a big issue. Simply update your distro package with the sudo apt-get update && sudo apt-get upgrade command, then restart your terminal or laptop. Here's a youtube tutorial that can help you solve your core18 error problem.
"Snapd has not logged" means that first, you need to login into your snapcraft account. For login run snapcraft login.
After you solve the core 18 issue, now run the snapcraft command again and build your snap binary file.
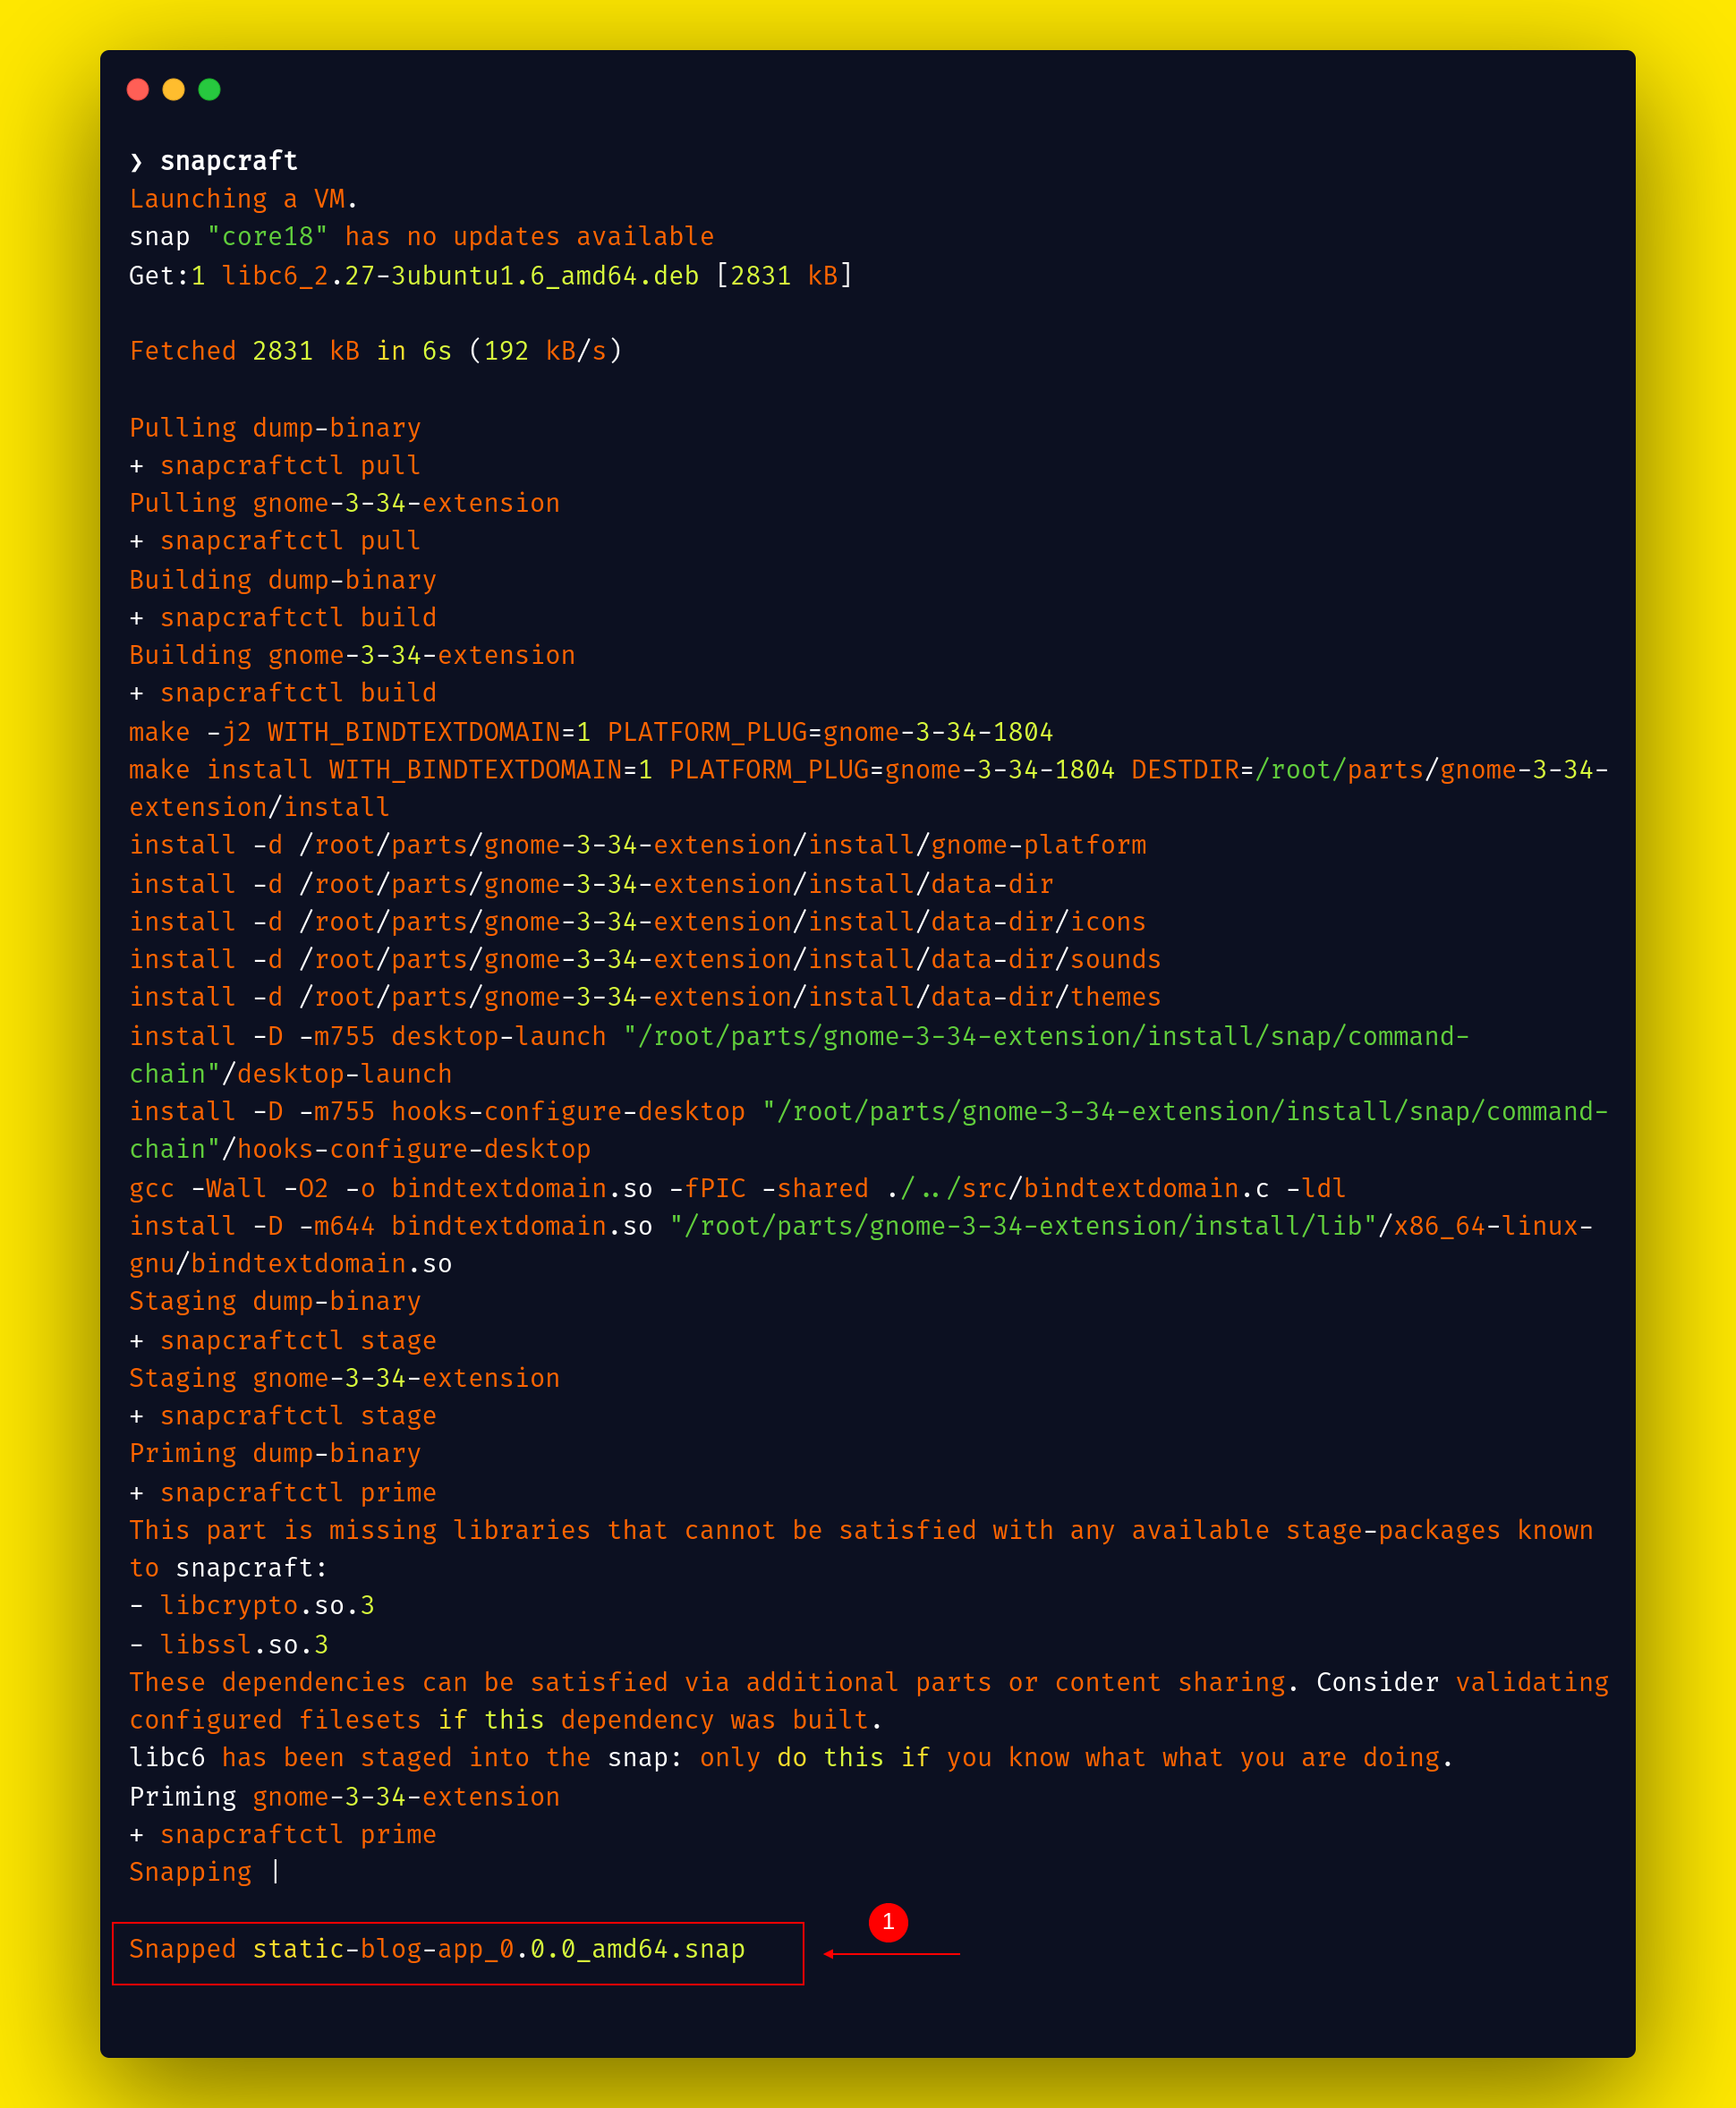 Create a binary with snapcraft
The Snapcraft creates a new binary static-blog-app_0.0.0_amd64.snap file. Now the static-blog-app_0.0.0_amd64.snap file is ready to publish on the Snapcraft website or snap store.
How to install static-blog-app_0.0.0_amd64.snap locally in the system
If you install the static-blog-app_0.0.0_amd64.snap file locally with the following command, you might find the signatures metadata error.
sudo snap install ./static-blog-app_0.0.0_amd64.snap
Here's the error:
 cannot find signatures metadata error for snap
To solve this error, you need to run the snap command with the --dangerous flag.
 Install snap locally package
How to Build a Cross-Platform Application with GitHub Actions
GitHub Actions is a continuous integration and continuous delivery (CI/CD) platform or pipeline that allows you to automate tasks like building, testing, and deployment.
You can triage GitHub actions on certain events like somebody pushing new code to the GitHub repository and running tests on the code. If the test passes then the code gets added to the main or master branch.
If you want to build cross-platform applications for Windows, macOS, and Linux, the easiest way is using the GitHub actions workflow. This workflow runs on a specific event like push, pull, and so on.
To try this out, you'll need to create a new action in your project. First, create a new .github/workflows folder. After in the workflows, create a file with any name with a .yml extension.
The Tauri app provides a GitHub action configuration. With Tauri actions, you can quickly build cross-platform applications for Windows, macOS, and Linux distros with the GitHub workflow.
name: Build application
on:
  push:
    branches:
      - 'main'
  workflow_dispatch:

jobs:
  release:
    strategy:
      fail-fast: false
      matrix:
        platform: [macos-latest, ubuntu-latest, windows-latest]
    runs-on: ${{ matrix.platform }}
    steps:
      - name: Checkout repository
        uses: actions/checkout@v2

      - name: Install Node.js
        uses: actions/setup-node@v3
        with:
          node-version: 16

      - uses: pnpm/action-setup@v2.0.1
        name: Install pnpm
        id: pnpm-install
        with:
          version: 7.13.1
          run_install: false

      - name: Get pnpm store directory
        id: pnpm-cache
        run: |
          echo "::set-output name=pnpm_cache_dir::$(pnpm store path)"

      - uses: actions/cache@v3
        name: Setup pnpm cache
        with:
          path: ${{ steps.pnpm-cache.outputs.pnpm_cache_dir }}
          key: ${{ runner.os }}-pnpm-store-${{ hashFiles('**/pnpm-lock.yaml') }}
          restore-keys: |
            ${{ runner.os }}-pnpm-store-

      - name: Rust setup
        uses: actions-rs/toolchain@v1
        with:
          toolchain: stable

      - name: Install dependencies (ubuntu only)
        if: matrix.platform == 'ubuntu-latest'
        run: |
          sudo apt-get update
          sudo apt-get install -y libgtk-3-dev webkit2gtk-4.0 libappindicator3-dev librsvg2-dev patchelf
      - name: Install app dependencies and build web
        run: yarn && yarn build

      - name: Build the app
        uses: tauri-apps/tauri-action@v0
        env:
          GITHUB_TOKEN: ${{ secrets.STATIC_BLOG_APP }}
        with:
          tagName: v__VERSION__ # tauri-action replaces \_\_VERSION\_\_ with the app version
          releaseName: 'v__VERSION__'
          releaseBody: 'See the assets to download this version and install.'
          releaseDraft: true
          prerelease: false
Following the GitHub action, you can build your application on every push after successfully building the application and show all files in the GitHub release assets section.
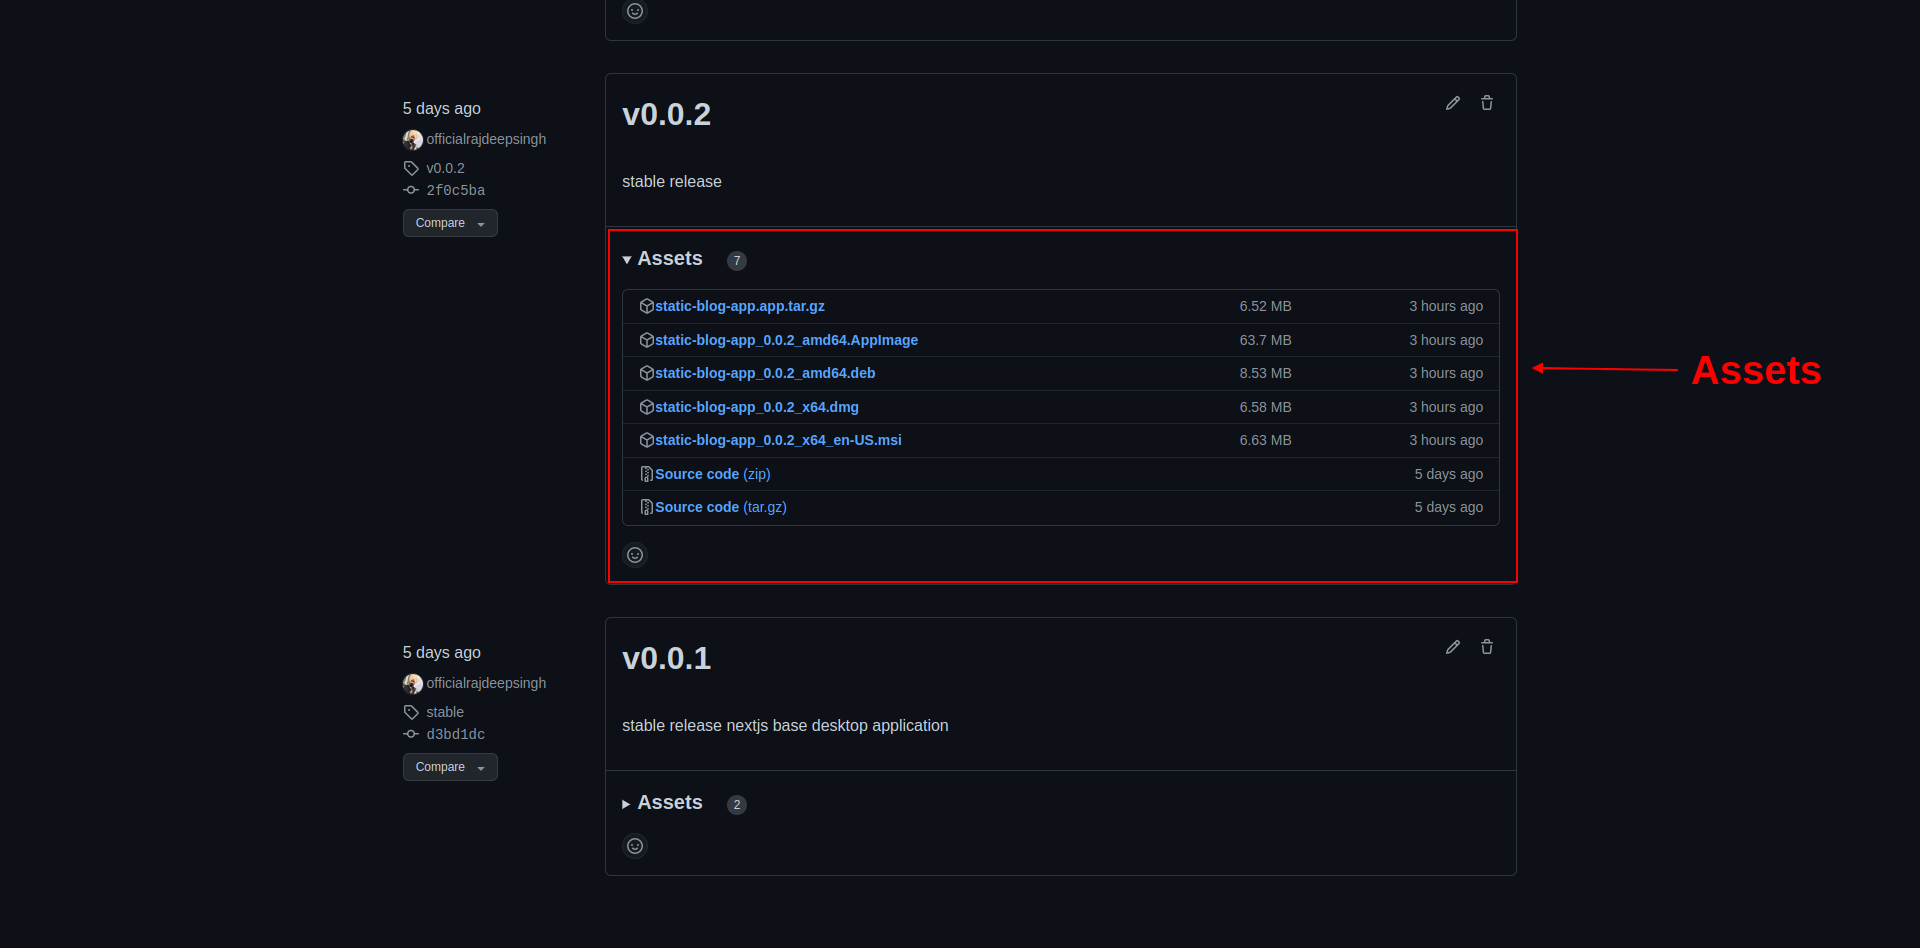 Show all applications in the assets section.
How to Publish the App
Publishing the package is the core of this article. A lot of people build their own Linux applications. But then they can't figure out how to submit the app on various distributions like Snapcraft, AppImage, and Homebrew.
So now I'll show how to submit a static-blog-app to Snapcraft and AppImage.
How to publish the app into the snap store or snapcraft
To publish a new package on the snap store, make sure you have a .snap binary available. Otherwise, first, build the .snap binary for the application (which we already went over above).
Go to the target or whatever folder where you created the .snp binary. Then run the snapcraft command. Make sure you first log in with your Snapcraft account. For login, run snapcraft login. Then run the following command with the argument I mentioned:
Syntax:
snapcraft upload <Opation> name-of-file
 Publish a new package to snap in devel release
After successfully getting into your account, then you can add or change the information regarding your package icon, name, and so on.
snapcraft upload --release=stable ./static-blog-app_0.0.0_amd64.snap
In the devel mode, you'll see a message on the application installation page. devel means development mode.
 Application in development mode
By default, your package publishes all the information collected by src-tauri/target/snap/snapcraft.yaml in the edge release. To understand more about the Snapcraft release system, you can read the release documentation.
 Go to the dashboard and add or update all the information regarding the app.
Make sure to use a banner image with a size of 720 x 240 for the snap.
How to publish your application on Snapcraft
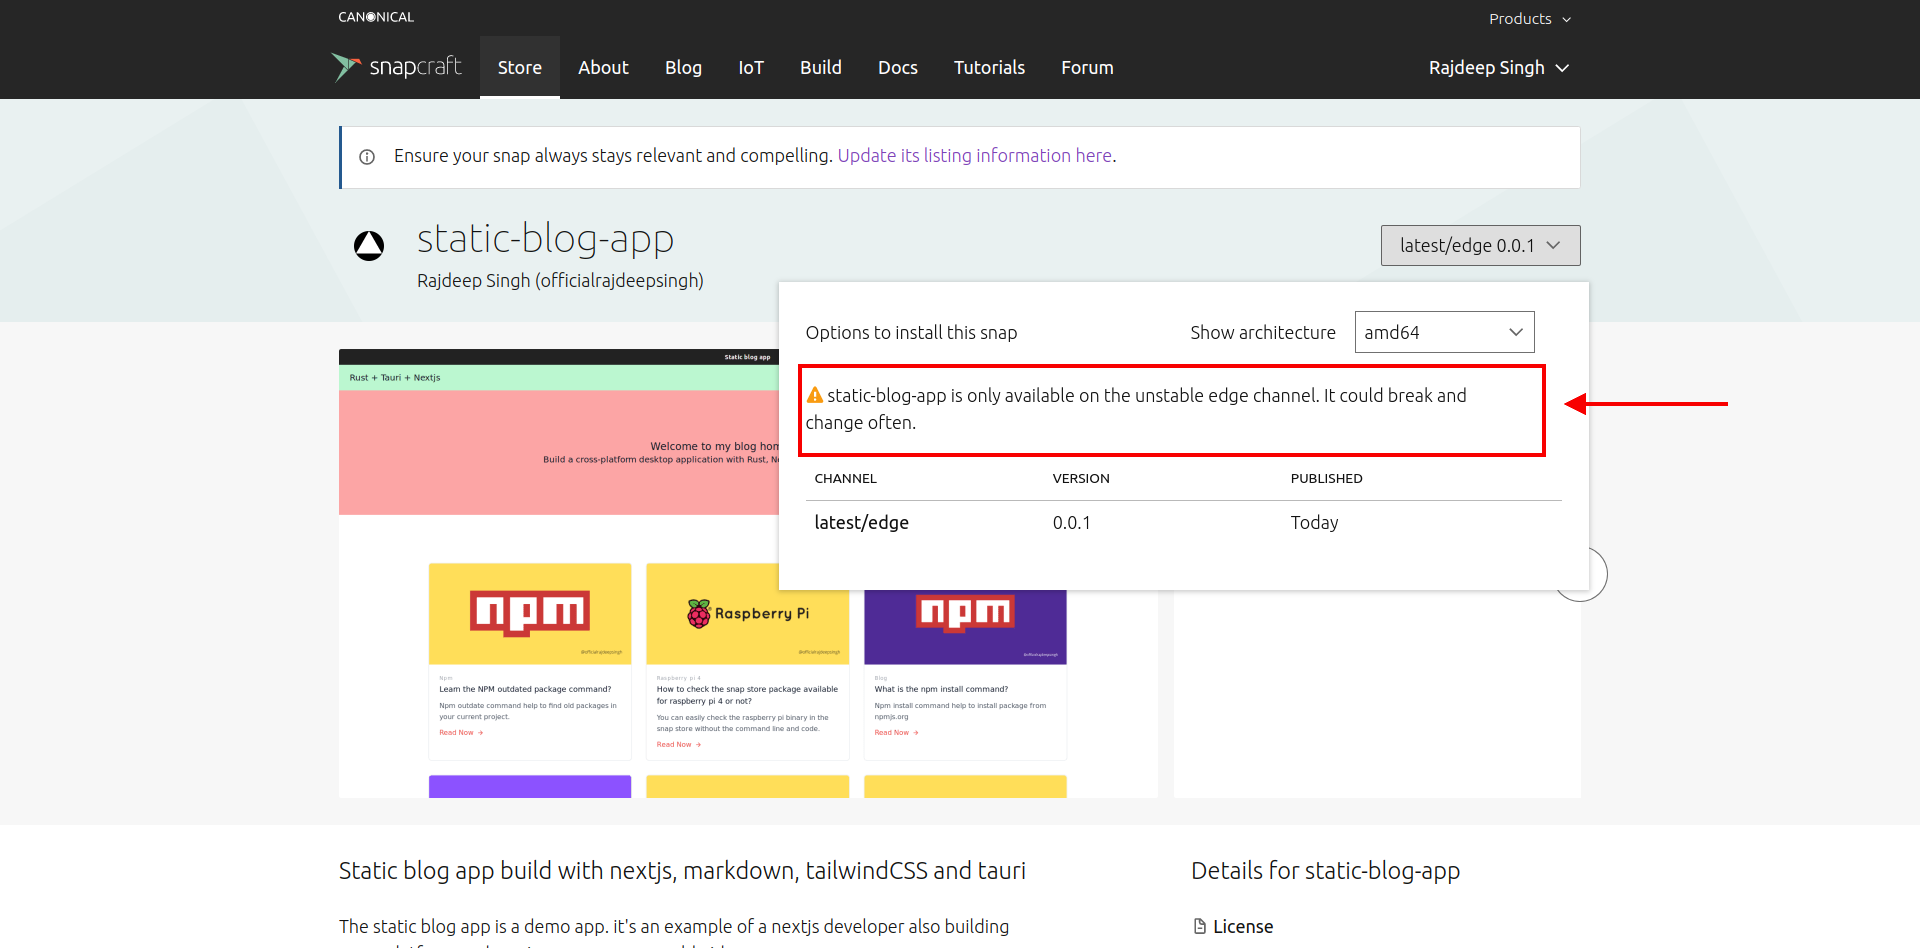
When you upload your application to your Snapcraft account, your application is private. To change how it's published, drag your available release into one of the release channels.
Go to the dashboard> my snap> select your snap> releases, and according to your requirements, add your application to one of the provided releases. The default is edge release.
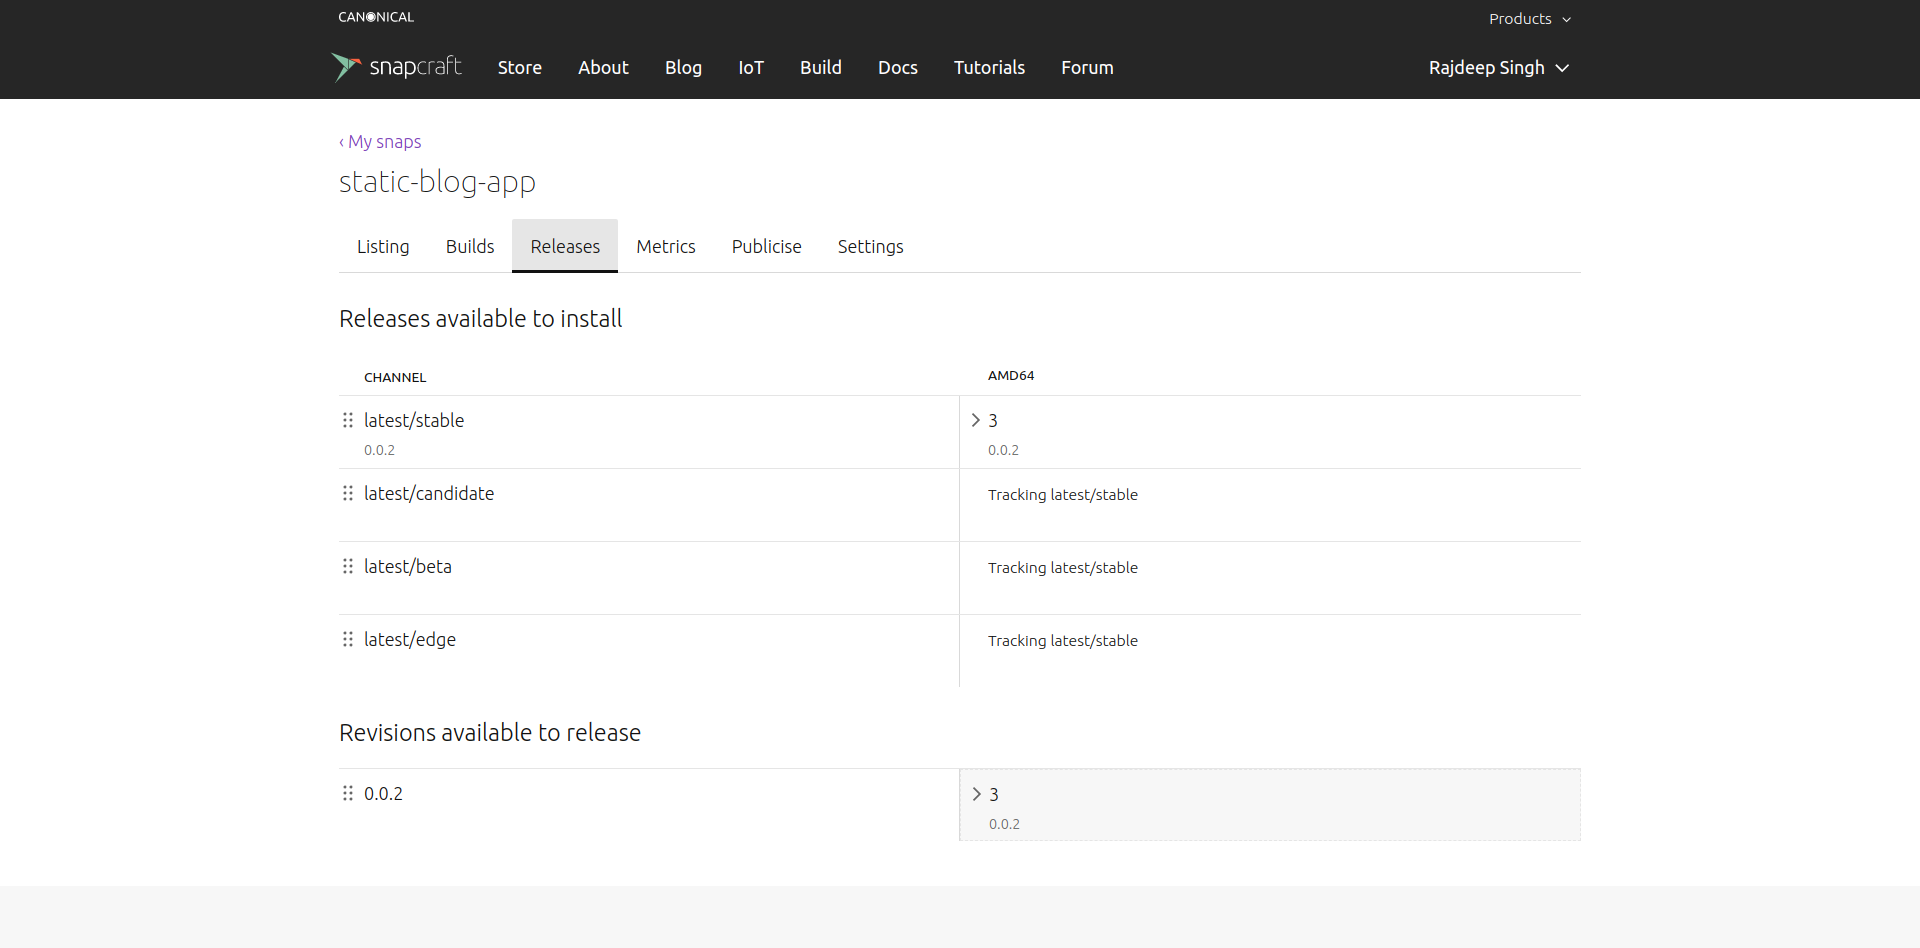
How to add an application to a stable release
To change the application to a stable release, go to the snap configuration src-tauri/target/snap/snapcraft.yaml file and update your grade: devel to grade: stable:
....

grade: stable

....
Now your application goes to stable release or channel and re-uploads your application.
 The application automatically goes to a stable release if you do not mention- release tags.
Now you've successfully released your application in a stable release.
How to update your snap application
For updating the snap application, you need to make changes in the tauri/target/snap/snapcraft.yaml file in the version section.
...

version: 0.0.1

or
version: 1.0.0

or

version: 0.1.0

...
Now rebuild your application with the snapcraft command.
 Rebuild your application
After successfully building your application, re-upload your latest build, and your application will be updated on the snap store website.
 Update your application in snapcraft
How to publish applications in AppImage
AppImage helps you distribute your application across Linux distros. You don't need to install AppImage for it to work in your system.
Publishing the application on AppImage is a straightforward process. First, you need an AppImage URL and a GitHub account.
First, go to the appImage GitHub repository and click on this link.
 Click this link
After that, a new page is opened in the browser:
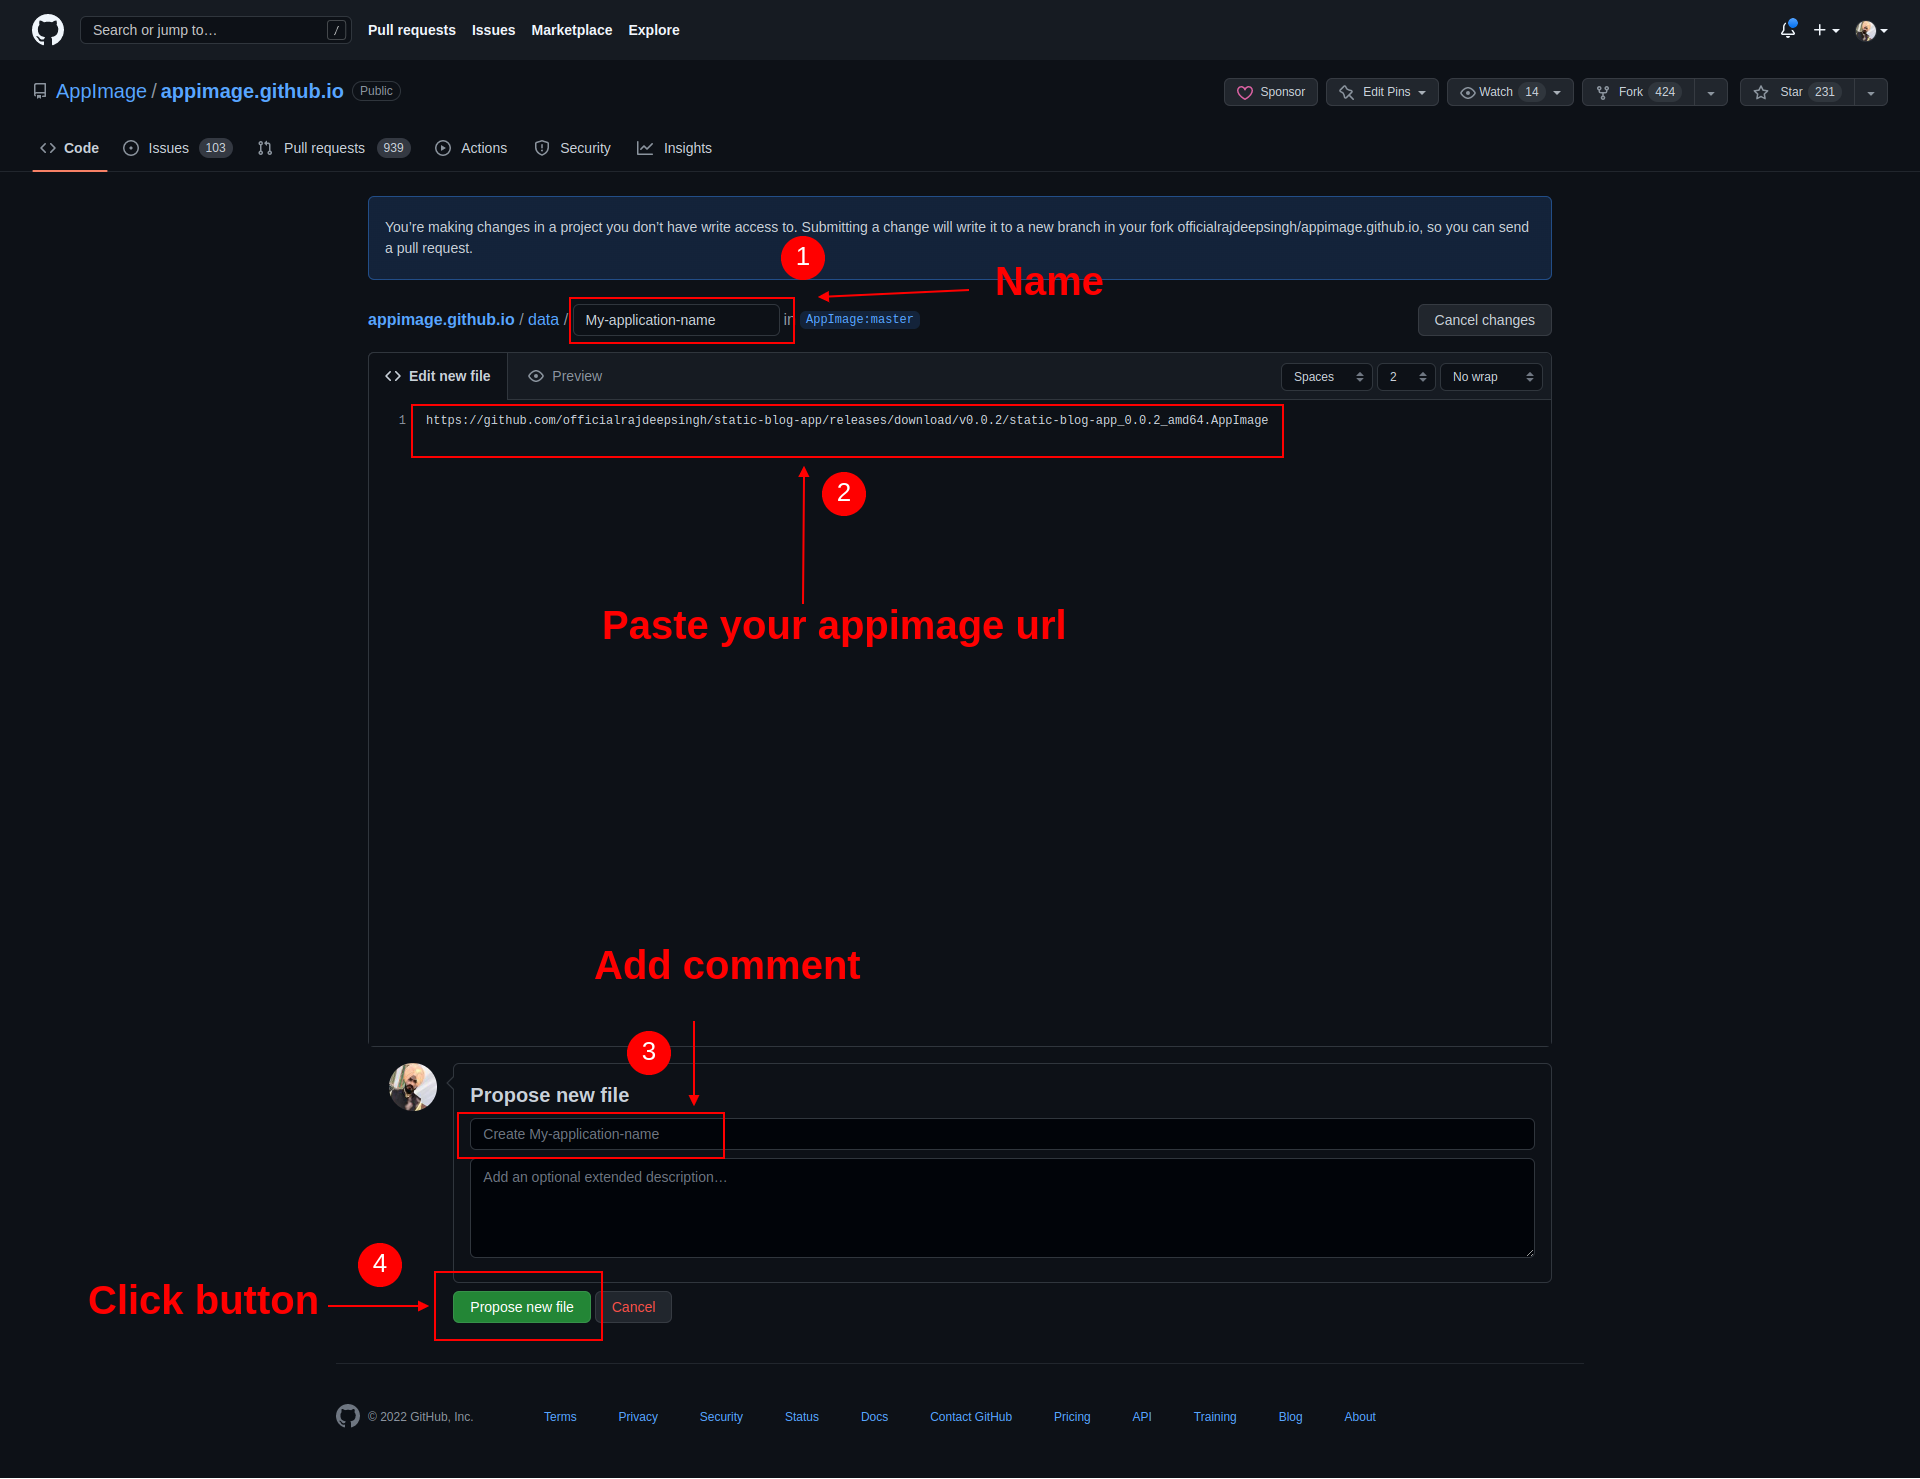 Submit pull request in AppImage
- Add your application name.
- Paste your image URL
- Add comment
- Click the new propose file button.
- Download the appimage.github.io repo in your GitHub account
- Create a new pull request into the appimage.github.io repository.
 Create a pull request into appimage.github.io
- Add the comment and click the create pull request button.
 Add comment and Create a pull request into appimage.github.io
Now your application is successfully submitted to the appimage.github.io repository. The appimage.github.io runs GitHub actions based on your application. Your application should pass all tests run AppImage. After that, your image should be successfully listed on AppImage so everybody can download your application.
If you submit an application on AppImage with a pull request, your GitHub action test will fail. You'll see the GLIBC_2.29' not found error.
I tried many ways to solve this issue, but I couldn't find a solution. If I do, I'll update my repository as well as this article.
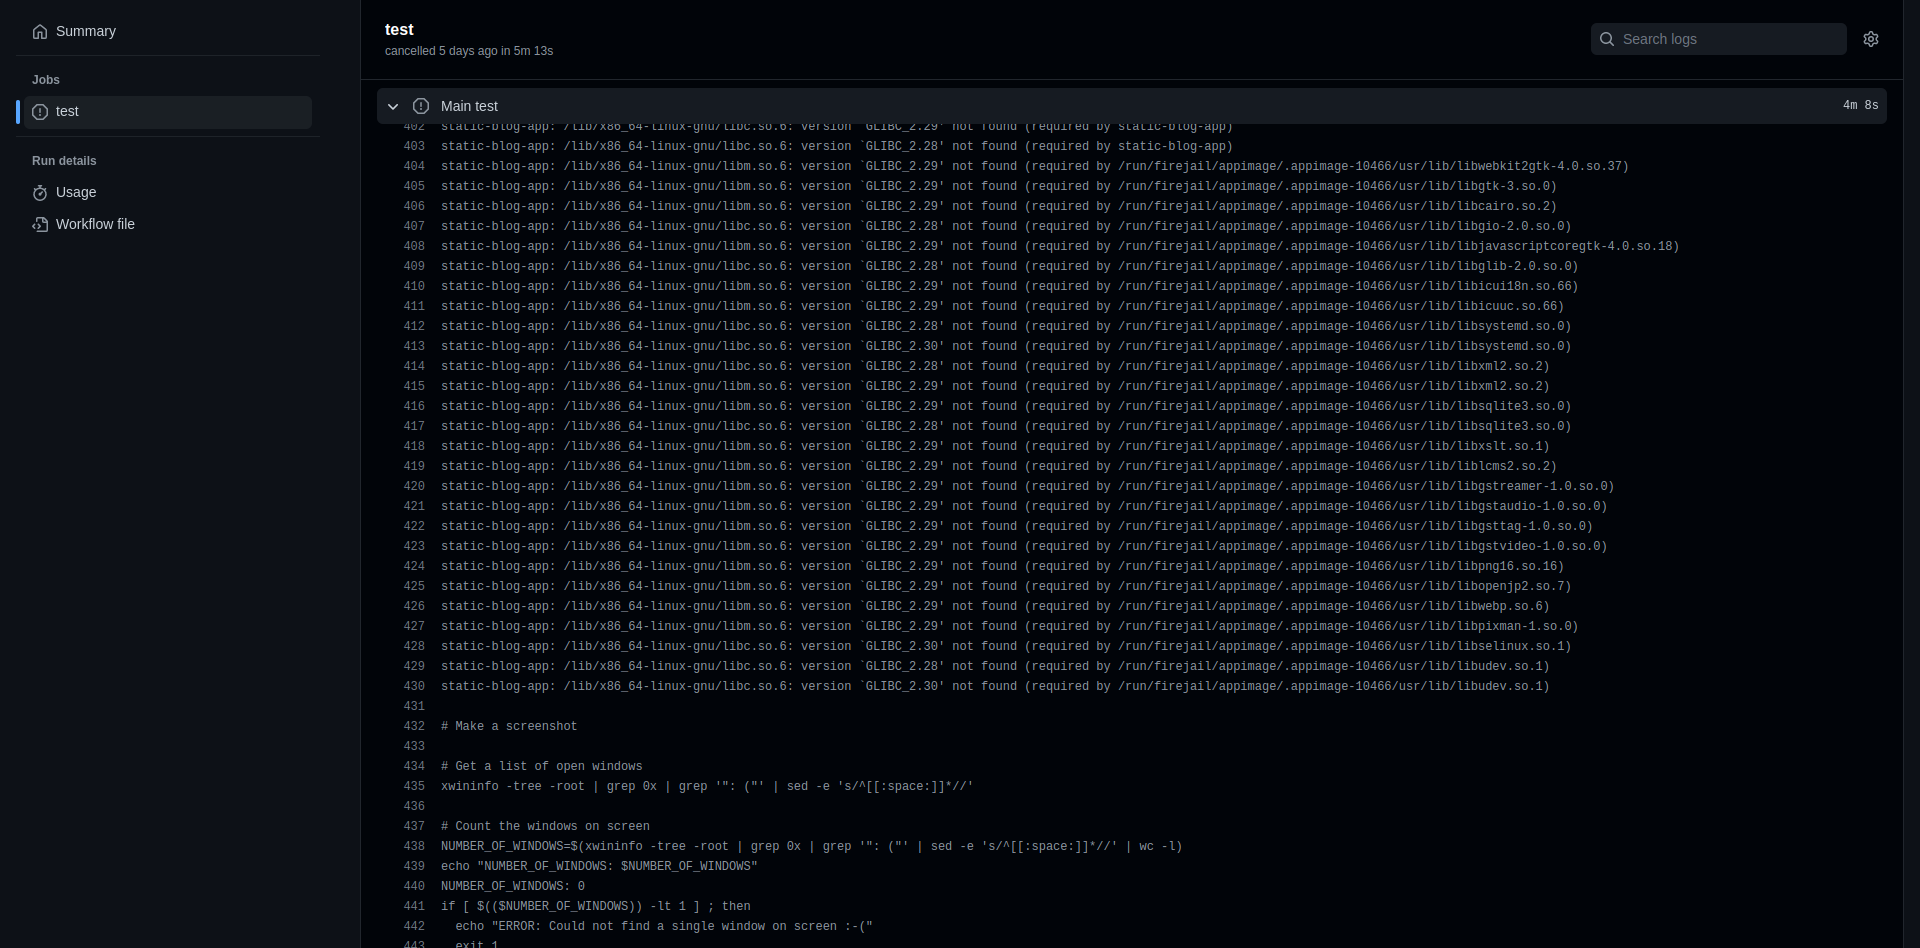 _GLIBC2.29 is not found
FAQ
If you're building the application with Tauri, do you have to code in Rust?
No, you can build an application without writing a single line of code in Rust. Instead, Tauri provides JavaScript and TypeScript API support for front-end development to handle a lot of stuff like clipboard, dialog, event, HTTP, notification, and so on.
How do you build cross-platform architecture (cross-compilation) with Tauri?
You can build an application cross-architecture (cross-compilation) with Rust. Rust Toolchain helps you build cross-compilation applications.
What is the toolchain in Tauri?
The Rust toolchain helps you build an application on a different architecture. In rust, there are 86 toolchains available for a different architectures.
❯ rustup target list
Can you use Tauri to build an Android or IOS application?
No, you can't use Tauri to build applications for Android and iOS. But there is a library that helps you build applications for mobile phones – I just haven't tested it yet. You can build applications with a toolchain. I'll soon write an article about this on my website.
What are Tauri JavaScript and TypeScript API?
Tauri provides a different type of API that helps enhance the user and developer experience. You can use the API to handle notifications, dialog, events, HTTP, and so on.
Conclusion
It's relatively easy to build cross-platform applications with Tauri. You can use any front-end framework for the application.
But other frameworks don't let you build various cross-architecture and cross-operating system applications, for example, Windows, macOS, and Linux distros.
Tauri comes with strong backend language support. With Rust, you can do anything you can with a low-level language. In addition, Rust provides memory safety, no garbage collector, and so on.
When building the Tauri application with Flatpak, I couldn't find a development and distribution solution. However, in the future, I will add it to the GitHub readme file.
I haven't covered how to distribute applications on Windows and macOS. I'm a Linux user and do not test applications on Windows and macOS. But there are lots of articles and videos on the internet you can check out to learn how to do that.
MacOS has a popular distribution platform called homebrew. The homebrew distribution system is similar to appimage.org. If you submit a new pull request for your application and pass all tests, your app shows on homebrew.
If you have any questions or suggestions related to developing and distributing a Tauri application, you can ask for help on the Tauri GitHub discussions.