
Welcome to this in-depth guide on crafting a RESTful API with NestJS, Docker, Swagger, and Prisma. My goal here is to teach you how to build robust and efficient backends, regardless of whether you're a seasoned developer or a beginner just dipping your toes into the world of coding.
In this journey, we'll be creating a delightful recipe management system. We'll explore the power of NestJS, Docker, Swagger, and Prisma, and harness these cutting-edge technologies to implement CRUD (Create, Read, Update, Delete) operations for managing recipes.
But this tutorial isn't just for the culinary enthusiasts or recipe collectors out there. It's for anyone who's passionate about learning and growing their development skills.
So, buckle up and get ready for an exciting coding adventure as we dive in and start building your very own recipe management system together.
This is what we'll build:
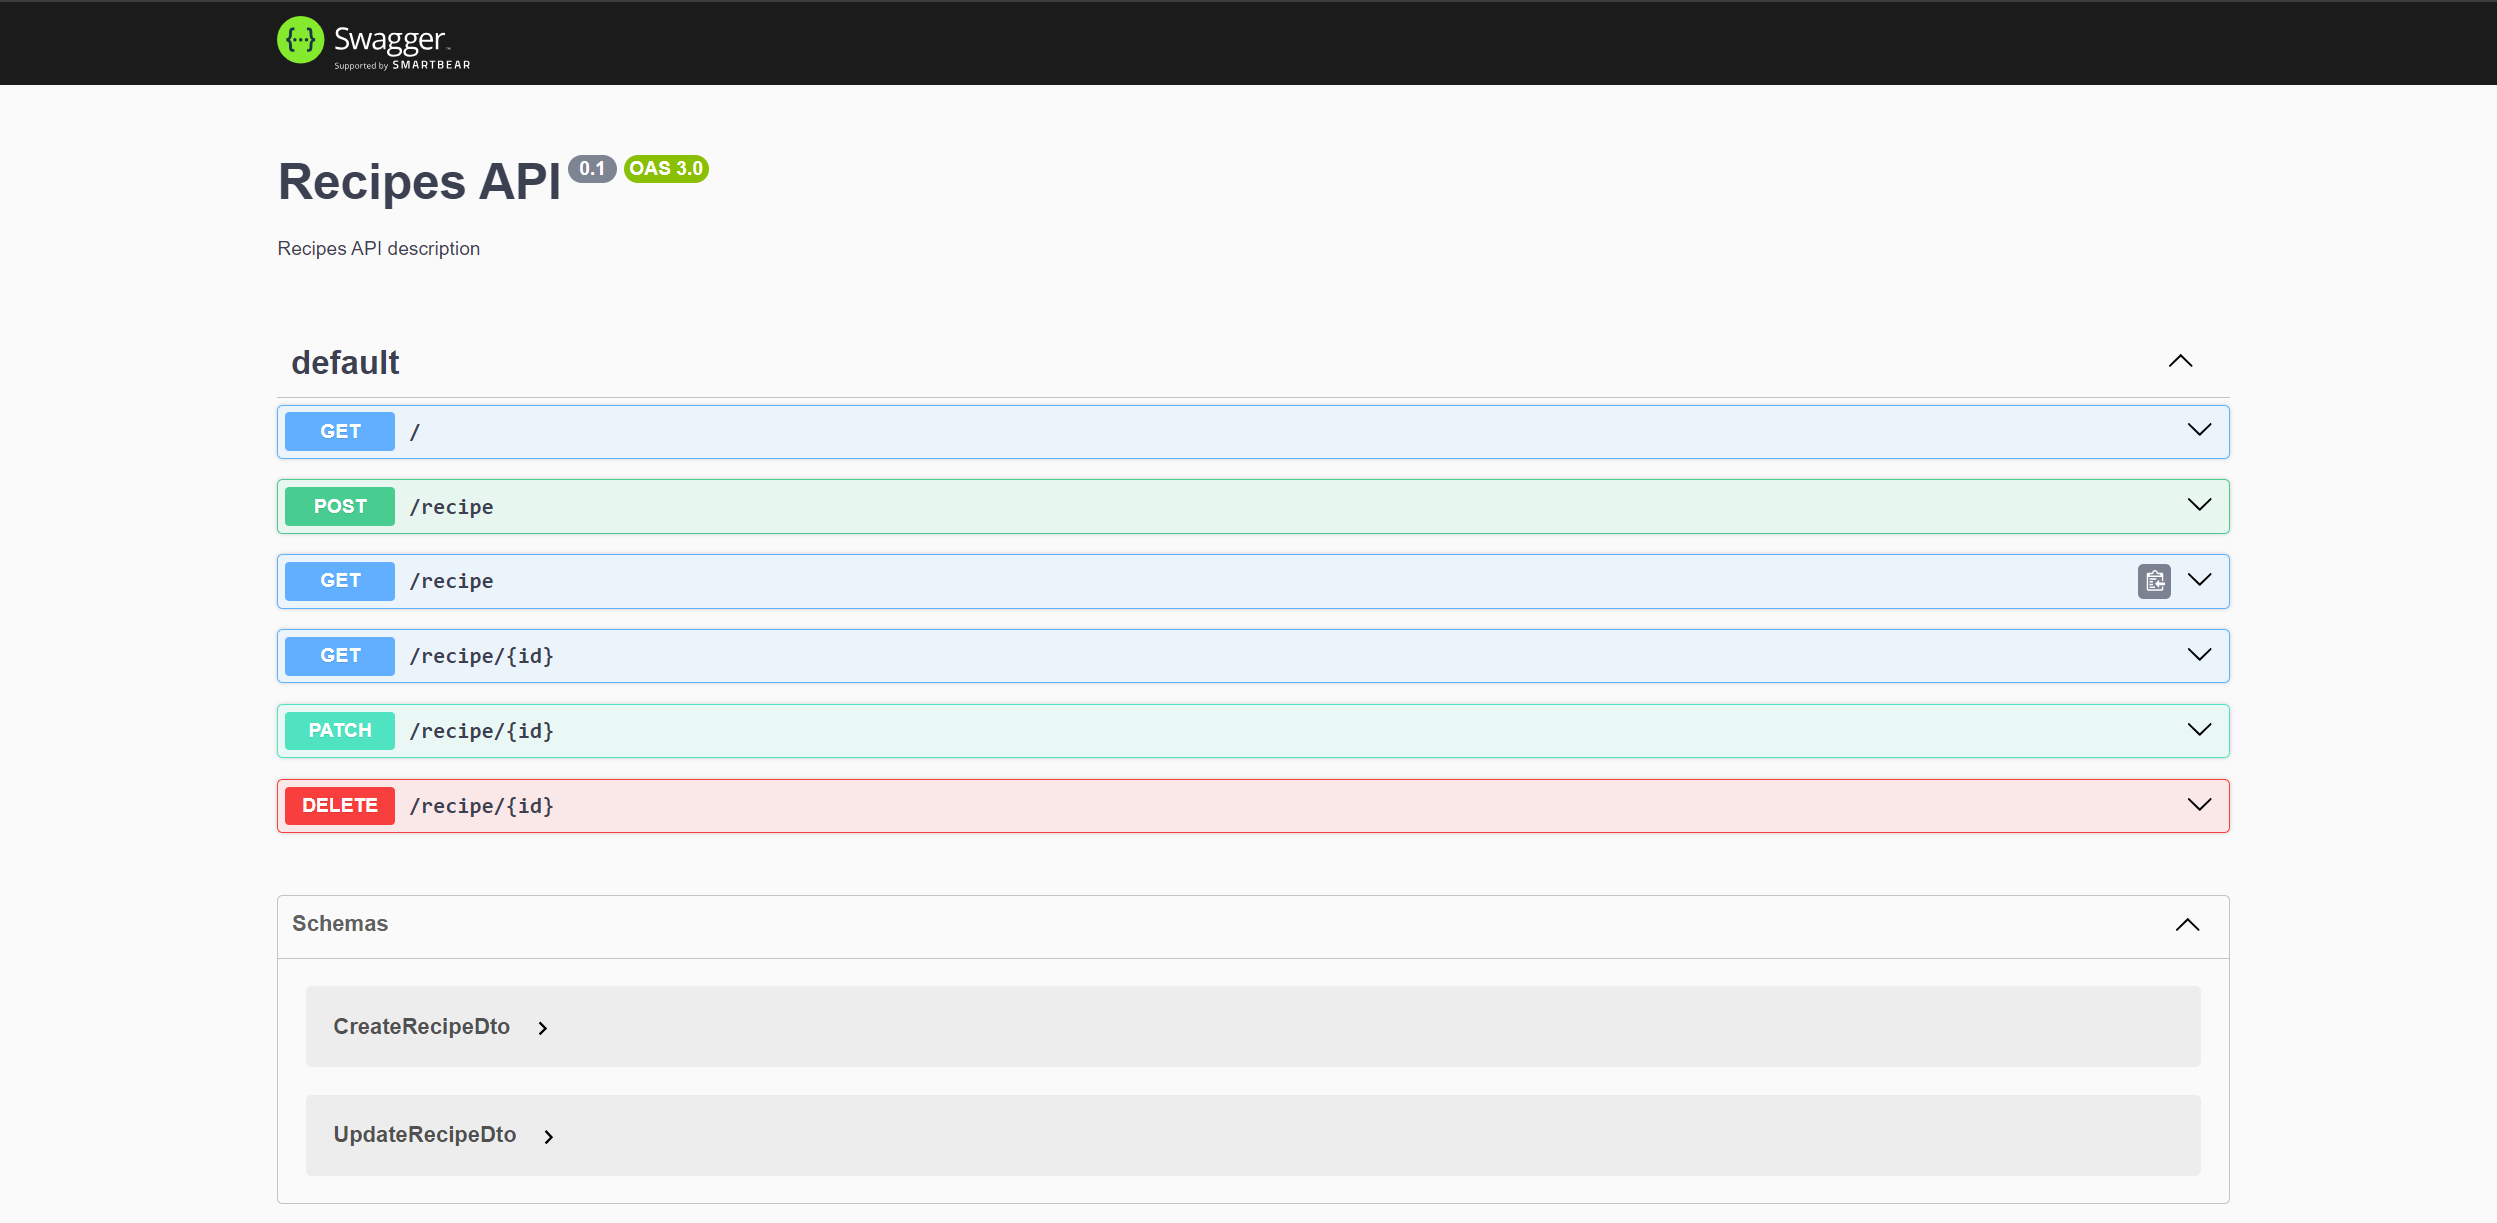 A snapshot of the Swagger UI showcasing all the implemented endpoints.
And here's what we'll cover:
Table of Contents
- Technologies
- Prerequisites
- Development Environment
- How to Set Up the NestJS Project
- How to Create a PostgreSQL Instance with Docker
- How to Set Up Prisma
- How to Initialize Prisma
- How to Set Your Environment Variable
- Understanding the Prisma Schema
- How to Model the Data
- How to Migrate the Database
- How to Seed the Database
- How to Create a Prisma Service
- How to Set Up Swagger
- How to Implement CRUD Operations for the Recipe Model
- How to Generate REST Resources with NestJS CLI
- How to Add PrismaClient to the Recipe Module
- How to Define the GET /recipes Endpoint
- How to Define the GET /recipes/:id Endpoint
- How to Define the POST /recipes Endpoint
- How to Define the PATCH /recipes/:id Endpoint
- How to Define the DELETE /recipes/:id Endpoint
- Summary and Final Remarks
Technologies
To build this application, we'll be leveraging the power of the following tools:
- NestJS: A progressive Node.js framework for building efficient, reliable, and scalable server-side applications.
- Prisma: An open-source database toolkit that makes it easy to reason about your data and how you interact with it.
- PostgreSQL: A powerful, open source object-relational database system.
- Docker: An open platform for developing, shipping, and running applications. Docker enables you to separate your applications from your infrastructure so you can deliver software quickly.
- Swagger: A tool for designing, building, and documenting RESTful APIs.
- TypeScript: A statically typed superset of JavaScript that adds optional types, classes, and modules to the language.
Each of these technologies plays a crucial role in creating a robust, scalable, and maintainable application. We'll dive deeper into each one as we proceed.
Prerequisites
Assumed Knowledge
This tutorial is designed to be beginner-friendly, but I do make a few assumptions about what you already know:
- Fundamentals of TypeScript
- Basics of NestJS
- Docker
If you're not familiar with these, don't fret! I've got you covered. This tutorial will guide you through everything you need to know.
But here are some more resources if you'd like to learn more:
- For a deeper dive into NestJS, feel free to explore the official NestJS documentation.
- To learn more about Docker, here's a full handbook for beginners.
- And for more info on TypeScript, here's a helpful crash course.
Development Environment
Tools and Technologies
In this tutorial, we'll use the following tools:
- Node.js – Our runtime environment
- Docker – For containerizing our database
- Visual Studio Code – Our code editor
- PostgreSQL – Our database
- NestJS – Our Node.js framework
Note: Don't forget to install the Prisma extension for Visual Studio Code. It enhances your coding experience by highlighting Prisma-specific syntax and keywords.
How to Set Up the NestJS Project
NestJS is a progressive Node.js framework that comes with a plethora of advantages, including a powerful Command Line Interface (CLI). This CLI simplifies the process of creating a new NestJS application, making it easy to start a new project anytime, anywhere.
One of the key benefits of NestJS is its rich set of built-in functionalities that significantly streamline the development process, making your life as a developer much easier.
Let's begin by installing the NestJS CLI on your system:
npm i -g @nestjs/cli
With the NestJS CLI installed, you're all set to whip up our recipe project. The CLI streamlines the creation of a new NestJS application, making it simple to get started.
To spin up a new project, execute the following command:
nest new recipe
After running this command, you'll encounter a prompt like the one you see below:
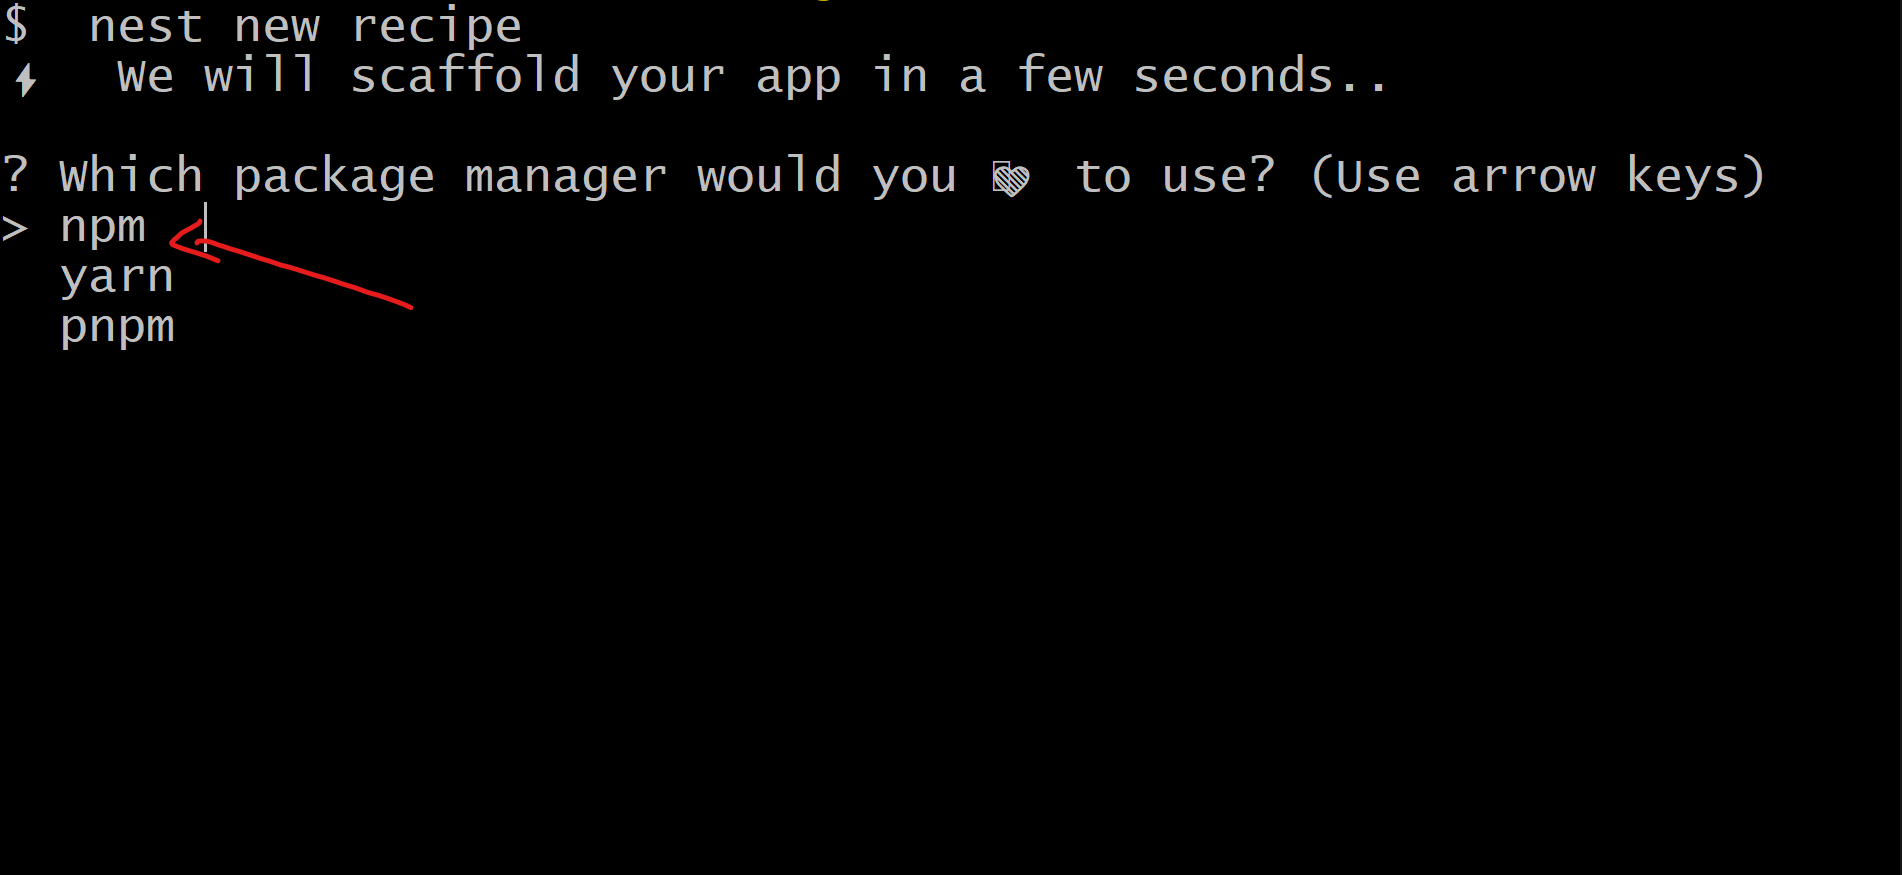 The Nest CLI prompting for a package manager selection during project setup.
As illustrated in the image, the Nest CLI will prompt you to select a package manager. For this project, we'll opt for npm. Once you've made your selection, the CLI will proceed with the project setup, and you'll see a series of operations being performed in your terminal.
Now you can open you project in VSCode (or the editor of your choice). You should see the following files:
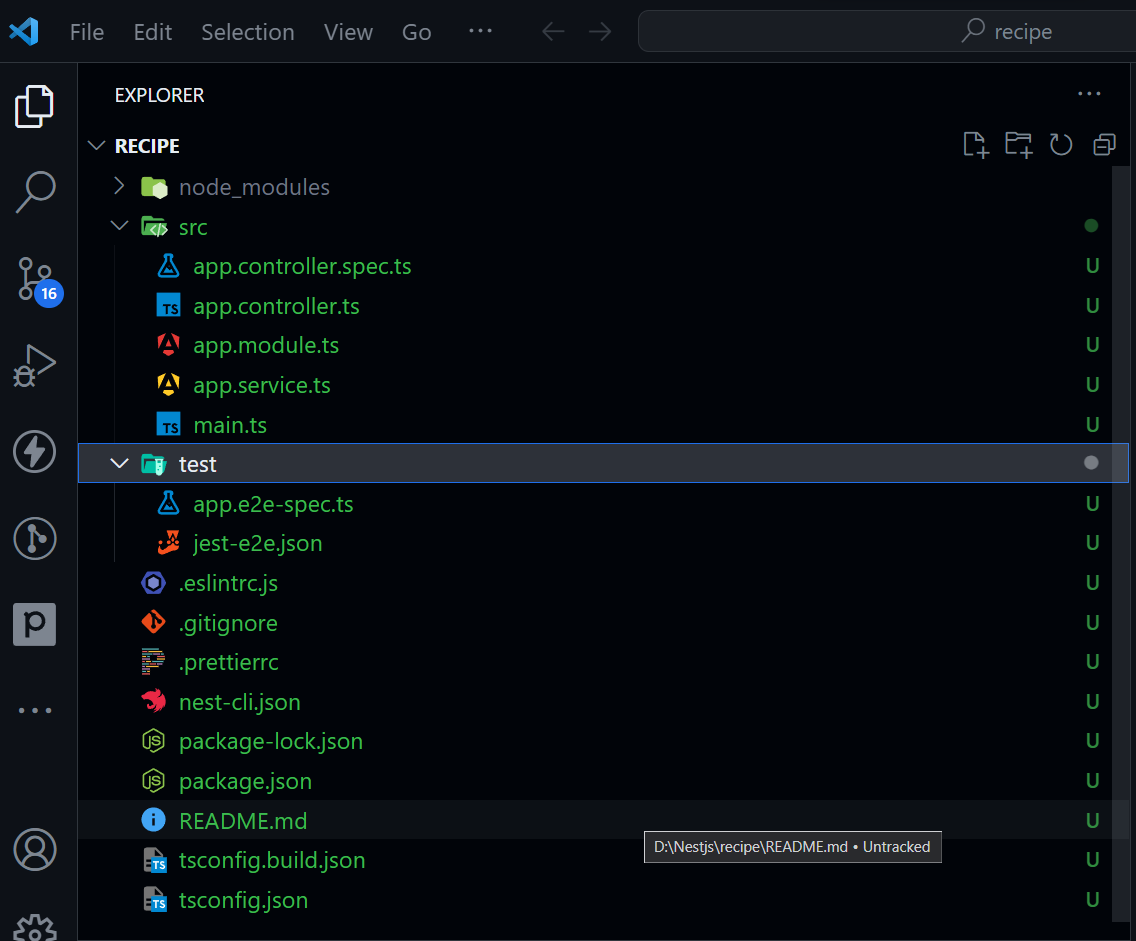 The folder structure of the project after it has been created using Nest CLI.
Let break down the project structure:
| Directory/File | Description |
|---|---|
recipe/ |
Root directory of the project. |
├── node_modules/ |
Contains all the npm packages required for the project. |
├── src/ |
Contains the source code of the application. |
│ ├── app.controller.spec.ts |
Contains the tests for app.controller.ts. |
│ ├── app.controller.ts |
Contains a basic controller with a single route. |
│ ├── app.module.ts |
The root module of the application. |
│ ├── app.service.ts |
Contains the services used by app.controller.ts. |
│ └── main.ts |
The entry point of the application. |
├── test/ |
Contains the end-to-end tests for the application. |
│ ├── app.e2e-spec.ts |
Contains the end-to-end tests for app.controller.ts. |
│ └── jest-e2e.json |
Contains the configuration for the end-to-end tests. |
├── README.md |
The readme file for the project. |
├── nest-cli.json |
Contains the configuration for the NestJS CLI. |
├── package-lock.json |
Contains the exact versions of the npm packages used in the project. |
├── package.json |
Lists the npm packages required for the project. |
└── tsconfig.build.json |
Contains the TypeScript compiler options for the build. |
The src directory is the nerve center of our application, hosting the bulk of our codebase. The NestJS CLI has already set the stage for us with several key files:
src/app.module.ts: This is the root module of our application, serving as the main junction for all other modules.src/app.controller.ts: This file houses a basic controller with a single route:/.When accessed, this route will return a simple 'Hello World!' message.src/main.ts: This is the gateway to our application. It's tasked with bootstrapping and launching the NestJS application.
To start your project and see the 'Hello World!' message in action, execute the following command:
npm run start:dev
This command triggers a live-reload development server. It vigilantly monitors your files, and if it spots any modifications, it automatically recompile your code and refreshes the server. This ensures that you can see your changes in real-time, eliminating the need for manual restarts.
To verify that your server is operational, head over to http://localhost:3000/ in your web browser or Postman. You should be welcomed by a minimalist page showcasing the message Hello World. This is your application's default landing page, a pristine canvas awaiting your creative touch.
How to Create a PostgreSQL Instance with Docker
To store our recipes REST API, we'll use a PostgreSQL database. Docker will help us containerize this database, ensuring a smooth setup and execution, regardless of the environment.
First, ensure Docker is installed on your system. If not, follow the instructions here.
Next, you'll need to create a docker-compose.yml file.
Open the terminal and run the following command:
touch docker-compose.yml
This command creates a new docker-compose.yml file in your project's root directory.
Open the docker-compose.yml file and add the following code:
# docker-compose.yml

version: '3.8'
services:
  postgres:
    image: postgres:13.5
    restart: always
    environment:
      - POSTGRES_USER=recipe
      - POSTGRES_PASSWORD=RecipePassword
    volumes:
      - postgres:/var/lib/postgresql/data
    ports:
      - '5432:5432'
volumes:
  postgres:
Here's a quick breakdown of this configuration:
image: postgres:13.5: Specifies the Docker image for the PostgreSQL database.restart: always: Ensures the container restarts if it stops.environment: Sets the username and password for the database.volumes: Mounts a volume to persist database data, even if the container is stopped or removed.ports: Exposes port5432on both the host machine and the container for database access.
Note: If you wish to use a different port, simply change the host machine port. For example, to use port 5433, modify the ports section as follows:
ports:
  - '5444:5432'
Note: Before proceeding, ensure port 5432 is free on your machine. To fire up the PostgreSQL container, execute the following command in your project's root directory (and also make sure you have open the docker desktop app and it is running):
docker-compose up
This command spins up the PostgreSQL container and makes it accessible on port 5432 of your machine. If all goes according to plan, you should see output similar to this:
...
 | PostgreSQL init process complete; ready for start up.
postgres-1  |
postgres-1  | 2024-01-12 14:59:33.519 UTC [1] LOG:  starting PostgreSQL 13.5 (Debian 13.5-1.pgdg110+1) on x86_64-pc-linux-gnu, compiled by gcc (Debian 10.2.1-6) 10.2.1 20210110, 64-bit
postgres-1  | 2024-01-12 14:59:33.520 UTC [1] LOG:  listening on IPv4 address "0.0.0.0", port 5432
postgres-1  | 2024-01-12 14:59:33.520 UTC [1] LOG:  listening on IPv6 address "::", port 5432
postgres-1  | 2024-01-12 14:59:33.526 UTC [1] LOG:  listening on Unix socket "/var/run/postgresql/.s.PGSQL.5432"
postgres-1  | 2024-01-12 14:59:33.533 UTC [62] LOG:  database system was shut down at 2024-01-12 14:59:33 UTC
postgres-1  | 2024-01-12 14:59:33.550 UTC [1] LOG:  database system is ready to accept connections
Remember, if you've changed the port number, the output will reflect your chosen port.
If the port is already in use, you'll encounter an error message like this:
Error starting userland proxy: listen tcp 0.0.0.0:5432: bind: address already in use
In such a case, free up the port or choose a different one in your docker-compose.yml file.
Note: if you close the terminal window, it will also stop the container. To prevent this, you can run the container in detached mode. This mode allows the container to run indefinitely in the background.
To do this, add a -d option at the end of the command, like so:
docker-compose up -d
To stop the container, use the following command:
docker-compose down
Congratulations 🎉. You now have your own PostgreSQL database to play around with.
How to Set Up Prisma
Now that we have our PostgreSQL database up and running, we're ready to set up Prisma. Prisma is an open-source database toolkit that makes it easy to reason about your data and how you interact with it.
Prisma is a powerful tool that offers a wide range of features, including:
- Database Migrations: Prisma makes it easy to evolve your database schema over time, without losing any data.
- Database Seeding: Prisma allows you to seed your database with test data.
- Database Access: Prisma provides a powerful API for accessing your database.
- Database Schema Management: Prisma allows you to define your database schema using the Prisma Schema Language.
- Database Querying: Prisma provides a powerful API for querying your database.
- Database Relationships: Prisma allows you to define relationships between your database tables.
You can learn more about Prisma here.
How to Initialize Prisma
To get started with Prisma, we'll need to install the Prisma CLI. This CLI allows us to interact with our database, making it easy to perform database migrations, seeding, and more.
To install the Prisma CLI, execute the following command:
npm install prisma -D
This command installs the Prisma CLI as a development dependency in your project. The -D flag tells npm to install the package as a development dependency.
Next, initialize Prisma in your project by executing the following command:
npx prisma init
This will create a new prisma directory with a schema.prisma file. This is the main configuration file that contains your database schema. This command also creates a .env file inside your project.
How to Set Your Environment Variable
The .env file contains the environment variables required to connect to your database. Open this file and replace the contents with the following:
DATABASE_URL="postgres://recipe:RecipePassword@localhost:5444/recipe"
Note: If you changed the port number in your docker-compose.yml file, ensure you update the port number in the DATABASE_URL environment variable with the port number you used.
This environment variable contains the connection string for your database. It's used by Prisma to connect to your database in the docker container.
Understanding the Prisma Schema
The schema.prisma file contains the schema for your database. It's written in the Prisma Schema Language, a declarative language for defining your database schema. The prisma/schema.prisma file is the main configuration file for your Prisma setup. It defines your database connection and the Prisma Client generator.
// prisma/schema.prisma

generator client {
  provider = "prisma-client-js"
}

datasource db {
  provider = "postgresql"
  url      = env("DATABASE_URL")
}
This file is written in the Prisma Schema Language, which is a language that Prisma uses to define your database schema. The schema.prisma file has three main components:
- Generator: This section defines the Prisma Client generator. The Prisma Client generator is responsible for generating the Prisma Client, a powerful API for accessing your database.
- Datasource: This section defines the database connection. It specifies the database provider and the connection string. It use
DATABASE_URLenvironment variable to connect to your database. - Model: This section defines the database schema. It specifies the database tables and their fields.
How to Model the Data
Now that we have set up our Prisma, we're ready to model our data. We'll be building a recipe management system, so we'll need to define a Recipe model. This model will have various fields.
Open the schema.prisma file and add the following code:
 // prisma/schema.prisma
 // ...
model Recipe {
  id           Int      @id @default(autoincrement())
  title        String   @unique
  description  String?
  ingredients  String
  instructions String
  createdAt    DateTime @default(now())
  updatedAt    DateTime @updatedAt
}
Here's a quick breakdown of this model:
id: This is the primary key of theRecipemodel. It's an auto-incrementing integer that uniquely identifies each recipe. It has the@idattribute, which tells Prisma that this field is the primary key. It also has the@default(autoincrement())attribute, which tells Prisma to auto-increment this field.title: This is the title of the recipe. It's a unique string that's used to identify the recipe.description: This is the description of the recipe. It's an optional string that describes the recipe.ingredients: This is the list of ingredients used in the recipe. It's a string that contains a comma-separated list of ingredients.instructions: This is the list of instructions for preparing the recipe. It's a string that contains a comma-separated list of instructions.createdAt: This is the date and time the recipe was created. It's set to the current date and time by default. It has the@default(now())attribute, which tells Prisma to set this field to the current date and time by default.updatedAt: This is the date and time the recipe was last updated. It's set to the current date and time by default.
How to Migrate the Database
Now that we've defined our database schema, we're ready to migrate our database. This will create the database tables and fields defined in our schema.prisma file.
To migrate your database, execute the following command:
npx prisma migrate dev --name init
This command will do three things:
Save the migration: Prisma Migrate will take a snapshot of your schema and figure out the SQL commands necessary to carry out the migration. Prisma will save the migration file containing the SQL commands to the newly created prisma/migrations folder.
Execute the migration: Prisma Migrate will execute the SQL commands in the migration file, creating the database tables and fields defined in your schema.prisma file.
Generate Prisma Client: Prisma will generate Prisma Client based on your latest schema. Since you did not have the Client library installed, the CLI will install it for you as well. You should see the @prisma/client package inside dependencies in your package.json file.
Prisma Client is a TypeScript query builder auto-generated from your Prisma schema. It is tailored to your Prisma schema and will be used to send queries to the database.
If all goes according to plan, you should see output similar to this:
The following migration(s) have been created and applied from new schema changes:

migrations/
  └─ 20220528101323_init/
    └─ migration.sql

Your database is now in sync with your schema.
...
✔ Generated Prisma Client (3.14.0 | library) to ./node_modules/@prisma/client in 31ms
Check the generated migration file to get an idea about what Prisma Migrate is doing behind the scenes:
-- prisma/migrations/20220528101323_init/migration.sql

CREATE TABLE "Recipe" (
    "id" SERIAL NOT NULL,
    "title" TEXT NOT NULL,
    "description" TEXT,
    "ingredients" TEXT NOT NULL,
    "instructions" TEXT NOT NULL,
    "createdAt" TIMESTAMP(3) NOT NULL DEFAULT CURRENT_TIMESTAMP,
    "updatedAt" TIMESTAMP(3) NOT NULL,

    CONSTRAINT "Recipe_pkey" PRIMARY KEY ("id")
);

-- CreateIndex
CREATE UNIQUE INDEX "Recipe_title_key" ON "Recipe"("title");
This migration file contains the SQL commands necessary to create the Recipe table. It also contains the SQL commands necessary to create the title field, which is a unique field. This ensures that the title field is unique, preventing duplicate recipes from being created.
How to Seed the Database
Now that we've migrated our database, we're ready to seed it with some test data. This will allow us to test our application without having to manually create recipes.
Firstly, create a seed file called prisma/seed.ts. This file will contain the dummy data and queries needed to seed your database.
Open the terminal and run the following command:
touch prisma/seed.ts
This command creates a new prisma/seed.ts file in your project's root directory.
Next, populate this file with the following code:
// prisma/seed.ts
import { PrismaClient } from '@prisma/client';

// initialize Prisma Client
const prisma = new PrismaClient();

async function main() {
  // create two dummy recipes
  const recipe1 = await prisma.recipe.upsert({
    where: { title: 'Spaghetti Bolognese' },
    update: {},
    create: {
      title: 'Spaghetti Bolognese',
      description: 'A classic Italian dish',
      ingredients:
        'Spaghetti, minced beef,
        tomato sauce, onions, garlic, olive oil, salt, pepper',
      instructions:
        '1. Cook the spaghetti. 2. Fry the minced beef. 3.
        Add the tomato sauce to the beef.
        4. Serve the spaghetti with the sauce.'
    }
  });

  const recipe2 = await prisma.recipe.upsert({
    where: { title: 'Chicken Curry' },
    update: {},
    create: {
      title: 'Chicken Curry',
      description: 'A spicy Indian dish',
      ingredients:
        'Chicken, curry powder, onions, garlic,
        coconut milk, olive oil, salt, pepper',
      instructions:
        '1. Fry the chicken. 2. Add the curry powder to the
        chicken. 3. Add the coconut milk.
        4. Serve the curry with rice.'
    }
  });

  console.log({ recipe1, recipe2 });
}

// execute the main function
main()
  .catch(e => {
    console.error(e);
    process.exit(1);
  })
  .finally(async () => {
    // close Prisma Client at the end
    await prisma.$disconnect();
  });
This file contains the dummy data and queries needed to seed your database. Let's break it down:
import { PrismaClient } from '@prisma/client';: This imports the Prisma Client, which is used to send queries to the database.const prisma = new PrismaClient();: This initializes the Prisma Client, allowing us to send queries to the database.async function main() { ... }: This is the main function that contains the dummy data and queries needed to seed your database.const recipe1 = await prisma.recipe.upsert({ ... });: This creates a new recipe. It uses theupsertmethod, which creates a new recipe if it doesn't exist, or updates the existing recipe if it does.const recipe2 = await prisma.recipe.upsert({ ... });: This creates a new recipe. It uses theupsertmethod, which creates a new recipe if it doesn't exist, or updates the existing recipe if it does.console.log({ recipe1, recipe2 });: This logs the newly created recipes to the console.main().catch((e) => { ... });: This executes the main function and catches any errors that occur.await prisma.$disconnect();: This closes the Prisma Client at the end.
Now before we can seed our database, we need add a script to our package.json file. Open the package.json file and add the following script:
// package.json

// ...
  "scripts": {
    // ...
  },
  "dependencies": {
    // ...
  },
  "devDependencies": {
    // ...
  },
  "jest": {
    // ...
  },
  // pasting the prisma script here
  "prisma": {
    "seed": "ts-node prisma/seed.ts"
  }
The seed command will execute the prisma/seed.ts script that you previously defined. This command should work automatically because ts-node is already installed as a dev dependency in your package.json.
Now that we've defined our seed script, we're ready to seed the database. To seed your database, execute the following command:
npx prisma db seed
This command will seed your database with the dummy data defined in your prisma/seed.ts file. If all goes according to plan, you should see output similar to this:
Running seed command `ts-node prisma/seed.ts` ...
{
  recipe1: {
    id: 1,
    title: 'Spaghetti Bolognese',
    description: 'A classic Italian dish',
    ingredients: 'Spaghetti, minced beef, tomato sauce, onions, garlic, olive oil, salt, pepper',
    instructions: '1. Cook the spaghetti. 2. Fry the minced beef. 3. Add the tomato sauce to the beef. 4. Serve the spaghetti with the sauce.',
    createdAt: 2024-01-12T16:21:09.133Z,
    updatedAt: 2024-01-12T16:21:09.133Z
  },
  recipe2: {
    id: 2,
    title: 'Chicken Curry',
    description: 'A spicy Indian dish',
    ingredients: 'Chicken, curry powder, onions, garlic, coconut milk, olive oil, salt, pepper',
    instructions: '1. Fry the chicken. 2. Add the curry powder to the chicken. 3. Add the coconut milk. 4. Serve the curry with rice.',
    createdAt: 2024-01-12T16:21:09.155Z,
    updatedAt: 2024-01-12T16:21:09.155Z
  }
}

The seed command has been executed.
Congratulations 🎉. You now have a fully functional database with dummy data.
How to Create a Prisma Service
Now that we've set up Prisma, we're ready to create a Prisma service. This service will act as a wrapper around the Prisma Client, making it easy to send queries to the database.
The Nest CLI gives you an easy way to generate modules and services directly from the CLI. Run the following command in your terminal:
npx nest generate module prisma
npx nest generate service prisma
Note that the generate command can be shortened to g. So, you can also run the following command:
npx nest g module prisma
npx nest g service prisma
This command generates a new module called prisma and a new service called prisma. It also imports the PrismaModule into the AppModule.
So you should see something like this:
  src/prisma/prisma.service.spec.ts
  src/prisma/prisma.service.ts
  src/prisma/prisma.module.ts
Note: In some cases, you may need to restart your server for the changes to take effect.
Next, open the prisma.service.ts file and replace the contents with the following:
// src/prisma/prisma.service.ts

import { Injectable } from '@nestjs/common';
import { PrismaClient } from '@prisma/client';

@Injectable()
export class PrismaService extends PrismaClient {}
This service is a wrapper around the Prisma Client, making it easy to send queries to the database. It's also a NestJS provider, which means it can be injected into other modules.
Next, open the prisma.module.ts file and replace the contents with the following:
// src/prisma/prisma.module.ts
import { Module } from '@nestjs/common';
import { PrismaService } from './prisma.service';

@Module({
  providers: [PrismaService],
  exports: [PrismaService]
})
export class PrismaModule {}
Note: The PrismaModule is a NestJS module that imports the PrismaService, making it readily available for use across other modules in your application. This setup allows seamless integration of the Prisma service throughout your project.
Congratulations 🎉! You've successfully set up your Prisma service.
Before we dive into writing our application logic, let's set up Swagger. Swagger is an industry-standard tool for designing, building, and documenting RESTful APIs. It empowers developers to create elegant and comprehensive API documentation effortlessly.
How to Set Up Swagger
To configure Swagger, we'll leverage the @nestjs/swagger package. This package offers a suite of decorators and methods specifically designed to generate Swagger documentation.
To install this package, run the following command:
npm install --save @nestjs/swagger swagger-ui-express
This command adds the @nestjs/swagger package as a dependency in your project. It also installs the swagger-ui-express package, which serves the Swagger UI.
Next, navigate to the main.ts file and append the following code:
// src/main.ts

import { NestFactory } from '@nestjs/core';
import { AppModule } from './app.module';
import { SwaggerModule, DocumentBuilder } from '@nestjs/swagger';

// Define the bootstrap function
async function bootstrap() {
  // Create a NestJS application instance by passing the AppModule to the NestFactory
  const app = await NestFactory.create(AppModule);

  // Use DocumentBuilder to create a new Swagger document configuration
  const config = new DocumentBuilder()
    .setTitle('Recipes API') // Set the title of the API
    .setDescription('Recipes API description') // Set the description of the API
    .setVersion('0.1') // Set the version of the API
    .build(); // Build the document

  // Create a Swagger document using the application instance and the document configuration
  const document = SwaggerModule.createDocument(app, config);

  // Setup Swagger module with the application instance and the Swagger document
  SwaggerModule.setup('api', app, document);

  // Start the application and listen for requests on port 3000
  await app.listen(3000);
}

// Call the bootstrap function to start the application
bootstrap();
This code initializes Swagger and generates the Swagger documentation. Let's break it down:
const config = new DocumentBuilder() ... .build();: This creates a new Swagger document builder. It sets the title, description, and version of the Swagger document. It also builds the Swagger document.const document = SwaggerModule.createDocument(app, config);: This creates a new Swagger document. It uses the Swagger document builder to generate the Swagger document.SwaggerModule.setup('api', app, document);: This sets up the Swagger UI. It uses the Swagger document to generate the Swagger UI.
While the application is running, open your browser and navigate to http://localhost:3000/api. You should see the Swagger UI.
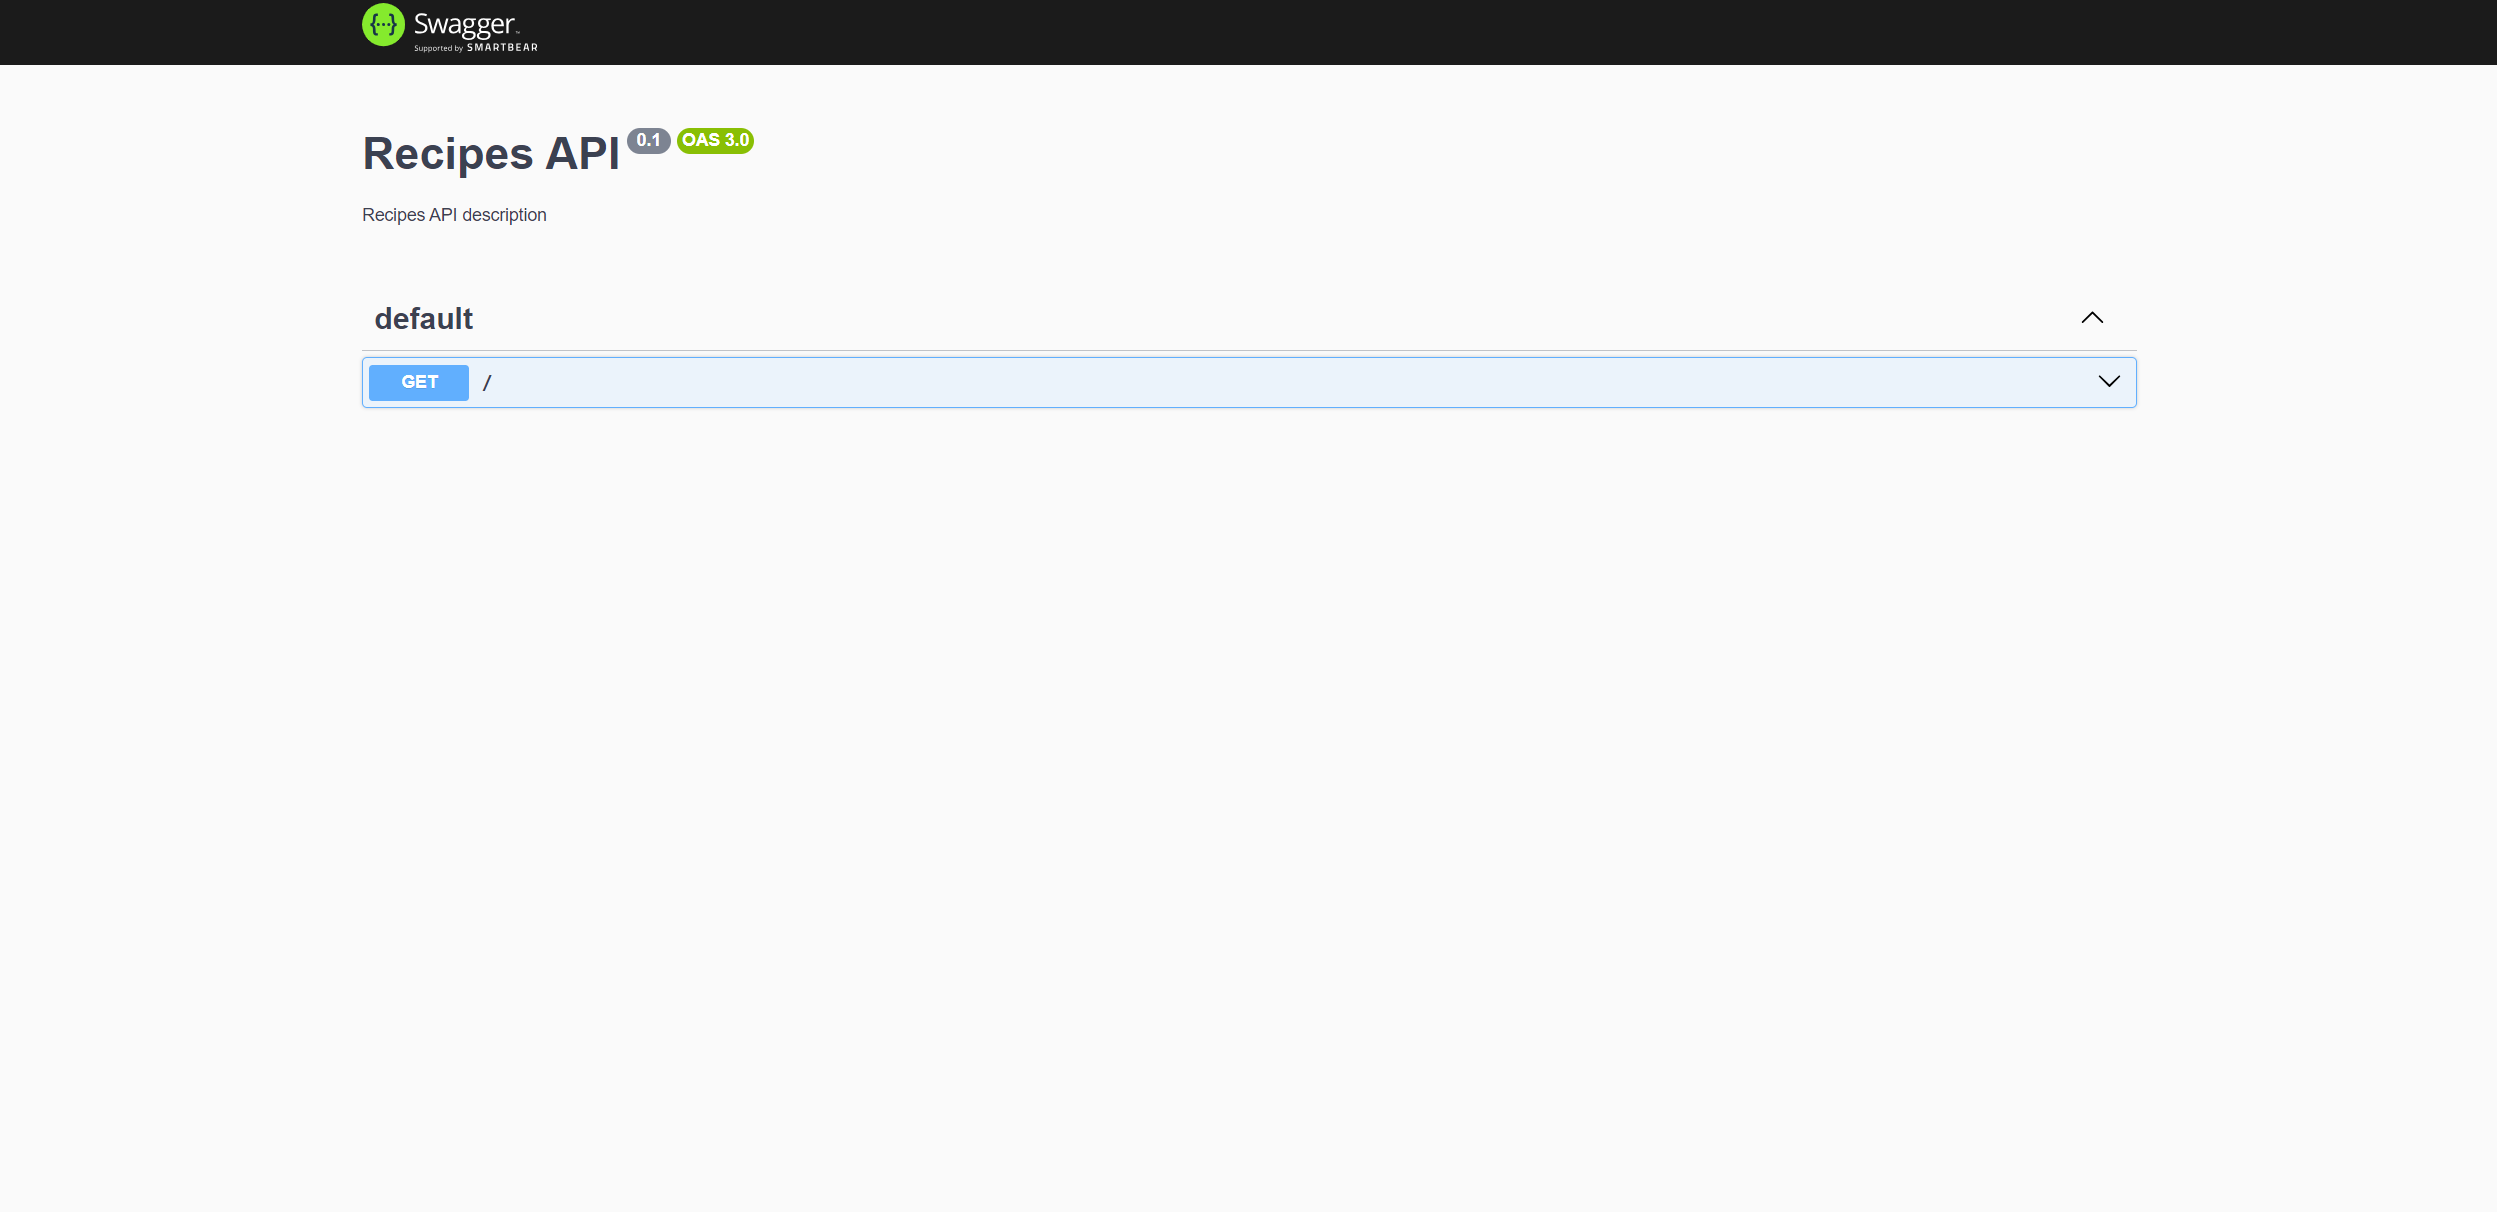 The initial view of the Swagger UI after successful setup.
Now that we've set up Swagger, we're ready to start building our REST API.
How to Implement CRUD Operations for the Recipe Model
In this section we'll implement the CRUD operations for the Recipe model. We'll start by generating the REST resources for the Recipe model. Then we'll add the Prisma Client to the Recipe module. Finally, we'll implement the CRUD operations for the Recipe model.
How to Generate REST Resources with NestJS CLI
Before we can implement the CRUD operations for the Recipe model, we need to generate the REST resources for the Recipe model. This will create the boilerplate code for the Recipe module, controller, service, and DTOs.
To generate the REST resources for the Recipe model, execute the following command:
npx nest generate resource recipe
And it will ask you what type of API you want to generate. So now we will select the REST API .
Check out the below image for reference:
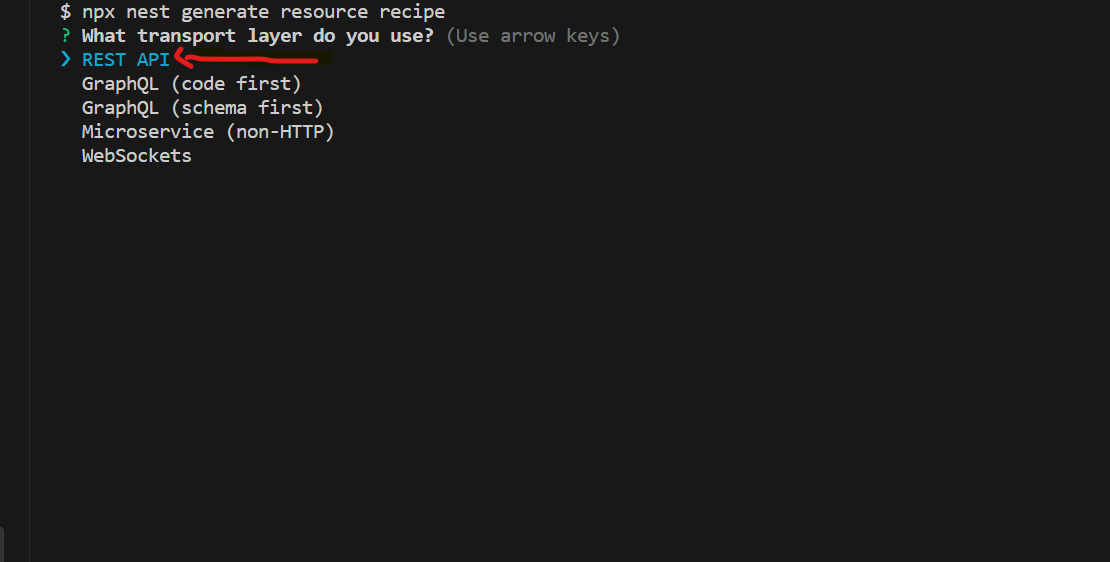 Selecting REST API when creating the CRUD operations using the Nest CLI
This command will generate the following files:
CREATE src/recipe/recipe.controller.ts (959 bytes)
CREATE src/recipe/recipe.controller.spec.ts (596 bytes)
CREATE src/recipe/recipe.module.ts (264 bytes)
CREATE src/recipe/recipe.service.ts (661 bytes)
CREATE src/recipe/recipe.service.spec.ts (478 bytes)
CREATE src/recipe/dto/create-recipe.dto.ts (33 bytes)
CREATE src/recipe/dto/update-recipe.dto.ts (176 bytes)
CREATE src/recipe/entities/recipe.entity.ts (24 bytes)
UPDATE src/app.module.ts (385 bytes)
If you open the Swagger API page again, you should see something like this:
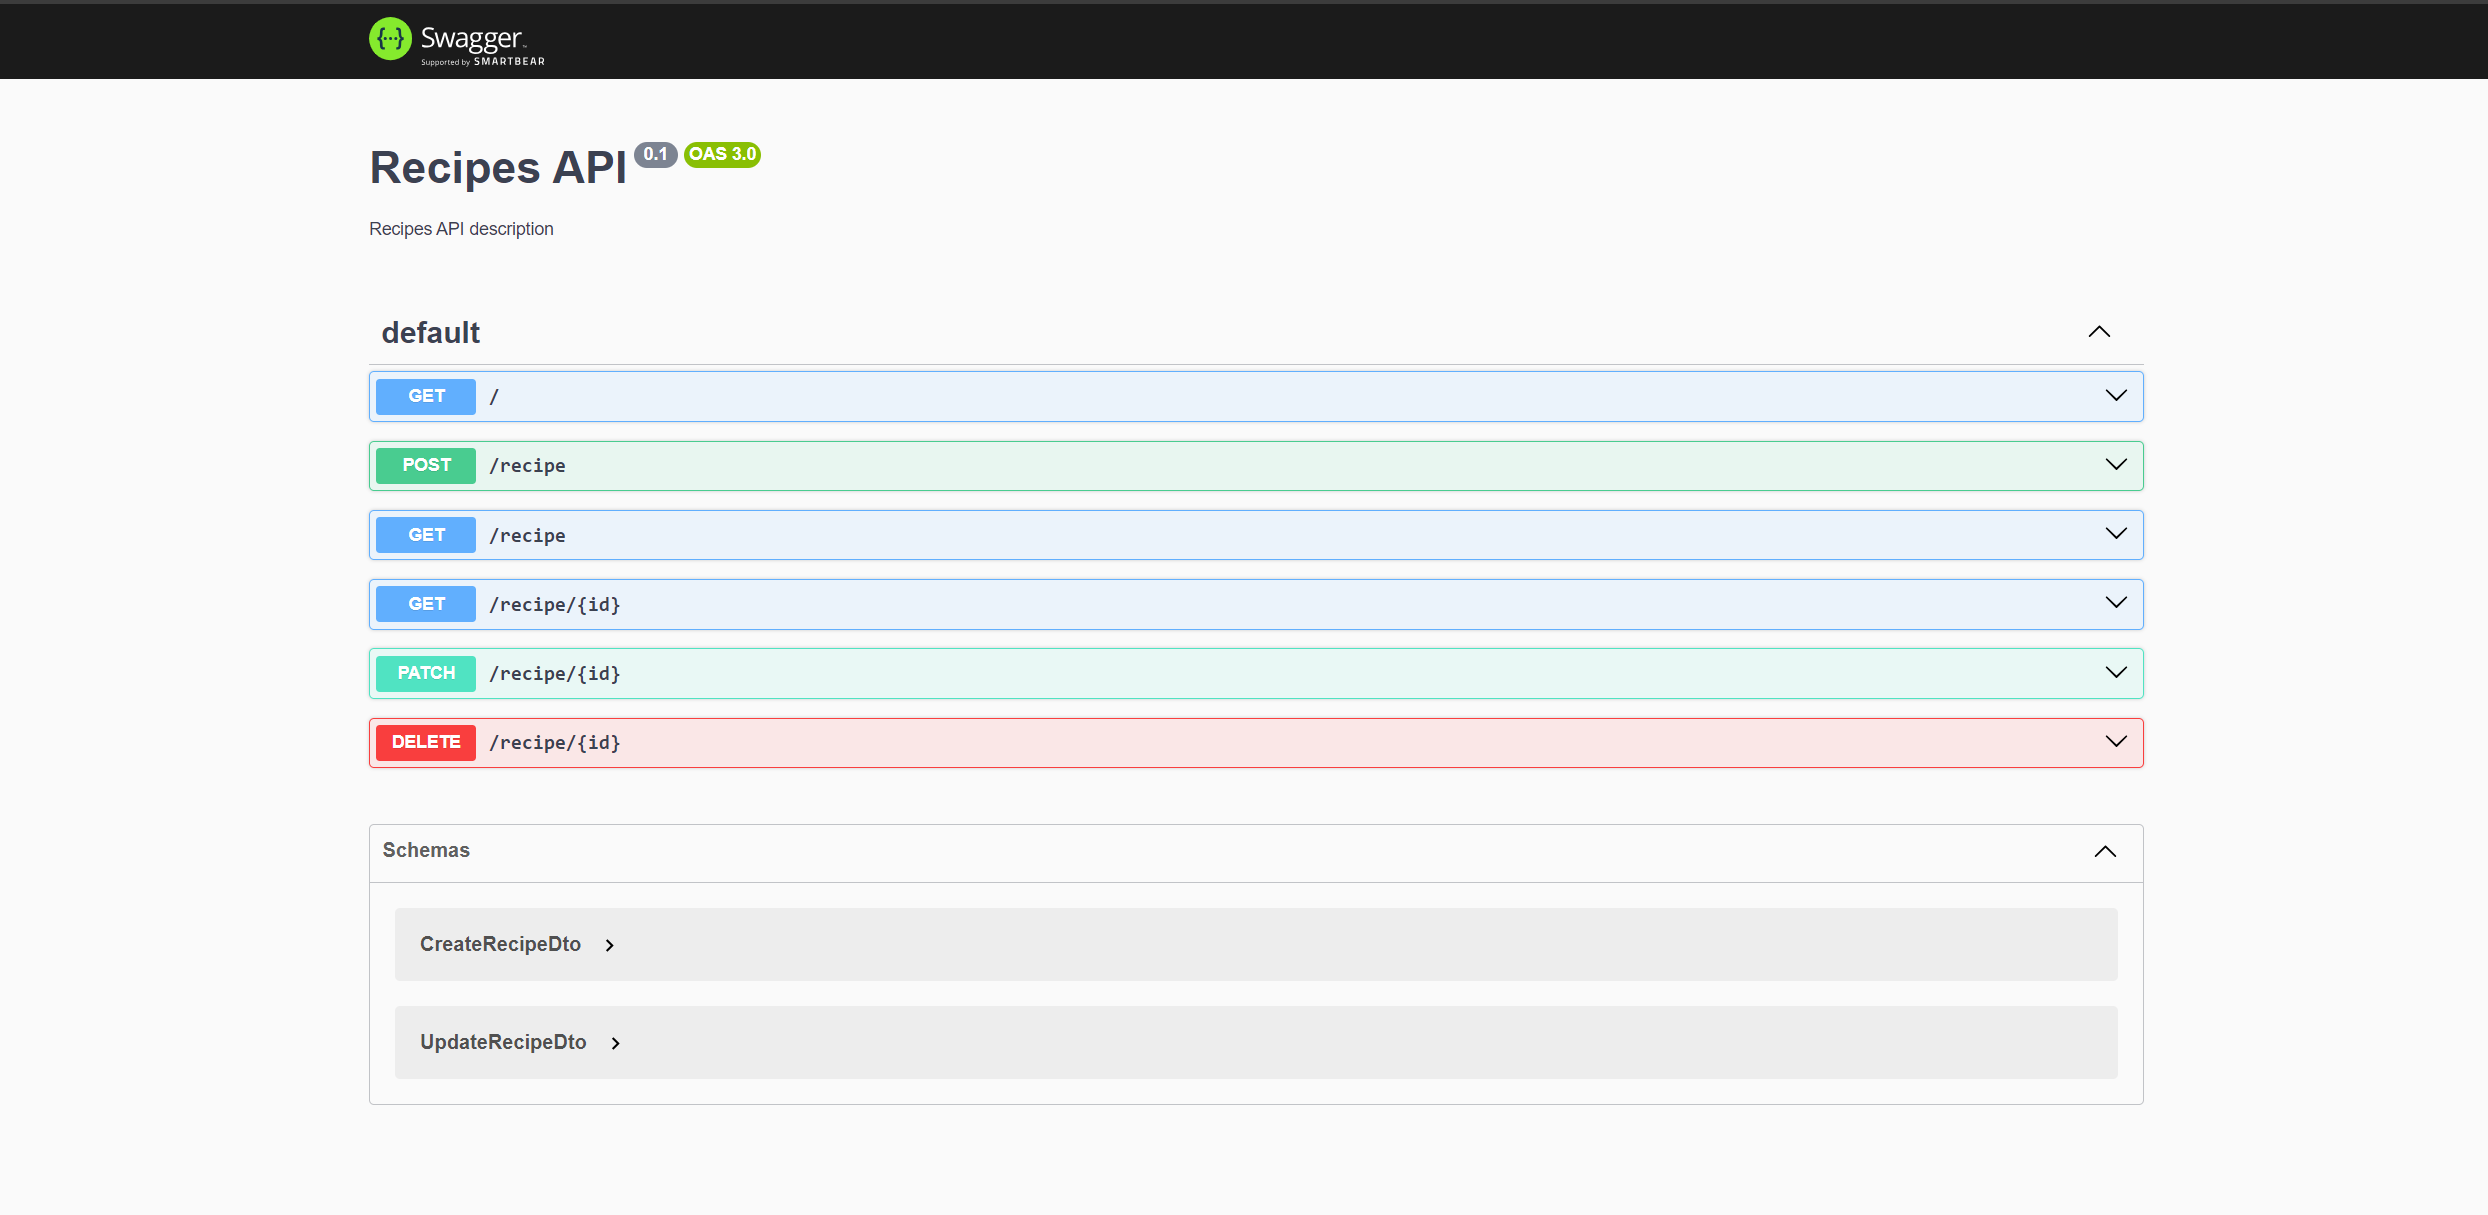 The Swagger UI displaying the newly created CRUD operations.
The swagger page now has a new section called Recipe API . This section contains the REST resources for the Recipe model.
Now when you open Swagger you will see something like this:
POST /recipes: Create a new recipe.GET /recipes: Retrieve all recipes.GET /recipes/{id}: Retrieve a specific recipe by its ID.PATCH /recipes/{id}: Update a specific recipe by its ID.DELETE /recipes/{id}: Delete a specific recipe by its ID.
How to Add PrismaClient to the Recipe Module
Now that we've generated the REST resources for the Recipe model, we're ready to add the Prisma Client to the Recipe module. This will allow us to send queries to the database.
Firstly, open the recipe.module.ts file and add the following code:
// src/recipes/recipes.module.ts

import { Module } from '@nestjs/common';
import { RecipeService } from './recipe.service';
import { RecipeController } from './recipe.controller';
import { PrismaModule } from '../prisma/prisma.module';

@Module({
  imports: [PrismaModule],
  controllers: [RecipeController],
  providers: [RecipeService]
})
export class RecipeModule {}
So now we have imported the PrismaModule and added it to the imports array. This will make the PrismaService available to the RecipeService.
Next, open the recipe.service.ts file and add the following code:
// src/recipes/recipes.service.ts
import { Body, Injectable, Post } from '@nestjs/common';
import { CreateRecipeDto } from './dto/create--recipe.dto';
import { UpdateRecipeDto } from './dto/update--recipe.dto';
import { PrismaService } from 'src/prisma/prisma.service';

@Injectable()
export class RecipesService {
  constructor(private readonly prisma: PrismaService) {}

  //  rest of the code
}
So now we have defined the prisma service as a private property of the RecipeService class. This will allow us to access the PrismaService from within the RecipeService class. So now we use the prisma service to perform the CRUD operations.
Sine we have defined the service for the Recipe model, we're ready to implement the CRUD operations for the Recipe model.
How to Define the GET /recipes Endpoint
Let's kickstart our journey into crafting API endpoints by defining the GET /recipes endpoint. This endpoint will serve as a gateway to fetch all the recipes stored in our database.
In your recipes.controller.ts file, you'll find a method named findAll. This method, as the name suggests, is responsible for fetching all the recipes. Here's how we'll define it:
// src/recipes/recipes.controller.ts

// Other code...

@Get()
async findAll() {
  return await this.recipeService.findAll();
}

// Other code...
In the above code:
- The
@Get()decorator maps thefindAllmethod to theGET /recipesendpoint. - The
findAllmethod invokes thefindAllmethod of therecipeService, which retrieves all the recipes from the database.
As we've previously seen, the Controller is the heart of our application's logic. In this context, we're aiming to implement a findAll method that fetches all recipes from our database. To accomplish this, we'll harness the power of Prisma's services within our recipe.service.ts file.
When you open the recipe.service.ts file you will see something like this :
// Other code...
// src/recipes/recipes.service.ts
 findAll() {
    return `This action returns all recipe`;
  }
// Other code...
NOW we will replace the findAll method with the following code:
// src/recipes/recipes.service.ts
// Other code...

async findAll() {
    return this.prisma.recipe.findMany();
}
// Other code...
In the above snippet:
- The
findAllmethod utilizes Prisma'sfindManyfunction to retrieve all recipes from the database. - The
awaitkeyword is not necessary here because theasyncfunction implicitly wraps the returned value in a Promise.
We've now successfully implemented the service method that our findAll controller will use to fetch all recipes.
Given that we already have seed data in our database, opening Swagger should allow us to retrieve all the recipes. Here's what you can expect to see:
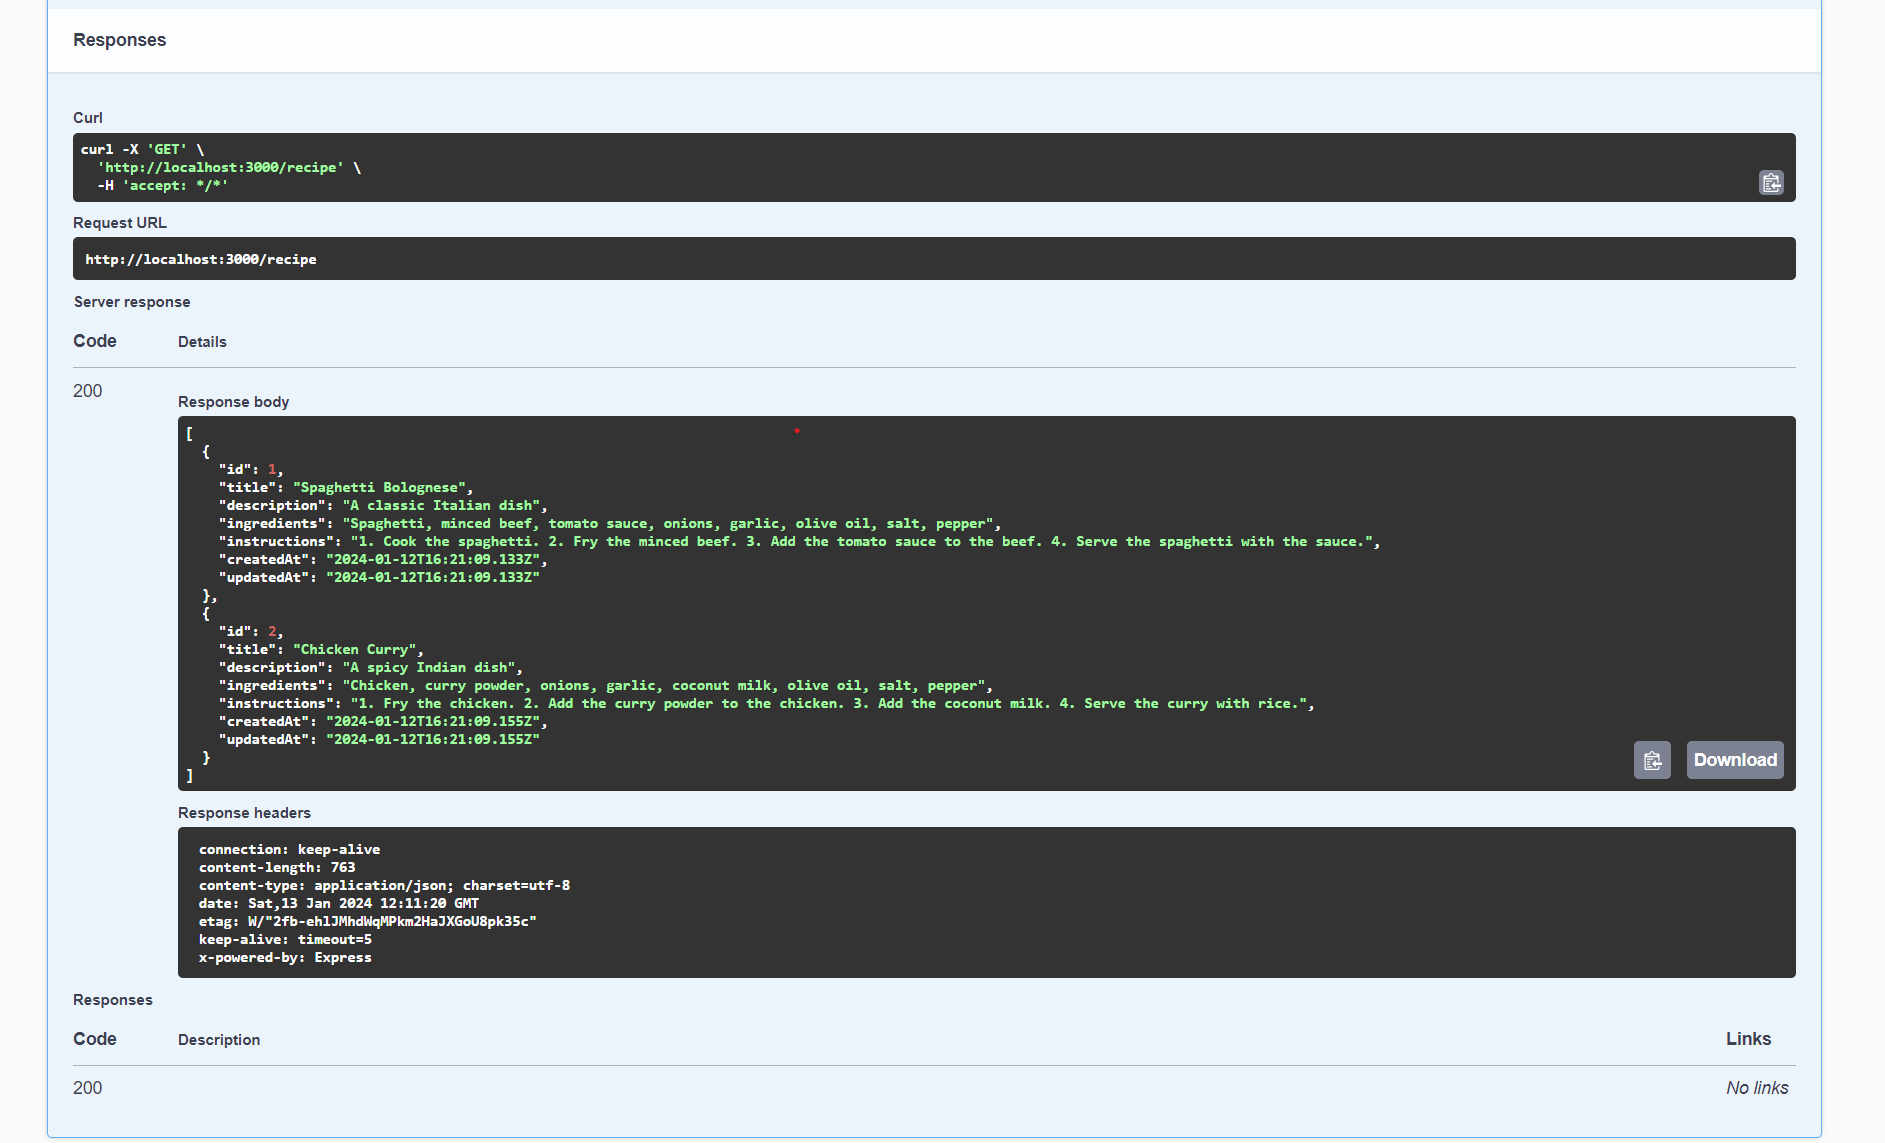 The Swagger UI displaying the result of the 'Fetch All Recipes' operation.
As depicted in the image above, our GET /recipes endpoint is functioning as expected, successfully fetching all recipes from our database.
This marks a significant milestone in our journey of building a robust recipe management system. Let's continue on and add some more features.
How to Define the GET /recipes/{id} Endpoint
Let's now focus on the GET /recipes/{id} endpoint, which retrieves a specific recipe based on its ID. To implement this, we'll need to modify both the controller and the service.
First, navigate to the recipes.controller.ts file. Here, you'll find the findOne method, which is defined as follows:
// src/recipes/recipes.controller.ts

// other code ...
@Get(':id')
async findOne(@Param('id') id: string) {
  return await this.recipeService.findOne(+id);
}
// other code ...
In this code:
- The
@Get(':id')decorator maps to theGET /recipes/{id}endpoint. - The
findOnemethod accepts anidparameter, which is extracted from the route parameters.
Next, let's turn our attention to the recipes.service.ts file. Here, you'll find a placeholder findOne method:
// src/recipes/recipes.service.ts
// other code ...
  findOne(id: number) {
    return `This action returns a #${id} recipe`;
  }

// other code ...
We'll replace this placeholder with a method that fetches a recipe based on its id:
// src/recipes/recipes.service.ts

findOne(id: number) {
  return this.prisma.recipe.findUnique({
    where: { id },
  });
}
In this code:
- The
findOnemethod takes anidas an argument and uses Prisma'sfindUniquefunction to retrieve the recipe with the correspondingid.
With the recent modifications, you've unlocked the ability to fetch individual recipes by their ID.
To see this feature in action, navigate to your Swagger page. Here's a snapshot of what you can expect:
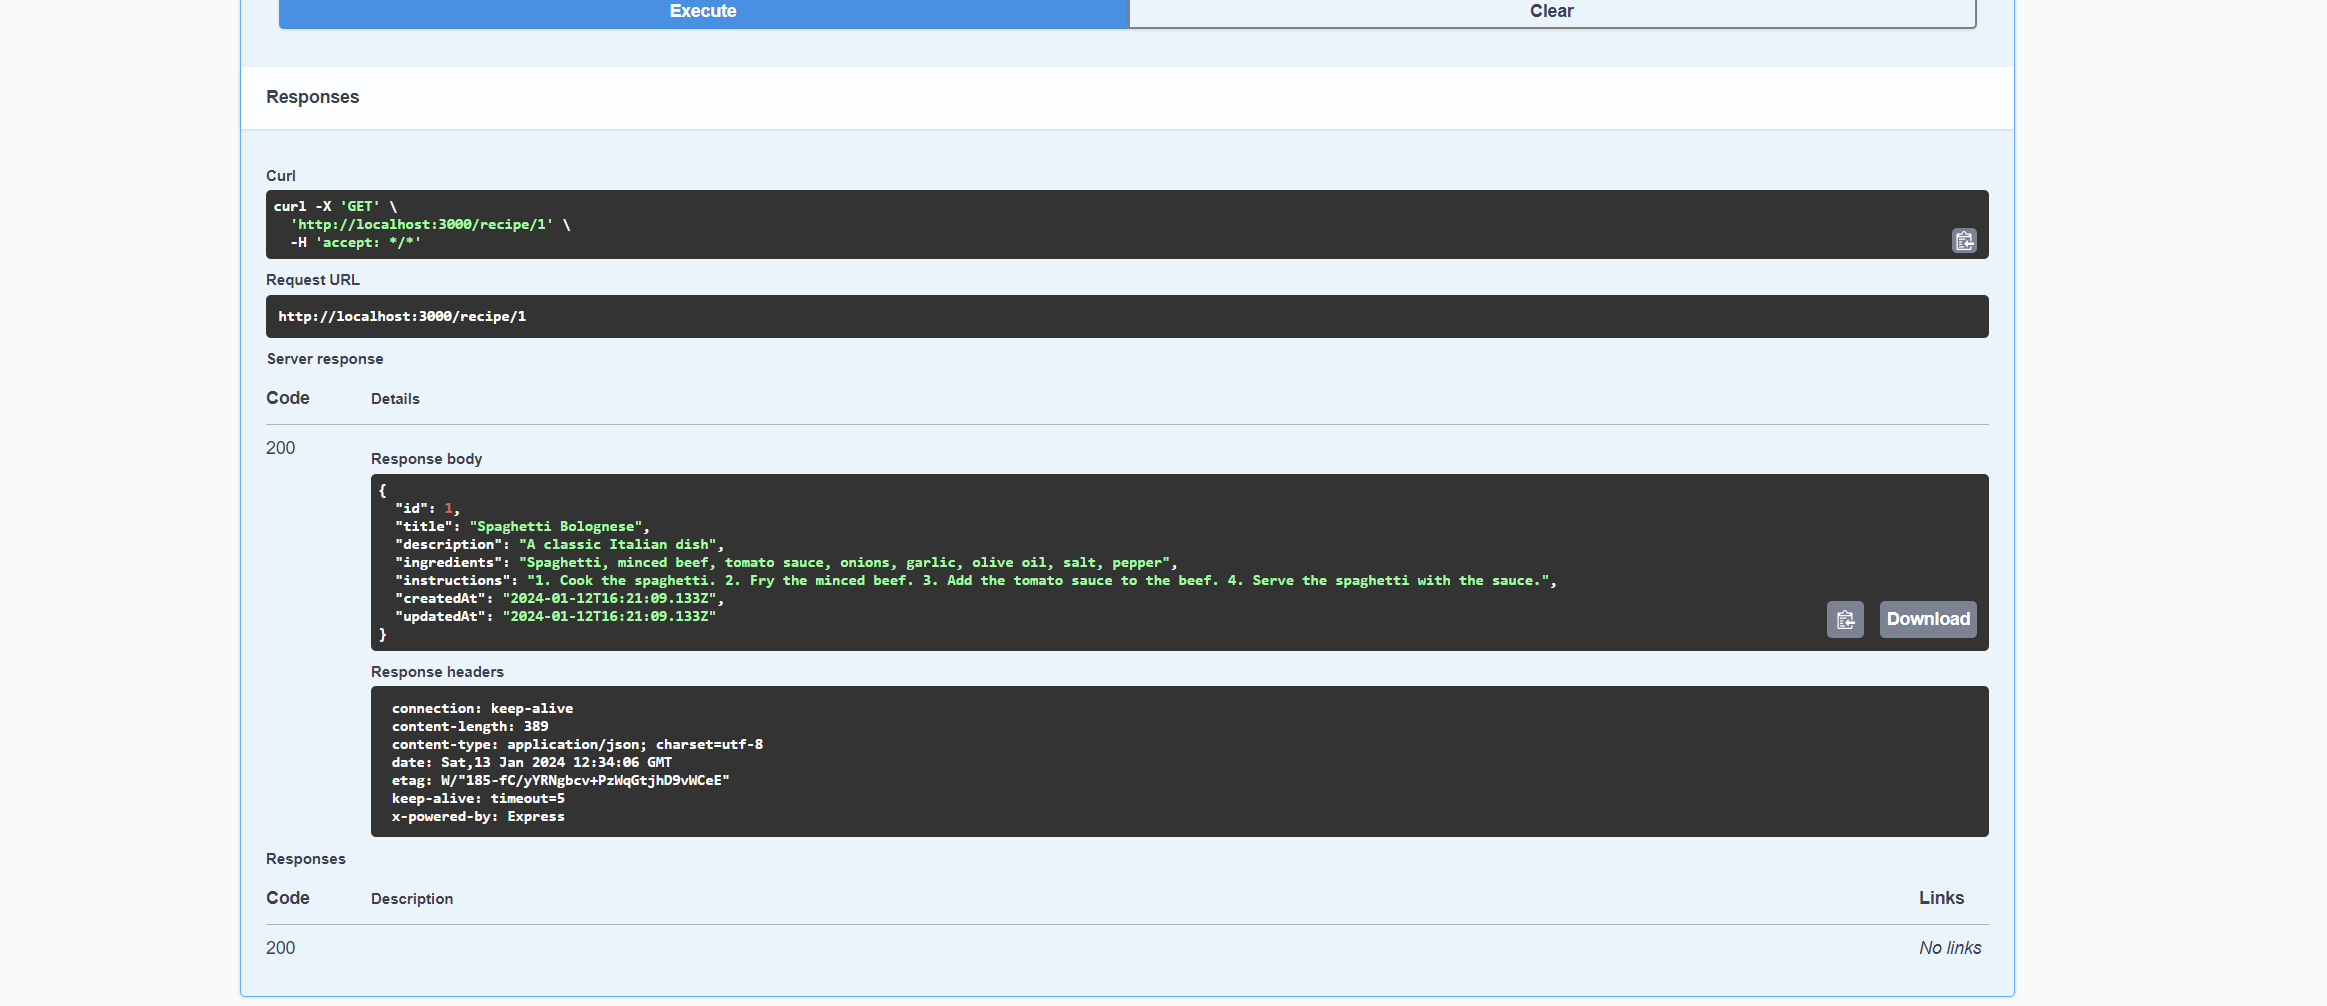 The Swagger UI displaying the result of the 'GET BY ID' operation.
Having achieved this milestone, we're ready to venture into creating our own recipes, adding to the existing ones in our database.
How to Define the POST /recipes Endpoint
The NestJS CLI has conveniently generated a create method for us when we created the resource for the Recipe model. Now, we need to implement the logic for this method in the recipe.service.ts file.
First, let's look at the create method in the recipe.controller.ts file:
We will see something like this:
// src/recipes/recipes.controller.ts

// other code ...
@Post()
create(@Body() createRecipeDto: CreateRecipeDto) {
  return this.recipesService.create(createRecipeDto);
}
// other code ...
In this code:
- The
@Post()decorator maps the method to thePOST /recipesendpoint. - The
createmethod accepts acreateRecipeDtoparameter, which is extracted from the request body.
The NestJS CLI has thoughtfully provided us with DTO (Data Transfer Object) files within the recipe folder. One of these, CreateRecipeDto, will be our tool of choice for validating incoming client data.
A Quick DTO Primer: If you're new to the concept of DTOs, they're essentially objects that carry data between processes. In the context of our application, we'll use DTOs to ensure the data we receive aligns with our expectations. If you're keen to delve deeper into DTOs, check out this comprehensive guide.
Now, let's implement the create method in the recipe.service.ts file to interact with our database.
But before we proceed, let's harness the power of the DTO (Data Transfer Object) folder, generated by the Nest CLI, to model our data.
The CreateRecipeDto class, as shown below, is a prime example of a DTO. It's designed to validate incoming client data, ensuring it aligns with our expectations.
// src/recipes/dto/create-recipe.dto.ts
import { IsString, IsOptional } from 'class-validator';

export class CreateRecipeDto {
  @IsString()
  title: string;

  @IsOptional()
  @IsString()
  description?: string;

  @IsString()
  ingredients: string;

  @IsString()
  instructions: string;
}
In this class, we're using the class-validator package to enforce data validation. This package offers a suite of decorators, such as IsString and IsOptional, which we've employed to validate the title, description, ingredients, and instructions fields.
With this setup, we can confidently ensure that these fields will always be strings, with description being optional.
Now, let's implement the create method in the recipe.service.ts file to interact with our database. When you open the recipe.service.ts file you will see something like this:
// src/recipes/recipes.service.ts

// other code ...
  create(createRecipeDto: CreateRecipeDto) {
    return 'This action adds a new recipe';
  }

// other code ...
Replace the create method with the following code:
// src/recipes/recipes.service.ts

// other code ...
create(createRecipeDto: CreateRecipeDto) {
  return this.prisma.recipe.create({
    data: createRecipeDto,
  });
}
// other code ...
In this code:
- The
createmethod uses Prisma'screatefunction to add a new recipe to the database. The data for the new recipe is provided by thecreateRecipeDto.
With these changes, you can now create new recipes in your swagger page. Here's what you can expect to see:
 The Swagger UI displaying the process of creating a new recipe.
As depicted in the image above, we've successfully added a third recipe to our collection. This demonstrates the effectiveness of our POST method in creating new recipes.
How to Define the PATCH /recipes/{id} Endpoint
Having implemented the endpoints to create and retrieve recipes, let's now focus on updating a recipe. We'll implement the PATCH /recipes/{id} endpoint, which updates a specific recipe based on its ID. This requires modifications in both the controller and the service.
In the recipes.controller.ts file, locate the update method. This method is mapped to the PATCH /recipes/{id} endpoint:
// src/recipes/recipes.controller.ts

// other code ...
@Patch(':id')
update(@Param('id') id: string, @Body() updateRecipeDto: UpdateRecipeDto) {
  return this.recipesService.update(+id, updateRecipeDto);
}
// other code ...
In this code:
- The
@Patch(':id')decorator maps the method to thePATCH /recipes/{id}endpoint. - The
updatemethod accepts two parameters:id(extracted from the route parameters) andupdateRecipeDto(extracted from the request body).
Next, let's implement the update method in the recipe.service.ts file. When you open the recipe.service.ts file, you will see something like this:
// src/recipes/recipes.service.ts

// other code ...
  update(id: number, updateRecipeDto: UpdateRecipeDto) {
    return `This action updates a #${id} recipe`;
  }

// other code ...
Replace the update method with the following code:
// src/recipes/recipes.service.ts

update(id: number, updateRecipeDto: UpdateRecipeDto) {
  return this.prisma.recipe.update({
    where: { id },
    data: updateRecipeDto,
  });
}
In this code:
- The
updatemethod uses Prisma'supdatefunction to update the recipe in the database. Thewhereclause specifies the recipe to update (based onid), and thedataclause specifies the new data for the recipe (provided byupdateRecipeDto).
With the recent modifications, we've unlocked the ability to update individual recipes by their ID.
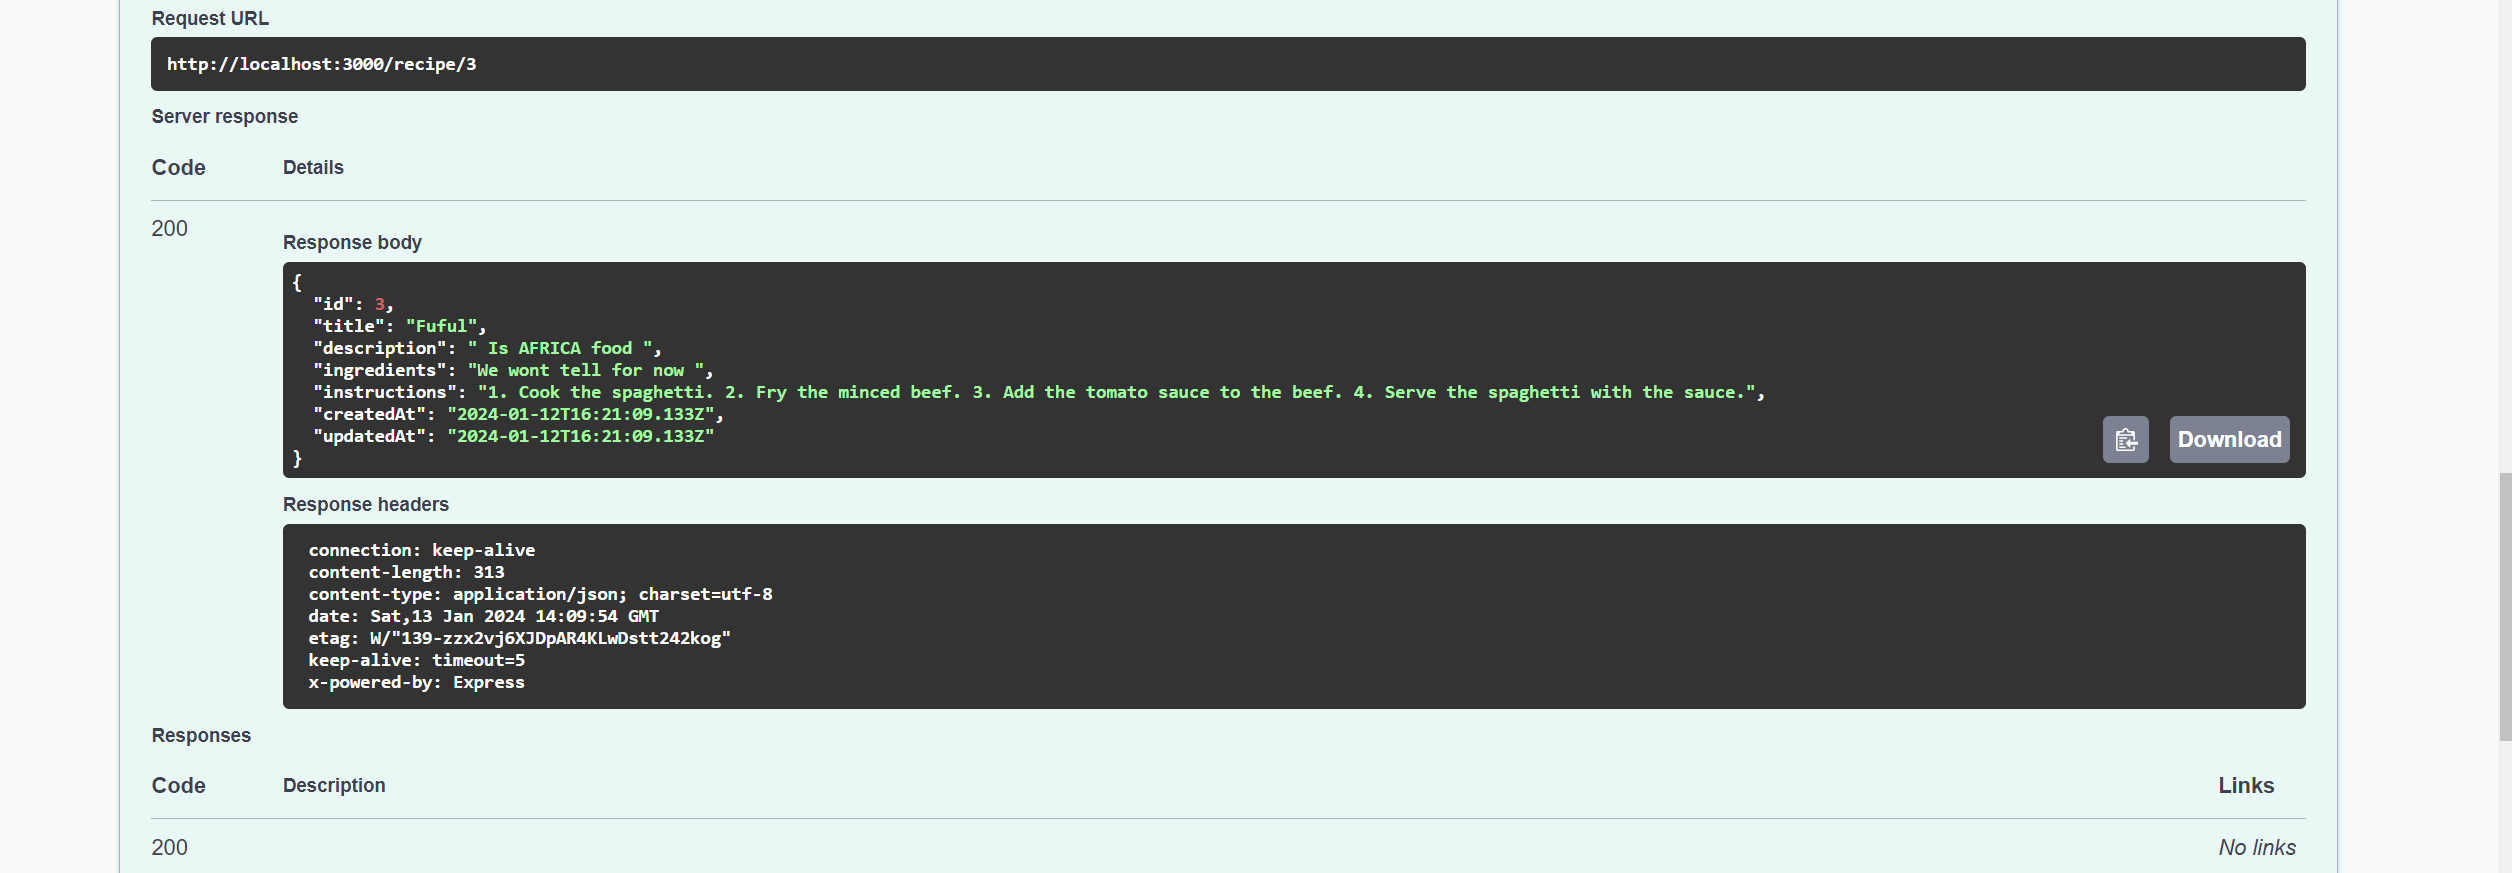
Let's put this new feature to the test by updating the recipe with an ID of 3.
Here's a snapshot of the current state of the recipe:
 Displaying the current data of a specific recipe.
As depicted above, this is the existing data for the recipe we're about to update.
After executing the update operation, here's how our recipe transforms:
 Displaying the updated data of a specific recipe after modification.
As you can see, our update operation has successfully modified the recipe, demonstrating the effectiveness of our newly implemented feature.
Let's now turn our attention to deleting recipes.
How to Define the DELETE /recipes/{id} Endpoint
Having successfully defined the GET, POST, and PATCH endpoints, our next task is to implement the DELETE /recipes/{id} endpoint. This endpoint will let us remove a specific recipe using its ID. As with the previous endpoints, we'll need to make modifications in both the controller and the service.
In the recipes.controller.ts file, we have a remove method. This method is mapped to the DELETE /recipes/{id} endpoint:
// src/recipes/recipes.controller.ts

@Delete(':id')
async remove(@Param('id', ParseIntPipe) id: number) {
  return await this.recipesService.remove(id);
}
In this updated code:
- The
@Delete(':id')decorator maps the method to theDELETE /recipes/{id}endpoint. - The
removemethod accepts anidparameter, which is extracted from the route parameters and parsed to a number usingParseIntPipe.
Next, let's implement the remove method in the recipe.service.ts file. Now with the remove method you see this:
// src/recipes/recipes.service.ts
// other code ...
 @Delete(':id')
  remove(@Param('id') id: string) {
    return this.recipeService.remove(+id);
  }

  // other code ...
Replace the remove method with this code:
// src/recipes/recipes.service.ts


// other code
async remove(id: number) {
  return await this.prisma.recipe.delete({
    where: { id },
  });
}

// other code ..
In this code, the remove method uses Prisma's delete function to remove the recipe with the specified id from the database.
In this code:
- The
removemethod uses Prisma'sdeletefunction to remove the recipe with the correspondingidfrom the database.
With these changes, you can now delete individual recipes by their ID. Check the Swagger page to see the updated API documentation.
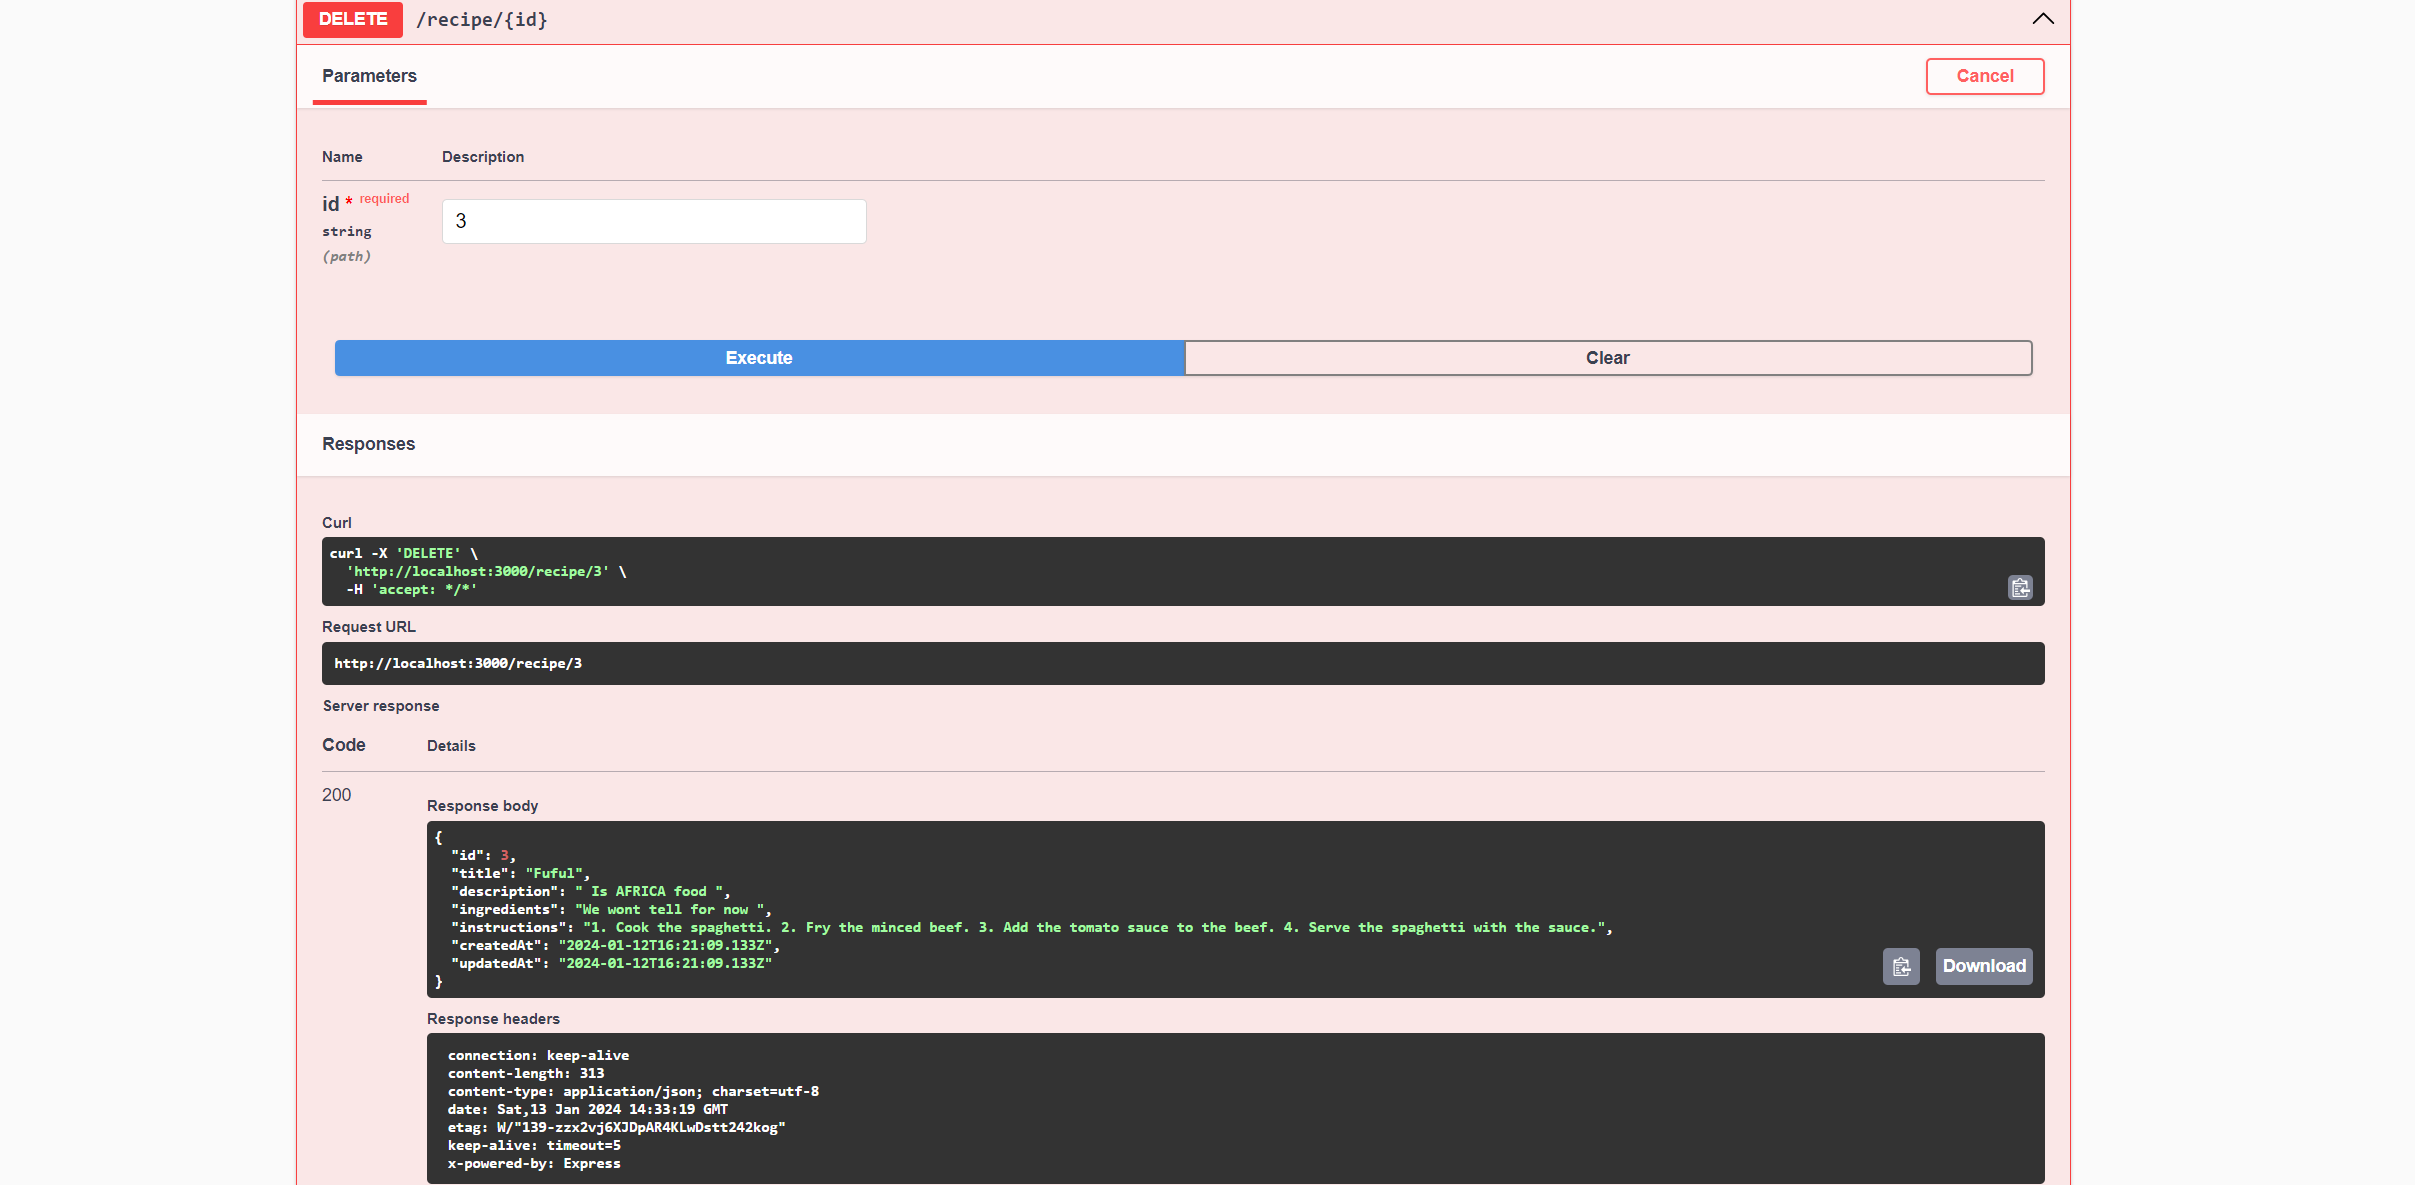 Displaying the process of deleting a specific recipe.
Summary and Final Remarks
In this handbook, we've journeyed through the process of building a REST API using NestJS and Prisma.
We started by setting up a NestJS project, configuring a PostgreSQL database using Docker, and integrating Prisma.
We then dove into the heart of our application, creating a Recipe model and implementing CRUD operations for it. This involved generating RESTful routes, integrating the Prisma Client into our Recipe service, and crafting the logic for each operation.
This guide serves as a solid foundation for your future projects. Feel free to expand upon it, adding more features and functionalities to suit your needs. Thank you for following along, and happy coding!