
If you're new to React.js and you're eager to dive into application development, then you've come to the right place!
Join me in this tutorial as I walk you through building a basic TODO app from the ground up.
The Importance of a TODO App for Beginners
A TODO app serves as an ideal project for beginners to grasp the fundamentals of a new programming language or framework quickly. It provides a practical context for learning essential concepts while working towards a tangible outcome.
If you're embarking on your React.js journey, building a TODO app along with this tutorial could be the perfect starting point.
Prerequisites
Before we begin, ensure you have basic knowledge of React.js and have Node.js and npm installed on your computer. If you haven't already, take a moment to set up your development environment.
Our Objective
Our goal is to create a simple TODO app with features. Here's what we'll be aiming for:
Adding New TODOs: Enable users to add new tasks to the list.
Editing and Deleting TODOs: Provide functionality to modify or remove existing tasks.
Marking TODOs as Completed: Allow users to indicate when tasks are finished.
Tracking Completed TODOs: Implement a feature to keep track of all completed tasks.
Feel free to expand upon this list with additional features if you like. For the purpose of this tutorial, we'll focus on these core functionalities.
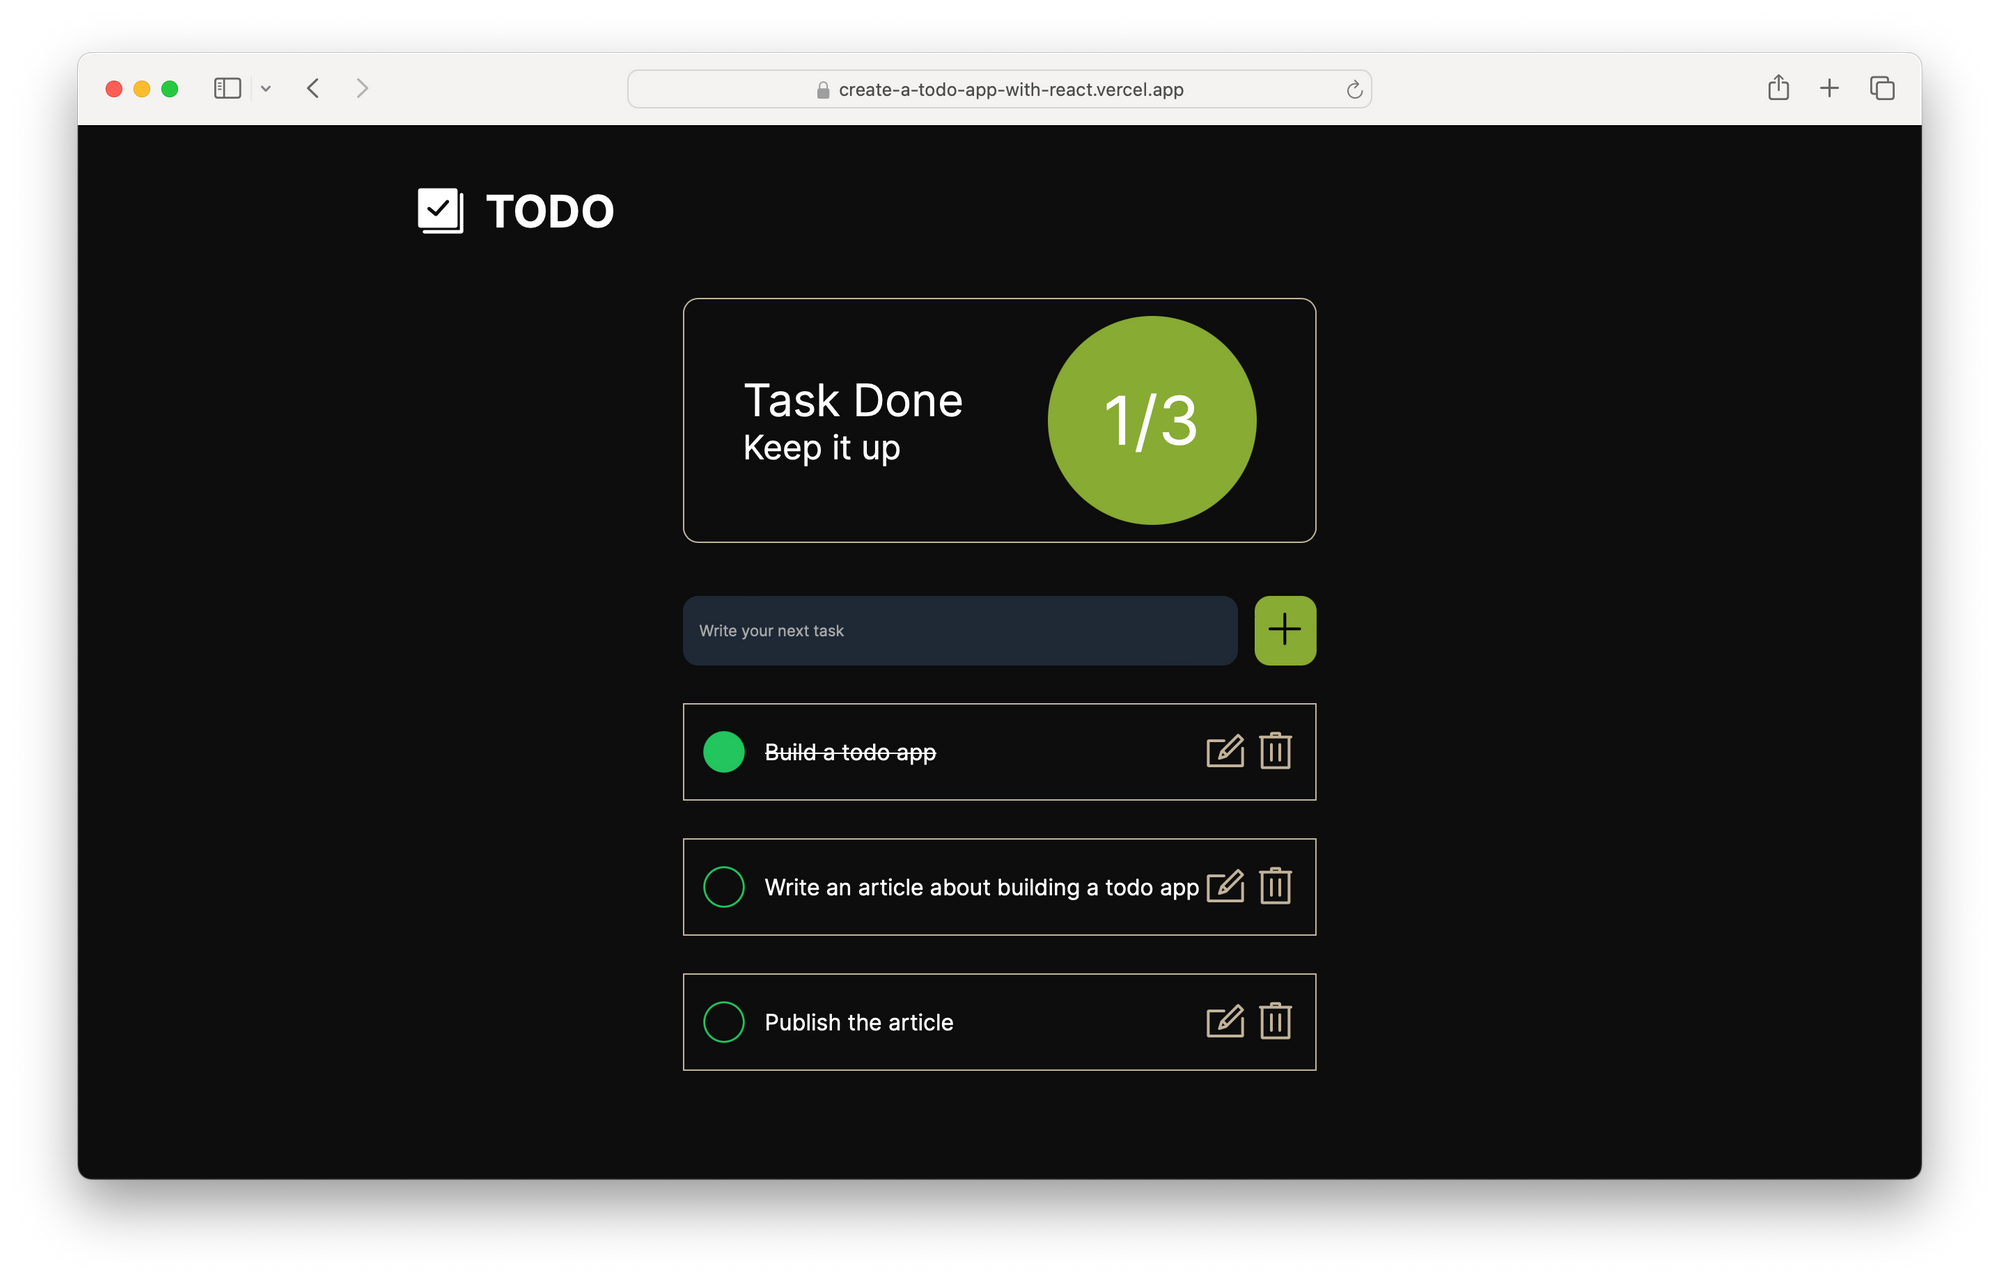
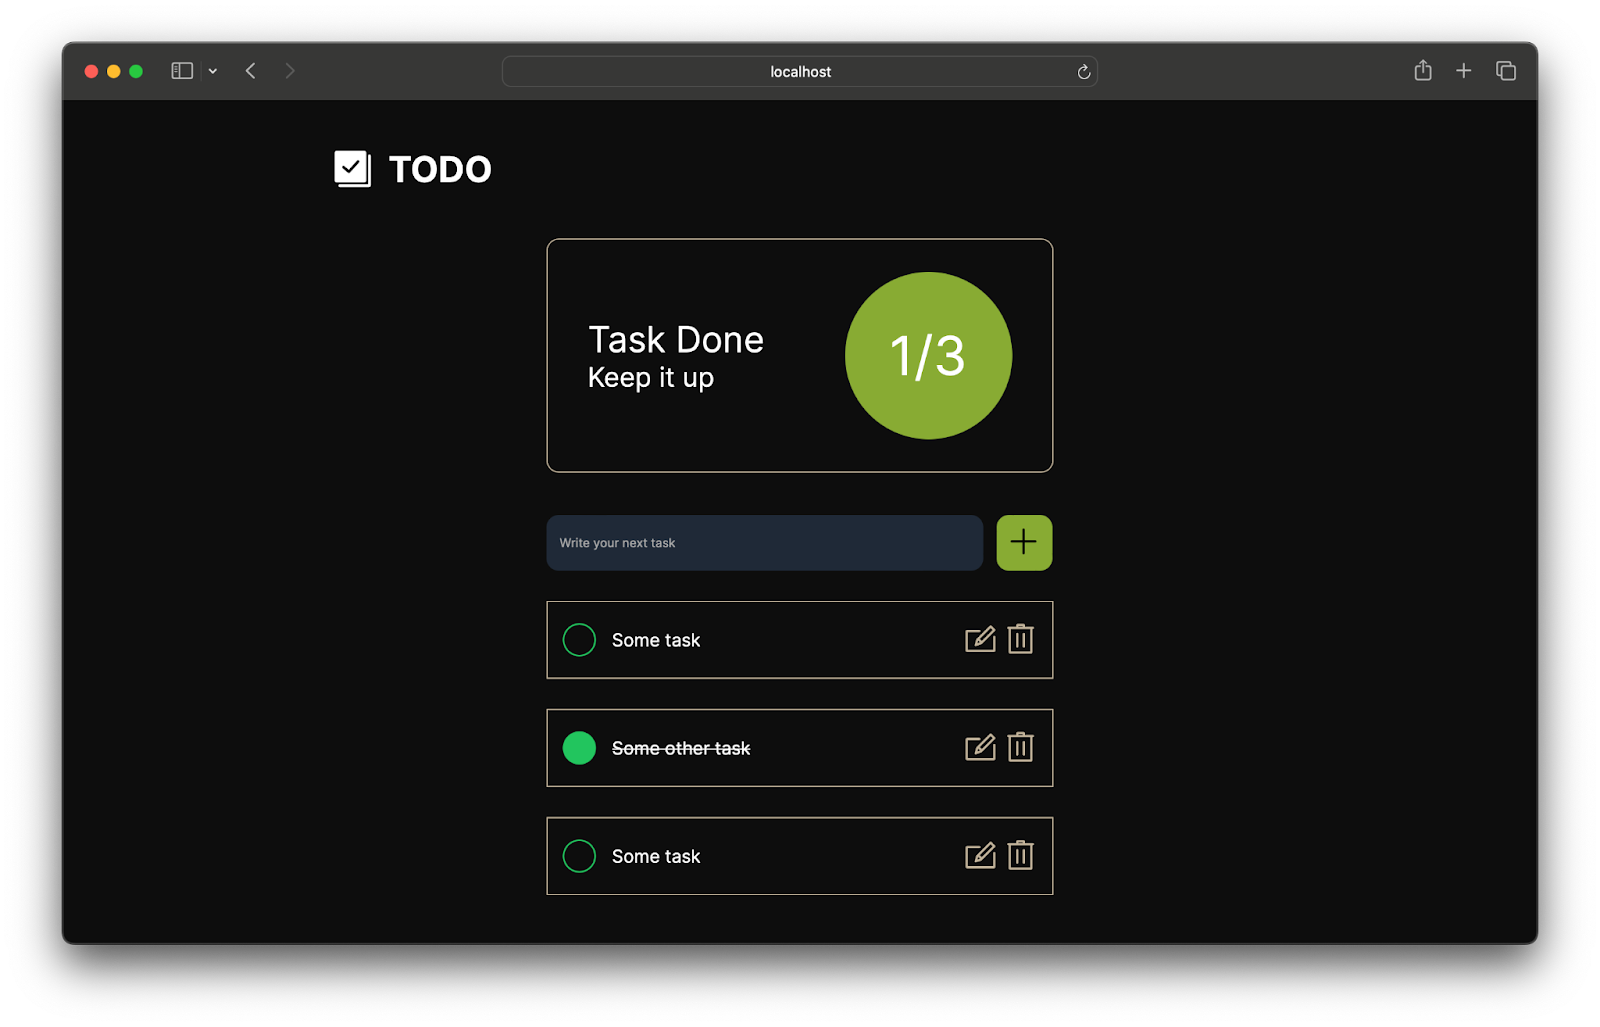
This is an example of the TODO app we are going to be building:

A preview of our todo app
Table of Contents:
How to Set Up Your React App
In 2024, using a framework like Next.js or Remix is a recommended approach for initiating a React project. Either framework will suffice – so just choose the one you're most comfortable with. For this tutorial, we'll be using Next.js.
To create a React app with Next.js, navigate to your preferred directory and run the following command:
npx create-next-app@latest
Note: We won't be using TypeScript and TailwindCSS for this project, so you can proceed with the default settings.
Once the installation is complete, navigate into your newly created app directory (I've named mine 'todo') and start the development server by running:
cd todo
npm run dev
## or with yarn
cd todo
yarn run dev
With your development server up and running, we're ready to begin crafting our TODO app!
How to Build the Components
In React, we build UIs out of components. Our TODO app's UI consists of several parts. Let's break them down:
The Header Component
The Header component serves to display the title of our app. Rather than directly embedding HTML, we'll build this functionality within a React component.
Start by creating a directory for our components:
# In the root directory of your project, create a new directory
mkdir src/components
# Navigate into the directory
cd src/components
# Create a new file for the Header component
touch Header.jsx
Components in React are essentially JavaScript functions that return HTML. In our Header.jsx file, define a function that returns the HTML content for our Header component:
// src/components/Header.jsx
function Header() {
  return (
    <>
      <svg>
        <path d="" />
      </svg>
      <h1>TODO</h1>
    </>
  );
}

export default Header;
We're exporting the Header function so that we can utilize it throughout our project.
The TODOHero Component
The TODO Hero Component plays a pivotal role in our application. It serves as the section where we provide an overview of the total number of todos and the number of completed tasks.
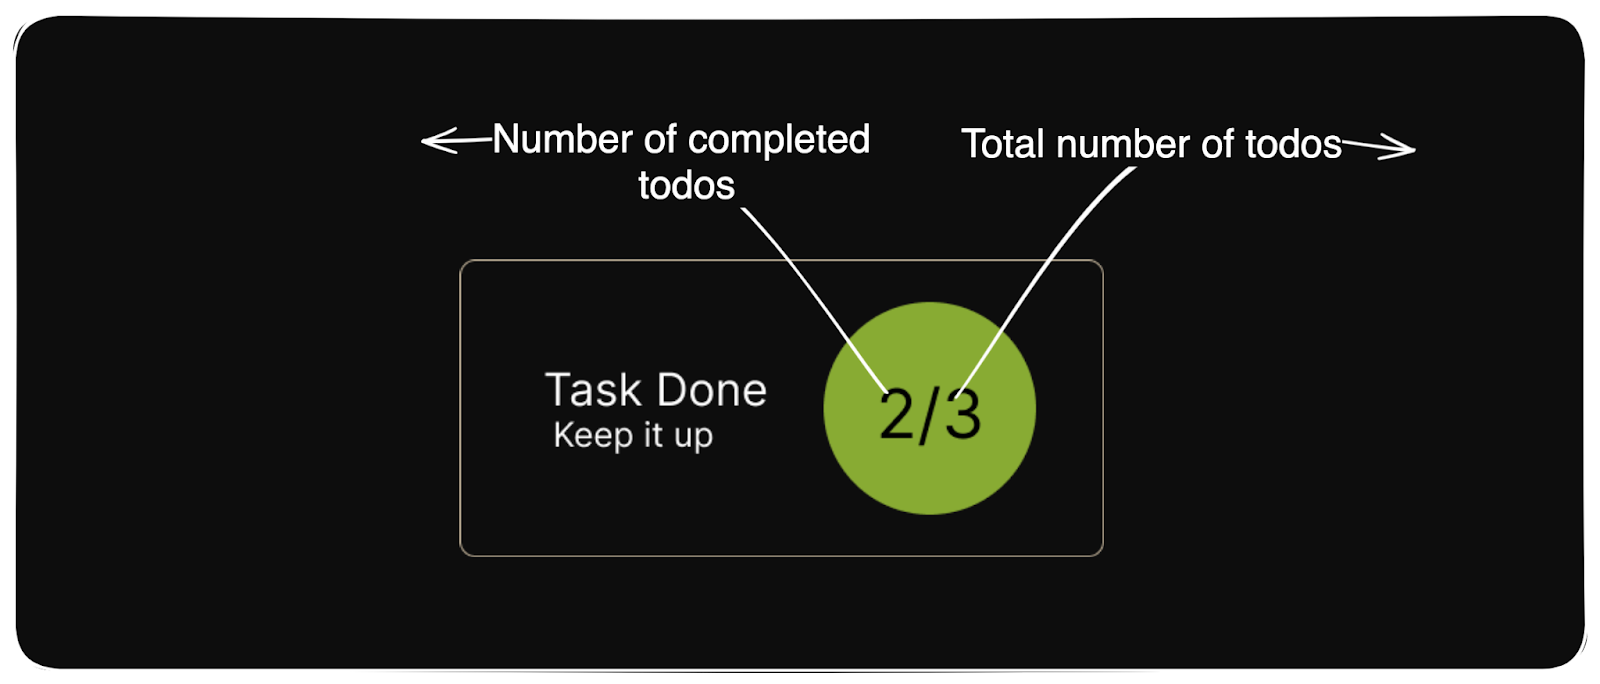
An image showing the TODOHero component
Unlike the header component, which remains static throughout our app usage, the TODOHero component is dynamic. It continuously updates based on the number of completed todos and the total number of todos.
When building components, it's important to identify dynamic parts early on. In React, we achieve this by passing arguments, called props, to our components.
Let's create the TODOHero component. First, make sure you're in the src/components directory:
cd src/components
Now, create a new file for the TODOHero component:
touch TODOHero.jsx
In TODOHero.jsx, define a function that takes props as arguments:
// src/components/TODOHero.jsx
function TODOHero({ todos_completed, total_todos }) {
  return (
    <section>
      <div>
        <p>Task Done</p>
        <p>Keep it up</p>
      </div>
      <div>
        {todos_completed}/{total_todos}
      </div>
    </section>
  );
}
export default TODOHero;
This function returns HTML content for our TODOHero component. We're using props to dynamically update the number of completed todos and the total number of todos.
The Form Component
Our Form component is going to be a simple input with a submit button, so go ahead and create a new component
touch src/components/Form.jsx
Like I said, this is going to be a very simple form: just an input with a submit button. The label is for accessibility.
// src/components/Form.jsx

function Form() {
  const handleSubmit = (event) => {
    event.preventDefault();
    // reset the form
    event.target.reset();
  };
  return (
    <form className="form" onSubmit={handleSubmit}>
      <label htmlFor="todo">
        <input
          type="text"
          name="todo"
          id="todo"
          placeholder="Write your next task"
        />
      </label>
      <button>
        <span className="visually-hidden">Submit</span>
        <svg>
          <path d="" />
        </svg>
      </button>
    </form>
  );
}
export default Form;
We've added an onSubmit event to the form with a handleSubmit event handler. The event.preventDefault() prevents the form from submitting and reloading the entire app. Lastly, we reset the form with event.target.reset().
The TODOList Component
Lastly, let's create the List component. Start by creating a new component file named TODOList.jsx:
touch src/components/TODOList.jsx
The list itself is a straightforward ordered list:
// src/components/TODOList.jsx

function TODOList() {
  return <ol className="todo_list">{/* <li> list goes here */}</ol>;
}
export default TODOList;
The list items will be generated dynamically from the todo data. But before we proceed, let's create a separate component for the list item.
In React, nearly everything is a component, so we'll create the Item component alongside the TODOList component:
// src/components/TODOList.jsx

function Item({ item }) {
  return (
    <li id={item?.id} className="todo_item">
      <button className="todo_items_left">
        <svg>
          <circle cx="11.998" cy="11.998" fillRule="nonzero" r="9.998" />
        </svg>
        <p>{item?.title}</p>
      </button>
      <div className="todo_items_right">
        <button>
          <span className="visually-hidden">Edit</span>
          <svg>
            <path d="" />
          </svg>
        </button>
        <button>
          <span className="visually-hidden">Delete</span>
          <svg>
            <path d="" />
          </svg>
        </button>
      </div>
    </li>
  );
}
The list item itself is simply an <li> element with buttons for editing and deleting tasks. We've ensured that the <li> itself is not clickable, following the principle that "anything clickable on the web should either be a button or a link".
Now, we can use the Item component within our list:
// src/components/TODOList.jsx

function TODOList({ todos }) {
  return (
    <ol className="todo_list">
      {todos && todos.length > 0 ? (
        todos?.map((item, index) => <Item key={index} item={item} />)
      ) : (
        <p>Seems lonely in here, what are you up to?</p>
      )}
    </ol>
  );
}
export default TODOList;
With these components in place, our TODO app's UI is fully constructed.
Putting it All Together
So far, we've created four separate components, each of which doesn't do much on its own. Now, we need to render these components in our index page.
In Next.js, pages are located inside the src/app directory, and the index page is typically named page.js.
First, let's empty the contents of the file as we won't need anything inside it:
echo -n > src/app/page.js
Next, import all the components we've created and utilize them inside the page.js file as shown below:
// src/app/page.js

import React from "react";
import Form from "@/components/Form";
import Header from "@/components/Header";
import TODOHero from "@/components/TODOHero";
import TODOList from "@/components/TODOList";
function Home() {
  return (
    <div className="wrapper">
      <Header />
      <TODOHero todos_completed={0} total_todos={0} />
      <Form />
      <TODOList todos={[]} />
    </div>
  );
}
export default Home;
By viewing the output in your browser, it should resemble something like this:
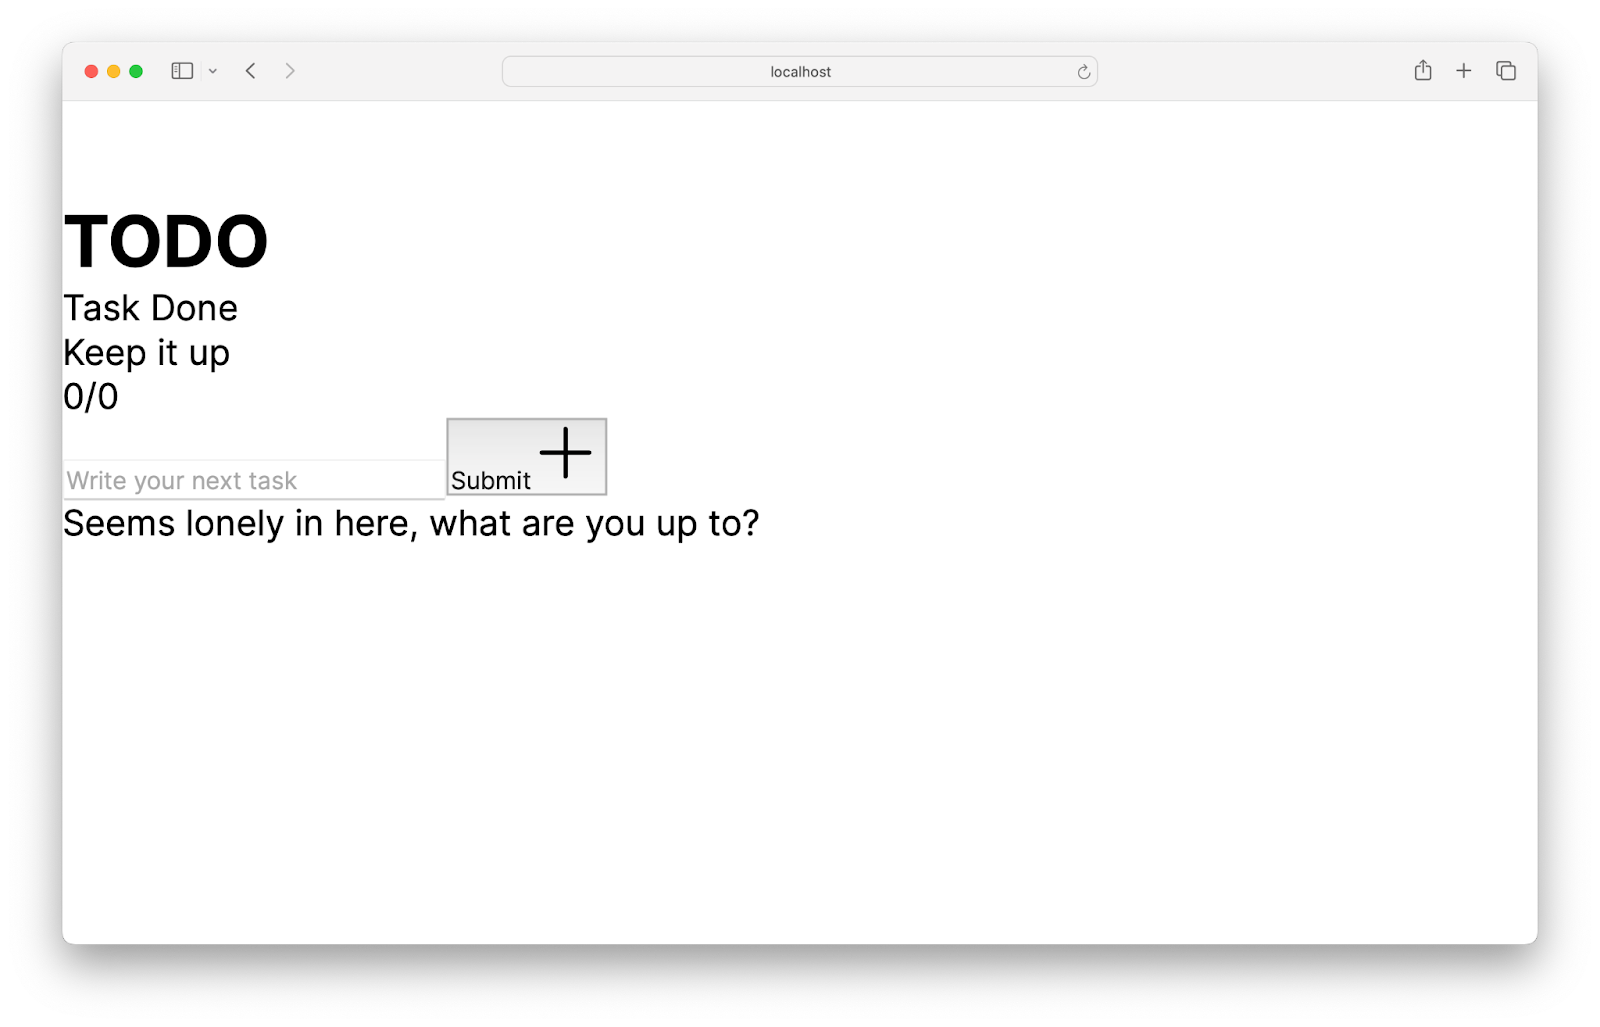
A preview of our app without CSS
The Styling
For styling, we'll stick to good old CSS. Let's create a styles.css file to hold our styles:
touch src/app/styles.css
Also, delete all the CSS files that came with installing Next.js as we won't need them:
rm src/app/page.module.css && src/app/globals.css
Now, you can add your CSS rules in the styles.css file. Though not perfect, the following CSS should suffice for our simple example:
*,
*::after,
*::before {
  padding: 0;
  margin: 0;
  font-family: inherit;
  box-sizing: border-box;
}
html,
body {
  font-family: sans-serif;
  background-color: #0d0d0d;
  color: #fff;
  display: flex;
  align-items: center;
  justify-content: center;
  width: 100vw;
}
button {
  cursor: pointer;
}
.visually-hidden {
  position: absolute !important;
  clip: rect(1px, 1px, 1px, 1px);
  padding: 0 !important;
  border: 0 !important;
  height: 1px !important;
  width: 1px !important;
  overflow: hidden;
  white-space: nowrap;
}
.text_large {
  font-size: 32px;
}
.text_small {
  font-size: 24px;
}
.wrapper {
  display: flex;
  flex-direction: column;
  width: 70%;
}
@media (max-width: 510px) {
  .wrapper {
    width: 100%;
  }
  header {
    justify-content: center;
  }
}
header {
  display: flex;
  align-items: center;
  justify-content: flex-start;
  gap: 12px;
  padding: 42px;
}
.todohero_section {
  border: 1px solid #c2b39a;
  display: flex;
  align-items: center;
  justify-content: space-around;
  align-self: center;
  width: 90%;
  max-width: 455px;
  padding: 12px;
  border-radius: 11px;
}
.todohero_section div:last-child {
  background-color: #88ab33;
  width: 150px;
  height: 150px;
  border-radius: 75px;
  font-size: 48px;
  display: flex;
  align-items: center;
  justify-content: center;
  text-align: center;
}
.form {
  align-self: center;
  width: 97%;
  max-width: 455px;
  display: flex;
  align-items: center;
  gap: 12px;
  margin-top: 38px;
}
.form label {
  width: 90%;
}
.form input {
  background-color: #1f2937;
  color: #fff;
  width: 100%;
  height: 50px;
  outline: none;
  border: none;
  border-radius: 11px;
  padding: 12px;
}
.form button {
  width: 10%;
  height: 50px;
  border-radius: 11px;
  background-color: #88ab33;
  border: none;
}
.todo_list {
  align-self: center;
  width: 97%;
  max-width: 455px;
  display: flex;
  flex-direction: column;
  align-items: center;
  margin-top: 27px;
  margin-bottom: 27px;
  gap: 27px;
}
.todo_item,
.edit-form input {
  display: flex;
  justify-content: space-between;
  align-items: center;
  height: 70px;
  width: 100%;
  max-width: 455px;
  border: 1px solid #c2b39a;
  font-size: 16px;
  background-color: #0d0d0d;
  color: #fff;
  padding: 12px;
}
.edit-form input {
  outline: transparent;
  width: calc(100% - 14px);
  height: calc(100% - 12px);
  border: transparent;
}
.todo_items_left,
.todo_items_right {
  display: flex;
  align-items: center;
}
.todo_items_left {
  background-color: transparent;
  border: none;
  color: #fff;
  gap: 12px;
  font-size: 16px;
}
.todo_items_right {
  gap: 4px;
}
.todo_items_right button {
  background-color: transparent;
  color: #fff;
  border: none;
}
.todo_items_right button svg {
  fill: #c2b39a;
}
Lastly, we need to import the CSS file in our layout. Open the layout.js file located right next to the page.js and import the CSS file as demonstrated below:

An image showing how to import styles.css file in our component
Upon previewing the app again, it should now reflect the applied styles:

An image showing the preview of our app after adding CSS
Building the Functionality: How to add todos
At this stage, we've crafted a visually appealing todo app, but it lacks functionality. Let's change that in this section.
A Way to Store the Todo Data
Firstly, we need a method to store our todo data. In React, this is accomplished using state—a JavaScript object that holds information about a component's state.
React provides a hook called useState(), which enables us to manage state in our React apps. But in Next.js, before utilizing useState, you need to specify that the component is a client component.
Add the following code to the top of your src/app/page.js file:
"use client";
As depicted in the image below:
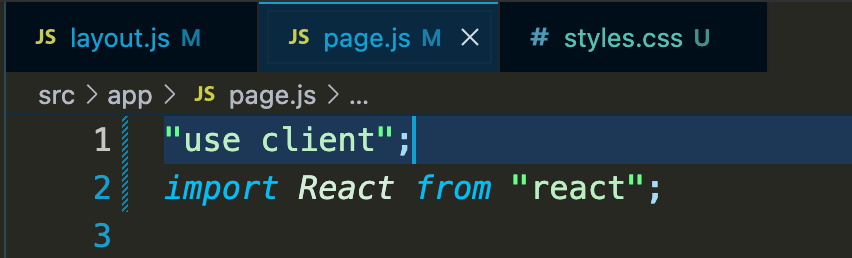
An image showing how to add "use client" to the top of our page.js
Now, we can use the useState hook to create a state for our todo data:
// src/app/page.js

"use client";
import React from "react";
import Form from "@/components/Form";
// Add imports for other components
function Home() {
  const [todos, setTodos] = React.useState([]);
  return (
    <Header />
    // Add other components here
  );
}
export default Home;
In the above code snippet, you'll notice that useState initially holds an empty array. It's important to understand that useState returns two values: todos and setTodos (you can name these anything you prefer).
The first value, todos, holds the current value of the state, while setTodos (the second value) is a function used to update the state. Clear so far?
What Kind of Data Do We Want to Store?
Now that we have a means to store our data, let's define the type of data we intend to store. Essentially, it will be an array of objects, where each object holds the necessary information to render our list of todos:
const [todos, setTodos] = React.useState([
{ /* Object */ },
{ /* Object */ },
{ /* Object */ },
]);
Each object in the array will have the following structure:
{
title: "Some task",  // string
id: self.crypto.randomUUID(), // string
is_completed: false // boolean
}
Here, self.crypto.randomUUID() is a method that allows the browser to generate unique IDs for each todo item. If you view the console, you'll observe that the generated IDs are indeed unique.

console.log of our todo data
This structure ensures that each todo item has a title, a unique identifier (id), and a Boolean value indicating whether the task is completed (is_completed).
How to Pass the Todo Data to Our Components
In React, there's a concept called state sharing, which allows children components to access the state of their parent components. This means that the todo state we created earlier can be shared among all our components.
The first place we need the data from the state is in our List Component. Let's pass the state to the List component:
// src/app/page.js

"use client";
import React from "react";
// import other components
import TODOList from "@/components/TODOList";

function Home() {
  const [todos, setTodos] = React.useState([
    { title: "Some task", id: self.crypto.randomUUID(), is_completed: false },
    {
      title: "Some other task",
      id: self.crypto.randomUUID(),
      is_completed: true,
    },
    { title: "last task", id: self.crypto.randomUUID(), is_completed: false },
  ]);
  return (
    <div className="wrapper">
      ...
      <TODOList todos={todos} />
    </div>
  );
}
export default Home;
We already made provisions in our List component to receive a todos prop:
// src/components/TODOList.jsx

function TODOList({ todos }) {
  return (
    <ol className="todo_list">
      {todos && todos.length > 0 ? (
        todos?.map((item, index) => (
          <Item key={index} item={item} setTodos={setTodos} />
        ))
      ) : (
        <p>Seems lonely in here, what are you up to?</p>
      )}
    </ol>
  );
}
Now, the todos prop will be populated by the data from our state, and without any further ado, this will work. Here’s an image showing the List created from our todos data:

An image showing a list of our todos
The other place we need the data is in our TODOHero component. We don’t need all of the data in that component – we just need to count the total number of todos and the number of completed todos:
// src/app/page.js

"use client";
import React from "react";
// import other components
import TODOHero from "@/components/TODOHero";
import TODOList from "@/components/TODOList";
function Home() {
  const [todos, setTodos] = React.useState([
    { title: "Some task", id: self.crypto.randomUUID(), is_completed: false },
    // add other dummy data
  ]);
  const todos_completed = todos.filter(
    (todo) => todo.is_completed === true
  ).length;
  const total_todos = todos.length;
  return (
    <div className="wrapper">
      <Header />
      <TODOHero todos_completed={todos_completed} total_todos={total_todos} />
      <Form />
      <TODOList todos={todos} />
    </div>
  );
}
export default Home;
Here, the JavaScript filter method is used to filter out all the todos with is_completed set to true, and then we get the length. The total_todos is simply the length of the entire array.
Here’s an image showing the TODOHero component with updated values:
An image showing the updated TODOHero component
Adding More Todo Data to Our State
Currently, our todo app displays todos from our dummy data:
const [todos, setTodos] = React.useState([
  { title: "Some task", id: self.crypto.randomUUID(), is_completed: false },
  {
    title: "Some other task",
    id: self.crypto.randomUUID(),
    is_completed: true,
  },
  { title: "last task", id: self.crypto.randomUUID(), is_completed: false },
]);
But the purpose of creating a Form component was to enable us to create new todos ourselves, not rely on dummy data.
The good news is that just as we have access to the todo state data, we can also update the state of a parent from a children component. This means we can pass the function used to update the state, setTodos, to our Form component:
// src/app/page.js

"use client";
import React from "react";
import Form from "@/components/Form";
// import other components

function Home() {
  const [todos, setTodos] = React.useState([
    { title: "Some task", id: self.crypto.randomUUID(), is_completed: false },
    // add other dummy data
  ]);

  ...
  return (
    <div className="wrapper">
      ...
      <Form setTodos={setTodos} />
      <TODOList todos={todos} />
    </div>
  );
}
export default Home;
With access to the setTodos function in our Form component, we can now add new todos to our state when we submit the form:
// src/components/Form.jsx

function Form({ setTodos }) {
  const handleSubmit = (event) => {
    event.preventDefault();
    const value = event.target.todo.value;
    setTodos((prevTodos) => [
      ...prevTodos,
      { title: value, id: self.crypto.randomUUID(), is_completed: false },
    ]);
    event.target.reset();
  };
  return (
    <form className="form" onSubmit={handleSubmit}>
      …
    </form>
  );
}
export default Form;
The code snippet below is where the magic happens:
setTodos((prevTodos) => [
  ...prevTodos,
  { title: value, id: self.crypto.randomUUID(), is_completed: false },
]);
It is the equivalent of doing the following in plain JavaScript:
let prevTodos = [];

prevTodos.push({
  title: value,
  id: self.crypto.randomUUID(),
  is_completed: false,
});
Now that we can add new todos to our state by ourselves, we can get rid of the dummy data. We no longer need it. Let's go back to using an empty array:
const [todos, setTodos] = React.useState([]);
Now that we're through with the first part, we can add todos as we please. Here’s a video demonstrating it working:
How to Build the TODO App's Functionality
How to Mark Todos as Complete
In our List component, we constructed an <li> element with buttons. Now, we're going to attach an onClick event handler to the first button.
// src/components/TODOList.jsx

function Item({ item }) {
  const completeTodo = () => {
    // perform some action
  };
  return (
    <li id={item?.id} className="todo_item" onClick={completeTodo}>
      <button className="todo_items_left">
        <svg>
          <circle cx="11.998" cy="11.998" fillRule="nonzero" r="9.998" />
        </svg>
        <p>{item?.title}</p>
      </button>
      <div className="todo_items_right">
        <button>...</button>
        <button>...</button>
      </div>
    </li>
  );
}
When we click on this button and the completeTodo handler is invoked, our objective is to:
Filter the data to find the todo that was clicked.
Modify the data and set the
is_completedvalue to true.
Before we can proceed with data modification, we need access to the setTodo function in our <Item /> component. Fortunately, React allows state to be passed down to grandchildren components.
This means we can pass the setTodo function from the <List /> component to our <Item /> component:
// src/app/page.js

"use client";
import React from "react";
// import other components
import TODOList from "@/components/TODOList";

function Home() {
  const [todos, setTodos] = React.useState([]);

...

  return (
    <div className="wrapper">
      ...
      <TODOList todos={todos} setTodos={setTodos} />
    </div>
  );
}
export default Home;
Then, within our <List /> component, we pass the setTodo function to our <Item /> component:
// src/components/TODOList.jsx

function TODOList({ todos, setTodos }) {
  return (
    <ol className="todo_list">
      {todos && todos.length > 0 ? (
        todos?.map((item, index) => (
          <Item key={index} item={item} setTodos={setTodos} />
        ))
      ) : (
        <p>Seems lonely in here, what are you up to?</p>
      )}
    </ol>
  );
}
Now, within our <Item /> component, we can use the setTodos function to update the todo's is_completed status when the button is clicked:
// src/components/TODOList.jsx

function Item({ item, setTodos }) {
  const completeTodo = () => {
    setTodos((prevTodos) =>
      prevTodos.map((todo) =>
        todo.id === item.id
          ? { ...todo, is_completed: !todo.is_completed }
          : todo
      )
    );
  };
  return (
    <li id={item?.id} className="todo_item">
      <button className="todo_items_left" onClick={completeTodo}>
        ...
      </button>
      <div className="todo_items_right">
        <button>...</button>
        <button>...</button>
      </div>
    </li>
  );
}
Now, clicking on the first button within the todo item will toggle its completion status, effectively modifying the todo data.
When a todo is marked as completed, we want to enhance its visual representation. This includes adding a fill to the SVG circle beside the todo title, creating the illusion that the todo is completed. Also, we want to add a strike-through to the text to signify completion.
<button className="todo_items_left" onClick={completeTodo}>
  <svg fill={item.is_completed ? "#22C55E" : "#0d0d0d"}>
    <circle cx="11.998" cy="11.998" fillRule="nonzero" r="9.998" />
  </svg>
  <p style={item.is_completed ? { textDecoration: "line-through" } : {}}>
    {item?.title}
  </p>
</button>;
In the above code snippet, the button's color changes based on the completion status of the todo item. If the item is completed (is_completed is true), the SVG circle fills with a green color – otherwise, it fills with a dark color. Also, the todo title text receives a line-through style if the todo is completed, indicating its completion visually.
And now everything is working perfectly:
How to Edit Todos
When editing todos, we want to have a form in which we can edit the title of the todo. When the edit button is clicked we want to swap out the everything in the <li> and have a form instead:
// src/components/TODOList.jsx

function Item({ item, setTodos }) {
  const [editing, setEditing] = React.useState(false);
  const inputRef = React.useRef(null);
  const completeTodo = () => {
    // mark todo as complete
  };
  const handleEdit = () => {
    setEditing(true);
  };
  React.useEffect(() => {
    if (editing && inputRef.current) {
      inputRef.current.focus();
      // position the cursor at the end of the text
      inputRef.current.setSelectionRange(
        inputRef.current.value.length,
        inputRef.current.value.length
      );
    }
  }, [editing]);
  const handleInpuSubmit = (event) => {
    event.preventDefault();
    setEditing(false);
  };
  const handleInputBlur = () => {
    setEditing(false);
  };
  return (
    <li id={item?.id} className="todo_item">
      {editing ? (
        <form className="edit-form" onSubmit={handleInpuSubmit}>
          <label htmlFor="edit-todo">
            <input
              ref={inputRef}
              type="text"
              name="edit-todo"
              id="edit-todo"
              defaultValue={item?.title}
              onBlur={handleInputBlur}
              onChange={handleInputChange}
            />
          </label>
        </form>
      ) : (
        <>
          <button className="todo_items_left" onClick={completeTodo}>
            ...
          </button>
          <div className="todo_items_right">
            <button onClick={handleEdit}>...</button>
            <button>...</button>
          </div>
        </>
      )}
    </li>
  );
}
I know the code above is quite a handful. Well, that’s because we are doing a lot here – but the first thing we did was create a state:
const [editing, setEditing] = React.useState(false);
When the edit button is clicked we set the value of our editing state to true, which will render our form:
const handleEdit = () => {
  setEditing(true);
};
Now, when we submit the edit todo form by pressing enter, we also want to set the variable back to false so we can get back our list:
const handleInpuSubmit = (event) => {
  event.preventDefault();
  setEditing(false);
};
When we mouse out of the edit form, we also want to set the state back to false:
const handleInputBlur = () => {
  setEditing(false);
};
Another thing we want to do is to focus the input once editing is set to true:
React.useEffect(() => {
  if (editing && inputRef.current) {
    inputRef.current.focus();
    // position the cursor at the end of the text
    inputRef.current.setSelectionRange(
      inputRef.current.value.length,
      inputRef.current.value.length
    );
  }
}, [editing]);
The edit todo itself has a single input field with an onChange event. As we edit the title in the input field, we want to modify the current todo with the updated title:
const handleInputChange = (e) => {
  setTodos((prevTodos) =>
    prevTodos.map((todo) =>
      todo.id === item.id ? { ...todo, title: e.target.value } : todo
    )
  );
};
The JavaScript array.map() method is perfect for this because it returns a new array with the same number of elements after modifying the title.
Here’s a video of it working seamlessly:
How to Delete Todos
Deleting todos is a straightforward process. When the delete button is clicked, we filter out the todo that triggered the delete event from the todo list.
// src/components/TODOList.jsx

const handleDelete = () => {
  setTodos((prevTodos) => prevTodos.filter((todo) => todo.id !== item.id));
};
Don’t forget to add an onClick event to the delete button:
// src/components/TODOList.jsx

function Item({ item, setTodos }) {
  ...
    const handleDelete = () => {
    setTodos((prevTodos) => prevTodos.filter((todo) => todo.id !== item.id));
  };
  return (
    <li id={item?.id} className="todo_item">
      {editing ? (
        <form className="edit-form" onSubmit={handleInpuSubmit}>
          ...
        </form>
      ) : (
        <>
          …
          <div className="todo_items_right">
            …
            <button onClick={handleDelete}>
              <span className="visually-hidden">Delete</span>
              <svg>
                <path d="" />
              </svg>
            </button>
          </div>
        </>
      )}
    </li>
  );
}
And voilà! It just works like a charm:
How to Persist Our Todo Data
Up to this point, our todo data has been stored solely in the application's state:
const [todos, setTodos] = React.useState([]);
While this approach works, it presents a challenge: when the app is reloaded, all todo data is lost.
When it comes to persisting data, we typically think of databases. Storing our todo data in a database offers several advantages, such as easy access from any device. But there's an alternative: localStorage.
LocalStorage is a browser-based storage system. It has some limitations, like a 5MB storage cap and data accessibility restricted to the browser where it's stored. Despite these drawbacks, we'll use localStorage in this tutorial for simplicity's sake.
How to Persist the Todo Data to localStorage
Currently, when we add a new todo, we're only updating the todo state in our Form component:
// src/components/Form.jsx

const handleSubmit = (event) => {
  event.preventDefault();
  const value = event.target.todo.value;
  setTodos((prevTodos) => [
    ...prevTodos,
    { title: value, id: self.crypto.randomUUID(), is_completed: false },
  ]);
  event.target.reset();
};
We still want to keep this, but at the same time we want to add the same data to localStorage, so we’ll modify the code above to look like this:
// src/components/Form.jsx

const handleSubmit = (event) => {
  event.preventDefault();
  const value = event.target.todo.value;
  const newTodo = {
    title: value,
    id: self.crypto.randomUUID(),
    is_completed: false,
  };
  // Update todo state
  setTodos((prevTodos) => [...prevTodos, newTodo]);
  // Store updated todo list in local storage
  const updatedTodoList = JSON.stringify([...todos, newTodo]);
  localStorage.setItem("todos", updatedTodoList);
  event.target.reset();
};
Did I mention that you can only store strings in localStorage? We can’t store an array or object in localStorage. That's why we first convert our array of todo data to a string:
const updatedTodoList = JSON.stringify([...prevTodos, newTodo]);
And then finally we persist the data in localStorage with this code:
localStorage.setItem('todos', updatedTodoList);
You’ll notice we used our todos state data in our <Form /> component:
const updatedTodoList = JSON.stringify([...todos, newTodo]);
So don’t forget to pass the todo state to the component:
// src/app/page.js

<Form todos={todos} setTodos={setTodos} />
Also, since we can edit and delete todos in our app, we need to update the data in localStorage accordingly. First, pass the todos data to our <Item /> component:
// src/components/TODOList.jsx

function TODOList({ todos, setTodos }) {
  return (
    <ol className="todo_list">
      {todos && todos.length > 0 ? (
        todos?.map((item, index) => (
        // pass the todos to <Item />
          <Item key={index} item={item} todos={todos} setTodos={setTodos} />
        ))
      ) : (
        <p>Seems lonely in here, what are you up to?</p>
      )}
    </ol>
  );
}
Now that we have access to the todo data in our <Item /> component, we can persist data to localStorage after marking todo as completed:
// src/components/TODOList.jsx

const completeTodo = () => {
  setTodos((prevTodos) =>
    prevTodos.map((todo) =>
      todo.id === item.id ? { ...todo, is_completed: !todo.is_completed } : todo
    )
  );

  // Update localStorage after marking todo as completed
  const updatedTodos = JSON.stringify(todos);
  localStorage.setItem("todos", updatedTodos);
};
We also want to persist the data to localStorage after editing a todo:
// src/components/TODOList.jsx

const handleInpuSubmit = (event) => {
  event.preventDefault();

  // Update localStorage after editing todo
  const updatedTodos = JSON.stringify(todos);
  localStorage.setItem("todos", updatedTodos);
  setEditing(false);
};

const handleInputBlur = () => {
  // Update localStorage after editing todo
  const updatedTodos = JSON.stringify(todos);
  localStorage.setItem("todos", updatedTodos);

  setEditing(false);
};
Lastly we want to also persist the data to localStorage after we delete a todo:
// src/components/TODOList.jsx

const handleDelete = () => {
  setTodos((prevTodos) => prevTodos.filter((todo) => todo.id !== item.id));
  // Update localStorage after deleting todo
  const updatedTodos = JSON.stringify(
    todos.filter((todo) => todo.id !== item.id)
  );
  localStorage.setItem("todos", updatedTodos);
};
And that’s all you need – pretty easy right? Now when we create new todos, they’ll be persisted in localStorage even after reloading our app.
How to Read the Todo Data from localStorage
Even though we've successfully persisted our data to localStorage, our app data is still wiped when we reload our app or the browser. That's because we are not yet utilizing the data stored in localStorage.
To address this, when our app is mounted (loaded), we want to retrieve the data from localStorage and then pass it to our state.
In our src/app/page.js, we'll read the data from localStorage and store it in our todos state.
// src/app/page.js

"use client";
import React from "react";
import Form from "@/components/Form";
import Header from "@/components/Header";
import TODOHero from "@/components/TODOHero";
import TODOList from "@/components/TODOList";

function Home() {
  const [todos, setTodos] = React.useState([]);

  // Retrieve data from localStorage when component mounts
  React.useEffect(() => {
    const storedTodos = localStorage.getItem("todos");
    if (storedTodos) {
      setTodos(JSON.parse(storedTodos));
    }
  }, []);

  const todos_completed = todos.filter(
    (todo) => todo.is_completed == true
  ).length;
  const total_todos = todos.length;

  return (
    <div className="wrapper">
      <Header />
      <TODOHero todos_completed={todos_completed} total_todos={total_todos} />
      <Form todos={todos} setTodos={setTodos} />
      <TODOList todos={todos} setTodos={setTodos} />
    </div>
  );
}

export default Home;
The code inside the useEffect() hook we run once the component is mounted.
This is the part that reads the data from localStorage:
const storedTodos = localStorage.getItem("todos");
Since the data stored in localStorage is a string, we have to convert it back to our array of objects before we can use it:
JSON.parse(storedTodos)
And that’s all you need to get it working. Now even when we reload the app, the data is persisted as you can see in this video:
And We’ve Done It.
Congratulations! After a journey filled with coding and persistence, we've successfully built a simple yet functional todo app from scratch. The journey might have been long, but the result is worth it.
You can explore the entire source code of the app here. Feel free to dive into the code and see how it all comes together.
But wait, there's more! If you're eager to try out the app yourself, I have a hosted version available here. Go ahead and give it a try to experience the app firsthand.
Thank you for joining me on this coding adventure. I hope you've gained valuable insights into building React apps and persisting data with localStorage.
If you have any questions, feel free to message on Twitter at @sprucekhalifa, and don't forget to follow me for more insights and updates. Happy coding!