By Krissanawat
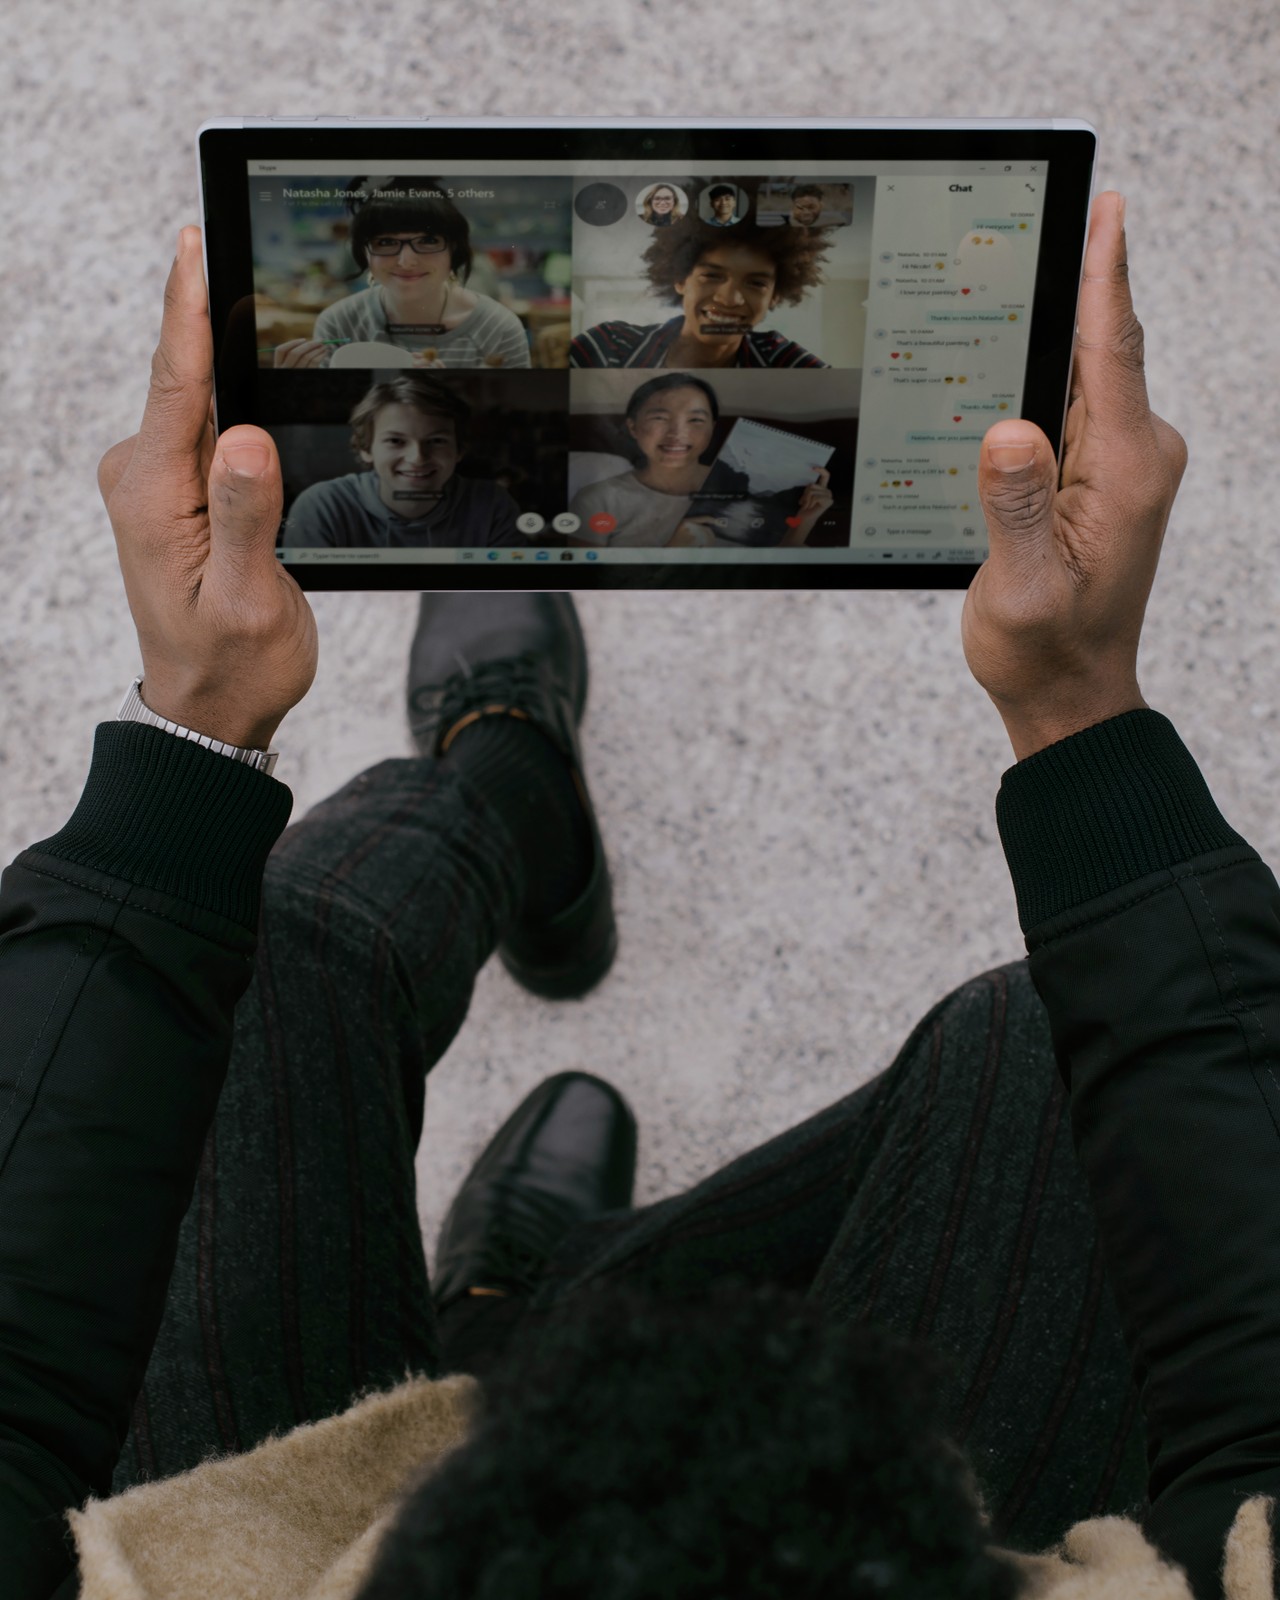
Video calling has become an essential day to day activity during the COVID-19 pandemic. By using features such as chat apps, audio calling, and video calling, we have been able to stay connected with our friends and family.
Now, let's create our own React Native app that will let us make video calls.
In this tutorial, we are going to learn how to implement a video calling feature in the React Native app using the Twilio programmable video call API.
The process is pretty straightforward. We'll simply create a video conference room and invite others to join that room. To do this, we are going to need access to the camera and microphone. So we'll need to use a real smartphone device for testing purposes.
The main package we are going to use to access the Twilio API is the react-native-twilio-video-webrtc package.
Requirements
- Twilio Account
- Minimum of two iOS or Android devices for testing.
- React Native Environment setup.
Let’s get started!
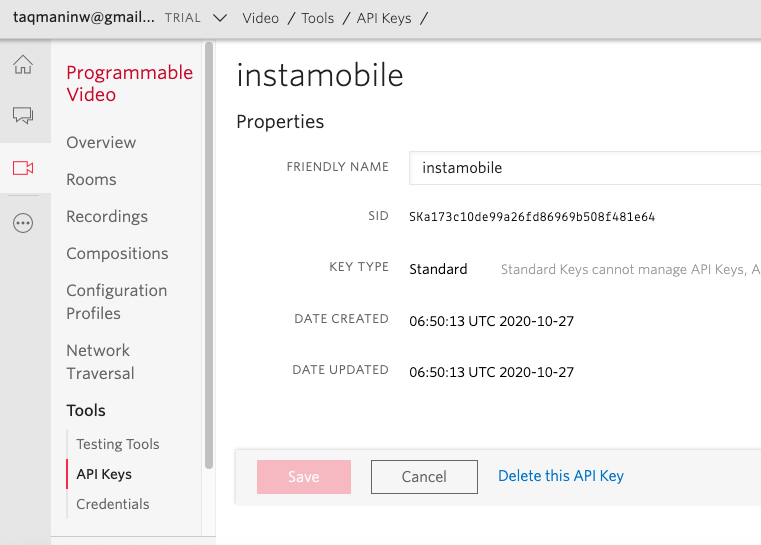
How to Get Your Twilio API Key
In order to get your Twilio API key, you are going to need a Twilio account. For that, visit this URL. After setting up your account, you need to go to the location directed by the screenshot below:
How to Setup the Server to Handle Fetching the Access Token
To fetch the access token, we need to create a new Node server project. For that, we need to install the necessary packages by running the following command:
yarn add dotenv express ngrok nodemon twilio
Next, we need to add Twilio credentials in the environment variables file – .env, as shown in the code snippet below:
PORT=3000
ACCOUNT_SID=AC5ceb0847c50c91b143ce07
API_KEY_SID=SKa173c10de99a26fd86969b
API_KEY_SECRET=Czv7IjNIZJis8s7jb5FePi
Now we need to create an API endpoint. First, we need to import the necessary packages and create object instances to obtain the access token as directed in the code snippet below:
import 'dotenv/config';
import express from 'express';

import twilio from 'twilio';
import ngrok from 'ngrok';
const AccessToken = twilio.jwt.AccessToken;
const VideoGrant = AccessToken.VideoGrant;

const app = express();
Here, we are going to create an API endpoint to get the access token. By using the get method provided by the Express instance, we need to create an endpoint function that responds with the access token.
Inside the function, we need to create a new instance with Twillio credentials. Then, we need to add the username that we received from the register screen on the mobile device as an identity attribute.
Lastly, we'll grant access to the user so they can use the video and then return the JWT token back to the device. Here's the code to do all this in the snippet below:
app.get('/getToken', (req, res) => {
  if (!req.query || !req.query.userName) {
    return res.status(400).send('Username parameter is required');
  }
  const accessToken = new AccessToken(
    process.env.ACCOUNT_SID,
    process.env.API_KEY_SID,
    process.env.API_KEY_SECRET,
  );

  // Set the Identity of this token
  accessToken.identity = req.query.userName;

  // Grant access to Video
  var grant = new VideoGrant();
  accessToken.addGrant(grant);

  // Serialize the token as a JWT
  var jwt = accessToken.toJwt();
  return res.send(jwt);
});
We also expose the endpoint API we created to the internet for the east access. For that, we can use the code from the following code snippet:
app.listen(process.env.PORT, () =>
  console.log(`Server listening on port ${process.env.PORT}!`),
);

ngrok.connect(process.env.PORT).then((url) => {
  console.log(`Server forwarded to public url ${url}`);
});
Lastly, we need to run the server as shown in the screenshot below:
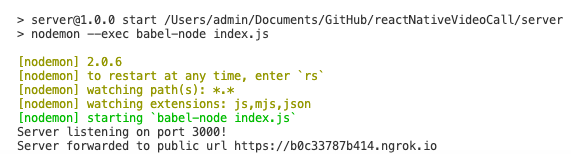
Here, we have successfully created an API endpoint to return the access token.
How to Configure Our React Native Project
In our React Native project, we need to set up the packages manually as well as configure permissions to access the camera and microphone for both Android and iOS platforms.
But first, we need to install the necessary packages, which are react-navigation and react-native-twilio-video-webrtc, by running the following command in our project terminal:
yarn add @react-navigation/native @react-navigation/stack react-native-reanimated react-native-gesture-handler react-native-screens react-native-safe-area-context @react-native-community/masked-view react-native-dotenv react-native-permissions <https://github.com/blackuy/react-native-twilio-video-webrtc>
Setup for iOS
For iOS, we need to set up the package manually. First, we need to increment the IOS target to 11 on the Podfile. This is necessary because Twilio’s Native Video SDK only has support for iOS 11.0+:
platform :ios, '11.0'
require_relative '../node_modules/@react-native-community/cli-platform-ios/native_modules'
In Podfile, we need to setup a permission request as directed in the code snippet below:
permissions_path = '../node_modules/react-native-permissions/ios'
  pod 'Permission-Camera', :path => "#{permissions_path}/Camera.podspec"
  pod 'Permission-Microphone', :path => "#{permissions_path}/Microphone.podspec"
Then, we need to open info.plist and add code to request permission for camera and microphone access as directed in the code snippet below:
  <key>UIViewControllerBasedStatusBarAppearance</key>
    <false/>
  <key>NSCameraUsageDescription</key>
  <string>We require your permission to access the camera while in a video call</string>
  <key>NSMicrophoneUsageDescription</key>
  <string>We require your permission to access the microphone while in a video call</string>
Now we are done with our iOS setup.
Setup for Android
First and foremost, we need to add the following line of code to the ./android/settings.gradle file:
project(':react-native-twilio-video-webrtc').projectDir = new File(rootProject.projectDir, '../node_modules/react-native-twilio-video-webrtc/android')
Also, we need to add package implementation code to the ./android/app/build.gradle file:
implementation project(':react-native-twilio-video-webrtc')
Lastly, we need to import this to the MainApplication.java file as well:
import com.twiliorn.library.TwilioPackage;
Then, we need to activate the package by using the following piece of code:
@Override
protected List getPackages() {
  @SuppressWarnings("UnnecessaryLocalVariable")
  List packages = new PackageList(this).getPackages();
  //  add the following code
  packages.add(new TwilioPackage());
  return packages;
}
How to Build the Register Room Screen
Here, we are going to create a screen called "Register Room" which is going to allow us to register to a room in our video calling React Native app.
First, we need to import the necessary packages as shown in the code snippet below:
import React, {useState, useRef, useEffect, useContext} from 'react';
import {
  StyleSheet,
  View,
  Text,
  StatusBar,
  TouchableOpacity,
  TextInput,
  Alert,
  KeyboardAvoidingView,
  Platform,
  ScrollView,
  Dimensions,
} from 'react-native';

import {
  TwilioVideoLocalView,
  TwilioVideoParticipantView,
  TwilioVideo,
} from 'react-native-twilio-video-webrtc';

import {NavigationContainer} from '@react-navigation/native';
import {createStackNavigator} from '@react-navigation/stack';
- react-navigation: To handle the navigation of the register screen and video call screen.
- react-native: This packages allows us to handle permissions to access the camera and microphone.
- react-native-twilio-video-webrtc: this allows us to access Twilio's Video call programmable API.
How to Initialize Instances and Variables
First, we are going to create an instance for react-navigation. Then, we are going to initialize the states as well as context variables to distribute states as shown in the code snippet below:
const Stack = createStackNavigator();
const initialState = {
  isAudioEnabled: true,
  status: 'disconnected',
  participants: new Map(),
  videoTracks: new Map(),
  userName: '',
  roomName: '',
  token: '',
};

const AppContext = React.createContext(initialState);

const dimensions = Dimensions.get('window');
Bootstrap Navigation
In the App.js file, we are going to create a navigation container stack. Using the Stack component we are going to distribute state to every screen using context as directed in the code snippet below:
export default () => {
  const [props, setProps] = useState(initialState);

  return (
    <>
      <StatusBar barStyle="dark-content" />
      <AppContext.Provider value={{props, setProps}}>
        <NavigationContainer>
          <Stack.Navigator>
            <Stack.Screen name="Home" component={HomeScreen} />
            <Stack.Screen name="Video Call" component={VideoCallScreen} />
          </Stack.Navigator>
        </NavigationContainer>
      </AppContext.Provider>
    </>
  );
};
How to Create the Register Screen
The Register screen will have a modal dialog to get the user's credentials and allow users to join the video call room.
First, we need to fetch the props from the context to the register.js file as shown in the code snippet below:
import React, {useState, useRef, useEffect, useContext} from 'react';
import {
  checkMultiple,
  request,
  requestMultiple,
  PERMISSIONS,
  RESULTS,
} from 'react-native-permissions';

const RegisterScreen = ({navigation}) => {
  const {props, setProps} = useContext(AppContext);
Next, we need to create a function to handle the camera and microphone permissions. The code for the function is provided in the code snippet below:
const _checkPermissions = (callback) => {
    const iosPermissions = [PERMISSIONS.IOS.CAMERA, PERMISSIONS.IOS.MICROPHONE];
    const androidPermissions = [
      PERMISSIONS.ANDROID.CAMERA,
      PERMISSIONS.ANDROID.RECORD_AUDIO,
    ];
    checkMultiple(
      Platform.OS === 'ios' ? iosPermissions : androidPermissions,
    ).then((statuses) => {
      const [CAMERA, AUDIO] =
        Platform.OS === 'ios' ? iosPermissions : androidPermissions;
      if (
        statuses[CAMERA] === RESULTS.UNAVAILABLE ||
        statuses[AUDIO] === RESULTS.UNAVAILABLE
      ) {
        Alert.alert(
          'Error',
          'Hardware to support video calls is not available',
        );
      } else if (
        statuses[CAMERA] === RESULTS.BLOCKED ||
        statuses[AUDIO] === RESULTS.BLOCKED
      ) {
        Alert.alert(
          'Error',
          'Permission to access hardware was blocked, please grant manually',
        );
      } else {
        if (
          statuses[CAMERA] === RESULTS.DENIED &&
          statuses[AUDIO] === RESULTS.DENIED
        ) {
          requestMultiple(
            Platform.OS === 'ios' ? iosPermissions : androidPermissions,
          ).then((newStatuses) => {
            if (
              newStatuses[CAMERA] === RESULTS.GRANTED &&
              newStatuses[AUDIO] === RESULTS.GRANTED
            ) {
              callback && callback();
            } else {
              Alert.alert('Error', 'One of the permissions was not granted');
            }
          });
        } else if (
          statuses[CAMERA] === RESULTS.DENIED ||
          statuses[AUDIO] === RESULTS.DENIED
        ) {
          request(statuses[CAMERA] === RESULTS.DENIED ? CAMERA : AUDIO).then(
            (result) => {
              if (result === RESULTS.GRANTED) {
                callback && callback();
              } else {
                Alert.alert('Error', 'Permission not granted');
              }
            },
          );
        } else if (
          statuses[CAMERA] === RESULTS.GRANTED ||
          statuses[AUDIO] === RESULTS.GRANTED
        ) {
          callback && callback();
        }
      }
    });
  };
Then, we need to call this permission-checking function every time the app starts. For that, we need to call the function inside the useEffect hook as directed in the code snippet below:
useEffect(() => {
    _checkPermissions();
  }, []);
Lastly, we need to create a simple form with two inputs that accept room name and user name. Then, we need to send the inputs to the server to register on the Twilio API. The code for this is provided in the code snippet below:
return (
    <KeyboardAvoidingView
      behavior={Platform.OS === 'ios' ? 'padding' : 'height'}
      style={styles.container}>
      <ScrollView contentContainerStyle={styles.container}>
        <View style={styles.form}>
          <View style={styles.formGroup}>
            <Text style={styles.text}>User Name</Text>
            <TextInput
              style={styles.textInput}
              autoCapitalize="none"
              value={props.userName}
              onChangeText={(text) => setProps({...props, userName: text})}
            />
          </View>
          <View style={styles.formGroup}>
            <Text style={styles.text}>Room Name</Text>
            <TextInput
              style={styles.textInput}
              autoCapitalize="none"
              value={props.roomName}
              onChangeText={(text) => setProps({...props, roomName: text})}
            />
          </View>
          <View style={styles.formGroup}>
            <TouchableOpacity
              disabled={false}
              style={styles.button}
              onPress={() => {
                _checkPermissions(() => {
                  fetch(`https://ae7a722dc260.ngrok.io/getToken?userName=${props.userName}`)
                    .then((response) => {
                      if (response.ok) {
                        response.text().then((jwt) => {
                          setProps({...props, token: jwt});
                          navigation.navigate('Video Call');
                          return true;
                        });
                      } else {
                        response.text().then((error) => {
                          Alert.alert(error);
                        });
                      }
                    })
                    .catch((error) => {
                      console.log('error', error);
                      Alert.alert('API not available');
                    });
                });
              }}>
              <Text style={styles.buttonText}>Connect to Video Call</Text>
            </TouchableOpacity>
          </View>
        </View>
      </ScrollView>
    </KeyboardAvoidingView>
  );
We will get the result as shown in the emulator screenshot below:
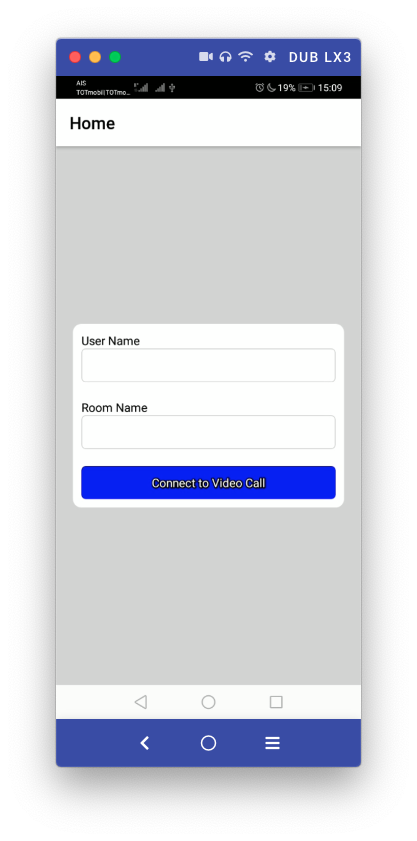
Here, we can notice our Register Room screen with a modal form where we can input the room name and user name in order to register to the Twilio API running on the server.
How to Build the Video Call Screen
In the Video Call Screen, we are going to have two windows – one to display our own camera's view, and the other to display the recipient's camera's view.
First, we need to initialize the context to accept the states. Then we'll create a reference variable using the useRef hook to access the states as directed in the code snippet below:
const VideoCallScreen = ({navigation}) => {
  const twilioVideo = useRef(null);
  const {props, setProps} = useContext(AppContext);
Next, we need to initialize the connection using the connect method from the twilioVideo object, providing the room name and access token as directed in the code snippet below:
useEffect(() => {
    twilioVideo.current.connect({
      roomName: props.roomName,
      accessToken: props.token,
    });
    setProps({...props, status: 'connecting'});
    return () => {
      _onEndButtonPress();
    };
  }, []);
Now, we need to create the main body template for the Video Call Screen. Here, we show the participant's camera view only when the connection is established and streaming using conditional rendering. The overall code for this is provided in the code snippet below:
{(props.status === 'connected' || props.status === 'connecting') && (
        <View style={styles.callWrapper}>
          {props.status === 'connected' && (
            <View style={styles.grid}>
              {Array.from(props.videoTracks, ([trackSid, trackIdentifier]) => (
                <TwilioVideoParticipantView
                  style={styles.remoteVideo}
                  key={trackSid}
                  trackIdentifier={trackIdentifier}
                />
              ))}
            </View>
          )}
        </View>
      )}
Next, we need to create functions to control the in-video features such as end call, mute, and switching front and back camera. The coding implementation of the required functions are provided in the code snippet below:
const _onEndButtonPress = () => {
    twilioVideo.current.disconnect();
    setProps(initialState);
  };

  const _onMuteButtonPress = () => {
    twilioVideo.current
      .setLocalAudioEnabled(!props.isAudioEnabled)
      .then((isEnabled) => setProps({...props, isAudioEnabled: isEnabled}));
  };

  const _onFlipButtonPress = () => {
    twilioVideo.current.flipCamera();
  };
Here, we used the disconnect, setLocalAudioEnabled and flipCamera methods provided by twilioVideo instance to trigger the required in-video features.
Now we need to render out some buttons to trigger the functions. For that, we need to use the code from the following code snippet:
       <View style={styles.optionsContainer}>
        <TouchableOpacity style={styles.button} onPress={_onEndButtonPress}>
          <Text style={styles.buttonText}>End</Text>
        </TouchableOpacity>
        <TouchableOpacity style={styles.button} onPress={_onMuteButtonPress}>
          <Text style={styles.buttonText}>
            {props.isAudioEnabled ? 'Mute' : 'Unmute'}
          </Text>
        </TouchableOpacity>
        <TouchableOpacity style={styles.button} onPress={_onFlipButtonPress}>
          <Text style={styles.buttonText}>Flip</Text>
        </TouchableOpacity>
      </View>
The last step is to add the TwilioVideo component that is configured to handle and observe all the video calling events. The overall configured TwilioVideo component is provided in the code snippet below:
      <TwilioVideo
        ref={twilioVideo}
        onRoomDidConnect={() => {
          setProps({...props, status: 'connected'});
        }}
        onRoomDidDisconnect={() => {
          setProps({...props, status: 'disconnected'});
          navigation.goBack();
        }}
        onRoomDidFailToConnect={(error) => {
          Alert.alert('Error', error.error);
          setProps({...props, status: 'disconnected'});
          navigation.goBack();
        }}
        onParticipantAddedVideoTrack={({participant, track}) => {
          if (track.enabled) {
            setProps({
              ...props,
              videoTracks: new Map([
                ...props.videoTracks,
                [
                  track.trackSid,
                  {
                    participantSid: participant.sid,
                    videoTrackSid: track.trackSid,
                  },
                ],
              ]),
            });
          }
        }}
        onParticipantRemovedVideoTrack={({track}) => {
          const videoTracks = props.videoTracks;
          videoTracks.delete(track.trackSid);
          setProps({...props, videoTracks});
        }}
      />
We will get the following result if we are able to establish the proper connection between users in a room:
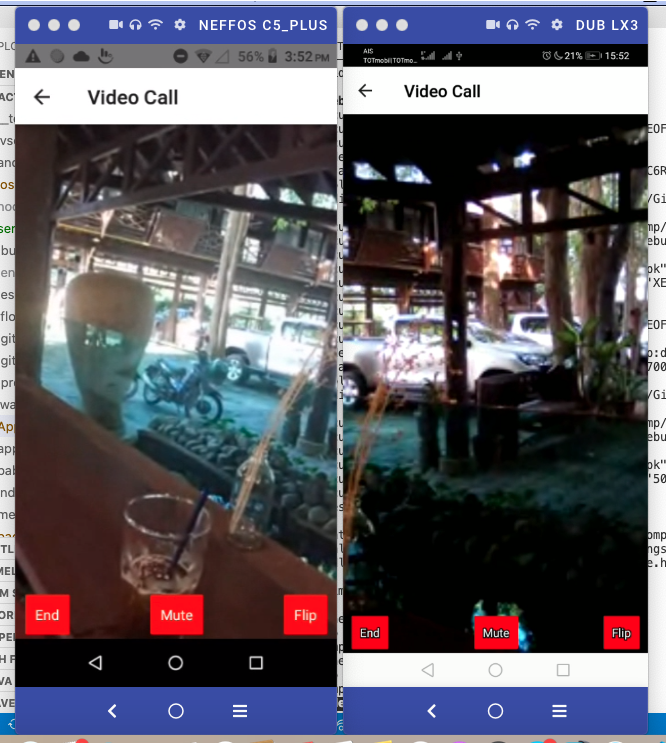
The screenshots above demonstrate video calling between two participants in a room.
With this, we have successfully implemented the Video Calling feature in our React Native app.
Conclusion
This tutorial aimed to deliver a beginner-level learning resource on how to setup Video Calling in a React Native app. We did this by using Twilio's programmable video call API.
We not only covered the React Native part but also the overall API implementation in a separate Node server project.
Now, the next step can be to add advanced features such as starting an anonymous call or multiple participant video calling rooms.
For feature inspiration and a proper video calling app, you can check out instamobile.io that offers state of a Video Chat app with powerful features.
See ya next time folks, Happy Coding!