

Container orchestration has been called the next big thing in the world of technology. And it’s easy to see why.
Container orchestration helps IT professionals and programmers maximize their applications’ performance. It helps them ensure that multiple containers can work together to handle more tasks at the same time than any one container could manage on its own.
But how does container orchestration work, exactly? What are its advantages, and how do you go about implementing it? This article will provide answers to all of your queries and more.
Prerequisites
To understand container orchestration, you need:
- Ubuntu 22.04 LTS, or any other version is OK.
- Basic understanding of what containers are and how they function
- A consistent internet connection
- Sudo permissions
What You Will Learn
If you're unfamiliar with container orchestration, you may be wondering what the fuss is about.
In this tutorial, we'll go through the advantages of container orchestration and how to apply it in your organization.
By the end, you'll better understand why container orchestration is so essential and how it can help your business run more efficiently.
What is Container Orchestration?
If you’re running a business, chances are you’re using containers to run your applications. But what actually is container orchestration?
In short, it’s a way to manage and automate the deployment, scaling, and management of containers.
The Benefits of Using a Container Orchestrator
There are many benefits to using a container orchestrator, including increased efficiency, scalability, and portability.
A container orchestrator can also help you manage your application's lifecycle, making it easier to deploy and update your applications. In addition, a container orchestrator can help you automate tasks such as monitoring and logging.
With a container orchestrator, you can define the resource constraints for each of your containers. For example, if you need more CPU power for one of your containers than another, the container orchestrator will allocate resources accordingly.
How to Pick Your Container Orchestration Platform
There are a few things you should consider when selecting a container orchestration platform. The first is whether you want a self-hosted or cloud-based solution. A cloud-based solution may be the ideal option if you're just getting started with containers.
Another thing to consider is what features you require. Some platforms offer more comprehensive management tools than others.
Finally, think about how easy the platform is to use and whether it integrates well with other tools you're using.
Overview of an Example Stack
In a typical container orchestration setup, you will have several different components working together to provide a complete solution.
For example, you might have:
- a container registry, where your images are stored
- a container runtime, which manages the lifecycle of your containers
- and a container orchestration platform, which provides scheduling and coordination for your containers.
Some use cases that require an orchestrated approach include continuous integration/deployment (CI/CD) and batch processing.
A CI/CD pipeline is an automated system that helps developers release new features into production at any time by reducing manual tasks like deployment scripts and configuration management.
A batch processing workload is one where many compute-intensive tasks share resources during specific periods, such as on weekends or after hours when demand is low.
One way to execute these tasks would be with a queue, but this method does not scale well. To process more jobs in parallel, you need a scheduler capable of managing hundreds or thousands of concurrent jobs.
Batch processing also has strict requirements for data consistency: it cannot tolerate a high degree of variability in execution times between individual jobs because there may be some dependencies between them.
Scheduling algorithms that can reduce variability in execution times by intelligently managing the order in which they run their jobs are preferable here.
How to Plan Your Implementation
Step 1 – Decide on Architecture
Now that you know what container orchestration is and why you need it, it's time to start planning your implementation.
The first step is deciding on the architecture of your system. This will involve deciding how many nodes you need, what type of storage each node will use, and how the nodes will be interconnected.
Once you have a good understanding of your desired architecture, you can begin looking at different orchestration solutions that will fit your needs.
There are two common ways you can orchestrate your containers: scheduler-based orchestration and resource-based orchestration.
In scheduler-based orchestration, an external scheduler decides when and where containers should run. In resource-based orchestration, allocating resources is done internally by the orchestrator based on preconfigured policies.
If you want more control over the placement of containers, then scheduler-based orchestration may be better for you. If you want less overhead concerning configuring resources, then resource-based orchestration may be more appropriate.
Step 2 – Preparation
As your company expands, you'll need to consider how to scale.
One method is to use container orchestration. This allows you to manage and deploy your containers more efficiently. You can even set up an automation that will automatically take care of scaling for you as needed.
Step 3 – Putting it All Together
Now that you know the basics of container orchestration and how it can benefit your business, it's time to put it all together. Here are the steps you'll need to take:
- Define your goals and objectives. What do you want to achieve with container orchestration?
- Choose the right tool for the job. There are various container orchestration tools available, so do your research to find the one that best fits your needs.
- Set up your environment. Getting your containers set up can be challenging if you don't know what you're doing. Be sure to read through the documentation and follow any instructions before beginning.
- Test it out! Try running your app with a new orchestration system before fully committing. The last thing you want is something not to work or go as planned once it's already been implemented on production servers. Fortunately, testing things out beforehand will help you minimize any surprises in the future.
Now that you know the basics of container orchestration at a high level, it's time to get started!
Types of Container Orchestration Platforms
There are three main types of container orchestration platforms: Kubernetes, Docker Swarm, and Apache Mesos. Each has advantages and downsides, so it is critical to select the best one for your purposes.
For example, if you're a startup or small business with limited IT resources, then you might want to use Docker Swarm. It is designed for teams that don't have many systems administrators.
For larger enterprises with more experienced IT staff, Kubernetes is a good choice because it is more scalable and provides more control over how containers are deployed. But both Kubernetes and Docker Swarm provide excellent scalability as well as a high degree of user-friendliness.
In this tutorial, we will be working with Kubernetes. Kubernetes is an open-source container orchestrator. By orchestrating your containers with Kubernetes, you can automate many of the tasks associated with managing them.
How to Install Kubernetes as a Single Node
One option for getting started with Kubernetes is to install it as a single node. This can be a great way to learn the basics of the system and get a feel for how it works. Plus, it's relatively simple to set up.
Kubernetes is an open platform that allows you to make many decisions on your own, which can be really helpful.
In the following tutorial, I decided to use:
- Ubuntu 22.04 LTS. If you are using any other operating system you can learn more here.
- MicroK8s. From a single node, MicroK8s creates a certified Kubernetes cluster in just a few minutes. Microk8s Kubernetes distribution from Canonical is small, versatile, and portable.
Step 1: Use the snap package to install MicroK8s.
MicroK8s is distributed as a snap, which necessitates the installation of snapd. This is already included in the most recent version of Ubuntu.
Type the following command to get the most recent version of MicroK8s:
sudo snap install microk8s --classic
After running the command above. It will begin downloading MicroK8s as shown in the image below.

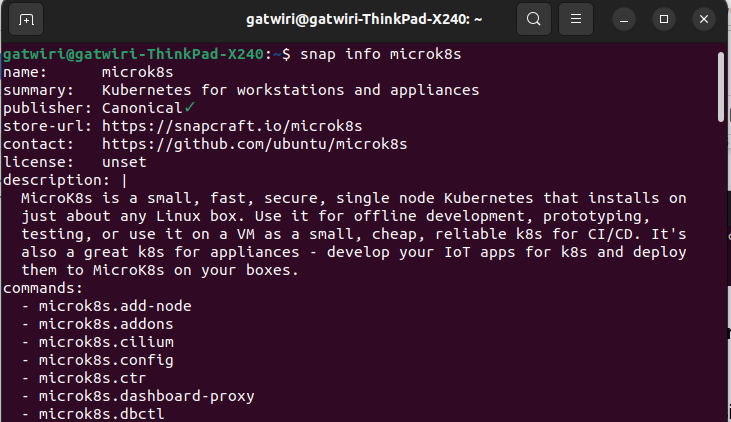
Step 2: On your Ubuntu system, list the various versions of Microk8s.
You may use the snap command below to see all possible versions of microk8s.
snap info microk8s
When you execute the command above, you should get the output seen in the image below:
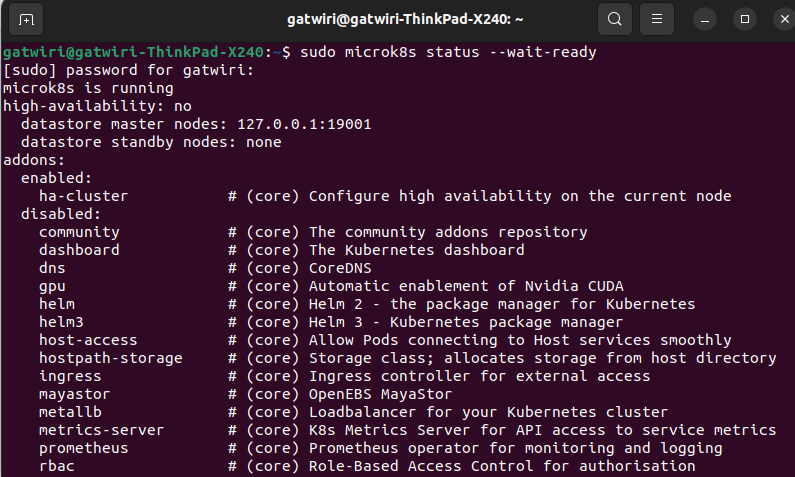
Step 3: Check that MicroK8s has been installed.
You can check the status of MicroK8s using an existing command in Ubuntu. To accomplish this, enter the following command in your terminal.
sudo microk8s status --wait-ready
Note that to wait for Kubernetes services to start, you must use the "-wait-ready" parameter during installation.
After executing the command you will get the following output:
Step 4: Connect to Kubernetes
The most critical step is now to gain access to Kubernetes. MicroK8s offers its version of kubectl for interacting with Kubernetes. It is capable of running commands that track and control your Kubernetes cluster.
Enter the following command into the terminal to see your current node.
sudo microk8s kubectl get nodes
After running the command above you will get the following output. As you can see, the status is "Ready". By using this command, you may also look at the node's Name, roles, age, and version.

Step 5: Examine the running services
If you wish to see what MicroK8s services are currently running, use the following command:
sudo microk8s kubectl get services
This command displays the name, type, Cluster-IP, external-IP, port(s), and age of the currently running services.

Step 6: Deploy the application with MickroK8s.
In the following example, we are using kubectl to deploy a NGINX application. To successfully deploy NGINX, enter the following command:
sudo microk8s kubectl create deployment nginx --image=nginx
As you can see in the image below, the application has been deployed:

You may use the same command to deploy any other app.
Make sure you remember to replace Nginx with your preferred application name, as shown in the image below.

Conclusion
If you're looking for a way to improve your application's efficiency and deployment, container orchestration is a great solution.
By using containers, you can package all the necessary components of your application into one easily-deployable unit.
Plus, by using a container orchestration tool like Kubernetes, you can automate the entire process. You don't have to worry about manually configuring anything; just write some code, put it in a container, and deploy it.
With this kind of automation, things are only going to get easier.