By Mohammed Salman
For my first post on Medium, and I wanted to share with you how I made a news app with React Native.
Requirements for building the app:
- A basic understanding of the JavaScript language.
- Install: Node.js, react native using npm.
- Libraries used: moment, react-native, react-native-elements.
If you’re not familiar with these resources, don’t worry — they are quite easy to use.
The topics we will cover in the post are:
- News API
- Fetch API
- FlatList
- Pull down to refresh
- Linking
And more…so let’s get started!
You can find the project repo here
News API
A simple and easy-to-use API that returns JSON metadata for headlines and articles live all over the web right now. — NewsAPI.org
First, you should go ahead and sign up for News Api to get your free apiKey (your authentication key).
Create a new React Native project, and call it news_app (or whatever you want). In the project directory, make a new folder and call it src . In the src directory, create a folder an name it components . So your project directory should look something like this:
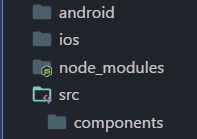 project directory
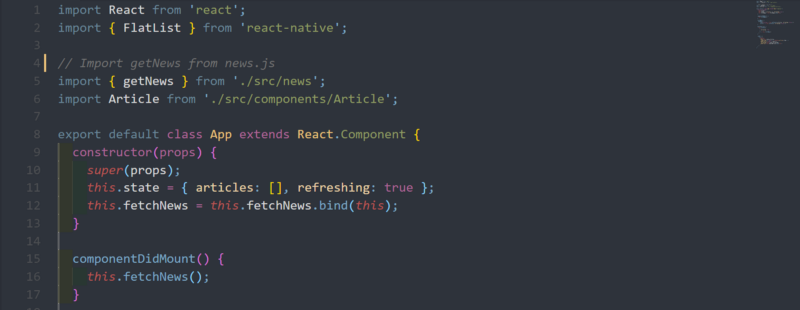
In the src folder, create a new file called news.js . In this file we are going to fetch the JSON that contains the headlines from the News API.
news.js
Make sure you replace YOUR_API_KEYHERE with your own API key. For more information about the News API, go to newsapi docs**._**
Now we declare the getNews function, which is going to fetch the articles for us. Export the function so we can use it in our App.js file.
App.js
In the constructor, we define the initial state. articles will store our articles after we fetch them, and refreshing will help us in refresh animation. Notice that I set the refreshing bool to true, because when we start the app, we want the animation to start while we load the articles (news headlines).
componentDidMount is invoked immediately after a component is mounted. Inside it we call the fetchNews method.
componentDidMount() { this.fetchNews();}
In fetchNews we call getNews() which returns a promise. So we use the .then() method which takes a callback function, and the callback function takes an argument (the articles).
Now assign the articles in the state to the articles argument. I only typed articles because it’s a new ES6 syntax which means { articles: articles } , and we set refreshing to false to stop the spinner animation.
fetchNews() { getNews().then( articles => this.setState({ articles, refreshing: false }) ).catch(() => this.setState({ refreshing: false }));}
.catch() is called in rejected cases.
handleRefresh method is going to start the spinner animation and call the fetchNews() method. We pass () => this.fetchNews() , so it’s called immediately after we assign the state.
handleRefresh() { this.setState({ refreshing: true },() => this.fetchNews());}
Inside the render method, we return a FlatList component. Then we pass some props. data is the array of articles from this.state . The renderItem takes a function to render each item in the array, but in our case it just returns the Article component we imported earlier (we’ll get to it). And we pass the article item as a prop to use later in that component.
Article.js
In src/components create a new JavaScript file and call it Article.js
Let’s start by installing two simple libraries using npm: react-native-elements, which gives us some premade components we could use, and moment that will handle our time.
Install them using npm:
npm install --save react-native-elements moment
In Article.js:
There is a lot going on here. First, we start by destructuring the article prop and the styles object defined below the class.
Inside the render method, we define the time constant to store the time when the article was published. We use the moment library to convert the date to the time passed since then, and we pass publishedAt or time from now if publishedAt is null.
defaultImg is assigned an image URL in case the URL of the article image is null.
The render method returns _TouchableNativeFeedback_ to handle when the user presses the card. We pass it some props: useForground , which tells the element to use the foreground when displaying the ripple effect on the card, and onPress , which takes a function and executes it when the user presses the card. We passed () => Linking.openUrl(url) , which will simply open the URL to the full article when we press the card.
The card takes three props: featuredTitle , which is a title placed over the image, featuredTitleStyle to style it, and image which is the article image from the article prop. Otherwise, if its null , it’s going to be the defaultImg .
.. featuredTitle={title} featuredTitleStyle={featuredTitleStyle} image={{ uri: urlToImage || defaultImg }}..
As for the text element, it will hold the description for the article.
<Text style={{ marginBottom: 10 }}>{description}</Text>
We added a divider to separate the description from time and source name.
<Divider style={{ backgroundColor: '#dfe6e9' }} />
Below the Divider , we have a View that contains the source name and the time the article was published.
..<View style={{ flexDirection: ‘row’, justifyContent: ‘space-between’ }} > <Text style={noteStyle}>{source.name.toUpperCase()}</Text> <Text style={noteStyle}>{time}</Text></View>..
After the class, we defined the styles for these components.
Now if we run the app:
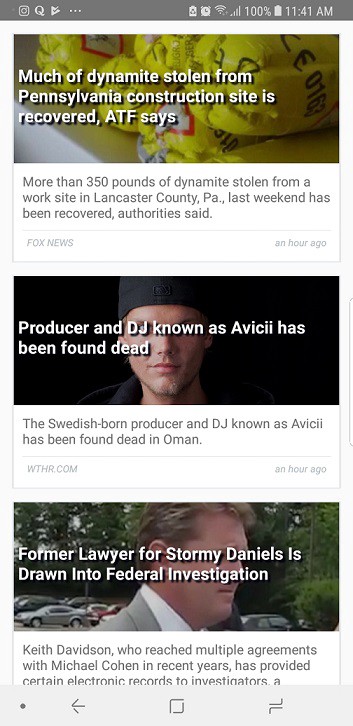 our news app
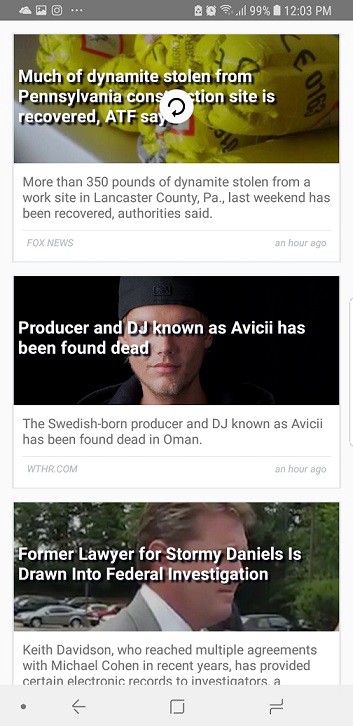 pull down to refresh
There you go! The source code for the app is available on GitHub: HERE, feel free to fork it.
I hope you enjoyed my article! If you have any questions at all, feel free to comment or reach me on twitter and I will definitely help :)
Next Story ?How to build native desktop apps with JavaScript