
You may have heard the old saying: "Measure twice, cut once." Well that is exactly why you should plan out a website before you build it. And that's where prototyping comes in.
When we design our websites, we progress from wireframing to prototyping to – finally – a full design.
I wanted to explore and expand on what Prototyping actually means by taking you through the full process.
Note that I created another course that covers the first step of designing a website: building a wireframe. You can read about wireframing and watch my 30 minute video course here.
In this tutorial, we'll cover:
- What an Early Prototype is
- Creating a Structure: Frame, Rows, Columns
- Adding Content: Header, Slider, About
- Designing Sections
- Conclusion: What we've learned from the prototyping process
What is an Early Prototype?
A prototype is normally the secondary iteration of a design, as it is built on top of a wireframe.
A wireframe usually involves a simple drawn sketch via paper, pen, or online tool. Next we build the prototype, which is our more refined mockup for the website or app.
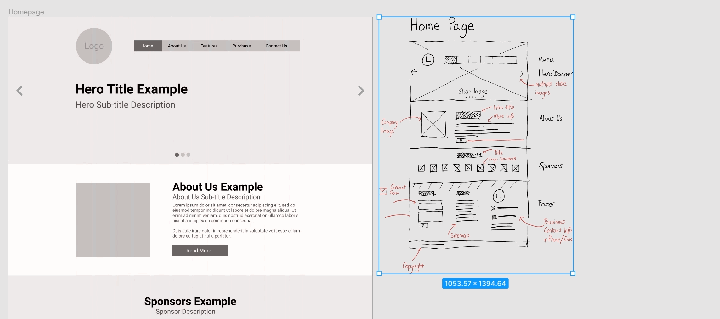
Let's take a look at the early wireframe we built in the previous article:
 The wireframe we created in my previous wireframing course.
It has a number of pages, sections, and areas where text and images will be added later.
The goal, then, in the Prototype is to build this visually, but without adding color or images.
In this example, I will be using Figma to do the Prototype. You can view the whole Figma protype here.
How to Create a Website Prototype Structure: Frame, Rows, Columns
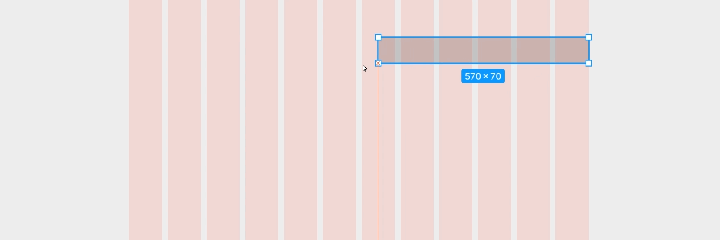
When we created the wireframe, we considered the grids – but they were hand drawn.
When doing an early prototype, we have to define them properly so that the whole design follows the grid structure.
In this example, I will be using a 12-column design with a regular width of 1140px, which is traditionally used and seen in Bootstrap designs. This gives us a 15-30px margin between grid units.
This will be useful later when we collapse the columns to rows for mobile responsiveness.
You can create your own grid structure in Figma. But be aware that you (or someone else) will later need to actually code these designs.
Whenever you're designing something, be sure to take the developer into consideration.
How to Add Content to a Website Prototype: Header, Slider, Sections
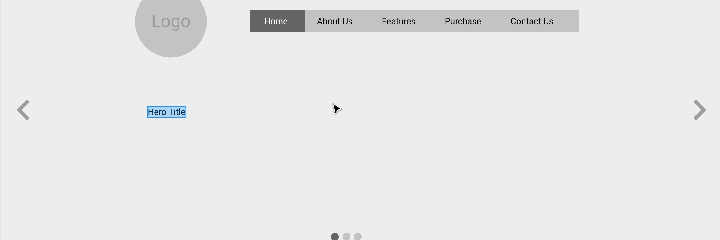
Unlike the Wireframe, we are no longer representing text with lines, and headers with blocks. Instead we need to fill out content for a mockup.
This doesn't mean adding colors or images. But it does mean we have to show real text.
At this stage, it's a great idea to make sure that the header and sections are shown with the actual content they will be intended to hold. This will allow better selection for colors and images in later stages of the design.
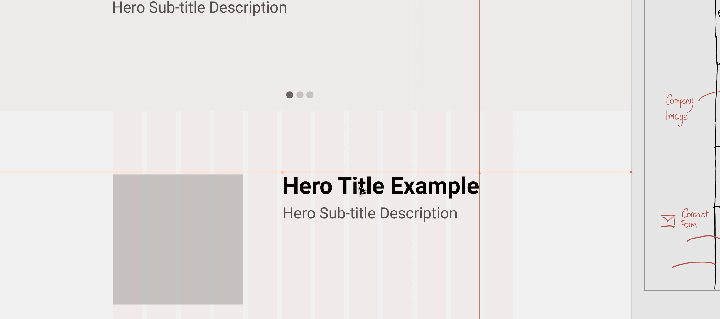
In this part of the example, I built out the slider with hero text, and a description underneath. There are a few things to look out for at this phase of the prototype process:
- Font sizing and positioning
- Content location and spacing
- Margins and padding between sections and content
How to Design Sections of the Website Prototype
For prototyping and the final mockup, it's important to start layering your groups and sections. Sections can include things like the header, the "about us" section, and the sponsors section.
You can create groups in your UI tool (Figma does this with Ctrl+G). Label your sections and set them with different background colors. This will make it easy to identify them, and will allow you to easily move them about.
Too many times I've been asked to move certain parts of a website up and down the grouping. By grouping all your components into sections, you will make it much easier on yourself during the prototype phase of the design work.
Conclusion: What We Have Learned from the Prototyping Process
As we build out the rest of the design, it's important to ensure that this early prototype does not become a full mockup for a website design.
It's easy to get carried away. But the goal of doing a prototype after a wireframe is to ensure that we can continue to plan the website's development.
It's much easier to identify problems and issues in the early planning stages and update them before diving into creating the full design. Such prototyping may only take you a few hours, but it can save days worth of effort later in the process.
Once you've prototyped multiple pages, you can move on to the full mockup design phase. This will involve figuring out color theory, typography, and images that work accordingly. We will take a look at this in the next article in this series next month.
Bonus: Adding an Interactive Prototype Run
We only created a single page for this example. This said, prototyping also allows you to create an emulated example of the site operating.
This emulation is very useful for conducting demos, testing how clients respond to seeing a real world example of an early mock-up, and revising how all of your links flow.
I hope you enjoyed this article. If you don't know who I am, I'm Adrian from Australia. ? I have a tiny channel on Twitter & YouTube, so if you want to know more about me or enjoy my content, check me out sometime ?
- Youtube: https://youtube.com/adriantwarog
- Twitter: https://twitter.com/adrian_twarog