
Hi everyone! Hooks are one of the main features of modern React code and one of the first concepts you should get comfortable with when learning about this library.
In this article I'm going to explain some of the most useful hooks React provides us with, how they work, and examples of situations in which we can use them.
Hope you enjoy the reading. Let's go!
Table of Contents
A bit of history about React and what hooks are for
As you may know, React is a open-source library used to build user interfaces in a simpler and more efficient way than tools that came before (vanilla JS and jQuery mainly). It was developed by Meta (aka Facebook) and released to the public in 2013.
Hooks were a feature introduced years later in 2016 (in React's 16.8 version). Just to have an idea of what hooks are for and why are they improvement over what was done before, let's view an example of "pre-hooks" code against some modern React "post-hooks" code.
In old React code, we used class components. These had a render method which contained the JSX responsible for rendering the UI.
And if we wanted this component to store a state, we had to declare it within a constructor method and change it by calling this.setState. Beneath is a short example for you to have an idea:
// javascript
import React from "react"

class Counter extends React.Component {
    constructor(props) {
      super(props)
      this.state = { count: 0 }
    }

    handleIncrement = () => { this.setState(prevState => {
        return { count: prevState.count - 1 };
      })
    }

    handleDecrement = () => { this.setState(prevState => {
        return { count: prevState.count + 1 };
      })
    }

    render() {

      return (
        <div className="App">

          <button onClick={this.handleIncrement}>Increment</button>
          <button onClick={this.handleDecrement}>Decrement</button>

          <h2>{this.state.count}</h2>
        </div>
      )
    }
  }

  export default Counter
It's important to mention that function components (what we use nowadays) were available in "pre-hooks" React too. But we could only use them for stateless components – meaning components that didn't store state and weren't responsible of any complex logic apart from just rendering UI.
With the incorporation of hooks, we can now use function components (and their more straight-forward and less verbose composition) together with all the more complex functionalities class components offered us.
In short, hooks are things we use to implement logic and functionalities in our components.
Here's another example were we transform what we had in our class component into a functional one:
// javascript
import { useState } from 'react'

export default function Counter() {

    const [count, setCount] = useState(0)

    const handleIncrement = () => setCount(count+1)
    const handleDecrement = () => setCount(count-1)

    return (
        <div className="App">
            <button onClick={() => handleIncrement()}>Increment</button>
            <button onClick={() => handleDecrement()}>Decrement</button>

            <h2>{count}</h2>
        </div>
    )
}
Frequently Used React Hooks
Now you have an idea of what hooks are for and why are they better than what was before. So let's take a look at the most used ones, on what occasions are they useful, and how to implement them.
UseState hook
In modern React, we build our applications with functional components. Components are themselves JavaScript functions, independent and reusable bits of code.
The purpose of building the application with components is to have a modular architecture, with a clear separation of concerns. This makes code easier to understand, easier to maintain, and easier to reuse when possible.
The state is an object that holds information about a certain component. Plain JavaScript functions don't have the ability to store information. The code within them executes and "disappears" once the execution is finished.
But thanks to state, React functional components can store information even after execution. When we need a component to store or "remember" something, or to act in a different way depending on the environment, state is what we need to make it work this way.
It's important to mention that not all components in a React app must have state. There are stateless components as well which just render its content without the need to store any information, and that's just fine.
Another important thing to mention is that state change is one of the two things that make a React component re-render (the other is a change in props). In this way, the state stores information about the component and also controls its behavior.
In order to implement state in our components, React provides us with a hook called useState. Let's see how it works with the following example.
// javascript
// App.js
import { useState } from 'react'

function App() {

  const [count, setCount] = useState(0)

  return (
    <div className="App">
      <p>Count is: {count}</p>

      <div>
        <button onClick={() => setCount(count+1)}>Add 1</button>
        <button onClick={() => setCount(count-1)}>Decrease 1</button>

        <button onClick={() => setCount(count+10)}>Add 10</button>
        <button onClick={() => setCount(count-10)}>Decrease 10</button>

        <button onClick={() => setCount(0)}>Reset count</button>
      </div>
    </div>
  )
}

export default App
First we import the hook from React:
import { useState } from 'react'Then we initialize the state:
const [count, setCount] = useState(0)
Here we provide a variable name for the state (count) and a function name we'll use every time we need to update that state (setCount). Then we set the initial value of the state (0), which will be the value loaded by default every time the app starts.
- Lastly, as mentioned above, every time we want to update the state, we have to use the function we declared:
setCount. To use it, we just need to call it passing it the new state we want as a parameter. That is, if we want to add 1 to the previous estate, we callsetCount(count+1).
As mentioned as well, this will cause an update of the state and the re-render of the component. Which in our app means we'll see on the screen that the counter is going up.
It's important to mention that the setState function is asynchronous. So if we try to read the state immediately after updating it, like this:
<button onClick={() => {
          setCount(count+1)
          console.log(count)
}}>Add 1</button>
we would get the previous value of the state, without the update.
The correct way of reading state after the update would be using the useEffect hook. It lets us execute a function after every component re-render (by default) or after any particular variable where we declare changes.
Something like this:
useEffect(() => console.log(value), [value])
Also, the fact that useState is asynchronous has implications when considering very frequent and quick state changes.
Take, for example, the case of a user that presses the ADD button many times in a row, or a loop that emits a click event a certain number of times.
By updating state like setCount(count+1) we take the risk that count won't yet be updated when the next event is fired.
For example, let's say at the start count = 0. Then setCount(count+1) is called and the state is asynchronously updated.
But then again setCount(count+1) is called, before the state update was completed. This means that still count = 0, which means that the second setCount won't update the state correctly.
A more defensive approach would be to pass setCount a callback, like so: setCount(prevCount => prevCount+1).
This makes sure that the value to update is the most recent one and keeps us away from the problem mentioned above. Every time we perform updates on a previous state we should use this approach.
If you'd like to take a more in-depth look at ways to manage state in React, you can take a look at this article I wrote a while ago.
UseEffect hook
Together with useState, useEffect will probably be the hook you use the most when developing a React app. It's like the bread and butter for the React dev.
UseEffect allows you to run a side effect on your component. Side effect basically means something that happens after some other specific thing happens.
A typical use case is to fetch data once the component has been mounted. Let's say we have a function called fetchData which is responsible for that – our useEffect hook might look like this:
useEffect(() => { fetchData() }, [])
The structure of this hook is quite simple. It accepts two arguments. First we have a callback which executes our function and then we have an array called "array of dependencies". If we leave it empty like it is in the example, the callback will execute after the component renders.
Now let's say we want our side effect to run after a variable changes. Following the previous example we used for the useState hook, for our side effect after the count variable changes, we could set useEffect like this:
// javascript
// App.js
import { useState } from 'react'

function App() {

  const [count, setCount] = useState(0)

  useEffect(() => { console.log('Count has changed!') }, [count])

  return (
    <div className="App">
      <p>Count is: {count}</p>

      <div>
        <button onClick={() => setCount(count+1)}>Add 1</button>
        <button onClick={() => setCount(count-1)}>Decrease 1</button>

        <button onClick={() => setCount(count+10)}>Add 10</button>
        <button onClick={() => setCount(count-10)}>Decrease 10</button>

        <button onClick={() => setCount(0)}>Reset count</button>
      </div>
    </div>
  )
}

export default App
A third and last thing to mention about useEffect is the possibility to return a "cleanup" function. This "cleanup" function will execute when the component unmounts. Following our previous example, adding a cleanup function might look like this:
  useEffect(() => {
    fetchData()
    return cleanUp()
  }, [])
Cleanup functions in useEffect are normally used to cancel subscriptions to avoid React trying to update the state of a component that has already been unmounted.
For more info about useEffect's cleanup function, you can refer to this article.
UseContext hook
React context API was released in 2016 with React's 16.3 version. What context does in React is to provide a solution for prop drilling.
Prop drilling refers to the situation in which we have a parent component that stores a state. And beneath that parent, we have many levels of children components.
If we need to render that state in a child component that is deeply nested in that structure, the solution would be to pass the state as props all along the component chain.

A graphic of prop drilling
This option works just fine. The problem is we would need to repeat the same code in many different places, which if we ever need to change our code later on (you'll always have to do this sooner or later) is something very tedious to work with and prone to errors and bugs.
The context API solves this situation by providing "a place" to store state that needs to be consumed from many different parts of our application, and along different levels of the component tree.
The way this works is that the context component will store the given state, and from any given component we can read and update that state, no matter where that component is located. We forget all about props. Instead, we can just work directly with the context and all the components that read that context state will re-render when the state is updated.
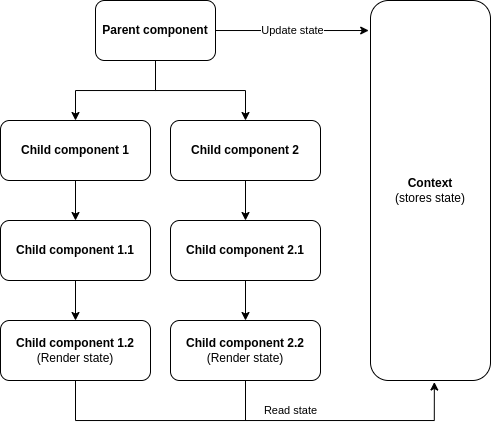
A graphic of the same situation but using context
Now that we have the theoretical foundation, let's see how the useContext hook allows us to use this API. The typical implementation would look something like this. Within a "context" folder we'll have two files. Context.js and ContextProvider.js.
Within Context.js we'll just initialize the context API by using the createContext function, which takes as an argument the initial state we want to provide (we don't want anything in this case so we can just pass null).
/// Context.js
import { createContext } from 'react'

const Context = createContext(null)

export default Context

On `ContextProvider.js` we'll import the context we initialized in the previous file. We'll also initialize the states we want to consume later on and update from our app's components. Finally, we return the context provider and with the `value` object we pass all the states and setState functions we want to consume later on.

The contextProvider is a HOC. A **higher order component or HOC** is similar to a higher order function in JavaScript (I have an article about that [here](https://gercocca.hashnode.dev/higher-order-functions-and-callbacks)).

Higher order functions are functions that take other functions as arguments OR return other functions. React HOCs take a component as a prop, and manipulate it to some end without actually changing the component itself. You can think of this like wrapper components.
/// ContextProvider.js import { useState } from 'react' import Context from './Context'
const ContextProvider = ({children}) => {
const [darkModeOn, setDarkModeOn] = useState(true) const [englishLanguage, setEnglishLanguage] = useState(true)
return ( <Context.Provider value={{ darkModeOn, setDarkModeOn, englishLanguage, setEnglishLanguage }} > {children} </Context.Provider> ) }
export default ContextProvider
In our `App.js` file, we'll wrap all the components that we want to be able to interact with the state with our contextProvider. In this case we want the whole application to be able to consume and update the context, so we wrap it all.
/// App.js
import './App.scss' import { Suspense, lazy } from 'react' import { BrowserRouter as Router, Routes, Route } from 'react-router-dom' import ContextProvider from './context/ContextProvider' import ErrorBoundary from './ErrorBoundary'
const Header = lazy(() => import ('./components/header/Header')) const AboutPage = lazy(() => import ('./components/aboutPage/AboutPage')) const ProjectsPage = lazy(() => import('./components/projectsPage/ProjectsPage')) const ShortrProject = lazy(() => import('./components/projectsPage/shortrProject/ShortrProject')) const MixrProject = lazy(() => import('./components/projectsPage/mixrProject/MixrProject')) const HelprProject = lazy(() => import('./components/projectsPage/helprProject/HelprProject')) const MyWebsiteProject = lazy(() => import('./components/projectsPage/myWebsiteProject/MyWebsiteProject')) const CurriculumPage = lazy(() => import('./components/curriculumPage/CurriculumPage')) const BlogPage = lazy(() => import('./components/blogPage/BlogPage')) const ContactPage = lazy(() => import('./components/contactPage/ContactPage'))
export default function App() { return (
<Suspense fallback={<></>}>
<Route path='/' element={<Suspense fallback={<></>}>}/>
<Route path='/projects' element={<Suspense fallback={<></>}>}/>
<Route path='/projects/helpr' element={<Suspense fallback={<></>}>}/>
<Route path='/projects/myWebsite' element={<Suspense fallback={<></>}>}/>
<Route path='/projects/mixr' element={<Suspense fallback={<></>}>}/>
<Route path='/projects/shortr' element={<Suspense fallback={<></>}>}/>
<Route path='/curriculum' element={<Suspense fallback={<></>}>}/>
<Route path='/blog' element={<Suspense fallback={<></>}>}/>
<Route path='/contact' element={<Suspense fallback={<></>}>}/>
) }
Finally, from the component we want to read/update context state, we import the context and the useContext hook and destructure the states and functions in the following way (and just use the regular state and setState functions).
import { useContext, useState } from 'react' import Context from '../../context/Context'
import { Link, NavLink } from 'react-router-dom'
const Header = () => {
const { darkModeOn, setDarkModeOn, englishLanguage, setEnglishLanguage } = useContext(Context)
const [showMobileMenu, setShowMobileMenu] = useState(false)
const openMobileMenu = () => { document.body.classList.add('mobileMenu-open') setShowMobileMenu(true) }
const hideMobileMenu = () => { document.body.classList.remove('mobileMenu-open') setShowMobileMenu(false) }
return ( <header className={darkModeOn ? 'header header-dark' : 'header header-light'}>
Germán Cocca
G
{englishLanguage ? 'About' : 'Sobre mi'}
{englishLanguage ? 'Projects' : 'Proyectos'}
Blog
Curriculum
{englishLanguage ? 'Contact' : 'Contacto'}
<button data-testid='es-language-btn' className={englishLanguage ? '' : 'selected'} onClick={() => setEnglishLanguage(false)}>ES <button data-testid='en-language-btn' className={englishLanguage ? 'selected' : ''} onClick={() => setEnglishLanguage(true)}>EN
<input type='checkbox' data-testid='dark-mode-toggle' id='dark-mode-toggle' aria-checked='true' className='toggle-checkbox' checked={darkModeOn} onClick={() => setDarkModeOn(!darkModeOn)} />
<nav id='mobile-menu' className={showMobileMenu ? 'mobile-menu-active' : 'mobile-menu'}>
<NavLink to='/' onClick={() => hideMobileMenu()}>{englishLanguage ? 'About' : 'Sobre mi'}
<NavLink to='/projects' onClick={() => hideMobileMenu()}>{englishLanguage ? 'Projects' : 'Proyectos'}
<NavLink to='/blog' onClick={() => hideMobileMenu()}>Blog
<NavLink to='/curriculum' onClick={() => hideMobileMenu()}>Curriculum
<NavLink to='/contact' onClick={() => hideMobileMenu()}>{englishLanguage ? 'Contact' : 'Contacto'}
<button className={englishLanguage ? '' : 'selected'} onClick={() => { setEnglishLanguage(false) hideMobileMenu() }}>ES <button className={englishLanguage ? 'selected' : ''} onClick={() => { setEnglishLanguage(true) hideMobileMenu() }}>EN
) }
export default Header
This is a tiny bit more boilerplate than just passing everything through props, but it's a lot more maintainable, simple, and easy to understand once it's set up.

Another interesting thing to mention is that we can have many different contexts in our application. We can separate them into concerns. For example, say we have one for authentication states, another regarding user preferences and configuration, another for payments or whatever... And then we can wrap those contexts only around the specific components that need to use them.

So if we have a lot of information that needs to be shared around our app, having many different contexts would be a more modular and tidy way to approach this.

## UseReducer hook

UseReducer is a hook that allows us to natively implement reducers in our app to manage complex states. If you're familiar with [Redux](https://redux.js.org/) or similar state management libraries, the word "reducer" probably rings a bell.

Basically, reducers are a kind of function that take in two or more arguments, perform some kind of action with them, and return a single result that follows from the two arguments.

A **reducer** is a pure function that takes the previous state and an action as an argument, and returns the next state. It's called a reducer because it's the same function type you could pass to an array: `Array.prototype.reduce(reducer, initialValue)`.

But before we dive in to reducers, why do we need this if we already have the useState hook to manage our state?

Well, a problem that may come up when you're using useState is the case where new state to be set depends on the previous state or when state changes occur very frequently in our application.

In these occasions, useState may provoke some unexpected and unpredictable behavior. So this is where **reducers** come in to solve this problem.

**useReducer** is the hook Reacts provides that lets us implement reducers to manage our state. Here's an implementation example:

```js
// App.js
import { useReducer } from 'react'
import './App.scss'

function App() {

  function reducer(state, action) {
    switch (action.type) {
      case 'ADD': return { count: state.count + 1 }
      case 'SUB': return { count: state.count - 1 }
      case 'ADD10': return { count: state.count + 10 }
      case 'SUB10': return { count: state.count - 10 }
      case 'RESET': return { count: 0 }
      default: return state
    }
  }

  const [state, dispatch] = useReducer(reducer, { count: 0 })

  return (
    <div className="App">
      <p>Count is: {state.count}</p>

      <div>
        <button onClick={() => dispatch({type: 'ADD'})}>Add 1</button>

        <button onClick={() => dispatch({type: 'SUB'})}>Decrease 1</button>

        <button onClick={() => dispatch({type: 'ADD10'})}>Add 10</button>
        <button onClick={() => dispatch({type: 'SUB10'})}>Decrease 10</button>

        <button onClick={() => dispatch({type: 'RESET'})}>Reset count</button>
      </div>
    </div>
  )
}

export default App
We start by importing the hook from React:
import { useReducer } from 'react'Then we'll declare a reducer function, which as parameters will take the current state and an action to perform on it. Within it, it will have a switch statement that will read the action type, execute the corresponding action on the state, and return the updated state.
It's common practice to use switch statements on reducers and capital letters to declare the actions.
function reducer(state, action) {
    switch (action.type) {
      case 'ADD': return { count: state.count + 1 }
      case 'SUB': return { count: state.count - 1 }
      case 'ADD10': return { count: state.count + 10 }
      case 'SUB10': return { count: state.count - 10 }
      case 'RESET': return { count: 0 }
      default: return state
    }
  }
- Afterwards, it's time to declare our useReducer hook, which looks fairly similar to the useState hook. We declare a value for our state ('state' in our case), a function we'll use to modify it ('dispatch'), and then useReducer will take the reducer function as first parameter and the default state as second parameter.
const [state, dispatch] = useReducer(reducer, { count: 0 })
- Lastly, to update our state we won't call the reducer directly, but instead we'll call the function we just created ('dispatch'), passing it the corresponding action type we want to execute. Behind the scenes, the dispatch function will connect with the reducer and actually modify the state.
<button onClick={() => dispatch({type: 'ADD'})}>Add 1</button>
It's quite a bit more boilerplate than using useState, but useReducer isn't that complex after all.
To sum it up, we just need:
A reducer, that is the function that will consolidate all possible state changes
A dispatch function, that will send the modifying actions to the reducer.
The thing here is that the UI elements won't be able to update the state directly like they did before when calling setState with a value. Now they will have to call an action type and go through the reducer, which makes state management more modular and predictable.
Also, again if you're familiar with Redux and other state management libraries, you probably noticed that with the Context API and the useReducer hook we can easily implement the same features Redux provides, but natively in React now. So personally, I think for most use cases you don't need a state management library in modern React code.
The story was different before, though, and that's probably why so many state management libraries got popular and many devs are still into them nowadays.
UseRef hook
The useRef hook is a function that returns a mutable ref object whose .current property is initialized with the passed argument (initialValue). The returned object will persist for the full lifetime of the component.
There are two main uses of useRef: Keeping track of a mutable variable through re-renders, and accessing the DOM nodes or React elements.
We can declare a ref using the useRef hook the following way: const ref = useRef(initialValue). Then reference.current accesses the reference value, and reference.current = newValue updates the reference value. Pretty simple.
There are 2 things to remember about refs:
The value of the reference is persisted between component re-renderings.
Updating a reference doesn’t trigger a component re-rendering.
To see an example of this, let's imagine a case where we need to count the number of clicks on a button without re-rendering a component. We could do that like this:
import { useRef } from 'react';

function LogButtonClicks() {
    const countRef = useRef(0);

    const handle = () => {
        countRef.current++;
        console.log(`Clicked ${countRef.current} times`);
    };

    console.log('I rendered!');

    return <button onClick={handle}>Click me</button>;
}
By updating and logging the ref, we avoid the component re-render and achieve our goal. So, the 2 main differences between references and state are:
Updating a reference doesn’t trigger re-rendering, while updating the state makes the component re-render.
And also... The reference update is synchronous (the updated reference value is available right away), while the state update is asynchronous (the state variable is updated after re-rendering).
Some Less Common but Still Useful Hooks
Here I'll present two hooks that are used for memoization in React. If you're not familiar with memoization, you can refer to this article I wrote a while ago about it.
Basically memoization means making components "remember" props and state, so they re-render only if props/state have changed and avoided unnecessary re-renders. This improves the app's performance.
UseCallback hook
useCallback memoizes callback functions received as props, so they're not recreated on every re-render. Using useCallback correctly can improve the performance of our app.
The way we can implement it is by wrapping the function we're passing as props to a childr component within the useCallback hook, like this:
import { useCallback } from 'react'
import Child from "./child"

export default function Counter() {

    return (
        <div className="App">
             <Child name={ useCallback(() => {console.log('Really Skinny Jack')}, [])  } />
        </div>
    )
}
What useCallback does is to hold on to the value of the function despite the parent component re-rendering. This means that the child prop will remain the same as long as the function value remains the same as well. And that solves the problem of unnecessary child re-rendering.
To use it, we just need to wrap the useCallback hook around the function we're declaring. useCallback also has a dependency array, like useEffect. In the array present in the hook, we can declare variables that would trigger the change of the function value when the variable changes too (exactly the same way useEffect works).
const testingTheTest = useCallback(() => {
    console.log("Tested");
  }, [a, b, c]);
UseMemo hook
useMemo is a hook very similar to useCallback. But instead of caching a function, useMemo will cache the return value of a function.
In this example, useMemo will cache the number 2.
const num = 1
const answer = useMemo(() => num + 1, [num])
While useCallback will cache () => num + 1.
const num = 1
const answer = useMemo(() => num + 1, [num])
Custom React Hooks
If you think about it, hooks are just functions that allow us to implement commonly used logic in our components.
Following this same train of thought, in React apps it's common practice to extract frequently used functionalities into functions and export the with a name starting with the prefix use. This is what we call a custom hook.
Let's see an example of a custom hook that returns us the current window size when we call it.
// Hook
const useWindowSize = () => {
  // Initialize state with undefined width/height
  const [windowSize, setWindowSize] = useState({
    width: undefined,
    height: undefined,
  });

// Handler to call on window resize
  const handleResize = () => {
    // Set window width/height to state
    setWindowSize({
        width: window.innerWidth,
        height: window.innerHeight,
      });
  }

  useEffect(() => {
    // Add event listener
    window.addEventListener("resize", handleResize);
    // Call handler right away so state gets updated with initial window size
    handleResize();
    // Remove event listener on cleanup
    return () => window.removeEventListener("resize", handleResize);
  }, []); // Empty array ensures that effect is only run on mount

  return windowSize;
}

export default useWindowSize;
After, we can call and use our custom hook in any component in the following way:
// Usage
function App() {
  const size = useWindowSize();
  return (
    <div>
      {size.width}px / {size.height}px
    </div>
  );
}
As you can see in the example, custom hooks can also use React's native hooks within them. But think about them as just functions that execute certain commonly used logic needed in various parts of our app, It's nothing more complex than that, really.
If you'd like to know more about custom hooks, here's a website dedicated exclusively to that topic.
Round Up
Well everyone, in this article we've taken a look at hooks, a core topic in current React apps. As always, I hope you enjoyed the article and learned something new.
If you want, you can also follow me on LinkedIn or Twitter. See you in the next one!