
By Jillian Rowe
AWS is so cool because it is made up of discreet building blocks that you can use to build some fairly complex infrastructure. This is awesome once you get a handle on things. But when you are just starting out you need to know things like "how do I get the IP address of my server" and "wait which SSH key".
Let's go over a few of the key concepts, and then spin up our very own server on the cloud!
What you need to know to administer remote servers on AWS
There are many reasons why you might want to get started on AWS. Maybe your company is moving infrastructure onto the cloud. Maybe you want to start freelancing and don't want to invest in upfront server costs. Or maybe you just want to learn a new skillset.
In order to spin up a remote server on AWS you need to know a few foundational AWS terms and concepts. I'll go over some terms that are directly applicable to spinning up a remote server, but these same concepts are used for more complex infrastructure services such as ElasticBeanstalk, Docker Swarm, and Kubernetes.
Elastic Compute Cloud (EC2)
AWS EC2 instances are where you compute power lives. These are your remote servers. Knowing how to deal with EC2 instances is incredibly important because they appear just about everywhere.
Security Groups
Security groups are what allow access to your various AWS services, in this case an EC2 instance. These define which ports are open for inward and outward bound traffic.
Key Pairs
Key pairs are your SSH keys. Make sure you keep track of these and keep them somewhere safe! Also, if you use AWS a lot you will start a collection of key pairs, so make sure that you give them descriptive names and not just ssh. ;-)
Virtual Private Cloud (VPC)
A VPC is an isolated resource where your compute infrastructure lives. To carry on with my everything is Legos philosophy, the VPC is the Lego box while the EC2, Security Groups, and KeyPairs are the actual Legos.
VPCs take care of all of your networking. When you sign up for an AWS account you will get a default VPC and that is what we will be using today.
How to Launch an EC2 Instance
There are so, so many ways to launch an EC2 instance. Which one you want will depend upon your needs. Today we will go over using the AWS web console and using the python boto3 library.
As a quick aside, because AWS has so many services you have to go into each service individually to manage it. If you're ever lost, just search for your service from the 'Services' Menu.
Launch an EC2 Instance Using the Wizard
First you'll need to login to your AWS Console.
Navigate to the EC2 Dashboard
 Bring up the EC2 services page by searching for it in 'Services'
- Click on Services to bring up the search box.
- Type in the service name you want - in this case, EC2.
- Click on your service name from the menu to bring you to that services dashboard.
Select 'Launch Instance'
Once we're at the EC2 Dashboard you'll want to click the 'Launch Instance' button in the middle of the screen. This will start up the the AWS EC2 Launch Wizard, which will walk us through the process of starting up an EC2 instance.
If you want to go through part 2 where we'll startup an EC2 server programatically with Python this is an excellent chance to write down your default VPC id!
EC2 Wizard Overview
Once you select 'Launch Instance' you'll be brought to a wizard. The wizard menu has 7 steps, and you can switch between them as you like to get your instance configured just the way you want it.

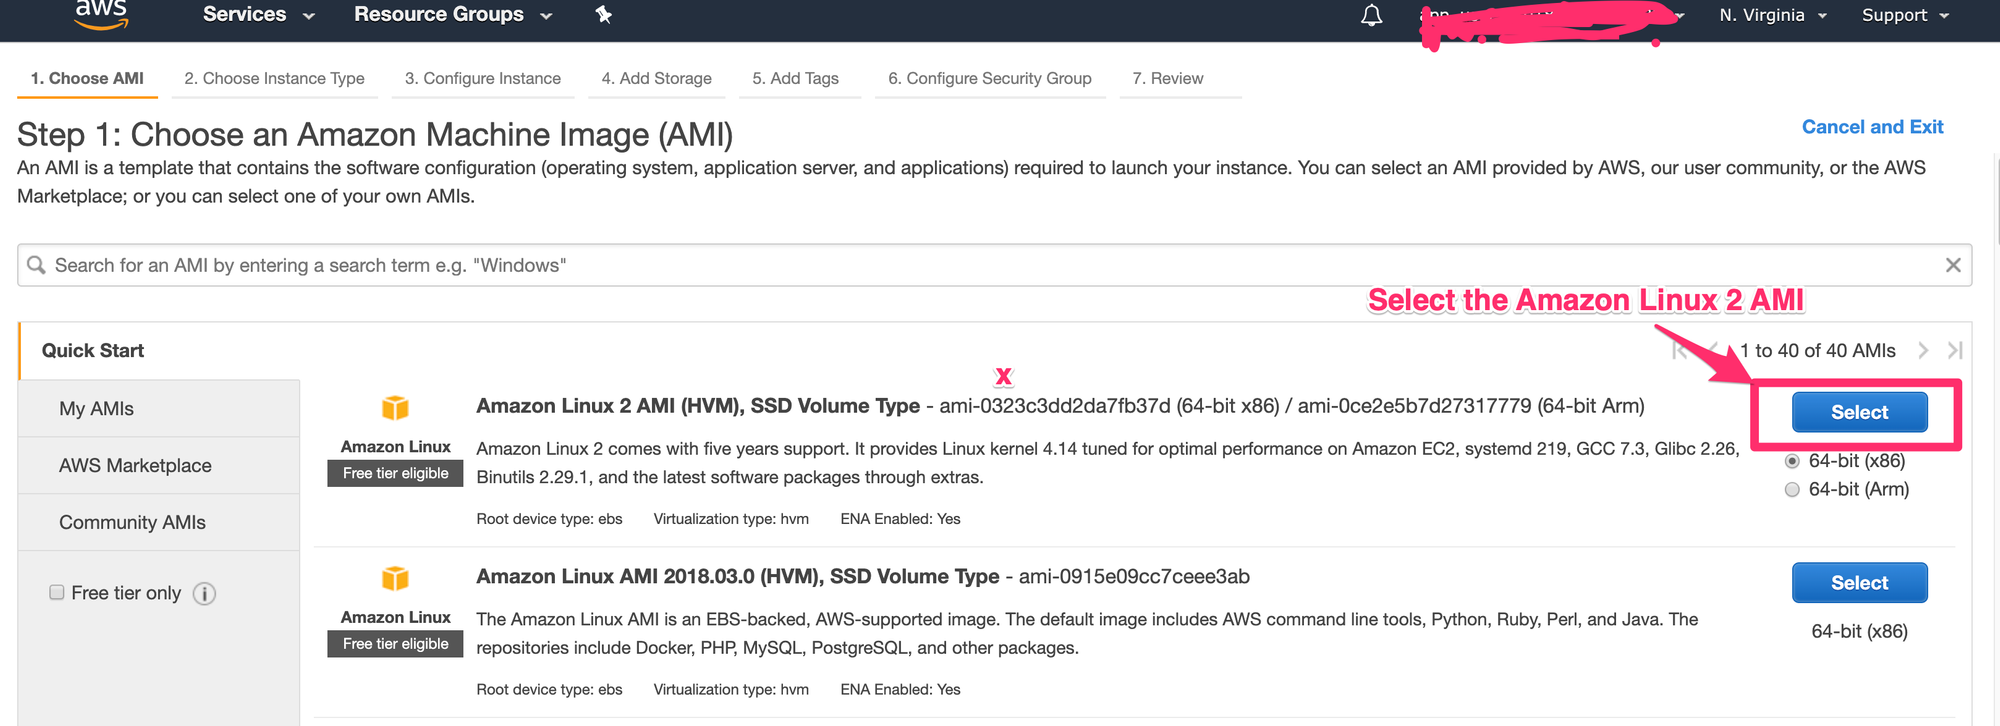
EC2 Wizard - Select Your AMI Type
Here is where the magic happens!

This is where you will choose your AMI type, which is mostly what operating system you want. There are any number of preconfigured AMIs for lots of common use cases, including ML applications, web servers, and databases. Check out the AWS Marketplace to see all the cool AMIs out there!
I like the Amazon Linux 2 image, but you can search for any image type, including Ubuntu, Centos, or any number of Bitnami images.
Quick side note here. I love the Bitnami images. They are all awesome, and if you're looking into deploying any kind of web application such as Ghost, Wordpress, Nginx, or even more complex applications like Redash or Airflow I really recommend them.
EC2 Wizard - Choose your Instance Type
I'm going with the free one because I intend on killing this, but if you're actually using this EC2 instance for anything important you'll want to add more power. If you need anything involving internet, such as transferring data, make sure that you pay attention to the internet capabilities and choose something in the moderate range.
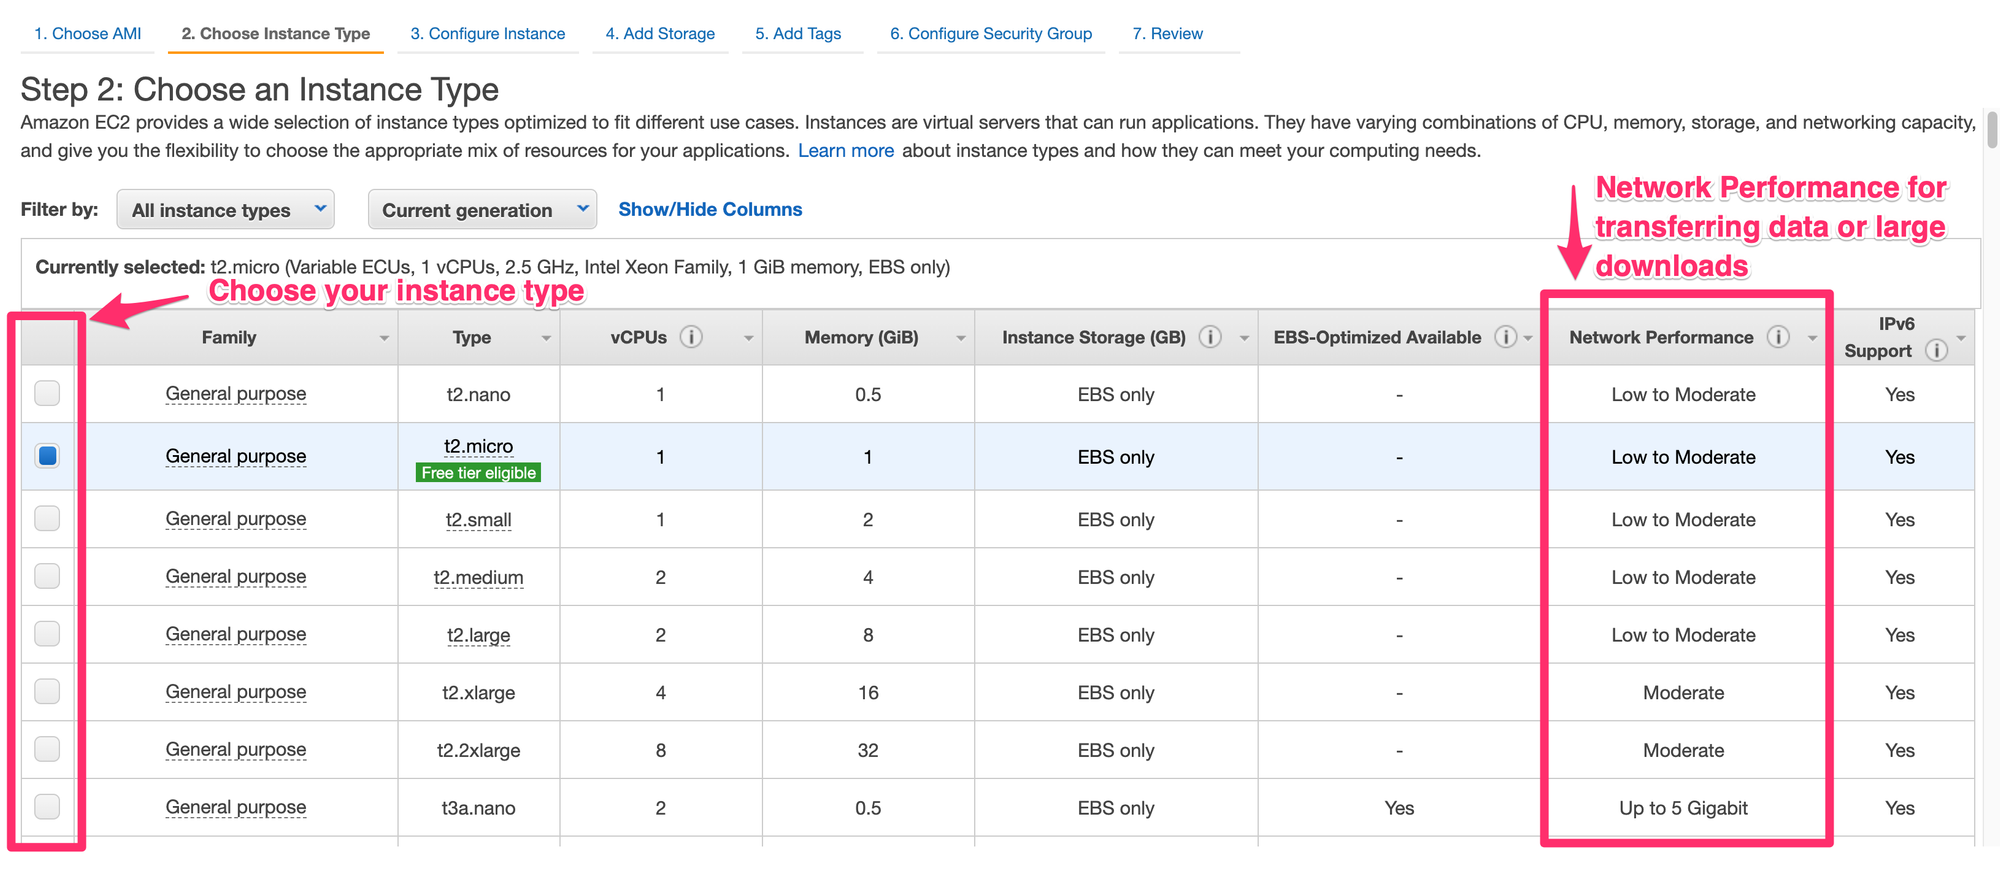
Scroll down and choose either 'Launch' to launch with default settings or 'Configure your Instance' to add in additional configurations such as changing the root file system size, choosing a VPC, or adding in user data.
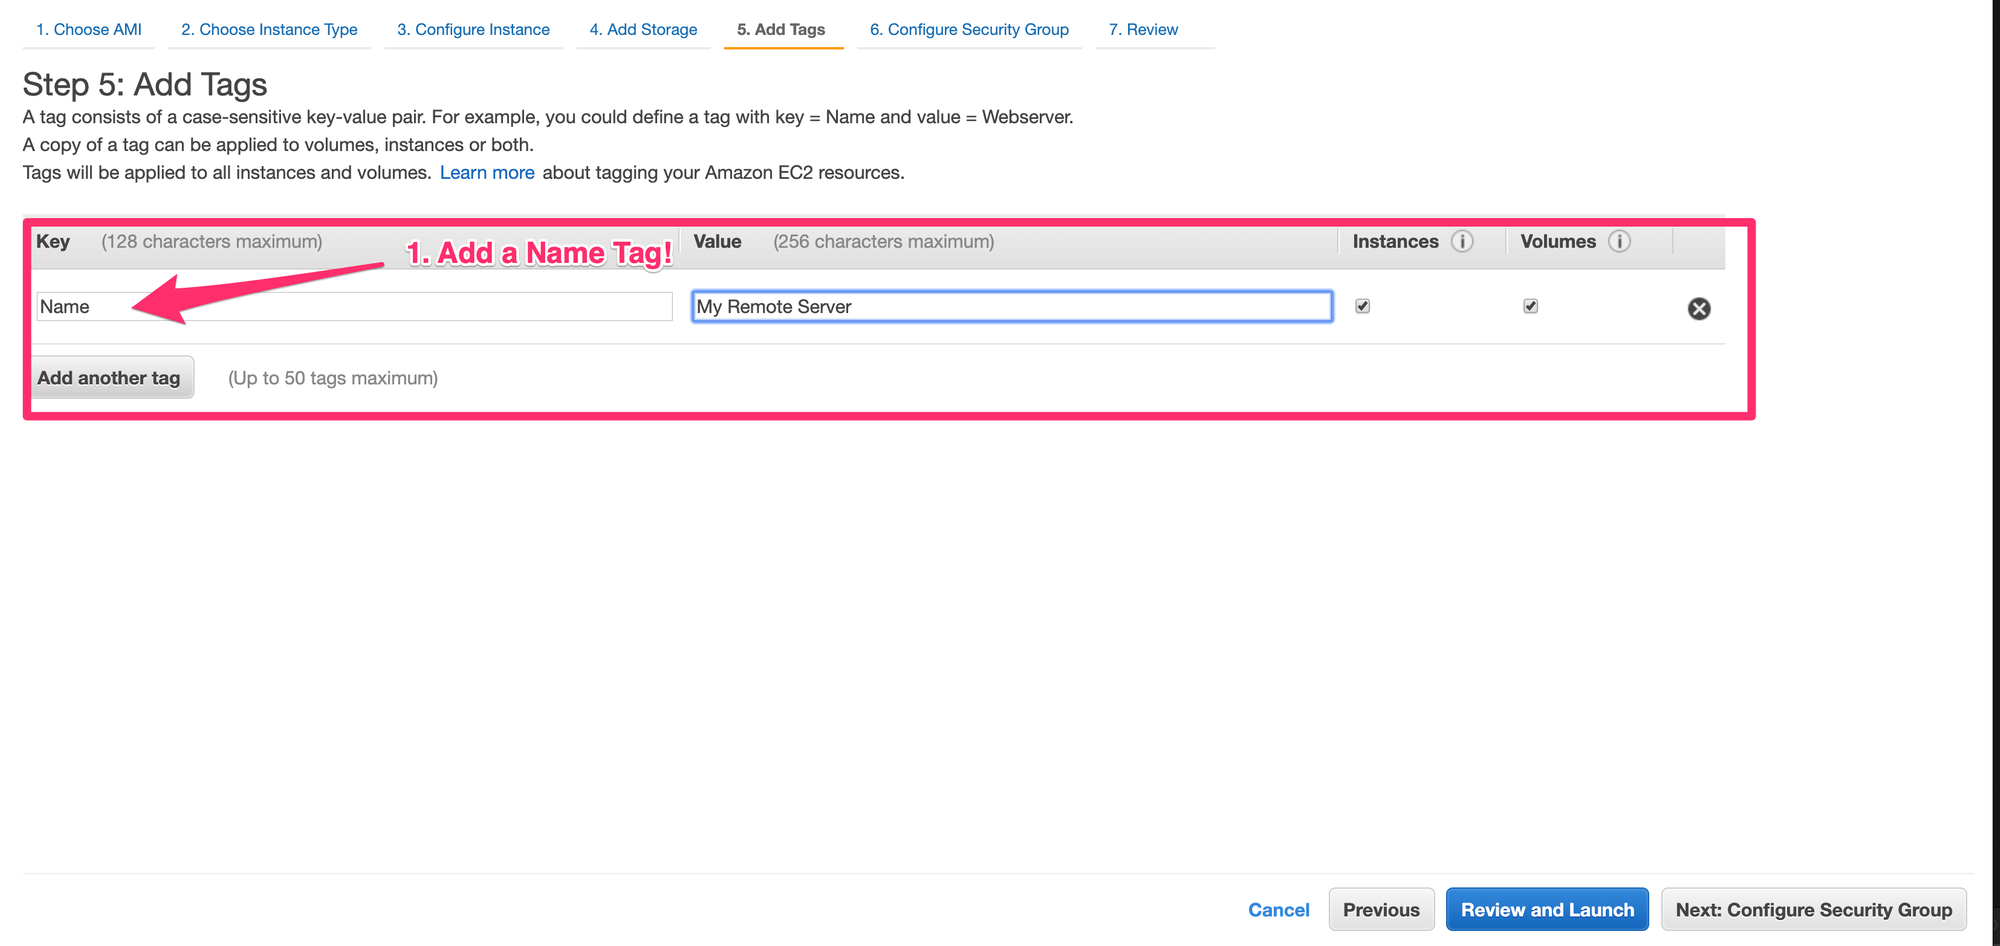
EC2 Wizard - Add Tags
When you're just starting out this doesn't matter too much, but as you get going with AWS you will want to make sure that all of your instances have, at the least, Name tags. This will allow you to more easily search for your instances and do nice things like create resource groups to group together your AWS services.
In the wizard menu select 'Add Tags'. Don't worry, you can switch between steps in the wizard as often as you like.
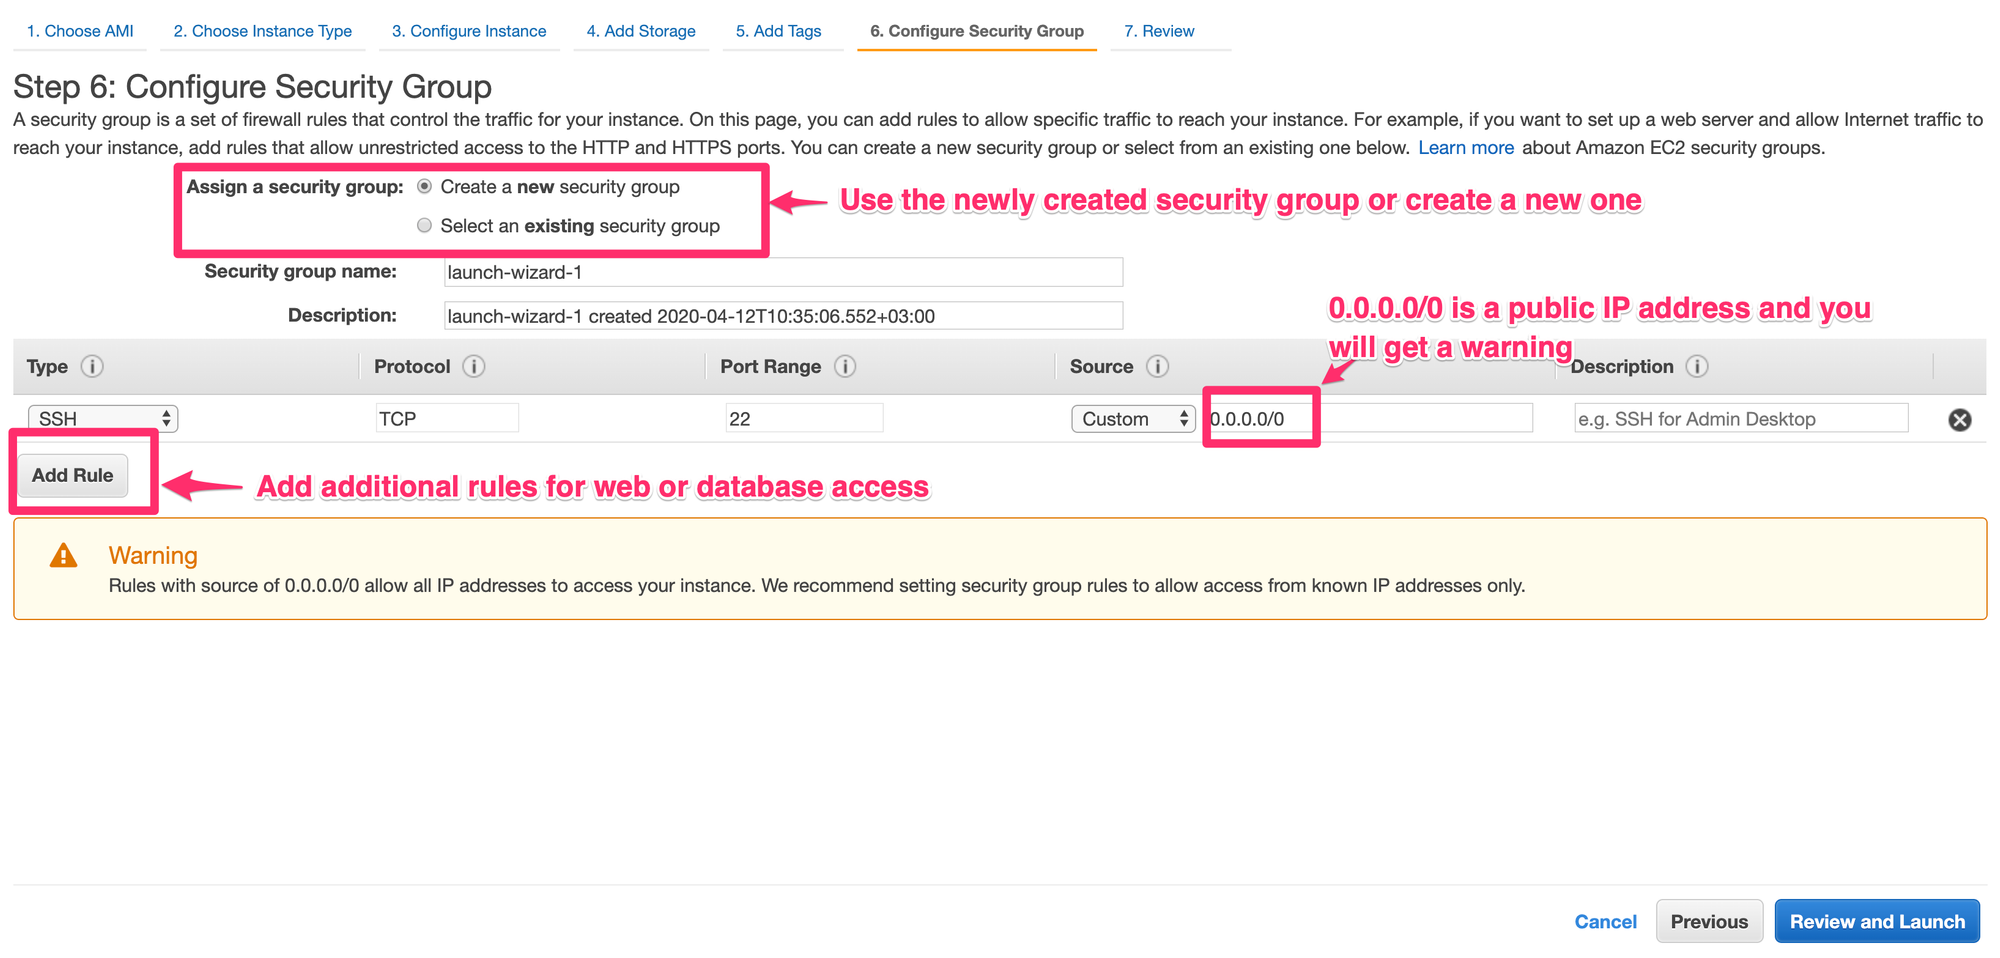
EC2 Wizard - Configure the Security Group
Before we finish up we'll configure the security group, which is what defines the access rules. AWS will create a security group for you, or you can choose one already. The default is to open port 22 for SSH, but if you'll use this for any web or database applications you will need to open those ports too.
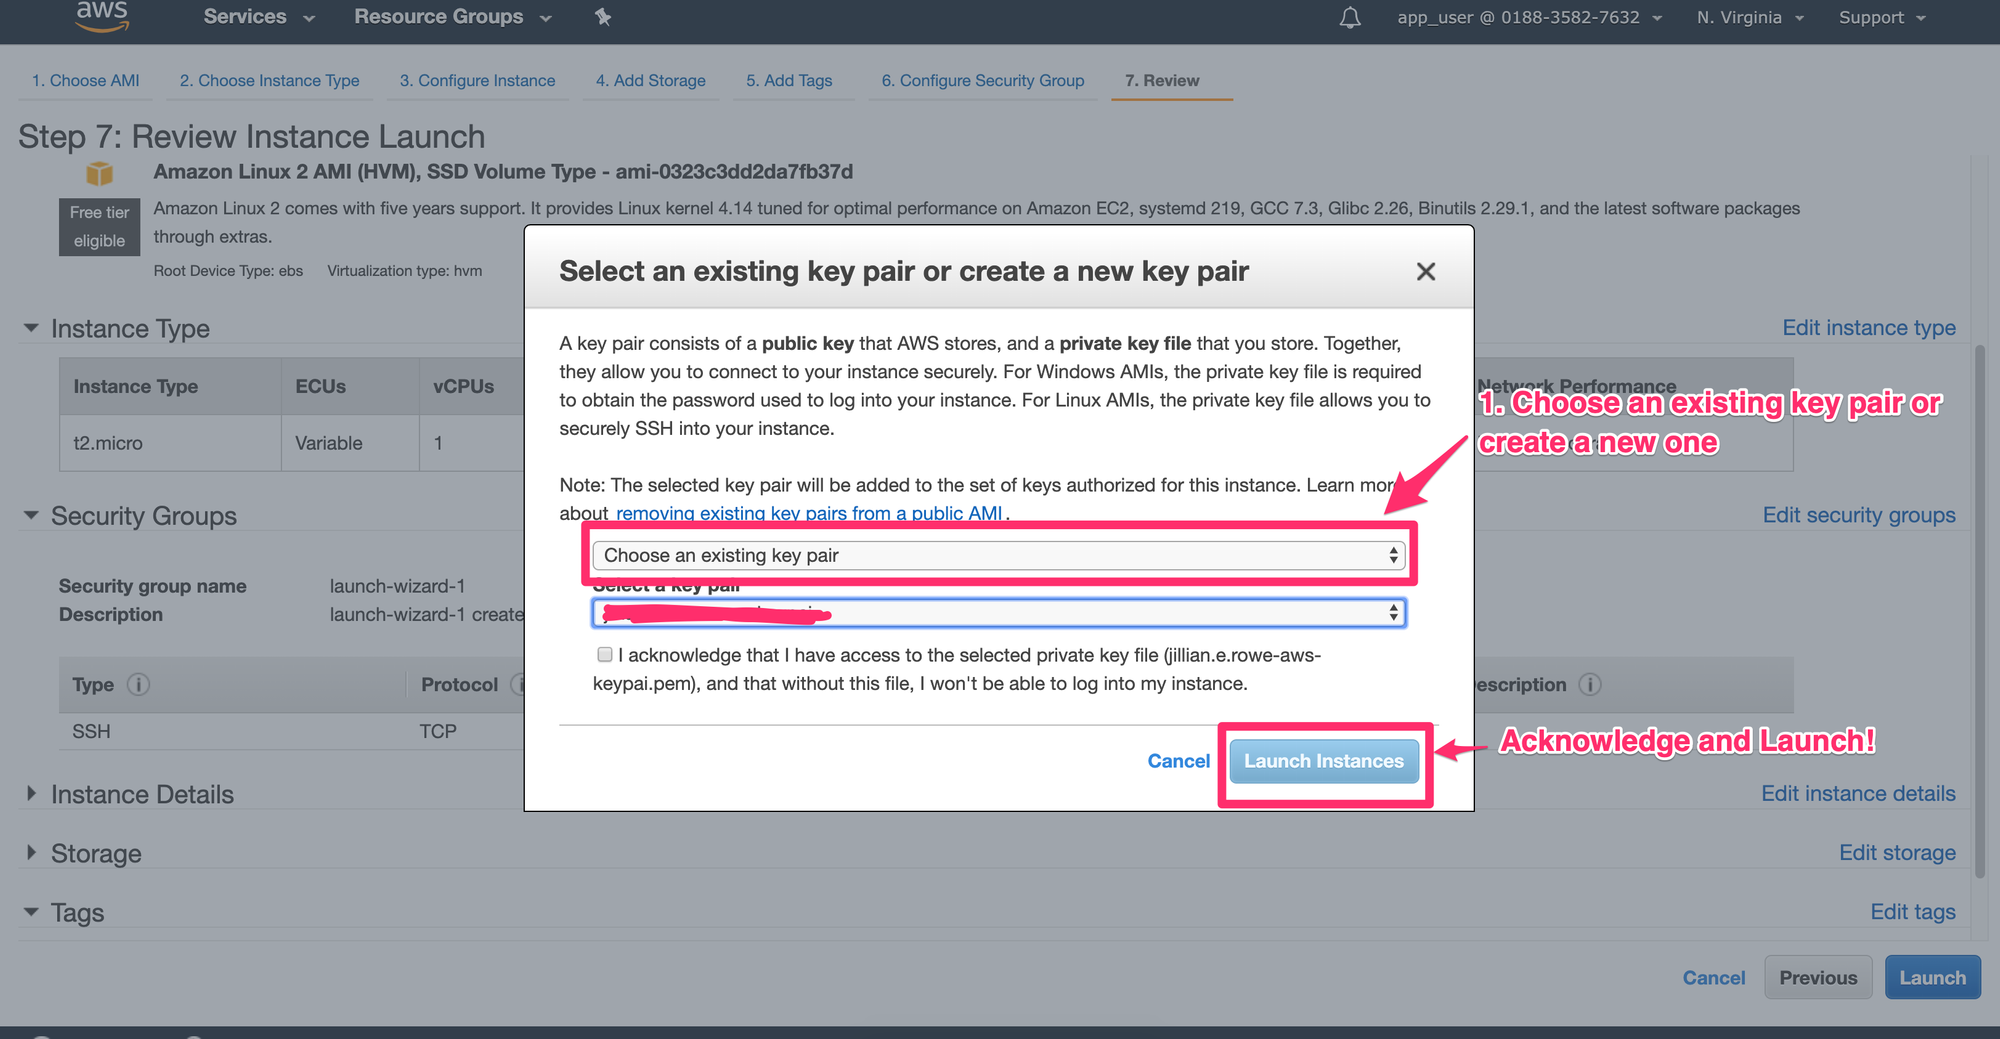
EC2 Wizard - LAUNCH
Now that we've told AWS what we want let's launch our instance! Click on the Review and Launch. You'll get a popup window asking you which SSH Key you want. You can also create a new SSH Keypair here.
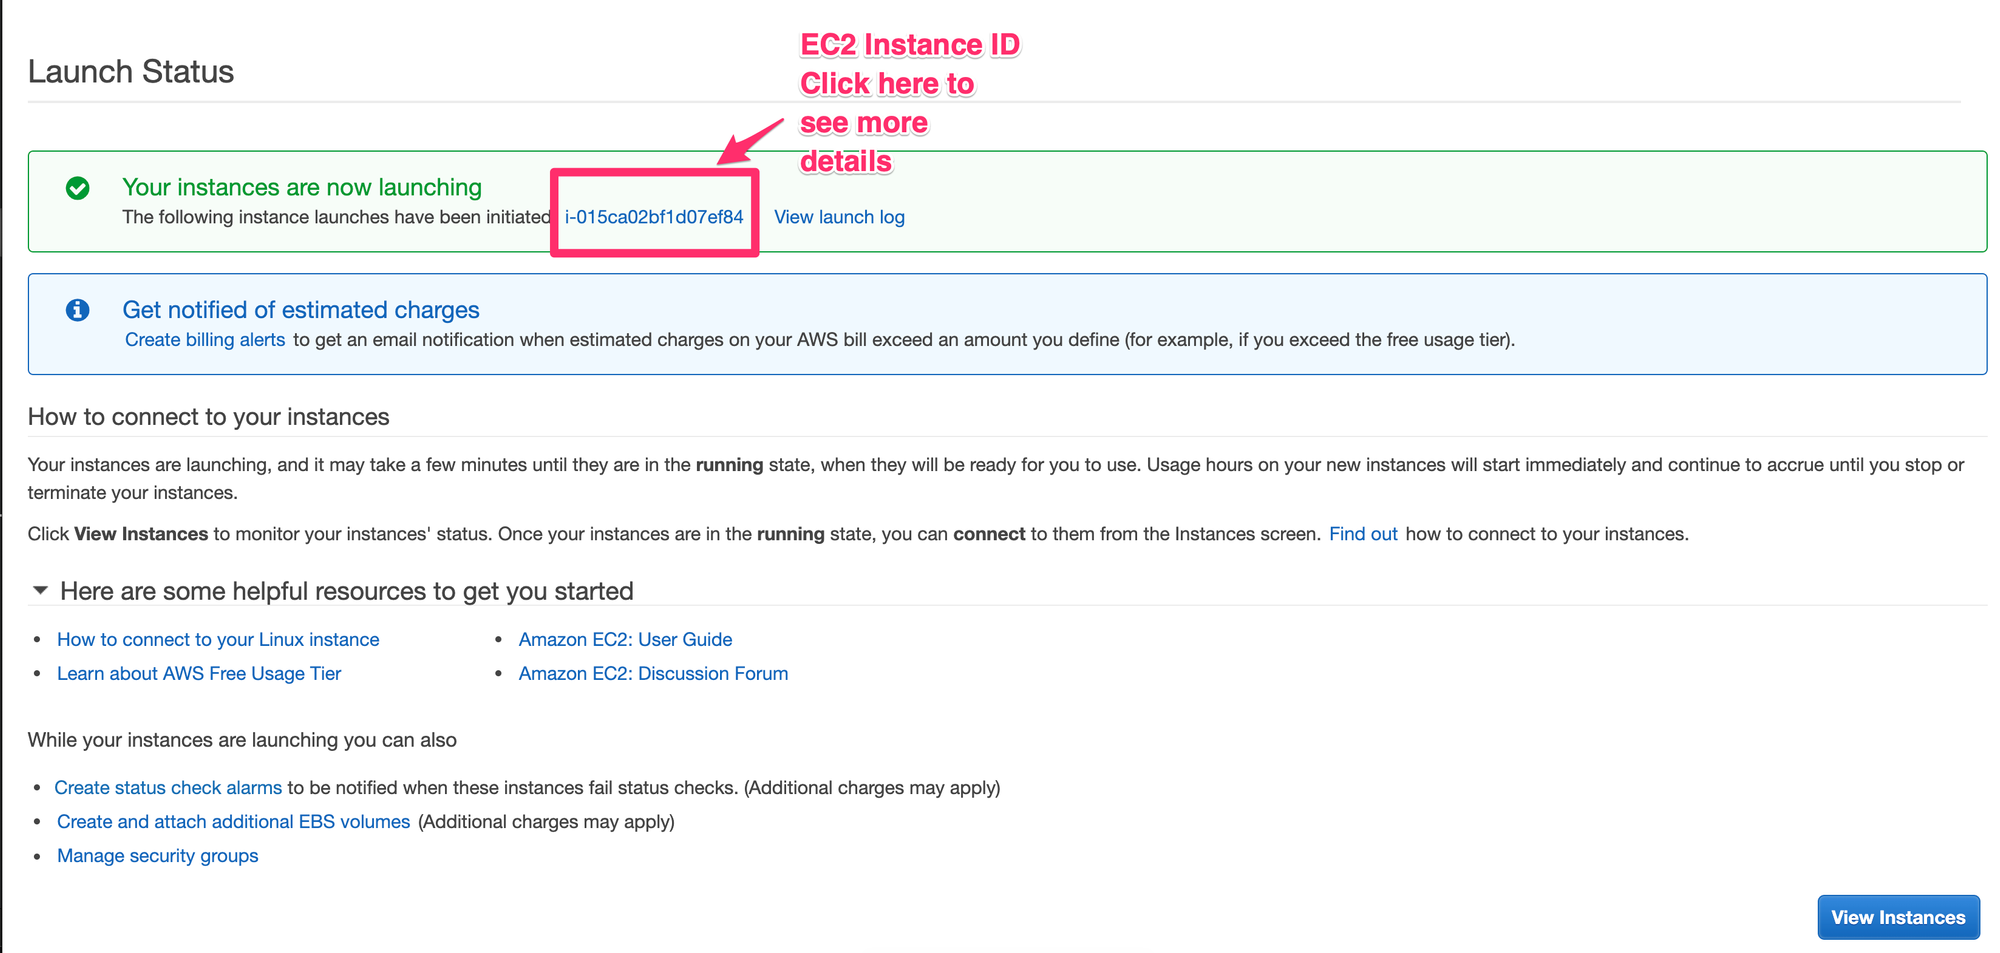
EC2 Wizard - Confirmation Page
Once you've launched you'll be brought to a confirmation page with your EC2 Instance ID.
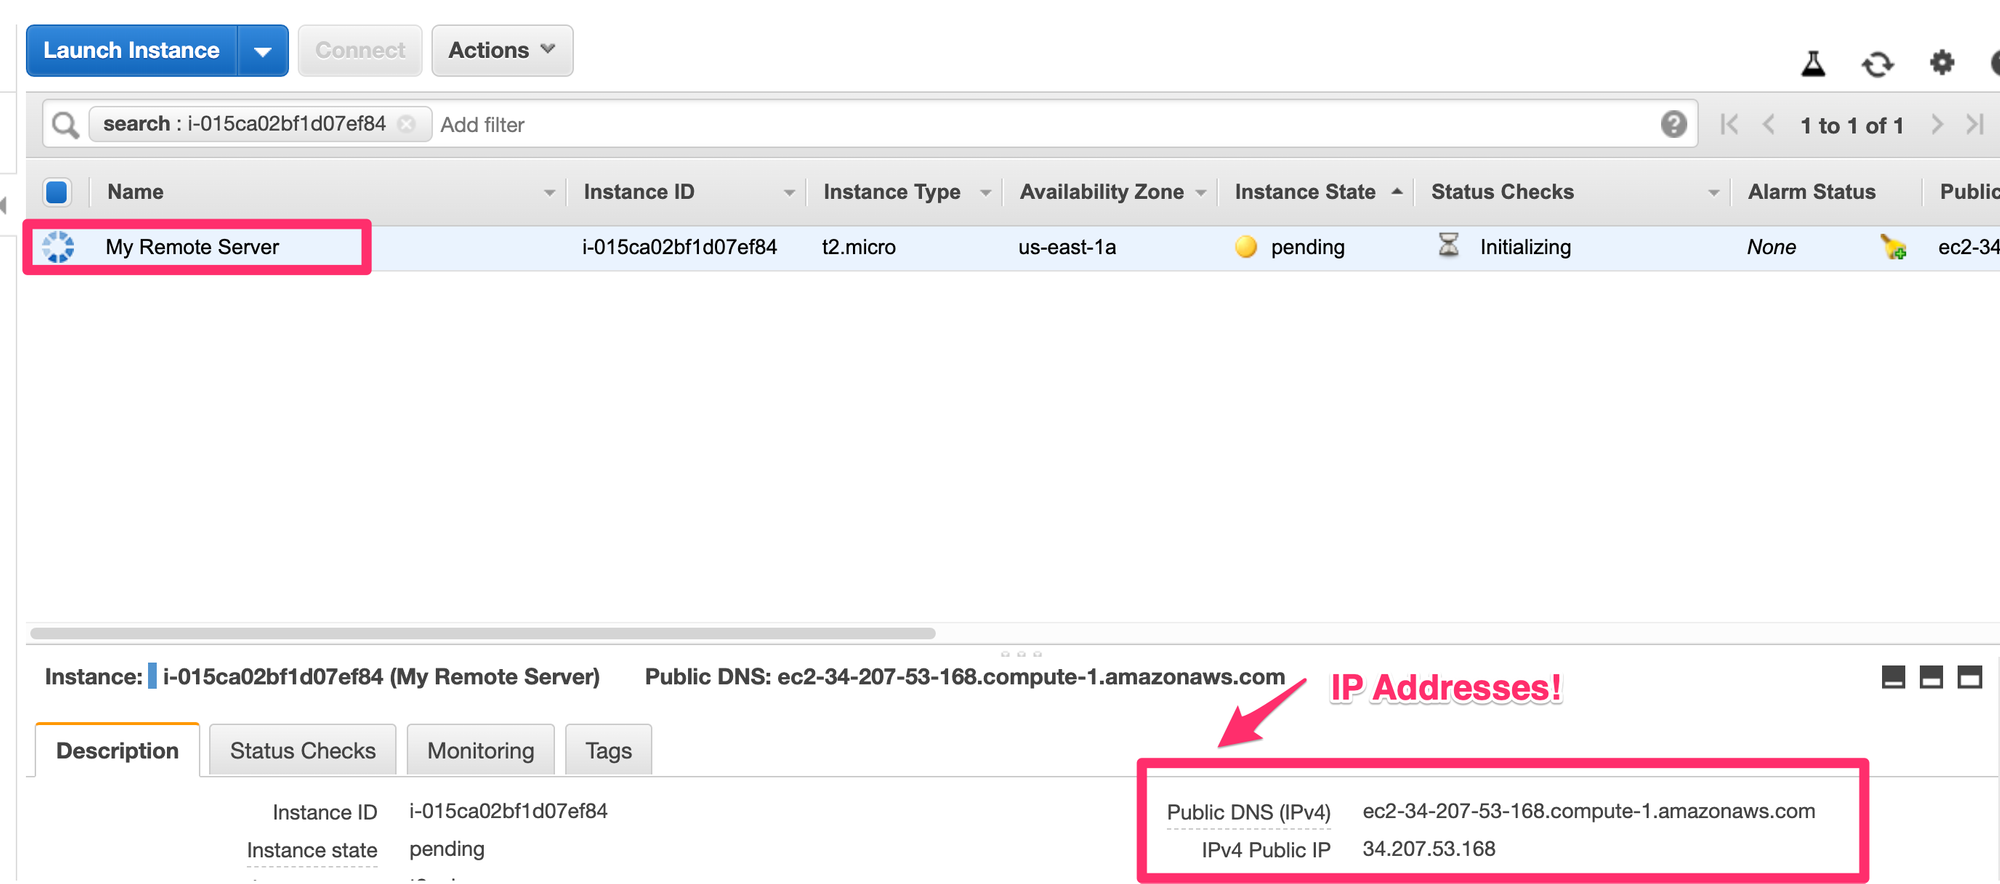
EC2 Dashboard - Get your IP Address
There we go! Now all that is left is to wait for our instance to be ready and SSH on over.
Ok! Now we just have to SSH over to our instance. The details for this will be slightly different depending on which instance type you chose.
This assumes you downloaded your keypair named my-remote-server.pem and moved it to ~/.ssh
chmod 400 ~/.ssh/my-remote-server.pem

# Amazon linux 2 ami
ssh -i ~/.ssh/my-remote-server.pem ec2-user@PUBLIC_DNS

# Ubuntu or Bitnami
ssh -i ~/.ssh/my-remote-server.pem ubuntu@PUBLIC_DNS
That's it! Now you have a remote server on the cloud!
Spin up an EC2 Instance with the Boto3 Python Library
Full disclaimer here. This is well beyond what I would normally do with the boto3 library. For anything beyond launching an EC2 instance I would recommend using the console or using an infrastructure as code tool such as Cloudformation or Terraform. But when you are starting out it is really important to understand the foundations.
I also have an obsessive need to write out reports for absolutely everything. Feel free to remove if you're not as paranoid. ;-)
import boto3
import time
import json
from pprint import pprint
from select import select
import logging
from logging import Logger
from paramiko import SSHClient
import paramiko
from typing import Any
import os

logger = logging.getLogger('launch_ec2')
logger.setLevel(logging.DEBUG)

PROJECT = "my-remote-server"
KEY_PAIR = "my-remote-server"
SECURITY_GROUP="sg-some-number"
# Amazon Linux 2 AMI
AMI_ID="ami-062f7200baf2fa504"
INSTANCE_TYPE="t3a.medium"

report_data = {
    'name': PROJECT,
    'computer_name': KEY_PAIR,
}

def initialize_dir():
    """
    Initialize a directory to write out our keypair and reports
    """
    if not os.path.exists(KEY_PAIR):
        os.mkdir(KEY_PAIR)


def create_key_pair():
    ec2_client = boto3.client('ec2')
    key_pair_response = ec2_client.create_key_pair(KeyName=KEY_PAIR)
    report_data['ssh_key'] = {}
    report_data['ssh_key']['id'] = key_pair_response['KeyPairId']
    report_data['ssh_key']['name'] = key_pair_response['KeyName']
    report_data['ssh_key']['key'] = key_pair_response['KeyMaterial']
    report_data['ssh_key']['key_file'] = os.path.abspath(os.path.join(KEY_PAIR, 'keypair.pem'))
    logger.info('Successfully created ssh key')


def write_key_file():
    """
    Write out the .pem ssh key file
    :return:
    """
    f = open(os.path.join(KEY_PAIR, 'keypair.pem'), 'w+')
    f.write(report_data['ssh_key']['key'])
    f.close()
    os.chmod(os.path.join(KEY_PAIR, 'keypair.pem'), 0o400)
    logger.info(
        'Wrote out ssh key file to {keypair}'.format(
            keypair=
            os.path.abspath(os.path.join(KEY_PAIR, 'keypair.pem'))
        )
    )


def create_instance():
    ec2 = boto3.resource('ec2')
    instance = ec2.create_instances(
        SecurityGroupIds=[SECURITY_GROUP],
        ImageId=AMI_ID,
        MinCount=1,
        MaxCount=1,
        InstanceType=INSTANCE_TYPE,
        KeyName=KEY_PAIR,
        TagSpecifications=[
            {
                'ResourceType': 'instance',
                'Tags': [
                    {
                        'Key': 'Name',
                        'Value': PROJECT
                    },
                ]
            },
        ],
    )
    report_data['ec2'] = {}
    report_data['ec2']['id'] = instance[0].id
    report_data['ec2']['PublicIP'] = None


def get_public_ip():
    print('Waiting for instance to initialize with public IP address...')
    print('This may take some time...')
    time.sleep(10)
    ec2 = boto3.resource('ec2')
    running_instances = ec2.instances.filter(Filters=[
        {
            'Name': 'instance-state-name',
            'Values': ['running']
        },
        {
            'Name': 'instance-id',
            'Values': [report_data['ec2']['id']]
        }
    ])
    for instance in running_instances:
        # Add instance info to a dictionary
        report_data['ec2'] = {
            'instance_id': report_data['ec2']['id'],
            'Type': instance.instance_type,
            'State': instance.state['Name'],
            'PrivateIP': instance.private_ip_address,
            'PublicIP': instance.public_ip_address,
            'LaunchTime': str(instance.launch_time)
        }


def write_report():
    """
    Write out a JSON file with all of the IDs and things we need
    """
    logger.info('Writing report to {}'.format(
        os.path.abspath(os.path.join(KEY_PAIR, 'report.json'))
    ))
    f = open(os.path.abspath(os.path.join(KEY_PAIR, 'report.json'))
             , 'w+')
    json.dump(report_data, f, ensure_ascii=False, indent=4)
    f.close()


def print_helper_commands():
    """
    Print some helper commands for ssh and rsync to the screen
    """
    rsync_command = "rsync -av --progress -e 'ssh -i {key_file}' HOST_DIR ec2-user@{public_id}:/home/ec2-user/efs".format(
        key_file=report_data['ssh_key']['key_file'],
        public_id=report_data['ec2']['PublicIP']
    )
    ssh_command = "ssh -i {key_file} ec2-user@{public_ip}".format(
        key_file=report_data['ssh_key']['key_file'],
        public_ip=report_data['ec2']['PublicIP']
    )
    report_data['ssh_command'] = ssh_command
    report_data['rsync_command'] = rsync_command
    print('Some helpful commands!')
    print('###################################')
    print('# SSH to the instance with: ')
    print(ssh_command)
    print('###################################')

    print('###################################')
    print('# Rsync data to the instance with: ')
    print(rsync_command)
    print('###################################')


def print_end_message():
    print('##################################')
    print('Finished!')
    print('See {dir}/report.json for details'.format(dir=KEY_PAIR))


initialize_dir()
create_key_pair()
write_key_file()
create_instance()
while report_data['ec2']['PublicIP'] is None:
    get_public_ip()
print_helper_commands()
write_report()
print_end_message()
WrapUp
That's all you need to know to get started with spinning up remote servers in the cloud! What kinds of projects do you want to deploy to the cloud?