

Many of the interesting processes in Git like merging, rebasing, or even committing are based on diffs and patches.
Developers work with diffs all the time, whether using Git directly or relying on the IDE's diff view. In this post, you will learn what Git diffs and patches are, their structure, and how to apply patches.
In a previous post, you learned about Git’s objects. Specifically, we discussed that a commit is a snapshot of the working tree at a certain point in time, in addition to some meta-data.
Yet, it is really hard to make sense of individual commits by looking at the entire working tree. Rather, it is more helpful to look at how different a commit is from its parent commit, that is, the diff between these commits.
So, what do I mean when I say diff? Let’s start with some history.
Git Diff's History 📖
Git’s diff is based on the diff utility on UNIX systems. diff was developed in the early 1970s on the Unix operating system. The first released version shipped with the 5th Edition of Unix in 1974.
git diff is a command that takes two inputs, and computes the difference between them. Inputs can be commits, but also files, and even files that have never been introduced to the repository.
 Git diff takes two inputs, which can be commits or files (Source: Brief)
This is important – git diff computes the difference between two strings, which most of the time happen to consist of code, but not necessarily.
Time to Get Hands-On 🙌🏻
You are encouraged to run the commands yourself while reading this post.
Consider this very short text file, called file.txt on my machine, which consists of 6 lines:

file.txt consists of 6 lines (Source: Brief)
Now, modify this file a bit. Remove the second line, and insert a new line as the fourth line. Add an ! to the end of the last line, so you get this result:
 After modifying
 file.txt, we get different 6 lines (Source: Brief)
Save this file with a new name, say new_file.txt.
Now we can run git diff to compute the difference between the files like so:
git diff -–no-index file.txt new_file.txt
(I will explain the --no-index switch of this command later.)
 The output of
 git diff (Source: Brief)
So the output of git diff shows quite a lot of things.
For now, focus on the part starting with This is a simple line. You can see that the added line (// new test) is preceded by a + sign. The deleted line is preceded by a - sign.
Interestingly, notice that Git views a modified line as a sequence of two changes - erasing a line and adding a new line instead. So the patch includes deleting the last line, and adding a new line that equals to that line, with the addition of a !.
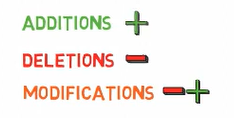 Addition lines are preceded by
 +, deletion lines by -, and modification lines are sequences of deletions and additions (Source: Brief)
The terms patch and diff are often used interchangeably, although there is a distinction, at least historically.
A diff shows the differences between two files, or snapshots, and can be quite minimal in doing so. A patch is an extension of a diff, augmented with further information such as context lines and filenames, which allow it to be applied more widely. It is a text document that describes how to alter an existing file or codebase.
These days, the Unix diff program, and git diff, can produce patches of various kinds.
A patch is a compact representation of the differences between two files. It describes how to turn one file into another.
That is, if you apply the “instructions” produced by git diff on file.txt – that is, remove the second line, insert // new text as the fourth line, and add another ! to the last line – you would get the content of new_file.txt.
Another important thing to note is that a patch is asymmetric: the patch from file.txt to new_file.txt is not the same as the patch for the other direction.
So, in this example, generating a patch between new_file.txt and file.txt, in this order, would mean exactly the opposite instructions than before - add the second line instead of removing it, and so on.
 A
A patch consists of asymmetric instructions to get from one file to another (Source: Brief)
Try it out:
git diff -–no-index new_file.txt file.txt
 Running
 git diff in the reverse direction yields the reverse instructions - add a line instead of removing it, and so on (Source: Brief)
The patch format uses context, as well as line numbers, to locate differing file regions. This allows a patch to be applied to a somewhat earlier or later version of the first file than the one from which it was derived, as long as the applying program can still locate the context of the change.
The Structure of a Diff 🔍
So, it's time to dive deeper 😎.
Generate a diff from file.txt to new_file.txt again, and consider the output more carefully:
git diff -–no-index file.txt new_file.txt
The first line introduces the compared files. Git always gives one file the name a, and the other the name b. So in this case file.txt is called a, whereas new_file.txt is called b.
 The first line in
 diff 's output introduces the files being compared (Source: Brief)
Then the second line, starting with index, includes the blob SHAs of these files. So even though in our case they are not even stored within a Git repo, Git shows their corresponding SHA-1 values.
If you need a reminder about blobs in particular and Git objects in general, check out this post.
The third value in this line, 100644, is the "mode bits", indicating that this is a "regular" file: not executable and not a symbolic link.
The use of two dots (..) here between the blob SHAs is just as a separator (unlike other cases where it is used within Git).
Other header lines might indicate the old and new mode bits if they changed, old and new filenames if the file were being renamed, and so on.
 The second line in
 diff 's output includes the blob SHAs of the compared files, as well as the mode bits (Source: Brief)
The blob SHAs (also called "blob IDs") are helpful if this patch is later applied by Git to the same project and there are conflicts while applying it.
After the blob IDs, we have two lines: one starting with - signs, and the other starting with + signs. This is the traditional "unified diff" header, again showing the files being compared and the direction of the changes: - signs show lines in the A version but missing from the B version, and + signs, lines missing in A version but present in B.
If the patch were of this file being added or deleted in its entirety, then one of these would be /dev/null to signal that.

- signs show lines in the A version but missing from the B version; and + signs, lines missing in A version but present in B (Source: Brief)
Consider the case where we delete a file:
rm file.txt
And then we use git diff:

diff's output for a deleted file (Source: Brief)
The A version, representing the state of the index, is currently file.txt, compared to the working dir where this file does not exist, so it is /dev/null. All lines are preceded by - signs as they exist only in the A version.
Going back to the previous diff:

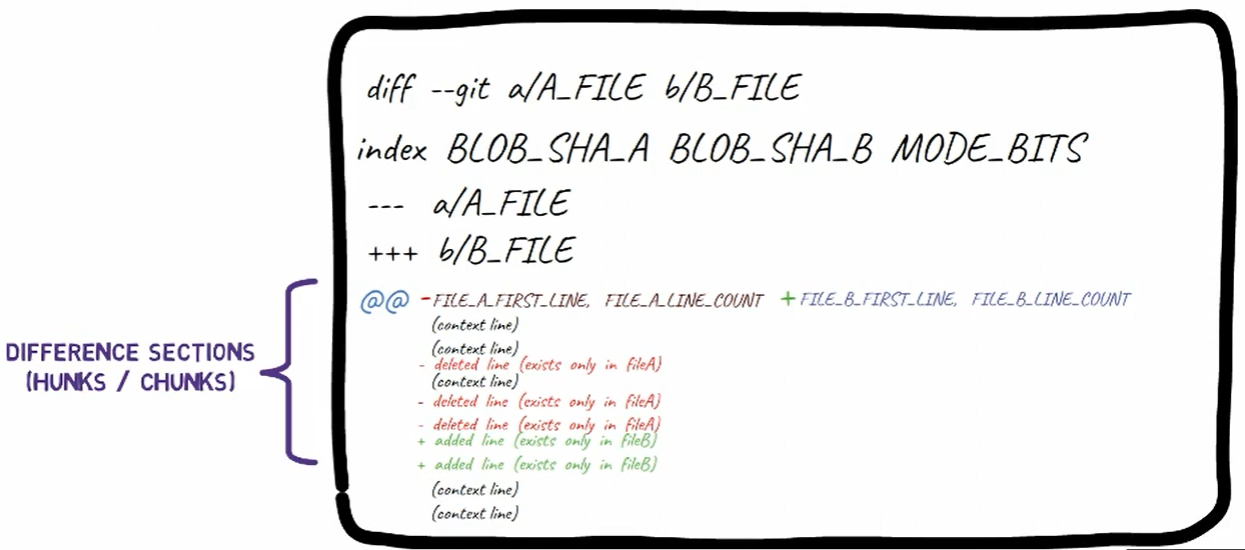
diff's output includes changes sections called "hunks" or "chunks" (Source: Brief)
After this unified diff header, we get to the main part of the diff, consisting of "difference sections", also called "hunks" or "chunks" in Git.
Note that these terms are used interchangeably, and you may stumble upon either of them in Git's documentation and tutorials, as well as Git's source code.
Every hunk begins with a single line, starting with two @ signs. These signs are followed by at most four numbers, and then a header for the chunk - which is an educated guess by Git which sometimes works well.
Usually, it will include the beginning of a function or a class, when possible. In this example it doesn't include anything as this is a text file, so consider another example for a moment:
git diff -–no-index example.py example_changed.py
 When possible, Git includes a header for each hunk, for example a function or class definition (Source: Brief)
In the image above the hunk's header includes the beginning of the function that includes the changed lines - def example_function(x).
Back to our previous example then:
Back to the previous diff (Source: Brief)
After the two @ signs, you can find four numbers.
The first numbers are preceded by a - sign as they refer to file A. The first number represents the line number corresponding to the first line in file A this hunk refers to. In the example above, it is 1, meaning that the line This is a simple file corresponds to line number 1 in version file A.
This number is followed by a comma (,), and then the number of lines this chunk consists of in file A. This number includes all context lines (the lines preceded with a space in the diff), or lines marked with a - sign, as they are part of file A, but not lines marked with a + sign, as they do not exist in file A.
In the example above this number is 6, counting the context line This is a simple file, the - line It has a nice poem:, then the three context lines, and lastly Are belong to you.
As you can see, the lines beginning with a space character are context lines, which means they appear as shown in both file A and file B.
Then, we have a + sign to mark the two numbers that refer to file B. First, the line number corresponding to the first line in file B, followed by the number of lines this chunk consists of - in file B.
This number includes all context lines, as well as lines marked with the + sign, as they are part of file B, but not lines marked with a - sign.
After the header of the chunk, we get the actual lines - either context, - or + lines.
Typically and by default, a hunk starts and ends with three context lines, in case there are of course three lines before and after the modified lines in the source file.
 The patch format by
 git diff (Source: Brief)
How to Produce diffs ⌨️
The example above shows a diff between the two files exactly. A single patch file can contain the differences for any number of files, and git diff produces diffs for all altered files in the repository in a single patch.
Often, you will see the output of git diff showing two versions of the same file and the difference between them.
To demonstrate, consider this other repository:
cd ~/brief-example
At the current state, the active directory is a Git repository, with a clean status:
git status
 In another repository with a clean status (Source: Brief)
Take an existing file, like this one:
 _An example file -
 my_file.py (Source: Brief)_
And change one of its lines. For example, consider the second line:
 _The contents of
 my_file.py after modifying the second line (Source: Brief)_
And run git diff:
 _The output of
 git diff for my_file.py after changing it (Source: Brief)_
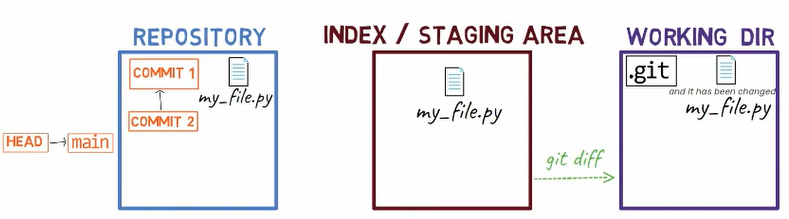
The output of git diff shows the difference between my_file.py's version in the staging area, which in this case is the same as the last commit (HEAD), and in the working directory.
I covered the terms "working directory", "staging area", and "commit" in a previous post, so check it out in case you missed it or would like to refresh your memory.
As a reminder, the terms "staging area" and "index" are interchangeable, and both are widely used.
 At this state, the status of the working dir is the same as the status of the index and that of
 HEAD. (Source: Brief)
So to see the difference between the working dir and the staging area, use git diff, without any additional flags.
 Without switches,
 git diff shows the difference between the staging area (Source: Brief)
As you can see, git diff lists here both file A and file B pointing to my_file.py. So file A here refers to the version of my_file.py in the staging area, whereas file B refers to its version in the working dir.
Note that if you modify my_file.py in a text editor, and don’t save the file, then git diff will not be aware of the changes you've made, as they haven’t been saved to the working dir.
There are a few switches we can provide to git diff to get the diff between the working dir and a specific commit, or between the staging area and the latest commit, or between two commits and so on.
First create a new file, new_file.txt, and save it. Currently the file is in the working dir, and it is actually untracked in Git.
 _A simple new file saved as
 new_file.txt (Source: Brief)_
Now stage and commit this file:
git add new_file.txt
git commit -m "new file!"
Now, the state of HEAD is the same as the state of the staging area, as well as the working tree:
 The state of
 HEAD is the same as the index and the working dir (Source: Brief)
Next, edit new_file.txt, by adding a new line at the beginning and another new line at the end:
 _Modifying
 new_file.txt by adding a line in the beginning and another in the end (Source: Brief)_
As a result, the state is as follows:
 After saving, the state in the working dir is different than that of the index or
 HEAD (Source: Brief)
A nice trick would be to use git add -p, which allows you you split the changes even within a file, and consider which ones you'd like to stage.
So in this case, add the first line to the index, but not the last line. To do that, you can split the hunk using s, then accept to stage the first hunk (using y), and not the second part (using n).
If you are not sure what each letter stands for, you can always use a ? and Git will tell you.
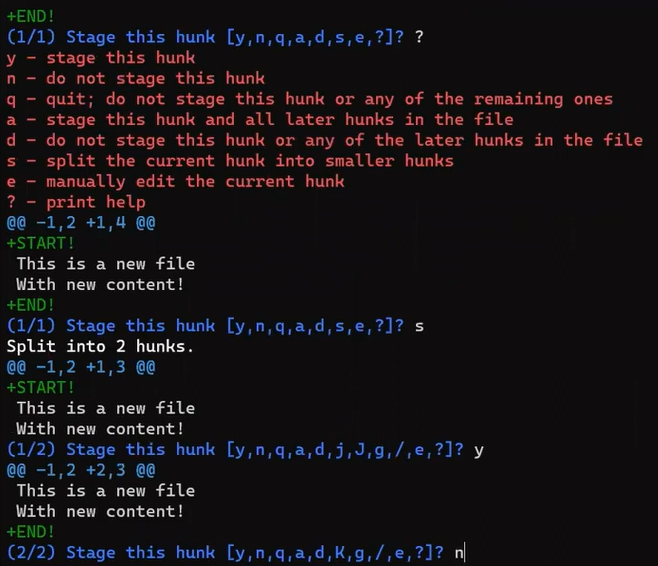 Using
Using git add -p, you can stage only the first change (Source: Brief)
So now the state in HEAD is without either of those new lines. In the staging area we have the first line but not the last line, and in the working dir we have both new lines.
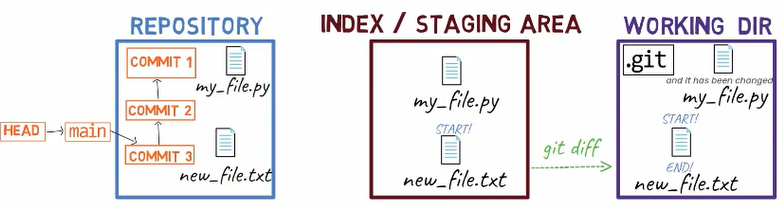 The state after staging only the first line (Source: Brief)
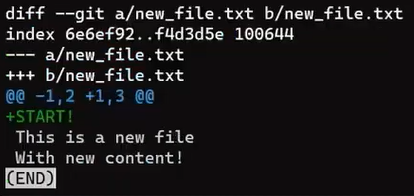
If you use git diff, what will happen?
git diff shows the difference between the index and the working dir (Source: Brief)
Well, as stated before, you get the diff between the staging area and the working tree.
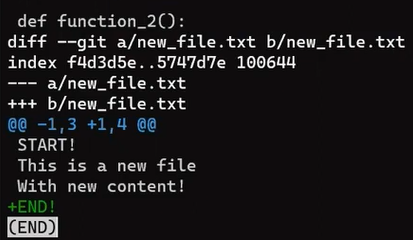
What happens if you want to get the diff between HEAD and the staging area? For that, you can use git diff –cached:

git diff --cached shows the difference between HEAD and the index (Source: Brief)
And what if we want the difference between HEAD and the working tree? For that we can run git diff HEAD:

git diff HEAD shows the difference between HEAD and the working dir (Source: Brief)
To summarize the different switches for git diff, see this diagram that you can go back to as a reference when needed:
 Different switches for
 git diff (Source: Brief)
As a reminder, at the beginning of this post you used git diff -–no-index. With the --no-index switch you can compare two files that are not part of the repository - or of any staging area.
Now, commit the changes you have in the staging area:
git commit -m "added a first line"
To observe the diff between this commit, and its parent commit, you can run the following command:
git diff HEAD~1 HEAD
 The output of
 git diff HEAD~1 HEAD (Source: Brief)
By the way, we can omit the 1 above and write HEAD~, and get the same result. Using 1 is the explicit way to state you are referring to the first parent of the commit.
Note that writing the parent commit here, HEAD~1, first results in a diff showing how to get from the parent commit to the current commit. Of course, I could also generate the reverse diff by writing:
git diff HEAD HEAD~1
 The output of
 git diff HEAD HEAD~1 generates the reverse patch (Source: Brief)
 The different switches for
 git diff (Source: Brief)
A short way to view the diff between a commit and its parent, is by using git show, for example:
git show HEAD
This is the same as writing:
git diff HEAD~ HEAD
We can now update our diagram:
 _The contents of
 new_file.txt after using git reset --hard HEAD~1 (Source: Brief)_
As a reminder, Git commits are snapshots - of the entire working directory of the repository, at a certain point in time. Yet, it is sometimes not very useful to regard a commit as a whole snapshot, but rather by the changes this specific commit introduced. In other words, by the diff between a parent commit to the next commit.
It is still important to remember that Git stores the entire snapshots, and the diff is dynamically generated from the snapshot data - by comparing the root trees of the commit and its parent.
Of course, Git can compare any two snapshots in time, not just adjacent commits, and also generate a diff of files not included in a repository.
How to Apply Patches 💪🏻
By using git diff you can see the patch, and you can then apply this patch using git apply.
Historical note 📔
Actually, sharing patches used to be the main way to share code in the early days of open source. But now - virtually all projects have moved to sharing Git commits directly through pull requests (called "merge requests" on some platforms).
The biggest problem with using patches is that it is hard to apply a patch when your working directory does not match the sender's previous commit.
Losing the commit history makes it difficult to resolve conflicts. You will better understand it as you dive deeper into the process of git apply.
A simple apply
What does it mean to apply a patch? It's time to try it out!
Take the output of git diff:
git diff HEAD~1 HEAD
And store it in a file:
git diff HEAD~1 HEAD > my_patch.patch
And reset to undo the last commit:
git reset –hard HEAD~1
If you are not completely comfortable with git reset, check a previous post that covered it in depth. In short, it allows us to "reset" the state of where HEAD is pointing to, as well as the state of the index and of the working dir.
In the example above, they are all set to the state of HEAD~1, or Commit 3 in the diagram.
So after running the reset command, the contents of the file are as follows:
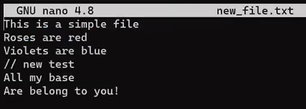
nano new_file.txt
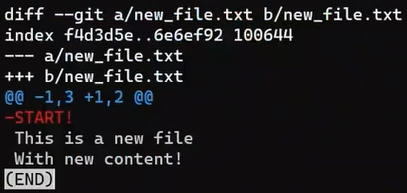
 The patch you are about to apply, as generated by
 git diff (Source: Brief)
And we will apply this patch:
nano my_patch.patch
This patch tells git to find the lines:
This is a new file
With new content!
That used to be lines 1 and 2, and add a line START right above them.
Run this command to apply the patch:
git apply my_patch.patch
And as a result, you get this version of your file, just like the commit you have created before:
nano new_file.txt
 _The contents of
 new_file.txt after applying the patch (Source: Brief)_
Understanding the Context Lines 🧑🏻🏫
To understand the importance of context lines, consider a more advanced scenario. What happens if line numbers have changed since you created the patch file? 🤔
To test, start by creating another file:
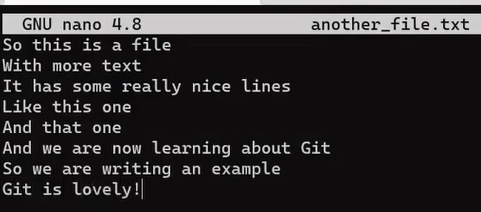 _Creating another file -
 another_file.txt (Source: Brief)_
Stage and commit this file:
git add another_file.txt
git commit -m "another file"
Now, change this file by adding a new line, and also erasing the line before the last one:
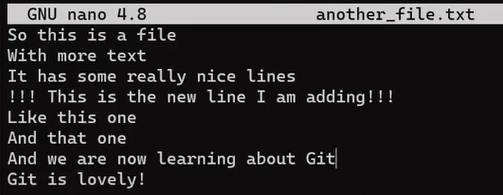 _Changes to
 another_file.txt (Source: Brief)_
Observe the difference between the original version of the file and the version including your changes:
git diff -- another_file.txt
 _The output for
 git diff -- another_file.txt (Source: Brief)_
(Using -- another_file.txt tells Git to run the command diff, taking into consideration only another_file.txt, so you don't get the diff for other files.)
Store this diff into a patch file:
git diff -- another_file.txt > new_patch.patch
Now, reset your state to that before introducing the changes:
git reset --hard
If you were to apply new_patch.patch now, it would simply work. Consider a more interesting case.
Modify another_file.txt again by adding a new line at the beginning:
 _Adding a new line at the beginning of
 another_file.txt (Source: Brief)_
As a result, the line numbers are different from the original version where the patch has been created. Consider the patch you created before:
 _
_new_patch.patch (Source: Brief)_
It assumes that the line So this is a file is the first line in another_file.txt, which is no longer the case. So...will git apply work?

git apply doesn't apply the patch (Source: Brief)
Well, no. The patch does not apply. But why? Is it really because of the change in line numbers?
To better understand the process Git is performing, you can add the --verbose flag to git apply, like so:
git apply --verbose new_patch.patch

git apply --verbose shows the process Git is taking to apply the patch (Source: Brief)
It seems that Git searched for the entire contents of the file, specifically, including the line So we are writing an example, that no longer exists in the file. As Git cannot find this line, it cannot apply the patch.
Why does Git look for the entire file? By default, Git looks for 3 lines of context before and after each change introduced in the patch. If you take three lines before and after the added line, and three lines before and after the deleted line (actually only one line after, as no other lines exist) - you get to the entire file.
You can ask Git to rely on fewer lines of context, using the -C argument. For example, to ask Git to look for 1 line of the surrounding context, run the following command:
git apply -C1 new_patch.patch
The patch applies cleanly! 🎉
Why is that? Consider the patch again:
_new_patch.patch (Source: Brief)_
When applying the patch with the -C1 option, Git is looking for the lines:
It has some really nice lines
Like this one
in order to add the line !!!This is the new line I am adding!!! between these two lines. These lines exist (and, importantly, they appear one right after the other). So Git can successfully add the line between them, even though the line numbers changed.
Similarly, Git would look for the lines:
And we are now learning about Git
So we are writing an example
Git is lovely!
As Git can find these lines, Git can erase the middle one.
If we changed one of these lines, say, changed And we are now learning about Git to And we are now learning about patches in Git, then Git would not be able to find the string above, and thus the patch would not apply.
Recap
In this post, you learned what a diff is, and the difference between a diff and a patch. You learned how to generate various patches using different switches for git diff.
You also learned what the output of git diff looks like, and how it is constructed. Ultimately, you learned how patches are applied, and specifically the importance of context.
Understanding diffs is a major milestone for understanding many other processes within Git - for example, merging or rebasing.
In future tutorials, you will use your knowledge from this post to dive into these other areas of Git.
About the Author
Omer Rosenbaum is Swimm’s Chief Technology Officer. He's the author of the Brief YouTube Channel. He's also a cyber training expert and founder of Checkpoint Security Academy. He's the author of Computer Networks (in Hebrew). You can find him on Twitter.