By Said Hayani
This is the second part of an article on building a Spotify UI clone with autoLayout programmatically. If you missed the first part, no worries - just please go and check it now.
In this article, we are going to add some mocked pictures and try to make the UI look the same as Spotify's.
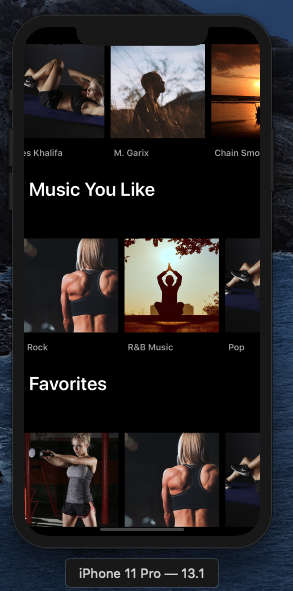
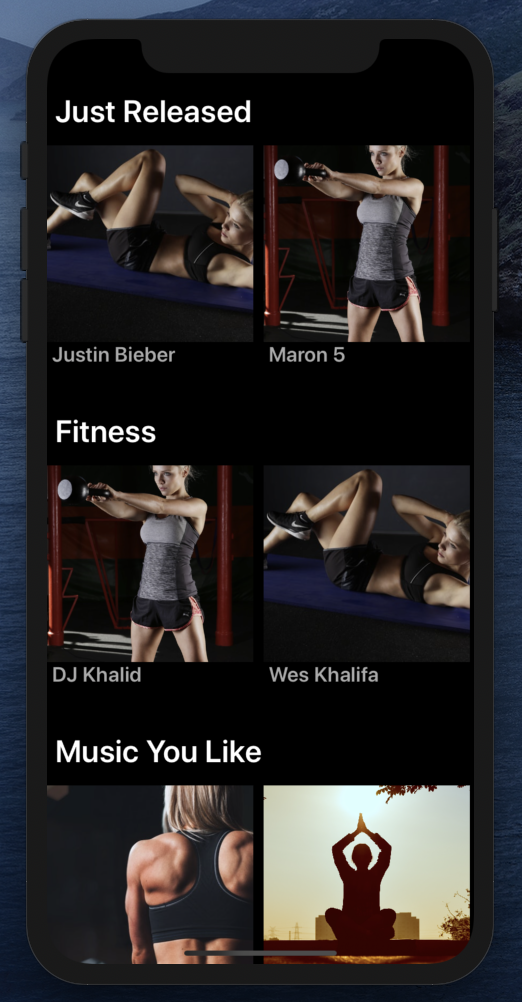
This is what we are going to do today ?
This is were we left off in the first part:
The next step is to create customized cells. So let's start by creating one with the name SubCustomCell.
First, create a new Swift file inside the project folder and name it SubCustomCell.swift. This file will contain our custom cell that will represent the Playlist. After creating the file, try to add in the code below and initialize the cell, maybe with backgroundColor, to see the UI changes when we register the cell with the collectionView.
import UIKit

class SubCustomCell: UICollectionViewCell {
        override init(frame: CGRect) {
        super.init(frame: frame)
        backgroundColor = .red
    }

    required init?(coder aDecoder: NSCoder) {
        fatalError("init(coder:) has not been implemented")
    }
}
Then we register the SubCustomCell inside CustomCell.swift within the init block. Replace UICollectionViewCell.self with SubCustomCell like below.
collectionView.register(SubCustomCell.self, forCellWithReuseIdentifier: cellId)
Also we need to make a modification on the cellForItemAt method and make it conform to SubCustomCell like the following.
 func collectionView(_ collectionView: UICollectionView, cellForItemAt indexPath: IndexPath) -> UICollectionViewCell {
        let cell = collectionView.dequeueReusableCell(withReuseIdentifier: cellId, for: indexPath) as! SubCustomCell
        // cell.backgroundColor = .yellow

        return cell
    }
You should see the backgroundColor changed to red .
 Swift CustomCell
Up until this point everything should be straightforward and clear.
Now we're going to fill the cells with some mocked pictures and create an ImageView inside each cell. I already downloaded some random pictures from pexels.com, but feel free to use any pictures you like (including these). You can find them in the project files on Github.
Let's create the UIImageView inside SubCustomCell.swift and make some constraints.
    let ImageView : UIImageView = {
       let iv = UIImageView()
        iv.backgroundColor = .yellow
        return iv

    }()
And add it to the view within the init block using addSubView.
 override init(frame: CGRect) {
        super.init(frame: frame)
        addSubview(ImageView)

    }
Now let's make the ImageView take up all the space within the cell with the constraints below.
 ImageView.translatesAutoresizingMaskIntoConstraints = false
            ImageView.topAnchor.constraint(equalTo: topAnchor).isActive = true
            ImageView.leftAnchor.constraint(equalTo: leftAnchor).isActive = true
            ImageView.rightAnchor.constraint(equalTo: rightAnchor).isActive = true
            ImageView.bottomAnchor.constraint(equalTo: bottomAnchor).isActive = true
LeftAnchorrepresents the left anchor of the cellrightAnchorrepresents the right anchor of the cellbottomAnchorrepresents the bottom anchor of the celltopAnchorrepresents the top anchor of the cell
And by making ImageView 's top anchor equal to the cell's top anchor (and doing the same for ImageView 's left, right, and bottom anchor) it makes the ImageView take up all the space of the SubCustomCell (cell).
Note: first you need to use translatesAutoresizingMaskIntoConstraints to be able to apply the constraints to the elements. Also don't forget to call isActive property and assign it to true – without doing that the constraints won't work and nothing will change.
The ImageView should have an image, so let's add one.
 let ImageView : UIImageView = {
       let iv = UIImageView()
        iv.backgroundColor = .yellow
        // we have >image1< file inside the project
        iv.image = UIImage(named: "image1")
        iv.contentMode = .scaleAspectFill
        iv.clipsToBounds = true

        return iv

    }()
And if you build and run the app, you should see the results and picture we added to the SubCustomCell.
Cool ?. Now there is an element we should add to the SubCustomCell to finish up. We need a title that will represent the title of the playlist: UILabel.
For the title it will be like this:
 let TitleLabel : UILabel = {
        let lb = UILabel()
        lb.textColor = UIColor.lightGray
        lb.font = UIFont.systemFont(ofSize: 16)
        lb.font = UIFont.boldSystemFont(ofSize: 20)
        lb.text = "Evening Music"

        return lb
    }()
I just put some random text there – you can put whatever you like. The next step is to add the element to the view and give it some constraints. The title will be placed at the bottom of the ImageView.
Add to view:
addSubview(TitleLabel)
Applying the constraints for both the ImageView and the TitleLabel
 ImageView.translatesAutoresizingMaskIntoConstraints = false
            ImageView.topAnchor.constraint(equalTo: topAnchor).isActive = true
            ImageView.leftAnchor.constraint(equalTo: leftAnchor).isActive = true
            ImageView.rightAnchor.constraint(equalTo: rightAnchor).isActive = true
            ImageView.heightAnchor.constraint(equalToConstant: 240).isActive = true
            ImageView.bottomAnchor.constraint(equalTo: TitleLabel.topAnchor).isActive = true


            TitleLabel.translatesAutoresizingMaskIntoConstraints = false
            TitleLabel.topAnchor.constraint(equalTo: ImageView.bottomAnchor,constant: 10).isActive = true
            TitleLabel.leftAnchor.constraint(equalTo: leftAnchor, constant: 5).isActive = true
            TitleLabel.rightAnchor.constraint(equalTo: rightAnchor, constant: -5).isActive = true
And here we go!
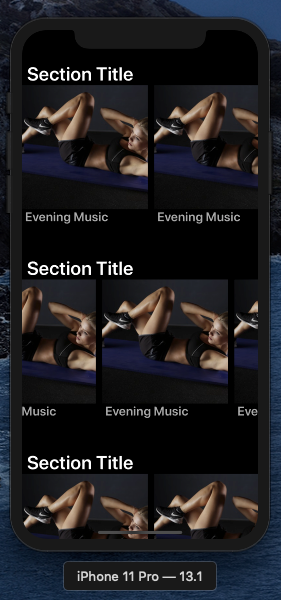
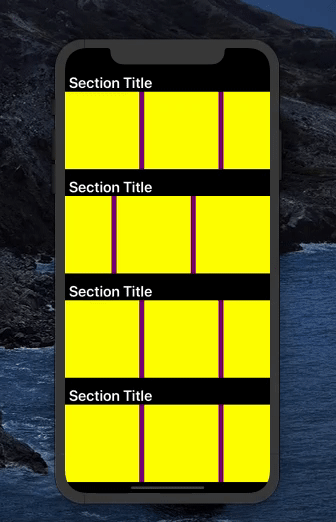
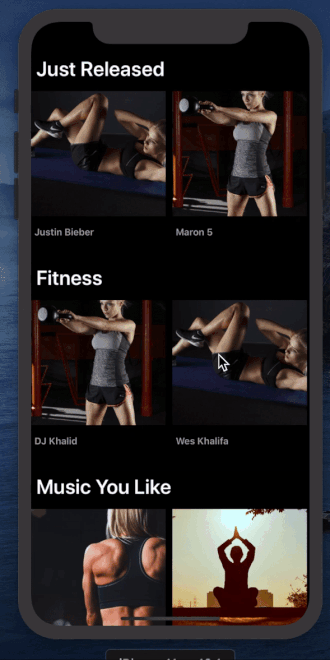
We made the picture take up most of the space in the cell, and the rest is taken up by the title. As you can see, you can scroll horizontally in each section and also vertically in the entire screen.
Now we are put some mock data into the cells to make it feel like it's real. For that I created a JSON file that contains some random data for sections and playlists.
First let's create a two structs, Section and Playlist . We create a separate file for each struct.
section.swift
import Foundation
struct Section {
    var title : String
    var playlists : NSArray
    init(dictionary:[String : Any]) {
        self.title = dictionary["title"] as? String ?? ""
        self.playlists = dictionary["playlists"] as? NSArray ?? []

}
}
playlist.swift
//
//  playlist.swift
//  spotifyAutoLayout
//
//  Created by admin on 12/6/19.
//  Copyright © 2019 Said Hayani. All rights reserved.
//

import Foundation
struct PlayList {
    var title: String
    var image : String
    init(dictionary : [String : Any]) {
        self.title = dictionary["title"] as? String ?? ""
        self.image = dictionary["image"] as? String ?? ""
    }

}
And then inside ViewController.swift we create a function that fetches the JSON for us and stores the results in an array.
        print("attempt to fetch Json")
        if let path = Bundle.main.path(forResource: "test", ofType: "json") {
            do {
                  let data = try Data(contentsOf: URL(fileURLWithPath: path), options: .mappedIfSafe)
                  let jsonResult = try JSONSerialization.jsonObject(with: data, options: .mutableLeaves)
                if let jsonResult = jsonResult as? [ Any] {
                            // do stuff
                    jsonResult.forEach { (item) in

                        let section = Section(dictionary: item as! [String : Any])
                       // print("FEtching",section.playlists)
                        self.sections.append(section)
                    }


                  self.collectionView.reloadData()
                  }
              } catch {
                   // handle error
              }
        }
    }
The fetchJson function is called within the ViewDidLoad method. We also have a variable called sections where we store the results:
var sections = [Section]()
The next step is to pass the data from ViewController to CustomCell. For that we create a variable inside CustomCell which will receive the data for each section:
 var section : Section?{
        didSet{
            print("section ✅",self.section)
        }
    }
We use cellForItemAt inside the ViewController method to pass the data directly to the CustomCell .
override func collectionView(_ collectionView: UICollectionView, cellForItemAt indexPath: IndexPath) -> UICollectionViewCell {
        let cell = collectionView.dequeueReusableCell(withReuseIdentifier: cellId, for: indexPath) as! CustomCell

        cell.section = sections[indexPath.item]

        return cell
    }
Note: we always call self.collectionView.reloadData() every-time fetchJson is called so the block below, inside CustomCell, will be called as well. Check the console, shift + command + C:
 var section : Section? {
        didSet{
            print("section ✅",self.section)
        }
    }
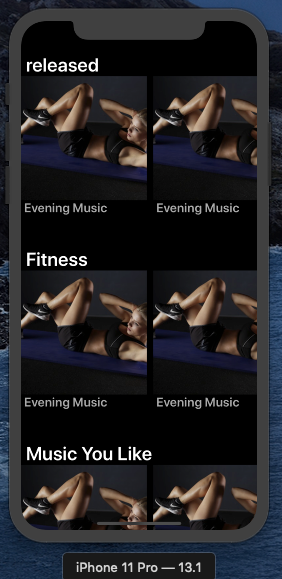
The first thing we change is to set the the section title:
 var section : Section? {
        didSet{
            print("section ✅",self.section)
            guard let section = self.section else {return}
            self.titleLabel.text = section.title
        }
    }
And then you should see that each section has a specific title on the screen ?.
Now it's time to pass the data down to SubCustomCell. We do the same thing as we did above. We need to pass the playlists array, so we create a variable named playlists inside CustomCell.
var playlists : [PlayList]() //empty
First, we map through the playlists from the JSON. Then we add each playlist with the playlists var.
 var section : Section? {
        didSet{
            print("section ✅",self.section)
            guard let section = self.section else {return}
            self.titleLabel.text = section.title
            // append to playlists array
             self.section?.playlists.forEach({ (item) in
                let playlist = PlayList(dictionary: item as! [String : Any])
                self.playlists.append(playlist)

            })
            self.collectionView.reloadData()
        }
    }
Attention! If you try to run the app it may crash. This is because we forgot to set the number of sections. Since we are now receiving the data from JSON, the number should be dynamic based on the number of sections we have. The number of sections should be equal to the number of sections inside the JSON, so we need to modify numberOfItemsInSection inside ViewController to the below :
   override func collectionView(_ collectionView: UICollectionView, numberOfItemsInSection section: Int) -> Int {
        return sections.count
    }
We do the same thing with the same method inside CustomCell.swift – but here we consider the number of the playlists instead.
func collectionView(_ collectionView: UICollectionView, numberOfItemsInSection section: Int) -> Int {
        return  self.playlists.count
    }
The last step we have to complete is to pass each single playlist Object to SubCustomCell within cellForItemAt in CustomCell.swift.
 func collectionView(_ collectionView: UICollectionView, cellForItemAt indexPath: IndexPath) -> UICollectionViewCell {
        let cell = collectionView.dequeueReusableCell(withReuseIdentifier: cellId, for: indexPath) as! SubCustomCell
        // here ?
        cell.playlist = playlists[indexPath.item]
        return cell
    }
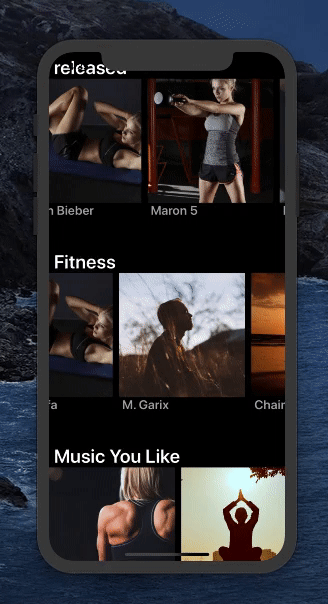
And we are going to get that data inside SubCustomCell via the playlist variable and finally display the title and image of the playlist.
var playlist : PlayList? {
           didSet{
               print("Playlist ?",self.playlist)
            guard let playlist = self.playlist else {return}
            // The Image ?
            self.ImageView.image = UIImage(named: playlist.image)
            // the playlist title ?
            self.TitleLabel.text = self.playlist?.title

           }
       }
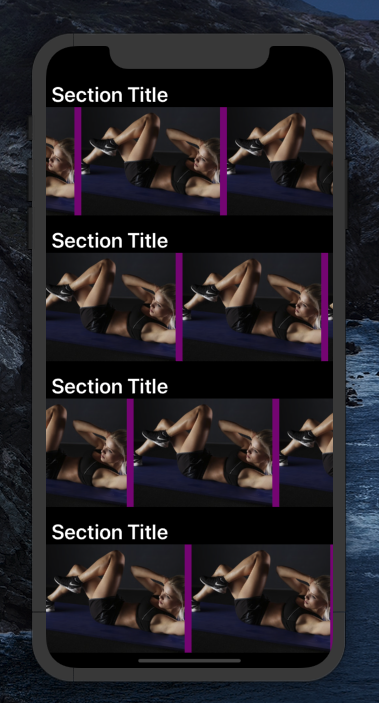
I think everything should work fine now, just as below ?
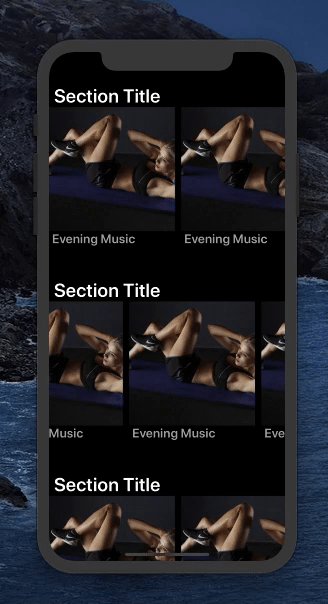
One last update to the UI: we have to add some padding and margins to the section and playlist titles and make the playlist a little bit smaller.
Let's first add some padding for the section titles. To do that, we need just to give the constant property some number value inside the section cell CustomCell and within setupSubCells:
collectionView.topAnchor.constraint(equalTo: titleLabel.bottomAnchor,constant: 15).isActive = true
And if you see the entire collectionView come in at the bottom of the titleLabel, all we need to do is add more space by adding 15:
Next we come to the title of the playlist. This will be inside SubCustomCell, and we just need to add more space at the bottom of the ImageView.
ImageView.bottomAnchor.constraint(equalTo: TitleLabel.topAnchor,constant: -15).isActive = true
We already have the constant there. In order for it to work, the value should be -15
Finally the playlist needs to be a little bit smaller. This is easy: we just make the playlist cell's height and width equal to the section cell's height divided by 2, just like below:
CustomCell.swift
 func collectionView(_ collectionView: UICollectionView, layout collectionViewLayout: UICollectionViewLayout, sizeForItemAt indexPath: IndexPath) -> CGSize {

        let width = frame.height / 2
        let height = frame.height / 2

        return CGSize(width: width, height: height)

    }
Make the ImageView's height equal to 150 as well.
  //SubCutomCell.swift
  ImageView.heightAnchor.constraint(equalToConstant: 150).isActive = true
And here we go ?.

Perfect! I think that's enough for today – I don't want to make this article too long. So we will have another part where we will add the TabBar and the description, as well as some icons for the playlist.
View the Full source code on GitHub?.
Thanks for your time. I hope I haven't missed anything. If I did please @mention me on Twitter, or if you have any questions or an addition to this post the doors are always open to anyone. Thanks??.
Subscribe to my email list to be notified when the third part of this tutorial is published.
By the way, I’ve recently worked with a strong group of software engineers for one of my mobile applications. The organization was great, and the product was delivered very quickly, much faster than other firms and freelancers I’ve worked with, and I think I can honestly recommend them for other projects out there. Shoot me an email if you want to get in touch — said@devsdata.com.