By Ibrahima Ndaw
In this tutorial, we will be using TypeScript on both sides (server and client) to build a Todo App from scratch with React, NodeJS, Express, and MongoDB.
So, let's start by planning the API.
- API with NodeJS, Express, MongoDB and TypeScript
- Setting up
- Create a Todo Type
- Create a Todo Model
- Create API controllers
- Get, Add, Update and Delete Todos
- Create API routes
- Create a Server
- Client-side with React and TypeScript
- Setting up
- Create a Todo Type
- Fetch data from the API
- Create the components
- Add Todo Form
- Display a Todo
- Fetch and Display data
- Resources
Let's dive in.
API with NodeJS, Express, MongoDB and TypeScript
Getting set up
If you're new to this, you can start with A Practical Guide to TypeScript or How to build an API from scratch with Node JS, Express, and MongoDB to get most out of this tutorial. Otherwise, let's get started.
To create a new NodeJS App, you need to run this command on the terminal:
yarn init
It will ask for a couple of questions and then initialize the app. You can skip it by adding a -y flag to the command.
Next, structure the project as follows:
├── dist
├── node_modules
├── src
   ├── app.ts
   ├── controllers
   |  └── todos
   |     └── index.ts
   ├── models
   |  └── todo.ts
   ├── routes
   |  └── index.ts
   └── types
      └── todo.ts
├── nodemon.json
├── package.json
├── tsconfig.json
As you can see, this file structure is relatively simple. The dist directory will serve as an output folder once the code has compiled to plain JavaScript.
We also have an app.ts file that is the entry point of the server. The controllers, types, and routes are also in their respective folder names.
Now, we need to configure the tsconfig.json file to help the compiler along following our preferences.
- tsconfig.json
{
  "compilerOptions": {
    "target": "es6",
    "module": "commonjs",
    "outDir": "dist/js",
    "rootDir": "src",
    "strict": true,
    "esModuleInterop": true,
    "forceConsistentCasingInFileNames": true
  },
  "include": ["src/**/*"],
  "exclude": ["src/types/*.ts", "node_modules", ".vscode"]
}
Here we have four main properties to underline:
outDir: tells the compiler to put the compiled code into the dist/js folder.
rootDir: informs TypeScript to compile every .ts file located in the src folder.
include: tells the compiler to include files that are in the src directory and sub-directory.
exclude: will exclude the files or folders passed in the array during compile-time.
We can now install the dependencies to enable TypeScript in the project. Because by default, this app will use JavaScript.
There are two ways of using TypeScript in a NodeJS app. Either locally in the project or globally in our machine. I will go for the latter based on personal preference, but you can stick with the local way if you want too.
Now, let's execute the following command on the terminal to install TypeScript.
yarn add typescript -g
This g flag allows installing TypeScript globally and this makes it accessible from anywhere on the computer.
Next, let's add some dependencies in order to use Express and MongoDB.
yarn add express cors mongoose
We also need to install their types as development dependencies to help the TypeScript compiler understand the packages.
yarn add -D @types/node @types/express @types/mongoose @types/cors
Now, TypeScript won't yell at you anymore - it will use these types to define the libraries we've just installed.
We also need to add other dependencies to be able to compile the TypeScript code and start the server concurrently.
yarn add -D concurrently nodemon
With that in place, we can now update the package.json file with the scripts needed to start the server.
- package.json
  "scripts": {
    "build": "tsc",
    "start": "concurrently \"tsc -w\" \"nodemon dist/js/app.js\""
  }
concurrently will help compile the TypeScript code, keep watching for changes, and also start the server simultaneously. That said, we can now launch the server - however, we have not created something meaningful yet in that regard. So, let's fix that in the next section.
Create a Todo Type
- types/todo.ts
import { Document } from "mongoose"

export interface ITodo extends Document {
  name: string
  description: string
  status: boolean
}
Here, we have a Todo interface that extends the Document type provided by mongoose. We will be using it later to interact with MongoDB. That said, we can now define how a Todo model should look.
Create a Todo Model
- models/todo.ts
import { ITodo } from "./../types/todo"
import { model, Schema } from "mongoose"

const todoSchema: Schema = new Schema(
  {
    name: {
      type: String,
      required: true,
    },

    description: {
      type: String,
      required: true,
    },

    status: {
      type: Boolean,
      required: true,
    },
  },
  { timestamps: true }
)

export default model<ITodo>("Todo", todoSchema)
As you can see here, we start by importing the interface ITodo and some utilities from mongoose. The latter helps to define the Todo schema and also pass in ITodo as a type to the model before exporting it.
With that, we can now use the Todo model in other files to interact with the database.
Create API controllers
Get, Add, Update and Delete Todos
- controllers/todos/index.ts
import { Response, Request } from "express"
import { ITodo } from "./../../types/todo"
import Todo from "../../models/todo"

const getTodos = async (req: Request, res: Response): Promise<void> => {
  try {
    const todos: ITodo[] = await Todo.find()
    res.status(200).json({ todos })
  } catch (error) {
    throw error
  }
}
Here, we first need to import some types from express because I want to type the values explicitly. If you want, you can let TypeScript infer it for you.
Next, we use the function getTodos() to fetch data. It receives a req and res parameter and returns a promise.
And with the help of the Todo model created earlier, we can now get data from MongoDB and return a response with the array of todos.
- controllers/todos/index.ts
const addTodo = async (req: Request, res: Response): Promise<void> => {
  try {
    const body = req.body as Pick<ITodo, "name" | "description" | "status">

    const todo: ITodo = new Todo({
      name: body.name,
      description: body.description,
      status: body.status,
    })

    const newTodo: ITodo = await todo.save()
    const allTodos: ITodo[] = await Todo.find()

    res
      .status(201)
      .json({ message: "Todo added", todo: newTodo, todos: allTodos })
  } catch (error) {
    throw error
  }
}
As you can see, the function addTodo() receives the body object that contains data entered by the user.
Next, I use typecasting to avoid typos and restrict the body variable to match ITodo and then create a new Todo based on the model.
With that in place, we can now save the Todo in the DB and return a response that contains the todo created and the updated todos array.
- controllers/todos/index.ts
const updateTodo = async (req: Request, res: Response): Promise<void> => {
  try {
    const {
      params: { id },
      body,
    } = req
    const updateTodo: ITodo | null = await Todo.findByIdAndUpdate(
      { _id: id },
      body
    )
    const allTodos: ITodo[] = await Todo.find()
    res.status(200).json({
      message: "Todo updated",
      todo: updateTodo,
      todos: allTodos,
    })
  } catch (error) {
    throw error
  }
}
To update a todo, we need to extract the id and the body from the req object and then pass them to findByIdAndUpdate(). This utility will find the Todo on the database and update it. And once the operation is completed, we can now return the updated data to the user.
- controllers/todos/index.ts
const deleteTodo = async (req: Request, res: Response): Promise<void> => {
  try {
    const deletedTodo: ITodo | null = await Todo.findByIdAndRemove(
      req.params.id
    )
    const allTodos: ITodo[] = await Todo.find()
    res.status(200).json({
      message: "Todo deleted",
      todo: deletedTodo,
      todos: allTodos,
    })
  } catch (error) {
    throw error
  }
}

export { getTodos, addTodo, updateTodo, deleteTodo }
The function deleteTodo() allows you to delete a Todo from the database. Here, we pull out the id from req and pass it as an argument to findByIdAndRemove() to access the corresponding Todo and delete it from the DB.
Next, we export the functions to be able to use them in other files. That said, we can now create some routes for the API and use these methods to handle the requests.
Create API routes
- routes/index.ts
import { Router } from "express"
import { getTodos, addTodo, updateTodo, deleteTodo } from "../controllers/todos"

const router: Router = Router()

router.get("/todos", getTodos)

router.post("/add-todo", addTodo)

router.put("/edit-todo/:id", updateTodo)

router.delete("/delete-todo/:id", deleteTodo)

export default router
As you can see here, we have four routes to get, add, update, and delete todos from the database. And since we already created the functions, the only thing we have to do is import the methods and pass them as parameters to handle the requests.
So far, we have covered a lot. But we still don't have a server to start. So, let's fix that in the next section.
Create a Server
Before creating the server, we need to first add some environment variables that will hold the MongoDB credentials in the nodemon.json file.
- nodemon.json
{
    "env": {
        "MONGO_USER": "your-username",
        "MONGO_PASSWORD": "your-password",
        "MONGO_DB": "your-db-name"
    }
}
You can get the credentials by creating a new cluster on MongoDB Atlas.
- app.ts
import express, { Express } from "express"
import mongoose from "mongoose"
import cors from "cors"
import todoRoutes from "./routes"

const app: Express = express()

const PORT: string | number = process.env.PORT || 4000

app.use(cors())
app.use(todoRoutes)

const uri: string = `mongodb+srv://${process.env.MONGO_USER}:${process.env.MONGO_PASSWORD}@clustertodo.raz9g.mongodb.net/${process.env.MONGO_DB}?retryWrites=true&w=majority`
const options = { useNewUrlParser: true, useUnifiedTopology: true }
mongoose.set("useFindAndModify", false)

mongoose
  .connect(uri, options)
  .then(() =>
    app.listen(PORT, () =>
      console.log(`Server running on http://localhost:${PORT}`)
    )
  )
  .catch(error => {
    throw error
  })
Here, we start by importing the express library that allows us to access the use() method that helps handle the Todos routes.
Next, we use the mongoose package to connect to MongoDB by appending to the URL the credentials held on the nodemon.json file.
That said, now if we connect successfully to MongoDB, the server will start. If appropriate, an error will be thrown.
We're now done building the API with Node, Express, TypeScript, and MongoDB. Let's now start building the client-side app with React and TypeScript.

Client-side with React and TypeScript
Setting up
To create a new React app, I will go with create-react-app - you can use other methods as well if you want.
So, let's run in the terminal the following command:
npx create-react-app my-app --template typescript
Next, install the Axios library to be able to fetch remote data.
yarn add axios
Once the installation completed, let's structure our project as follows:
├── node_modules
├── public
├── src
|  ├── API.ts
|  ├── App.test.tsx
|  ├── App.tsx
|  ├── components
|  |  ├── AddTodo.tsx
|  |  └── TodoItem.tsx
|  ├── index.css
|  ├── index.tsx
|  ├── react-app-env.d.ts
|  ├── setupTests.ts
|  └── type.d.ts
├── tsconfig.json
├── package.json
└── yarn.lock
Here, we have a relatively simple file structure. The main thing to notice is that src/type.d.ts will hold the types. And since I will use them on almost every file, I added the extension .d.ts to make the types globally available. And now we don't need to import them anymore.
Create a Todo Type
- src/type.d.ts
interface ITodo {
  _id: string
  name: string
  description: string
  status: boolean
  createdAt?: string
  updatedAt?: string
}

interface TodoProps {
  todo: ITodo
}

type ApiDataType = {
  message: string
  status: string
  todos: ITodo[]
  todo?: ITodo
}
Here, the ITodo interface needs to mirror the shape of data from the API. And since we don't have mongoose here, we need to add additional properties to match the type defined on the API.
Next, we use that same interface for the TodoProps which is the type annotation for the props that will be received by the component responsible for rendering the data.
We have now defined our types - let's now start fetching data from the API.
Fetch data from the API
- src/API.ts
import axios, { AxiosResponse } from "axios"

const baseUrl: string = "http://localhost:4000"

export const getTodos = async (): Promise<AxiosResponse<ApiDataType>> => {
  try {
    const todos: AxiosResponse<ApiDataType> = await axios.get(
      baseUrl + "/todos"
    )
    return todos
  } catch (error) {
    throw new Error(error)
  }
}
As you can see, we need to import axios to request data from the API. Next, we use the function getTodos() to get data from the server. It will return a promise of type AxiosResponse that holds the Todos fetched that need to match the type ApiDataType.
- src/API.ts
export const addTodo = async (
  formData: ITodo
): Promise<AxiosResponse<ApiDataType>> => {
  try {
    const todo: Omit<ITodo, "_id"> = {
      name: formData.name,
      description: formData.description,
      status: false,
    }
    const saveTodo: AxiosResponse<ApiDataType> = await axios.post(
      baseUrl + "/add-todo",
      todo
    )
    return saveTodo
  } catch (error) {
    throw new Error(error)
  }
}
This function receives the data entered by the user as an argument and returns a promise. Here, we need to omit the _id property because MongoDB will create it on the fly.
- src/API.ts
export const updateTodo = async (
  todo: ITodo
): Promise<AxiosResponse<ApiDataType>> => {
  try {
    const todoUpdate: Pick<ITodo, "status"> = {
      status: true,
    }
    const updatedTodo: AxiosResponse<ApiDataType> = await axios.put(
      `${baseUrl}/edit-todo/${todo._id}`,
      todoUpdate
    )
    return updatedTodo
  } catch (error) {
    throw new Error(error)
  }
}
To update a Todo, we have to pass in the updated data and the _id of the object. Here, we need to change the status of the Todo, which is why I only pick the property we need before sending the request to the server.
- src/API.ts
export const deleteTodo = async (
  _id: string
): Promise<AxiosResponse<ApiDataType>> => {
  try {
    const deletedTodo: AxiosResponse<ApiDataType> = await axios.delete(
      `${baseUrl}/delete-todo/${_id}`
    )
    return deletedTodo
  } catch (error) {
    throw new Error(error)
  }
}
Here, we also have a function that receives as a parameter the _id property and returns a promise.
With that in place, we can now go to the components folder and add some meaningful code to its files.
Create the components
Add Todo Form
- components/AddTodo.tsx
import React from "react"

type Props = TodoProps & {
  updateTodo: (todo: ITodo) => void
  deleteTodo: (_id: string) => void
}

const Todo: React.FC<Props> = ({ todo, updateTodo, deleteTodo }) => {
  const checkTodo: string = todo.status ? `line-through` : ""
  return (
    <div className="Card">
      <div className="Card--text">
        <h1 className={checkTodo}>{todo.name}</h1>
        <span className={checkTodo}>{todo.description}</span>
      </div>
      <div className="Card--button">
        <button
          onClick={() => updateTodo(todo)}
          className={todo.status ? `hide-button` : "Card--button__done"}
        >
          Complete
        </button>
        <button
          onClick={() => deleteTodo(todo._id)}
          className="Card--button__delete"
        >
          Delete
        </button>
      </div>
    </div>
  )
}

export default Todo
As you can see, here we have a functional component of type React.FC (FC stands for functional component). It receives as a prop the method saveTodo() that allows us to save data to the DB.
Next, we have a formData state that needs to match the ITodo type to satisfy the compiler. That is why we pass it to the useState hook. We also need to add an alternative type ({}) because the initial state will be an empty object.
And with that, we can now move forward and display the data fetched.
Display a Todo
- components/TodoItem.tsx
import React from "react"

type Props = TodoProps & {
  updateTodo: (todo: ITodo) => void
  deleteTodo: (_id: string) => void
}

const Todo: React.FC<Props> = ({ todo, updateTodo, deleteTodo }) => {
  const checkTodo: string = todo.status ? `line-through` : ""
  return (
    <div className="Card">
      <div className="Card--text">
        <h1 className={checkTodo}>{todo.name}</h1>
        <span className={checkTodo}>{todo.description}</span>
      </div>
      <div className="Card--button">
        <button
          onClick={() => updateTodo(todo)}
          className={todo.status ? `hide-button` : "Card--button__done"}
        >
          Complete
        </button>
        <button
          onClick={() => deleteTodo(todo._id)}
          className="Card--button__delete"
        >
          Delete
        </button>
      </div>
    </div>
  )
}

export default Todo
Here, we need to extend the TodoProps type and append the functions updateTodo and deleteTodo to handle appropriately the props received by the component.
Now, once the Todo object passed in, we will be able to display it and add the functions needed to update or delete a Todo.
Great! We can now go to the App.tsx file and add the last piece to the puzzle.
Fetch and Display data
- App.tsx
import React, { useEffect, useState } from 'react'
import TodoItem from './components/TodoItem'
import AddTodo from './components/AddTodo'
import { getTodos, addTodo, updateTodo, deleteTodo } from './API'

const App: React.FC = () => {
  const [todos, setTodos] = useState<ITodo[]>([])

  useEffect(() => {
    fetchTodos()
  }, [])

  const fetchTodos = (): void => {
    getTodos()
    .then(({ data: { todos } }: ITodo[] | any) => setTodos(todos))
    .catch((err: Error) => console.log(err))
  }
Here, we first need to import the components and utility functions held on API.ts. Next, we pass to useState an array of type ITodo and initialize it with an empty array.
The method getTodos() returns a promise - therefore, we can access the then function and update the state with the data fetched or throw an error if any occurs.
With that in place, we can now call the function fetchTodos() when the component is successfully mounted.
- App.tsx
const handleSaveTodo = (e: React.FormEvent, formData: ITodo): void => {
  e.preventDefault()
  addTodo(formData)
    .then(({ status, data }) => {
      if (status !== 201) {
        throw new Error("Error! Todo not saved")
      }
      setTodos(data.todos)
    })
    .catch(err => console.log(err))
}
Once the form is submitted, we use addTodo() to send the request to the server, and then if the Todo has successfully saved, we update the data, otherwise an error will be thrown.
- App.tsx
const handleUpdateTodo = (todo: ITodo): void => {
  updateTodo(todo)
    .then(({ status, data }) => {
      if (status !== 200) {
        throw new Error("Error! Todo not updated")
      }
      setTodos(data.todos)
    })
    .catch(err => console.log(err))
}

const handleDeleteTodo = (_id: string): void => {
  deleteTodo(_id)
    .then(({ status, data }) => {
      if (status !== 200) {
        throw new Error("Error! Todo not deleted")
      }
      setTodos(data.todos)
    })
    .catch(err => console.log(err))
}
The functions to update or delete a Todo are quite similar. They both receive a parameter, send the request, and get back a response. And then, they check if the request has been successful and handle it accordingly.
- App.tsx
  return (
    <main className='App'>
      <h1>My Todos</h1>
      <AddTodo saveTodo={handleSaveTodo} />
      {todos.map((todo: ITodo) => (
        <TodoItem
          key={todo._id}
          updateTodo={handleUpdateTodo}
          deleteTodo={handleDeleteTodo}
          todo={todo}
        />
      ))}
    </main>
  )
}

export default App
Here, we loop through the todos array and then pass to the TodoItem the expected data.
Now, if you browse on the folder that contains the server-side app (and execute the following command in the terminal):
yarn start
And also on the client-side app:
yarn start
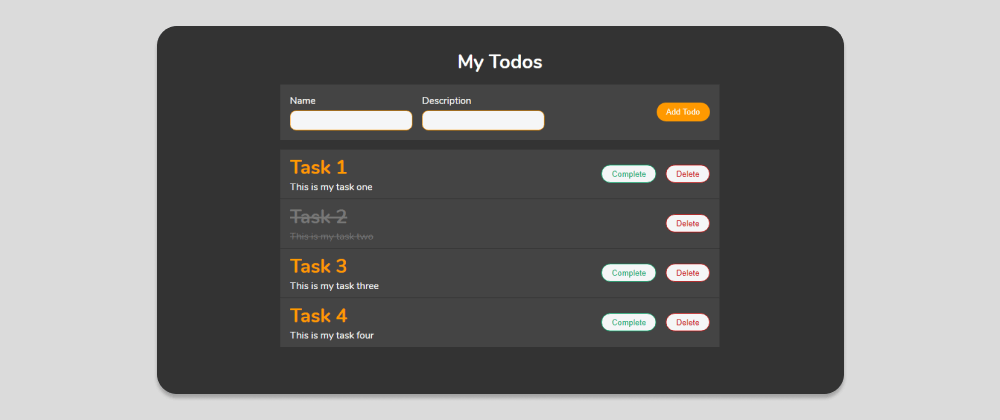
You should see that our Todo app works as expected.
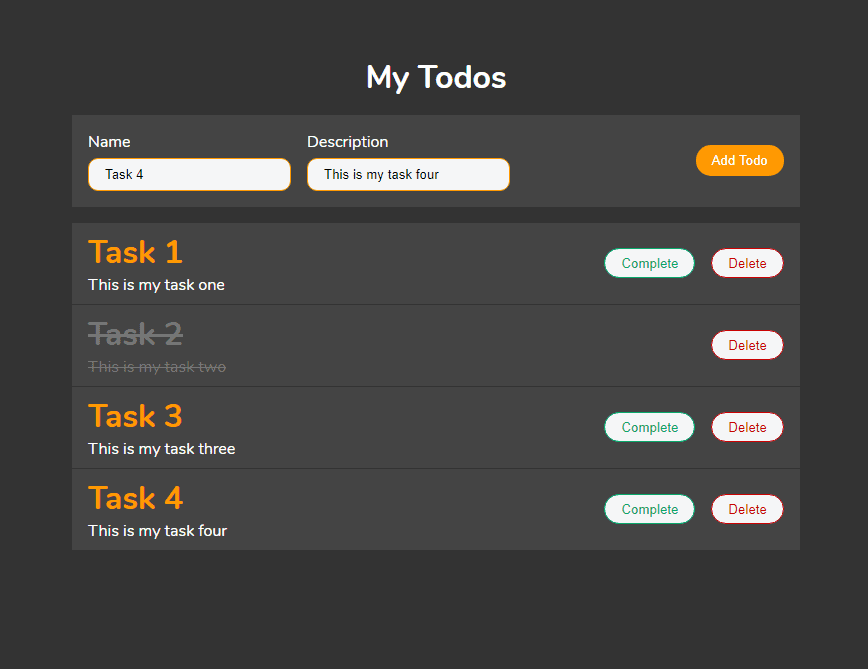
Great! With that final touch, we have now finished building a Todo App using TypeScript, React, NodeJs, Express, and MongoDB.
You can find the Source Code here.
You can find other great content like this on my blog or follow me on Twitter to get notified.
Thanks for reading.