By Siben Nayak
In my previous articles, I talked about building and deploying serverless applications on AWS using Chalice and SAM.
These were quick fun projects that leveraged the power of serverless computing and allowed us to deploy a serverless application on AWS within a few minutes.
But many people are not able to completely leverage such tutorials if they don't have an AWS account. Setting up an AWS account and configuring a development environment can be time-consuming. And it can lead to unwanted expenses as well (if you don't configure it properly).
In this article, I will walk you through the steps required to build and deploy a serverless application without having to create and setup an actual AWS account.
This time, we will create a sample Pet Store application using Amazon API Gateway, AWS Lambda, and Amazon DynamoDB. This application will have APIs for adding a new pet and fetching the list of available pets.
Prerequisites
We will be using AWS SAM for this tutorial. You can install and configure SAM by following the guidelines in the previous article here.
How to Create a Project
Run the sam-init command to create a new project. This will create a pet-store folder in your current directory.
sam init -r java11 -d maven --app-template pet-store -n pet-store
For more details about the parameters passed, please refer to the previous article.
Let’s change the pom.xml to update the name of the module to PetStore and use Java 11 instead of Java 8.
Let’s create a Pet class now to contain the attributes for the pets. We will start with simple attributes like name, age and category.
Since we will be using Amazon DynamoDB as our data store, let’s add the corresponding SDK dependencies in the pom.xml.
This will bring in the dependencies for AWS SDK for DynamoDB and Apache HTTP Client that we'll use to create a synchronous DynamoDB client.
How to Read and Write Items
We need to create a data access class to interact with Amazon DynamoDB and run our read/write queries. Create a PetStoreClient class and add the dependency on DynamoDbClient.
We will now create two functions in the PetStoreClient class to read and write items from DynamoDB.
Write an Item
Adding a single item in DynamoDB is a PUT request. We will create a PutItemRequest and specify the table name and the item attributes to be added.
We will then use the DynamoDbClient to put this item in DynamoDB.
Read Items
Reading a list of items in DynamoDB is a SCAN request. We will create a ScanRequest and specify the table name to be scanned.
We will then use the DynamoDbClient to scan the table in DynamoDB and return a list of items.
Note: A scan request goes through all the items in the table, so I don't recommend it for real world use cases.
How to Resolve Dependencies
We have added DynamoDbClient as a dependency in our PetStoreClient class. As a general best practice, all such dependencies in your code should be resolved using Dependency Injection (DI).
When you hear about DI, Spring is probably the name that comes to mind. But the Spring ecosystem is HUGE and you'll have to bring in a lot of its frameworks even if you just want to use the DI part.
Also, the injection is done at runtime, making Lambda's cold start time even longer.
Guice is another nice dependency injection framework that is much lighter than Spring. But just like Spring, it does the injection at runtime so it's not a good candidate for DI either.
Then there is Dagger, a pure DI only framework that injects dependencies during compile time! Its small size and compile time injection make it the perfect choice for implementing DI in Lambdas.
I will go deeper into the details of DI and cover the use of Dagger in another article. In this article, we will use the ageless style of static factory methods for providing dependencies.
Let's create a class called DependencyModule and declare all our dependencies in it.
In this class, we are creating a new instance of DynamoDbClient and injecting it in our PetStoreClient. We are also creating an instance of ObjectMapper to help us deal with serialization and de-serialization of JSON objects.
How to Update the Lambda and API Endpoints
Next, we need to update the entry point for the Lambda function and add our specific endpoints for adding and retrieving pets.
Add the following snippet to the Resources section of the template.yaml file.
This updates our function to use the handleRequest method from the App class. It also adds two API endpoints for adding and retrieving pets.
Update the Outputs section as well to reflect the new function name.
How to Integrate the Client
Now that we have the code for interacting with DynamoDB ready and the dependencies sorted, we need to make changes in the Lambda handler to invoke this code.
Update the code in App.java to invoke the functions in PetStoreClient and perform the actions according to the API request.
Since we used static factories for dependency injection, we will not be able to effectively test our code. I will cover unit testing of cloud applications in another article. For now, we will need to delete the unit tests in order to build the project.
How to Build the Project
From the pet-store folder, run the sam build command.
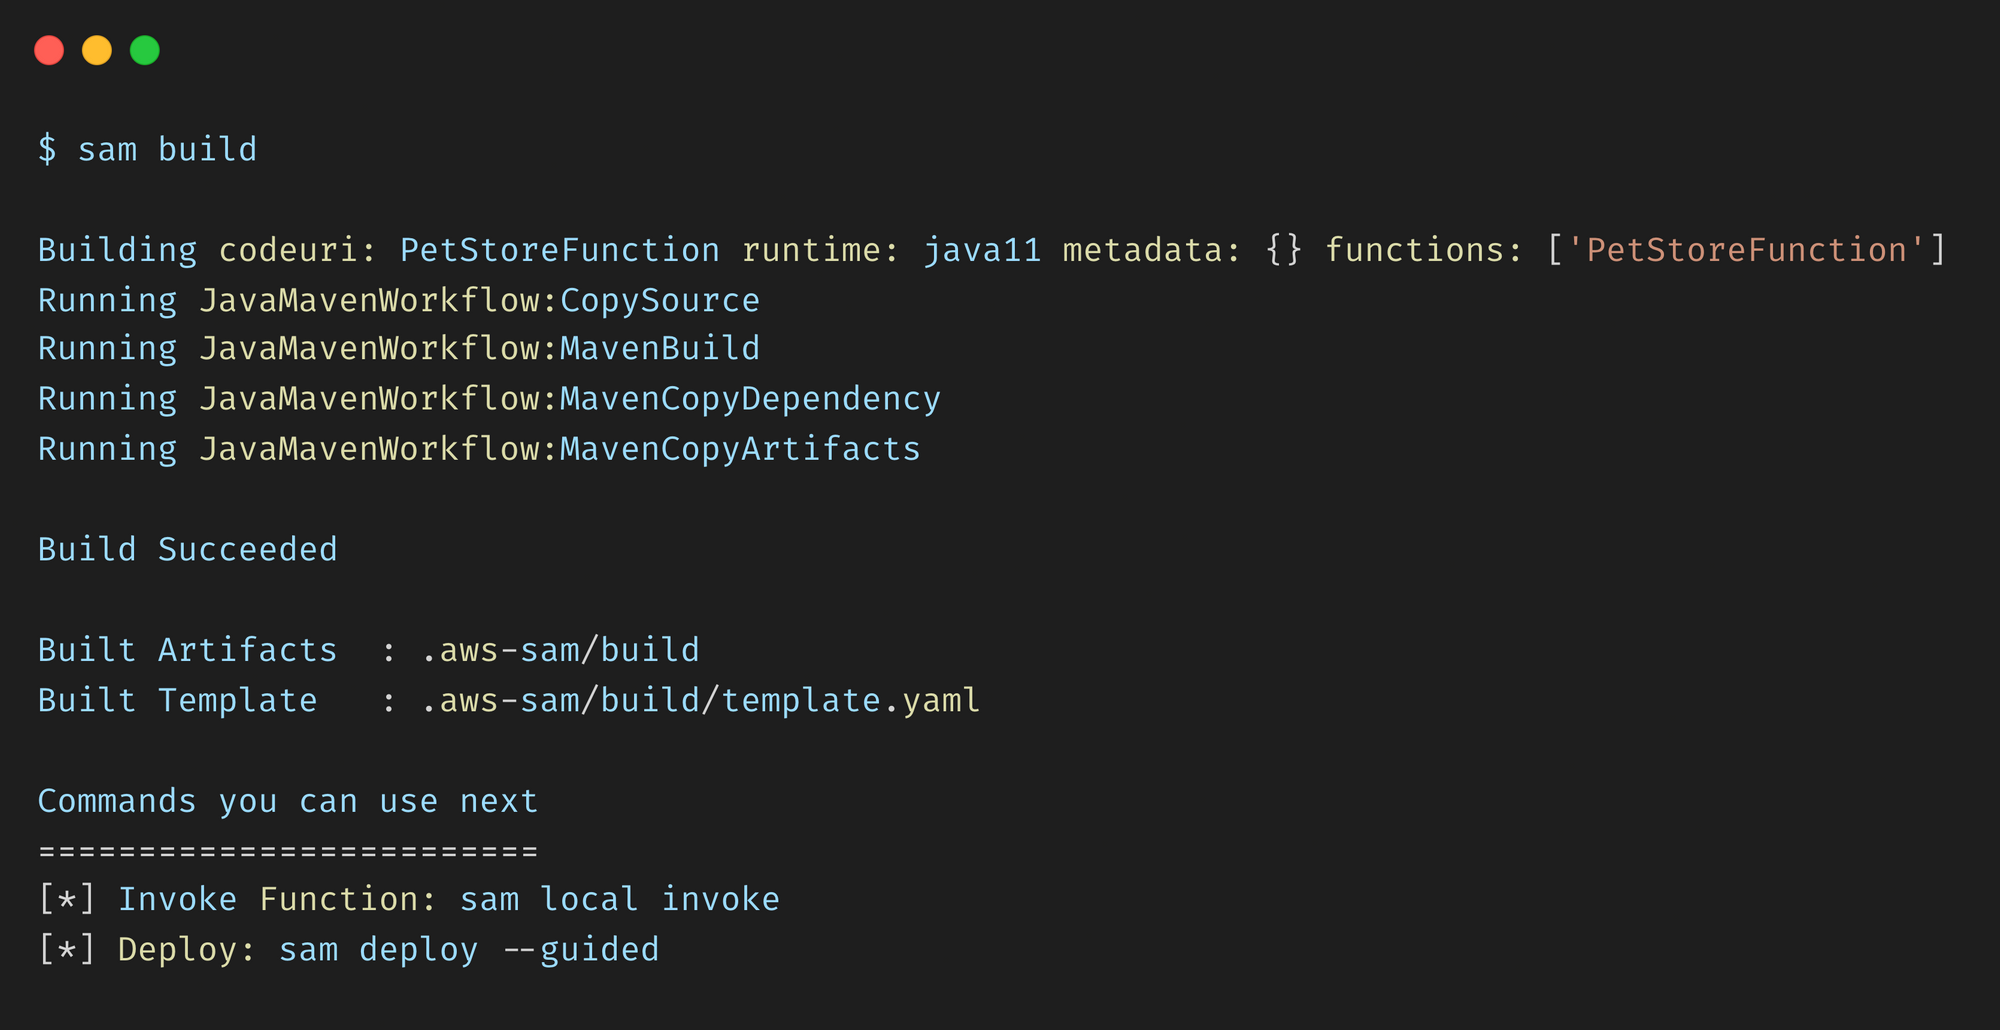
This compiles your source code and builds any dependencies that you have in the application. It then moves all the files into the .aws-sam/build folder so that they are ready to be packaged and deployed.
How to Test Locally (Part 1)
In the previous article, we discussed how the SAM CLI provides the sam local command to run your application locally. This internally uses Docker to simulate the execution environment of Lambda. If you don’t have Docker installed, you can get it from here.
This was fine for the Daily News API because it fetched data from the internet and did not depend on any other AWS component.
However, in our current project, we are relying on Amazon DynamoDB as our data store, and need access to it so that we can successfully run our application.
Essentially, we need a way to somehow mock the services provided by AWS on our local machine so that we can test them locally without using an actual AWS account.
How to Run AWS Locally
LocalStack was created just to solve this problem. In it’s own words:
LocalStack provides an easy-to-use test/mocking framework for developing Cloud applications. It spins up a testing environment on your local machine that provides the same functionality and APIs as the real AWS cloud environment.
In a nutshell, LocalStack brings all the features of AWS cloud into a Docker container running locally on your machine. This lets you build and test your cloud applications without having to deploy them on an actual AWS cloud account.
What does it mean for you as a developer?
- No need to provision an AWS account.
- No need to setup a development environment and think about security and other configurations.
- No need to incur unnecessary AWS costs during development period.
- Transparent local environment which exactly mimics the actual AWS environment.
How to Setup LocalStack
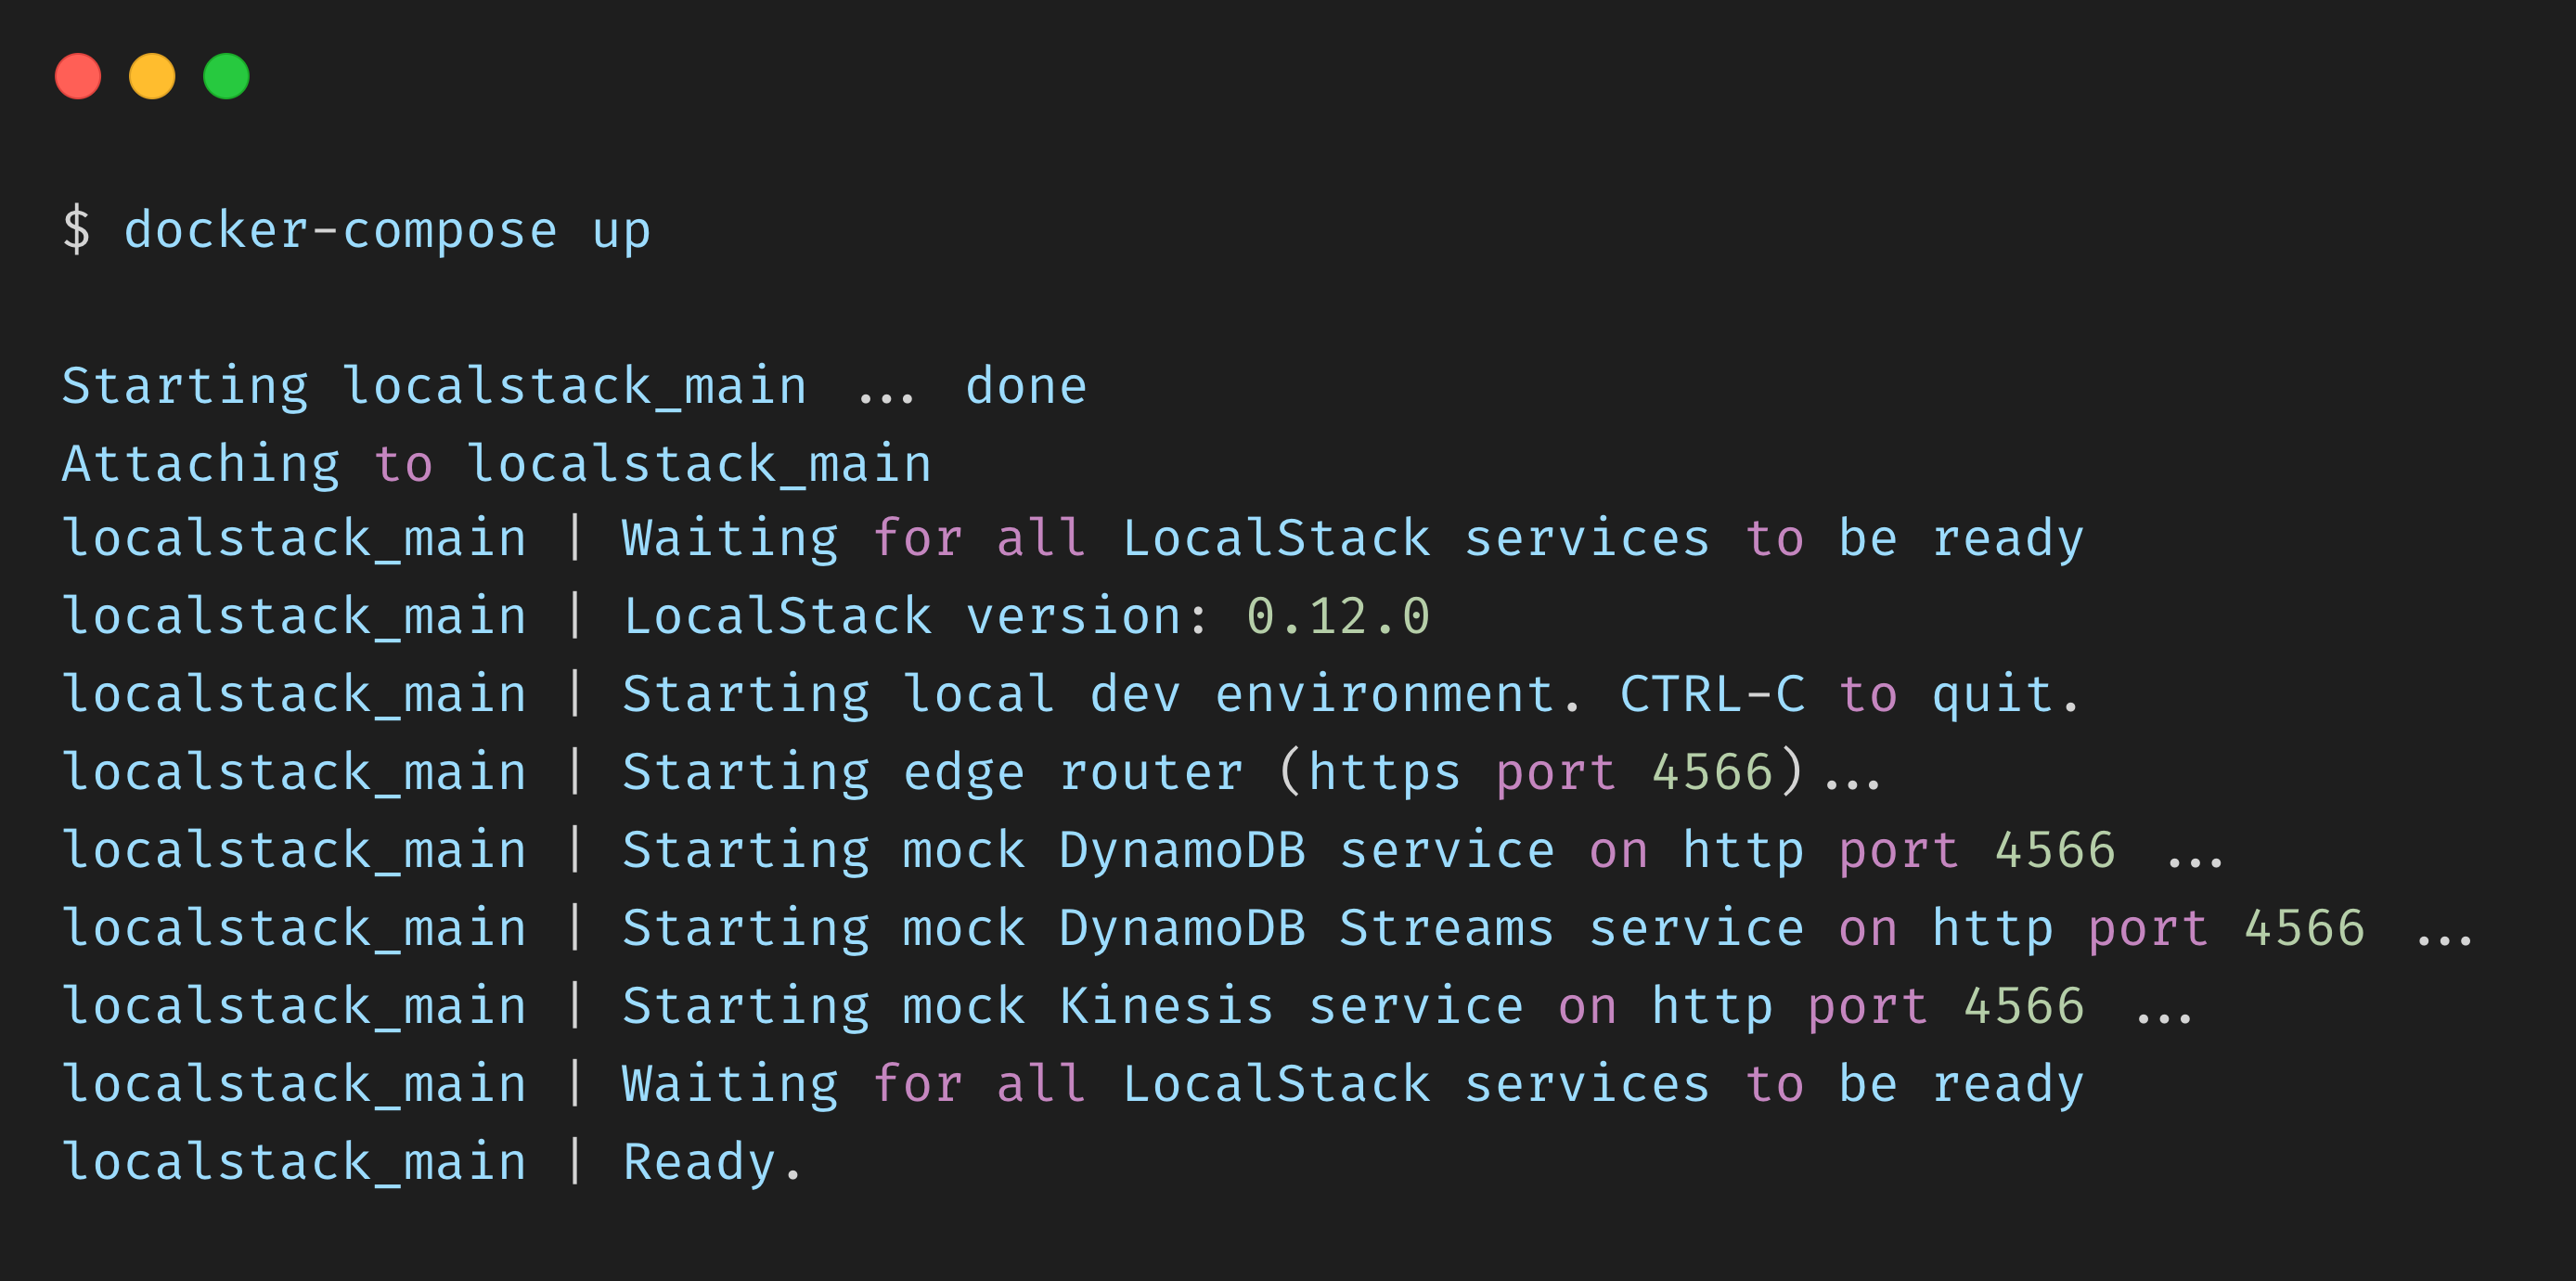
LocalStack is really easy to setup and start using. We will use Docker to pull in the latest image of LocalStack and start a container that runs a mock version of Amazon DynamoDB.
Create a docker-compose.yaml file in the pet-store folder and add the following content:
Let’s take a look at some of the configuration we are using:
- SERVICES —since Amazon DynamoDB is our only dependency, we will only enable this specific service
- DEFAULT_REGION — we will be using us-west-1 as our AWS region
- LAMBDA_EXECUTOR — setting this to local means that all our Lambda functions will run in a temporary directory on the local machine
- DATA_DIR — location to save persistent data for services like Amazon DynamoDB
Note: All LocalStack services are exposed via the edge service on port 4566. This is the only port we need to use.
Now, we can use docker-compose to start our local version of Amazon DynamoDB in its own container.
How to Create a Table
Now that we have a local setup of Amazon DynamoDB running, we should be able to create a table for our application.
We had used pet-store as the table name in our code, so let’s go ahead and create it. We will use AWS CLI to access Amazon DynamoDB running on our local machine and create the required table.
Run the following command to create a table named pet-store with an attribute id as its primary key.
aws --endpoint-url "http://localhost:4566" dynamodb create-table \
    --table-name pet-store \
    --attribute-definitions AttributeName=id,AttributeType=S \
    --key-schema AttributeName=id,KeyType=HASH \
    --billing-mode PAY_PER_REQUEST
Note that we have used the endpoint-url parameter to specify that we are pointing to the locally running AWS instance rather than the actual one.
How to Test Locally (Part 2)
Make the following change to the DynamoDbClient code to point it to the locally running Amazon DynamoDB instance:
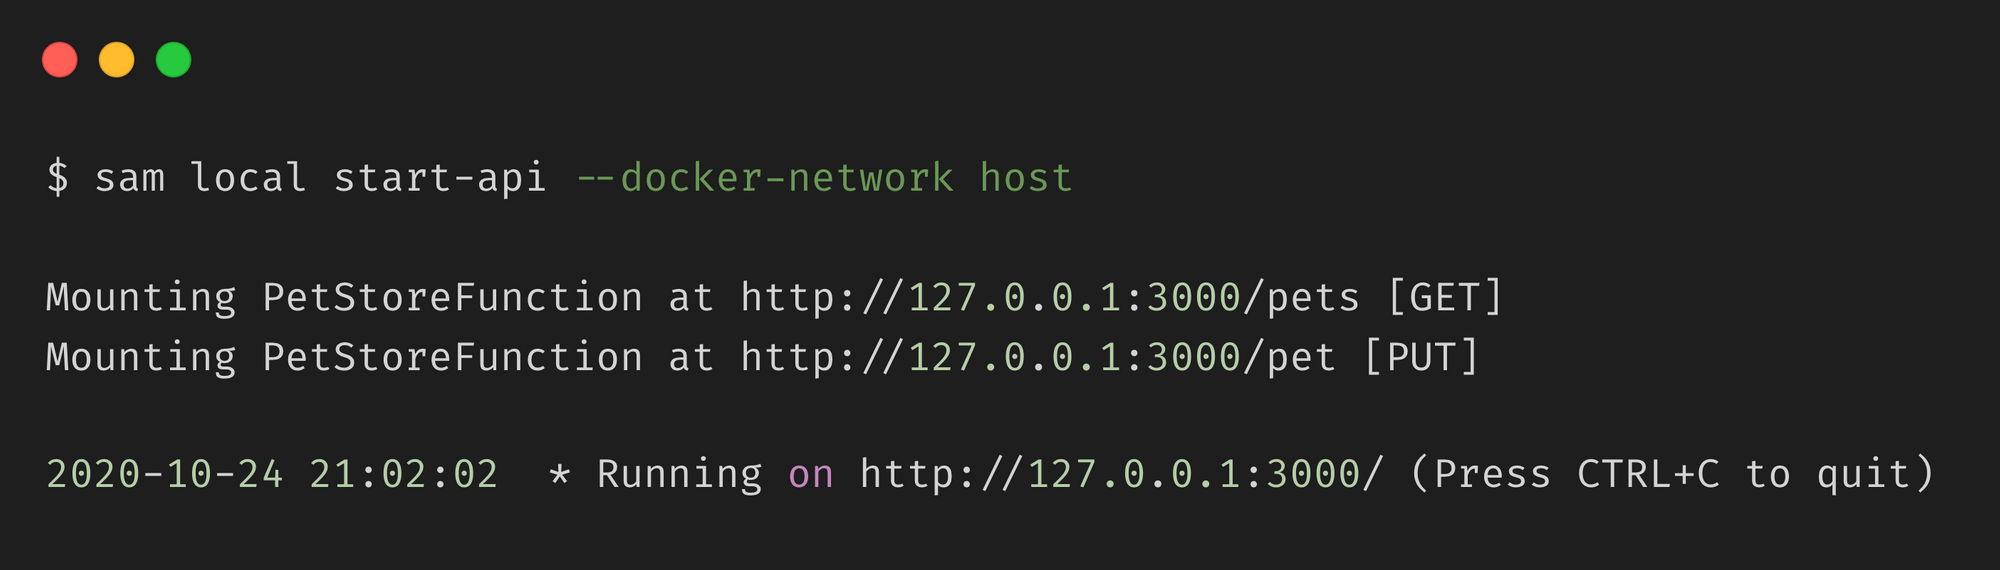
Next, use sam build to build the project and run the following command to start the API locally:
sam local start-api
This internally creates a local server and exposes a local endpoint that replicates your REST API.
Now, let’s test our application by adding a new pet. Run the following command to add a new pet by invoking the /pet endpoint we specified earlier.
curl --location --request PUT 'http://127.0.0.1:3000/pet' \
--header 'Content-Type: application/json' \
--data-raw '{
    "name": "Rocket",
    "age": 2,
    "category": "Dog"
}'
This creates a new Pet record, adds it to our local Amazon DynamoDB, and returns the generated UUID in the response.
Let’s add another Pet to our store.
curl --location --request PUT 'http://127.0.0.1:3000/pet' \
--header 'Content-Type: application/json' \
--data-raw '{
    "name": "Candle",
    "age": 1,
    "category": "Pig"
}'
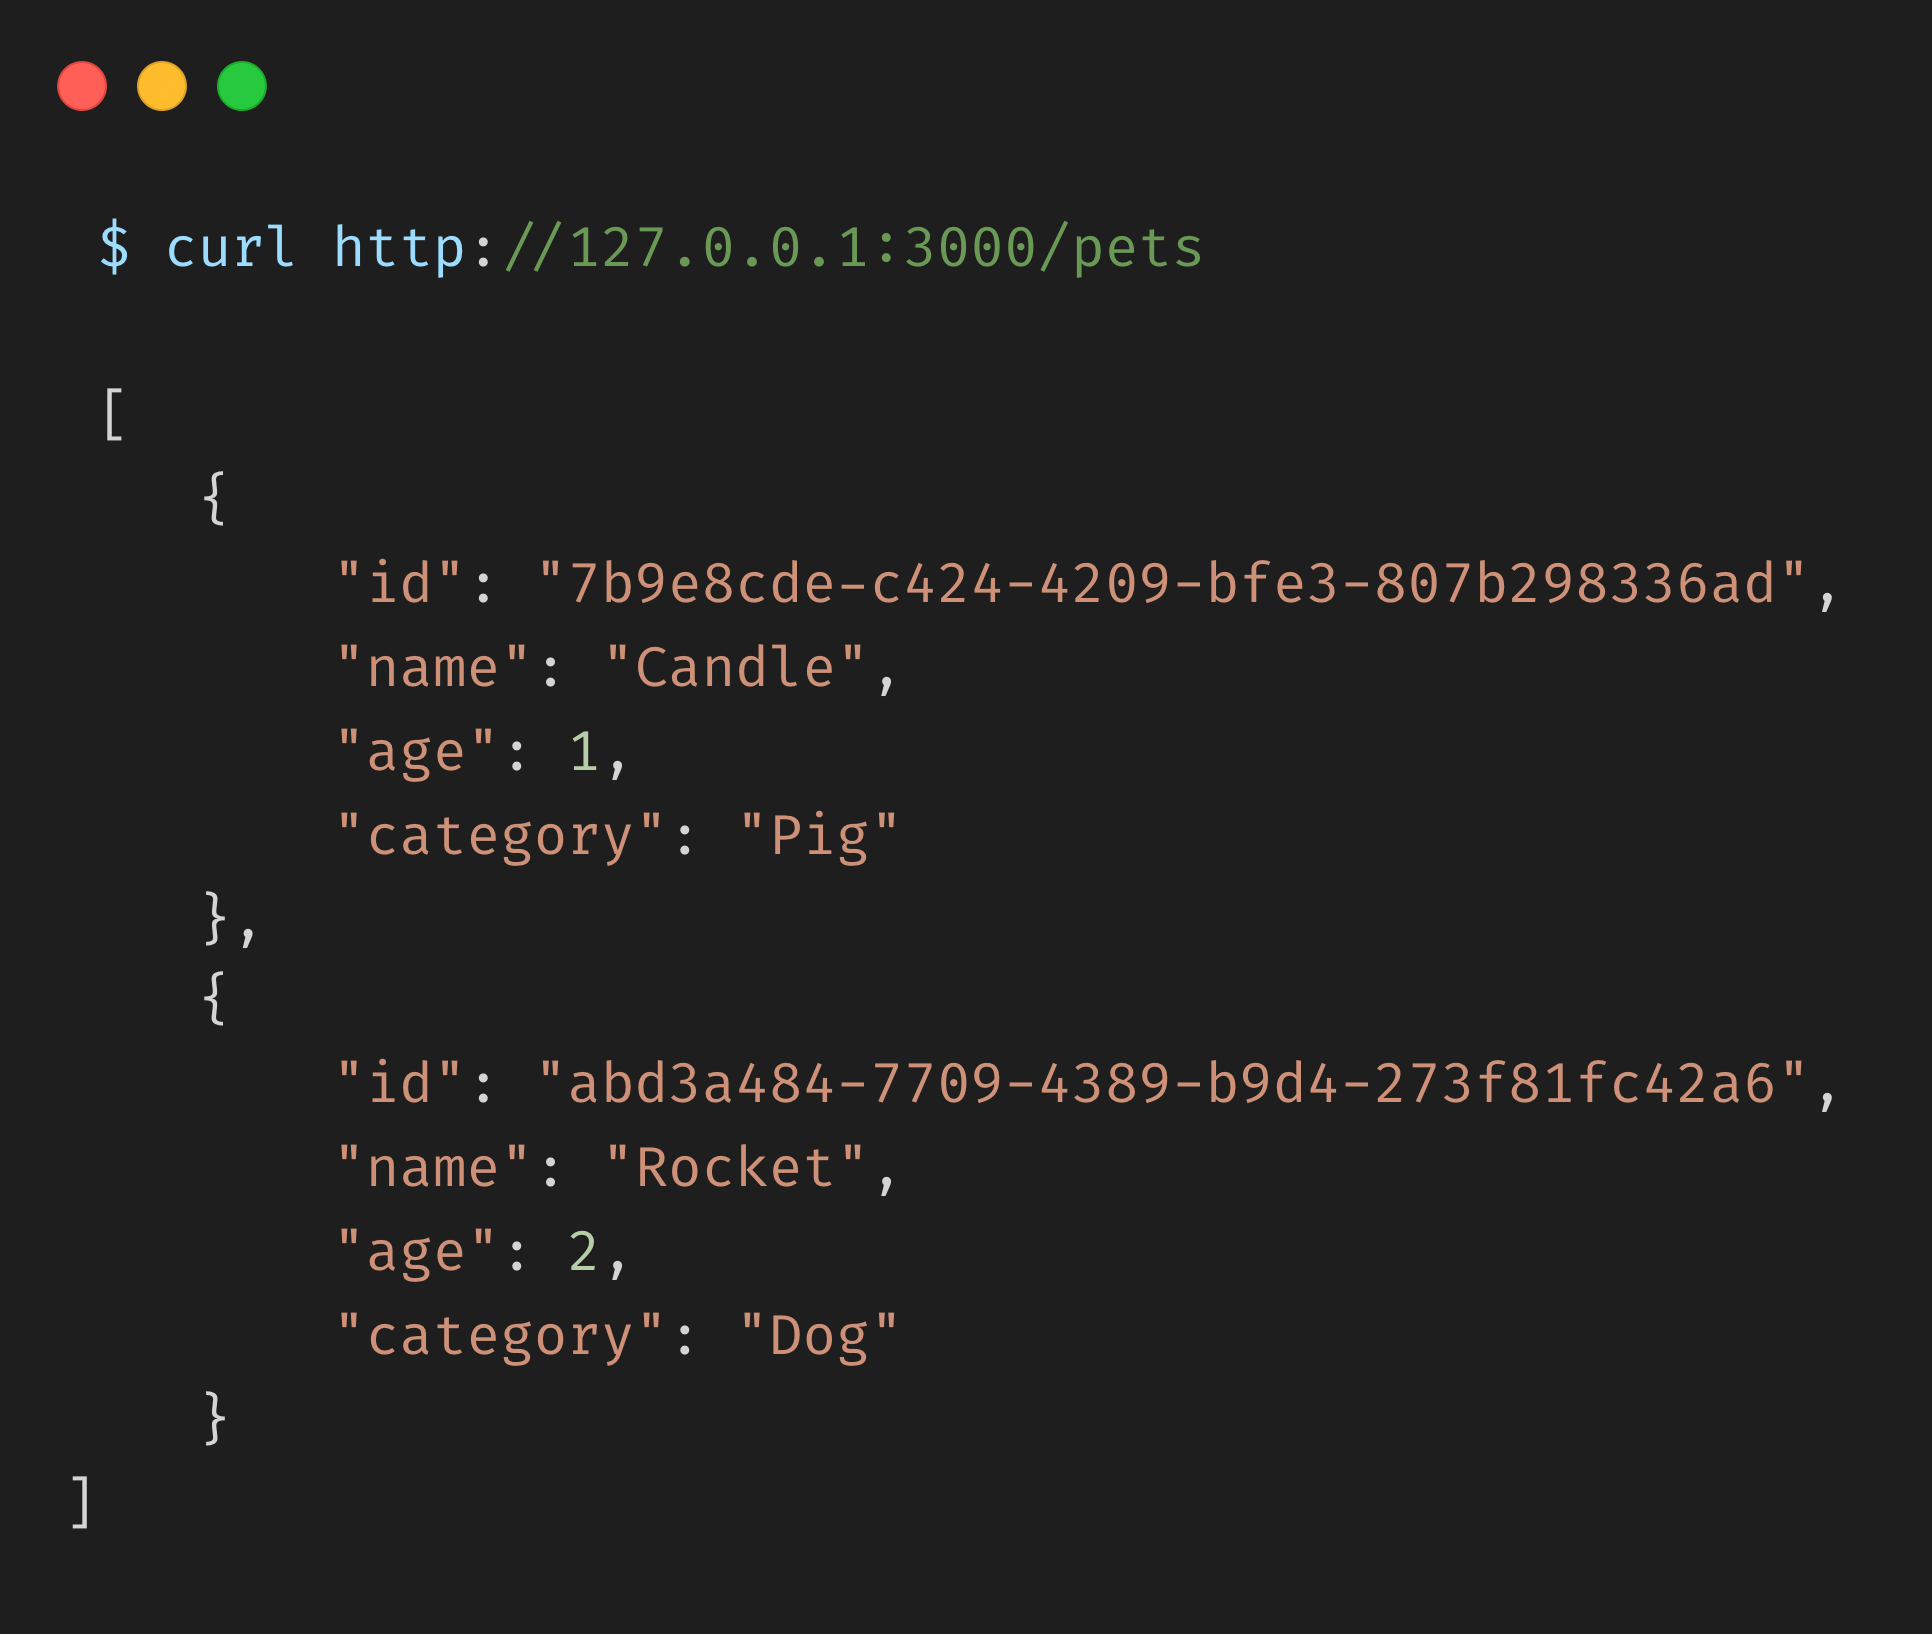
Now, let’s invoke our /pets API to get a list of pets available in our data store. We should expect to get a list of pets containing Rocket and Candle.
Conclusion
Congratulations! You just built and deployed a serverless application that uses AWS DynamoDB completely on your local machine.
You can now go ahead and make any modifications to your App.java file. Rerun sam deploy to redeploy your changes and sam local start-api to start the local server and test the changes.
Once you are ready for deployment, you just need to remove the endpoint overrides and you are good to go. In an ideal situation, this would be controlled by environment variables and would require absolutely no code changes to make it production ready.
The full source code for this tutorial can be found here.
Thank you for staying with me so far. Hope you liked the article. You can connect with me on LinkedIn where I regularly discuss technology and life. Also take a look at some of my other articles here on freeCodeCamp News or on Medium.
Happy reading ?