
By Serhii Povisenko
Sometimes, when you face a challenge, you might be able to solve it with routine processes. But other times you need to try something completely new, something that you know nothing about.
Usually in these scenarios you should apply engineering thinking. For me, these moments are the most insightful and I want to share some of mine with the community.
Here I will guide you through the steps that my team and I took when we connected existing AWS infrastructure to a large private network using Direct Connect.
Along the way, I will provide Terraform code snippets that will show you how to implement all of these components as "infrastructure as code" with accompanying design schemes.
What we'll cover
- Problems to Solve
- What is Direct Connect?
- How to embed it
- Transit VPC using Terraform
- Direct Connect using Terraform
- Peering between main and transit VPCs
- Do you use OpenVPN (optional)?
- Router Service
- Closing thoughts
Problems to Solve
We had services within our VPC that should be able to communicate with other services in a separate virtual private network
In order to establish the connection, we needed to accept an AWS hosted connection from a network provider as part of a signed contract to grant access to the VPN using AWS Direct Connect.
So how were we to implement all of this? How were we going to embed it a current solution that was managed using Terraform? Were there any best practices for doing that?
What is Direct Connect?
AWS Direct Connect makes it easy to establish a dedicated network connection from your premises to your Amazon VPC or among Amazon VPCs. This option can potentially reduce network costs, increase bandwidth throughput, and provide a more consistent network experience than the other VPC-to-VPC connectivity options. (source)
Essentially you have a network provider who has AWS facilities in a shared data centre. Then you both can make a direct connection between your AWS network components and the network using the provider's hardware (literally a patchcord in the nest) with subsequent access.
Generic implementation in terms of AWS looks like the following:
- You configure one or two (reserved) Direct Connections in the console, which creates a Direct Connect Gateway.
- Then you attach a private VIF (one per connection) to the gateway.
- Once you make a few calls with the provider's network engineers and exchange routing policies, it is done.
Usually all instructions regarding how to enable the connection will be sent over to you by the provider.
How to embed it
Our first assumption was that we would enable the connection in the VPC and create the routing configuration to direct connect gateway for the required requests (for example, we'd distinguish them by the header "Host" or by IPs).
On high level, it would look something like this:
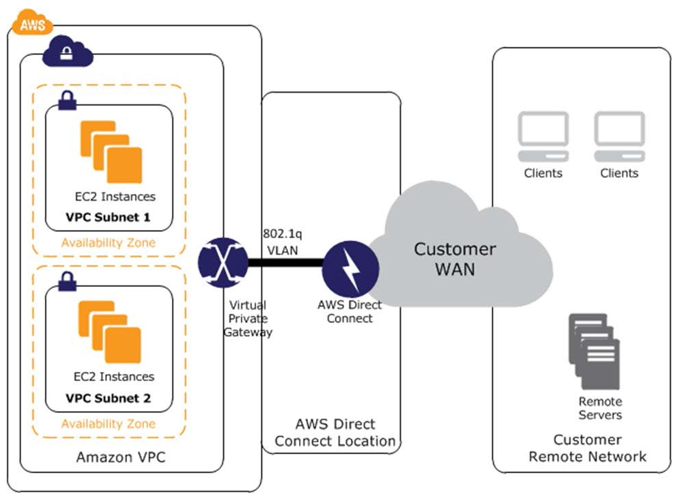 AWS Direct Connect
During a call with the provider's network engineers, they asked us about our IP range that we advertised to the network. We wondered why. It was because Direct Connect work is declared by a protocol called BGP. If you want more info, there are a lot of videos that will teach you about one of the major Internet protocols that are running under the hood.
Our initial thought was that it needed to be a subnet which contained services that we wanted to access the network. After that, we were asked to configure the subnet 10.1.2.0/24 as an allowed prefix in our Direct Connect configuration.
Long story short, "allowed prefixes" here stand for an IP range that we were going to advertise to the network provider that they would register in the routing policies.
Well, after all that, it did not work. The provider did not "see" our advertised routes despite the fact that we could see them.
A bit of investigation and voilà:
AWS will allocate private IPs (/30) in the 169.x.x.x range for the BGP session and will advertise the VPC CIDR block over BGP. You can advertise the default route via BGP.
Additionally, we found other folks who seemed faced the same issue:
we ended up with creating a new VPC with smaller CIDR our partner wanted.
So basically, the IP's range that you can advertise over Direct Connect is limited up to /30. Also, you can not advertise subnets – rather you should advertise the whole VPC CIDR.
Our network CIDR was 10.1.0.0/16 and we had an issue with that - it was too large to accept for the network provider. On top of that, during the call we discovered another thing we had to do when connecting to the network: we needed to contact the network IP access management department (if the network was large enough, I suppose) to ask them to provide us with a unique range within the network. Subsequently, it should be our new VPC CIDR.
We decided to create a separate VPC. To get some proofs of work we found some official guides form AWS such as this one. Shortly after this, we learned that the AWS community would start using separate words for that separate VPC - they'd call it a transit VPC.
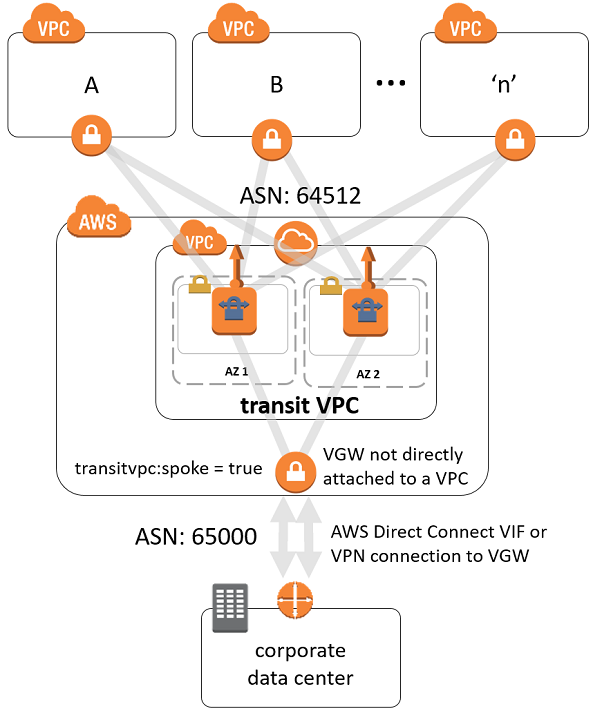 Direct Connect using transit VPC
Before getting a reply to a request a unique IP range in the network, we asked the provider about currently unused IP ranges so we could implement it quickly on our side. This would give us the proof of work we needed for a solution. Everything worked perfectly.
The next step was to implement everything (Direct Connect configurations + VPCs peering) in our existing Terraform configuration.
Transit VPC using Terraform
First of all, before we start to dig into the code, I want to say that you can find all the code below on GitHub here.
Let's first recap what we discussed before. We have conditions where we had an existing VPC. And we wanted some services within it to be able to communicate through the network that we connected to using Direct Connect.
We were granted two AWS-hosted connections (primary and secondary, in order to ensure connection fallback). The main idea was to extend our existing infrastructure somehow. Somehow meant Transit VPC – the solution that helped us integrate with such connections.
Now let's look at some code to represent what we have discussed. The first thing to define is going to be our main VPC. I want to present it for illustration purposes only, so it makes all further steps seem more consistent.
```hashicorp configuration language variable "main_vpc_name" { description = "Name of your main VPC" } variable "main_vpc_cidr" { description = "CIDR of your main VPC, e.g. 10.1.0.0/16" } variable "public_subnet" { description = "pubic subnet of your main VPC (if you have), e.g. 10.1.1.0/24" } variable "private_app_subnet" { description = "private subnet of your main VPC (if you have), e.g. 10.1.2.0/24" } variable "main_vpc_key_name" { default = "main-vpc-key" description = "Name of SSH key of your main VPC" } variable "aws_availability_zone" { description = "Your AWS AZ of your main VPC" }
provider "aws" { profile = "your-profile" region = "your-region" }
terraform { backend "s3" { bucket = "your-terraform-states-bucket" key = "terraform.tfstate" profile = "your-profile" region = "your-region" } }
module "vpc" { version = "~> v2.0" source = "terraform-aws-modules/vpc/aws" name = var.main_vpc_name cidr = var.main_vpc_cidr
azs = [ var.aws_availability_zone, ]
private_subnets = [ var.private_app_subnet ]
public_subnets = [ var.public_subnet, ]
single_nat_gateway = true one_nat_gateway_per_az = false enable_nat_gateway = true enable_vpn_gateway = false
tags = { Terraform = "true" } } /* bellow could be defined any other resources from you infrastructure e.g. OpenVPN server, instances, security configuration, key pairs etc.
... */
Next, some of the main VPC's parameters are going to be used in the transit VPC. So let's define them as output:

```hashicorp configuration language
output "main_vpc_id" {
  value = module.vpc.vpc_id
}
output "main_vpc_range" {
  value = module.vpc.vpc_cidr_block
}
output "main_vpc_az" {
  value = module.vpc.azs.0
}
output "main_vpc_key_name" {
  value = var.main_vpc_key_name
}
output "main_public_routing_table_id" {
  value = module.vpc.public_route_table_ids.0
}
output "main_private_routing_table_id" {
  value = module.vpc.private_route_table_ids.0
}
Now we can start to configure our transit VPC. Just for sake of good design, we decided to manage it in a separate state under a separate folder (e.g. tranist-vpc/). Let's first import above outputs as locals:
```hashicorp configuration language locals { main_private_routing_table = data.terraform_remote_state.main.outputs.main_private_routing_table_id
main_public_routing_table = data.terraform_remote_state.main.outputs.main_public_routing_table_id
main_vpc_id = data.terraform_remote_state.main.outputs.main_vpc_id
main_vpc_range = data.terraform_remote_state.main.outputs.main_vpc_range
main_vpc_az = data.terraform_remote_state.main.outputs.main_vpc_az
main_vpc_key_name = data.terraform_remote_state.main.outputs.main_vpc_key_name }
Next, we can start defining the transit VPC configuration. First, I want to list all variables that we need (_pay attention to the IPs of the DNS servers in the network that we want to connect to. You should know them to specify as DNS servers in transit VPC_):

```hashicorp configuration language
variable "transit_vpc_name" {
  default = "transit-vpc"
}
variable "transit_vpc_cidr" {
  description = "Transit VPC CIDR. Your unique IP range in the network e.g. 10.10.14.0/24"
}
variable "transit_private_subnet" {
  description = "Transit VPC private subnet e.g 10.10.14.0/25"
}
variable "transit_public_subnet" {
  description = "Transit VPC public subnet for the NAT gateway e.g. 10.10.14.128/25"
}
variable "network_dns_server" {
  description = "IP of one of DNS servers in the network. Distributed by provider"
}
variable "network_dns_server_2" {
  description = "IP of one of DNS servers in the network. Distributed by provider"
}
variable "dhcp_options_domain_name" {
  description = "DHCP option domain name depending on your AWS region e.g. {your_region}.compute.internal"
}
And, secondly, the configuration:
```hashicorp configuration language module "transit-vpc" { version = "~> v2.0" source = "terraform-aws-modules/vpc/aws" name = var.transit_vpc_name cidr = var.transit_vpc_cidr
azs = [ local.main_vpc_az, ]
private_subnets = [ var.transit_private_subnet, ]
public_subnets = [ var.transit_public_subnet, ]
single_nat_gateway = true one_nat_gateway_per_az = false enable_nat_gateway = true enable_vpn_gateway = false enable_dhcp_options = true dhcp_options_domain_name = var.dhcp_options_domain_name dhcp_options_domain_name_servers = [var.network_dns_server, var.network_dns_server_2]
tags = { Terraform = "true" } }
## Direct Connect using Terraform

Let's continue with the Direct Connect configuration. First, let's define all variables that we need in order to continue. You should get all these values from your network provider. I assume they will be sent over to you (the same worked for us) in a separate document like a spreadsheet:

```hashicorp configuration language
variable "bgp_provider_asn" {
  description = "BGP autonomous system number of the provider. Distributed by provider"
}
variable "provider_vln_id" {
  description = "BGP VLN ID of the provider. Distributed by provider"
}
variable "primary_bgp_key" {
  description = "BGP auth key for primary virtual interface. Distributed by provider"
}
variable "secondary_bgp_key" {
  description = "BGP auth key for secondary virtual interface. Distributed by provider"
}
variable "primary_connection_id" {
  description = "BGP auth key for primary virtual interface. Distributed by provider"
}
variable "secondary_connection_id" {
  description = "IP range distributed by provider"
}
variable "primary_amazon_address" {
  description = "IP range distributed by provider"
}
variable "secondary_amazon_address" {
  description = "IP range distributed by provider"
}
variable "primary_customer_address" {
  description = "IP range distributed by provider"
}
variable "secondary_customer_address" {
  description = "IP range distributed by provider"
}
And now we can do the rest of the configuration:
```hashicorp configuration language resource "aws_dx_gateway" "provider-gateway" { name = "provider-dc-gateway" amazon_side_asn = "64512" // usually it's a default value }
resource "aws_dx_gateway_association" "transit" { dx_gateway_id = aws_dx_gateway.provider-gateway.id associated_gateway_id = aws_vpn_gateway.transit_vpn_gw.id allowed_prefixes = [ var.transit_vpc_cidr ] }
resource "aws_dx_private_virtual_interface" "primary" { connection_id = var.primary_connection_id name = "provider-vif-primary" vlan = var.provider_vln_id address_family = "ipv4" bgp_asn = var.bgp_provider_asn amazon_address = var.primary_amazon_address customer_address = var.primary_customer_address dx_gateway_id = aws_dx_gateway.provider-gateway.id bgp_auth_key = var.primary_bgp_key
}
resource "aws_dx_private_virtual_interface" "secondary" { connection_id = var.secondary_connection_id name = "provider-vif-secondary" vlan = var.provider_vln_id address_family = "ipv4" bgp_asn = var.bgp_provider_asn amazon_address = var.secondary_amazon_address customer_address = var.secondary_customer_address dx_gateway_id = aws_dx_gateway.provider-gateway.id bgp_auth_key = var.secondary_bgp_key }
Now, if you go to your AWS console, next to Direct Connection you should see something like this:
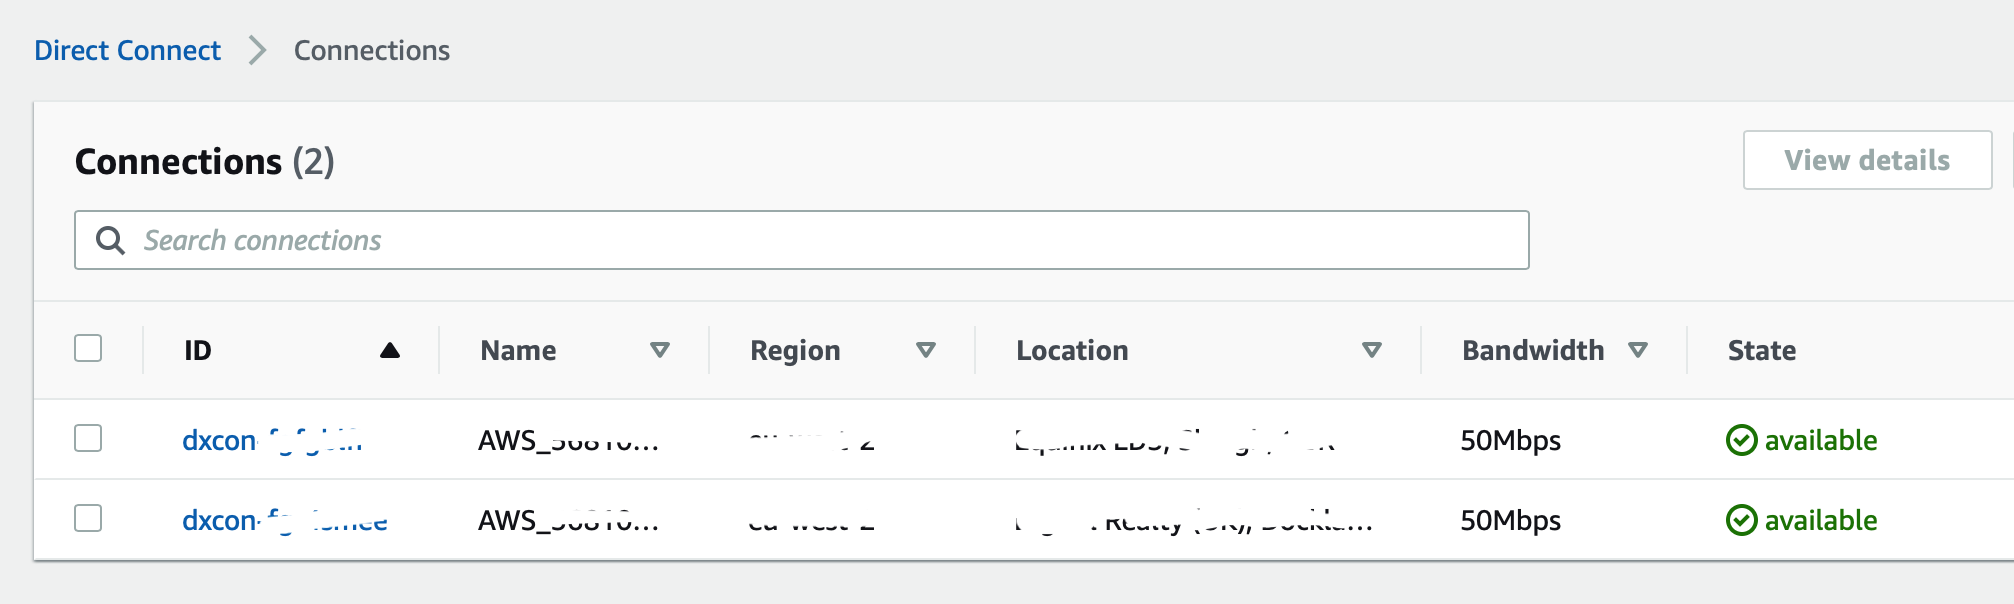
_configured direct connections_
## Peering between main and transit VPCs
The last issue to solve is to configure connectivity between our services and transit VPC in order to establish access to the network.
To accomplish this, we decide to use [VPC peering](https://docs.aws.amazon.com/vpc/latest/peering/what-is-vpc-peering.html). Here we will need some of the _locals_' variables that we imported before:
```hashicorp configuration language
resource "aws_vpc_peering_connection" "main-to-transit" {
peer_vpc_id = module.transit-vpc.vpc_id
vpc_id = local.main_vpc_id
auto_accept = true
tags = {
Name = "VPC Peering between main and transit VPC"
}
}
resource "aws_route" "from-main-to-transit" {
route_table_id = local.main_private_routing_table
destination_cidr_block = var.transit_vpc_cidr
vpc_peering_connection_id = aws_vpc_peering_connection.main-to-transit.id
}
resource "aws_route" "from-main-public-to-transit" {
route_table_id = local.main_public_routing_table
destination_cidr_block = var.transit_vpc_cidr
vpc_peering_connection_id = aws_vpc_peering_connection.main-to-transit.id
}
resource "aws_route" "from-transit-to-main" {
route_table_id = module.transit-vpc.private_route_table_ids.0
destination_cidr_block = local.main_vpc_range
vpc_peering_connection_id = aws_vpc_peering_connection.main-to-transit.id
}
Next we need to allow inbound HTTP traffic from the main VPC. That configuration can be done like this:
```hashicorp configuration language resource "aws_security_group" "transit_vpc_sg" { name = "transit-vpc-sg" description = "Transit VPC SG" vpc_id = module.transit-vpc.vpc_id
ingress { description = "Allow HTTP from main VPC" from_port = 80 to_port = 80 protocol = "tcp" cidr_blocks = [local.main_vpc_range] }
egress { from_port = 0 to_port = 0 protocol = "-1" cidr_blocks = ["0.0.0.0/0"] }
tags = { Name = "transit-vpc" } }
Great. Now we have two VPCs that are peered and coexist together.

## Do you use OpenVPN (optional)?

In our case, we have an OpenVPN server to manage access (SSH) to the main VPC's internal resources. And we wanted to access the transit VPCs resources in the same way. In order to do that we needed to create few additional resources within the transit VPC:

```hashicorp configuration language
resource "aws_vpn_gateway" "transit_vpn_gw" {
  tags = {
    Name = "transit-vpn-gw"
  }
}

resource "aws_vpn_gateway_attachment" "vpn_attachment" {
  vpc_id         = module.transit-vpc.vpc_id
  vpn_gateway_id = aws_vpn_gateway.transit_vpn_gw.id
}

resource "aws_vpn_gateway_route_propagation" "transit" {
  vpn_gateway_id = aws_vpn_gateway.transit_vpn_gw.id
  route_table_id = module.transit-vpc.private_route_table_ids.0
}
And then add an ingress rule to transit-vpc-SG that was created on the previous step:
```hashicorp configuration language ingress { description = "Allow SSH from main VPC" from_port = 22 to_port = 22 protocol = "tcp" cidr_blocks = [local.main_vpc_range] }
To make all of this work you need to specify the transit VPC's CIDR along with the main VPC's CIDR in the OpenVPN server routing setting under the VPN Setting section:
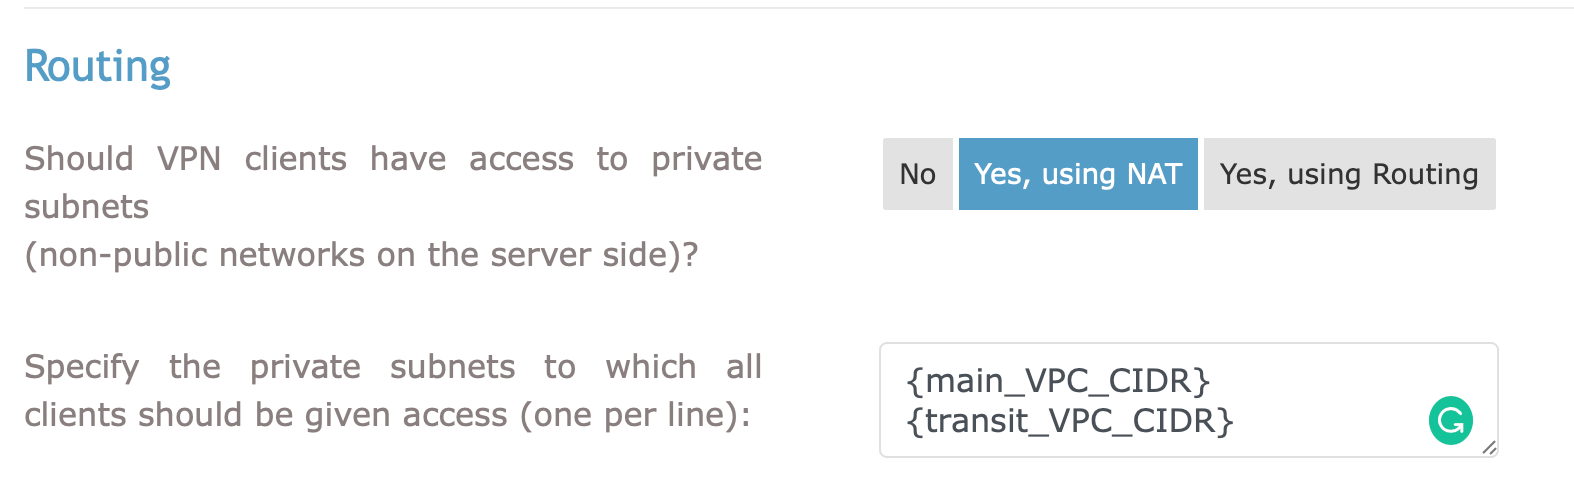
_OpenVPN server routing settings_
So now we are almost there. The last thing to do is to design and configure how our services within the main VPC will be able to programmatically access the network.
## Router Service
To recap, the main reason why we've done all of that is that we need to be able to access other services in the network (for example request or submit data). We found two possible ways to achieve that here:
* Migrate required services to the transit VPC and use them there, assigned with new private IPs. Main VPC internal routing should be adjusted. On top of that, any access to DB servers, logs' storage, and so on should be managed as well.
* Create router service (running HAproxy or NGingx) within the transit VPC. Add router private IP to the `hosts` file in each service in the main VPC that wants to access the network so the IP will be resolved behind the required domain name.
We choose the second option as it seemed to be the most aligned with the [open-close principle](https://en.wikipedia.org/wiki/Open–closed_principle). Here how it approximately looks:
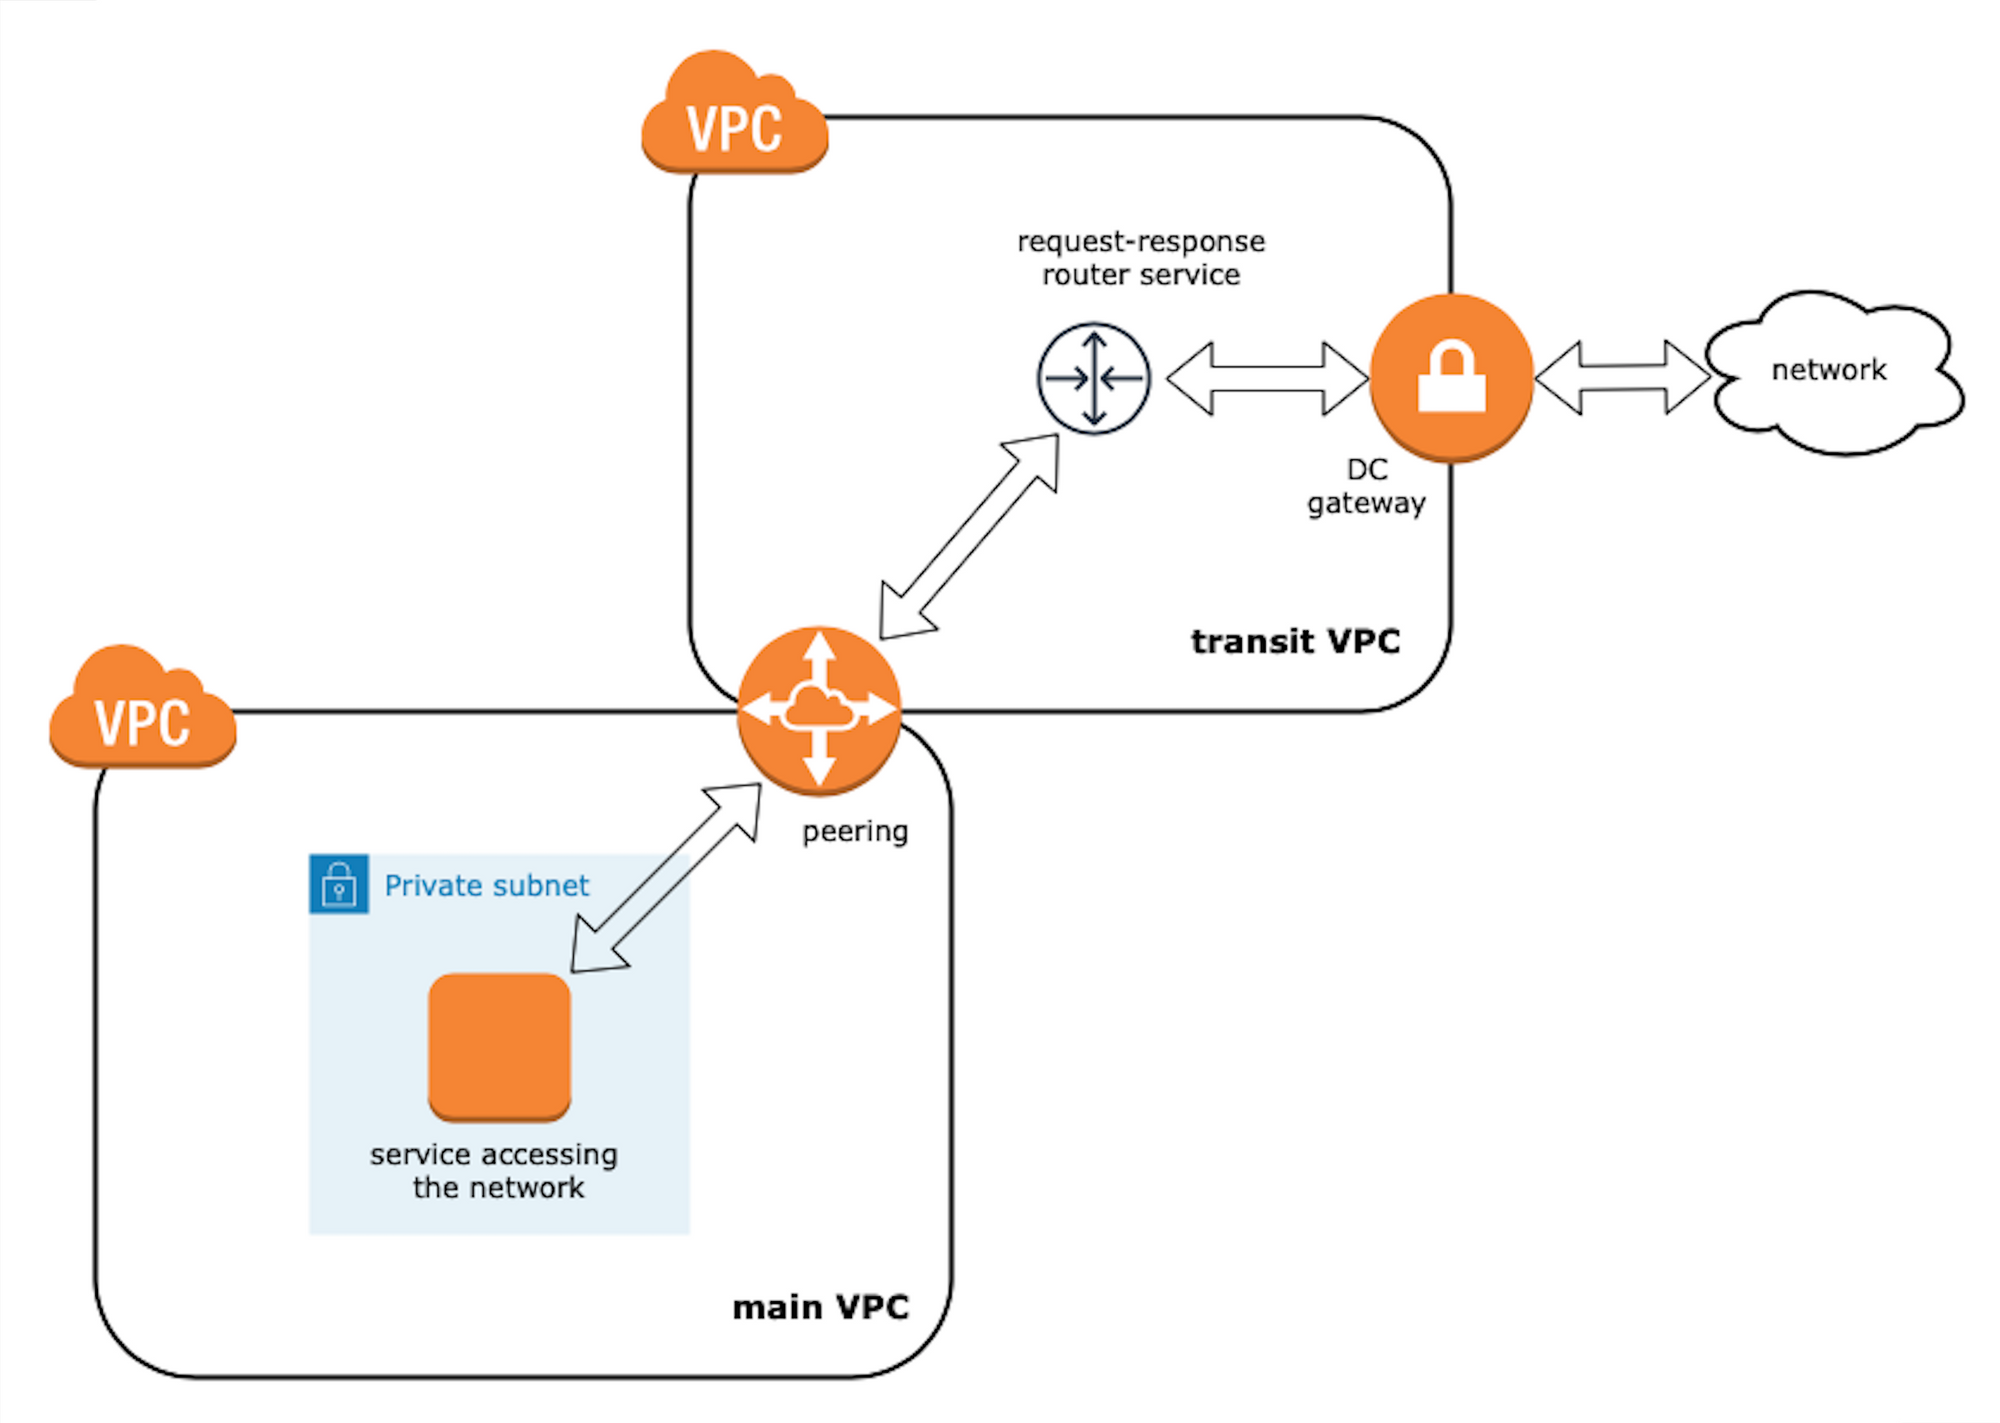
_transit VPC router service_
Let's configure it in Terraform:
```hashicorp configuration language
variable "router_private_ip" {
description = "Private IP of router instance in transit VPC t route request back and forward e.g. 10.10.14.90"
}
resource "aws_instance" "router" {
ami = "ami-0eb89db7593b5d434" // any AMI you prefer
instance_type = "t2.micro" //any type you prefer
availability_zone = local.main_vpc_az
key_name = local.main_vpc_key_name
subnet_id = module.transit-vpc.private_subnets.0
private_ip = var.router_private_ip
vpc_security_group_ids = [
aws_security_group.router_sg.id,
]
user_data = file("router_init.sh")
associate_public_ip_address = false
tags = {
Name = "transit-vpc-router"
Managed = "terraform"
}
}
resource "aws_security_group" "router_sg" {
name = "router_security_group"
description = "router_security_group"
ingress {
from_port = 80
to_port = 80
protocol = "tcp"
cidr_blocks = [
local.main_vpc_range,
var.transit_private_subnet
]
}
ingress {
from_port = 22
to_port = 22
protocol = "tcp"
cidr_blocks = [
local.main_vpc_az,
]
}
egress {
from_port = 0
to_port = 0
protocol = "-1"
cidr_blocks = [
"0.0.0.0/0",
]
}
vpc_id = module.transit-vpc.vpc_id
tags = {
Managed = "terraform"
}
}
Here router_init.sh contains a script to configure and launch the HAproxy service in a container. For illustration purposes, let's assume that we want to access two internal domain names in the network:
domain-name-1.internal.comdomain-name-2.internal.com
#! /bin/bash

# Install Docker
apt-get update

apt-get install -y \
    apt-transport-https \
    ca-certificates \
    curl \
    software-properties-common

curl -fsSL https://download.docker.com/linux/ubuntu/gpg | apt-key add -

apt-key fingerprint 0EBFCD88

sudo add-apt-repository \
   "deb [arch=amd64] https://download.docker.com/linux/ubuntu \
   $(lsb_release -cs) \
   stable"

apt-get update

apt-get install -y docker-ce

usermod -a -G docker ubuntu

chown -R ubuntu:ubuntu /home/ubuntu/.docker/

# Create HAproxy configuration
cat > /home/ubuntu/haproxy.cfg <<- "EOF"
       global
           log stdout local0
           daemon
           maxconn 4000

       defaults
           log               global
           mode              http
           option            httplog
           timeout connect   5s
           timeout check     5s
           timeout client    60s
           timeout server    60s
           timeout tunnel    3600s

       frontend http-in
           bind *:80

           #hosts acls
           acl domain1_acl             hdr(host) -i domain-name-1.internal.com
           acl domain2_acl             hdr(host) -i domain-name-2.internal.com


           use_backend domain1         if domain1_acl
           use_backend domain2         if domain2_acl

       backend domain1
           mode http
           option forwardfor
           http-request replace-header Host .* domain-name-1.internal.com
           server domain1 domain-name-1.internal.com:443 ssl verify none

       backend domain2
           mode http
           option forwardfor
           http-request replace-header Host .* domain-name-2.internal.com
           server domain2 domain-name-2.internal.com:443 ssl verify none
EOF

#Launch router
docker run -d --restart always --name haproxy --net=host -v /home/ubuntu:/usr/local/etc/haproxy:ro haproxy:2.1-alpine
The last step is to check that our domains were added to the hosts file on the instances in the main VPC and start making requests over HTTP.
Closing Thoughts
In this article, I showed you how to integrate Direct Connect into your existing AWS infrastructure. I also talked about how you can efficiently manage it using Terraform.
Then I discussed what approach would be appropriate for a network routing configuration that would make the solution transparent and easy to maintain as much as possible.
Transit VPC, which is recommended by AWS to solve such challenges, was indeed easy to configure. And the approach we tried with router service within transit VPC to access the private network showed its proof of work. But it didn't seem to be any better than other alternatives.
Lastly, I introduced Terraform code snippets are will hopefully be useful for anyone who wants to do something similar.
I hope you enjoyed this article and found it helpful!