

S3 and CloudFront are AWS cloud services that make serving static assets powerful and cheap. How can we host a simple static website or JAMstack app on it?
- A little about AWS
- What are the benefits of serving from S3 and CloudFront?
- Before we start, you’ll need an AWS account
- Storing your website on S3
- Serving your website on S3
- Distributing your website on CloudFront
- Custom domain names
- Advanced AWS Usage
- Resources
A little about AWS
If you’re not familiar, AWS (Amazon Web Services) is a cloud service provider that gives developers opportunities to build pretty much anything they can imagine in the cloud.
Though their services extend beyond the likes of machine learning and artificial intelligence, we’re going to stick with the entry level services for the purpose of this guide that will allow us to easily host an HTML website.
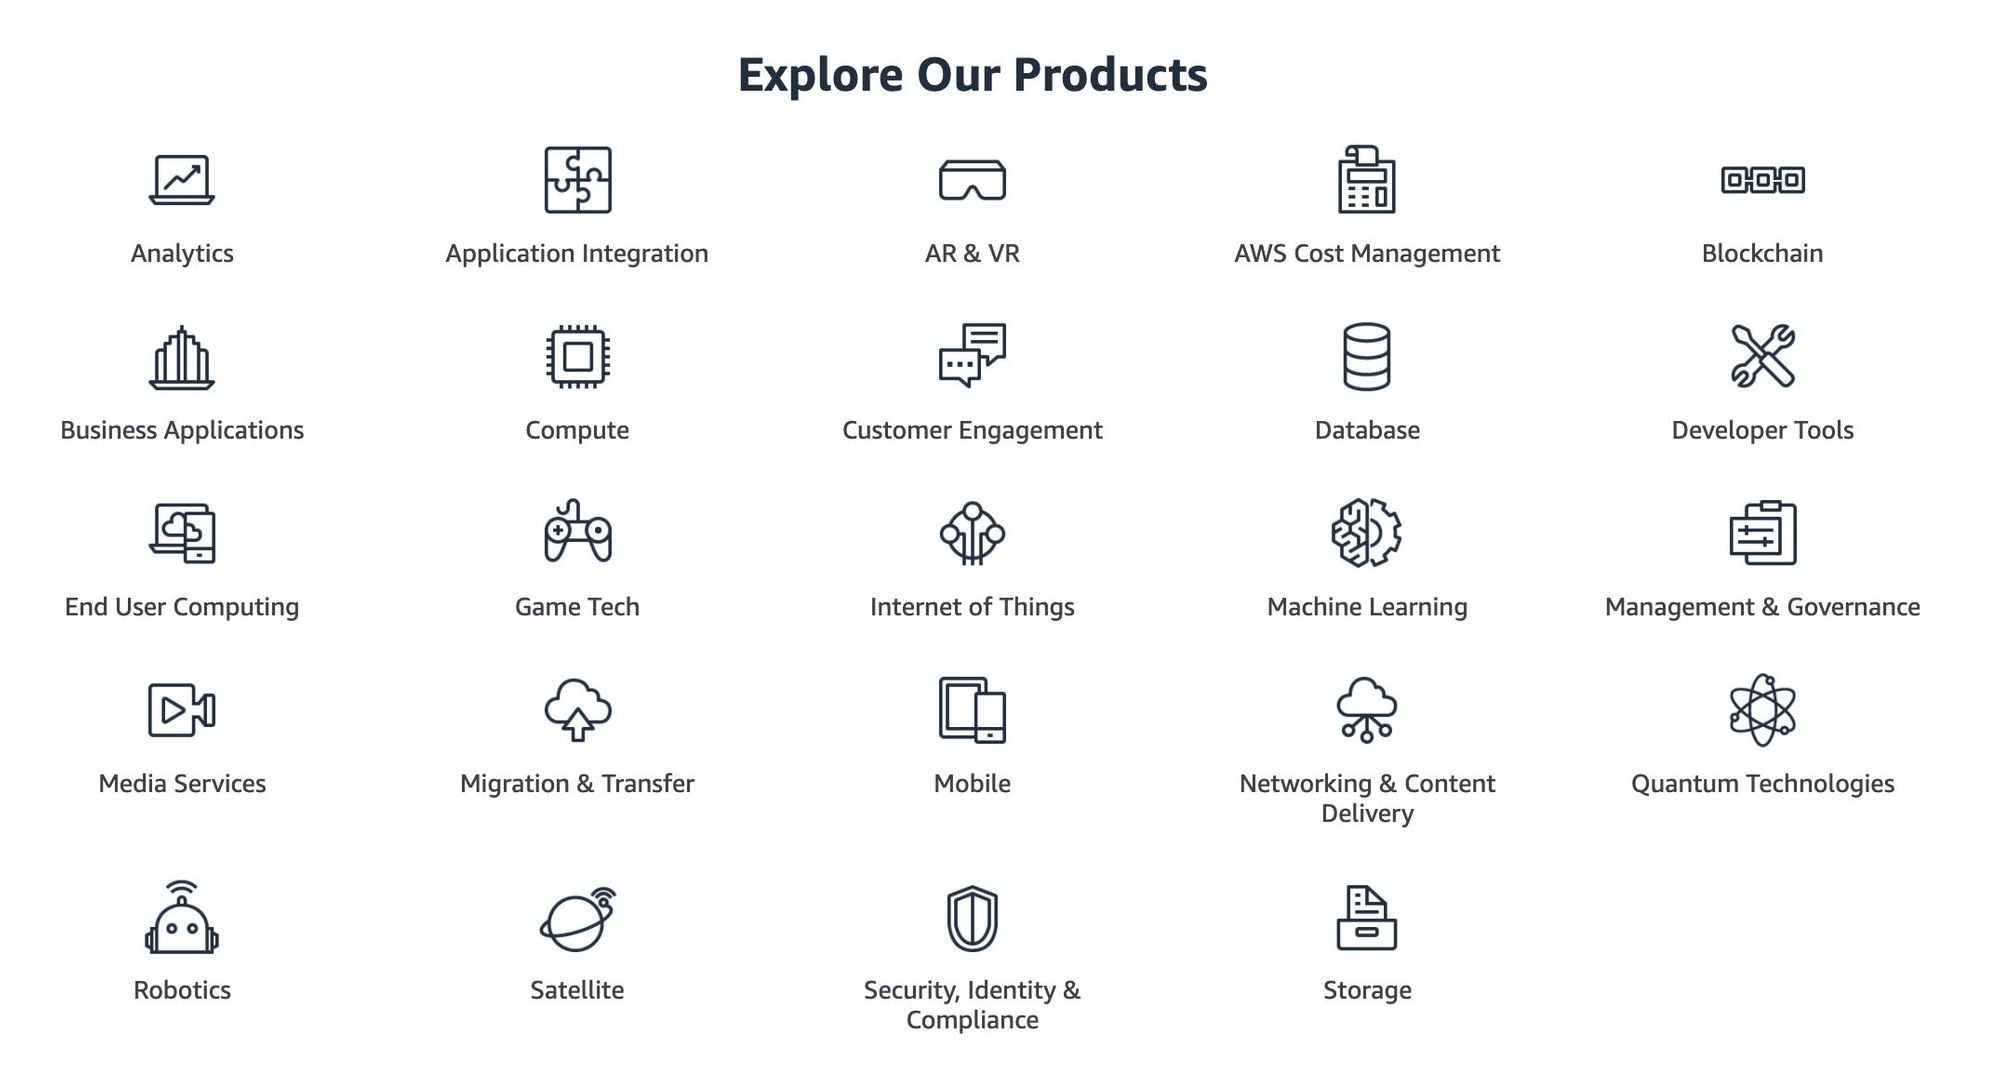 Types of AWS services available
Building a site with S3 and CloudFront is a common recipe that small and high scale companies across the web use, but let’s break down what each service actually does.
Object storage with S3
S3 (Simple Storage Service) acts as your hosting for your static website. Think of it like a hard drive in the cloud which we’re not able to use it for processing purposes, but rather for simple file storage and access.
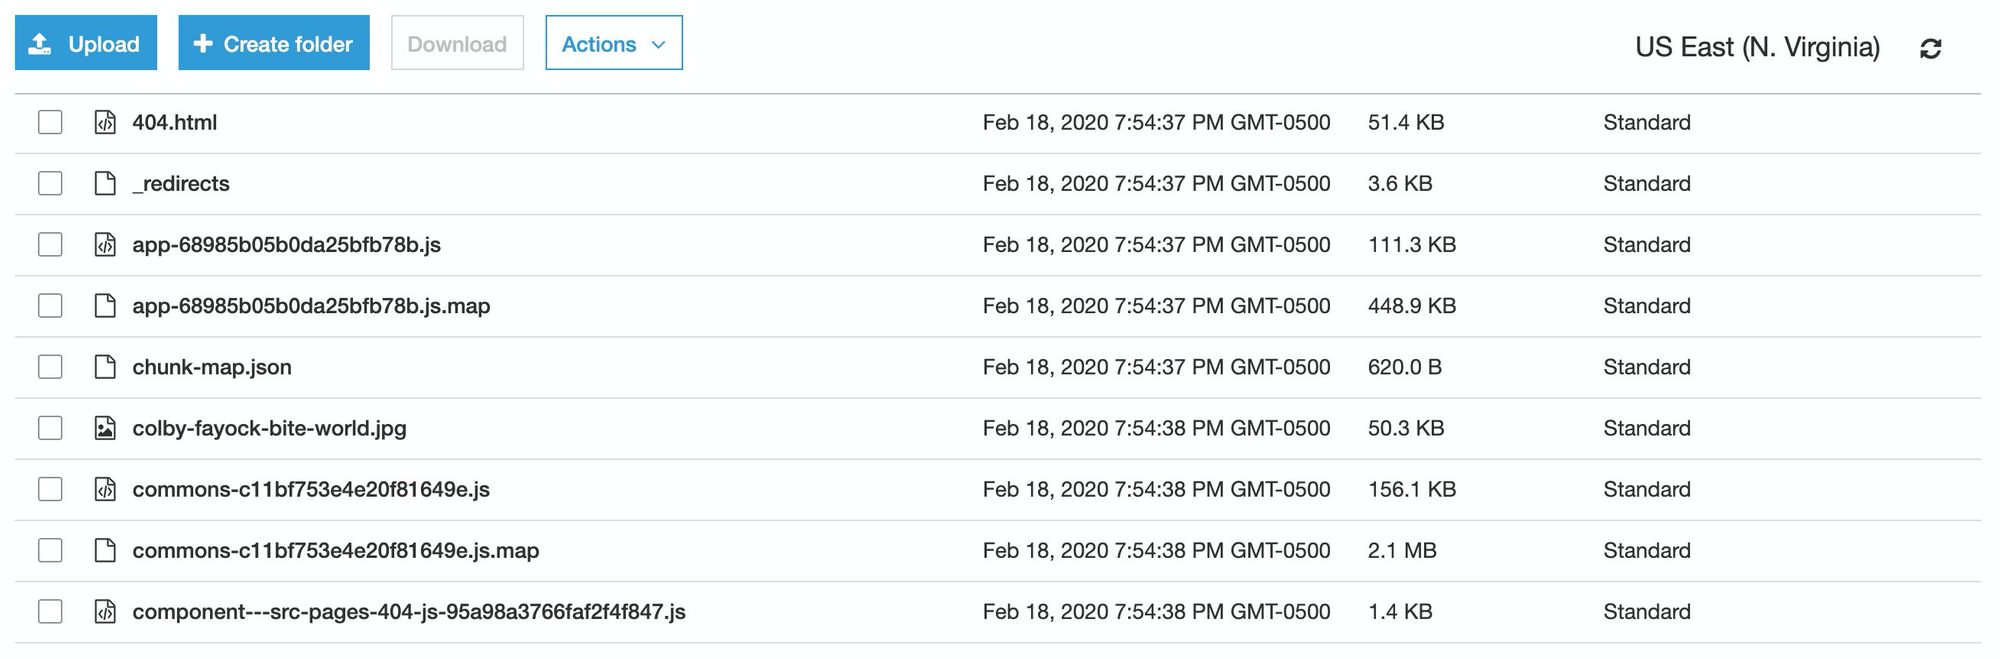 List of files from a static site in an AWS S3 bucket
When an app or website is compiled in static form, this is all we need to serve it to the people visiting our site. The HTML is sent in the initial request “as is” (unless there’s processing with your provider) and any additional work occurs after the page loads in the browser usually by JavaScript. This allows us to take this simple (and cheap) approach by serving these files from S3.
Content Delivery Network with CloudFront
CloudFront works as a CDN (Content Delivery Network) that sits in front of your website, caching the files, and serving them directly to the people visiting your site.
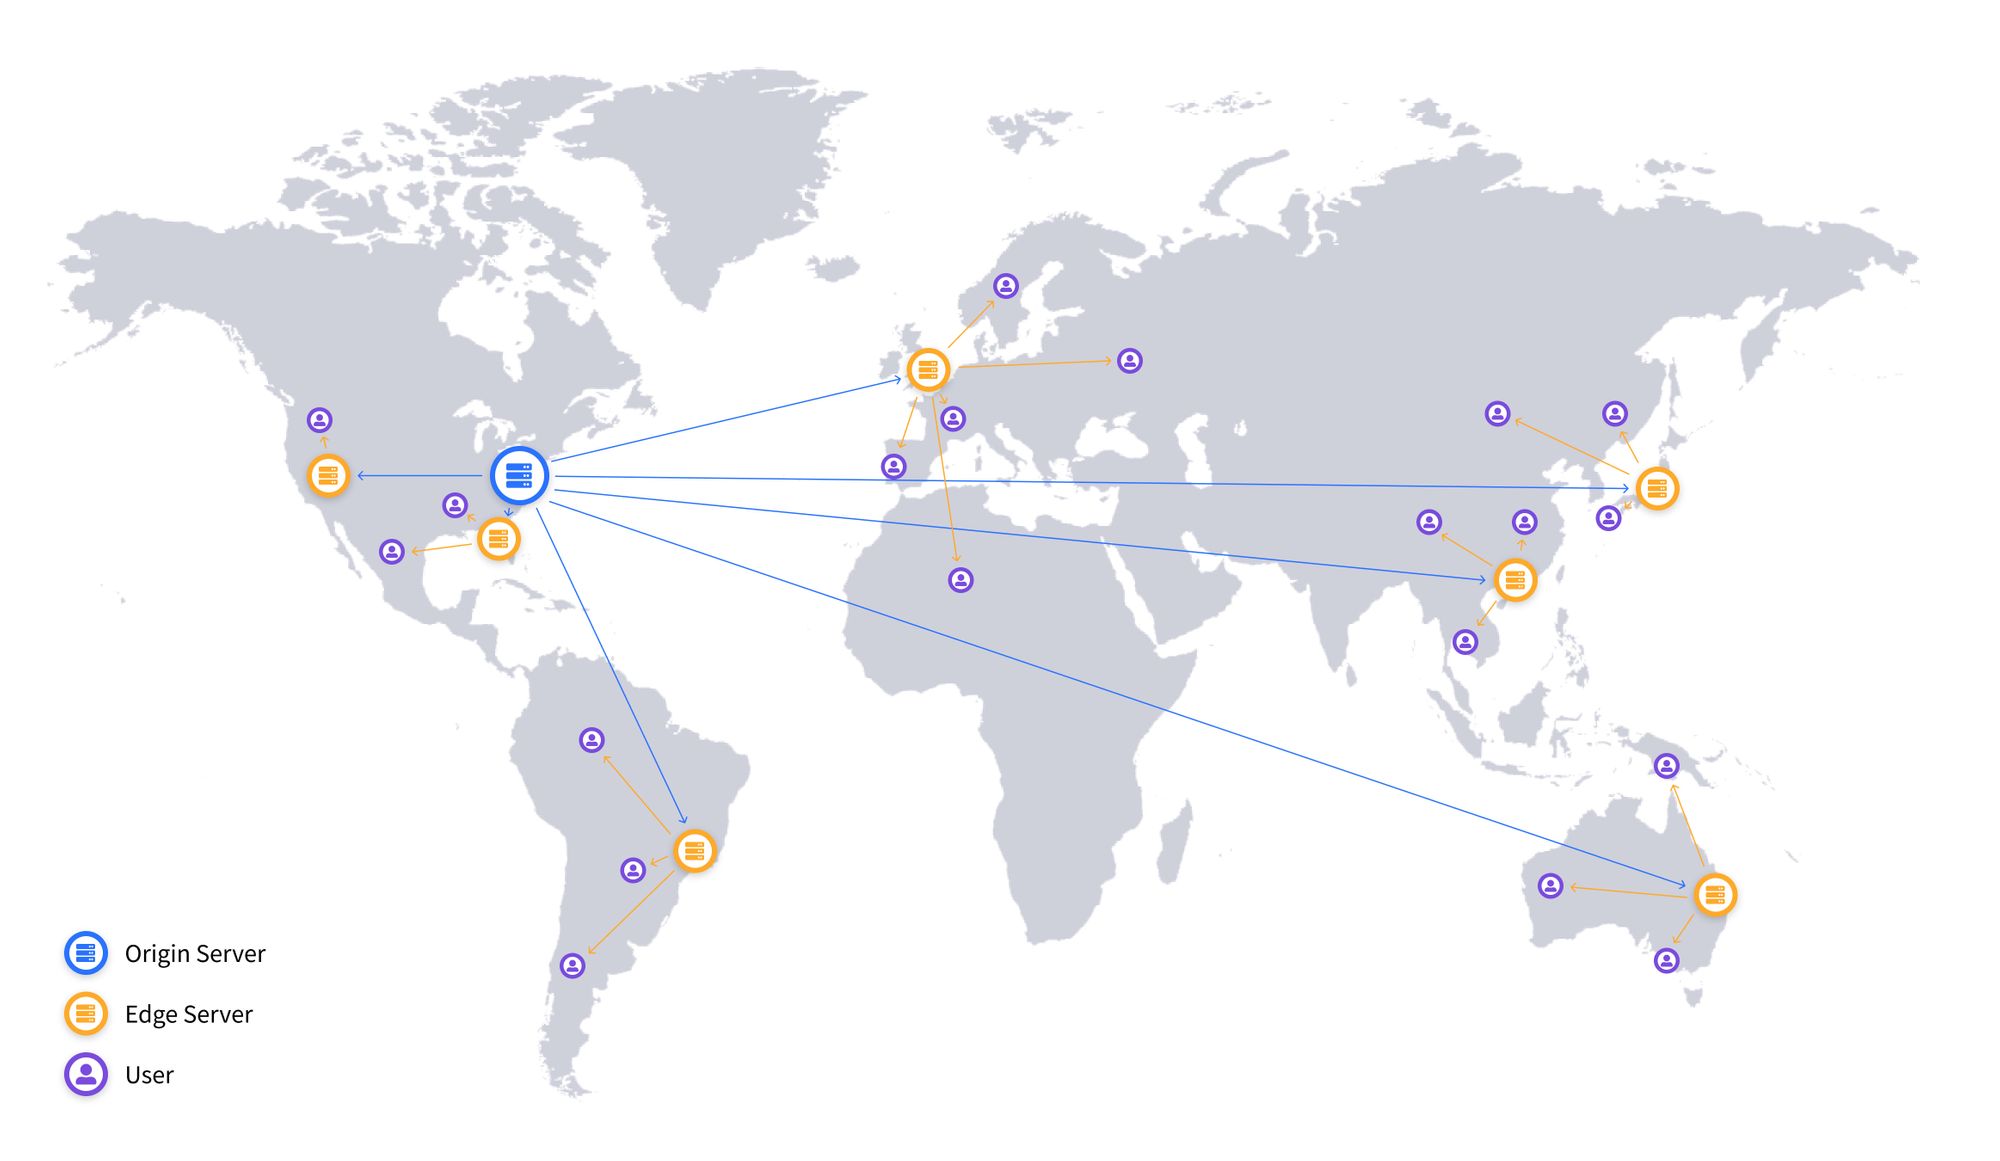 CDN Diagram
Where you host and serve your website from, typically called the origin, is the main source of your files and can serve the website itself. But putting a CDN in front of it provides the people accessing your content a shorter and faster way to make their request.
What are the benefits of serving from S3 and CloudFront?
Given the rise in the JAMstack era, many services are popping up that provide similar services for static sites that make it really easy to deploy. Some even come with a generous free tier like Netlify and Zeit!
But sometimes developers need a little bit more control over their services or they need to integrate into a larger cloud pipeline that’s already 99% percent in AWS, which is exactly where S3 shines. Also, chances are, during your first year you might still qualify for AWS’s free tier.
Fitting in to the AWS Well-Architected Framework
As a lead provider in cloud services, AWS has published many guides to help developers and teams strive for excellence in their solutions in terms of performance, cost, and security.
One particular guideline is their 5 pillars of what they describe as a “well-architected" infrastructure.
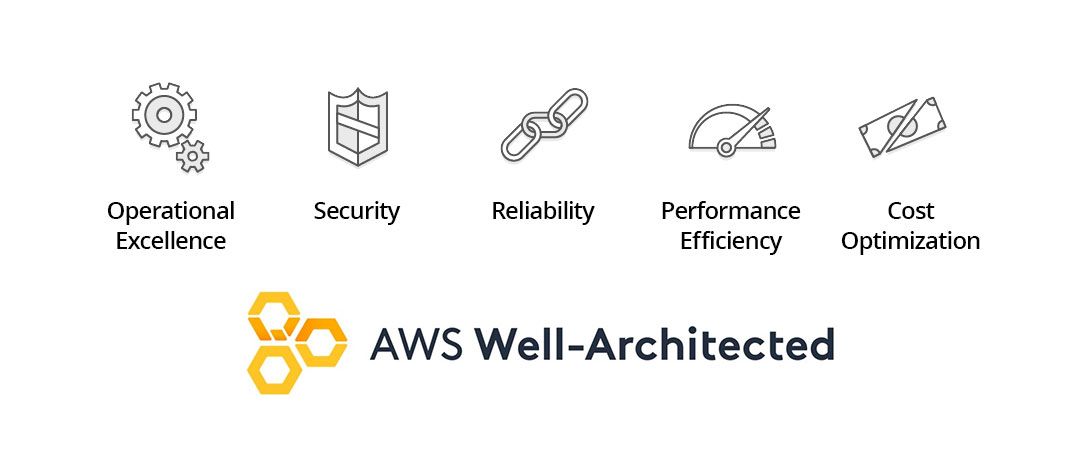 AWS Well-Architected Framework
By default, we check all of these boxes with our hosting solution by using S3 and CloudFront. Out of the box, the HTML and assets you serve will be fast, cheap, secure, and reliable.
The beauty of static and JAMstack sites
Building on top of the pillars, what you’re actually serving is a static HTML file and group of assets that won’t require any type of rendering resources on the initial request. Before this, a common problem was having to worry about a site crashing due to heavy load. But with S3 and CloudFront, your website is infinitely scalable.
On a similar note, when that server scales up as it's trying to serve millions of hits on your post that went viral, so will your costs. Serving a static site is cheap and can greatly reduce the cost associated with running a web server.
Before we start, you’ll need an AWS account
To work through this guide, you’ll need an AWS account. Luckily, it's free to create an account – you’ll only pay for the services used.
On top of that, AWS provides a generous free tier for some of its services. Some services provide only 12 months of a free tier (like S3) where others are always eligible for the free tier (like Lambda), so make sure to do your homework so you don’t rack up an unexpectedly high bill.
To create your account, head over to the AWS website and then continue on to get started: https://aws.amazon.com/.
Storing your website on S3
To get started, we’re going to begin with a simple HTML file that will serve as our website. This will allow us to focus more on the process of hosting rather than the intricacies of the website itself.
Creating our website file
Begin by creating a new folder called my-static-site. Inside that folder, let's create a new file called index.html and add the following to the file:
<!DOCTYPE html>
<html lang=“en”>
<head>
  <meta charset=“UTF-8”>
  <meta name=“viewport” content=“width=device-width, initial-scale=1.0”>
  <title>My Static Website</title>
</head>
<body>
  <h1>Hello World!</h1>
  <p>This is my static website. ?</p>
</body>
</html>
If you open this file from your computer in your favorite browser, you should now be seeing this.
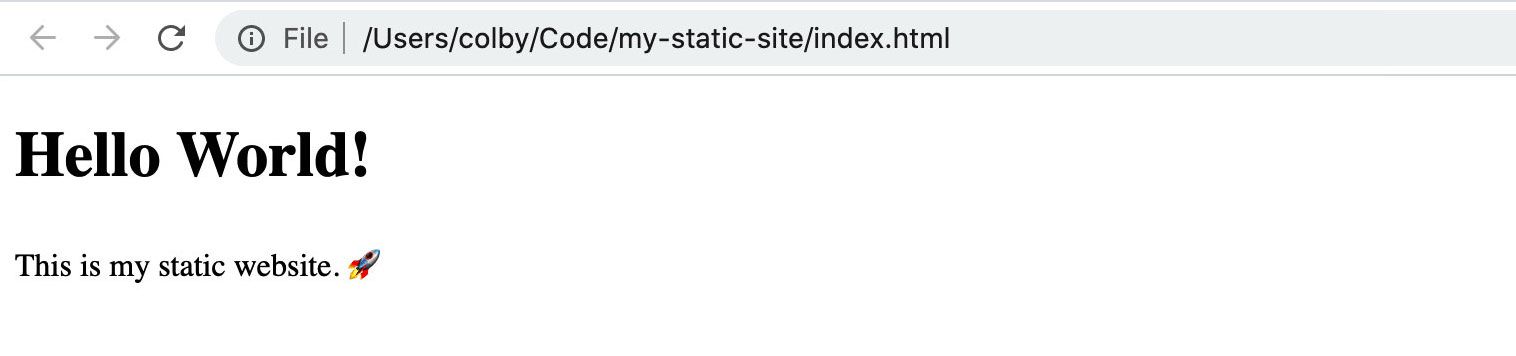 Hello World! Opening a local webpage
Creating a new bucket
Head on over to your AWS account, log in, and navigate to your S3 console.
Once there, let’s create our bucket by clicking on the blue Create bucket button:
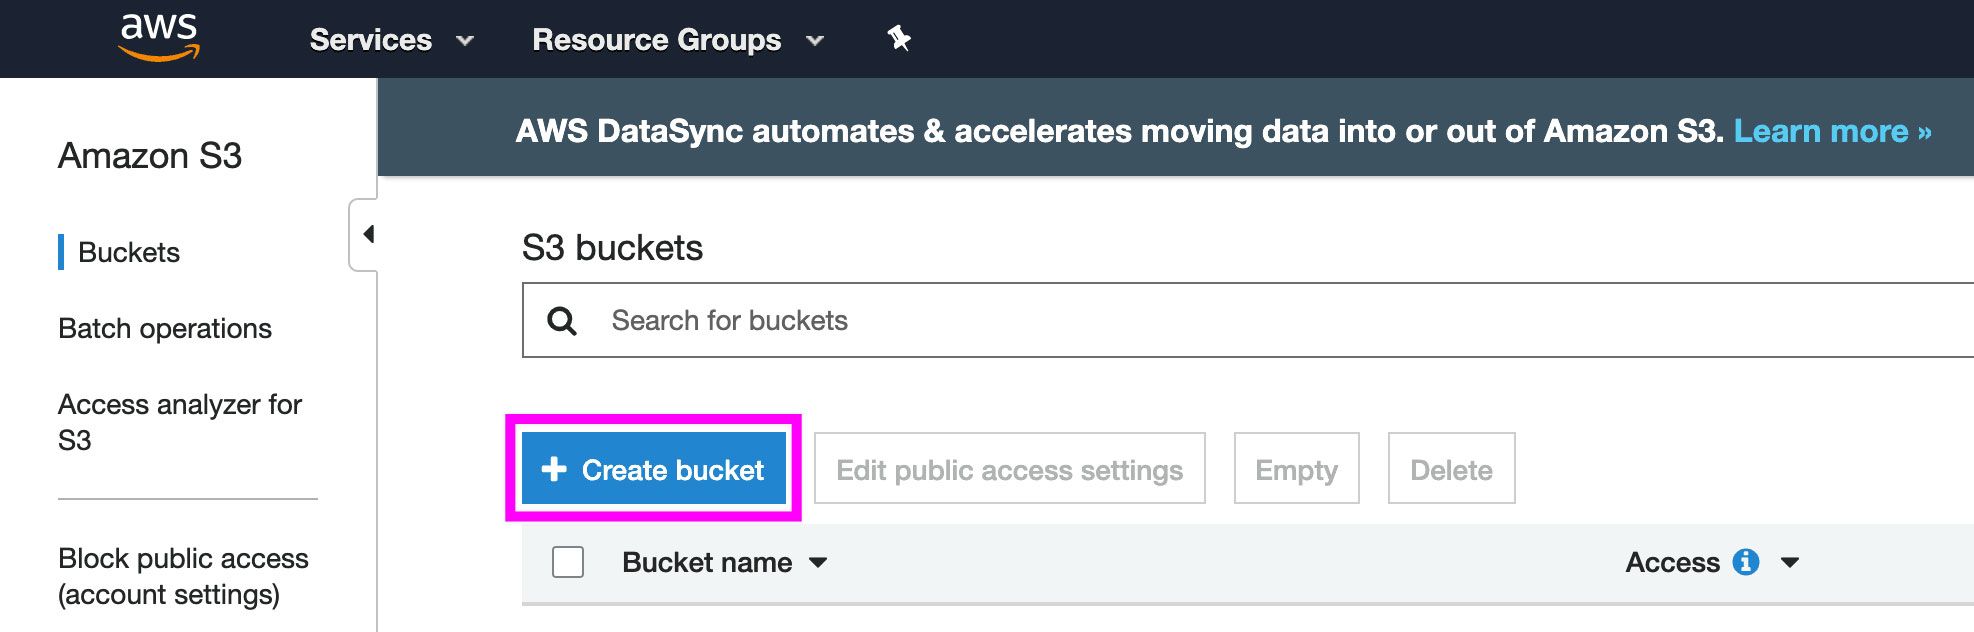 Creating a bucket in AWS S3
The first thing AWS wants us to do is enter a Bucket name. The bucket name must be globally unique, meaning, the name you use can be the only one in the world, so let’s try something like [yourname]-static-website, where I’ll use colbyfayock-static-website.
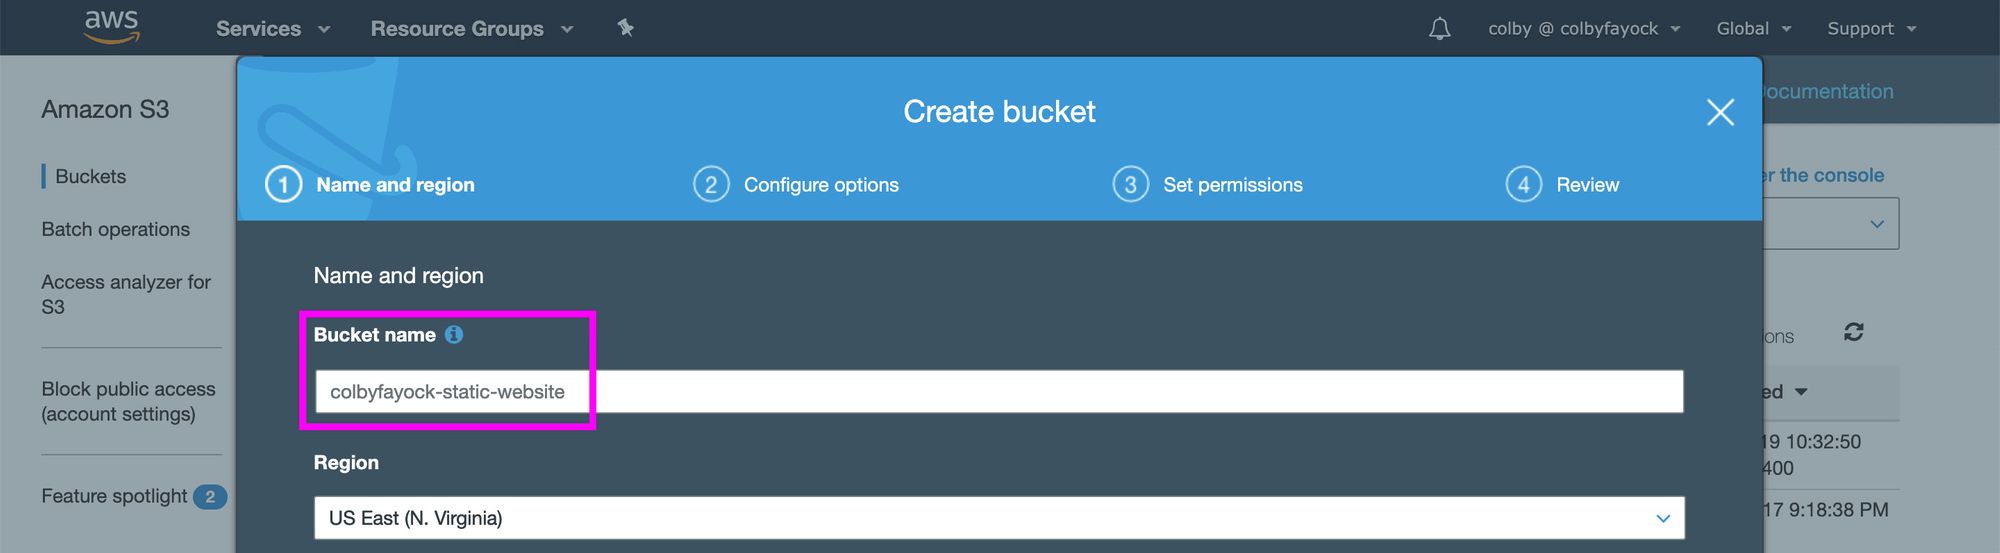 Naming a bucket in AWS S3
Next, let’s set the Region. This is the geographic location where AWS will host the bucket and your website. You’re probably fine with the default, but if you’d like, you can select the location closest to you if it’s permitted. Since I’m in Virginia, I’m going to stick with my default of US East (N. Virginia).
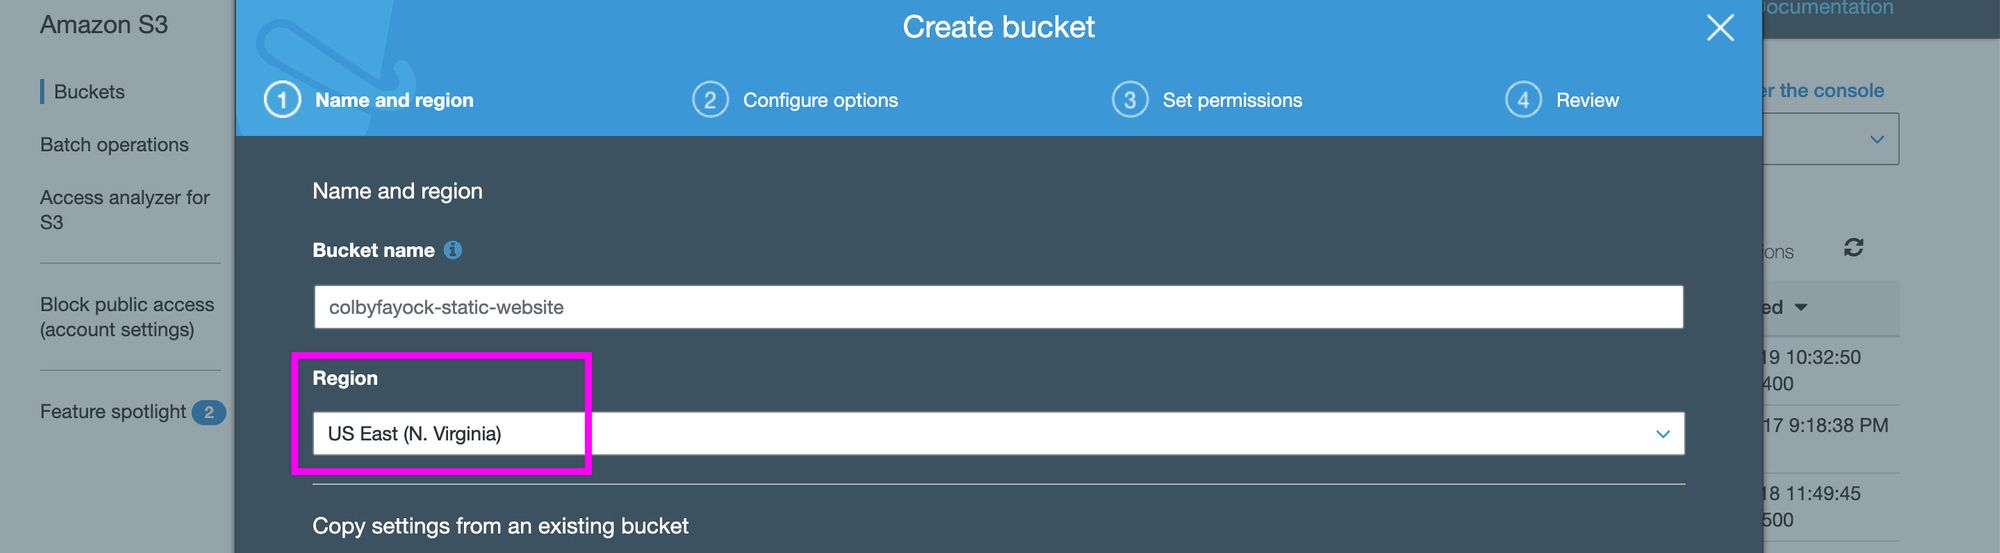 Setting the region of a bucket in AWS S3
Finally, hit the Create button on the bottom left of the page.
Note: even if you use the [yourname]-static-website pattern, there’s a chance the name will be taken. If it’s taken, AWS will show an error stating “Bucket name already exists,” at which point you’ll want to try a new name of your choosing.
Alternatively, you can hit Next for advanced usage, but for this guide, we’re okay with all of the defaults S3 provides.
If successful, you should now see your bucket in the list on the S3 console dashboard.
 New bucket in AWS S3
Uploading your website to the bucket
Let’s navigate to our new bucket by clicking the row of our bucket. You’ll be greeted with a message stating “This bucket is empty. Upload new objects to get started,” so that’s what we’ll do.
Click the Upload button to get started.
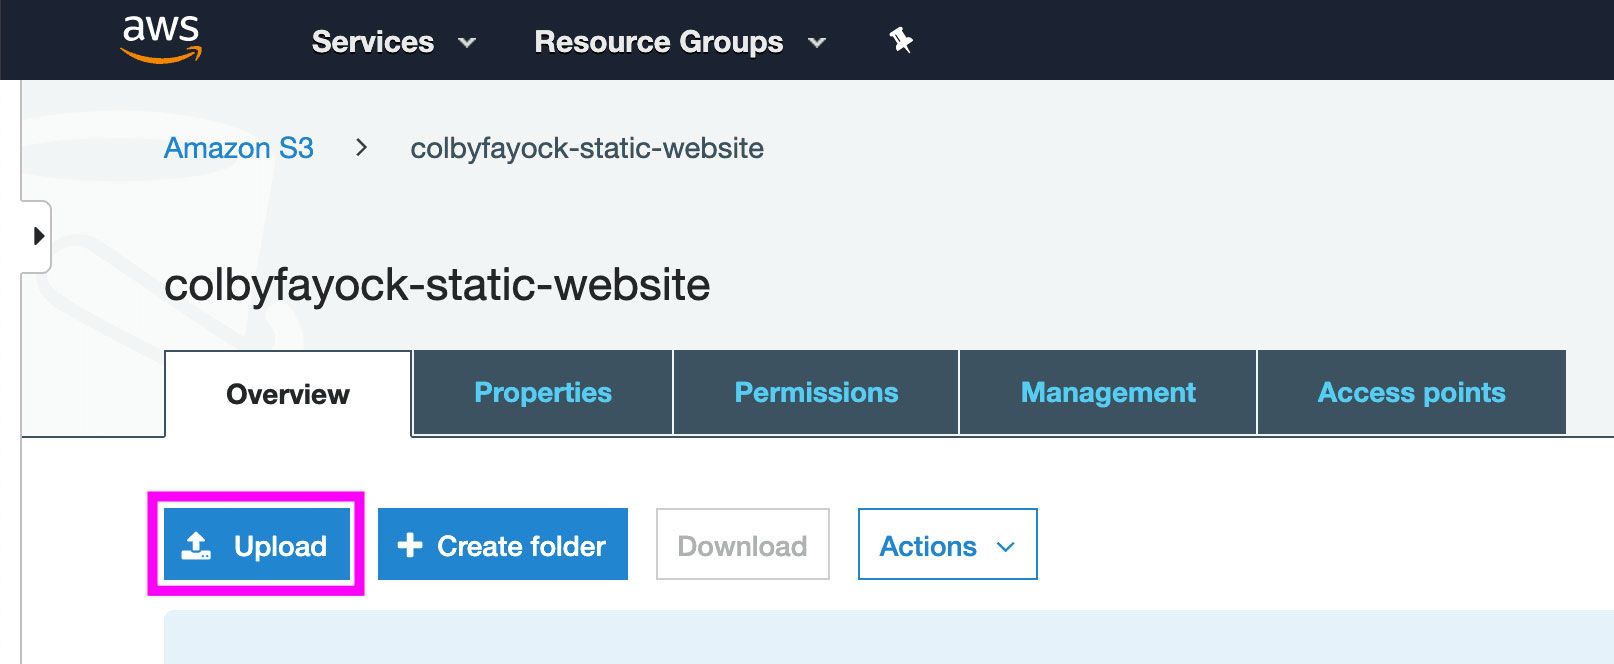 Uploading files to AWS S3
You’ll then see a popup that will ask you to upload a file. Click on the Add files button and select your index.html file we created earlier.
Once selected, click the Upload button on the bottom left.
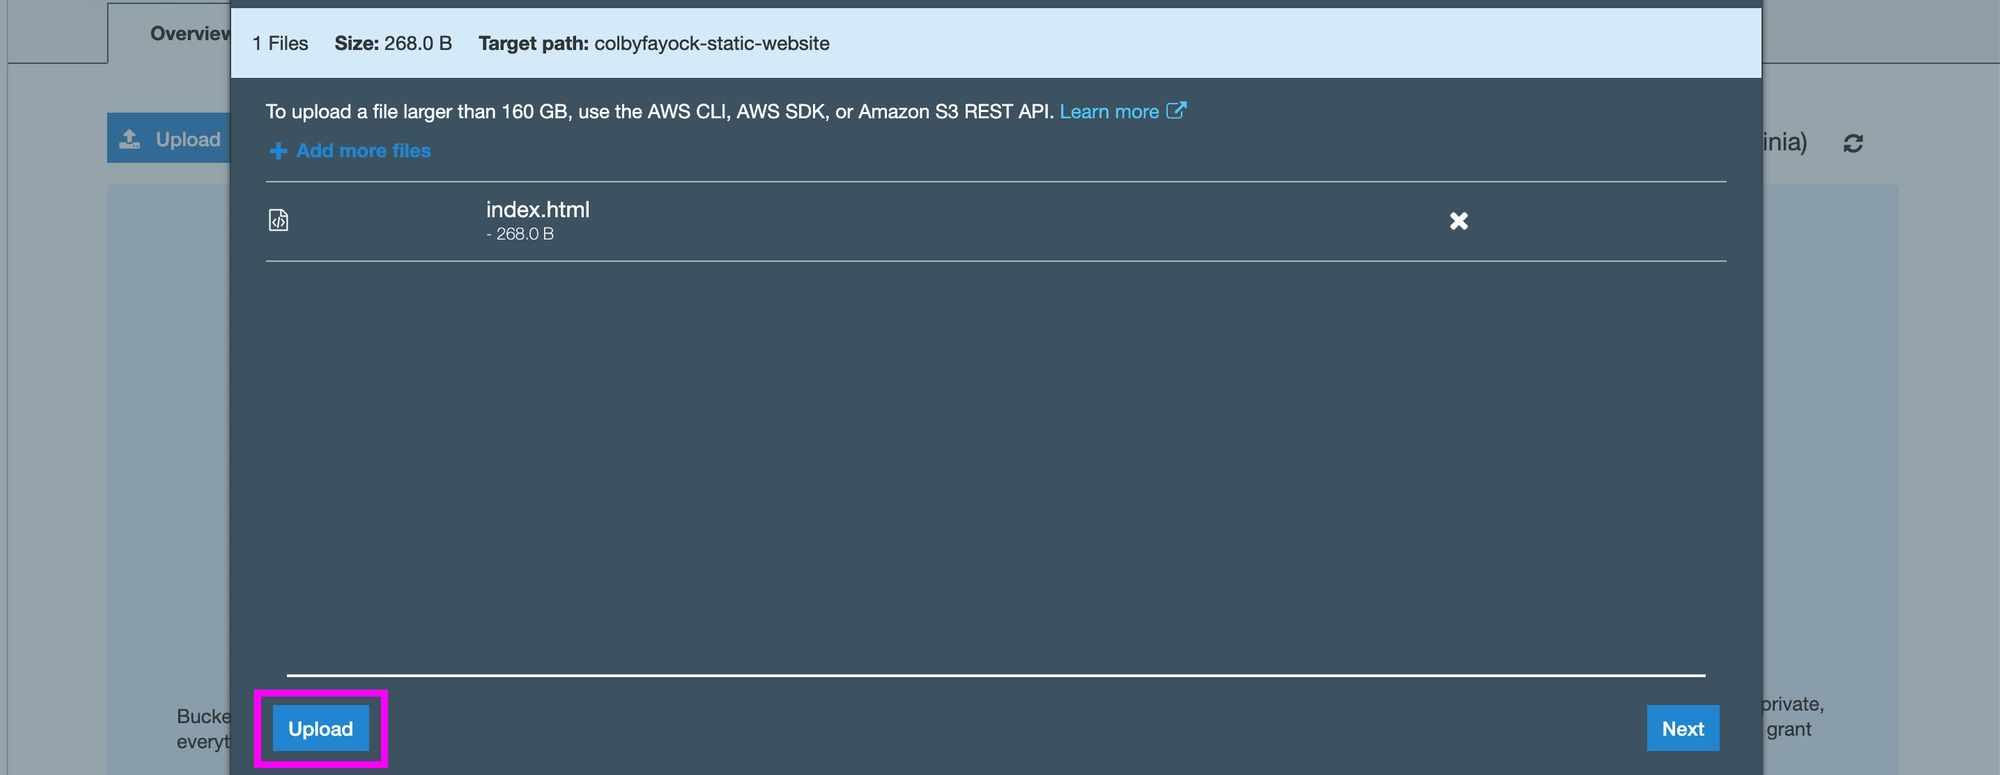 Selecting files to upload in AWS S3
And now your file is uploaded to S3!
Serving your website on S3
If you try to navigate to your index.html file and open it, you’ll notice a big ugly "Access Denied" message.
 Access Denied to bucket file
This is because your file doesn’t currently have the permissions and settings necessary to serve the file to the public, so let’s fix that.
Setting up your bucket as a website
Navigate to the Properties tab inside of your bucket, then click Static website hosting.
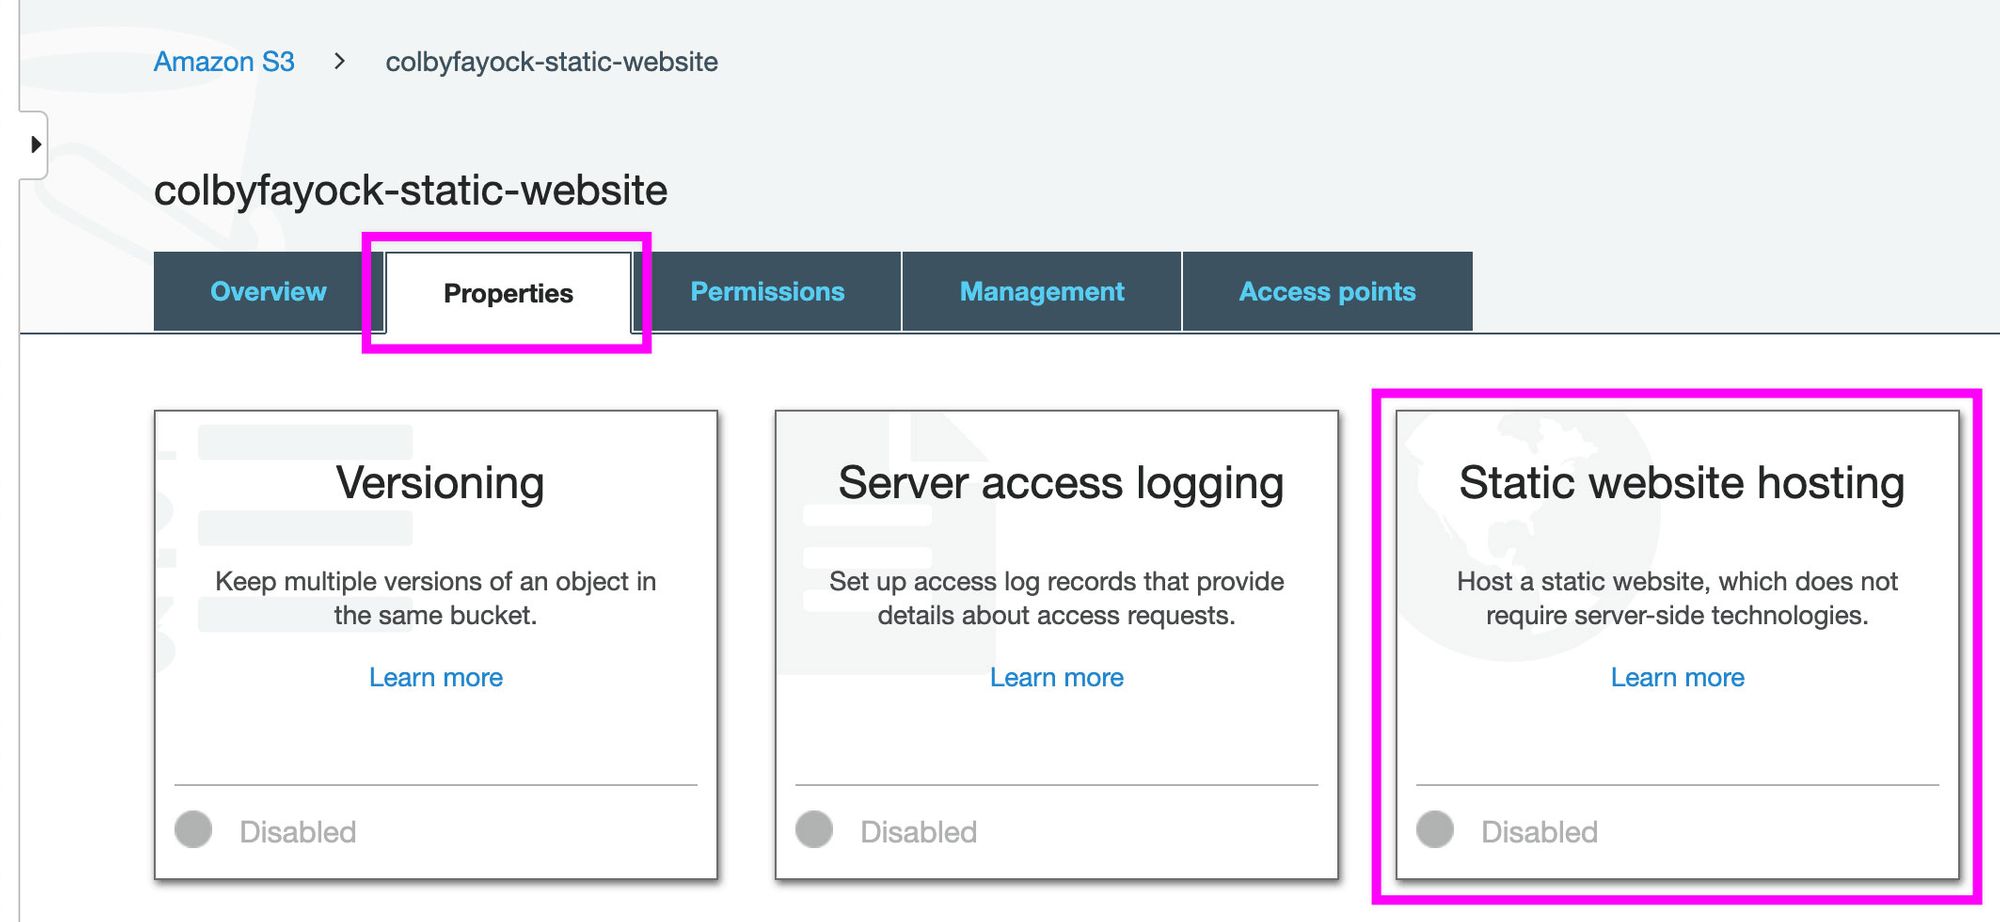 Setting up an AWS S3 bucket for statice website hosting
Once there, we want to do a few things:
- Note down the Endpoint at the top of the block. We’ll use this to access our site later (you can always find this here again)
- Select the “Use this bucket to host a website” option
- Enter
index.htmlin the Index document field - Finally hit Save
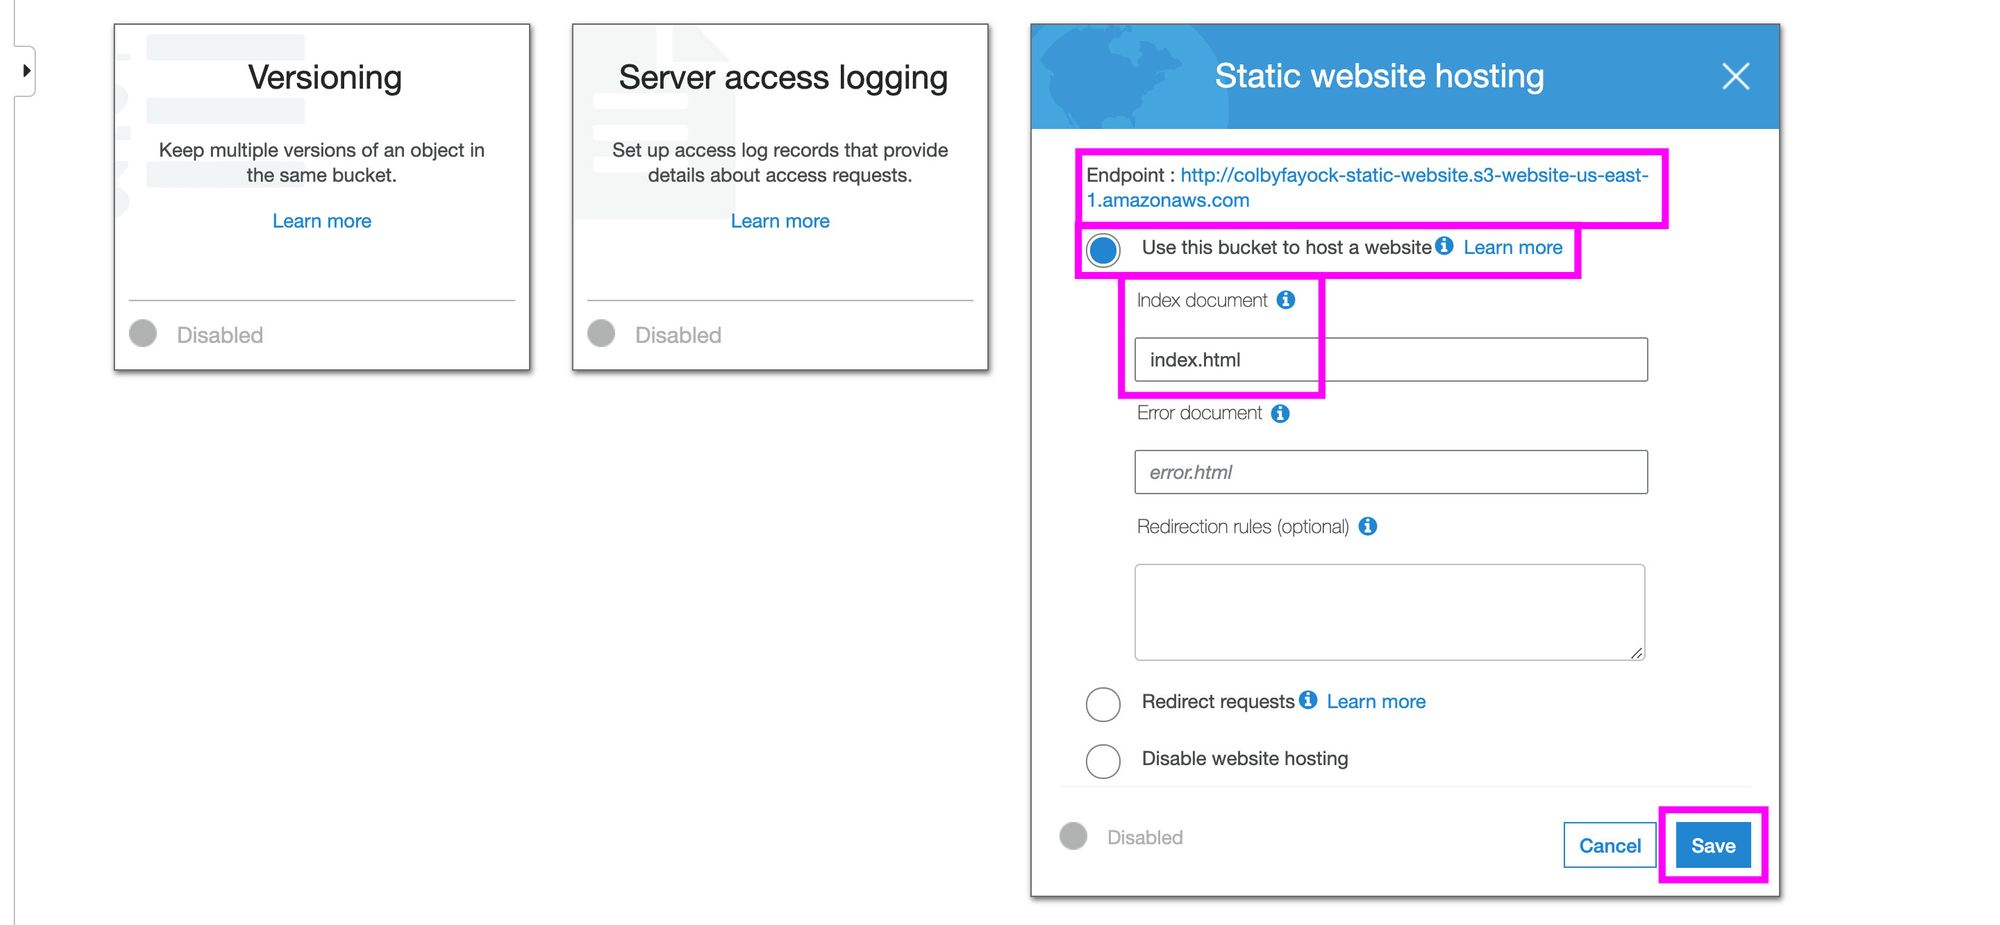 Configuring an AWS S3 bucket for static website hosting
Setting up your bucket policy and permissions
Next, navigate to the Permissions tab. Here we’ll want to do 2 things: unblock all public access and add a Bucket Policy.
First, on the main page, let’s click Edit to unblock all access.
 Configuring an AWS S3 bucket permissions
Then, uncheck the “Block all public access” checkbox and hit Save.
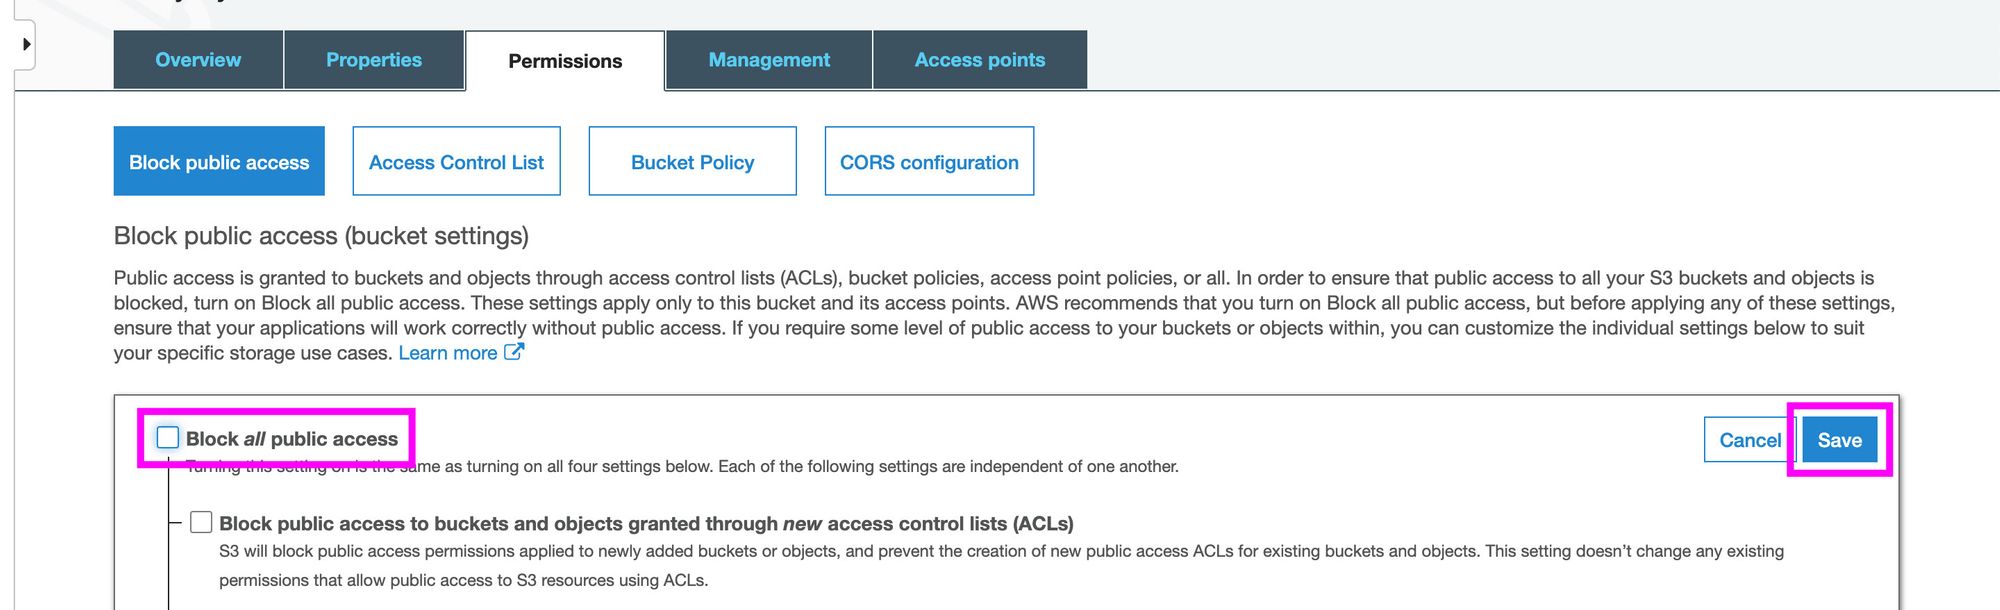 Allowing public access to an AWS S3 bucket
AWS will ask you to confirm these settings, as this may not always be what you want to do with your bucket. But for the purposes of hosting a website, we want the whole world to see, so type in the word “confirm” and hit the Confirm button.
After confirming, click the Bucket policy button and you’ll be taken to a text editor.
In this text box, we’ll want to paste the following snippet. Within this snippet, make sure to replace [your-bucket-name] with the name of your bucket, otherwise you will not be able to save this file.
{
  "Version":"2012-10-17",
  "Statement":[{
    "Sid":"PublicReadGetObject",
        "Effect":"Allow",
      "Principal": "*",
      "Action":["s3:GetObject"],
      "Resource":["arn:aws:s3:::[your-bucket-name]/*”
      ]
    }
  ]
}
This policy states that it’s allowing the public to perform a GetObject request on the S3 resource, which is your S3 bucket.
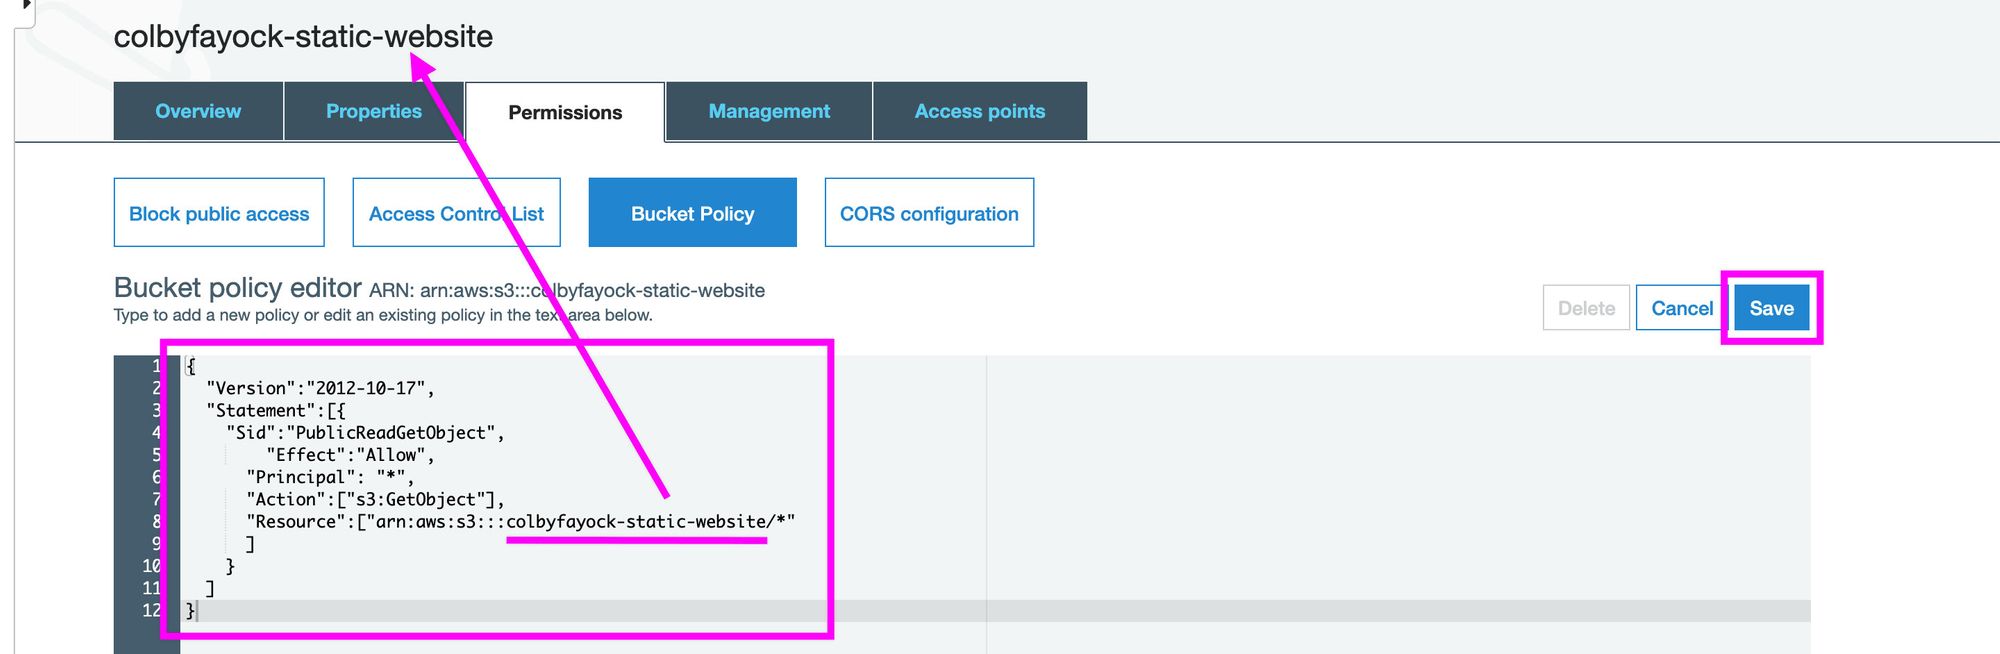 Setting up a public policy for an AWS S3 bucket
After you add the policy, click the Save button. Your should now see a message stating "This bucket has public access.”
Previewing your new bucket website
If you noted down the Endpoint from your Properties page, you can now visit that address to see your website. The endpoint should look like this:
http://[your-bucket-name].s3-website-[region-id].amazonaws.com
If you didn’t, jump back up a few steps to remind yourself how to find it or look under the Properties tab.
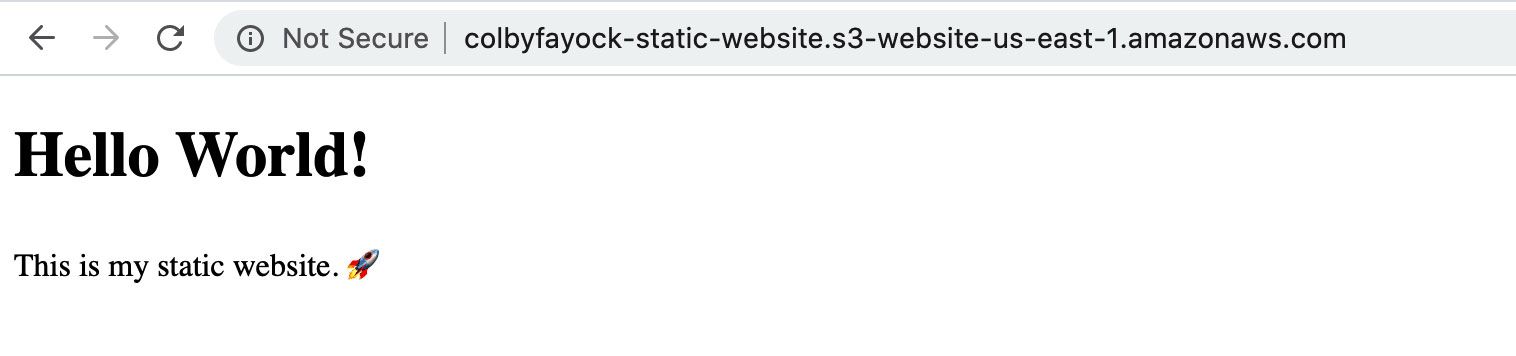 Hello World! Opening an AWS S3 website
Congrats, you're halfway there! ?
Distributing your website on CloudFront
Now that we have our static website being served from a bucket on S3, let’s take it up another level and serve it across the world using CloudFront.
Creating a CloudFront distribution
Navigate to your CloudFront dashboard and click the Create Distribution button.
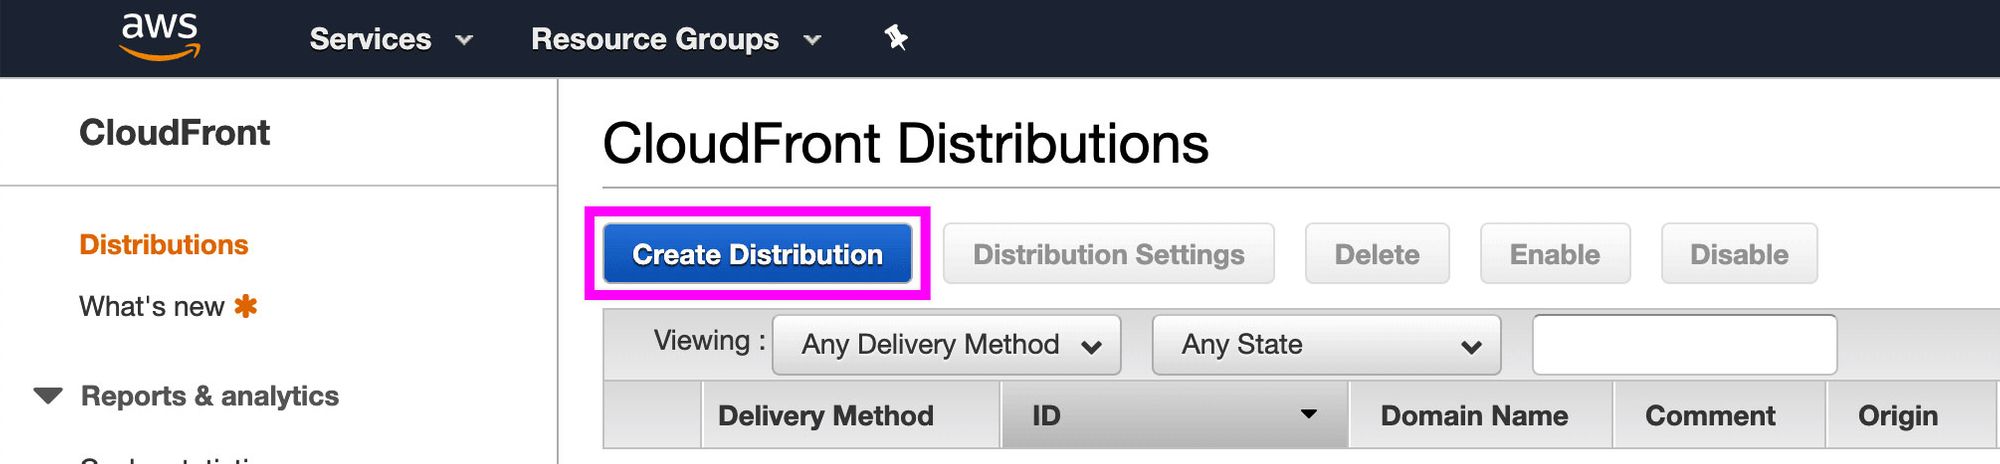 Creating a new distribution in AWS CloudFront
Next, select Get Started under the Web delivery method.
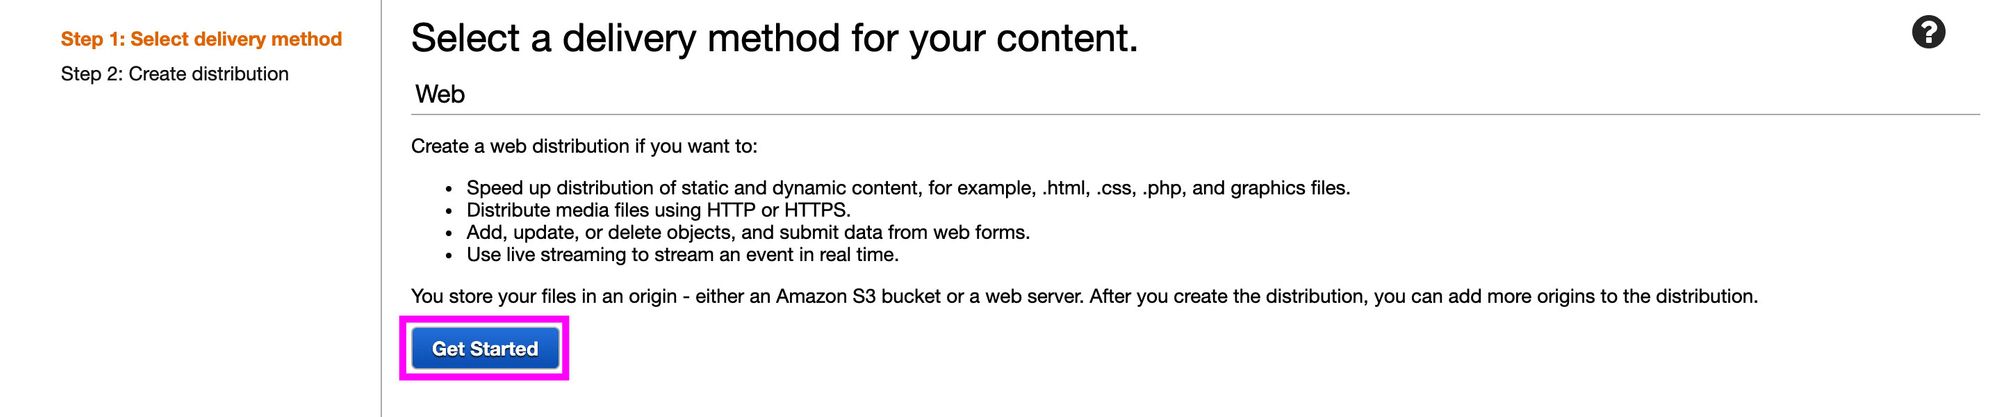 Getting started with an AWS CloudFront distribution with Web delivery
Here, we’ll enter a few custom parameters to get our distribution set up.
Click into the Origin Domain Name field. Once selected, a dropdown list should appear where you can select the S3 bucket you just created. Go ahead and select your S3 bucket.
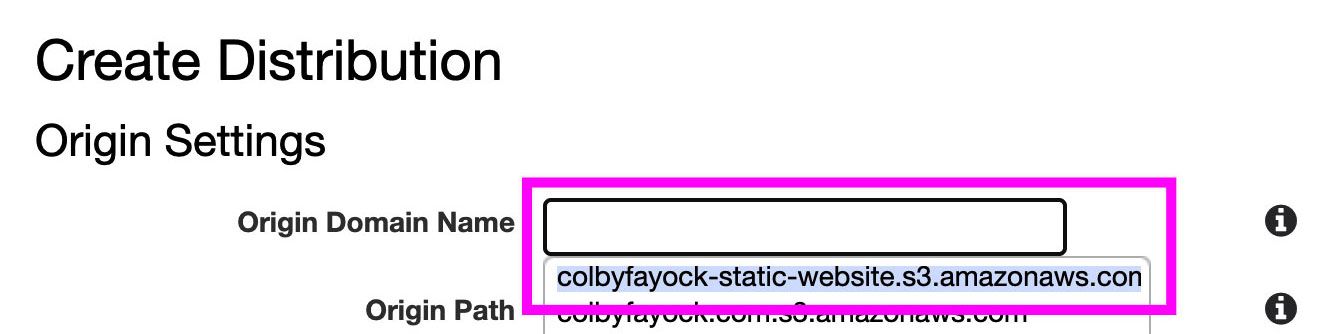 Setting the origin domain name in AWS CloudFront to your bucket
While you can customize most of the settings to your liking, for our purposes, we’re going to leave all as their default values except for one.
Scroll down to the Default Root Object field and type index.html.
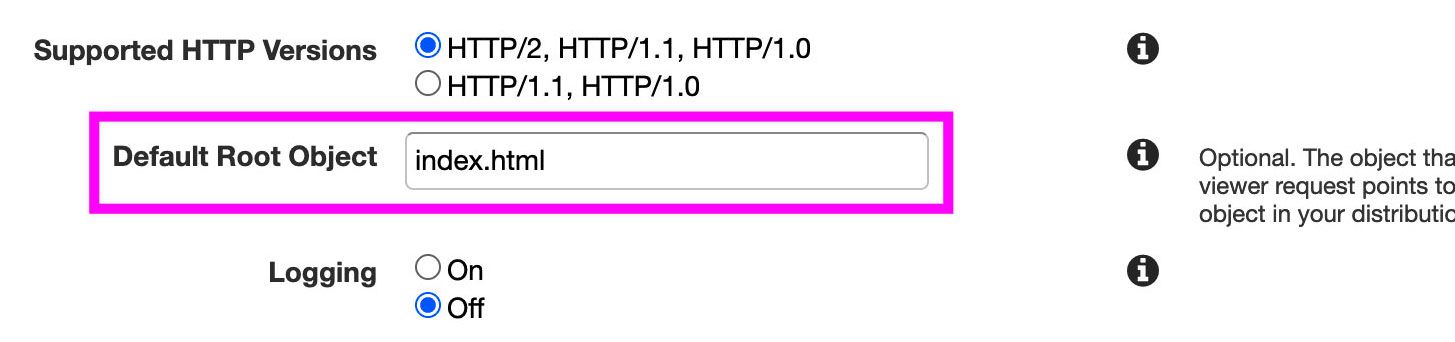 Setting the Default Root Object for a distribution in AWS CloudFront
After, scroll down to the bottom and click Create Distribution in the bottom right.
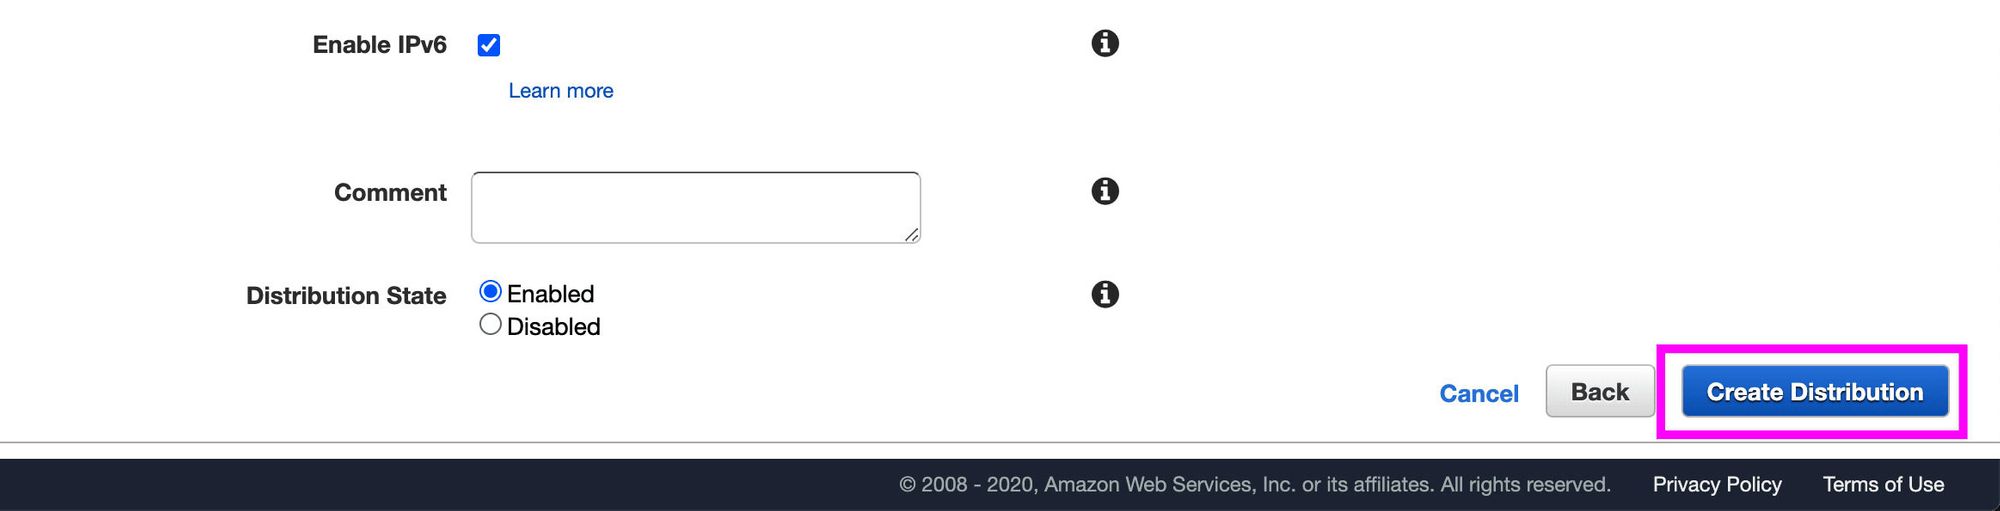 Creating an AWS CloudFront distribution
Previewing your new CloudFront distribution
After hitting the Create button, it will take some time for your distribution to be created and set up. You’ll notice on the CloudFront Distributions list page that the Status of your new distribution is In Progress.
 AWS CloudFront distribution deployment is In Progress
Once this completes, it will say Deployed. Then you can find your Domain Name in the same row.
 AWS CloudFront distribution is Deployed
Using the value in the Domain Name column, open your distribution in your browser and success! You now are viewing your S3 bucket through CloudFront’s distribution network.
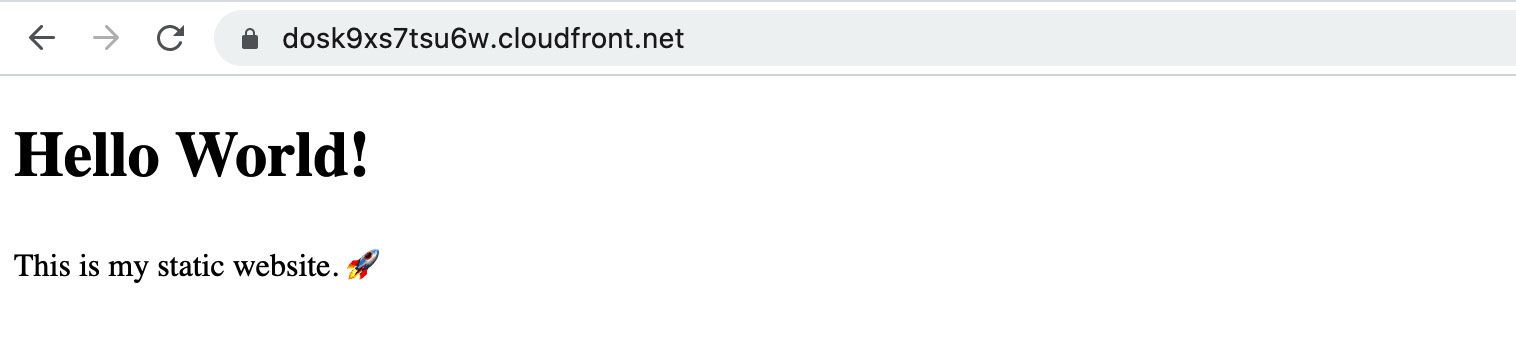 Hello World! Opening an AWS CloudFront website
Custom domain names
While most of us will probably want to use a custom domain name with our website, we’re not going to dive too deep into that this guide, as there are many ways to set that up depending on where you purchase your domain name.
However, here are a few things to consider.
HTTPS / SSL Certificate
If you’re creating your CloudFront distribution to use with a custom domain name, you'll most likely want to configure your distribution with an SSL certificate using AWS’s Certificate Manager. Alternatively you can provide your own certificate with tools like Let's Encrypt, but by using ACM, AWS makes it easy to pull in the records for use with your distribution.
Once in ACM, you’ll want to configure the certificate, map what domains and subdomains should match (typically *.domain.com), and then create your certificate to use with your distribution.
To get started, you can check out the AWS guide for requesting a public certificate.
CNAMEs and Aliases
A common approach to setting up a custom domain is to use a CNAME. CloudFront makes this pretty painless, as you’ll add it as a configuration option when you’re configuring your distribution.
To get started with setting up a CNAME in CloudFront, see the AWS guide.

If you’re using Route53 to manage your DNS, you can then set up an A record (alias) to point to your distribution. You can learn more using this guide.
Advanced AWS Usage
For this guide, we walked you through setting up a new static website and app using the AWS console. But whether you want to learn more, improve your deploy efficiency, or want to automate this process, you’ll want to take a it a step further with the AWS CLI or CloudFormation.
While we won’t walk you through how to use these tools here, we’ll get you started with a little bit of an idea of what you’re up against.
AWS CLI
The AWS CLI allows someone to perform AWS operations from the command line. This can be incredibly powerful when you want to script out your resource creation or if you simply prefer to do all of your work from the terminal.
Once set up locally, you’ll be able to perform actions like creating a bucket using the following command:
aws s3api create-bucket —-bucket [your-bucket-name] —-region [bucket-region]
To get started, check out the AWS CLI Github page or the AWS CLI User Guide .
AWS CloudFormation
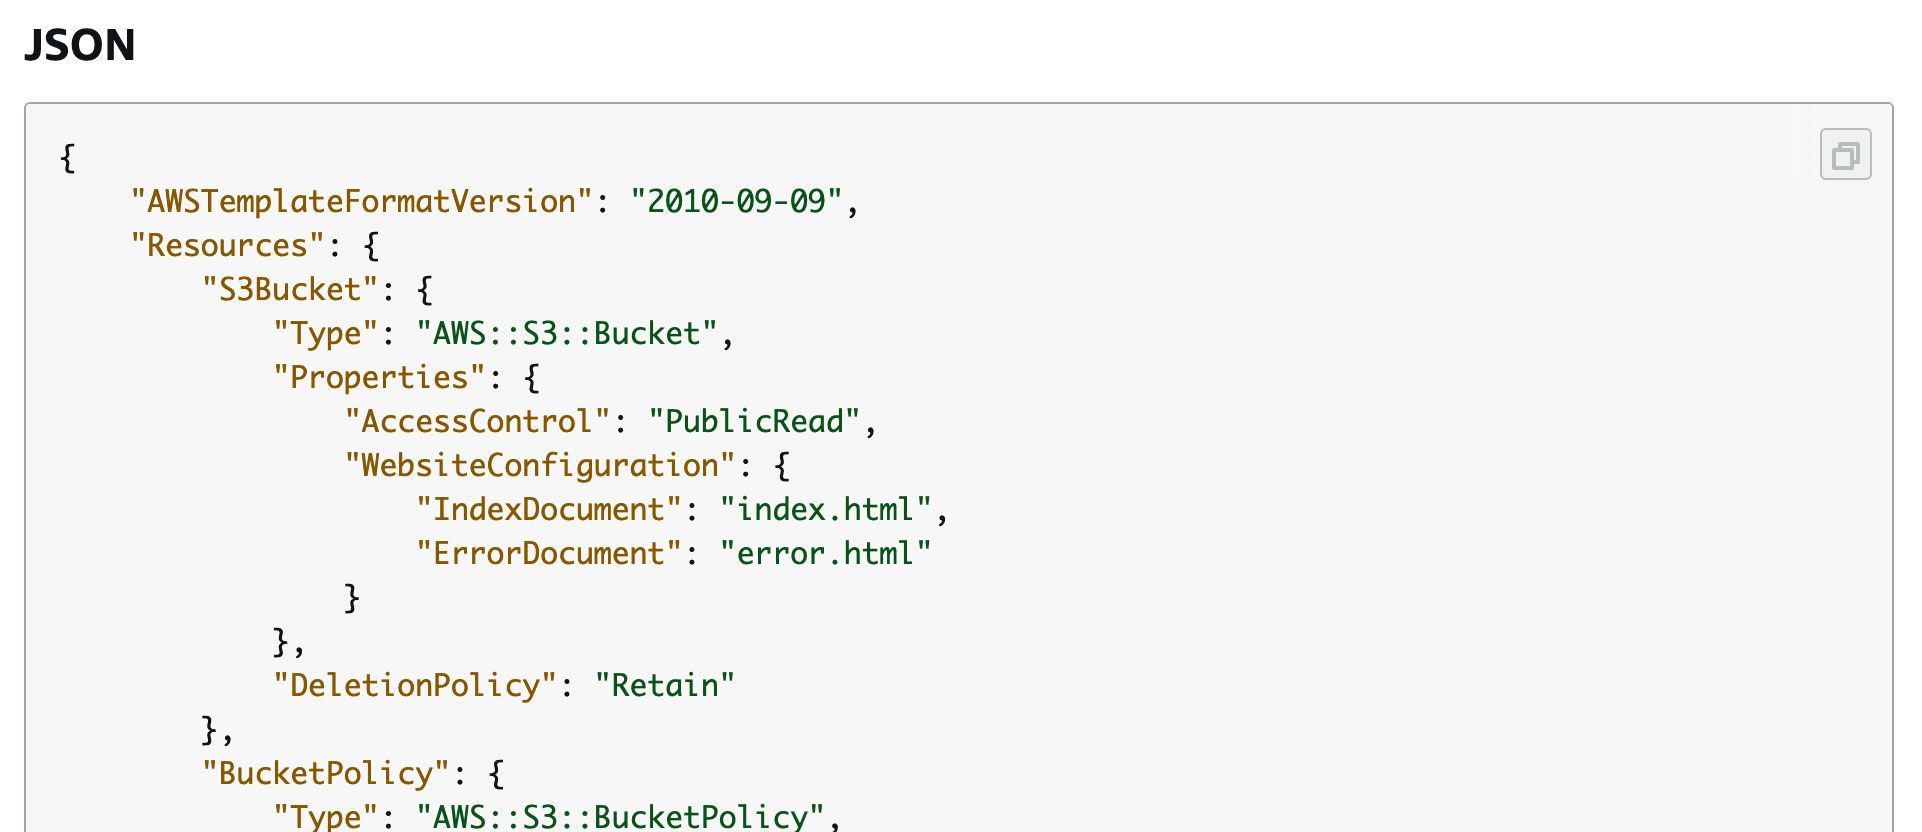
AWS preaches “infrastructure as code.” It’s the idea that you can spin up your infrastructure using something that’s written in a file, where in this particular case, it would be a CloudFormation template. This allows you to have a repeatable process that will be the same each time you perform the deploy.
CloudFormation allows you to set up a configuration file that will deploy the services and resources of your choosing by pointing to that file with the CLI or by uploading it in the console.
Here’s an example from AWS of what that looks like for a static S3 bucket that could serve as a website.
 AWS CloudFront template example
To get started, check out AWS’s CloudFormation example templates or their Get Started guide.
Resources
If you’re interested in getting deeper into the AWS ecosystem, here are a few resources to get started:
- AWS Certified Cloud Practitioner Training 2019 - A Free 4-hour Video Course (freeCodeCamp.org)
- Introducing The #AWSCertified Challenge: A Path to Your First AWS Certifications (freeCodeCamp.org)
- 10-Minute Tutorials (AWS)
- A Cloud Guru (Paid courses)
- AWS Case Studies (AWS)
