

Infrastructure as code is the process of provisioning and managing your cloud resources by writing a template file that is both human-readable and machine consumable.
For AWS cloud development, the built-in choice for infrastructure as code is AWS CloudFormation.
Using IaC, developers can manage a project’s infrastructure efficiently, allowing them to easily configure and maintain changes within a project’s architecture and resources.
There are numerous IaC tools available such as Ansible, Puppet, Chef, and Terraform.
But for this guide, we will use CloudFormation, which was made specifically for AWS resources.
What You Will Learn in This Tutorial
After going through this tutorial, you will understand how to maintain your resources within one software file.
In addition to this, you will learn the benefits related to speed that Infrastructure as Code brings to the table. Without IaC, the time and cost of manual deployment of various infrastructures can be much greater compared to maintaining infrastructure as software.
In this article, we will consider an example. It will demonstrate manually provisioning resources vs deploying a CloudFormation script to create a serverless Lambda function and REST API on AWS.
Services We'll Use in This Tutorial
We will use the following services to implement Infrastructure as Code in AWS:
AWS Service Name | Description |
AWS API Gateway (API GW) | We will use this service to create our REST API. It also allows for creating, publishing, and monitoring secure Socket and Restful APIs. |
AWS Lambda | We will use this service to set up an example serverless function on the backend which will be integrated with our REST API. |
Identity Access and Management (IAM) | Service that allows you to manage access to various AWS services through roles and permissions. We will create a role for our Lambda function so that we can access the API gateway. |
AWS CLI | To work with AWS services and resources, you can use the command line interface rather than the console for easy access. |
AWS SAM | An abstraction of CoudFormation allows developing the serverless applications. |
For those who are new to AWS, it's good to have some knowledge of it to understand the article. So, you can follow along with me by creating an account on AWS here and making sure you have AWS CLI installed to work with the example.
Overview of the Example
For the article, we will be implementing a REST API with an API gateway. It will be integrated with a serverless backend Lambda function that handles POST and gets requests made by our API.
The first step will show you how to manually build and deploy these resources using the AWS console. The second step will show you how to automate the process using CloudFormation.
How to Deploy Manually
In manual deployment, we will work inside the AWS console. It is a bit hard to track changes while working outside the local IDE, especially for large-scale projects.
In the first step, we will create a Lambda function.
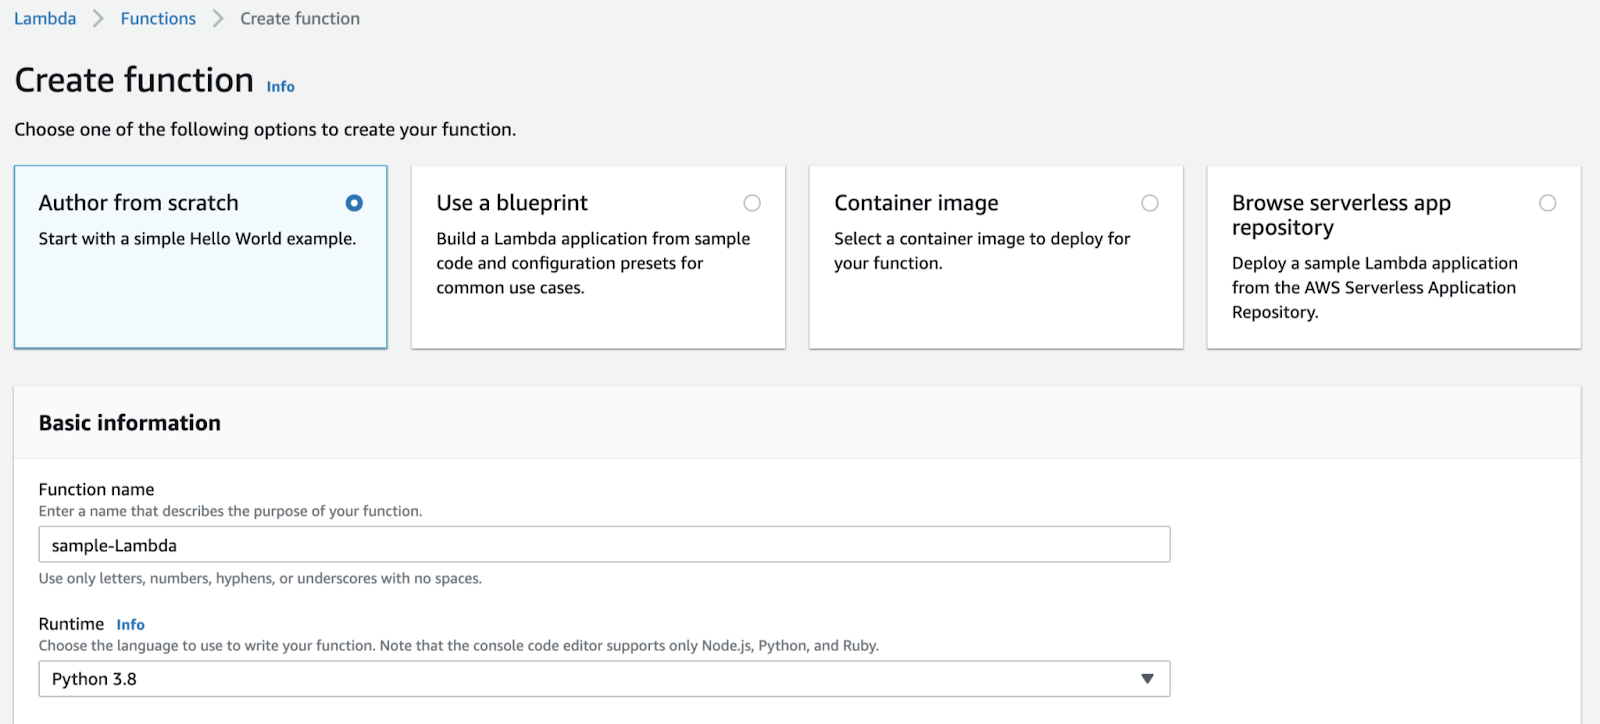
If you want your Lambda function to work with some other service like Comprehend, you must give permissions for that service. So, make sure to create a role with these permissions.
Following is our Lambda function that will return “Hello World” when integrated with the API gateway.
import json

def lambda_handler(event, context):
    # TODO implement
    return {
        'statusCode': 200,
        'body': json.dumps('Hello World!')
    }
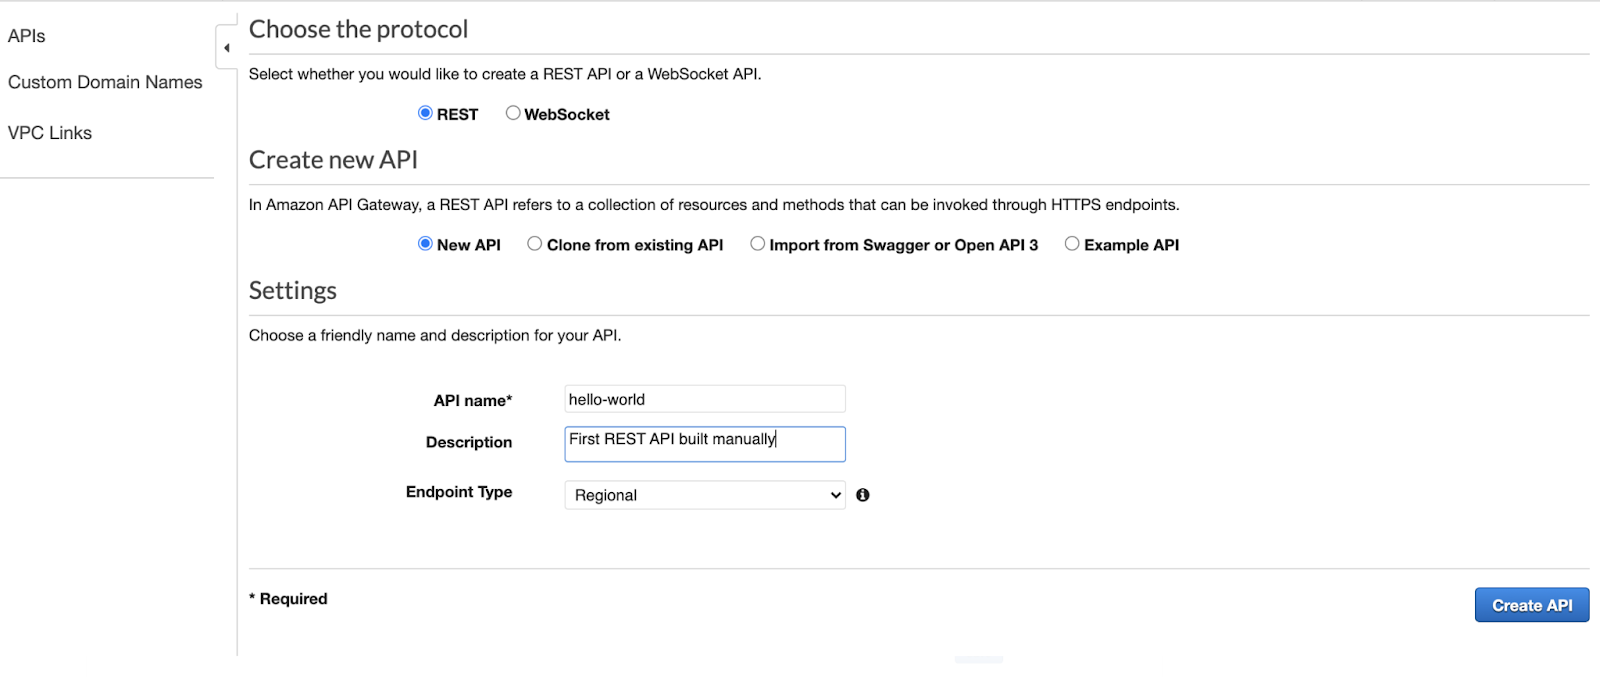
Now that we have configured our Lambda function, the next step is to create a REST API to interact with the Lambda function.
For this, go to Amazon API Gateway, Click create API, and select REST API from the provided options.
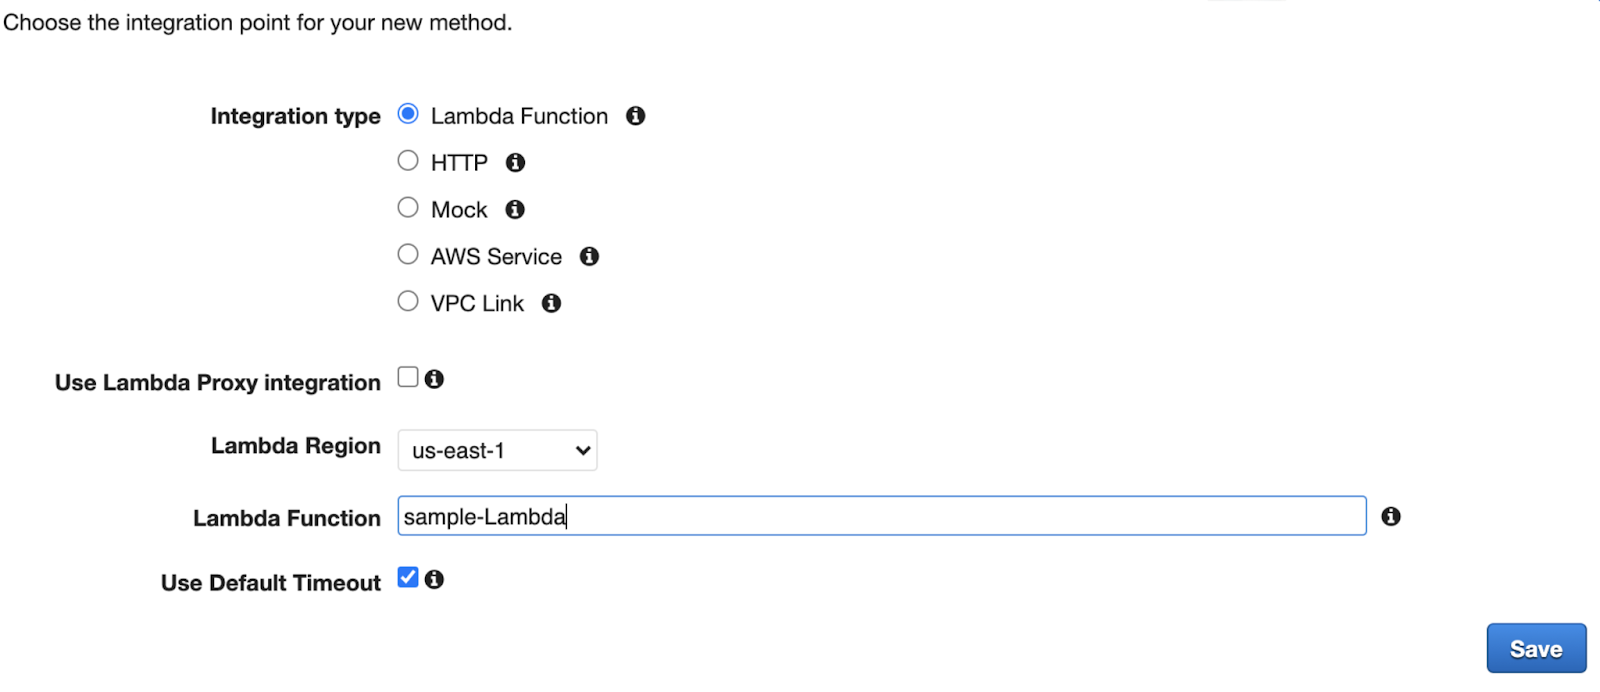
Now we will integrate Lambda with the API. For this, create a GET method from the actions menu and point our REST API to the Lambda function.
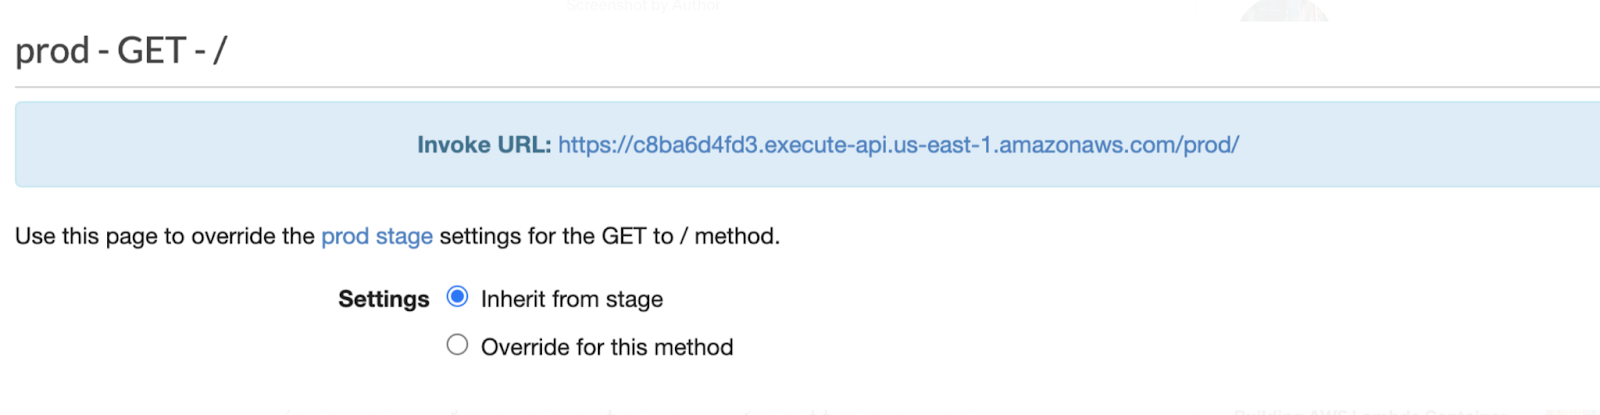
We are in a position to deploy and test our API for its proper integration with Lambda. Select any stage name you want – for this example, I'm using “prod”.
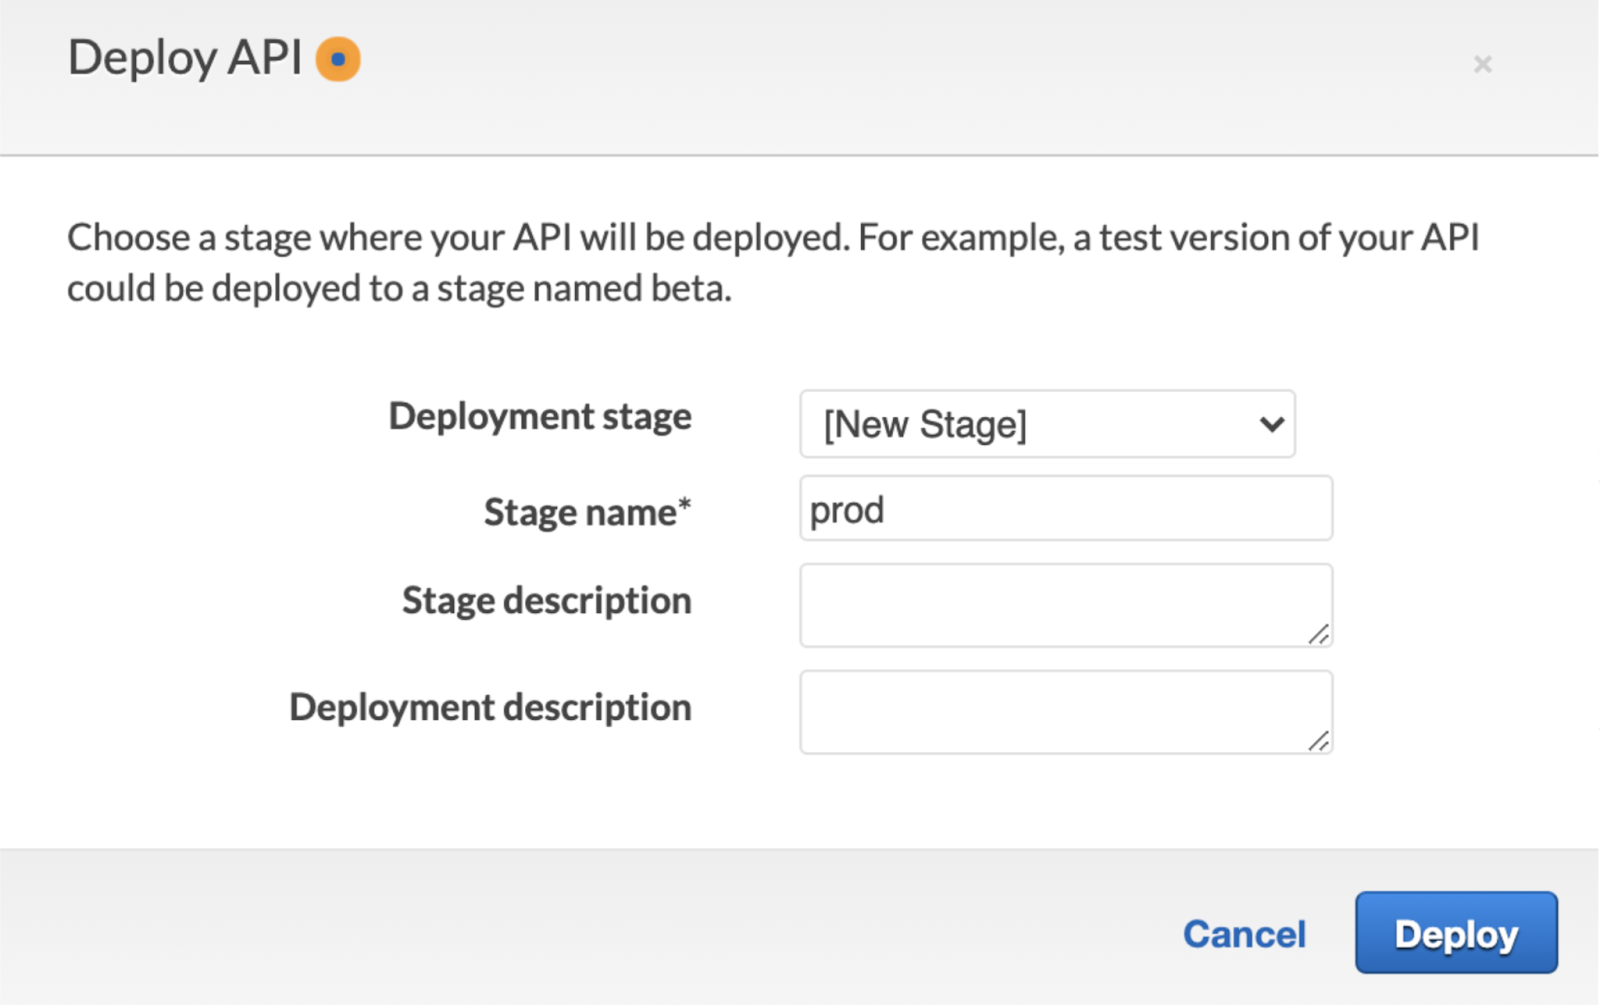
After deploying the API, you can see a URL on the “prod” stage. Hitting this URL will trigger the Lambda function. As we have returned “Hello World” from our Lambda function, so you should be able to see the desired result.
How to Deploy with CloudFormation
Up to this point, we have seen how manual deployment works, which usually takes a few minutes.
But let’s imagine that we have more than one API, method, and more than one developer working on them. In this scenario, tracking all the resources and changes would be challenging.
So, in this section, we will use AWS CloudFormation instead. It will give flexibility to the developers, allowing them to adjust their Infrastructure with a simple script.
How Does CloudFormation Work?
We will use the YAML file to provision and declare these resources and deploy them to AWS to create a CloudFormation stack. CloudFormation is a stack that contains all the resources required for the project.
We will be using the SAM template as described above in the services section. It is an abstraction of CloudFormation to build serverless applications with less YAML code.
For those who don’t know about YAML, you can think about it like JSON. But CloudFormation uses both of these file formats.
In the first step, we head to our local IDE and write the same Lambda function as we did in the AWS console.
helloworld.py:
import json

def lambda_handler(event, context):
    # TODO implement
    return {
        'statusCode': 200,
        'body': json.dumps('Hello World!')
    }
Next, we will create a template.yaml file containing our infrastructure. We will define our Lambda function and API Gateway in this file.
To build this file, we need to add some information that is common to all SAM templates.
template.yaml:
AWSTemplateFormatVersion: '2010-09-09'
Transform: AWS::Serverless-2016-10-31
Description: First CloudFormation template
Now, we have to add “Globals” to this CloudFormation template.yaml file. Globals are the common configs for the resources that you are going to deploy. Globals allow you to declare information globally for a specific resource type rather than specifying it again and again for different resources.
template.yaml:
Globals:
    #Common to all Lambda functions you create
    Function:
      MemorySize: 128
      Runtime: python3.6
      Timeout: 5
We define have to define the Resources tag in our template.yaml file. The Lambda function and REST API will come under this tag.
template.yaml:
Resources:

    ##Lambda and API GW Integrated
    helloworld:
        Type: AWS::Serverless::Function
        Properties:
          #filename.functionname
          Handler: helloworld.lambda_handler

          #REST API created
          Events:
            PostAdd:
              Type: Api
              Properties:
                Path: /helloworld
                Method: get
In the above code, we define parameters for creating the Lambda function. For the event, we create a REST API that triggers the Lambda function.
Note: There is an array of parameters like CodeURI and description that you can specify for your serverless function. The best way to create a template file is to go through the CloudFormation docs and see the parameters available for your specified resource/service.
How to Deploy the Template File
We can deploy our template.yaml file using the following two AWS CLI commands:
##s3 bucket stores our sam template which we need to deploy
aws cloudformation package --template-file template.yaml --output-template-file sam-template.yaml --s3-bucket helloworld-sam
After running the above command, you will be able to see a SAM template file. We will use this file in the second command below.
In this command, give your appropriate path to the sam-template.yaml file:
#Deploy stack
#point to template file created by a previous command and a stack name as well as your region you're deploying

aws cloudformation deploy --template-file /path to sam-template.yaml file --stack-name test-stack --capabilities CAPABILITY_IAM --region us-east-1
After executing both of these commands, you will see the stack created in the CLI. You can verify it using CloudFormation in the console.
Here you will see all the resources provisioned through the code created and deployed using the template.yaml file.
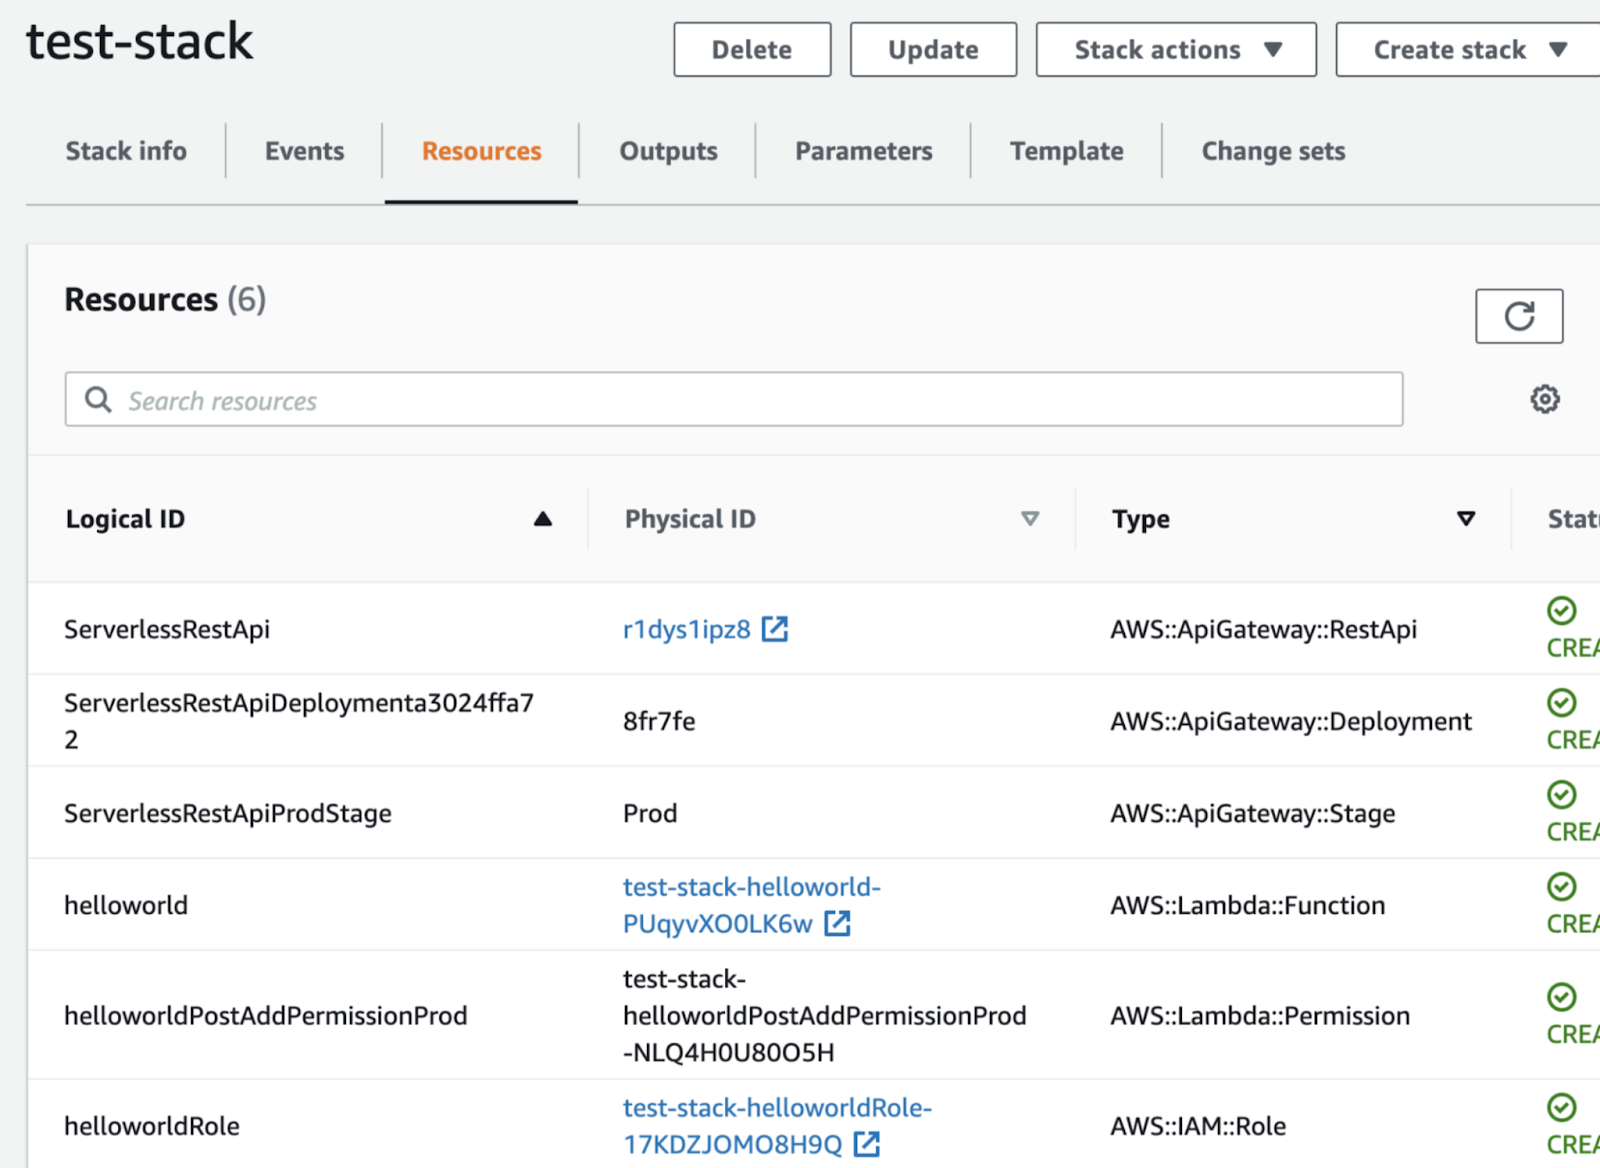
You can click on API and access the URL to check the output as we did for the manual deployment.
Wrapping Up
That’s it – you have successfully implemented infrastructure as code in AWS using CloudFormation.
I hope this article has been helpful for anyone wanting to understand implementing infrastructure as code in AWS.
Connect with me on LinkedIn and Twitter
Hasta la vista!