
By Adham El Banhawy
I was recently building a simple landing page website for a client who wanted to receive emails through their website without sharing their email.
Honestly, I had never tried to implement that functionality myself before. I was always used to having a simple "Contact Us" button with an anchor tag and a mailto in the href attribute like this:
<button>
    <a href="mailto:myemail@example.com">Contact Me</a>
</button>
But this approach has two inconveniences:
- It forces both parties, the user who wants to send the message and the site owner who receives it, to share their emails with one another. While this is OK for some, it is not ideal for privacy-minded individuals.
- For the site visitor, clicking the link forces them to open their default mail program on their device, and that can be frustrating. What if they're using a public computer? What if they're not logged in? What if they simply don't want to use their mail program?
Yes, technically they can just grab the recipient's email address and send the message via their browser or wherever they're logged in. But those are all extra steps and hurdles that can discourage users from sending their messages and the business might lose potential feedback or opportunities.
For this reason, we chose to go with an email form from which the user can simply write in their message and click submit, sending an email to the site's owner without ever leaving the website.
A quick Google search shows that there are third party tools/widgets that you could embed in a website, but most of them are branded and require paid subscription for full customization.
And unless you are using a CMS like WordPress that has a built-in plugin that can do that, that's an inconvenient recurring cost.
I instead chose to code that feature myself so I would have full control.
For the purposes of this guide I will recreate the steps I took to implement that functionality using HTML and AWS services.
The HTML Form
I'll keep it super simple here and go with a basic HTML form with no CSS, just to test our desired functionality.
<h2>Contact Us</h2>
<form>
  <label for="name">Name:</label>
  <input name="name" type="text"/><br/><br/>
  <label for="email">Email:</label>
  <input name="email" type="email"/><br/><br/>
  <label for="name">Message:</label>
  <textarea name="message"></textarea><br/><br/>
  <input type="submit"/>
  <div>
    <p id="result-text"></p>
  </div>
</form>
 Nothing fancy to see here...
Now we want to handle the submit functionality with JavaScript.
const form = document.querySelector('form')
form.addEventListener('submit', event => {
  // prevent the form submit from refreshing the page
  event.preventDefault()

  const { name, email, message } = event.target
  console.log('Name: ', name.value)
  console.log('email: ', email.value)
  console.log('Message: ', message.value)

})
At this point, we have a form that gets input from the user and JavaScript code that just displays the results to the console.
We can leave it at that for now and start working on the backend services that will receive the form data and send an email with that data.
The Backend Overview
Let's dive into AWS and what services we are going to use and how.
As mentioned in the title, we will use AWS Lambda and Simple Email Service (SES). SES is a serverless messaging service that allows you to send email messages when invoked. AWS Lambda allows you to write server-side code to execute in response to events.
We will also use API Gateway which enables us to invoke Lambda functions via HTTP.
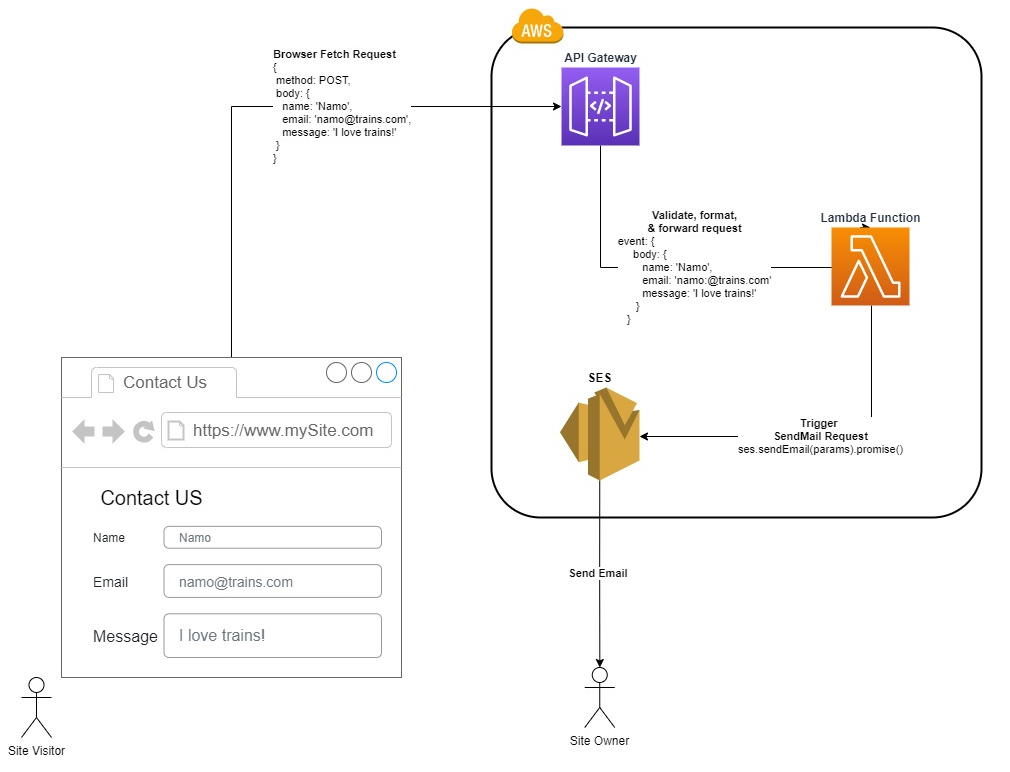
In this case, when our form is submitted, the following workflow will happen:
- Our browser (JavaScript) will make a post request, with the form data in the request body, to an endpoint URL specified by AWS API Gateway
- The API Gateway will validate this request. Then it will trigger the Lambda function which accepts an event parameter. API Gateway will put the form data in the body property of the event parameter.
- Our Lambda function will extract the data from the event body and we will then use this data to build the body of the email we want to send as well as its recipients. Our function will then use the AWS SDK to invoke SES with the email data.
- Once SES gets the sendMail request, it turns the email data into an actual text email and sends it to the recipient via AWS's own mail servers.
Once the email is sent, our browser will receive a response with status code 200 and a success message. If any step in the AWS cloud fails, the response will have a 500 status code.
Step 1: How to Set Up SES
We're actually going to set up each one of these steps in the reverse order, beginning with SES, which is going to be easier.
First in your AWS console, go to the SES service —> then click on Email Addresses in the side menu —> then click on the "Verify a New Email Address" button.

In the dialogue that opens up, enter the email address that you want the SES service to put as the sender when it sends the email.

This will send an email to the email address you put with a link to click to verify. This is how AWS knows that the owner of the email consents to having their email address used as the sender address.
Until you verify the email, the SES email dashboard will keep the verification status as pending.

Once the email owner opens the email they received from AWS and clicks the verification link in it, the verification status should change to verified (refresh the page to see the change).

And that's all you have to do for SES. You can optionally test the service by selecting your verified email in the list and clicking the "Send a Test Email" button. This will let you put in a recipient's email address, a subject, and a message and send it.
The email sent is going to be signed by AWS servers and your verified address should be the sender. It should look like this:

Step 2: How to Set Up Lambda
Now this is the most fun part. We are going to create a function that is going to receive the form data and call SES.
The beauty of Lambda functions is that you don't have to worry about running your backend code on a server 24/7 and maintaining that server. It's serverless.
But that doesn't mean there are no servers involved. AWS is going to take care of that under the hood so you can only focus on writing code, not maintaining servers. Additionally, you only get billed for the number of times your function gets called and the amount of time it takes to execute, and it's incredibly cheap!
Create an IAM Role and Configure it
Before we start writing our lambda function, we need to create an IAM role to attach it to the function and grant it permissions (referred to as policies in AWS) to invoke the SES service.

From your AWS console, go to the IAM service —> click on Policies in the side menu —> then click on the "Create Policy" button.

In the policy creation page, go to the JSON tab and paste the following permissions, then click Next.
{
    "Version": "2012-10-17",
    "Statement": [
        {
            "Sid": "VisualEditor0",
            "Effect": "Allow",
            "Action": [
                "ses:SendEmail",
                "ses:SendRawEmail"
            ],
            "Resource": "*"
        }
    ]
}
In the third screen, name the policy and click the "Create Policy" button.

Now we create an IAM role which will be attached to the lambda and link it to the permissions policy which we just created.

From the IAM side menu, click Roles then click the "Create role" button.
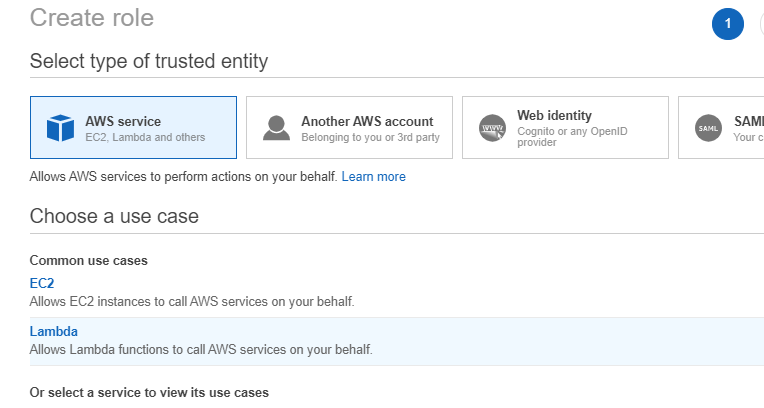
In the role creation screen, make sure the type selected is "AWS service" and select the Lambda case then click on the "Next:Permissions" button.

On the next screen, search for the policy we created earlier by its name and select it, then click next.

On the review screen, give the role a name you can remember then click on "Create role".
Now we can create a new lambda function. Go to the Lambda service dashboard and click the "Create Function" button.

In the function creation screen, name your function, select the "Author from scratch" option, and choose Node.js as the runtime.
Under "Change default execution role" choose the "Use an existing role" option then choose the name of the role you created in the previous step from the "Existing role" drop down.
Finally, click the "Create function" button to create the function.
Write the Code and Test it
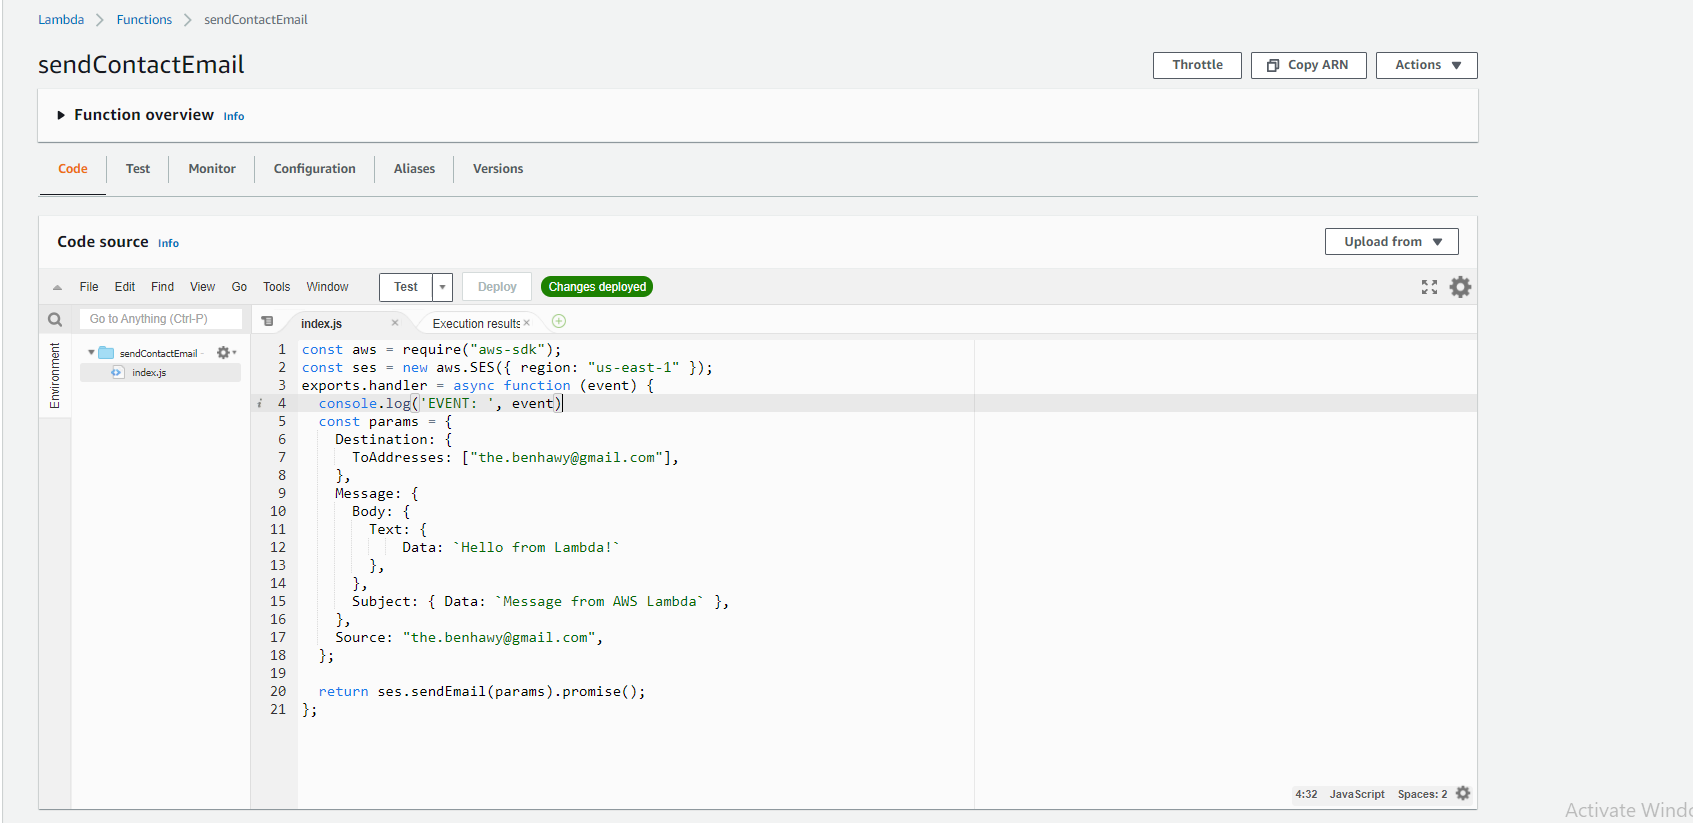
In the editor, open the index.js file (this is the file that will be executed when your lambda is called), and replace its content with the following code:
const aws = require("aws-sdk");
const ses = new aws.SES({ region: "us-east-1" });
exports.handler = async function (event) {
  console.log('EVENT: ', event)
  const params = {
    Destination: {
      ToAddresses: ["your@email.com"],
    },
    Message: {
      Body: {
        Text: {
            Data: `Hello from Lambda!`
        },
      },
      Subject: { Data: `Message from AWS Lambda` },
    },
    Source: "your@email.com",
  };

  return ses.sendEmail(params).promise()
};
Notice that on line 2 we are using the AWS SDK and creating an SES instance. The reason I chose us-east-1 as the region is because that's where I registered & verified my email. Be sure to replace the email and use the AWS region where you registered your email.
Now to test this function, click on the "Deploy" button. Then click on the Test button —> Configure test event which should open up a test configuration dialogue where you can create a new test event.
In the test event body editor, enter the following JSON which mimics what will eventually come from our browser request. Then click create.
{
  "body": {
        "senderName": "Namo",
        "senderEmail": "namo@trains.com",
        "message": "I love trains!"
    }
}
Now clicking the test button will run the test we just created. It should open a new tab in the editor to show us the logs created from running the function, which should look like this:

Notice the event object we logged out shows here under Function logs with the body data we used in the test event.
This test should have sent an email to my inbox as well – let's see if that happened.

Yep, just as expected. And that happened almost immediately after running the test.
Now let's modify our function code to get a more meaningful message from the test data.
const aws = require("aws-sdk");
const ses = new aws.SES({ region: "us-east-1" });
exports.handler = async function (event) {
  console.log('EVENT: ', event)
    // Extract the properties from the event body
  const { senderEmail, senderName, message } = JSON.parse(event.body)
  const params = {
    Destination: {
      ToAddresses: ["the.benhawy@gmail.com"],
    },
        // Interpolate the data in the strings to send
    Message: {
      Body: {
        Text: {
            Data: `You just got a message from ${senderName} - ${senderEmail}:
            ${message}`
        },
      },
      Subject: { Data: `Message from ${senderName}` },
    },
    Source: "the.benhawy@gmail.com",
  };

  return ses.sendEmail(params).promise();
};
It's important to note that when API Gateway calls our function it will pass a string to the event body. This is why I use JSON.parse on event.body, to turn it into JSON and extract our sender's email, name, and message. Then I use those variables in the email body text and subject using string interpolation.
If you try the test it, the code will return an error. This is because the test is passing a JSON object to event.body and we are using JSON.parse on JSON, which causes an error in JavaScript.
Sadly, the test editor doesn't allow us to pass strings to the event, so we'll have to test that later from somewhere else.
Step 3: How to Set Up API Gateway
Next, the last AWS service we are going to use is API Gateway, which will enable our browser to send HTTP requests to the Lambda function we created.

Without leaving your lambda function page, expand the "Function overview" section and click on "Add trigger".

Next, choose API Gateway from the dropdown, HTTP API as the API type, "Open" as the security mechanism, and check the CORS checkbox option. Then click "Add".
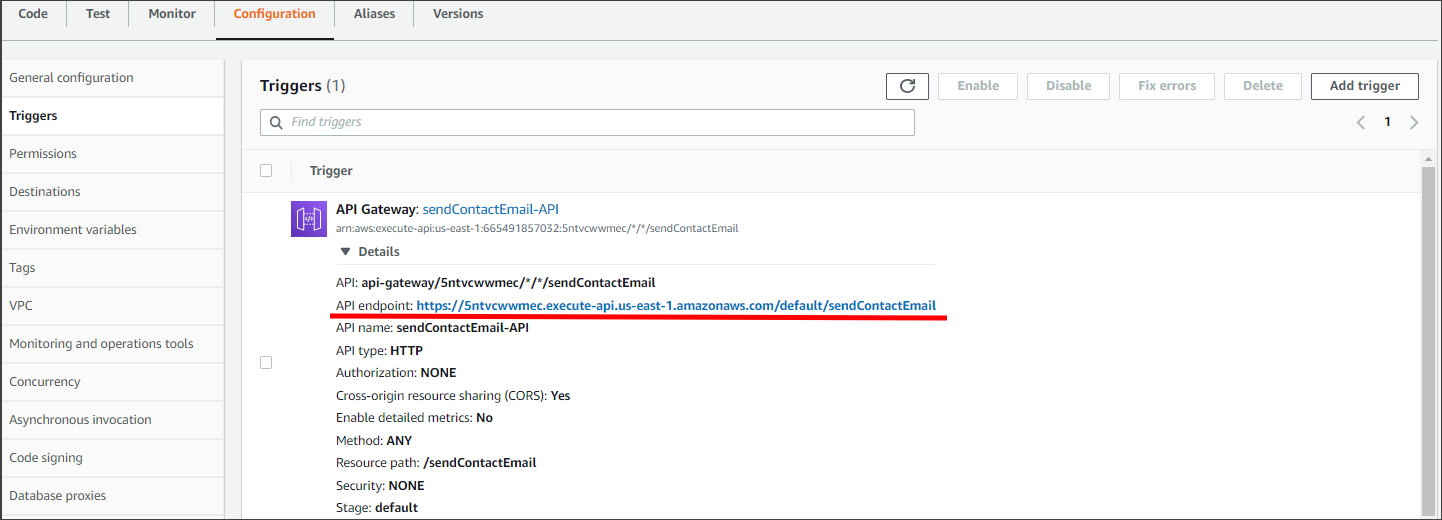
You should be redirected to the "Configuration" tab of your function, showing you the new API Gateway trigger you just created. From there, note the API endpoint. This is the URL we are going to be calling from our browser with the form data.
Back to the HTML
We can finally test the form to see if it sends emails or not.
Let's modify our JavaScript to handle sending the request when the form is submitted.
const form = document.querySelector("form");
form.addEventListener("submit", (event) => {
  // prevent the form submit from refreshing the page
  event.preventDefault();

  const { name, email, message } = event.target;

    // Use your API endpoint URL you copied from the previous step
  const endpoint =
    "<https://5ntvcwwmec.execute-api.us-east-1.amazonaws.com/default/sendContactEmail>";
  // We use JSON.stringify here so the data can be sent as a string via HTTP
    const body = JSON.stringify({
    senderName: name.value,
    senderEmail: email.value,
    message: message.value
  });
  const requestOptions = {
    method: "POST",
    body
  };

  fetch(endpoint, requestOptions)
    .then((response) => {
      if (!response.ok) throw new Error("Error in fetch");
      return response.json();
    })
    .then((response) => {
      document.getElementById("result-text").innerText =
        "Email sent successfully!";
    })
    .catch((error) => {
      document.getElementById("result-text").innerText =
        "An unkown error occured.";
    });
});
Now, the moment of truth: fill in the form and click submit. If you see the success message, that means the email was sent.

Since I own the email the message was sent to, I take a quick look at my inbox to see that I received an email from myself with the details I used in the form!

If you've followed along, you now have a functioning "Contact Us" form that you can plug into any website. And you'll only get billed for when it is actually used.
I don't know about you, but I think this is pretty awesome and almost magical! And it's a nice, practical way to use cloud computing/services in your workflow.
Of course you can customize this flow in terms of using a framework on the frontend like React or Vue or a different programming language for the Lambda like Python or Go.
Before you go...
Thank you for reading this far! I write posts about JavaScript, cloud development, and my personal educational & professional experiences as a self-taught developer. So feel free to follow me on twitter @adham_benhawy where I tweet about them too!