

Hello everyone! Thanks for your great feedback on my tutorial about the basics of the find command. After reading it, many people requested that I write a more advanced version about the find command.
Well, here it is! Now, it's time to take your skills to the next level. In this article, let's explore the more advanced version of the find command.
If you're just learning about the find command for the first time, I covered the basics of file searching and explored some powerful commands to search files quickly using Linux in my previous tutorial. If you haven't read it and aren't yet familiar with find, I would highly recommend that you have a look through it and then come back here.
How to Search Files Owned by a User
The find command accepts a special argument called user which you can use to filter the files owned by a user.
The syntax looks like this:
find [path] -user [username] [options]
Let's say you want to search all the files owned by me (my username on this laptop is aruna). You can do this by using the below command:
find ./5minslearn/ -user aruna
 Search files owned by a user
The above command will list all the files owned by the user aruna in the 5minslearn directory.
You may notice the [options] added to the end of the syntax. This basically means you can add any arguments following this to make your search a bit more effective.
For example, let's try to filter only the directories that I own. To filter the directories, you have to add the -type option. Here's the command for it:
find ./5minslearn/ -type d -user aruna
 Find directories created by a user
From the above screenshot, you can see that this command lists all the directories and sub-directories owned by me inside the 5minslearn directory.
How to Search Files that Have Specific Permissions
Using -perm argument, you can search for files that have a specific permission.
Here's the syntax:
find [path] -perm [permissions] [options]
For example, let's assume you want to search all the files that have read-only permission in the current directory. The code for read-only files is 400.
Note: If you don't know how this code (400) is generated and you're curious to know, please refer to the How can I remove permissions using Octal Mode? section of my Linux File Permission blog.
find . -perm 400
 Find files with read-only permission
I created this welcome.txt file with read-only permission long ago. You can see from the above screenshot that the find command has identified it perfectly.
I would like to share a weird experience that I faced in my career.
I was working on a project that contains a huge number of minified (around 200+) files. Out of those, I had to find all the files that didn't have read-only permission. I was pretty sure that it would be so low that I could count them on one hand.
Looking over 200 files to find a maximum of 5 files is a time-consuming process. So, I decided to find an alternative way.
I searched on Google and I was surprised by the result.
I learned that I could do this by just prepending a -not flag with the -perm command. Here's the command for you:
find . -not -perm 400
The command will list all the files in the current directory that do not have read-only permission.
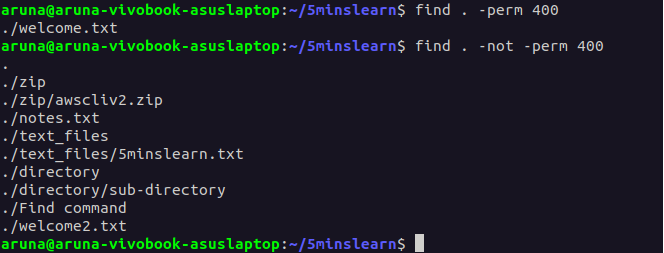 Find all the files that do not have read-only permission
The additional advantage is that you can prepend this -not flag before any option in the find command to find the opposite of the search query.
Here's another example for you:
find . -not -type f
Running the above command will list all the items that are not files (directories, symlinks, and so on) in the current directory.
How to Search Files that Belong to a Particular Group
As we saw in my previous tutorial on file permissions, there may be multiple people who share a common machine for their work. They're grouped together as Developers, QA, and others.
So what if you want to find all the files that people in the Developers group can view? That's difficult, right?
But don't worry. Here's a simple alternative using the find command.
Using the -group argument in the find command you can search for all files that belong to a group.
The syntax is:
find [path] -group [groupname] [options]
I have a group with my name on my machine. Let's try to find all the files owned by my group.
find . -group aruna
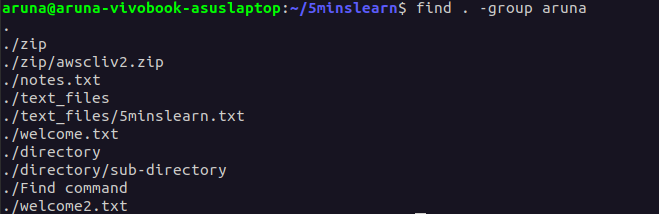 Find command to list all files belonging to a group
You can also combine the -group option with other find command options to refine your search.
For example, you can combine the -group option with the -perm option to search files that belong to a group and have specific permissions.
find . -group aruna -perm 400
 Find all files that belong to a group with read-only permissions
The above command will list all read-only files that belong to the aruna group.
Similarly, as I mentioned earlier, you can also combine the -group option with the -not option to find files that do not belong to a particular group.
Let's try to find the files that do not belong to the sudo group.
find . -not -group sudo
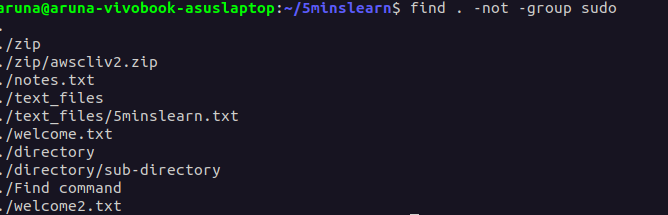 Find files that do not belong to
 sudo group
How to Find Recently Modified Files
The -newer option in the find command searches for files that are modified after the last modification of the given file.
The syntax looks like this:
find [path] -newer [reference_file]
For example, if you want to search for all files that are modified after the notes.txt file you can use the following command:
find . -newer notes.txt
This command will search for all files in the current directory that were recently modified after notes.txt file.
 Find recently modified files
How to Search for Files that Were Accessed a Few Minutes Ago
To search for files that were accessed a few minutes ago, you can use the -amin argument. This argument will accept the number of minutes (n) and finds all the files that are accessed n minutes ago.
The syntax is:
find [path] -amin [n] [options]
For example, let's try to find the files that were accessed within the last 30 minutes:
find . -amin -30
 Find all files that were accessed in the last 30 minutes
I hope you noticed the negative (minus) sign before the number. It indicates that the file was accessed in the past.
How to Search All Empty Files
You can use the -empty flag in the find command to search for files and directories that are empty.
Here's the syntax:
find [path] -empty [options]
To search for all empty files and directories, you can use the following command:
find . -empty
 Find all empty files and directories
To search only for the empty directories, you can combine the -empty option with the -type option:
find . -type d -empty
 Find all empty directories
This command will list all the empty directories in the current directory.
The -empty flag can be appended with the -delete flag to delete all the empty files and folders.
How to Find Files that Match a Specific Regular Expression
The -regex argument allows you to apply a filter using regular expressions (RegEx).
The syntax looks like this:
find [path] -regex [expression] [options]
For example, let's assume you want to search the files whose names start with the letter w. You can use the below command to do that:
find . -regex "./w.*"
 Find all files that match the specified regular expression
Conclusion
In this article, you've learned some advanced tips to search files effectively and perform various operations on them.
I would recommend that you learn the find command by trying it out. Come up with a few scenarios yourself and try to find the files using the techniques you have learned.
Dropping a couple of scenarios for you here:
- Find and delete files that end with
.txt - Find files that are not owned by you
- Find files that do not match a pattern
- Find all the files beginning with
log-and having a size between 50MB and 100MB - Find all the files that belong to a group and were accessed 10 minutes ago
Hope you enjoyed reading this article!
To read more such interesting blogs, subscribe to my email newsletter on my site and follow me on social media.