

When you're testing different components in React, you’ll need to simulate user interactions with various parts of each component.
In this tutorial, I am going to show you some methods to simulate user interactions with different interactive elements.
Before getting started, make sure you know how to structure a test in React and how to write simple tests. You can brush up on that knowledge by reading my previous post about how to write unit tests in React.
I also have a challenge for you, so make sure you read the complete article.
How to Set Up the Project
Create your React app using the command create-react-app testing-user-interactions. Next, install the library user-event.
npm i user-event
I am assuming you know how to use this library. If not, I explained how it works in my previous tutorial.
Basically, this library has a few functions you can use to simulate a user. We’ll go through all these functions with examples.
Before writing your tests, you'll need to make the following imports at the start of your test suite (the file in which you write all your tests).
import {render, screen} from '@testing-library/react'
import userEvent from '@testing-library/user-event'
You'll also need to import the component you’ll be testing.
For every test, we'll be simulating user interactions and test how our component behaves.
How to Test select Element Interactions
In your application, you may have select elements that allow a user to select something from a list of options. Let’s take an example:
<select id='selectCity'>
    <option> Mumbai</option>
    <option> Bangalore</option>
    <option> Chennai</option>
</select>
Normally, when a user sees a select element, they would click it and select an option they want. We are going to simulate the exact same behaviour and test if our component reacts accordingly. For instance, if a user selects Chennai, the value shown must be the same.
First, let’s see how to query the element. Let's use getByRole to query the element. You can use the role combobox for the above element.
screen.getByRole('combobox')
What is a role? How do you know which role to use for an element? In React, for testing purposes, there's an attribute called role defined for every HTML element. This makes it easier for you to query an element while testing.
Now, in order to know the value of the role attribute for each element, you can refer to the list of roles here.
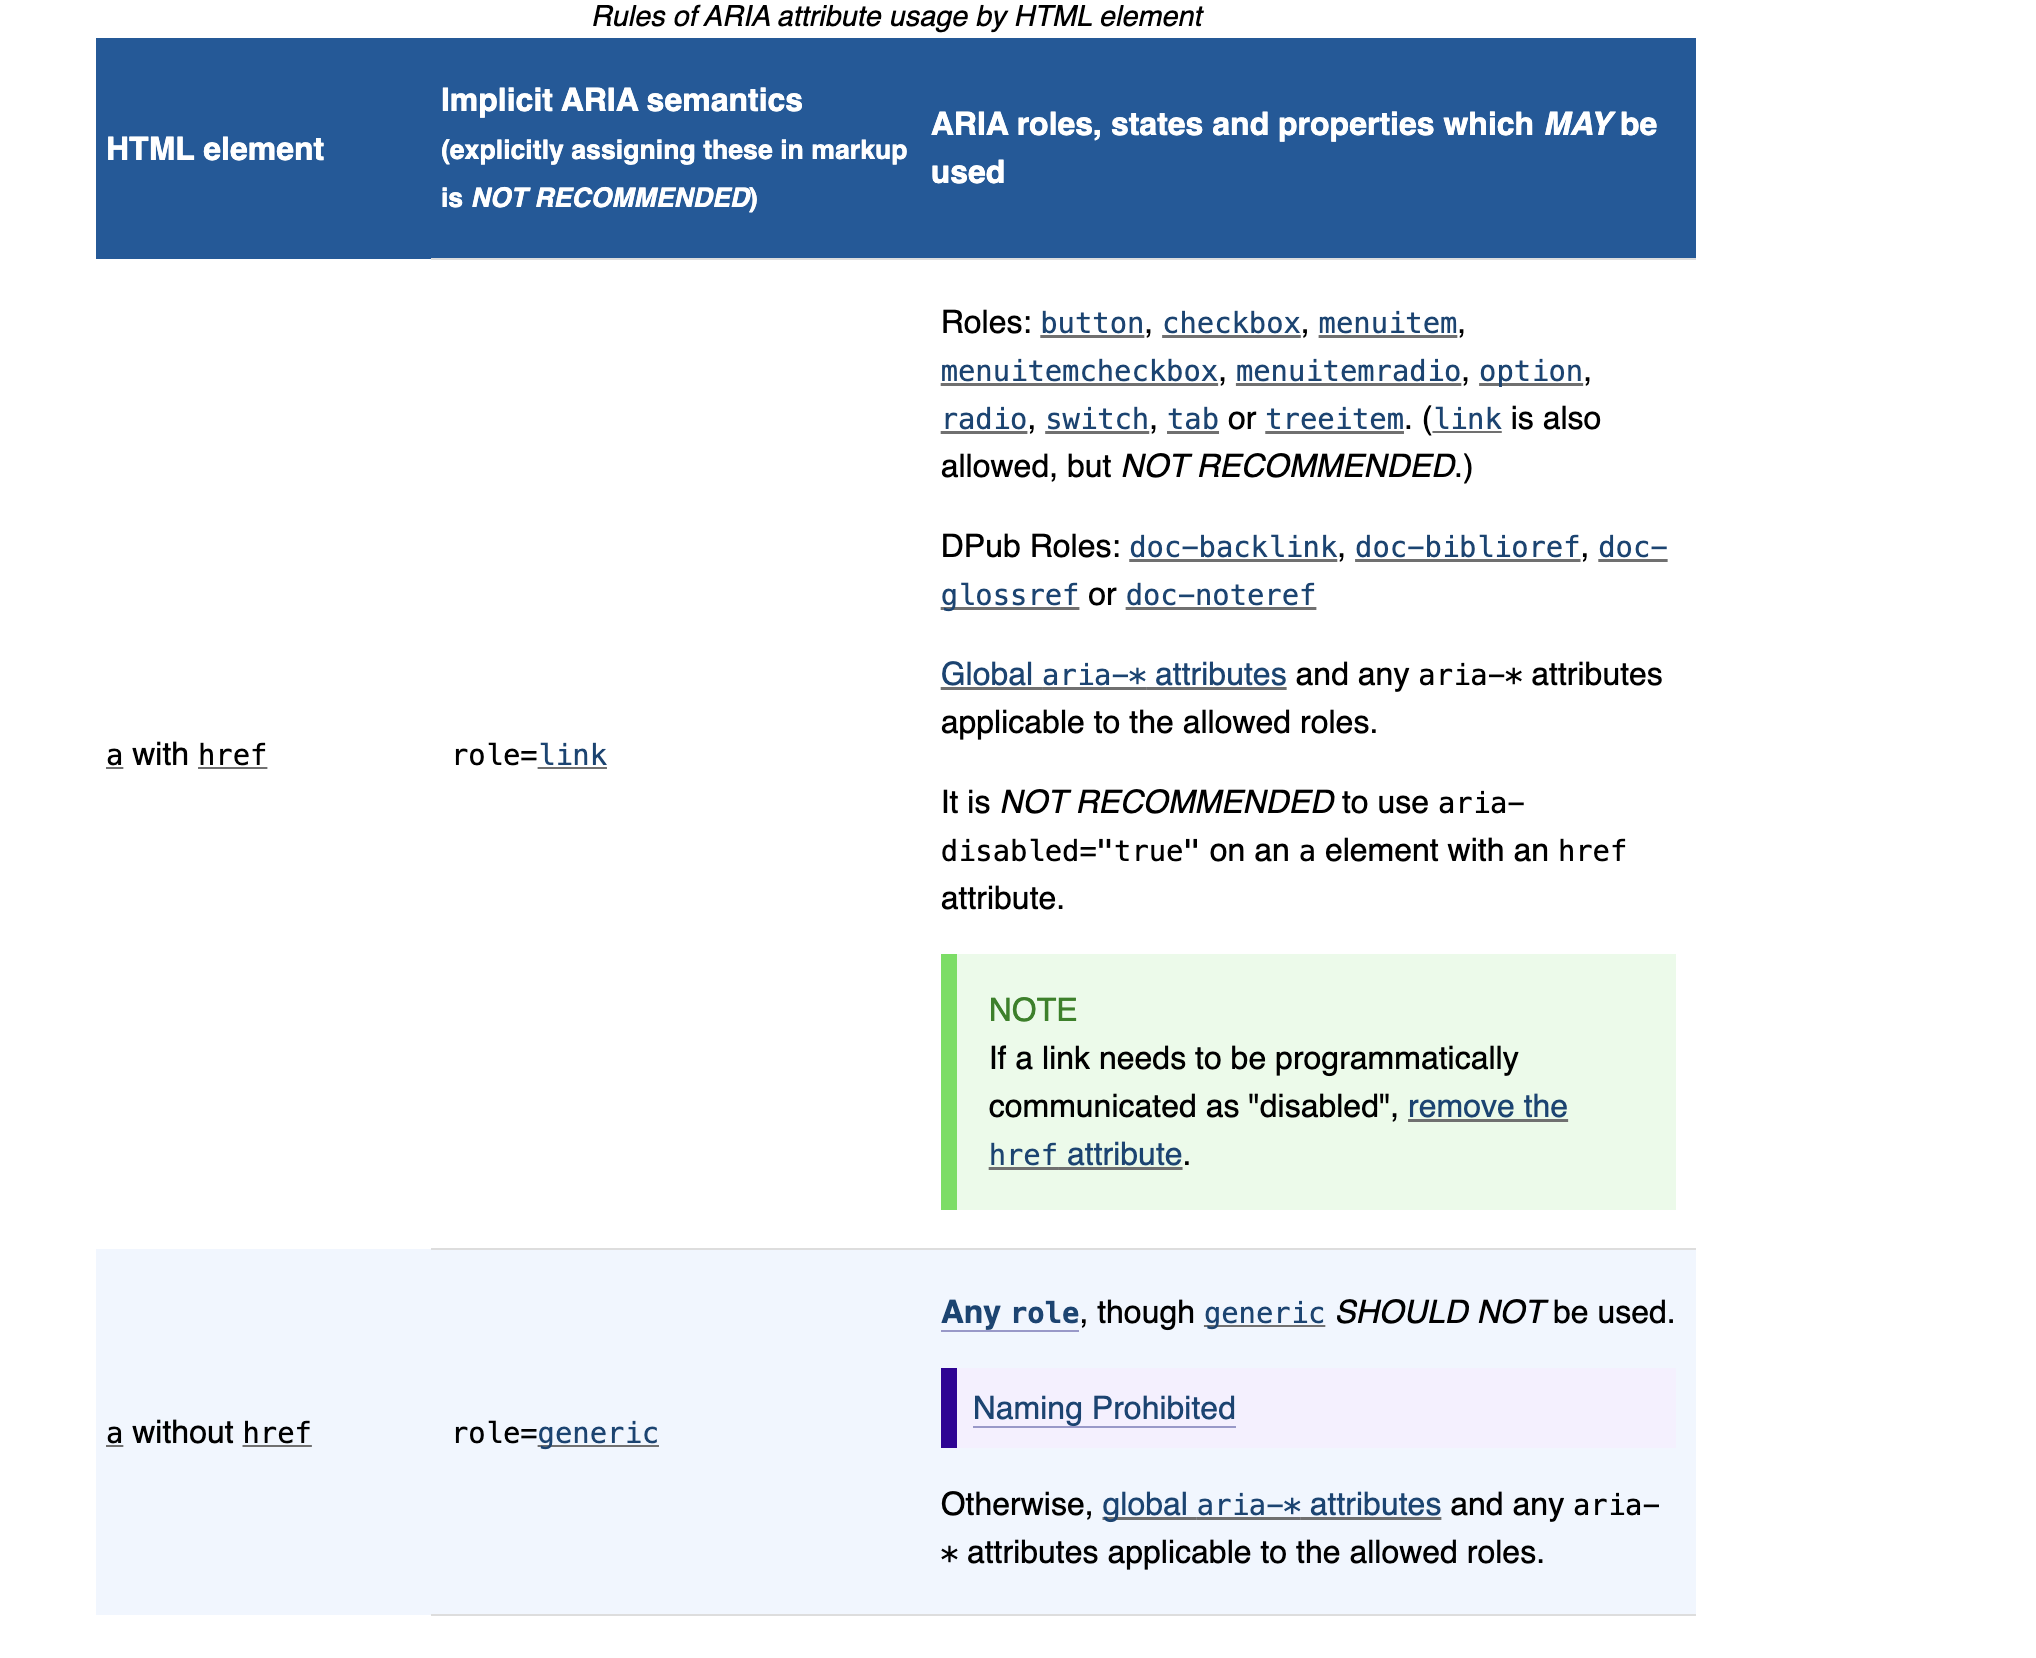
A Snapshot of the List of Roles
If you want to query an anchor element containing an href attribute, you can use the role link. Same is true for other elements in the list.
However, do not define an explicit role attribute for your HTML element, as it's already defined for you.
Let's see another method of querying the element. If there are is more than one select element, you can use getByLabelText(). For this, add a label, <label htmlFor=”selectCity”>Select City</label> for the element and do screen.getByLabelText(/select city/i). You’ll get the element.
Now, use the [selectOptions()](https://testing-library.com/docs/ecosystem-user-event/#selectoptionselement-values-options) method of the library to simulate a user selecting an option. It takes three arguments: the element, the value, and any options.
userEvent.selectOptions(
    screen.getByRole('combobox'),
    'Chennai'
)
Then, add an assertion at the end of your test to check if the element has the same value that the user selected.
expect(screen.getByRole('combobox')).toHaveValue('Chennai')
The user selected Chennai and our select element has the same value, so the test passes.
How to Test State Change
Now, I’ll make a state update on changing the select element’s value. First, I’ll have a state called cityName to display the option selected.
const [cityName, setCityName] = useState('Mumbai');
<h2> City Name: {cityName} </h2>
Then, I’ll add an onChange attribute with a method that updates the state.
onChange={(e) => { setCityName(e.target.value)}}
To write the test for this, follow the same process:
test("City Name header rendering", () => {
    render(<SelectElement/>)
    userEvent.selectOptions(
        screen.getByRole('combobox'),
        'Bangalore'    )
    expect(screen.getByRole('heading',
                     { name: /bangalore/i})).toBeInTheDocument();
})
To query the h2 element, use [getByRole()](https://testing-library.com/docs/queries/byrole/) with the name option. The name option adds another filter to the query – in case there are multiple h2 elements.
How to Test a Hover Event
Your application may have functionalities where a user can hover over an element to see some information as a tooltip. So, to learn how to test this, let’s implement a basic tooltip functionality.
<div className="tooltip">
    <p> Hover over me</p>
    <span className="tooltiptext">Tooltip text</span>
</div>
There’s also some CSS styles for the classes defined above, but I won’t show them here. Basically, when a user hovers over the text Hover over me, the tooltip text is visible.
To simulate a user hovering over the text element, use the hover() method. Add an assertion at the end to test if the tooltip is visible.
test("Tooltip visible", () => {
    render(<HoverEvent/>)
    userEvent.hover(screen.getByText(/hover over me/i))
    expect(screen.getByText(/tooltip text/i)).toBeInTheDocument()
})
The test will pass if the tooltip is visible on hover. If it doesn't, you'll need to refactor your code.
How to Test a File Upload Event
Another important event is a user uploading files to your website. This is a pretty common functionality in any UI application.
Let’s have an input of type file.
<label htmlFor="singleFile">Upload File</label>
<input type='file' id='singleFile' />
In the test, you’ll need to simulate the user uploading a file. Use the upload() method to do that:
test("Test single file upload", () => {
    render(<FileUpload/>)
    const file = new File(['hello'], 'hello.png', {type: 'image/png'})
    userEvent.upload(screen.getByLabelText(/upload file/i), file)
    expect(screen.getByLabelText(/upload file/i).files[0]).toEqual(file)
})
First, create a mock file and upload the same. Then, make an assertion that the file present in the input matches our uploaded file. It does, so the test passes.
Now, let’s take an example of multiple file uploads.
<label htmlFor='multipleFiles'>Upload multiple files</label>
<input type='file' id='multipleFiles' multiple />
In our test, upload multiple files.
test("Test multiple file uploads", () => {
    render(<FileUpload/>)
    const files = [
           new File(['file1'], 'file1.png', {type: 'image/png'}),
           new File(['file2'], 'file2.png', {type: 'application/pdf'})
    ]
    userEvent.upload(screen.getByLabelText(/upload multiple files/i),
                        files)
    const fileInput = screen.getByLabelText(/upload multiple files/i)

    expect(fileInput.files.length).toBe(2);
    expect(fileInput.files[0]).toEqual(files[0]);
    expect(fileInput.files[1]).toEqual(files[1]);
})
In the assertions, check the number of files and whether both the files match the uploaded ones. Thus, all our tests pass with 100% coverage.
Now, time for the challenge. Go through my posts on Muliple File Uploads and Different Examples of the useState Hook and write unit tests for all the functionalities. Upload your code on GitHub and share it with me.
How to Test Form Behaviour
An important feature of most web apps is form handling. When writing tests for a React app, it’s highly likely you will need to test your component’s behaviour with forms.
In our example, let’s have a form with two input fields, one select field and a submit button.
First, let’s define the states for the respective fields and an additional state for indicating whether the form is submitted.
const [name, setName] = useState('')
const [password, setPassword] = useState('')
const [country, setCountry] = useState('')
const [formSubmitted, setFormSubmitted] = useState(false)
<form>
    <input onChange={(e) => {setName(e.target.value)}}
           placeholder='Enter name'/>
    <input onChange={(e) => {setPassword(e.target.value)}}                          placeholder='Enter password'/>
    <label htmlFor='selectCountry'> Select Country </label>
    <select id='selectCountry'
            onChange={(e) => {setCountry(e.target.value)}}>
        <option>India</option>        <option>Japan</option>
        <option>China</option>        <option>USA</option>
        <option>England</option>
    </select>
    <button onClick={handleSubmit}> Submit </button>
</form>
In the onChange attribute, make the state updates. In the end, display a text on successful submission of the form.
{formSubmitted && 'Form Submitted'}
Also, let’s add some validation in the handleSubmit method. When a validation fails, a list of errors will be shown. Create another state to hold errors.
const [errors, setErrors] = useState([])
Now, implement the handleSubmit method.
const handleSubmit = (event) => {
    event.preventDefault();
    const errorList=[];
    if(name == '' || password == '' || country == '') {
        errorList.push('Please fill all the details')
    }
    const regex = /^[a-z]*$/i;
    if(!name.match(regex)) {
        errorList.push('Please enter a valid name')
    }
    if(errorList.length != 0) {
        setErrors(errorList);
        setFormSubmitted(false);
        return;
    }
    setErrors([]);
    setFormSubmitted(true)
}
First, we’ll do event.preventDefault() which cancels out any events that prevent submitting the form. Then, we’ll add few error checks and add any errors to the state errors. In the end, if there are no errors then set errors to an empty array and set formSubmitted as true.
We’ll also display the list of all the errors which will be visible on clicking the submit button.
errors.map(err => (
    <p>
        {err}
    </p>
))
Let’s write the tests for this example. There are a few different things you should test. First, write a test simulating a user interacting with the form and submitting it with correct values.
test("Form getting submitted with correct input values", () => {
    render(<FormBehaviour/>)

    userEvent.type(screen.getByPlaceholderText(/enter name/i), 'kunal')
    userEvent.type(screen.getByPlaceholderText(/enter password/i),                                   'pass')
    userEvent.selectOptions(screen.getByLabelText(/select country/i),                               'India')
    userEvent.click(screen.getByText(/submit/i))

    expect(screen.getByText(/form submitted/i)).toBeInTheDocument();
})
Use the type and click methods of the userEvent library to simulate the respective actions. In the end, add an assertion to see if the text matching the regex /form submitted/i is visible in the document since our logic displays the text as soon as the form is submitted.
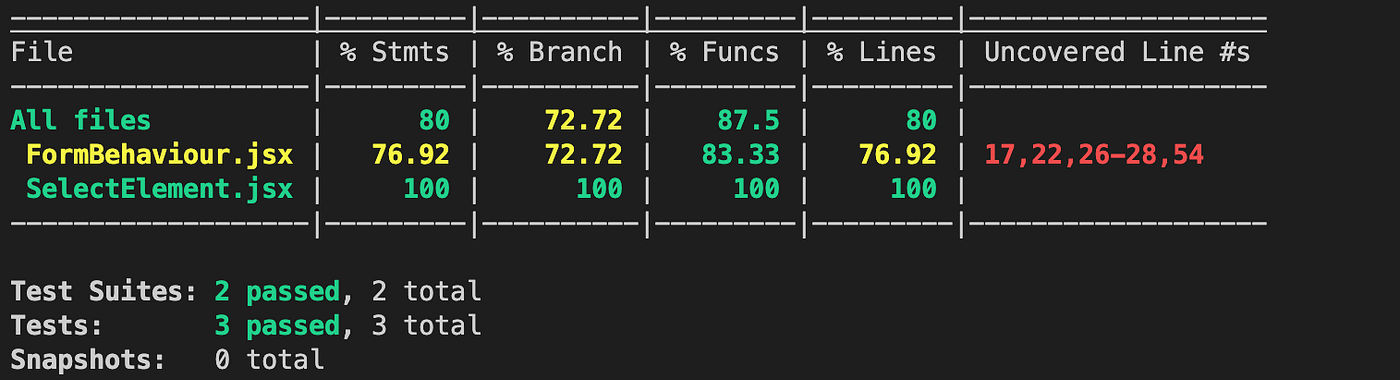
Test Coverage for the Form Behaviour Component
Our test passes, but there are still some uncovered lines. We have tested regular form behaviour. However, we also have error handling mechanisms in place. So, you also need to write tests that cover different error scenarios.
First, simulate a user clicking the submit button without entering anything.
test("Empty fields error shown", () => {
    render(<FormBehaviour/>)
    userEvent.click(screen.getByText(/submit/i))
    expect(screen.getByText(/please fill all the details/i))                         .toBeInTheDocument()
})
On clicking the submit button, an error message should be visible prompting the user to fill all the details. Make an assertion for the same.
Not all lines are covered yet. We still have one more error scenario. What if the user enters an invalid name?
test("Invalid name error shown", () => {
    render(<FormBehaviour/>)
    userEvent.type(screen.getByPlaceholderText(/enter name/i), '@###')       userEvent.type(screen.getByPlaceholderText(/enter password/i),                                    'pass')
    userEvent.selectOptions(screen.getByLabelText(/select country/i),                                  'India')
    userEvent.click(screen.getByText(/submit/i))
    expect(screen.getByText(/Please enter a valid name/i))
          .toBeInTheDocument();
})
This test is similar to the first test, except here, the user enters an invalid name. So, assert whether the corresponding error is shown.
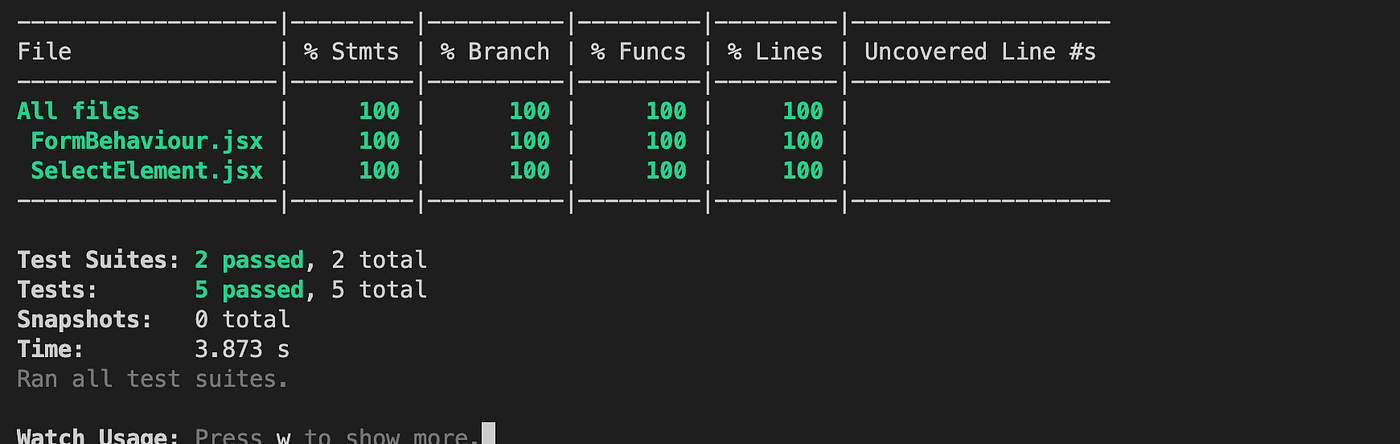
100% Coverage for the Form Behaviour Component
Now, all our tests pass with 100% coverage.
You can find the complete code on GitHub.
Conclusion
Testing user interactions helps you make sure that users can interact efficiently and effectively with your application. You need to cover all possible scenarios a user may encounter. In this article, I have shown you how you can simulate user interactions with different elements.
I have also demonstrated testing form behaviour covering many scenarios. I hope you now know how to use the userEvent library to test your component’s behaviour with user events.
If you are unable to understand the content or find the explanation unsatisfactory, get in touch with me and let me know. New ideas are always appreciated! Feel free to connect with me on Twitter. Till then, Goodbye!