By Dan Ruta
WebAssembly is blazing fast for number crunching, game engines, and many other things, but nothing can quite compare to the extreme parallelization of shaders, running on the GPU.
This is especially so if you’re looking to do some image processing. Usually, on the web, this is done through WebGL, but how would you access its APIs when using WebAssembly?
Setting up
We’ll very briefly go through setting up an example project, then we’ll look at how an image can be loaded as a texture. Then, in a separate context, we’ll apply an edge detection GLSL shader to the image.
All the code is in a repo here, if you’d prefer to jump straight to that. Note that you have to serve your files via a server for WebAssembly to work.
As a prerequisite, I’m going to assume you already have your WebAssembly project set up. If not, you can check out the article here on how to do it, or just fork the repo linked above.
For demoing the below code, I’m using a basic html file which serves only to load an image, get its imageData, and pass it to the WebAssembly code using the ccallArrays function.
 The HTML file with the preview input image
As for the C++ code, there is an emscripten.cpp file which manages and routes method calls to context instances created in the Context.cpp file. The Context.cpp file is structured as follows:
Compilation
WebGL is based on and follows the OpenGL ES (Embedded Systems) spec, which is a subset of OpenGL. When compiling, emscripten will map our code to the WebGL API.
There are a couple of different versions we can target. OpenGL ES 2 maps to WebGL 1, whereas OpenGL ES 3 maps to WebGL 2. By default you should target WebGL 2, as it comes with some free optimizations and improvements.
To do this, we must add the USE_WEBGL2=1 flag to the compilation.
If you are planning to use some OpenGL ES features not present in the WebGL spec, you can use the FULL_ES2=1 and/or FULL_ES3=1 flags.
To be able to handle large textures/images, we can also add the ALLLOW_MEMORY_GROWTH=1 flag. This removes the memory limit of the WebAssembly program, at the cost of some optimizations.
If you know ahead of time how much memory you’ll need, you can instead use the TOTAL_MEMORY=X flag, where X is the memory size.
So we’re going to end up with something like this:
emcc -o ./dist/appWASM.js ./dev/cpp/emscripten.cpp -O3 -s ALLOW_MEMORY_GROWTH=1 -s USE_WEBGL2=1 -s FULL_ES3=1 -s WASM=1 -s NO_EXIT_RUNTIME=1 -std=c++1z
Finally, we need the following imports, in our code:
#include <emscripten.h>#include <string>#include <GLES2/gl2.h>#include <EGL/egl.h>extern "C" { #include "html5.h" // emscripten module}
Implementation
If you have previous experience with WebGL or OpenGL, then this bit may seem familiar.
When writing OpenGL, the API will not work until you create a context. This is normally done using platform specific APIs. However, the web is not platform bound, and we can instead use an API integrated into OpenGL ES.
The majority of the legwork, however, can be more easily implemented using emscripten’s APIs in the html5.h file. The functions we’re interested in are:
- _emscripten_webgl_createcontext — This will instantiate a context for the given canvas and attributes
- _emscripten_webgl_destroycontext — This is needed for cleaning up memory when destructing context instances
- _emscripten_webgl_make_contextcurrent — This will assign and switch which context WebGL will render to
Create the context
To start implementing, you have to first create the canvas elements in your JavaScript code. Then, when using the emscripten_webgl_create_context function, you pass the id of the canvas as the first parameter, with any configurations as the second. The emscripten_webgl_make_context_current function is used to set the new context as the one currently in use.
Next, the vertex shader (to specify coordinates) and the fragment shader (to calculate the colour at each pixel) are both compiled, and the program is built.
Finally, the shaders are attached to the program, which is then linked, and validated.
Though that sounds like a lot, the code for this is as follows:
The shader compilation is done within the CompileShader helper function which performs the compilation, printing out any errors:
Create the shader
The shader code for this example is minimal, and it just maps each pixel to itself, to display the image as a texture:
You can access the canvas’ context in JavaScript in addition to the context in the C++ code, but it must be of the same type, ‘webgl2’. While defining multiple context types does nothing when just using JavaScript, if you do it before creating the webgl2 context in WebAssembly, it will throw an error when the code execution gets there.
Loading the texture
The first thing to do when applying the shader is to call the emscripten_webgl_make_context_currentfunction to make sure that we are still using the correct context, and glUseProgramto make sure we are using the correct program.
Next, we get the indices of the GLSL variables (similar to getting a pointer) via theglGetAttribLocationand glGetUniformLocation functions, so we can assign our own values to those locations. The function used to do that depends on the value type.
For example, an integer, such as the texture location needs glUniform1i, whereas a float would need glUniform1f. This is a good resource for seeing which function you need to use.
Next, we get the texture object via glGenTextures, assign it as the active texture, and load the imageData buffer. The vertex and indices buffers are then bound, to set the boundaries of the texture to fill the canvas.
Finally, we clear the existing content, define our remaining variables with data, and draw to the canvas.
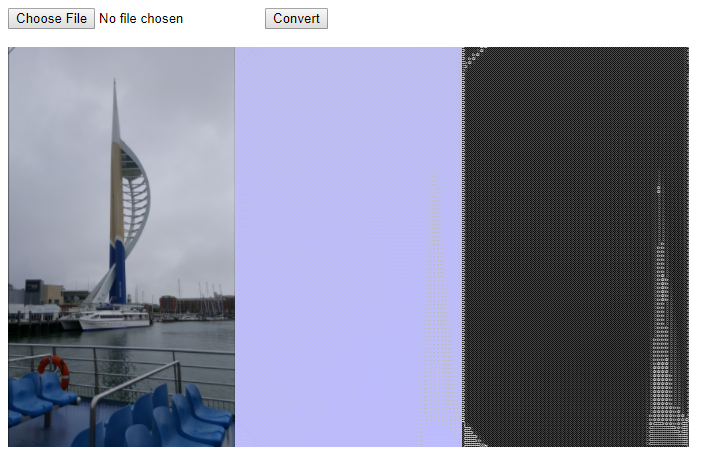
 The texture being loaded
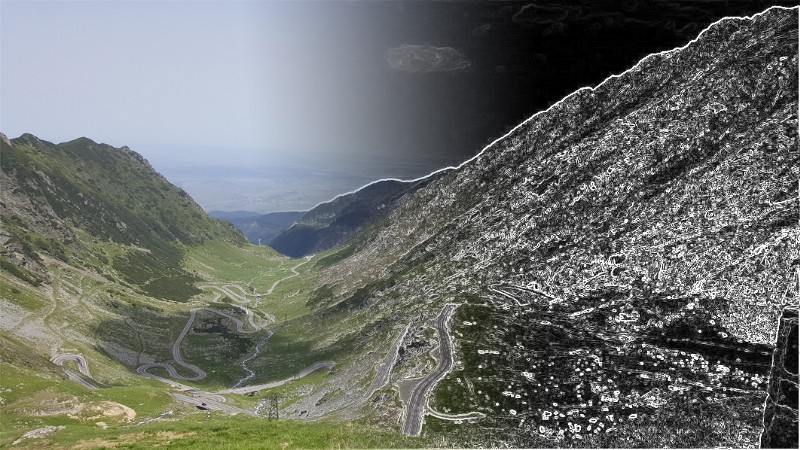
Detect edges using a shader
To add another context, where the edge detection is done, we load a different fragment shader (which applies the Sobel filter), and we bind the width and height as extra variables, in the code.
To pick between different fragment shaders, for the different contexts, we just add an if-else statement in the constructor, like so:
And to load the width and height variables, we add the following to the run function:

If you run into an error similar toERROR: GL_INVALID_OPERATION : glUniform1i: wrong uniform function for type, then there’s a mismatched assignment function for the given variable.
One thing to look out for when sending the imageData, is to use the correct heap, unsigned integer (the Uint8Array typed array). You can learn more about those here, but if you’re using the ccallArray function, set the ‘heapIn’ config to “HEAPU8”, as seen above.
If the type is not correct, the texture will still load, but you’re going to be seeing strange renderings, like these:
Conclusion
We’ve gone through a mini “Hello World!”-style project to show how to load textures and apply GLSL shaders to them in WebAssembly. The complete code is hosted on GitHub here, for further reference.
For a real project, you may want to add some additional error handling. I omitted it here, for clarity.
It may also be more efficient (in the above example) to share data such as the imageData texture between contexts. You can read more about this and more here.
For some further reading, you can check out this link for common mistakes, or you can look through some demo projects in emscripten’s glbook folder, on GitHub.
To see WebGL being used in a WebAssembly project, you can check out the dev branch on jsNet, a web based deep learning framework, where I’ll be working on moving heavier computations onto shaders, over the next few weeks (support for WebGL compute shaders via OpenGL ES 3.1 can’t come soon enough ? ).
Update
To see what GPU compute using shaders would look like in WebAssembly, you can check out the repo for GPGPU, a small library I’m working on, with both JavaScript and WebAssembly versions.