
By Imran
In today's digital age, managing who can access what resources is more critical than ever. That's where ReBAC comes in. It's a fresh take on authorization, focusing on the relationships between different entities rather than just assigning static roles or attributes.
Traditional access control methods, like Role-Based Access Control (RBAC), assign specific roles to users. While this works in many cases, it can become difficult, especially in dynamic environments where roles and permissions need to adapt quickly. On the other hand, Attribute-Based Access Control (ABAC) offers flexibility based on user attributes, but it can get complex to manage.
Now, ReBAC is all about understanding the intricate web of relationships between entities. Whether it's within an organization, a social media platform, or a project management tool, ReBAC ensures that access control remains dynamic and context-aware.
By the end of this tutorial, you'll have a clear understanding of ReBAC and be able to model a ReBAC scenario.
Key Takeaways
- ReBAC Principles: Understand how ReBAC uses relationships between entities for access control, differing from traditional models.
- Policy Visualization: Learn about representing policies as graphs for clearer management.
- Real-World Examples: Explore ReBAC's application in scenarios like social media platforms and project management tools.
- Benefits of ReBAC: Discover the advantages like granular control and dynamic policy adaptation.
- Permission Models: Get familiar with ReBAC's common models such as Ownership and Hierarchical Models.
- Permify Implementation: Step-by-step guide to implement ReBAC in Permify, including entity definition, relationship establishment, and permissions setup.
What is Relationship-Based Access Control (ReBAC)?
Traditional access control methods, like Role-Based Access Control (RBAC), assign specific roles to users, like giving someone a badge that says "manager" or "employee". But what if the roles aren't so clear-cut, and relationships between people and resources matter more?
That's where Relationship-Based Access Control (ReBAC) steps in. Instead of relying solely on predefined roles or attributes, ReBAC considers the intricate web of connections between users, resources, and other entities. It's like saying, "You can access this because you're connected to it in this specific way", rather than just based on a generic label.
But how does ReBAC actually do this? ReBAC examines the relationships between entities, such as users and resources, and uses these connections to determine access.
Let's break it down further. In our everyday lives, we have relationships that matter. Think about social media – you can see certain posts because you're friends with someone or because someone you follow liked it. ReBAC takes this idea and applies it to access control in systems.
Policy as a Graph
At the core of ReBAC lies the concept of "Policy as a Graph". This idea shows the importance of visualizing access policies through relationships.
Imagine that you have a detailed map of a bustling city. It doesn't just show buildings but also the connections between them – the roads, bridges, and pathways that link everything together.
Now, picture this map as a representation of your organization. Instead of buildings, it represents team members, departments, and their roles. The connections between them symbolize the relationships that dictate access.
This is what we mean by "Policy as a Graph" in ReBAC.
In simpler terms, access policies are like interconnected dots on a graph. Each dot represents an entity, and the lines between them signify the relationships influencing authorization. It's a visual representation that helps us understand the complex web of connections that govern access.
How is ReBAC Different from Other Control Models?
Now, let's explore how ReBAC sets itself apart from other access control models, such as Role-Based Access Control (RBAC).
Unlike traditional models, ReBAC doesn't rely solely on rigid roles or attributes. Instead, it works on deriving permissions from existing relationships. Here's how it stands out:
- Role Derivation:ReBAC allows the creation of authorization policies based on pre-existing relationships. This means that assigning a user a certain role in one context might automatically extend that role to related entities, saving the need for manual assignment.
- Resource Roles:Unlike global roles in traditional models, ReBAC introduces the concept of resource-specific roles (for example: Folder#Owner). These roles are exclusive to the context of a particular resource, ensuring that permissions are relevant and tailored to that specific entity.
Real-World Examples
To better understand how Relationship-Based Access Control (ReBAC) functions in the real world, let's explore two scenarios that mimic everyday complexities.
These examples will help illustrate how ReBAC excels in managing intricate access dynamics.
Instagram-like Social Platform
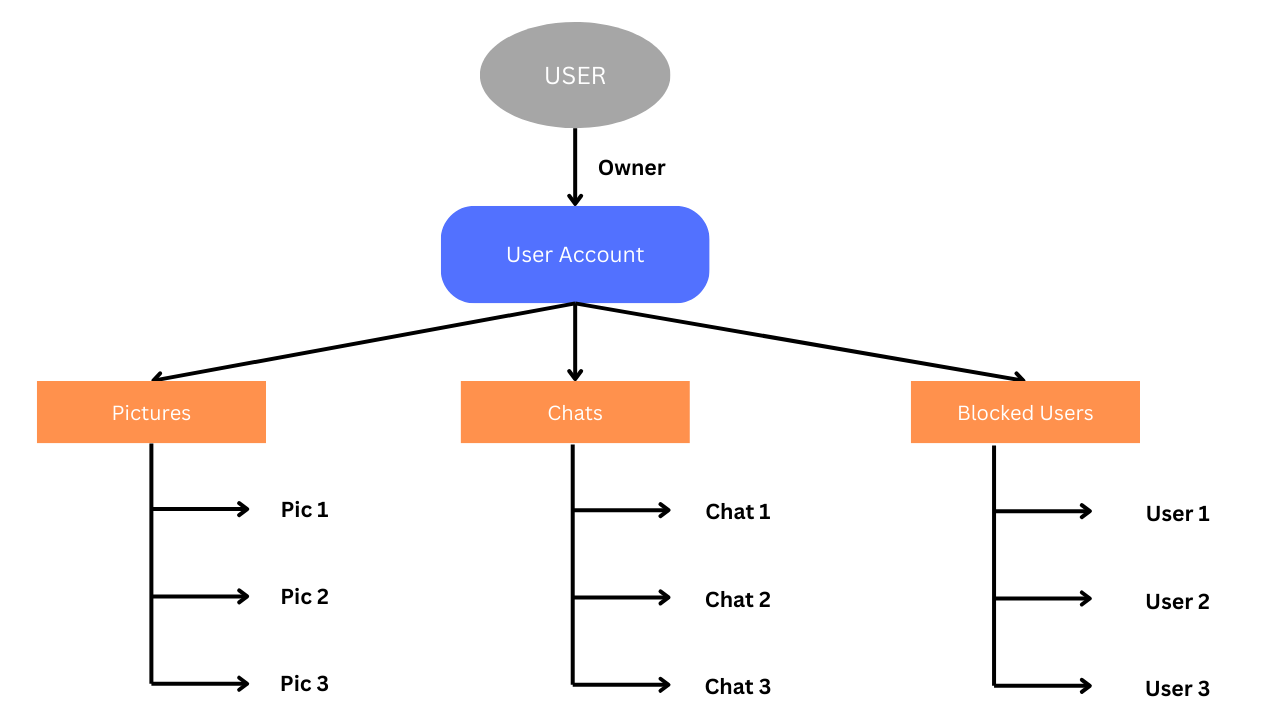
Consider an Instagram-inspired platform where users hold individual accounts. Each account consists of user-generated content, namely pictures (Pic 1 and Pic 2), chat interactions with different users, and project collaboration.
The user account possesses a list of blocked users who are restricted from viewing pictures. Here's a detailed breakdown of the entities and permissions:
1. Account Entities
- User Account: Represents individual user accounts on the platform.
- Pictures (Pic 1 and Pic 2): Depict user-generated visual content.
- Chats: Captures interaction histories with different users.
- Blocked Users List: Maintains a list of users who are blocked from viewing pictures.
2. Permissions Dynamics
Account Access Permissions:
- "Account#Owner" grants ownership, allowing the user account holder to manage all aspects.
- "Account#Viewer" enables others to view the user's account.
Picture Management Permissions:
- "Picture#Owner" designates ownership at the picture level, allowing the user to edit, delete, and upload pictures.
- "Picture#Viewer" permits normal viewers to only view pictures.
- "BlockedUser#CannotView" ensures that blocked users cannot view pictures.
Chat Interaction Permissions:
- "Chat#Participant" allows users to participate in chat interactions.
- "Chat#BlockedUser" restricts certain users from participating in chats.
Account Editing Permissions:
- "Account#Edit" grants the ability to update account details and preferences.
 Instagram-like Social Platform Entities
In this scenario, the "#" symbol represents the relationship between entities when defining permissions. For example, "Account#Owner" signifies ownership of the user account, allowing the account holder to manage all aspects of their account.
Project Management Tool
Imagine a project management tool where teams collaborate on various projects. Entities like "Teams", "Projects", and "Tasks" play central roles, showcasing ReBAC's adaptability:
1. Team Entities:
- Teams: Represent collaborative groups within the project management tool.
- Projects: Encompass various ongoing initiatives.
- Tasks: Break down project activities into manageable tasks.
2. Permissions Dynamics:
Team Leadership Permissions:
- "Team#Lead" designates team leadership, allowing leaders to manage team-related activities.
Project Ownership Permissions:
- "Project#Owner" signifies ownership at the project level, granting comprehensive control over project-related actions.
Task Assignment Permissions:
- "Task#Assignee" designates individuals responsible for specific tasks.
 Project Management Tool Entities
These real-world scenarios demonstrate ReBAC's versatility and effectiveness in managing access control in different settings.
Advantages of ReBAC
Now, let's understand why Relationship-Based Access Control (ReBAC) stands out from traditional methods like Role-Based Access Control (RBAC) and Attribute-Based Access Control (ABAC). ReBAC brings a host of benefits to the table, enhancing scalability, flexibility, and adaptability in complex organizational setups. Let's take a closer look at its key advantages:
Granular and Contextual Control
ReBAC allows organizations to define granular access controls tailored to the specific relationships between users, resources, and entities. This ensures that permissions are contextually relevant, providing a nuanced level of control.
Efficient Management of Hierarchies
In scenarios with hierarchical structures, ReBAC simplifies the management of access control. By allowing permissions to be inherited based on relationships, it reduces the need for manual role assignments.
This simplifies the creation of natural connections between different business units, resources, and entities, making it easier to navigate complex hierarchies.
Scalability and Adaptability
ReBAC is designed to scale with organizational growth and changes in relationships. It easily accommodates the introduction of new entities or connections. However, it's crucial to address the challenge of role explosion, where the number of roles grows exponentially alongside asset growth.
Without proper management, this can lead to security risks and administrative overhead. Yet, ReBAC's scalability ensures that access controls remain effective, mitigating these challenges and avoiding the need for extensive modifications.
With these advantages in mind, ReBAC offers a robust framework for access control that meets the evolving needs of modern organizations. Now, let's delve into the common Relationship Type Permission Models to further understand how ReBAC operates.
Common Relationship Type Permission Models
Let’s look at the some of the permission models:
Ownership Model
The Ownership Model in ReBAC is a fundamental concept where ownership relationships streamline authorization within hierarchical structures.
In this model, the act of owning a higher-level entity automatically extends ownership over its subordinate entities.
Imagine a scenario in a cloud storage platform where users create folders to organize their files. In the Ownership Model, the user who creates a folder is designated as the owner.
Consequently, this ownership relation automatically grants the user ownership permissions for all files within that folder.
This hierarchical ownership structure simplifies permission management and mirrors real-world ownership dynamics.
Parent-Child & Hierarchical Model
The Parent-Child & Hierarchical Model is a powerful tool for managing access control in hierarchical structures such as organizational frameworks or file systems.
In this model, permissions granted at the parent level down to its child entities, ensuring a cohesive and efficient authorization system.
Consider a corporate environment where organizations have multiple departments. Using ReBAC's Parent-Child & Hierarchical Model, permissions granted at the organization level, such as admin privileges, seamlessly extend to the organization's departments and their respective members.
This hierarchical flow of permissions reflects the organizational structure, making it easy to manage access control across different levels.
User Groups & Teams Model
The User Groups & Teams Model allows for efficient permission management by grouping users based on shared attributes or project affiliations.
In this model, permissions assigned to a group leader, for instance, can be effortlessly applied to all members of that group.
In a collaborative project management tool, teams serve as user groups. Applying ReBAC's User Groups & Teams Model, the team lead's permissions, like editing or deleting project tasks, can be automatically inherited by all team members.
This streamlined approach simplifies access control in collaborative environments, where team-based permissions are crucial for project efficiency.
These three Relationship-Based Access Control models demonstrate the flexibility and adaptability of ReBAC in handling diverse organizational structures and application domains.
By aligning permissions with inherent relationships among entities, ReBAC provides an intuitive and powerful access control framework.
How to Implement ReBAC with Permify
Now, let's practically implement ReBAC using Permify.
Permify is an open-source authorization as a service platform that allows developers to model, manage, and enforce access control in applications. It provides tools for defining complex authorization rules and relationships between entities, such as users, organizations, and resources.
Permify uses a domain-specific language for creating authorization models and offers a Playground environment for testing these models.
It also supports the creation of relational tuples and attributes for managing dynamic access control scenarios, streamlining the process of implementing robust and flexible authorization systems in software applications.
We'll create a scenario covering both Ownership and Parent-Child & Hierarchical models.
We'll use the Permify Playground for modeling.
Modeling
Modeling in Permify involves creating a schema that defines the relationships and permissions between different entities in your system.
Here's a simplified process:
- Define Entities: Start by creating entities that represent the resources in your system (for example: users, organizations, teams).
- Define Relations: Establish relationships between these entities. For example, an organization can have members and admins, or a team can be part of an organization.
- Define Actions and Permissions: Specify the actions that can be performed on each entity and the conditions under which they are allowed. For example, only admins can delete an organization.
Permify uses its own language for modeling authorization logic, allowing for complex structures using set-algebraic operators. The modeling process includes defining entities, relations, actions, permissions, and, if needed, attributes for more advanced scenarios like ABAC (Attribute-Based Access Control).
Modeling in Permify is about creating a clear blueprint of your organization's structure and defining who gets to do what.
Let's break down how to model a schema in Permify.
Step 1: Define Entities
Entities are the core objects in your model. In this case, we have user, organization, department, project, file, and task.
entity user {}
entity organization {}
entity department {}
entity project {}
entity file {}
entity task {}
Step 2: Establish Relationships
Next, we specify relationships between these entities. This defines how they are connected.
Organization:
- Has
adminwho are users.
entity organization {
    relation admin @user
}
Department:
- Belongs to an
organization(parent). - Has
head,manager, andemployeeroles, all of which are users.
entity department {
    relation parent @organization
    relation head @user
    relation manager @user
    relation employee @user
}
Project:
- Belongs to a
department(parent).
entity project {
    relation parent @department
}
File:
- Belongs to a
department(parent). - Has an
ownerwho is a user.
entity file {
    relation parent @department
    relation owner @user
}
Task:
- Belongs to a
project(parent). - Has an
assigneewho is a user.
entity task {
    relation parent @project
    relation assignee @user
}
Step 3: Define Permissions
Permissions determine what actions specific roles can perform on each entity.
Project:
contribute_to_projectpermission is granted toemployeeormanagerof the parentdepartment.
entity project {
    // ... (existing relations)
    permission contribute_to_project = parent.employee or parent.manager
}
File:
read,edit, anddeletepermissions are controlled based on themanagerof the parentdepartmentand theowner.
entity file {
    // ... (existing relations)
    permission read   = parent.manager or owner
    permission edit   = parent.manager or owner
    permission delete = owner
}
Task:
view_taskpermission is given to theassignee.
entity task {
    // ... (existing relations)
    permission view_task = assignee
}
Full Schema:
// Define entities
entity user {}

entity organization {
    // Organizational roles
    relation admin @user
}

entity department {
    // Department roles
    relation parent @organization
    relation head @user
    relation manager @user
    relation employee @user
}

entity project {
    // Project roles
    relation parent @department

    // Permissions
    permission contribute_to_project = parent.employee or parent.manager
}

entity file {
    // Represents files' parent entity (department)
    relation parent @department

    // Represents the owner of the file
    relation owner @user

    // Permissions
    permission read   = parent.manager or owner
    permission edit   = parent.manager or owner
    permission delete = owner
}

entity task {
    // Represents tasks' parent entity (project)
    relation parent @project

    // Represents the assignee of the task
    relation assignee @user

    // Permissions
    permission view_task   = assignee
}
Relation Tuples
The creation of relation tuples for the organization schema can be accomplished through the Permify Playground and API.
Here's how the relationship tuples would be structured according to the schema:
User and Organization Relationships:
- For assigning a user as an admin in an organization, the tuple would be:
organization:ID#admin@user:ID. - To denote a user as a member of an organization:
organization:ID#member@user:ID.
User and Department Relationships:
- Assigning a head to a department:
department:ID#head@user:ID. - Assigning a manager to a department:
department:ID#manager@user:ID. - Associating an employee with a department:
department:ID#employee@user:ID. - To set a department's parent organization:
department:ID#parent@organization:ID.
Project and Department Relationships:
- To define the parent department of a project:
project:ID#parent@department:ID.
File Management:
- Associating a file with its parent department:
file:ID#parent@department:ID. - Defining the owner of a file:
file:ID#owner@user:ID.
Task Management:
- Linking a task to its parent project:
task:ID#parent@project:ID. - Assigning a user as the assignee of a task:
task:ID#assignee@user:ID.
In each of these tuples, ID is a placeholder that should be replaced with the actual identifier of the entity or user in your system.
For instance, if you have an organization with an ID of 1 and a user with an ID of 3, and you want to assign this user as an admin of that organization, the tuple would be organization:1#admin@user:3.
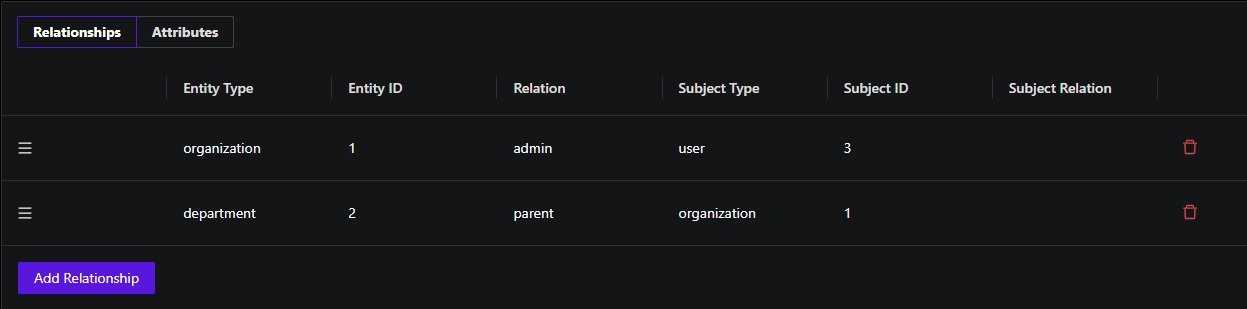 Relationships dashboard
These tuples are created and managed using the Permify API. The API allows for creating, updating, and deleting these tuples as needed, reflecting the dynamic nature of relationships and permissions in an organization. This flexibility ensures that your authorization data is always up-to-date and consistent with the current state of your system's entities and their relationships.
Enforcement
To enforce access control in your schema using Permify, you can create scenarios in the Permify Playground's Enforcement section. This is done using YAML to define various test scenarios.
Here's an example based on your schema and the created relation tuples:
Check if a user (for example: user:2) can contribute to a project:
- Entity:
project:1 - Subject:
user:2 - Assertion:
contribute_to_project: true or false(depending on whether user:2 is an employee or manager in the parent department of project:1).
- name: user_access_test
  checks:
    - entity: project:1
      subject: user:2
      context: null
      assertions:
        contribute_to_project: false
  entity_filters: []
  subject_filters: []
Check if a user (for example: user:4) can view a task:
- Entity:
task:1 - Subject:
user:4 - Assertion:
view_task: true or false(true if user:4 is the assignee of the task).
- name: user_access_test
  checks:
    - entity: task:1
      subject: user:4
      context: null
      assertions:
        view_task: false
  entity_filters: []
  subject_filters: []
These scenarios will help you validate the permissions as per your schema in a controlled environment.
Each assertion in the YAML scenario will define the expected outcome (true or false) for a particular action or permission based on your schema and data tuples.
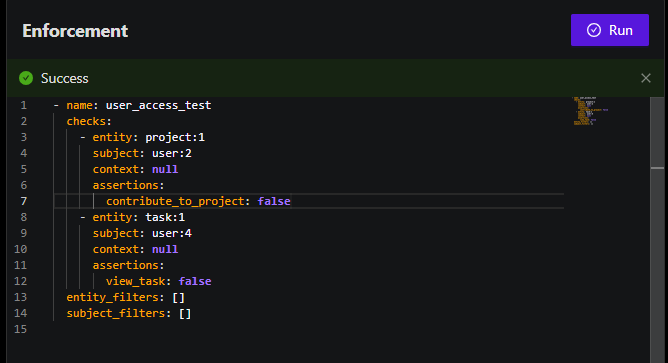 YAML representation
For detailed steps and examples, refer to the Permify Modeling Documentation.
Conclusion
By following these steps, you can effectively implement a sophisticated ReBAC system using Permify.
This implementation will provide a robust, flexible, and secure access control framework tailored to the unique needs and relationships within your organization.