
You're going to spend a lot of time working on webpages when using JavaScript. In fact, while you're using JavaScript, the webpage is where all the exciting and important stuff takes place.
A webpage is one big document for a JavaScript developer since every element on the page is connected (like a big family). It's all made up of parents (parentNodes) and children (childNodes). The Document Object Model is the name of this family (DOM).
In this article, you'll learn about the DOM along with loops and events by building a simple iOS calculator app.
Table of Contents
Prerequisites
So, what are you going to need to make the most of this tutorial?
You'll need a browser, a text editor (Vscode), and some basic JavaScript knowledge. For a head start, I recommend checking out one of these great introductory courses.
You can also read this great article on JavaScript Fundamentals.
If you've already read the article and participated in the challenge, here's my simple solution.
This article also assumes you have a basic understanding of HTML and CSS, as well as how the web works.
With that, let's dive in.
What is the DOM?
The Document Object Model (DOM) is a logical structure that defines how elements in a document can be manipulated and changed. Because the DOM is a structured this way, it is commonly referred to as a tree in which everything is connected.
Here's an example:
You can access, modify, delete, or add new elements or content to a document using the DOM. In summary, the DOM allows you to manipulate almost everything on a webpage.
Roll up your sleeves and let's get right to work now that we have a better understanding of what the DOM is.
How to Select Elements in the DOM
One of the very first things you’ll do when working with the DOM is to select elements in the document.
In fact, you must first learn how to access elements in the DOM before you can manipulate it.
You can select (or access) elements in a few different ways. Below, we'll go over the few that you'll need the most.
How to Select DOM Elements by ID
With getElementById(), you may select any element on a webpage that has an id. All you need to do is pass in the id of the element you wish to select.
...
  <body>
    <form>
      <input type="text" />
      <button id="btn">Submit</button>
    </form>
...
Here's the JavaScript:
const button = document.getElementById("btn");

console.log(button)
It is important to remember that the getElementById method only selects the first element on a page if there are many items with the same id. Note that an id should be unique and you should never have multiple elements with the same id.
...
  <body>
    <form>
      <input type="text" />
      <button id="btn">one</button>
      <button id="btn">two</button>
      <button id="btn">three</button>
      ...
    </form>
...
And here's the JavaScript:
const button = document.getElementById("button");

console.log(button); // only the first button is selected
How to Select DOM Elements by Class Name
You can use the getElementsByClassName method to select any element that has a class:
...
  <body>
    <form>
      <input type="text" />
      <button class="btn">Submit</button>
    </form>
  </body>
...
The JavaScript:
const button = document.getElementsByClassName("btn");

console.log(button);
Keep in mind that it says getElements – Elements with an "s". This indicates that all items with the class btn will be selected by the selector, and they will all be added to an HTMLCollection (an array). You do remember what an array is, don't you?
...
  <body>
    <form>
      <input type="text" />
      <button class="btn">one</button>
      <button class="btn">two</button>
      <button class="btn">three</button>
      ...
    </form>
...
The JavaScript:
const buttons = document.getElementsByClassName("btn");

console.log(buttons); // returns an HTMLCollection of all the buttons
How to Select DOM Elements by Tag Name
This works in a similar way to getElementsByClassName: it returns an HTMLCollection of all the Tags found in the document.
...
  <body>
    <article class="article">
      <p>This is a paragraph</p>
      <p>This is the second paragraph</p>
      <p>This is the third paragraph</p>
      <p>This is fourth paragraph</p>
    </article>
  </body>
...
The JavaScript:
const p_tag = document.getElementsByTagName("p");

console.log(p_tag);
How to Select Elements by Using CSS Selectors
Here are my favorite selectors: querySelector() and querySelectorAll(). With these selectors, you can select any element in the DOM the same way you'd select any element with CSS
const img = document.querySelector("img"); // select element by tag name
const input = document.querySelector("input[type='text']");
const last_div = document.querySelector("form > *:last-child");
const button = document.querySelector(".btn") // select element by class name
const button = document.querySelector("#btn") // select element by id
You use querySelector() to select a single element. If the selector matches many elements on the page, just the first one is returned.
...
  <body>
    <article class="article">
      <p>This is a paragraph</p>
      <p>This is the second paragraph</p>
      <p>This is the third paragraph</p>
      <p>This is fourth paragraph</p>
    </article>
  </body>
...
The JavaScript:
const p_tag = document.querySelector("p")

console.log(p_tag)
querySelectorAll(), on the other hand, will select all the items in the document that match the selector and store them in a NodeList (an array) similar to the ones seen above.
const p_tags = document.querySelectorAll("p");

console.log(p_tags);
It's worth noting that when you use document.querySelector(), you're searching the whole document for the element. But when you perform element.querySelector(), you're only searching the selected element.
Consider the following example: querySelector(). The selector will only look for items that match within the element.
...
  <body>
    <form>
      <input type="text" />
      <button class="btn">one</button>
      <button class="btn">two</button>
      <button class="btn">two</button>
    </form>
    <button class="btn">button one outside the form</button>
    <button class="btn">button two outside the form</button>
  </body>
...
The JavaScript:
const form = document.querySelector("form")

const form_btns = form.querySelectorAll(".btn")

console.log(form_btns); // only buttons within the form will get selected
The form.querySelectorAll() will only select the buttons within the form. This also applies to all elements and selectors.
How to Create and Add Elements to the DOM
After learning how to select HTML elements that have already been created in the DOM, let's try creating our own elements using JavaScript.
There are a few steps to take in order to add elements to the DOM using JavaScript. We'll go over each of them below.
How to Create a DOM Element
JavaScript requires that any element be created before it can be added to the DOM. For this, we use the document.createElement() method.
const new_div = document.createElement("div");
const new_paragraph = document.createElement("p");
const new_link = document.createElement("a");
const new_image = document.createElement("img");
We just created the above tags in JavaScript and have not yet added them to the DOM. Nonetheless, they are still simply tags with no attributes or text content, so let's correct that right away.
How to Set Attributes of Elements
To set the attributes, such as adding a class, changing the ID, or changing the SRC, we simply use the setAttribute() method on the new element.
The setAttribute("attribute", "value") method takes two parameters, the attribute and the value to be applied to the attribute.
const new_div = document.createElement("div");
const new_paragraph = document.createElement("p");
const new_link = document.createElement("a");
const new_image = document.createElement("img");

// setting the attributes
new_div.setAttribute("class", "my_div"); // setting a class attribute
new_paragraph.setAttribute("id", "my_paragraph"); // setting an id attribute
new_link.setAttribute("href", "https://example.com"); // setting the href attribute
new_image.setAttribute("src", "https://image-link.png"); // setting the src attribut of image
How to Add the Text Content
Some of our newly created elements still require text to be added to them in order for us to use them in the document – even after attributes have been added.
To create the texts and add them to our newly created elements, use the method createTextNode().
const new_div = document.createElement("div");
const new_paragraph = document.createElement("p");
const new_link = document.createElement("a");
const new_image = document.createElement("img");

...

// creating the textNodes
const new_div_text = document.createTextNode("Hello world");
const new_paragraph_text = document.createTextNode("This is a paragraph");
const new_link_text = document.createTextNode("Click to visit link");

// append the textsNodes to the elements
new_div.append(new_div_text);
new_paragraph.append(new_paragraph_text);
new_link.append(new_link_text);

console.log(new_div, new_paragraph, new_link, new_image);
And from here, we can actually add the newly created element to the DOM.
How to Add Elements to the DOM
The sole way to add newly created elements to the DOM is by inserting them into an existing element.
...
  <body>
    <div class="container">

    </div>
  </body>
...
The JavaScript:
const new_div = document.createElement("div");
const new_paragraph = document.createElement("p");
const new_link = document.createElement("a");
const new_image = document.createElement("img");

...

// adding elements to the DOM

// selecting parent element
const container = document.querySelector(".container");

container.appendChild(new_div);
container.appendChild(new_paragraph);
container.appendChild(new_link);
container.appendChild(new_image);
The new element will be added as a child to the already selected existing element using the appendChild() method.
There are, of course, more ways to add new elements to the DOM, but I'll leave them for your own reading.
How to Modify Elements in the DOM
In addition to creating and adding elements to the DOM, JavaScript also allows us to modify already-existing DOM elements. We can change their contents, add or remove attributes, or even change their styles.
How to Modify Text
Use textContent or innerText to modify the text of any element. See the example below:
...
  <body>
    <article class="article">
      <p>This is a paragraph</p>
    </article>
  </body>
...
The JavaScript:
const p_tag = document.querySelector("article p");

// modify text content using textContent
p_tag.textContent = "Override existing text";

// modify text content using innerText
p_tag.innerText = "Override existing text using innerText";
Aside from text we can also modify attributes.
How to Modify Attributes
You can use the setAttribute() method to change any attribute that an element may have had in addition to adding new ones, as we have already seen in a previous section.
...
  <body>
    <article class="article">
      <p class="my_paragraph">This is a paragraph</p>
    </article>
  </body>
...
The JavaScript:
const p_tag = document.querySelector("article p");

p_tag.setAttribute("class", "new_paragraph");

console.log(p_tag);
Since we're talking about changing attributes, we can also add, delete, and toggle between adding and deleting a class attribute to an element using the classList.add(), classList.remove(), and classList.toggle() methods, respectively.
const p_tag = document.querySelector("article p");

p_tag.classList.add("active") // add a new tag
p_tag.classList.remove("active") // remove a class
p_tag.classList.toggle("active") // would remove the class if it exits or add it if it dosen't
How to Modify Element Styles
You may change the styles of elements directly in JavaScript. Simply select the element and add the style property followed by the CSS style you want to use.
...
  <body>
    <div class="container">
      <p>This is a paragraph</p>
    </div>
  </body>
...
The JavaScript:
const container = document.querySelector(".container");

container.style.display = "none";
You can add any CSS style you want. The main difference is that CSS properties are separated by hyphens (-), for example, background-color. But in JavaScript CSS properties are written in camelCase – backgroundColor.
container.style.backgroundColor = "red";
How to Remove Elements from the DOM
Whatever can be created can also be deleted, including elements in the DOM. For example, you can remove the child of a parent element by using removeChild(). Similarly, you can remove the p element in the div below by using removeChild():
...
  <body>
    <div class="container">
      <p>This is a paragraph</p>
    </div>
  </body>
...
The JavaScript:
const parent_element = document.querySelector(".container");
const child_element = document.querySelector(".container p");

parent_element.removeChild(child_element);
Above we selected the parent element and then removed the child. You can also just remove the p directly by using remove().
const child_element = document.querySelector(".container p");

child_element.remove();
It is entirely up to you how you delete elements.
Loops and Iterations
Loops let us accomplish repeated tasks, such as printing a number numerous times or iterating through an array.
With loops, we can access every item in an array, as seen in the example below, where we print out all the elements in an array.
const my_array = [1, 3, 5, "hello", 55, "60", "JavaScript"];

for (let i = 0; i < my_array.length; i++) {
  const item = my_array[i];

  console.log(item);
}
The code above would print out every item in the array until it reaches the last one when you execute it.
But what if we wanted to stop at a certain point? You can use the break statement to exit a loop. For instance, we might decide to stop printing the elements in that array when we reach the fifth one.
const my_array = [1, 3, 5, "hello", 55, "60", "JavaScript"];

for (let i = 0; i < my_array.length; i++) {
  const item = my_array[i];

  if (i == 5) {
    break;
  }

  console.log(item);
}
The break statement terminates the loop's execution.
You see, many years ago, the for loop (the loop above) was a great method to iterate over items in an array. But since the world and JavaScript have changed, we now have fancier and quicker ways to iterate over arrays. Now we're going to explore the most common ones.
How to Use the forEach() and map() Methods
The forEach() method is one of the new fancy ways of looping over arrays. The forEach() method will loop through the array and run a function that you define for each item in the array.
const my_array = [1, 3, 5, "hello", 55, "60", "JavaScript"];

my_array.forEach(function (item) {
  console.log(item);
});
It's even shorter when you're using arrow functions:
const my_array = [1, 3, 5, "hello", 55, "60", "JavaScript"];

my_array.forEach((item) => console.log(item));
The function you provide must take at least a one parameter which is the current item in the array. The other two parameters are optional: the index (the current item's index, which is a number) and the last parameter is the original array that you're looping through.
my_array.forEach(callback_function, index, original_array)
The only difference between Array.map() and Array.forEach() is that Array.map() will return a new array after the callback function, whereas Array.forEach() does not return any. Array.map() will do exactly what Array.forEach() will do, which is execute a function for each item in the array.
In contrast to the for loop, the break statement is ineffective in the Array.forEach() and Array.map() methods.
The for...of Loop
The for...of loop, which accepts a variable and the array you want to iterate over, is one of the new fancy ways we may loop over any iterable item.
const my_array = [1, 3, 5, "hello", 55, "60", "JavaScript"];

for (const item of my_array) {
  console.log(item);
}
Just like in a regular loop, the break statement can be used in a for...of loop.
const my_array = [1, 3, 5, "hello", 55, "60", "JavaScript"];

for (const item of my_array) {
  console.log(item);
  if (item >= 6) {
    break;
  }
}
DOM Events
Users will engage in a variety of actions when using your application, such as clicking buttons, hovering over items on the screen, submitting forms, refreshing pages, and other activities that users enjoy.
In JavaScript, all of these user interactions are referred to as Events.
There are many events in JavaScript, thus it contains event listeners that may be used to respond to each one. However, we're only going to talk about the most typical ones in this post.
| Event | Description |
| click | When a user clicks an element, this event is triggered. |
| mouseover | Hovering over elements in the DOM causes this event to be triggered. |
| input | When the value of an input or select element changes, this event is fired. |
| submit | When a form is submitted, this event is triggered |
| keydown | When a keyboard key is pushed, the keydown event is triggered. |
| Keyup | Fired when a pushed key is released. It is the opposite of Keydown. |
| DOMContentLoaded | This event is fired when the DOM has loaded, but this event is fired before any external resource(like css and images) is downloaded. |
| load | On the other hand, this event won't be triggered until all DOM elements, including external resources, have loaded. |
There are many other events in JavaScript, but we'll stop here. You can view additional events in the MDN DOM event reference.
Now that we've seen several types of events, let's see how we might respond to them.
JavaScript Event Handling
The addEventListener method is the recommended way to handle events in JavaScript. This method allows you to define a function that will be executed whenever the event you specify is triggered.
const input = document.querySelector("input[type='text']");

const handle_input = (e) => {
  console.log(e.target.value);
};

input.addEventListener("input", handle_input);
The function you pass into the addEventListener() method will accept one argument: a reference to the Event Object, which has a set of properties that describe the event that just happened.
You can also remove an event listener from an element using the removeEventListener(). This method must take the exact same function as the one you passed into the addEventListener() method.
const input = document.querySelector("input[type='text']");

const handle_input = (e) => {
  console.log(e.target.value)
};

const handle_input2 = (e) => {
  console.log(e.target.value);
  console.log(e);
};

input.removeEventListener("input", handle_input); // this will work

input.removeEventListener("input", handle_input2); // passing in a different function will not work
And for now that's all for events and event handling. Enough of the talk, let's practice all we've be learning so far.
How to Build the Calculator App
We're going to build the basic iPhone calculator to put our new JavaScript skills to the test. To get started, create an HTML file, a CSS file, and then a JavaScript file.
By now, I assume you know how to set up a basic environment using those three tools. You may use an online code editor like CodePen, which is what I'll be doing in this lesson, if you don't have access to a PC where you can generate those files.
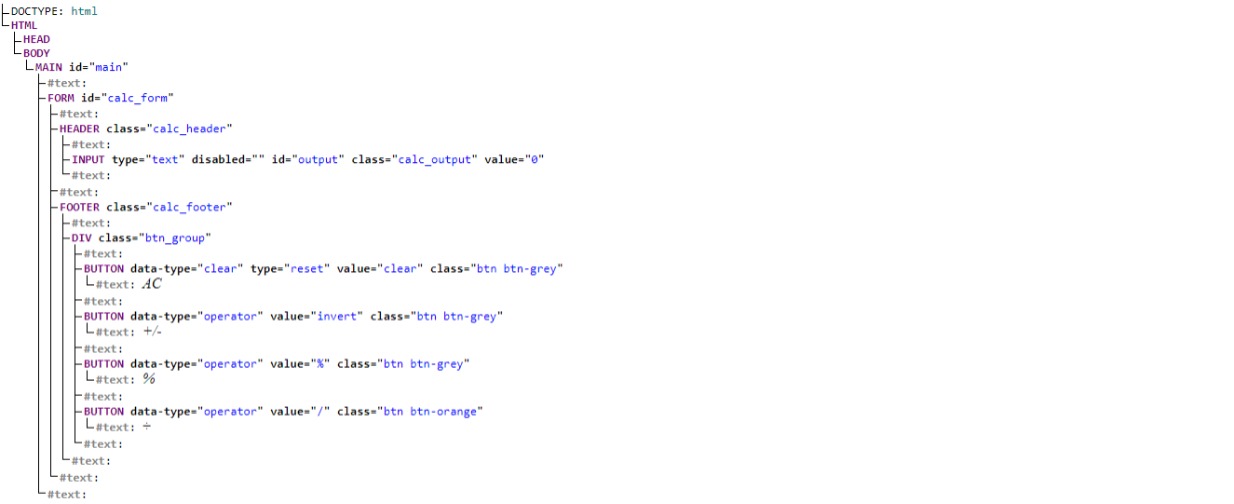
We'll begin by building the foundation of our application. Open the HTML file you prepared and paste the following code into it.
<!DOCTYPE html>
<html lang="en">
  <head>
    <meta charset="UTF-8" />
    <meta http-equiv="X-UA-Compatible" content="IE=edge" />
    <meta name="viewport" content="width=device-width, initial-scale=1.0" />
    <title>iPhone Calculator</title>
    <script defer src="script.js"></script>
    <link rel="stylesheet" href="style.css" />
  </head>
  <body>
    <main id="main">
      <form id="calc_form">
        <header class="calc_header">
          <input
            type="text"
            disabled
            id="output"
            class="calc_output"
            value="0"
          />
        </header>
        <footer class="calc_footer">
          <div class="btn_group">
            <button
              data-type="clear"
              type="reset"
              value="clear"
              class="btn btn-grey"
            >
              AC
            </button>
            <button data-type="operator" value="invert" class="btn btn-grey">
              +/-
            </button>
            <button data-type="operator" value="%" class="btn btn-grey">
              %
            </button>
            <button data-type="operator" value="/" class="btn btn-orange">
              ÷
            </button>
          </div>
          <div class="btn_group">
            <button
              data-type="operand"
              value="7"
              class="btn btn-dark-grey"
              id="7"
            >
              7
            </button>
            <button data-type="operand" value="8" class="btn btn-dark-grey">
              8
            </button>
            <button data-type="operand" value="9" class="btn btn-dark-grey">
              9
            </button>
            <button data-type="operator" value="*" class="btn btn-orange">
              x
            </button>
          </div>
          <div class="btn_group">
            <button data-type="operand" value="4" class="btn btn-dark-grey">
              4
            </button>
            <button data-type="operand" value="5" class="btn btn-dark-grey">
              5
            </button>
            <button data-type="operand" value="6" class="btn btn-dark-grey">
              6
            </button>
            <button data-type="operator" value="-" class="btn btn-orange">
              -
            </button>
          </div>
          <div class="btn_group">
            <button data-type="operand" value="1" class="btn btn-dark-grey">
              1
            </button>
            <button data-type="operand" value="2" class="btn btn-dark-grey">
              2
            </button>
            <button data-type="operand" value="3" class="btn btn-dark-grey">
              3
            </button>
            <button data-type="operator" value="+" class="btn btn-orange">
              +
            </button>
          </div>
          <div class="btn_group">
            <button
              data-type="operand"
              value="0"
              class="btn btn-grow btn-dark-grey"
            >
              0
            </button>
            <button data-type="operand" value="." class="btn btn-dark-grey">
              .
            </button>
            <button value="=" data-type="operator" class="btn btn-orange">
              =
            </button>
          </div>
        </footer>
      </form>
    </main>
  </body>
</html>
As you can see above, our calculator is basically an HTML form with a lot of buttons and an input field. To style it, let's add some CSS so that it resembles the calculator on iPhones. Open the CSS file you made and add the following code:
*,
*::after,
*::before {
  padding: 0px;
  margin: 0px;
  font-family: inherit;
}

body {
  background-color: #333333;
  display: flex;
  align-items: center;
  justify-content: center;
  font-size: 16px;
}

body,
html {
  height: 100vh;
  font-family: sans-serif;
}

button {
  cursor: pointer;
  border: 0px;
}

input[type="text"] {
  background-color: transparent;
  text-align: end;
  width: 100%;
  color: #d2d2d2;
  border: 0px;
  font-size: 4rem;
}

#main {
  border: 2px solid #ededed;
  border-radius: 50px;
  width: 100%;
  max-width: 280px;
  background-color: #000000;
  padding: 2rem 1rem;
}

.calc_header {
  margin-top: 90px;
  padding: 12px;
}

.calc_footer > * + * {
  margin-top: 1rem;
}

.calc_footer > *:last-child {
  gap: 1rem;
}

.btn_group {
  display: flex;
  justify-content: space-between;
  align-items: center;
  gap: 0.3rem;
}

.btn {
  display: flex;
  justify-content: center;
  align-items: center;
  border-radius: 50%;
  width: 60px;
  height: 60px;
  color: #ffffff;
  font-size: 20px;
  transition: all 0.3s cubic-bezier(0.19, 1, 0.22, 1);
}

.btn.btn-grow {
  flex-grow: 1;
  border-radius: 40px;
}

.btn:hover {
  transform: translate(-2px, -3px);
}

.btn.active {
  background-color: #ffffff;
  color: #f69906;
}

.btn-grey {
  background-color: #9f9f9f;
  color: #000;
}

.btn-grey:hover {
  background-color: #ededed;
}

.btn-dark-grey {
  background-color: #313131;
}

.btn-dark-grey:hover {
  background-color: #999999;
}

.btn-orange {
  background-color: #f69906;
}

.btn-orange:hover {
  background-color: orange;
}
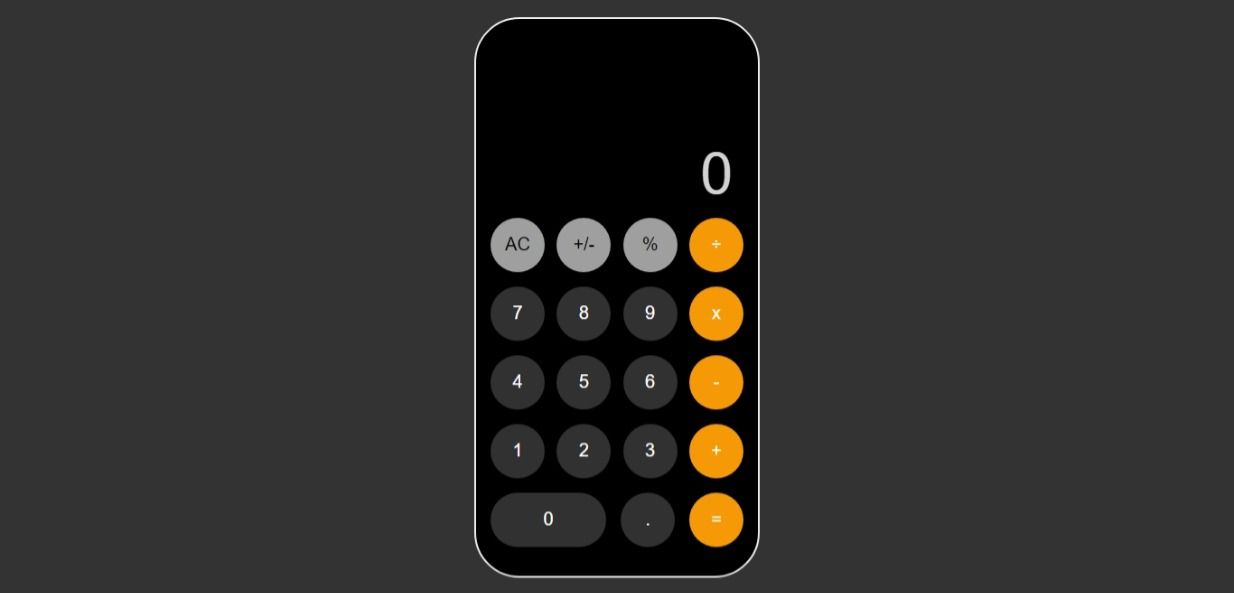
And now, we have a simple calculator application with no functionality at this time. This is how the live preview appears:
From the example above, whenever you click a button, the form is submitted and the page is reloaded. But we don't want that to happen.
If you recall from the Events section, we discussed the submit event that is fired whenever we submit a form. We can use that event to stop our form from submitting whenever we click a button.
To do this, open the JavaScript file you created and add the following code:
const form = document.getElementById("calc_form");

form.addEventListener("submit", (e) => {
  e.preventDefault();
});
If you return to the HTML code above and pay close attention, you will see that each button has a value property and a data-type attribute that is either operator or operand:
<button data-type="operand" value="6" class="btn btn-dark-grey">
6
</button>
<button data-type="operator" value="-" class="btn btn-orange">
-
</button>
The reason for this is so that we can distinguish between numbers (operands) and operators when selecting buttons in JavaScript.
How to Add Functionality to the Calculator
Now that we've done this, we can begin adding functionality to our application.
To begin, let's display the values of our operands when we click on the buttons. Add the following code to your JavaScript file.
const output = document.getElementById("output");
const form = document.getElementById("calc_form");
const operand_btns = document.querySelectorAll("button[data-type=operand]");
...
let is_operator = false;
operand_btns.forEach((btn) => {
  btn.addEventListener("click", (e) => {
    if (output.value == "0") {
      output.value = e.target.value;
    } else if (is_operator) {
      is_operator = false;
      output.value = e.target.value;
    } else if (output.value.includes(".")) {
      output.value = output.value + "" + e.target.value.replace(".", "");
    } else {
      output.value = output.value + "" + e.target.value;
    }
  });
});
Instead of selecting all the buttons one after the other (which is tedious by the way) we used the querySelectorAll(). This will select all the buttons we specified and put them in a NodeList (an array with node items).
const operand_btns = document.querySelectorAll("button[data-type=operand]");
If you remember what we discussed in the Loops and Iteration section, you cannot access any of those selected buttons unless you iterate over the array using one of the loop methods we discussed in that section.
operand_btns.forEach((btn) => {
  // you can access each button here
});
Lastly we added a click event listener to each button like this:
btn.addEventListener("click", (e) => {
  // control what happens when a button is clicked
});
Now, whenever we click on any operand value, the value of that number is displayed on the calculator.
In the else..if statement, we check if there is a decimal in our output value. If there is, we simply stop adding any further decimal point by replacing it with an empty string.
output.value = output.value + "" + e.target.value.replace(".", "");
Another else..if statement checks to see whether we've previously clicked on an operator button. If we have and then click on an operand button, we want to set the is_operator value to false and restart the value in the output from the new value.
else if (is_operator) {
  is_operator = false;
  output.value = e.target.value;
}
Here is the live preview of the example above:
Now let's also select the buttons with data-type operator and specify what will happen whenever we click on any of the buttons.
Open your JavaScript file and add the following code:
const operator_btns = document.querySelectorAll("button[data-type=operator]");
...
let equation = [];
operator_btns.forEach((btn) => {
  btn.addEventListener("click", (e) => {
    e.currentTarget.classList.add("active");

    switch (e.target.value) {
      case "%":
        output.value = parseFloat(output.value) / 100;
        break;
      case "invert":
        output.value = parseFloat(output.value) * -1;
        break;
      case "=":
        equation.push(output.value);
        output.value = eval(equation.join(""));
        equation = [];
        break;
      default:
        let last_item = equation[equation.length - 1];
        if (["/", "*", "+", "-"].includes(last_item) && is_operator) {
          equation.pop();
          equation.push(e.target.value);
        } else {
          equation.push(output.value);
          equation.push(e.target.value);
        }
        is_operator = true;
        break;
    }
  });
});
The first thing we do in the code above, after adding a click event listener to our button, is add the class active to any operator buttons that we click. We have previously defined the styling for this active class in our CSS.
.btn.active {
  background-color: #ffffff;
  color: #f69906;
}
We want to apply those styles on the button we just clicked whenever we press the operator button.
We could have used an if..else statement here as well, but who says we can't try new things? The switch statement that follows is a conditional statement in JavaScript, much like the if statement we have been seeing.
The switch statement accepts a value (the condition), in this example the value of the button that was clicked. For each case, the value is checked. In the first case a % simply converts the number in the output to a percentage.
case "%":
  output.value = parseFloat(output.value) / 100;
  break;
If it were the invert button, we would simply "invert" the output result by multiplying it by "-1."
case "invert":
  output.value = parseFloat(output.value) * -1;
  break;
If the = button was clicked, we add the last value from the output value to our equation array, use eval() to quickly evaluate every equation there, and then clear the equation array.
case "=":
  equation.push(output.value);
  output.value = eval(equation.join(""));
  equation = [];
  break;
NOTE: eval() is a dangerous function. It can execute code when passed as input, and users can use it to write malicious code that can be dangerous. Only use ever when you trust the source of input that will be provided.
The code in the default runs when any other operator button that is not one of those we listed before is clicked. In the default first, we obtain the last item in the array by using this code:
let last_item = equation[equation.length - 1];
Then, if the previous button we clicked was an operator—that is, if it was one of the following: /, *, +, or - —we simply delete it from the equation using equation.pop() and add the new one we clicked with equation.push().
If our last array item was not an operator, we add the output value and the value of the button we clicked to the equation array.
else {
  equation.push(output.value);
  equation.push(e.target.value);
}
Lastly we also set the value of is_operator to true anytime we click on any operator button:
default:
  let last_item = equation[equation.length - 1];
  if (["/", "*", "+", "-"].includes(last_item) && is_operator) {
    equation.pop();
    equation.push(e.target.value);
  } else {
    equation.push(output.value);
    equation.push(e.target.value);
  }
  is_operator = true;
  break;
You'll notice that for each case we pass in the break statement. The break statement here will stop the execution of the switch anytime a case is true and the code finishes executing.
And there you have it – a fully functional calculator application! And here's the live preview:
Before we finish, there is one little issue with our calculator: the active class we added to our operator buttons when clicked remains active even after we click another button.
Let's remedy that by creating a function that removes the active from any operator button.
const remove_active = () => {
  operator_btns.forEach((btn) => {
    btn.classList.remove("active");
  });
};
Now we simply need to call this function before adding the active class to any button.
operator_btns.forEach((btn) => {
  btn.addEventListener("click", (e) => {
    remove_active();
    e.currentTarget.classList.add("active");
    ...
  });
});
We also need to remove the active class from the operators whenever an operand button get's clicked.
operand_btns.forEach((btn) => {
  btn.addEventListener("click", (e) => {
    remove_active();
    ...
  });
});
Now that's much better. You can find the full code and live preview of our app in the pen below:
JavaScript Challenge
Despite the fact that our calculator app is now completely working, there are a few functionalities that I did not include that I believe would be a wonderful opportunity for you to practice your new JavaScript skills.
The clear button: When we click on any operand button, the value of the button should change from AC to C. When this button is clicked, we clear the form and remove any active class from our operator buttons.
The iPhone calculator only allows a maximum of 9 numbers as operands. You cannot surpass this limit, which I believe would be a useful feature for our calculator software as well.
Commas are automatically appended to numbers in the output of the iPhone calculator, and our program does not currently have this capability.
If we use two decimal operands, sometimes the result is affected by a floating point rounding error. Our calculator app is not handling any rounding at the moment. Check out this article if you want to learn more about this topic.
Do you believe you can complete any of these challenges? Good luck!
Conclusion
Congratulations, JavaScript whiz! You've made it this far. In this tutorial, we learnt about the DOM, Loops, JavaScript Events and how to handle them, and we built a simple calculator at the end.
If you participate in the challenge in this post, please share your solution online and tag me @sprucekhalifa on Twitter. And don't forget to follow me as well, as I tweet about JavaScript.
Oh, and happy coding!