
In March of 2024, Laravel 11 was released. And with it arrived a new tool in the Laravel ecosystem: Laravel Reverb.
Reverb is a separate open-source package that's a first-party WebSocket server for Laravel applications. It helps facilitate real-time communication between client and server.
Before this new package, Laravel had event broadcasting, but basically it didn't have a built-in way to set up a self-hosted WebSocket server. Fortunately, Reverb now gives us that option.
Laravel Reverb has a few key features: it's written in PHP, it's fast, and and it's scalable. It was developed in particular to be horizontally scalable.
Reverb basically allows you to run an application on a single server – but if the application starts to outgrow that server, you can add multiple additional servers. Then those servers can all communicate with each other to distribute the messages between themselves.
In this article you will learn how to build a real-time chat application using Laravel Reverb. This will let you easily implement WebSocket communications between your backend and frontend.
For a frontend technology, you can use anything you want – but in this case we'll use React.js with the Vite.js build tool.
By the end of this article, you'll have a full-stack, real-time app in your local machine, which will work like this:
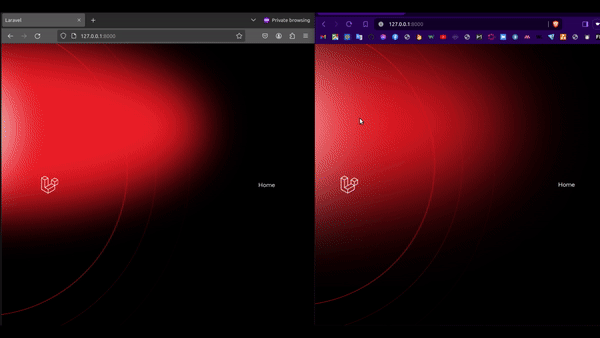 Demo of the app showing messaging between two logged in users
Table of Contents
- Prerequisites
- General Steps
- How to Install Laravel
- How to Create the Model and Migration
- How to Add Authentication
- How to Set Up Routes
- How to Set Up a Laravel Event
- How to Set Up a Laravel Queue Job
- How to Write the Controller Methods
- How to Install Laravel Reverb
- How to Setup WebSocket Channels
- How to Customize Laravel Views
- Let's Work on the Front End
- Running the Application
- Useful Reverb Resources
- Conclusion
Prerequisites
You'll need the following tools for the app that we'll build in this article:
- PHP: version 8.2 or above (run
php -vto check the version) - Composer (run
composerto check that it exists) - Node.js: version 20 or above (run
node -vto check the version) - MySQL: version 5.7 or above (run
mysql --versionto check if it exists, or follow the docs to install it)
General Steps
The main steps in this article will be:
- Installing Laravel 11.
- Adding authentication flow to it (authentication scaffolding). Laravel provides a basic starting point for this using Bootstrap with React / Vue.
- Installing Reverb.
- React.js components and event listening in the frontend.
How to Install Laravel
To start, install Laravel 11 by using the composer command:
composer create-project laravel/laravel:^11.0 laravel-reverb-react-chat && cd laravel-reverb-react-chat/
At this point, you can check out the app by running the serve command:
php artisan serve
How to Create the Model and Migration
You can generate a model and a migration for the messages by using this single command:
php artisan make:model -m Message
Then you'll need to set up the Message's model with the following code:
<?php

namespace App\Models;

use Illuminate\Database\Eloquent\Factories\HasFactory;
use Illuminate\Database\Eloquent\Model;
use Illuminate\Database\Eloquent\Relations\BelongsTo;

class Message extends Model
{
    use HasFactory;

    public $table = 'messages';
    protected $fillable = ['id', 'user_id', 'text'];

    public function user(): BelongsTo {
        return $this->belongsTo(User::class, 'user_id');
    }

    public function getTimeAttribute(): string {
        return date(
            "d M Y, H:i:s",
            strtotime($this->attributes['created_at'])
        );
    }
}
As you can see, there's a getTimeAttribute() accessor that will format the message creation timestamp into a human-readable date and time format. It will show it on the top of each message in the chat box.
Next, set up the migration for the messages database table with this code:
<?php

use Illuminate\Database\Migrations\Migration;
use Illuminate\Database\Schema\Blueprint;
use Illuminate\Support\Facades\Schema;

return new class extends Migration
{
    public function up(): void {
        Schema::create('messages', function (Blueprint $table) {
            $table->id();
            $table->foreignId('user_id')->constrained();
            $table->text('text')->nullable();
            $table->timestamps();
        });
    }

    public function down(): void {
        Schema::dropIfExists('messages');
    }
};
This migration creates a messages table in the database. The table contains columns for an auto-incrementing primary key (id), a foreign key (user_id) referencing the id column of the users table, a text column for storing the message content, and timestamps to automatically track the creation and modification times of each record.
The migration also includes a rollback method (down()) to drop the messages table if needed.
In this article, we'll use the MySQL database, but you can go with SQLite as the default one if you prefer. Just make sure to set up your database credentials in .env file correctly:
DB_CONNECTION=mysql
DB_HOST=127.0.0.1
DB_PORT=3306
DB_DATABASE=database_name
DB_USERNAME=username
DB_PASSWORD=password
After setting up the environment variables, optimize the cache:
php artisan optimize
Run migrations to recreate the database tables as well as to add the messages table:
php artisan migrate:fresh
How to Add Authentication
Now, you can add authentication scaffolding to your app. You can use Laravel's UI package to import some asset files. First you'll need to install the appropriate package:
composer require laravel/ui
Then import the React-related assets into the application:
php artisan ui react --auth
It may ask to overwrite the app/Http/Controllers/Controller.php, and you can go ahead and allow it:
The [Controller.php] file already exists. Do you want to replace it? (yes/no) [no]
This will do all of the authentication scaffolding compiled and installed, including routes, controllers, views, vite configurations, and a simple React-specific sample.
At this point, you're just one step away from the app being ready to go.
NOTE: Make sure you have Node.js (with npm) version 20 or above installed. You can check that by running the node -v command. Otherwise, just go ahead and install it using the official page.
npm install && npm run build
The command above will install NPM packages and build frontend assets. Now you can start the Laravel application and check out your fully ready app sample:
php artisan optimize && php artisan serve
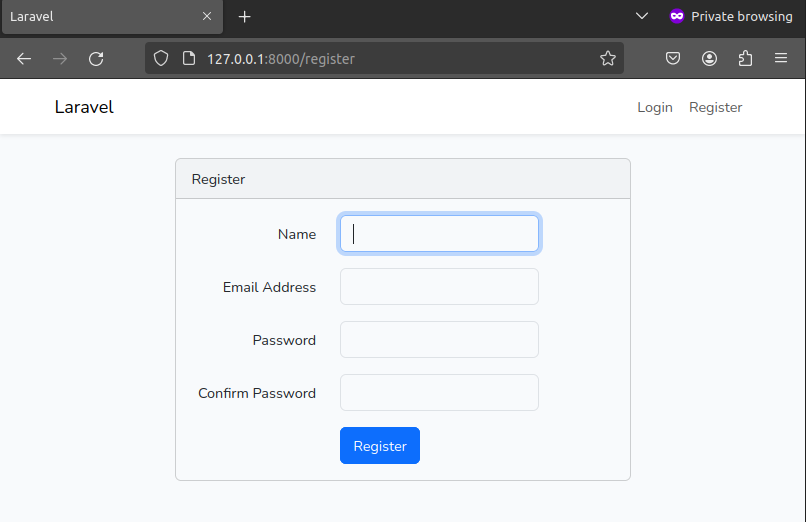 A screenshot of the Register page
It's also important to note that you can separately run the dev command instead of using build every time when you're making changes to frontend files:
npm run dev
See the details in the package.json file, in the scripts field.
How to Set Up Routes
In this real-time chat app, you'll need to have a few routes:
homefor the home page (already should be added)messagefor adding a new messagemessagesto get all the existing messages
You'll have these kind of routes in the web.php file:
<?php

use Illuminate\Support\Facades\Auth;
use Illuminate\Support\Facades\Route;
use App\Http\Controllers\HomeController;

Route::get('/', function () { return view('welcome'); });

Auth::routes();

Route::get('/home', [HomeController::class, 'index'])
    ->name('home');
Route::get('/messages', [HomeController::class, 'messages'])
    ->name('messages');
Route::post('/message', [HomeController::class, 'message'])
    ->name('message');
After setting up those routes, let's use Laravel Events and Queue Jobs advantages.
How to Set Up a Laravel Event
You need to create a GotMessage event for listening for a specific event:
php artisan make:event GotMessage
Laravel's events provide a simple observer pattern implementation, allowing you to subscribe and listen for various events that occur within your application. Event classes are typically stored in the
app/Eventsdirectory. (Docs)
Set up a private WebSocket channel in the broadcastOn method for all the authenticated users to receive messages in real time. In this case, we will call it "channel_for_everyone", but you can also make it dynamic, depending on the user, like "App.Models.User.{$this->message['user_id']}".
<?php

namespace App\Events;

use Illuminate\Broadcasting\InteractsWithSockets;
use Illuminate\Broadcasting\PrivateChannel;
use Illuminate\Contracts\Broadcasting\ShouldBroadcast;
use Illuminate\Foundation\Events\Dispatchable;
use Illuminate\Queue\SerializesModels;

class GotMessage implements ShouldBroadcast
{
    use Dispatchable, InteractsWithSockets, SerializesModels;

    public function __construct(public array $message) {
        //
    }

    public function broadcastOn(): array {
        // $this->message is available here
        return [
            new PrivateChannel("channel_for_everyone"),
        ];
    }
}
As you can see, there's a public $massage property as a constructor argument, so you can get message infromation in the front end.
We've already used the channel name in the channels file, and we'll use it in the front end as well for real-time message updates.
Don't forget to implement the ShouldBroadcast interface in the event's class.
How to Set Up a Laravel Queue Job
Now it's time to create the SendMessage job for sending messages:
php artisan make:job SendMessage
Laravel allows you to easily create queued jobs that may be processed in the background. By moving time intensive tasks to a queue, your application can respond to web requests with blazing speed and provide a better user experience to your customers. (Docs)
<?php

namespace App\Jobs;

use App\Events\GotMessage;
use App\Models\Message;
use Illuminate\Bus\Queueable;
use Illuminate\Contracts\Queue\ShouldQueue;
use Illuminate\Foundation\Bus\Dispatchable;
use Illuminate\Queue\InteractsWithQueue;
use Illuminate\Queue\SerializesModels;

class SendMessage implements ShouldQueue
{
    use Dispatchable, InteractsWithQueue, Queueable, SerializesModels;

    public function __construct(public Message $message) {
        //
    }

    public function handle(): void {
        GotMessage::dispatch([
            'id' => $this->message->id,
            'user_id' => $this->message->user_id,
            'text' => $this->message->text,
            'time' => $this->message->time,
        ]);
    }
}
The SendMessage.php queue job is responsible for dispatching the GotMessage event with information about a newly sent message. It receives a Message object upon construction, representing the message to be sent.
In its handle() method, it dispatches the GotMessage event with details such as the message ID, user ID, text, and timestamp. This job is designed to be queued for asynchronous processing, enabling efficient handling of message sending tasks in the background.
As you can see, there's a public $massage property as a constructor argument, which we'll use to attach a message information to the queue job.
How to Write the Controller Methods
For the defined routes, here are the appropriate controller methods:
<?php

namespace App\Http\Controllers;

use App\Jobs\SendMessage;
use App\Models\Message;
use App\Models\User;
use Illuminate\Http\JsonResponse;
use Illuminate\Http\Request;

class HomeController extends Controller
{
    public function __construct() {
        $this->middleware('auth');
    }

    public function index() {
        $user = User::where('id', auth()->id())->select([
            'id', 'name', 'email',
        ])->first();

        return view('home', [
            'user' => $user,
        ]);
    }

    public function messages(): JsonResponse {
        $messages = Message::with('user')->get()->append('time');

        return response()->json($messages);
    }

    public function message(Request $request): JsonResponse {
        $message = Message::create([
            'user_id' => auth()->id(),
            'text' => $request->get('text'),
        ]);
        SendMessage::dispatch($message);

        return response()->json([
            'success' => true,
            'message' => "Message created and job dispatched.",
        ]);
    }
}
- In the
homemethod, we'll get the logged in user's data from the database using theUsermodel and send it to the blade view. - In the
messagesmethod, we'll retrieve all the messages from the database using theMessagemodel, attach theuserrelationship data to it, append thetimefield (accessor) to each item, and send all that to the view. - In the
messagemethod, a new message will be created in the database table by using theMessagemodel, and theSendMessagequeue job will be dispatched.
How to Install Laravel Reverb
Now we've come to the most important moment: it's time to install Reverb in your Laravel app.
It's so easy. All the necessary packaging and configuration setup can be done using this single command:
php artisan install:broadcasting
It will ask you to install Laravel Reverb as well as install and build the Node dependencies required for broadcasting. Just press enter to continue.
After the command execution, make sure you've automatically added reverb-specific environment variables to the .env file, like:
BROADCAST_CONNECTION=reverb

###

REVERB_APP_ID=795051
REVERB_APP_KEY=s3w3thzezulgp5g0e5bs
REVERB_APP_SECRET=gncsnk3rzpvczdakl6pz
REVERB_HOST="localhost"
REVERB_PORT=8080
REVERB_SCHEME=http

VITE_REVERB_APP_KEY="${REVERB_APP_KEY}"
VITE_REVERB_HOST="${REVERB_HOST}"
VITE_REVERB_PORT="${REVERB_PORT}"
VITE_REVERB_SCHEME="${REVERB_SCHEME}"
You'll also have two new configration files in the config directory:
reverb.phpbroadcasting.php
How to Setup WebSocket Channels
Lastly, you'll need to add a channel in the channels.php file. It should already be created after installing Reverb.
<?php

use Illuminate\Support\Facades\Broadcast;

Broadcast::channel('channel_for_everyone', function ($user) {
    return true;
});
You'll have only one channel. You can change the channel's name and make it dynamic – it's up to you. In the closure of the channel, we'll always return true, but you can modify it later to make some restrictions regarding the channel's subscription.
Optimize caches one more time:
php artisan optimize
How to Customize Laravel Views
Now your back end should be ready at this point, so you can switch to the front end.
Before working on the React stuff, you'll want to set up Laravel *.blade.php views. In the home blade view, make sure to have the root div with an ID of main to render all the React components there.
@extends('layouts.app')

@section('content')
    <div class="container">
        <div id="main" data-user="{{ json_encode($user) }}"></div>
    </div>
@endsection
The div with ID of main gets a data property for holding the $user info sent from the controller's home method.
I won't put the whole resources/views/welcome.blade.php content here, but you can just make the following small changes to it:
- Replace
url('/dashboard')withurl('/home'); - Replace
DashboardwithHome; - Remove
mainandfootersections.
Let's Work on the Front End
In Reverb, event broadcasting is done by a server-side broadcasting driver that broadcasts your Laravel events so that the front end can receive them within the browser client.
In the front end, Laravel Echo does that job under the hood. Echo a JavaScript library that makes it painless to subscribe to channels and listen for events broadcast by your server-side broadcasting driver.
You can find the WebSocket configurations setup with Echo in the rources/js/echo.js file, but you don't need to do anything there for this project.
Let's create a few React components so that we have a refactored and more readable project.
Create a Main.jsx component in the new components folder:
import React from 'react';
import ReactDOM from 'react-dom/client';
import '../../css/app.css';
import ChatBox from "./ChatBox.jsx";

if (document.getElementById('main')) {
    const rootUrl = "http://127.0.0.1:8000";

    ReactDOM.createRoot(document.getElementById('main')).render(
        <React.StrictMode>
            <ChatBox rootUrl={rootUrl} />
        </React.StrictMode>
    );
}
Here we'll check if there's an element with the id 'main'. If it exists, it proceeds with rendering the React application.
As you can see, there's a ChatBox component. We'll learn more about it soon.
Remove the resources/js/components/Example.jsx file, and import the Main.jsx component in the app.js:
import './bootstrap';
import './components/Main.jsx';
Create Message.jsx and MessageInput.jsx files so you can use them in the ChatBox component.
The Message component will get userId and message arguments (fields) to show each message in the chat box.
import React from "react";

const Message = ({ userId, message }) => {
    return (
        <div className={`row ${
        userId === message.user_id ? "justify-content-end" : ""
        }`}>
            <div className="col-md-6">
        <small className="text-muted">
                    <strong>{message.user.name} | </strong>
                </small>
                <small className="text-muted float-right">
                    {message.time}
                </small>
                <div className={`alert alert-${
                userId === message.user_id ? "primary" : "secondary"
                }`} role="alert">
                    {message.text}
                </div>
            </div>
        </div>
    );
};

export default Message;
The Message.jsx component renders individual messages within the chat interface. It receives the userId and message props. Based on whether the message sender matches the current user, it aligns the message to the appropriate side of the screen.
Each message includes the sender's name, timestamp, and the message content itself, styled differently based on whether the message is sent by the current user or another user.
The MessageInput component will care about creating a new message:
import React, { useState } from "react";

const MessageInput = ({ rootUrl }) => {
    const [message, setMessage] = useState("");

    const messageRequest = async (text) => {
        try {
            await axios.post(`${rootUrl}/message`, {
                text,
            });
        } catch (err) {
            console.log(err.message);
        }
    };

    const sendMessage = (e) => {
        e.preventDefault();
        if (message.trim() === "") {
            alert("Please enter a message!");
            return;
        }

        messageRequest(message);
        setMessage("");
    };

    return (
        <div className="input-group">
            <input onChange={(e) => setMessage(e.target.value)}
                   autoComplete="off"
                   type="text"
                   className="form-control"
                   placeholder="Message..."
                   value={message}
            />
            <div className="input-group-append">
                <button onClick={(e) => sendMessage(e)}
                        className="btn btn-primary"
                        type="button">Send</button>
            </div>
        </div>
    );
};

export default MessageInput;
The MessageInput component provides a form input field for users to type messages and send them in the chat interface. By clicking the button, it triggers a function to send the message to the server via an Axios POST request to the specified rootUrl that it got from the parent ChatBox component. It also handles validation to ensure that users cannot send empty messages. You can customize it later if you want.
Now create a ChatBox.jsx component to have the front end ready:
import React, { useEffect, useRef, useState } from "react";
import Message from "./Message.jsx";
import MessageInput from "./MessageInput.jsx";

const ChatBox = ({ rootUrl }) => {
    const userData = document.getElementById('main')
        .getAttribute('data-user');

    const user = JSON.parse(userData);
    // `App.Models.User.${user.id}`;
    const webSocketChannel = `channel_for_everyone`;

    const [messages, setMessages] = useState([]);
    const scroll = useRef();

    const scrollToBottom = () => {
        scroll.current.scrollIntoView({ behavior: "smooth" });
    };

    const connectWebSocket = () => {
        window.Echo.private(webSocketChannel)
            .listen('GotMessage', async (e) => {
                // e.message
                await getMessages();
            });
    }

    const getMessages = async () => {
        try {
            const m = await axios.get(`${rootUrl}/messages`);
            setMessages(m.data);
            setTimeout(scrollToBottom, 0);
        } catch (err) {
            console.log(err.message);
        }
    };

    useEffect(() => {
        getMessages();
        connectWebSocket();

        return () => {
            window.Echo.leave(webSocketChannel);
        }
    }, []);

    return (
        <div className="row justify-content-center">
            <div className="col-md-8">
                <div className="card">
                    <div className="card-header">Chat Box</div>
                    <div className="card-body"
                         style={{height: "500px", overflowY: "auto"}}>
                        {
                            messages?.map((message) => (
                                <Message key={message.id}
                                         userId={user.id}
                                         message={message}
                                />
                            ))
                        }
                        <span ref={scroll}></span>
                    </div>
                    <div className="card-footer">
                        <MessageInput rootUrl={rootUrl} />
                    </div>
                </div>
            </div>
        </div>
    );
};

export default ChatBox;
The ChatBox component manages a chat interface within the application. It fetches and displays messages from a server using WebSocket and HTTP requests.
The component renders a list of messages, a message input field, and automatically scrolls to the bottom when new messages arrive.
It defines a WebSocket channel for real-time message updates. You need to set up that channel by using the same name as it was written in the routes/hannels.php and in the app/Events/GotMessage.php queue job.
Also, the leave() function is called within the useEffect cleanup function to unsubscribe from the WebSocket channel when the component unmounts. This prevents memory leaks and unnecessary network connections by stopping the component from listening to updates on the WebSocket channel after it's no longer needed.
Running the Application
Now, everything's ready and it's time to check out the app. Follow these instructions:
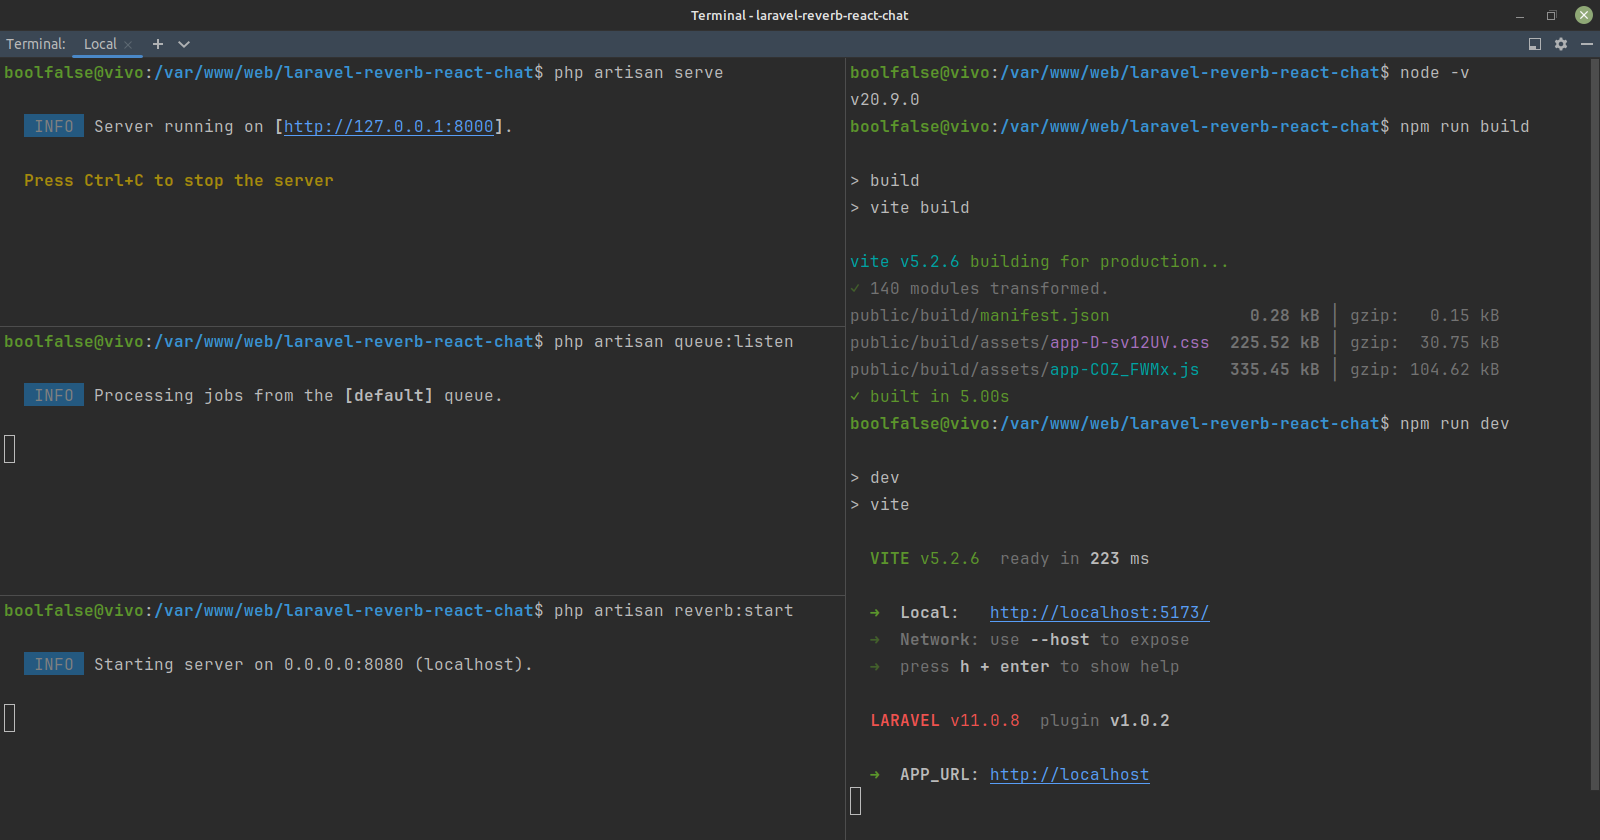 A screenshot from the terminal with all the necessary commands
- Build frontend assets (this is not a "forever" running command):
npm run build - Start listening to the Laravel events:
php artisan queue:listen - Start the WebSocket server:
php artisan reverb:start - Start the server (you may use an alternative for your app like a local running server):
php artisan serve
After all the necessary commands are running, you can check out the app by visiting the default URL: http://127.0.0.1:8000.
For testing, you can register two different users, have those users log in, send messages from each of them, and see the chat box.
Useful Reverb Resources
Now that we've reached the end of this article, it's worth listing some useful resources about Reverb:
- Laravel Broadcasting (official documentation)
- Taylor Otwel - Laravel Update (talk on Laracon EU 2024)
- Joe Dixon on X (creator of Reverb)
- Laracast episode (practical example with Reverb)
Conclusion
Now you know how to build real-time applications with Laravel Reverb in the new version of Laravel. With this, you can implement WebSocket communications in your full-stack app and avoid using any additional 3rd-party services (like Pusher and Socket.io).
If you want to have a clear idea of how to integrate React.js into your Laravel app without using any additional Laravel tools (like Inertia), you can read through my previous freeCodeCamp article, where you can build a single-page, full-stack Tasklist app.
The complete code for this article is here on my GitHub⭐, where I actively publicize much of my work about various modern technologies.
For more information, you can visit my website: boolfalse.com
Feel free to share this article. 😇