

So, you've been learning JavaScript. I bet you're loving it. You've learned the basics and you're starting to get the hang of it. So you might be wondering what to do next.
Well, let me introduce you to REST APIs, a powerful tool that you are going to add to your arsenal.
In this article, we are going to learn about REST APIs, what they are, and how to use them as a JavaScript developer.
Table of Contents
Who is this article for?
If you're new to the concept of REST APIs, or have heard about them but feel unsure about how they work, this article is tailor-made for you. It's designed for JavaScript developers who are eager to learn the ropes of working with REST APIs.
What do I need to continue with this article?
To get the most out of this article, you need some basic knowledge of JavaScript, a browser, and a code editor. Sounds good?
What will I learn by the end of this article?
By the end of this article, you'll become acquainted with REST APIs. You'll learn how to make your first API request and handle the responses. You'll also build an IP Address Tracker application to put your skills into practice.
Ip Address Tracker Application
Getting Started with REST APIs
Before we dive into the world of REST APIs, let's take a step back and understand what an API is.
What is an API?
API stands for Application Programming Interface. It acts as a communication channel between two applications, such as a web form submitting data to a database.
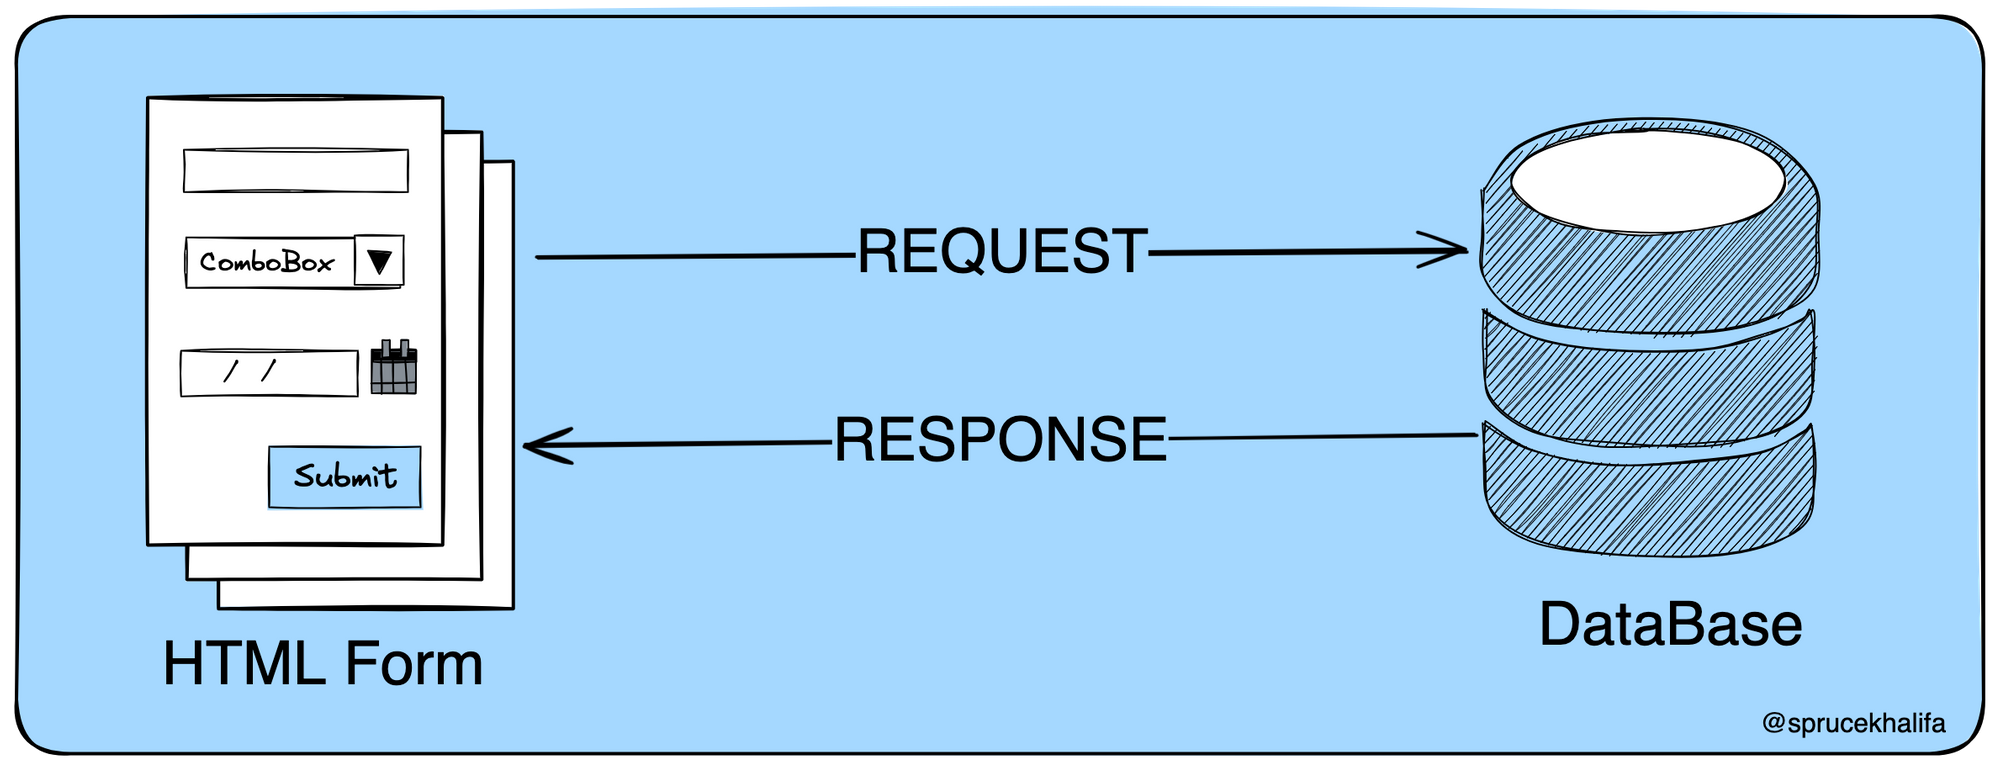
Diagram showing how an API helps two applications communicate by requesting and sending data.
From the above image, you can see that the API acts as a bridge between the web form and the database. The API handles the request made from the web form and sends a response back to the web form. In simple terms, that is how APIs work.
What is a REST API?
Now that you know what an API is and how they work, what is REST? REST (Representational State Transfer) is a set of rules (well, you can call them guidelines) that define methods and protocols for how data should be sent, received, and stored.
So basically, REST is a type of API that follows a set of rules that make communication between two applications smooth and organized.
We are not going to go into details about the rules of REST APIs. Here, we just want to know how to use them for now.
There are only two operations that happen when it comes to using APIs: making a request and receiving a response. We are going to focus on these two operations as we go forward.
How to Make Requests with Rest APIs
REST APIs are typically exposed as an Endpoint, a URL that directs your request. For example, there's a REST API called jsonplaceholder providing random user data. The endpoint to get user data looks like this: https://jsonplaceholder.typicode.com/users.
To get the user data, you make a request to that endpoint using JavaScript's Fetch API:
const request = fetch('https://jsonplaceholder.typicode.com/users');
console.log(request.json());
Run the code above to see it in action. You might wonder why you're getting a Promise instead of the data. That's because the Fetch API returns a Promise, and you need to instruct your code to wait for the API response before finishing.
But how do you do that? You can use async/await method in JavaScript like this:
async function GetData() {
  let endpoint = 'https://jsonplaceholder.typicode.com/users';
  const request = await fetch(endpoint);
  const response = await request.json();
  console.log(response);
}

GetData(); // call the function
Or you can use the .then() method:
fetch('https://jsonplaceholder.typicode.com/users')
  .then((response) => response.json())
  .then((json) => console.log(json));
Any of the above would do just fine. If you are not familiar with this code, I wrote a beginner's guide to Promises in JavaScript you can check it out.
Hey, now you know how to make a request and GET data from a REST API. But what if you want to add some data to some database using an API? How would you do that?
Well, we still have to use the fetch API, but this time we have to specify the method to be used. We'll take a look at those methods next.
Understanding HTTP Methods
In addition to the minimal syntax we've seen, the Fetch API takes in some options, and one of those options is the HTTP method.
HTTP methods inform the REST API about the type of request you're making. The common types are POST, GET, PUT, and DELETE, collectively known as CRUD operations (Create, Read, Update, Delete).
Let's look at each HTTP method separately.
GET HTTP Method
This HTTP method is used to read data from the server when using the REST API. To add a method to the Fetch API, you specify it after the endpoint, like this:
async function GetData() {
  let endpoint = 'https://jsonplaceholder.typicode.com/users';
  const request = await fetch(endpoint, { method: 'GET' });
  const response = await request.json();
  console.log(response);
}

GetData(); // call the function
When using the Fetch API, it's optional to specify the GET HTTP method. If you don't specify any HTTP method, the Fetch API assumes you're making a GET request. That's why the code you used for your first API request still works fine even without the HTTP method.
async function GetData() {
  let endpoint = 'https://jsonplaceholder.typicode.com/users';
  const request = await fetch(endpoint);
  const response = await request.json();
  console.log(response);
}

GetData(); // call the function
POST HTTP Method
Unlike the GET HTTP method, which retrieves data from an API, the POST HTTP method is used to add data when using REST APIs.
async function AddData() {
  let endpoint = 'https://jsonplaceholder.typicode.com/users';
  const request = await fetch(endpoint, {
    method: 'POST',
    body: JSON.stringify(data),
  });

  const response = await request.json();
  console.log(response);
}

const data = { username: 'John Snow', age: 22 };

AddData(); // call the function
If you want to add data to the Rest API using this method, you have to specify the POST HTTP method. You can also see that we passed the data we are trying to add to the body option.
Aside from HTTP methods, the Fetch API also has the body option that we can pass our data when adding data to our API. This data we are trying to add is usually in JSON format, which is why we have to convert our Object to JSON using the JSON.stringify() method.
const data = { username: 'John Snow', age: 22 };
const json = JSON.stringify(data);
console.log(json);
PUT HTTP Method
This method is used to update data when working with REST APIs. You use this method along with the data you want to update, just like the POST HTTP method.
Let's update the user with the id 11 we created above.
async function UpdateData() {
  let endpoint = 'https://jsonplaceholder.typicode.com/users/2';
  const request = await fetch(endpoint, {
    method: 'PUT',
    body: JSON.stringify(data),
  });

  const response = await request.json();
  console.log(response);
}

const data = { age: 42 }; // update the age

UpdateData(); // call the function
DELETE HTTP Method
This method, as the name implies, is used to delete data permanently from a server when using REST APIs. You don't pass any data to the body when using this method. Let's delete the user we created above:
async function UpdateData() {
  let endpoint = 'https://jsonplaceholder.typicode.com/users/2';
  const request = await fetch(endpoint, { method: 'DELETE' });

  const response = await request.json();
  console.log(response);
}

UpdateData(); // call the function
Having learned all this, you can now confidently create, read, update, and delete data from the server by using REST APIs.
Now, when making requests to a REST API, the HTTP method and the body options are not the only things you can specify along with your request. You can also pass along headers with your request.
Headers allow you to provide additional information about the request you are making. For example, we can tell the REST API the type of content we are sending beforehand.
async function AddData() {
  let endpoint = 'https://jsonplaceholder.typicode.com/users';
  const request = await fetch(endpoint, {
    method: 'POST',
    body: JSON.stringify(data),
    headers: { 'Content-Type': 'application/json' },
  });

  const response = await request.json();
  console.log(response);
}

const data = { username: 'John Snow', age: 22 };

AddData(); // call the function
Theheaders: { "Content-Type": "application/json"} header simply tells the REST API beforehand that we are trying to add data that is in JSON format. Of course, this is completely optional.
Up until now, we have only looked at making requests. lets now look at handling requests from a REST API
How to Handle Responses from the Rest API
Any time you make a request to an API, you will always get a response. There are a couple types of responses you can get back from a Rest API call. You either get a 2XX success response or a 4XX/5XX error response. In your JavaScript code, you'll need to handle these responses accordingly.
Don't worry – we're going to break down what the above responses mean.
Understanding Response codes
As stated above, anytime you make a request, you will always get a response. Depending on the status of your response code, you can determine if a response was successful or not.
2XX Success Status Code
Success responses are usually in the range of 200 to 299 HTTP status codes. The most common success code is 200 OK, indicating that the request was successful. When you receive a successful response, you can handle the data returned by the API.
Here's an example of that shows the status code of our response:
async function GetData() {
  let endpoint = 'https://jsonplaceholder.typicode.com/users';
  const request = await fetch(endpoint, { method: 'GET' });
  const response = await request.json();

  console.log(response.status);
}

GetData(); // call the function
If you get a 200 status code, it means that the request was successful and OK.
We should always use this status code to check if our request was successful before we try to use the data returned from an API request.
async function GetData() {
  let endpoint = 'https://jsonplaceholder.typicode.com/users';
  const request = await fetch(endpoint, { method: 'GET' });
  const response = await request.json();

  if (request.status == 200) {
    // Request was successful
    console.log(request.status);
  }
}

GetData(); // call the function
Additionally, you can also use theResponse.ok property to check if the request was successful; this property will return true if the request was successful.
async function GetData() {
  let endpoint = 'https://jsonplaceholder.typicode.com/users';
  const request = await fetch(endpoint, { method: 'GET' });
  const response = await request.json();

  if (response.ok) {
    // Request was successful
    console.log(response.status);
  }
}

GetData(); // call the function
4XX/5XX Error Status Code
When you make a request to an API, and you don't receive a success status code, you will either get a 400-499 or 500-599 error code. The error code you will receive will fall into one of these ranges.
Both of these status codes usually indicate an error. The 400–499 error codes indicate that there's something wrong with your request, while the 500–599 error codes indicate that error is coming from the server.
Consider the example below where we intentionally made a request to a non-existent endpoint (https://jsonplaceholder.typicode.com/nonexistent) to trigger a 404 Not Found error.
async function AddData() {
  let endpoint = 'https://jsonplaceholder.typicode.com/nonexistent';
  const request = await fetch(endpoint, {
    method: 'POST',
    body: data, // don't convert the data to json
  });

  const response = await request.json();

  if (response.ok) {
    console.log(response);
  } else {
    console.log(`An error with status code ${response.status} occured`);
  }
}

const data = { username: 'John Snow', age: 22 };

AddData(); // call the function
The status code 404 we received here indicates that there's something wrong with our request.
I did not cover all the status codes here, but if you are looking for a comprehensive list of the status codes, you can take a look at this guide.
Now depending on the response you receive, you can show different things to your users.
if you receive a success status code, you can use the data to build your application as you deem fit
If you receive an error status code, you can show an Error message to your users as well
How to handle the response body
Depending on the type of request you make, you are going to get back data as a response. To get this data we use the request.json();. We have used this a couple of times already – it will get the request body and parse the data back to an object that we can use.
async function GetData() {
  let endpoint = 'https://jsonplaceholder.typicode.com/users';
  const request = await fetch(endpoint);

  const response = await request.json(); // parse the data

  console.log(response);
}

GetData(); // call the function
You don't need to do anything else in order to process the data returned from your API request.
Aside from the request body, you also get the headers along with the response. This can be useful if, for example, you want to check the type of data returned by your API request beforehand:
async function GetData() {
  let endpoint = 'https://jsonplaceholder.typicode.com/users';
  const request = await fetch(endpoint);

  const dataType = request.headers.get('content-type');

  if (dataType.includes('application/json')) {
    const response = await request.json(); // parse the data
    console.log(response);
  } else {
    console.log('We expected the data to be in json format');
  }
}
GetData(); // call the function
Well, enough of all the talk. Let's roll up our sleeves and try a practical example.
Practical Example: How to Build a Web Application with a Public Rest API
I feel like we have learned a lot already, so let's put our new Rest API skills into practice, shall we?
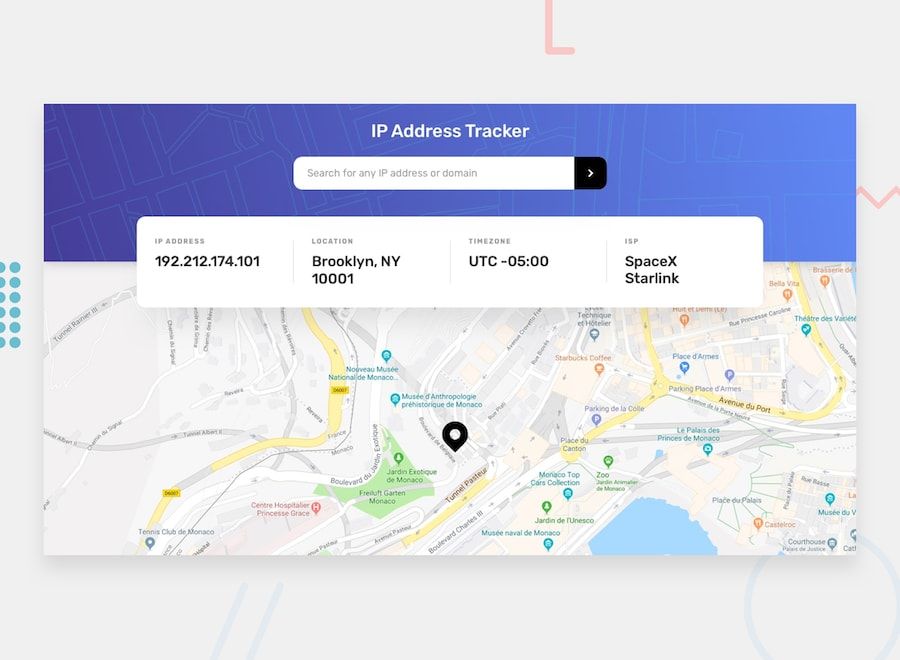
Our task is to build a web application with an IP address API. It'll retrieve information about an IP address and display the location of the IP address on a map with some other information. This is what it is supposed to look like:

Application we'll build
To build this we are going to use:
IP Geolocation API by IPify to get the IP address locations.
The endpoint for the API:
https://geo.ipify.org/api/v2/country,city?apiKey=XXXXXXXX&ipAddress=XXXXXXXTo get the API key you have to sign up for an account with IPify
To generate the map, we are going to be using LeafletJS
Now that we have that out of the way, let's build the HTML and CSS of the web application. If you are confident about your HTML and CSS skills, try building the web page on your own. Here's my implementation:
Now that we have the HTML and CSS out of the way, the first thing we need to do is to get the IP address the user entered. So create a index.js file and add the following code:
/* Select form */
const search_form = document.querySelector('.header_form');

search_form.addEventListener('submit', (event) => {
  /* stop form from auto submiting on click */
  event.preventDefault();

  /* get the value of the form field */
  const value = document.querySelector('#search').value;

  console.log(value);
});
Submit the the form to see the value that you entered in the HTML input form.
Next we need to pass that value into a function search_Ip_Address(). It actually makes a GET request to fetch our location data and uses the data to update the UI of our web application:
/* Select form */
const search_form = document.querySelector('.header_form');

search_form.addEventListener('submit', (event) => {
  /* stop form from auto submiting on click */
  event.preventDefault();

  /* get the value of the form field */
  const value = document.querySelector('#search').value;

  /* Pass the Ip address to the search_Ip_Address() function */
  search_Ip_Address(value);
});

/* Search for an IpAddress */
async function search_Ip_Address(ip_address) {
  const api_key = 'xxxxxxxxxxxxxxxxxxxxxxx';
  const request = await fetch(
    `https://geo.ipify.org/api/v2/country,city?apiKey=${api_key}&ipAddress=${ip_address}`,
  );
  const response = await request.json();

  /* Update the UI on the page */
  const { location, ip, isp } = response;
  update_ui(ip, location.city, location.timezone, isp);
}

/* update UI function */
function update_ui(ip_address, location, timezone, isp) {
  /* select all the elements on the page */
  const address = document.querySelector('.address');
  const city = document.querySelector('.location');
  const utc = document.querySelector('.utc');
  const isprovider = document.querySelector('.isp');

  /* Update all the elements on the page */
  address.textContent = ip_address;
  city.textContent = location;
  utc.textContent = 'UTC' + timezone;
  isprovider.textContent = isp;
}
Next we need to create our map. To begin, add the following to the head section of your HTML file:
<head>
  ...
  <link
    rel="stylesheet"
    href="https://unpkg.com/leaflet@1.9.4/dist/leaflet.css"
    integrity="sha256-p4NxAoJBhIIN+hmNHrzRCf9tD/miZyoHS5obTRR9BMY="
    crossorigin=""
  />
  <script
    src="https://unpkg.com/leaflet@1.9.4/dist/leaflet.js"
    integrity="sha256-20nQCchB9co0qIjJZRGuk2/Z9VM+kNiyxNV1lvTlZBo="
    crossorigin=""
  ></script>
  ...
</head>
Also make sure you have a div element on the page with an id of map:
<div class="map" id="map"></div>
Next we need to create a function that will create the map for us. So in your script.js add the following code:
/* create the map */
let map;
function create_map(lat, lng) {
map = L.map('map').setView([lat, lng, country, region], 14);
L.tileLayer('https://tile.openstreetmap.org/{z}/{x}/{y}.png', {
maxZoom: 20,
attribution:
'© <a href="http://www.openstreetmap.org/copyright">OpenStreetMap</a>',
}).addTo(map);
L.marker([lat, lng])
.addTo(map)
.bindPopup(`${region}, ${country}`)
.openPopup();
}
Lastly we just need to call the create_map() function any time the user searches for an IP address.
To call the create_map() when the user searches for an Ip address, update the search_Ip_Address() function:
/* Search for an IpAddress */
async function search_Ip_Address(ip_address) {
  const api_key = 'at_HhKzCe09UZIYJC9pY7YTg7kMMUzZd';
  const request = await fetch(
    `https://geo.ipify.org/api/v2/country,city?apiKey=${api_key}&ipAddress=${ip_address}`,
  );
  const response = await request.json();

  const { location, ip, isp } = response;

  /* Update the ui on the page */
  update_ui(ip, location.city, location.timezone, isp);

  /* Update the map on the page */
  /* first remove all map instances if any */
  if (map !== undefined && map !== null) {
    map.remove();
  }
  create_map(location.lat, location.lng, location.country, location.region);
}
Lastly, just call the search_Ip_Address() function when the page finishes loading:
const defaultIp = '197.210.78.172';
search_Ip_Address(defaultIp);
And there you go – a nice IP tracker web application. I hope that building this application helped you reinforce your newfound REST API skills.
To provide you with an opportunity for practice, here's a challenge you can undertake. Below is the final preview of the web app:
Challenge:
Currently, our IP tracker application lacks error handling. For instance, if a user enters a random word in the search input field that is not a valid IP address, the entire application will break.
As conscientious developers, we should always be vigilant about errors and handle them gracefully. Therefore, your challenge is twofold:
Implement input validation to ensure that the entered value is always a valid IP address. If the user enters an invalid IP address, display an error message.
Handle all unforeseen errors that users may encounter during the application's usage.
Conclusion
Knowing how to work with REST APIs is a key skill that developers must have. In this article, you learned about REST APIs and how to use them to develop your own applications.
If you have any questions, feel free to message me on Twitter at @sprucekhalifa, and don't forget to follow me for more insights and updates. Happy coding!
The example used in this tutorial was gotten from frontendmentor.io IP address tracker challenge on Frontend Mentor.