
By Sam Williams
Following tutorials when you start learning serverless is a good first step. But to really get better, you need to build your own projects.
The problem is that coming up with ideas that are realistic but help you grow is hard.
To help you out, I’ve come up with 7 awesome project ideas to progressively help you become a better serverless dev.
If you’re new to working with Serverless, then start with the first projects. If you’ve built APIs and Dynamo with Serverless before, then pick the projects that cover the topics you want to learn most.
I've also made this into a video if you want to watch and follow along:
Combination API Project
This project is designed to get you familiar with deploying an API with Lambda. You'll also practice calling other APIs and merging that data.
There are lots of logic you could use for this, but here are two examples:
- Get Steam game deals, converted into your local currency
- Get news translated into your local language
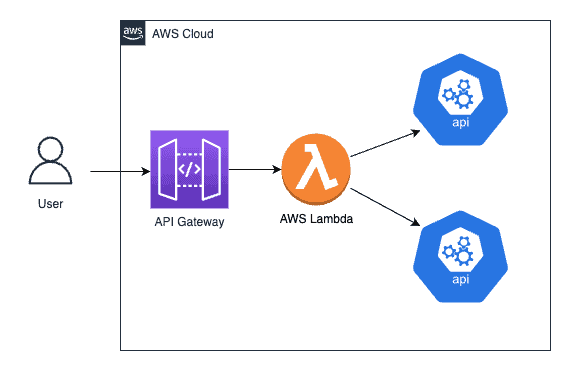
The architecture for this one is simple but that is exactly what you want as your first project. The idea is that the API you create will take some parameters, so look something like this
https://apiurl.amazonaws.com/dev/steamdeals?currency=EUR
https://apiurl.amazonaws.com/dev/news/fr
The logic is all going to be written into the Lambda. I'm not going to write the full code but here's some pseudo-code:
const handler = (event: APIGatewayProxyEvent) => {
    // get the path or query string parameter value

    // hit the first API to get the first data

    // get the data you need to translate / convert

    // pass the data from API1 into API2

    // combine the data

    // return data in API Gateway format
}
If you need some free and public APIs to use, then here's a massive doc of them to choose from https://github.com/public-apis/public-apis.
Then building this try using the Serverless Framework or AWS CDK. These tools will make you far more valuable as a developer.
To get started with the Serverless Framework check out this video.
URL Shortener Project
This project will get you deploying your first DynamoDB table, then writing and reading data from it.
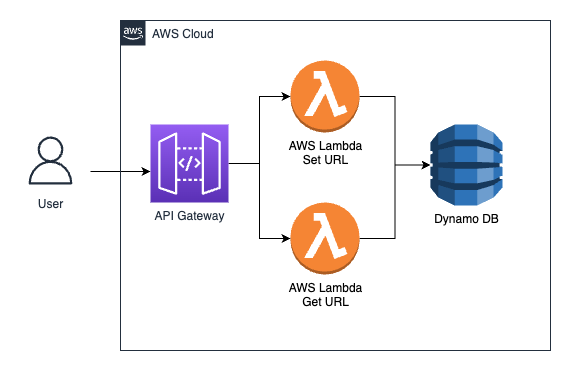
There are going to be two API endpoints. One to add a new URL to the shortener, one to give a shortened URL and get the original.
Here's the pseudo-code for the two endpoints:
// Adding a new URL
const handler = (event: APIGatewayProxyEvent) => {
    // get their original url (body of the event)

    // generate a random 5 character code

    // write to Dyanamo - {id: code, url: originalUrl }

    // return the url (https://{apiurl}.amazonaws.com/dev/get/{code})
}
To get the apiURL we can pass it in as an environment variable. If you are using the Serverless Framework you can do this by adding this to the environment section of your config:
apiUrl: {
  "Fn::Join": [
    "",
    [
      "https://",
      { Ref: "HttpApi" },
      ".execute-api.${self:provider.region}.amazonaws.com",
    ],
  ],
},
// Getting a URL by code
const handler = (event: APIGatewayProxyEvent) => {
    // get code from the url path

    // get from dynamo by ID

    // return the original url
}
You can take this one step further by changing the status code of the getUrl code to return a 301 - permanent redirect. You'll need to add some extra headers but this will automatically redirect the user to the desired page.
Reminder App Project
This project will teach you about Secondary Indexes in Dynamo as well as Dynamo Time-To-Live. You will also get to try either email automation with Amazon Simple Email Service (SES) or text messaging with Simple Notification Service (SNS).
You could also build a simple front end app and learn about hosting it in S3 and using CloudFront to distribute it.

The idea for this app is that you can post a new reminder to the first API endpoint. This will write a new record in DynamoDB, but you will have added a global secondary index (GSI) to the table. This means that you can get a reminder by id, or you can query based on the user.
It will also have a Time-To-Live (TTL) which will allow you to trigger a Lambda at the time of the reminder. The code for set reminders will looks pretty similar to the previous project.
The table will look something like this:
| id | userId | TTL | notificationType | message |
| 123 | test@gmail.com | 1648277828 | Publish next youtube video | |
| 897 | 447113350882 | 1648842828 | sms | Get More MILK |
The Time-To-Live (TTL) tells dynamo that once the time reaches this date, delete the record from Dynamo.
Two things to note with TTL:
- Make sure that this is the Unix timestamp for the deletion date – but in seconds.
new Date('october 20 2022').getTime()will be in milliseconds, so just divide by 1000. - The record will be deleted within a 15-minute window after your TTL so don't panic if it's been 5 minutes and the record hasn't been deleted yet.
You can then set up a second Lambda which is triggered any time a record is deleted from Dynamo. This then sends the message to either their email or phone.
// Send reminder
const handler = async (event: DynamoDBStreamEvent) => {
    // get the list of deleted records

    // map over each record
       // Call SES or SNS to send the reminder
}
The second API endpoint will be to get all of the reminders for a user. Make sure you've set up a GSI with a partition key of userId and a sort key of TTL.
// Get My Reminders
const handler = (event: APIGatewayProxyEvent) => {
    // get the userId from request

    // params = KeyConditionExpression: "'userId' = userId",

    // Query Dynamo

    // format the reminders

    // return to the user
}
For the front end you can write a simple web app with two sections: create new reminder, and list my reminders. This can be in React, Vue, Angular, or even raw HTML, CSS, and JavaScript.
Once you have the app you can use serverless-s3-sync to automatically push the code into S3 (which you create in Serverless).
Live Chat App Project
This project will teach you how to build WebSockets. A user can either create a new 'room' or join an existing room. Any messages sent are sent to everyone connected to the room.
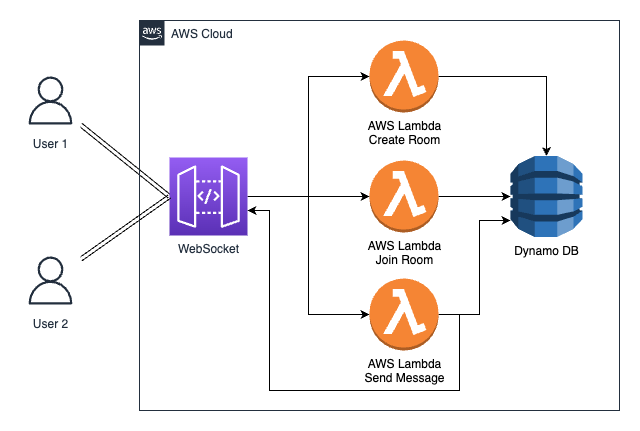
WebSockets work slightly differently than regular APIs. Instead of having multiple endpoints, you have one endpoint and different message types.
There are some default message types and some custom ones:
- connectToRoom – Custom
- createRoom – Custom
- onMessage – Custom
- disconnect – Default
When a user connects to the WebSocket, they can either send a connectToRoom or createRoom message. Both of these will create a record in Dynamo with the user's WebSocket connectionId and the roomId. As we did before, we'll have a GSI in Dynamo so we can later query to get all users for a roomId.
The code for connectToRoom and createRoom will look very similar to previous "writing data to Dynamo" lambdas.
You may want to check in connectToRoom that the room does exist first. You can do that by querying for all users by roomId. If there are no users in the room then that means they're trying to connect to a room that doesn't exist anymore.
Now a user is in a room they can send a message. Here's the pseudo-code for that Lambda:
// onMessage
const handler = (event: WebsocketMessageEvent) => {
    // get the user's connectionId

    // get the user by connectionId from Dynamo to get the roomId

    // query for all users in that roomId

    // send the message to all users

    // return
}
Finally, there is the onDisconnect which will be a simple Lambda that just deletes the user's record from Dynamo.
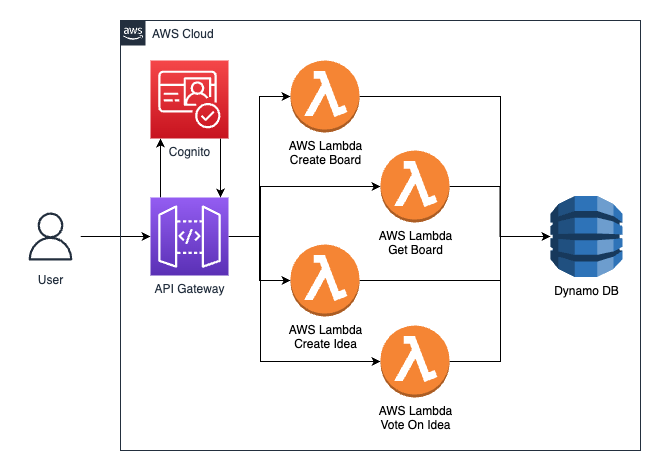
Idea Voting App Project
This project will teach you to design and build more advanced Dynamo tables and also work with Cognito for authentication. You should also build a simple front end for this to learn how to integrate Cognito into web apps.
The tool allows you to ask your community for ideas and find out which of those are most popular.
This starts with all users needing to sign up to your application. We use Cognito for this and do it so that we can ensure that each person can only vote once.
You'll need to then create a few endpoints:
- create a board
- add an idea to a board
- vote for an idea
- get board details
Create a board
The first API endpoint that we need is one to create a new board for ideas. Anyone can create a board and the record in Dynamo is really simple. Just a boardId and then some info about the board owner, maybe a title and description.
| boardId | owner | title | description |
|---|---|---|---|
| boardId | userId | My awesome idea | some description |
Add ideas to a board
Next we need to be able to add ideas to a board. This will be another API endpoint and Lambda. With the idea database record we need to be a bit smarter as we need to be able to directly reference an idea, but also get all ideas for a board.
To do this we have a schema like this. pk is a partition key and sk is a sort key, which are both needed for querying on DynamoDB.
| id | pk | sk | idea | owner |
|---|---|---|---|---|
| id | boardId | ideaId | the idea | userId |
With the id we can directly reference the idea, but we can also query on the record. We can get all ideas for board 1234 by querying for pk = 1234.
Add vote to the idea
Now that we have ideas on the board, we need our users to vote for them. This will be a new API endpoint and Lambda. This Lambda has a bit more work to do than the other two. First, we'll look at the schema for this record.
| pk | sk | pk2 | sk2 |
|---|---|---|---|
| ideaId | userId | userId | ideaId |
This may look strange at first but I'll explain why we want to structure it like this.
For a given idea, we want to know how many votes it has. We can find that out by querying on pk = ideaId which will return all votes for the idea.
When adding a vote we want to check that the user hasn't already voted for the idea. We can do that by querying pk = ideaId && sk = userId. If we find a record that matches, we know they've already voted for this idea. If not then we can add the vote record for this user and idea.
Get Board Details
We can now write a lambda that will query the data we have:
export const handler = async (event: APIGatewayProxyEvent) => {
    // get boardId from the request
    // query all ideas on the board
    // map over each idea
        // query for all votes on this idea
    // format it all into a nice format
    // return to the user
}
Get votes for a user
Lastly, we want to be able to show all votes for a given user. We can't query where sk = userId as you always need a partition key when querying DynamoDB. Therefore we created a second partition key (pk2) which contains the userId. Now we can query pk2 = userId to get all ideas that a user has voted for.
This pattern of having a second GSI where the PK and SK are switched is very common. It allows you to have a many-to-many relationship. You can query for all of B that are connected to a specific A and all of A that are connected to a specific B. This is often called a junction table.
Messaging App Project
This project will teach you to about Dynamo compound keys and give you more practice with websockets and Cognito.
This app allows users to sign up, request to join a room, and then see all messages that have been sent in that room. The owner of a room decides whether to let someone join the room.
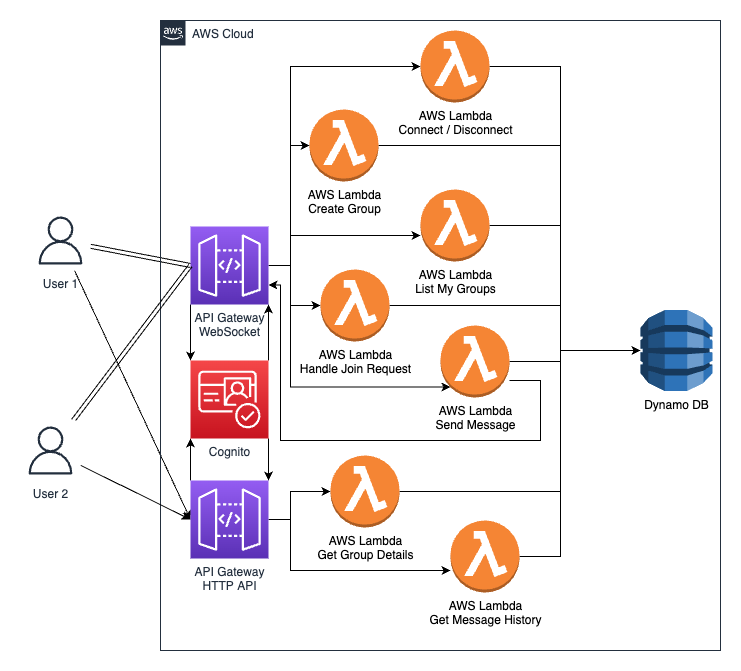
The architecture will start by looking a lot like the live chat application – with a WebSocket connection with Lambdas for onConnect, onDisconect, createGroup, joinGroup, listMyGroups handleJoinGroupRequest and sendMessage.
Before we get onto the Lambda code, we want to add Cognito to the application so we can have users signup. This will be used later when a user requests access to a group.
The createGroup Lambda will be almost identical to the live chat solution. It just creates a simple group record.
Websocket Connect / Disconnect
Now when a user logs in and connects to the WebSocket, we can create an onConnection Lambda. This will get the userId and verify their Cognito user token. This token will easily give us the userId and userName.
If they don't pass a token or the token is invalid (or has expired) then we can kill the websocket, stopping them from doing anything else without a valid token.
If the token is valid then we can store a simple connection record. This will allow us to send messages back down the websocket later.
Just remember to delete this record when the user disconnects from the WebSocket. We can use the default $disconnect action to trigger an onDisconnect lambda.
Create a group
The first thing that someone needs to be able to do is to create a group that they can then invite their friends to.
This will involve creating two records in Dynamo. The first is just a record of the group. This will include the group ID, group name, and who is the group owner.
The second is going to be a group membership record. This will be saying that this user is part of this group.
| pk | sk | pk2 | sk2 | userName | groupName |
|---|---|---|---|---|---|
| groupId | user#{userId} | userId | groupId | user name | group name |
This first part will allow us to query on pk = groupId and sk startsWith('user') to get all users for the group. That will be used in the sendMessage Lambda to get all the users to send the WebSocket message to.
The second parts (PK2, SK2) are added to allow us to get all groups that a user is authorised for by querying where PK2 = userId. This is used when we need to get a list of all of the user's groups.
Joining a group
The join Group request will now create a record in Dynamo for an access request. This will not give the user access to the group but will allow the owner of the group to review the access requests.
These records will be the first time that we're going to use compound keys. This is taking the sort key to the next level and the record will look like this:
| pk | sk |
|---|---|
| groupId | joinRequest#{userId} |
This enables us to query where pk = groupId and sk startsWith('joinRequest'). This will return all of the access requests for that group. When someone makes this request we can first check that they are the owner of the group.
The group owner then has two options – accept or reject. If the owner rejects the user we can just delete the access request record. If they accept the user then we need to add an authorised user. This will require a new record to Dynamo.
Send Message
Now we're onto the core of the messaging app – sending and storing messages.
In the sendMessage WebSocket Lambda, we can query for all users in the group and send the message to all current connections. We also need to store the message in Dynamo.
| pk | sk | message | user |
|---|---|---|---|
| groupId | message#{timestamp} | my message | userId |
Get Previous Messages
When a user logs in they need to be able to get the messages they missed whilst offline. With the message data structured this way, we can query where:
pk = groupId and sk > 'message#{ timestamp for yesterday }'
This will return all messages created since yesterday.
We could also allow them to get older messages by passing up the last message they have. This will allow us to get the next chuck of messages. This will allow us to create an infinite up scroll on the message history.
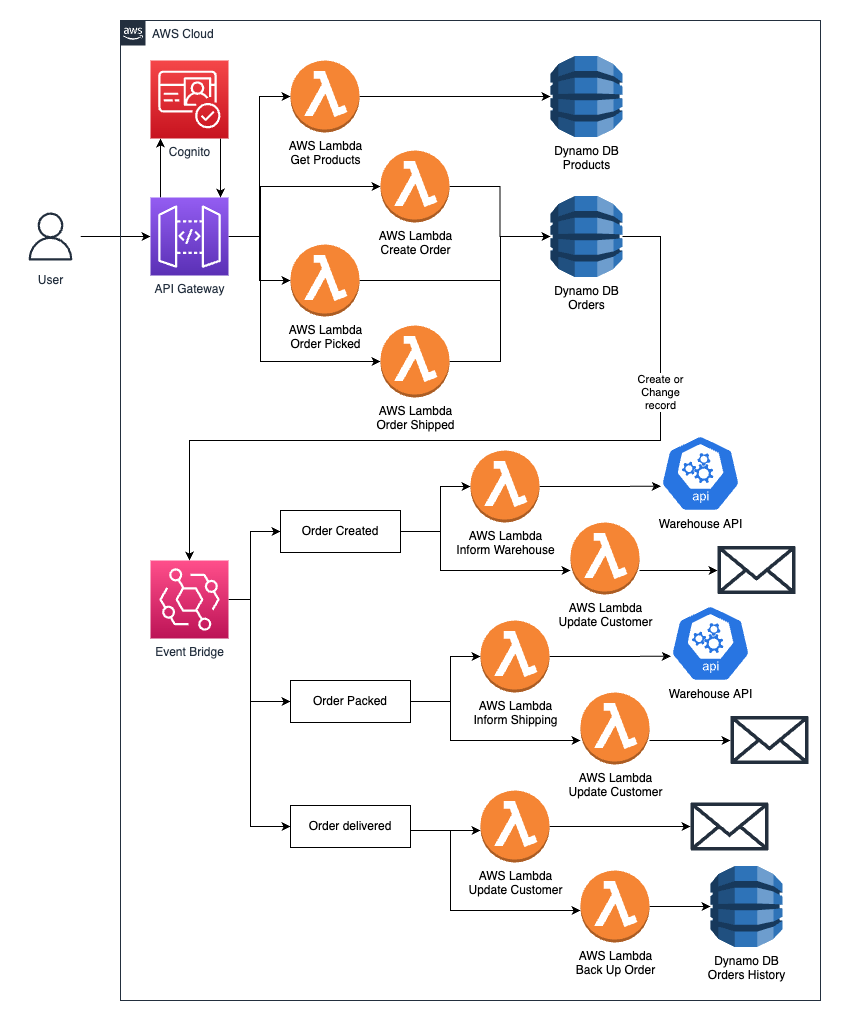
Event Driven E-Commerce System Project
This project will teach you about Event Bridge, plus give you some extra practice with DynamoDB Table design and services like SES and SNS for email and text.
This system will have products and filtering, carts and orders as you would expect. The key here is that order placement, order status changes, and delivery updates will all be handled through Event Bridge.
Storing Products
To start we need to store products. We can structure our sort keys in a way to allow a level of hierarchy for our products.
| id | pk | sk | title | description | ... |
|---|---|---|---|---|---|
| productId | clothing | mens#tops#{productId} | Next Slimfit T-Shirt | ... | ... |
| productId | clothing | womens#trousers#{productId} | Levi's Jeans | ... | ... |
This allows us to query for pk = clothing and sk beginsWith mens to get all men's clothes or for pk = clothing and sk beginsWith womens#trousers to get all women's trousers.
Placing an Order
The next part is being able to place an order. We're not going to try and take payment, just add an order record to the dynamoDB table.
Event Bridge
The big difference here is that we're going to start using Event Bridge. This is a tool which allows us to have events which can trigger multiple lambdas. This is great as we can add a new listener without having to change the upfront code.
Order Created
We're going to have two lambdas that listen for the orderCreated event. The first is going to take the order data and send it to a warehouse API to get packed. The second is going to send the user an order confirmation email
Order Packed
We're going to pretend that there is a real warehouse and after getting the order packing list, they packed up and got the order ready for shipping. They have a system that calls our API and changes the order status to packed.
This change in the Dynamo record will trigger another Event Bridge event for orderPacked. This also has two listeners: one to email an update to the user, and another to email a delivery service to collect the parcel from the warehouse and deliver it to the customer.
Order Shipped
Similarly we're going to pretend that a delivery company took the parcel and delivered it. They call another Order Shipped API endpoint and that changes the status of the order in the database again.
That triggers another event for orderDelivered and that has two listeners:
One for sending a "thank you" message to the customer.
And another one that will do something a bit different. It will take the order, remove any personal data, and store it into another DynamoDB table.
This is something becoming increasingly common as a preparation step for a data scientist. We remove the personal data to reduce the legal issues but still allow a data scientist to do things like train a model to give you "People also bought ...." kinds of recommendations.
What's Next
If you like these project ideas but don't know where to start, then I have a full video course that will teach you how to build all of these projects.
You can also download a Free PDF of these projects so you can visualise your progress in your learning journey.