

Hello, everyone! Today we're going to learn about Terraform by building a project.
Terraform is more than just a tool to boost the productivity of operations teams. You have the chance to transform your developers into operators by implementing Terraform.
This can help increase the efficiency of your entire engineering team and improve communication between developers and operators.
In this article, I'll show you how to fully automate the deployment of your Jenkins services on the AWS cloud using Terraform with a custom baked image.
Table of Contents
- What is Terraform?
- Why Should You Use Terraform?
- How Terraform works
- What is a Procedural Language vs a Declarative Language?
- Prerequisites and Installation
- File/Folder Structure of Our Project
- How to First Initialize Terraform State
- How to Provision an AWS Virtual Private Cloud
- How to Work with Terraform Modules
- How to Create a VPC Subnet
- How to Setup VPC Route Tables
- How to Create a Public Route Table
- How to Create a Private Route Table
- How to Setup a VPC Bastion Host
- How to Provision our Compute Service
- Jenkins master instance
- How to Create the Load Balancer
- Cleaning Up
- Summary
What is Terraform?
Terraform by HashiCorp is an infrastructure as code solution. It lets you specify cloud and on-premise resources in human-readable configuration files that you can reuse and share. It is a powerful DevOps provisioning tool.
Why Should You Use Terraform?
Terraform has a number of use-cases, including the capacity to:
- Specify infrastructure in config/code and easily rebuild/change and track changes to infrastructure.
- Support different cloud platforms
- Perform incremental resource modifications
- Support software-defined networking
How Terraform works
Let's have a look at how Terraform works at a high level.
Terraform is developed in the Go programing language. The Go code is compiled into terraform, a single binary. You can use this binary to deploy infrastructure from your laptop, a build server, or just about any other computer, and you won't need to run any additional infrastructure to do so.
This is because the Terraform binary makes API calls on your behalf to one or more providers, which include Azure, AWS, Google Cloud, DigitalOcean, and others. This allows Terraform to take advantage of the infrastructure that those providers already have in place for their API servers, as well as the authentication processes they require.
But Terraform doesn't know what API requests to make – so how does it know? Terraform configurations, which are text files in declarative language that specify what infrastructure you want to generate, are the answer. The "code" in "infrastructure as code" is these setups.
You have complete control over your infrastructure, including servers, databases, load balancers, network topology, and more. On your behalf, the Terraform binary parses your code and converts it into a series of API calls as quickly as possible.
What is a Procedural Language vs a Declarative Language?
A procedural language allows you to specify the entire process and list the steps necessary to complete it. You merely give instructions and specify how the process will be carried out. Chef and Ansible encourage this method.
Declarative languages, on the other hand, allow you to simply set the command or order and leave it up to the system to carry it out. You don't need to go into the process; you just need the result. Examples are Terraform, cloudFormation, and Puppeteer.
Enough of the theory...
Now is the moment to put Terraform's high availability, security, performance, and dependability into action.
Here, we're talking about a Terraform-based Jenkins server on Amazon Web Services. We are setting up the networking from the ground-up, so let's get started.
Prerequisites and Installation
There are a few things you'll need to have setup and installed to follow along with this tutorial:
- Create an AWS account
- Create an IAM user
- Create and Download your user secret and access key
- Install Terraform from the Terraform - HashiCorp Learn page
File/Folder Structure of Our Project
We'll use a modular development strategy to separate our Jenkins cluster deployment into numerous template files (rather than developing one large template file).
Each file is in charge of executing a target infrastructure component or AWS resource.
For creating and enforcing infrastructure settings, Terraform leverages the syntax of a JSON-like configuration language called HCL (HashiCorp Configuration Language).
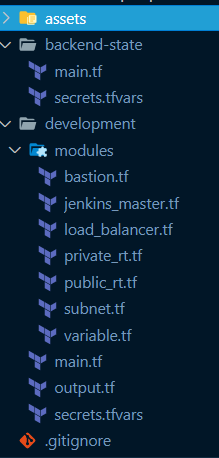 files/folders structures
How to First Initialize Terraform State
To follow best practices, we will be storing our Terraform state files in our cloud storage. This is essential especially for team collaboration.
Terraform state files are files that contain Terraform resources on the projects.
Inside the main.tf file in the backend-state folder, add the following code:
variable "aws_region" {
    default = "us-east-1"
 }
variable "aws_secret_key" {}
variable "aws_access_key" {}

provider "aws" {
    region = var.aws_region
    access_key = var.aws_access_key
    secret_key = var.aws_secret_key
}

resource "aws_s3_bucket" "terraform_state" {
    bucket = "terraform-state-caesar-tutorial-jenkins"

    lifecycle {
        prevent_destroy = true
    }

    versioning {
        enabled = true
   }

   server_side_encryption_configuration {
           rule {
            apply_server_side_encryption_by_default {
                sse_algorithm = "AES256"
            }
        }
   }
}
Let's make sure we know what's going on in the above code.
We use variables to store data, and in Terraform you declare a variable with the variable keyword followed by the name. The variable block can either take some properties such as default, description, type, and so on or none. You will be seeing this a lot.
Now we are declaring the variables as variable "variable_name"{} and using them in any resources/data block as var.variable_name. Later you'll see how we will be assigning values to those variables in our secrets.tfvars file.
To use Terraform, you need to tell it the provider it will be communicating with and pass in its required properties for authentication. Here we have the AWS region, access, and secret key (you should have these downloaded on your system from the prerequisites).
In terraform, each resource we need is defined in the resource block. Resources is the underlined infrastructure that creates our cloud service. It follows the syntax resource "terraform-resource-name" "custom-name" {}.
Terraform has a lot of resources for particular providers in the terraform docs (always refer to the docs if you have questions).
Next, we are creating the aws_s3_bucket. This will store our remote state. It takes the following properties:
- bucket → This has to be globally unique
- lifecycle → If you need to destroy your Terraform resources, you might want to prevent destroying the state as it is shared across teams
- versioning → Helps provide some version control over the states
- server_side_encryption_configuration → Provides encryption.
Our state backend is ready. But before we initialize it, plan, and apply it with Terraform, let’s assign our variable to its values.
In secrets.tfvars, add the following info from your AWS account:
  aws_region = "us-east-1
  aws_secret_key = "enter-your-secret"
  aws_access_key = "enter-your-access
In your terminal in the same backend-state folder, run terraform init.
 terraform state on terminal
Then terraform apply -var-file=secrets.tfvars:
 terraform state on terminal
In your AWS console, here's what you'll see:
 terraform state on aws s3 bucket
Now that our state is ready, let’s move to the next part.
How to Provision an AWS Virtual Private Cloud
To secure our Jenkins cluster, we will deploy the architecture within a virtual private cloud (VPC) and private subnet. You can deploy the cluster in the AWS default VPC.
To have complete control over the network topology, we will create a VPC from scratch.
 variable "cidr_block" {}
 variable "aws_access_key" {}
 variable "aws_secret_key" {}
 variable "aws_region" {}

 provider "aws" {
     region = var.aws_region
    access_key = var.aws_access_key
    secret_key = var.aws_secret_key
}

terraform {
    backend "s3" {
        bucket     = "terraform-state-caesar-tutorial-jenkins"
        key        = "tutorial-jenkins/development/network/terraform.tfstate"
        region     = "us-east-1"
        encrypt    = true
   }
}

resource "aws_vpc" "main_vpc" {
    cidr_block           = var.cidr_block
    enable_dns_support   = true
    enable_dns_hostnames = true

    tags = {
        Name        = "jenkins-instance-main_vpc"
    }
}
output "vpc_id" {
    value = aws_vpc.main_vpc.id
}

output "vpc_cidr_block" {
    value = aws_vpc.main_vpc.cidr_block
}
cidr_block            = "172.0.0.0/16"
aws_region = "us-east-1"
aws_secret_key = "enter-your-secret"
aws_access_key = "enter-your-access"
- cidr_block → Classless Inter-Domain Routing is referred to as CIDR. A CIDR block is an IP address range, to put it simply. This defines what range we are working in.
- output → The output block in Terraform is used to export resource values to other modules. This is another important term when transferring a resource data in one module to another resource in a separate module. (You will learn what modules are soon) Here's its syntax:
output "custom_output_name" { value = "resource-name"}. It takes in a value key that takes the resource passed. Here we are output vpc_id and cidr_block.
Now, in the terminal, run terraform init and terraform apply to create the resources. You can run terraform plan before to see what resources you are actually creating. Here's the command: terraform apply -var-file=secrets.tfvars, and the output:

You should see your vpc_id and vpc_cidr_block in your AWS Console:
 vpc on aws
How to Work with Terraform Modules
A group of typical configuration files in a specific directory make up a Terraform module. Terraform modules put together resources that are used for a single operation. This cuts down on the amount of code you need to create identical infrastructure components.
Using the syntax below, you can transfer one Terraform module resource to another to be used.
module "custom-module-name" {
    source     = "path-to-modules-resources"
}
And to used the module resource output inside another resource module, this is the command: module.custom-module-name.resource-output-value.
How to Create a VPC Subnet
Creating a VPC isn't enough – we also need a subnet to be able to install Jenkins instances on this isolated network. We must pass the VPC ID we output before, since this subnet belongs to a previously constructed VPC.
For resilience, we'll use two public subnets and two private subnets in distinct availability zones. Each subnet has its own CIDR block, which is a subset of the VPC CIDR block, which we got from the VPC resource.
resource "aws_subnet" "public_subnets" {
    vpc_id         = var.vpc_id
    cidr_block     = cidrsubnet(var.vpc_cidr_block, 8, 2 + count.index)
       availability_zone   = element(var.availability_zones, count.index)
    map_public_ip_on_launch = true
    count                   = var.public_subnets_count

    tags = {
        Name        = "jenkins-instance-public-subnet"
   }
}

resource "aws_subnet" "private_subnets" {
    vpc_id     = var.vpc_id
    cidr_block = cidrsubnet(var.vpc_cidr_block, 8, count.index)
    availability_zone    = element(var.availability_zones, count.index)
    map_public_ip_on_launch = false
    count                   = var.private_subnets_count

    tags = {
        Name        = "jenkins-instance-private-subnet"
    }
 }
Alright, what's going on in this code?
- count → The count meta-argument accepts a whole number, and creates that many instances of the resource or module. Here we are specifying 2 each to the variables private_subnets_count and public_subnets_count.
- map_public_ip_on_launch → Specify true to indicate that instances launched into the subnet should be assigned a public IP address.
- cidrsubnet() → cidrsubnet calculates a subnet address within a given IP network address prefix.
- element() → element retrieves a single element from a list.
Now let’s update our modules variables:
variable "vpc_id" {}
variable "vpc_cidr_block" {}
variable "private_subnets_count" {}
variable "public_subnets_count" {}
variable "availability_zones" {}
Update the secrets.tfvars like this:
private_subnets_count = 2
public_subnets_count  = 2
You must establish private and public route tables to specify the traffic-routing method in VPC subnets. Let’s do that before we execute terraform apply on our resources.
How to Setup VPC Route Tables
We will develop private and public route tables for fine-grained traffic management. This will enable instances deployed in private subnets to access the internet without being exposed to the general public.
How to create a public route table
First we need to establish an Internet gateway resource and link it to the VPC we generated previously. Then we need to define a public route table and a route that points all traffic (0.0.0.0/0) to the internet gateway. And lastly we need to link it with public subnets in our VPC so that traffic flowing from those subnets is routed to the internet gateway by creating a route table association.
/*** Internet Gateway - Provides a connection between the VPC and the public internet, allowing traffic to flow in and out of the VPC and translating IP addresses to public* addresses.*/
resource "aws_internet_gateway" "igw" {
    vpc_id = var.vpc_id

    tags = {
        Name = "igw_jenkins"
   }
}

/*** A route from the public route table out to the internet through the internet* gateway.*/
resource "aws_route_table" "public_rt" {
    vpc_id = var.vpc_id

    route {
        cidr_block = "0.0.0.0/0"
        gateway_id = aws_internet_gateway.igw.id
   }

   tags = {
           Name = "public_rt_jenkins"
   }
}
/*** Associate the public route table with the public subnets.*/
resource "aws_route_table_association" "public" {
    count     = var.public_subnets_count
    subnet_id = element(var.public_subnets.*.id, count.index)
    route_table_id = aws_route_table.public_rt.id
}
How to create a private route table
Now that our public route table is finished, let’s create the private route table.
To allow our Jenkins instances to connect to the internet as it is deployed on the private subnet, we will construct a NAT gateway resource inside a public subnet.
Add an Elastic IP address to the NAT gateway after that and a private route table with a route (0.0.0.0/0) that directs all traffic to the ID of the NAT gateway you established. Then we attach private subnets to the private route table by creating the route table association.
 /*** An elastic IP address to be used by the NAT Gateway defined below.  The NAT* gateway acts as a gateway between our private subnets and the public* internet, providing access out to the internet from within those subnets,* while denying access to them from the public internet.  This IP address* acts as the IP address from which all the outbound traffic from the private* subnets will originate.*/

 resource "aws_eip" "eip_for_the_nat_gateway" {
     vpc = true

    tags = {
        Name = "jenkins-tutoral-eip_for_the_nat_gateway"
    }
}

/*** A NAT Gateway that lives in our public subnet and provides an interface* between our private subnets and the public internet.  It allows traffic to* exit our private subnets, but prevents traffic from entering them.*/

resource "aws_nat_gateway" "nat_gateway" {
    allocation_id = aws_eip.eip_for_the_nat_gateway.id
    subnet_id     = element(var.public_subnets.*.id, 0)

    tags = {
        Name = "jenkins-tutorial-nat_gateway"
    }
}
/*** A route from the private route table out to the internet through the NAT * Gateway.*/

resource "aws_route_table" "private_rt" {
    vpc_id = var.vpc_id

    route {
        cidr_block     = "0.0.0.0/0"
        nat_gateway_id = aws_nat_gateway.nat_gateway.id }

        tags = {
            Name   = "private_rt_${var.vpc_name}"
            Author = var.author
        }
}
/*** Associate the private route table with the private subnet.*/
resource "aws_route_table_association" "private" {
    count = var.private_subnets_count
    subnet_id = element(aws_subnet.private_subnets.*.id, count.index)
    route_table_id = aws_route_table.private_rt.id
}
Now let's run terraform apply. But we need to update our main.tf files (as this is our entry terraform file) to be aware of our subnets and module variables and secrets.tfvars (for our variables).
variable "vpc_id" {}
variable "vpc_cidr_block" {}
variable "private_subnets_count" {}
variable "public_subnets_count" {}
variable "availability_zones" {}
variable "public_subnets" {}
variable "private_subnets_count" {}
variable "public_subnets_count" {}
variable "availability_zones" {}

module "subnet_module" {
    source     = "./modules"
    vpc_id     = aws_vpc.main_vpc.id
    vpc_cidr_block = aws_vpc.main_vpc.cidr_block
    availability_zones = var.availability_zones
    public_subnets_count = var.public_subnets_count
    private_subnets_count = var.private_subnets_count
 }
availability_zones = ["us-east-1a", "us-east-1b", "us-east-1c", "us-east-1d", "us-east-1e"]
Our subnets and respective securities are ready. Now we can initialize it, plan, and apply with Terraform.
We will run terraform apply to create the resources. You can run terraform plan before to see what resources you are actually creating.
In the terminal run terraform apply -var-file=secrets.tfvars.

Just keep in mind that the number of resources added here might defer from yours.
Here's the AWS Console (subnets, elastic address, route_tables):
 subnets
 elastic ip
 route tables
How to Setup a VPC Bastion Host
We deployed our Jenkins cluster inside the private subnets. Because the cluster lacks a public IP, instances won't be publicly available via the internet. So to take care of this, we'll set up a bastion host so that we can access Jenkins instances safely.
Add the following resources and security group in the bastion.tf file:
/*** A security group to allow SSH access into our bastion instance.*/
resource "aws_security_group" "bastion" {
    name   = "bastion-security-group"
    vpc_id = var.vpc_id

    ingress {
        protocol    = "tcp"
        from_port   = 22
        to_port     = 22
        cidr_blocks = ["0.0.0.0/0"]
    }
    egress {
        protocol    = -1
        from_port   = 0
        to_port     = 0
        cidr_blocks = ["0.0.0.0/0"]
   }

   tags = {
           Name = "aws_security_group.bastion_jenkins"
   }
}

/*** The public key for the key pair we'll use to ssh into our bastion instance.*/

resource "aws_key_pair" "bastion" {
    key_name   = "bastion-key-jenkins"
    public_key = var.public_key
 }

 /*** This parameter contains the AMI ID for the most recent Amazon Linux 2 ami,* managed by AWS.*/

 data "aws_ssm_parameter" "linux2_ami" {
     name = "/aws/service/ami-amazon-linux-latest/amzn-ami-hvm-x86_64-ebs"
}

/*** Launch a bastion instance we can use to gain access to the private subnets of* this availabilty zone.*/

resource "aws_instance" "bastion" {
    ami           = data.aws_ssm_parameter.linux2_ami.value
    key_name      = aws_key_pair.bastion.key_name
    instance_type = "t2.large"
    associate_public_ip_address = true
    subnet_id                   = element(aws_subnet.public_subnets, 0).id
    vpc_security_group_ids      = [aws_security_group.bastion.id]

    tags = {
        Name        = "jenkins-bastion"
    }
}

output "bastion" { value = aws_instance.bastion.public_ip }
Let's see what's going on in the code here:
- bastion security group resource – Newly generated EC2 instances do not allow SSH access.
- We will link a security group to the active instance in order to enable SSH access to the bastion hosts. Any inbound (ingress) traffic on port 22 (SSH) from anyplace (0.0.0.0/0) will be permitted by the security group. To improve security and prevent security breaches, you can substitute your own public IP address/32 or network address for the CIDR source block.
- aws_key_pair – To be able to connect to the bastion host using SSH and the private key, we added an SSH key pair when we created the EC2. Our public SSH key is used in the key pair. Using the sshkeygen command, you can also create a new one.
- aws_ssm_parameter – The Amazon 2 Linux machine image is used by the EC2 instance. The AMI ID is obtained from the AWS marketplace using the AWS AMI data source
- aws_instance – Finally, we deploy our EC2 bastion instance with its defined configurations and access
- output – By specifying an output, we use the Terraform outputs functionality to show the IP address in the terminal session.
Now, let’s update our variable within the modules and the main.tf with the new public_key we are passing as a variable:
variable "public_key"{}
varable "public_key" {}
module "subnet_module" {
    source     = "./modules"
    ...
    publc_key = var.public_key
}
public_key = "enter-your-public-key"
We will run terraform apply to create the resources. You can run terraform plan before to see what resources you are actually creating.
On the terminal, let's run terraform apply -var-file=secrets.tfvars:
 terminal resources
Here's the output in the AWS console:
 aws-console instances
How to Provision our Compute Service
Jenkins master instance
So far, we have successfully been able to set up our VPC and networking topology. Finally, we will create our Jenkins EC2 instance that will use a Jenkins master AMI baked by Packer.
You can check out my previous article on how it was baked: Learn Infrastructure as Code by Building a Custom Machine Image in AWS on freecodecamp.org. Regardless, you can used any of your custom images if you have one.
 /*** This parameter contains our baked AMI ID fetch from the Amazon Console*/ data "aws_ami" "jenkins-master" {
     most_recent = true owners      = ["self"]
}

resource "aws_security_group" "jenkins_master_sg" {
    name        = "jenkins_master_sg"
    description = "Allow traffic on port 8080 and enable SSH"
    vpc_id      = var.vpc_id

    ingress {
        from_port       = "22"
        to_port         = "22"
        protocol        = "tcp"
        security_groups = [aws_security_group.bastion.id]
   }
   ingress {
           from_port       = "8080"
        to_port         = "8080"
        protocol        = "tcp"
        security_groups = [aws_security_group.lb.id]
   }
   ingress {
           from_port   = "8080"
        to_port     = "8080"
        protocol    = "tcp"
        cidr_blocks = ["0.0.0.0/0"]
  }
  egress {
          from_port   = "0"
        to_port     = "0"
        protocol    = "-1"
        cidr_blocks = ["0.0.0.0/0"]
  }

  tags = {
      Name = "jenkins_master_sg"
  }
}
Attaching a security group to the instance will enable inbound traffic on port 8080 (the Jenkins web dashboard) and SSH only from the bastion server and the VPC CIDR block.
resource "aws_key_pair" "jenkins" {
    key_name   = "key-jenkins"
    public_key = var.public_key
}

resource "aws_instance" "jenkins_master" {
    ami       = data.aws_ami.jenkins-master.id
    instance_type  = "t2.large"
    key_name       = aws_key_pair.jenkins.key_name
    vpc_security_group_ids = [aws_security_group.jenkins_master_sg.id]
    subnet_id              = element(aws_subnet.private_subnets, 0).id
    root_block_device {
        volume_type           = "gp3"
        volume_size           = 30
        delete_on_termination = false
    }

    tags = {
        Name = "jenkins_master"
     }
 }
Next, we create a variable and define the instance type that we used to deploy the EC2 instance. We won't be allocating executors or workers on the master, so t2.large (8 GB of memory and 2vCPU) should be adequate for the purposes of simplicity.
Thus, build jobs won't cause the Jenkins master to get overcrowded. But Jenkins' memory requirements vary depending on your project's build requirements and the tools used in those builds. It will require two to three threads, or at least 2 MB of memory, to connect to each build node.
Just a note: consider installing Jenkins workers to prevent overworking the master. As a result, a general-purpose instance can host a Jenkins master and offer a balance between computation and memory resources. In order to maintain the article's simplicity, we won't do that.
How to Create the Load Balancer
To access the Jenkins dashboard, we will create a public load balancer in front of the EC2 instance.
This Elastic load balancer will accept HTTP traffic on port 80 and forward it to the EC2 instance on port 8080. Also, it automatically checks the health of the registered EC2 instance on port 8080. If the Elastic Load Balancing (ELB) finds the instance unhealthy, it stops sending traffic to the Jenkins instance.
 /*** A security group to allow SSH access into our load balancer*/ resource "aws_security_group" "lb" {
     name   = "ecs-alb-security-group"
    vpc_id = var.vpc_id

    ingress {
        protocol    = "tcp"
        from_port   = 80
        to_port     = 80
        cidr_blocks = ["0.0.0.0/0"]
     }
     egress {
         from_port   = 0
        to_port     = 0
        protocol    = "-1"
        cidr_blocks = ["0.0.0.0/0"]
     }

     tags = {
         Name = "jenkins-lb-sg"
      }
 }

 /***Load Balancer to be attached to the ECS cluster to distribute the load among instances*/

 resource "aws_elb" "jenkins_elb" {
     subnets    = [for subnet in aws_subnet.public_subnets : subnet.id]
    cross_zone_load_balancing = true
    security_groups       = [aws_security_group.lb.id]
    instances             = [aws_instance.jenkins_master.id]

    listener {
        instance_port     = 8080
        instance_protocol = "http"
        lb_port           = 80
        lb_protocol       = "http"
     }

     health_check {
         healthy_threshold   = 2
        unhealthy_threshold = 2
        timeout             = 3
        target              = "TCP:8080"
        interval            = 5
    }

    tags = {
        Name = "jenkins_elb"
    }
 }

 output "load-balancer-ip" {
     value = aws_elb.jenkins_elb.dns_name
 }
Before, we do our terraform apply, let’s update our development/output.tf folder to output the load balancer DNS:
 output "load-balancer-ip" {
     value = module.subnet_module.load-balancer-ip
 }
On the terminal, run the following command: terraform apply -var-file="secrets.tfvars". Which will give you this:
 load balancer output
After you apply the changes with Terraform, the Jenkins master load balancer URL should be displayed in your terminal session.
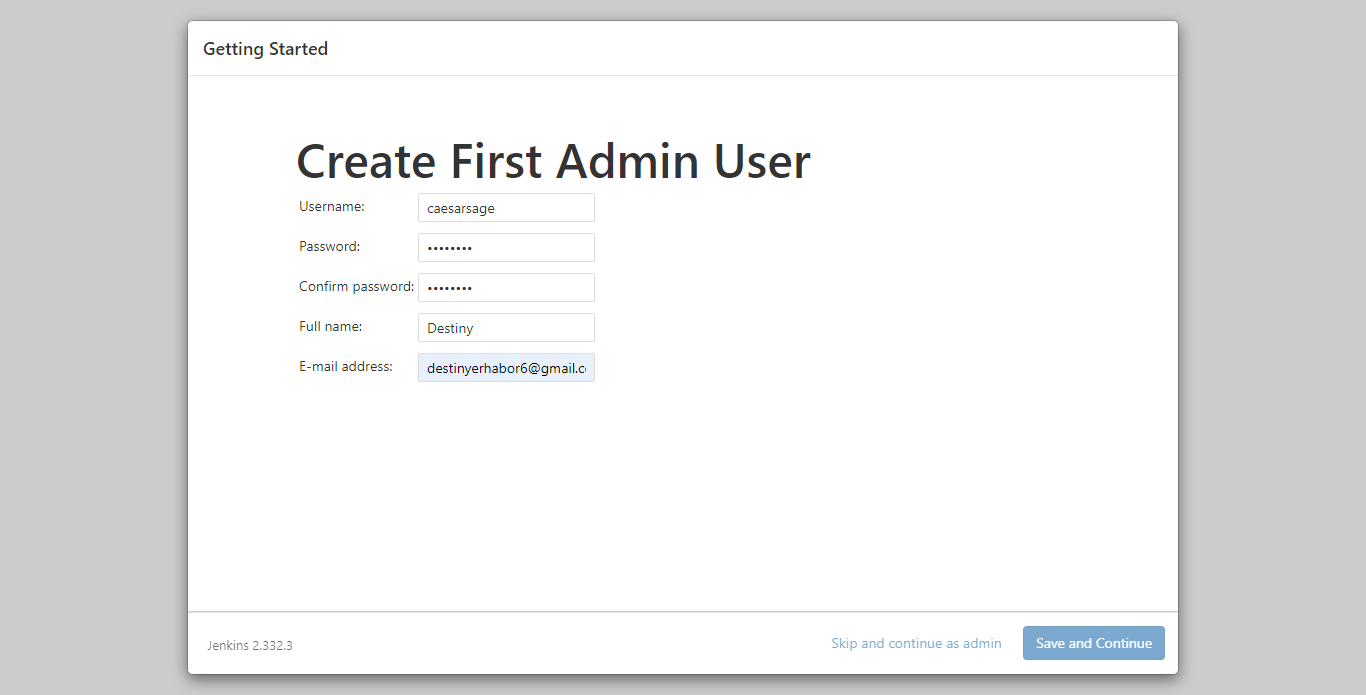
Point your favorite browser to the URL, and you should have access to the Jenkins web dashboard.
 jenkins-instances
Then just follow the screen instructions to UNLOCK.
 unlock jenkins
You can find the full code at this GitHub repo.
Cleaning Up
To avoid the unnecessary cost of running AWS services, you will need to run the following command to destroy all created and running resources:terraform destroy -var-file="secrets.tfvars" which should give this output:
 destroy resources
How interesting, right? With just few lines of code we can destroy and spin up our resources.
Summary
In this tutorial, you have learned how to use Terraform at a high level. You've also learned one of its applications by provisioning a Jenkins server on the AWS cloud platform.
You have also learned about best practices of Terraform backend states and modules.
To learn more about Terraform and its many use-cases, you can check out the official Terraform docs here.
Happy Learning!