

Time to learn how to use the operating system of the average hacker 🐧.
In this article, we will take a little tour of:
- The Linux operating system
- Package management
- The Linux file structure
- The Command Line Interface
And you get to learn how to update your Linux distro, too. Shall we? 🙃
What is Linux?
 Hacker Penguins | Credit: Wallpaperflare.com
The Linux kernel was created by Linus Torvalds in 1991. What makes it an operating system are the additions to the kernel such as a package manager, desktop environment, a shell, and a bootloader, among other components.
Because Linux is open-source, there are many customisations that have been made to the operating system. Each specific combination of customisations is called a distribution or distro for short.
There are over hundreds, if not thousands of distros in the world. Each of them has been optimised for a specific purpose, or simply for fun by people just like you and me.
Some famous distros are:
- Ubuntu (Most common)
- Elementary OS (One of the most beautiful)
- Debian (Neat and classy)
- Arch Linux (For linux bosses)
- Red Hat Enterprise Linux (Commercial and costly 💰)
What’s Linux got to do with hacking?
 A Guy Fawkes mask on a keyboard | Credit: Wallpaperflare.com
Linux is the choice OS of many hackers. Why, you may ask? Because it’s open-source, less prone to malware, lightweight, portable, and very compatible with multiple hacking tools.
Windows is a somewhat closed system so there are many things it doesn’t allow a hacker to do. Mac OS also isn’t that great either because of a lot of proprietary software. Linux has many distros to choose from and most can be modified as the user pleases without any restrictions.
A number of distros commonly used by hackers are Kali Linux, Parrot, BlackArch, and Archstrike. But don’t stop there, the options are unlimited.
As I mentioned earlier, Linux is also highly customisable. A great example of this feature is the desktop environment, which is a fancy name for how the desktop looks.
In Windows, there’s the basic taskbar, start menu, and a background with icons. It's nice that you can make slight modifications, and the feel changes with every new Windows version, especially with Windows 11. But Microsoft’s steps pale in comparison to the massive strides the Linux community has made when it comes to the way a desktop really looks and feels.
Common desktop environments include:
- Gnome (The best 😎)
- KDE Plasma (A Windows doppelganger)
- Xfce (For geeks)
- Mate (Hardware resource-efficient)
If you are into programming, you could build upon a current desktop environment released under the GNU license or develop your own desktop environment to suit your needs.
Tip: If you’re completely new to Linux, you might want to hold off a little before you replace your default OS. Many users are used to a GUI (Graphical User Interface) to carry out activities. But Linux users tend to use the CLI (Command Line Interface) more. This is simply because Linux is targeted towards developers and scientists, not the average user.
I personally suggest that you install a Linux distro on a hypervisor such as VirtualBox, and practice getting used to it. (I’m not suggesting VMware as it has a known vulnerability as at the time of writing). If you don’t know how to install Linux, you can learn it here.
Linux Package Management
 Colourful Packages | Credit: Wallpaperflare.com
Linux is quite different from other OSs, which means that installing apps is also different. Short version? You’re going to download apps off the distro app store via the CLI (terminal). Now for the long version.
.exe and .msi installers (which you use to install applications in Windows) don’t work all too well in Linux. So the managers of a distro have servers that host multiple applications optimised for that particular distro.
With some commands in the terminal from you, and help from a package manager, your computer connects to the server, downloads applications, and installs them. You can also get system updates this way.
A package manager is software used to manage software that is downloaded and installed. You may have heard of at least one of the following package managers:
- Apt (Linux)
- Chocolatey (Windows)
- MacPorts (MacOS)
- Pip (Python)
- Npm (Javascript)
- Gradle (Java)
- Composer (PHP)
Some .exe and .msi installers can work on Linux computers, but with a catch. A software called Wine adds a Windows compatibility layer to the distro to optimise it for Windows apps. Unfortunately, this doesn’t work for all applications.
Another alternative is to install Steam, or better still, SteamOS if you are a gamer with a flair for Linux 🎮.
Linux File Structure
 Folders | Credit: Wallpaperflare.com
The Linux OS has a directory tree just like Windows. At the very top (or bottom, depending on your perspective), we have the ‘/’ folder. This would be like your C: drive in Windows. It houses all your directories, files and apps. Below it are other folders which are summarised in the pic below
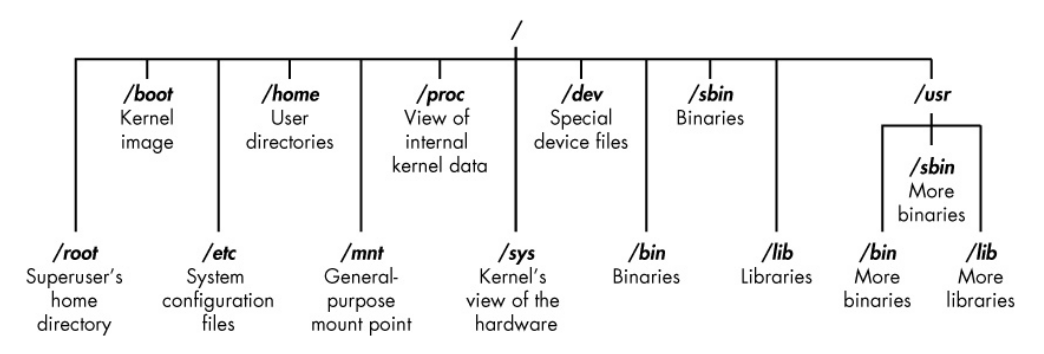 The Linux file structure | Credit: Hackers-arise.com
Some important directories to take note of are:
- /bin : binary or executable programs (nice place for keeping persistent scripts)
- /etc : system configuration files (an awesome place to obtain credentials)
- /home : home directory (the default current directory when you open up the terminal)
- /opt : optional or third-party software
- /tmp : temporary space, usually cleared on reboot (a great place to store enumeration scripts)
- /usr : User related programs
- /var : log files (the perfect place to frustrate a forensic analyst)
There is a lot more about Linux file structure and it probably deserves its own article, but this will do for now.
Now let's get a lot more hands-on experience in the terminal, and run some basic commands every hacker should know.
Intro to the Linux Shell
 Unix and its various derivatives | Credit: Wallpaperflare.com
A shell is a text-based interface for controlling a Linux computer. Similar to Microsofts’ Powershell or cmd, it is the interface between the user and the kernel, aside from the GUI (Graphical User Interface).
There are various types of shells, each made with improvements based off previous ones, or optimised for a particular goal.
Shells are used a lot by hackers because they are the fastest and most efficient way to deliver instructions to a computer. The GUI is fine, but can be rather limited because some features cannot be accessed graphically, or the tool you want to use simply doesn’t have a graphical interface.
Some common shells include:
- The Bourne shell (sh)
- The GNU-Bourne Again shell (bash)
- The Z shell (zsh)
- The C shell (csh)
- The Korn shell (ksh)
Quick lesson: The words ‘terminal’ and ‘shell’ are used interchangeably in the cybersecurity world and throughout this article. But, they are different. The terminal is the program that lets you access the shell via a graphical interface.
Basic Linux Shell Commands
In this article, we’ll go through the following commands: whoami, pwd, ls, cd, touch, cat, nano, operators, mv and cp, mkdir, rm and rmdir, stat, echo, grep, the ‘help’ flag and man pages.
You will need any Linux distro of your choice, though I suggest Kali. If you don’t know how to install one, you can read this article.
Open up the application called ‘Terminal’ and let’s begin. Shall we proceed? 🙃
How to use the whoami command
You use this command to check which user you are. On a personal computer, you are most likely to have only two accounts: the one created when installing the OS and root. If you are in the terminal as a normal user (account), you can try it out.
whoami
 whoami | Credit: Mercury
If you want to be root, run the command sudo su and put in your password. Try whoami and the terminal will tell you root:
 whoami as root | Credit: Mercury
Enterprise computers tend to have many users on one computer. As I stated in a previous article, each has various permissions, some more than others. When you gain initial access post-exploitation, you usually start of with a standard account. If you want to check if the name of the compromised account, use this command.
How to use the pwd command
The Present Working Directory (pwd) command informs you of where you currently are in the directory tree. By default this usually is the home directory.
pwd
 Present Working Directory | Credit: Mercury
If you are a beginner, it's quite normal to be lost in the directory tree and suddenly lose track of where you are. This command helps you to keep track of things.
Depending on your distro, you may see a ~ symbol when you open the terminal. That is the symbol for the default home directory for the user. It’s like the C:\Users\<default_user> folder in Windows, containing all user-specific files. In Linux, it will be as the format above /home/<default_user>.
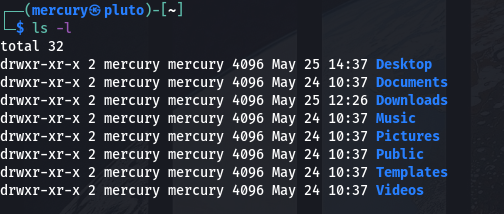
How to use the ls command
You use the ls command to list the contents of a directory. It lets you know what files are inside a directory without a GUI.
When used with flags, it’s a Swiss army knife, with various ways of showing what’s in the directory.
Common flags you might want to take note of are -l (long listing), -a (all aka show hidden files), and -c (show recently modified).ls.
 Listing | Credit: Mercury
Flags are features of applications/tools that allow you to tell them what to do. Let’s look at the -l flag for ls as an example. Long listing is a feature and can be activated by using the command ls -l .
 Long listing | Credit: Mercury
As you can see, running ls with the flag differs from just plain old ls. I’ll explain the extra details in another article, or you can go ahead and do some research yourself into what they are.
How to use the cd command
You use the Change Directory (cd) command to transverse across the directory tree.
cd <directory>
 Changing directory | Credit: Mercury
If you run the command ls -a, you will notice that there are two files that are always there no matter the folder: . and .. . The . file represents the current directory and the .. file represents the parent directory (the directory above the current one).
How to use the cat, more, and less commands
All the commands above are output commands. You use them to display the content of files to the terminal.
But there are notable differences here. cat is commonly used for files with small amounts of text. less and more are likely to be used for files with large amounts of text and output can be controlled with the arrow keys.
cat <file_name>
more <file_name>
less <file_name>
 cat vs more vs less | Credit: Mercury
You will notice that cat prints the output directly to your terminal, while more and less allow you to use the arrow keys. Output commands are used to gather information and credentials from compromised systems.
How to use the touch command
You use the touch command to create files. You can write to these files in a number of ways, such as using a text editor or piping input into it (more on that later).
You can make a file using the following syntax:
touch <file_name>
You can then use the ls command to check if your file has been created.
 Creating a file | Credit: Mercury
How to use the nano command
Nano is a popular built-in text editor in Linux. It’s very common because it's easy to use and it's supported in many CLI environments. Other common text editors are Vim (very annoying 😫) and gedit (as simple as Notepad 🙃).
You can edit a file with the following command:
nano <file_name>
 The nano interface | Credit: Mercury
There are some commands below the Nano interface that can aid you. ‘^’ simply means the Ctrl button and the ‘M’ button is Alt. ‘^S’ (or in this case Ctrl + S) is used to save the file after you write stuff to it. The nano command is used by hackers to change information in files, edit logs, or if you are a red hat hacker, delete essential configuration file lines.
Command Chaining Operators
‘Chaining’ commands is the concept of writing multiple commands together and executing them in a variety of ways. You usually do this with the use of special characters. Examples include:
- Ampersand (&): To run a program in the background
- Logical AND (&&): The following command will run only if the previous one successfully ran
- Pipe (|): The output of the previous command acts as input for the next command
- Overwrite (>): Overwrites the content of a file with the output of the previous one
- Append (>>): Appends the output from the previous command to a file
If you don’t understand how all these work, don't worry. They are usually run with other commands I’ll mention later in the article.
How to use the mv and cp commands
These are two commands that are quite similar but have notable differences. You use mv to move a file to another location. You use cp to copy a file to another location.
mv <file_name>
cp <file_name>
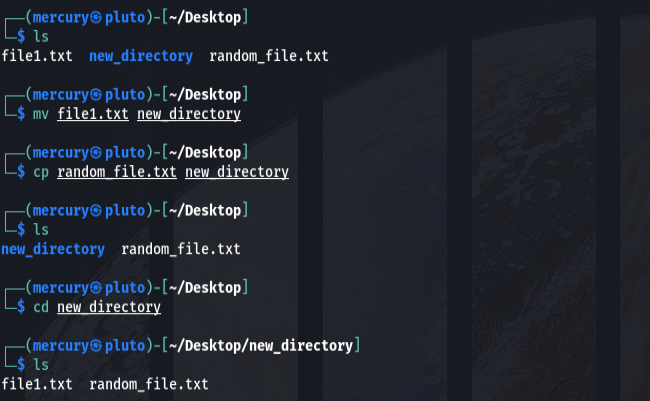 Examples of cp and mv | Credit: Mercury
There isn’t a command for renaming files in Linux, so most people use the mv command by using this syntax:
mv <original_file_name> <new_file_name>
Try it yourself to get a feel.
How to use the mkdir command
The mkdir command makes directories. You could use this to make a custom directory that only you can access on a compromised system to keep scripts or tools for persistence.
mkdir <directory>
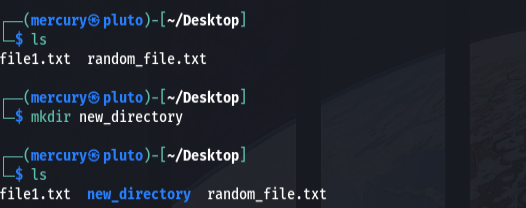 Making a new directory | Credit: Mercury
How to use the rm and rmdir commands
You might be able to figure this one out yourself. rm is the command to remove files, and rmdir is the command to remove directories.
rm <file_name>
rmdir <directory>
 rm, rmdir and rmdir with the ignore-fail-on-non-empty flag | Credit: Mercury
Linux is not too keen on getting folders deleted if they are not empty. To account for this, use the ignore-fail-if-non-empty flag to delete both files and directories.
Do note that you'll need to be extremely careful with these commands as they do not send the deleted files or directories to the Trash/Recycle bin. They're just gone.
How to use the stat command
You use the stat command to give information about a file.
stat <file_name>
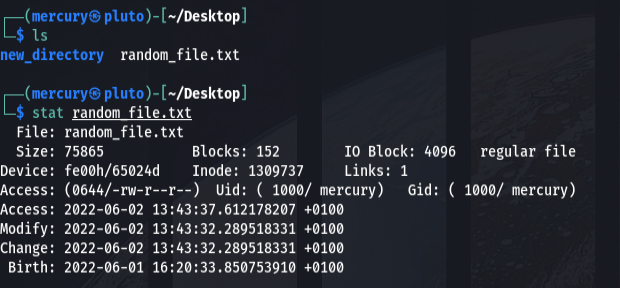 stat | Credit: Mercury
You can gather information about the file name and extension, permissions, when it was made, modified, last accessed and much more.
Now is a great time to learn about permissions. If you run the commands ls -la or stat, you may see something like this: drwxrwxrwx. Let’s break it down.
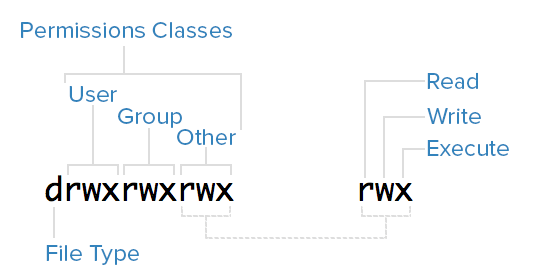 Permissions demystified | Credit: unix.stackexchange.com
The read (r) permission allows you to see the contents of a file, the write (w) permission allows you to modify the file, and the execute (x) permission allows you to run it as a process if it is a script or executable.
There are 3 classes of users that can access a file: a user, group and others. The root account is another class but that’s exempted here.
Each ‘rwx’ set is owned by a permission class. If the space reads a letter, the set has that permission. If it has a dash, they do not have permissions.
What about the ‘d’ at the front? That represents if it is a directory or a file. The ‘d’ means it’s a directory, and if it’s a dash (-), it's a file. Though, technically, a directory is a special type of file. But that’s a story for another day.
How to use the echo command
You use the echo command to print out input. Let’s use an example to make things clearer.
echo "<text>"
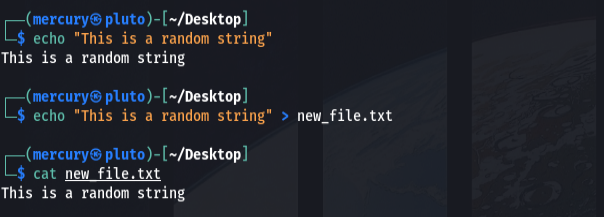
As you can see, you can use echo with the > operator to write text to files.
How to use the grep command
Let’s take things up a notch. You use the grep command to extract specified text from a file using the pipe operator.
grep "<text>"
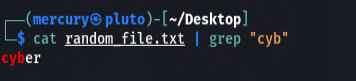 grep | Credit: Mercury
The command above isn’t as complicated as it first seems. We tell the computer to print the contents of a file, and using the pipe operator, tell the grep command to use it as input. This is called piping one command through another and can be done multiple times. The found text is shown in red.
grep is commonly used to look for certain texts in large files. A practical example would be if you are looking for credentials for a specific user in a file with a lot of text. You could use grep to look for words like ‘password’, ‘login’ and other keywords that you think would be around the credentials you are looking for.
How to use the ‘help’ flag and man pages
Last on our list are ‘help’ and man. The ‘help’ flag isn’t necessarily a command but it is a great aid if you are confused about an app or tool. Simply use the following:
<app or tool> --help
This will get quick, bite-size information about it. man, on the other hand, gives you all documented information about the app.
man <app>
 help vs man | Credit: Mercury
You may notice that in the gif, I used -h. That’s because its the short form of the flag. Some flags have short forms. If it starts with a single dash, that’s the short form. If it starts with two dashes, it’s the long form.
How to Update Your Linux
This entire section can actually be done with a single command but let’s break it down to understand the whole thing. The task: update your OS. In order to achieve the objective, you need to do two things.
- Update the local repository info: Think of this like checking for updates before actually downloading and installing them.
- Upgrade the system: As it says, we download the updates, and then install the updates.
The first command to run is:
sudo apt update
- sudo: To indicate we are running the command with higher permissions
- apt: The package manager
- update: To tell the computer to update its local information about the repository
After you punch in this command, you type in your password, and voilà. As you will observe, your computer will download information from the repositories on what packages (applications) to update.
I’ve already updated my own so it looks like the one below. But if this is your first time, it should take a few minutes.
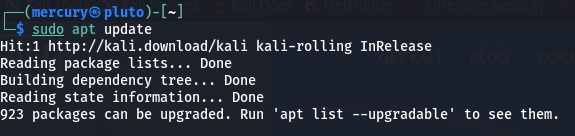 sudo apt update | Credit: Mercury
When that is over, you can run the next command to download and install the updates:
sudo apt full-upgrade
 sudo apt full-upgrade | Credit: Mercury
Note: You can interrupt the package download process, but never the installation process. That might break your OS and make it unusable.
During the upgrade you may notice some irregularities, such as the one below:
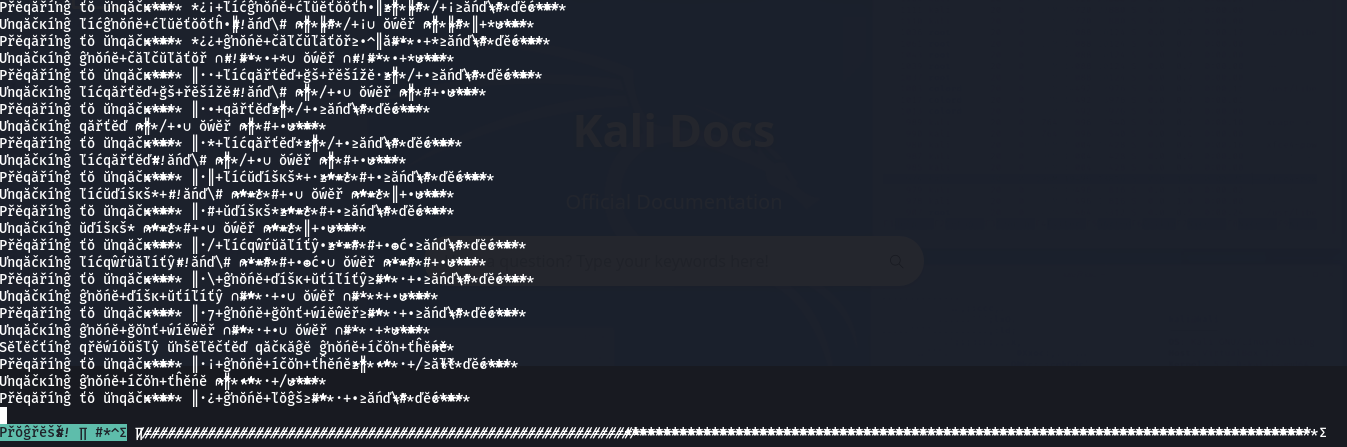 Scrambled upgrade | Credit: Mercury
Don’t worry, your computer isn’t going to blow up in your face or anything 😂. It’s just a bug. After the upgrades have finished installing, you will want to reboot your computer. This will allow your laptop to fully implement all updates.
 My personally customised desktop | Credit: Mercury
Congratulations 🎉. You have successfully updated your system. Remember how I said all this could be done with one command? Here it is. 👀
sudo apt update && sudo apt upgrade -y && reboot
Relax, it's not as complicated as it first seems. Take a look at the code bit by bit. The only unfamiliar pieces are the && symbols.
As I mentioned earlier, they are logical AND operators. This simply tells the computer to run the first command before, finish up, and then carry out the one after it. The -y flag tells the computer to carry out the upgrade without user input.
So the command above tells the computer to first update, then upgrade, and finally, reboot. Easy-peasy right? 😎
Conclusion
 Tux the Godfather ¦ Credit: Wallpaperflare.com
Let's do a quick recap of what you've done:
- We've had a tour of the Linux OS
- We've learned about package management in Linux
- We've reviewed the Linux file structure
- And we've run a few commands on the Command Line Interface
And on that note, we have come to the end of this article. I hope you enjoyed it. And as I always say, happy hacking! 🙃
Linux Resources
- You can read more about chaining commands here
- Here's a brilliant video on package management.
- And here's a quick introduction to the Linux file structure.
Acknowledgements
Thanks to Anuoluwapo Victor, Chinaza Nwukwa, Holumidey Mercy, Favour Ojo, Georgina Awani, and my family for the inspiration, support and knowledge used put this post together. You guys are awesome.