

Java is a go-to language for many programmers, and it's a critical skill for any software engineer. After learning Java, picking up other programming languages and advanced concepts becomes much easier.
In this book, I'll cover the practical knowledge you need to move from writing basic Java code to designing and building resilient software systems.
Many top companies rely on Java, so understanding it is essential, not just for tech jobs but also if you're considering starting your own business.
Looking to move up in your career? Contributing to open-source projects can be a smart move. This guide will also help you with the advanced skills you'll need to become an open-source Java developer and get noticed by employers.
And finally, the book will help you stay current with the latest in technology as you learn about the Java behind AI, big data, and cloud computing. You'll learn to create high-performance Java applications that are fast, efficient, and reliable.
Prerequisites
Before diving into the advanced concepts covered in this book, it is essential to have a solid foundation in Java fundamentals and Object-Oriented Programming (OOP).
This guide builds upon the knowledge and skills acquired in my previous book Learn Java Fundamentals – Object-Oriented Programming.
Here are the key prerequisites:
Strong Understanding of Java Basics
- Syntax and Structure: Familiarity with Java syntax and basic programming constructs.
- Basic Programming Concepts: Proficiency in writing and understanding simple Java programs.
Proficiency in Object-Oriented Programming Concepts
- Classes and Objects: Deep understanding of classes, objects, and their interactions.
- Inheritance and Polymorphism: Knowledge of how inheritance and polymorphism are implemented in Java.
- Encapsulation and Abstraction: Ability to encapsulate data and utilize abstraction in program design.
Experience with Java Data Types and Operators
- Primitive and Non-primitive Data Types: Comfort with using various data types in Java.
- Operators: Familiarity with arithmetic, relational, and logical operators.
Control Structures and Error Handling
- Control Flow Statements: Proficiency in using
if,else,switch, and loop constructs. - Exception Handling: Basic understanding of handling exceptions in Java.
Basic Understanding of Java APIs and Libraries
- Familiarity with using standard Java libraries and APIs for common tasks.
This guide assumes that you have already mastered these fundamental concepts and are ready to explore more advanced topics in Java programming.
This book will delve into complex topics that require a strong foundation in basic OOP principles, along with familiarity with Java's core features and functionalities.
How this Book Will Help You:
- Position yourself as a top candidate for senior Java developer roles, ready to tackle high-stakes projects and lead innovative software development initiatives.
- Transform you into an expert in high-demand areas such as concurrency and network programming, making you an invaluable asset to any team.
- Build a portfolio of impressive projects, from dynamic web applications to sophisticated mobile games, showcasing your advanced Java skills to potential employers.
- Learn to write code that's not only functional but exceptionally clean and efficient, adhering to the best practices that define expert-level Java programming.
- Engage with a community of like-minded developers, and by the end of this guide, you’ll not only gain knowledge but also a network of peers to collaborate with on future Java endeavors.
- Equip yourself with advanced problem-solving skills that enable you to dissect and overcome real-world software development challenges with innovative solutions.
- Stay ahead of the curve by mastering the latest Java features and frameworks that will define the future of software development.
- Prepare yourself to achieve Java certification, validating your skills and knowledge in a way that's recognized across the industry.
- Gain the confidence to contribute to open-source projects or even start your own, with the deep understanding of Java that this guide provides.
You're embarking on a journey to master Java Object-Oriented Programming, a skill that paves the way for diverse opportunities in software engineering. This guide will lay a foundation for you to transition from writing code to building robust software systems.
With these advanced skills, you're poised to contribute to open-source projects, qualify for top Java developer roles, and stay ahead in the tech industry. Your path from learning to leading in the Java community starts here. Let's begin.
Table of Contents
- Chapter 1: Unit Testing and Debugging
- Chapter 2. File Handling and Input/Output (I/O)
- Chapter 3: Deadlocks and How to Avoid Them
- Chapter 4: Java Design Patterns
- Chapter 5: How to Optimize Java Code for Speed and Efficiency
- Chapter 6: Concurrent Data Structures and Algorithms
- Chapter 7: Fundamentals of Java Security
- Chapter 8: Secure Communication in Java
- Conclusion
Chapter 1: Unit Testing and Debugging
In software development, unit testing and debugging play a vital role in ensuring the quality and reliability of your code. These practices provide a reliable means to verify the correctness of your code, allowing you to identify and address errors or bugs that may hinder its intended functionality.
Unit testing allows you to systematically test individual units of your code, such as functions or methods, applying pressure through tests to ensure their proper functioning.
By conducting these tests, you can establish a reliable method to validate the behavior of your code. This not only instills confidence in your work but also allows you to catch and address potential issues early on, making the development process more efficient.
To become an efficient software engineer, it is crucial to prioritize unit testing and debugging as integral parts of your software development workflow. By doing so, you can ensure the stability and effectiveness of your codebase, providing practical advice that will help you deliver high-quality software.
Fundamentals of Unit Testing
Java, with its rich ecosystem and extensive support for testing frameworks, offers a fertile ground for implementing unit testing practices. In this section, you'll learn about Java's testing landscape, highlighting essential tools and frameworks like JUnit.
JUnit is a widely used testing framework that provides a comprehensive set of features and functionalities to facilitate the creation and execution of high-quality unit tests in Java.
By leveraging tools like JUnit, you can confirm the effectiveness and efficiency of your testing efforts, leading to the development of robust and reliable Java applications.
Examples for unit testing include isolation, repeatability, and simplicity. When conducting unit tests, it is important to focus on testing the beginning, middle, and end of your functions.
By separating each key area and stress testing it, you can ensure thorough testing of your code. This approach aligns with the principles of the scientific method, where you aim to test all crucial aspects of your functions to achieve reliable and accurate results.
Unit Testing Examples
To illustrate unit testing in Java using JUnit, let's create some practical examples. We'll focus on a simple Java class and how we can apply unit testing to it, adhering to principles like isolation, repeatability, and simplicity.
Suppose we have a Java class named Calculator with a couple of basic mathematical operations:
public class Calculator {

    public int add(int a, int b) {
        return a + b;
    }

    public int subtract(int a, int b) {
        return a - b;
    }

    // Additional methods for multiplication and division can be added here.
}
Using JUnit, we will write test cases that individually test each method of the Calculator class.
First, include JUnit in your project. If you're using Maven, add the following dependency to your pom.xml:
 <dependency>
    <groupId>junit</groupId>
    <artifactId>junit</artifactId>
    <version>4.13.2</version>
    <scope>test</scope>
</dependency>
Now, let's create test cases:
import org.junit.Assert;
import org.junit.Test;

public class CalculatorTest {

    @Test
    public void testAdd() {
        Calculator calc = new Calculator();
        int result = calc.add(5, 3);
        Assert.assertEquals(8, result);
    }

    @Test
    public void testSubtract() {
        Calculator calc = new Calculator();
        int result = calc.subtract(5, 3);
        Assert.assertEquals(2, result);
    }

    // Additional test methods for multiplication and division can be added here.
}
In these test cases, we follow the principles of unit testing:
- Isolation: Each test method (
testAddandtestSubtract) is independent of others. They test specific functionalities of theCalculatorclass. This is what you want to do, test each case systematically and separately. - Repeatability: These tests can be run multiple times, and they will produce the same results, ensuring consistent behavior of the methods being tested.
- Simplicity: The tests are straightforward and focused solely on the method they are meant to test. For instance,
testAddonly tests theaddmethod.
How to Write Helpful Unit Tests
When crafting unit tests, it's essential to approach them with a clear and systematic strategy. This involves following certain guidelines and asking pertinent questions to ensure comprehensive and effective testing.
Here’s an outline to guide you through the process:
Create a New Object
Firstly, for each test, create a new instance of the object you're testing. This ensures that each test is independent and unaffected by the state changes caused by other tests. In Java, this typically looks like this:
@Test
public void testSomeMethod() {
    MyClass objectUnderTest = new MyClass();
    // Further test steps follow...
}
Use Assertions:
Utilize JUnit's assertion methods like assertEquals, assertTrue, and so on to verify the outcomes of your test. These assertions form the crux of your test, as they validate whether the object's behavior matches expectations. For example:
@Test
public void testAddition() {
    Calculator calc = new Calculator();
    int expectedResult = 10;
    int actualResult = calc.add(7, 3);
    Assert.assertEquals("Check if the addition method returns the correct sum", expectedResult, actualResult);
}
Initiate Several Objects:
In some cases, it may be necessary to initiate several objects to simulate more complex interactions. This is particularly useful when testing how different components of your application interact with each other. For instance:
@Test
public void testUserTransaction() {
    Account sender = new Account(1000); // Initial balance 1000
    Account receiver = new Account(500); // Initial balance 500
    Transaction transaction = new Transaction();
    transaction.transfer(sender, receiver, 200);
    Assert.assertEquals(800, sender.getBalance());
    Assert.assertEquals(700, receiver.getBalance());
}
Key Guidelines and Questions for Writing Tests
- What is the expected outcome? Clearly define what result you expect from the method you're testing. This guides your assertion statements.
- Are the tests independent? Ensure each test can run independently of the others, without relying on shared states or data.
- Are edge cases covered? Include tests for boundary conditions and edge cases, not just the typical or average scenarios. This is key for creating reliable software.
- Is each test simple and focused? Aim for simplicity. Each test should ideally check one aspect or behavior of your method.
- How does the method behave under different inputs? Test a variety of inputs, including valid, invalid, and edge cases, to ensure your method handles them correctly.
- Is the test repeatable and consistent? Your tests should produce the same results every time they're run, under the same conditions.
- Are the test names descriptive? Name your tests clearly to indicate what they are testing. For example,
testEmptyListReturnsZero()is more informative thantestList(). - Are you checking for exceptions? Where applicable, write tests to check that your method throws the expected exceptions under certain conditions.
Following these guidelines ensures that your unit tests are robust, reliable, and provide a comprehensive assessment of your code's functionality.
Practical Unit Testing Scenarios and Case Studies
Here are examples of Java code snippets that demonstrate real-world scenarios and case studies related to array manipulation, along with the corresponding unit tests using JUnit. These examples illustrate common challenges and how to address them through effective unit testing and debugging.
Sort a List of Products
Scenario: A Java method sorts an array of Product objects based on their price.
Product Class:
// Define a class named 'Product' representing a product with a name and price
public class Product {
    // Private instance variable 'name' to hold the name of the product
    private String name;

    // Private instance variable 'price' to hold the price of the product
    private double price;

    // Constructor to initialize a new Product object with a name and price
    public Product(String name, double price) {
        this.name = name; // Assign the 'name' argument to the 'name' instance variable
        this.price = price; // Assign the 'price' argument to the 'price' instance variable
    }

    // Public method 'getName' to return the name of the product
    public String getName() {
        return name; // Return the value of the 'name' instance variable
    }

    // Public method 'getPrice' to return the price of the product
    public double getPrice() {
        return price; // Return the value of the 'price' instance variable
    }
}
Sorting Method:
import java.util.Arrays;

public class ProductSorter {

    // This static method sorts an array of Product objects by their price in ascending order.
    public static void sortByPrice(Product[] products) {
        // Use Arrays.sort method with a lambda expression to define the sorting criteria.
        Arrays.sort(products, (p1, p2) -> Double.compare(p1.getPrice(), p2.getPrice()));
        // The lambda expression compares two Product objects based on their price.

        // The sort method modifies the 'products' array in place, sorting the Product objects by their price.
        // 'p1.getPrice()' and 'p2.getPrice()' fetch the prices of two Product objects for comparison.
        // 'Double.compare()' compares two double values and returns an integer to determine the order.
    }
}
Unit Test:
// Import the necessary classes for testing
import org.junit.Assert;
import org.junit.Test;

// Create a test class for the ProductSorter class
public class ProductSorterTest {

    // Define a test method to test the sorting of products by price
    @Test
    public void testSortByPrice() {
        // Create an array of Product objects with names and prices
        Product[] products = new Product[] {
            new Product("Laptop", 1200.00),
            new Product("Phone", 800.00),
            new Product("Watch", 300.00)
        };

        // Call the sortByPrice method to sort the products by price
        ProductSorter.sortByPrice(products);

        // Assert that the first product in the sorted array has the name "Watch"
        Assert.assertEquals("Watch", products[0].getName());

        // Assert that the second product in the sorted array has the name "Phone"
        Assert.assertEquals("Phone", products[1].getName());

        // Assert that the third product in the sorted array has the name "Laptop"
        Assert.assertEquals("Laptop", products[2].getName());
    }
}
Find the Maximum Value in an Array
Scenario: A method is supposed to find the maximum value in an array, but it's returning incorrect results.
Method with Bug:
// Class to perform operations on arrays
public class ArrayOperations {
    // Method to find the maximum value in an array
    public static int findMax(int[] array) {
        // Initialize max with the smallest possible integer value
        int max = Integer.MIN_VALUE;

        // Loop through each element in the array
        for (int i = 0; i < array.length; i++) {
            // Check if the current element is greater than the current max
            if (array[i] > max) {
                // If so, update the max with the new value
                max = array[i];
            }
        }

        // Return the maximum value found in the array
        return max;
    }
}
Unit Test:
// Import the necessary classes for testing
import org.junit.Assert;
import org.junit.Test;

// Define a test class for ArrayOperations
public class ArrayOperationsTest {
    // Define a test method for the findMax method in ArrayOperations
    @Test
    public void testFindMax() {
        // Define an array to test the findMax method
        int[] array = {3, 5, 9, 1, 6};
        // Call the findMax method with the test array and store the result
        int result = ArrayOperations.findMax(array);
        // Assert that the result is as expected (9 in this case)
        Assert.assertEquals(9, result); // This assertion will pass if the findMax method is correct
    }
}
Debugging and Fixing:
The issue is in the for-loop, which incorrectly starts from index 1 instead of 0. Correcting the loop to start from index 0 fixes the bug.
Corrected Method:
// Class to perform operations on arrays
public class ArrayOperations {
    // Method to find the maximum value in an array
    public static int findMax(int[] array) {
        // Initialize max with the smallest possible integer value
        int max = Integer.MIN_VALUE;

        // Loop through each element in the array
        for (int i = 0; i < array.length; i++) {
            // Check if the current element is greater than the current max
            if (array[i] > max) {
                // If so, update the max with the new value
                max = array[i];
            }
        }

        // Return the maximum value found in the array
        return max;
    }
}
These examples show how unit testing can reveal bugs in real-world scenarios and guide developers in debugging and fixing issues related to array manipulation in Java.
Unit Testing Best Practices
When it comes to writing and maintaining unit tests in Java, there are several best practices that can help ensure the effectiveness and reliability of your tests.
First and foremost, it is crucial to focus on test isolation. Each unit test should be independent of others, meaning that they should test specific functionalities of the code in isolation. This allows for a more systematic and targeted approach to testing, making it easier to identify and fix any issues that may arise.
By keeping tests isolated, you can ensure that changes made to one test do not inadvertently affect the results of other tests.
// Import the necessary classes for testing
import org.junit.Assert;
import org.junit.Test;

// Define a test class for Calculator
public class CalculatorTest {
    // Define a test method for the add method in Calculator
    @Test
    public void testAddition() {
        // Create a new Calculator object
        Calculator calc = new Calculator();
        // Assert that the add method returns the correct result
        Assert.assertEquals(5, calc.add(2, 3));
    }

    // Define a test method for the subtract method in Calculator
    @Test
    public void testSubtraction() {
        // Create a new Calculator object
        Calculator calc = new Calculator();
        // Assert that the subtract method returns the correct result
        Assert.assertEquals(1, calc.subtract(4, 3));
    }
}
Another important best practice is to prioritize test repeatability. Tests should be designed in such a way that they can be run multiple times, producing the same results each time.
This ensures consistent behavior and allows for easy identification of any changes or regressions in the code. By making tests repeatable, you can have confidence in the stability and reliability of your codebase.
public class StringFormatterTest {
    @Test
    public void testUpperCaseConversion() {
        StringFormatter formatter = new StringFormatter();
        Assert.assertEquals("HELLO", formatter.toUpperCase("hello"));
    }
}
Simplicity is also key when it comes to writing unit tests. Each test should be focused solely on the method or functionality it is meant to test.
By keeping tests simple and concise, you can improve readability and maintainability. Additionally, simple tests are easier to understand and debug, making it quicker to identify and fix any issues that may arise.
public class ArrayUtilsTest {
    @Test
    public void testFindMaximum() {
        int[] numbers = {1, 3, 5, 7};
        Assert.assertEquals(7, ArrayUtils.findMaximum(numbers));
    }
}
When writing unit tests, it is important to consider edge cases and boundary conditions. These are scenarios that may not be covered by typical or average test cases.
By including tests for edge cases, you can ensure that your code handles these situations correctly and avoid potential bugs or errors. Testing these extreme scenarios is crucial for creating reliable and robust software.
public class ArrayUtilsTest {
    @Test(expected = IllegalArgumentException.class)
    public void testMaximumWithEmptyArray() {
        ArrayUtils.findMaximum(new int[]{});
    }
}
Test names should be descriptive and indicative of what is being tested. This helps improve the readability and understandability of the tests, making it easier for other developers to navigate and interpret them.
Clear and concise test names also serve as documentation for the behavior and functionality being tested.
public class PasswordValidatorTest {
    @Test
    public void testPasswordLengthValidity() {
        Assert.assertTrue(PasswordValidator.isValidLength("secure123"));
    }

    @Test
    public void testPasswordSpecialCharPresence() {
        Assert.assertFalse(PasswordValidator.containsSpecialCharacter("password"));
    }
}
In addition to these best practices, it is essential to follow a systematic and comprehensive approach to unit testing. This involves asking pertinent questions and following guidelines to ensure comprehensive and effective testing.
Questions such as "What is the expected outcome?" and "Are the tests independent?" help guide the creation of thorough and reliable unit tests.
public class UserAuthenticationTest {
    @Test
    public void testValidUserLogin() {
        User user = new User("username", "password");
        Authentication auth = new Authentication();
        Assert.assertTrue(auth.isValidLogin(user));
    }

    // More tests covering different scenarios, such as invalid credentials, null values, etc.
}
These practices will help ensure the stability and effectiveness of your codebase, allowing you to deliver high-quality software that meets the highest standards of functionality and reliability.
Hands-On Exercises for Unit Testing in Java
Beginner Level: Exercise & Solution
Exercise: Testing a Sum Function
Create a function sumArray that takes an array of integers and returns the sum of all the elements. Write a unit test to validate that the function correctly sums the array elements.
Solution with Code:
// Java Method
public class ArrayOperations {
    public static int sumArray(int[] numbers) {
        int sum = 0; // Initialize sum to 0
        for (int num : numbers) { // Iterate through each element
            sum += num; // Add each element to sum
        }
        return sum; // Return the total sum
    }
}

// Unit Test
import org.junit.Assert;
import org.junit.Test;

public class ArrayOperationsTest {
    @Test
    public void testSumArray() {
        int[] numbers = {1, 2, 3, 4}; // Test array
        int expectedSum = 10; // Expected sum of the array elements
        // Assert that the sumArray method returns the correct sum
        Assert.assertEquals(expectedSum, ArrayOperations.sumArray(numbers));
    }
}
Intermediate Level: Exercise & Solution
Exercise: Testing Array Equality
Create a function arraysEqual that compares two arrays of integers and returns true if they are equal (same elements in the same order) and false otherwise. Write a unit test to validate the function's behavior for equal and unequal arrays.
Solution with Code:
// Java Method

// Class to perform operations on arrays
public class ArrayOperations {
    // Method to calculate the sum of elements in an array
    public static int sumArray(int[] numbers) {
        // Initialize sum to 0
        int sum = 0;
        // Iterate through each element in the array
        for (int num : numbers) {
            // Add each element to the sum
            sum += num;
        }
        // Return the total sum of the array elements
        return sum;
    }
}

// Unit Test

// Import the necessary classes for testing
import org.junit.Assert;
import org.junit.Test;

// Define a test class for ArrayOperations
public class ArrayOperationsTest {
    // Define a test method for the sumArray method in ArrayOperations
    @Test
    public void testSumArray() {
        // Define a test array
        int[] numbers = {1, 2, 3, 4};
        // Define the expected sum of the array elements
        int expectedSum = 10;
        // Assert that the sumArray method returns the correct sum
        Assert.assertEquals(expectedSum, ArrayOperations.sumArray(numbers));
    }
}
Advanced Level: Exercise & Solution
Exercise: Testing Array Rotation
Create a function rotateArray that takes an array and a positive integer k, and rotates the array to the right by k places. Write a unit test to validate the function's behavior for different values of k.
Solution with Code:
// Java Method

// Class to perform operations on arrays
public class ArrayRotations {
    // Method to rotate an array to the right by k positions
    public static void rotateArray(int[] array, int k) {
        // Get the length of the array
        int length = array.length;
        // Handle rotations larger than array length
        k %= length;
        // Reverse the whole array
        reverse(array, 0, length - 1);
        // Reverse the first part
        reverse(array, 0, k - 1);
        // Reverse the second part
        reverse(array, k, length - 1);
    }

    // Method to reverse a portion of an array from index 'start' to 'end'
    private static void reverse(int[] array, int start, int end) {
        // Loop until start is less than end
        while (start < end) {
            // Swap the elements at the start and end indices
            int temp = array[start];
            array[start] = array[end];
            array[end] = temp;
            // Increment start and decrement end
            start++;
            end--;
        }
    }
}

// Unit Test

// Import the necessary classes for testing
import org.junit.Assert;
import org.junit.Test;

// Define a test class for ArrayRotations
public class ArrayRotationsTest {
    // Define a test method for the rotateArray method in ArrayRotations
    @Test
    public void testRotateArray() {
        // Define a test array
        int[] array = {1, 2, 3, 4, 5};
        // Define the number of rotations
        int k = 2;
        // Call the rotateArray method with the test array and number of rotations
        ArrayRotations.rotateArray(array, k);
        // Define the expected rotated array
        int[] expectedRotatedArray = {4, 5, 1, 2, 3};
        // Assert that rotateArray correctly rotates the array
        Assert.assertArrayEquals(expectedRotatedArray, array);
    }
}
Each example provides a clear task, solution, and comments to guide the learner through the process of writing and understanding unit tests in Java.
These exercises range from basic array operations to more complex tasks like array rotation, covering different aspects of array manipulation and testing.
Additional Unit Testing Resources
Chapter 2: File Handling and Input/Output (I/O)
File Handling in Java using FileWriter and FileReader
File handling is an essential aspect of programming, especially when it comes to reading from and writing to files.
In Java, file handling is accomplished using various classes and methods provided by the language's standard library. One such set of classes is FileWriter and FileReader, which are specifically designed for handling textual data.
This chapter explores the concepts and techniques involved in file handling using FileWriter and FileReader in Java.
We will discuss the importance of character streams and why choosing the right stream, such as FileWriter and FileReader, is crucial for working with textual data. We'll also delve into the constructors and methods of these classes, explore practical demonstrations, and provide exercises to enhance your understanding and proficiency in Java file handling.
What is FileWriter?
FileWriter is a class in Java that is used for writing character-based data to a file. It is a subclass of the OutputStream class, which allows for the writing of byte-based data.
FileWriter is specifically designed for handling textual data and provides convenient methods for writing characters, character arrays, and strings to a file.
Constructors of FileWriter:
There are several constructors available in FileWriter for creating instances of the class. These constructors provide flexibility in specifying the file to be written, the character encoding to be used, and the buffer size for efficient writing. The constructors include options for passing a File object, a FileDescriptor, or a String representing the file path.
It is important to choose the appropriate constructor based on the specific use case. For example, using the File constructor allows for easy manipulation of file properties, while the String-based constructor provides a more convenient way to specify the file path. Also, specifying the character encoding and buffer size can greatly impact the performance and behavior of the FileWriter.
Methods of FileWriter:
FileWriter provides various methods for writing data to a file. The key methods include write(), flush(), and close().
The write() method allows for writing single characters, character arrays, and strings to the file. It provides flexibility in appending data to an existing file or overwriting the content of the file.
The flush() method is used to flush any buffered data to the file. This ensures that all data is written immediately and not held in memory.
The close() method is used to close the FileWriter and release any system resources associated with it. It is important to always close the FileWriter after writing to ensure that all data is properly written and resources are freed.
Enhancing Performance with BufferedWriter:
To improve the performance of writing data to a file, you can use FileWriter in conjunction with BufferedWriter. BufferedWriter is a class that provides buffering capabilities, reducing the number of system calls and improving overall efficiency.
By wrapping the FileWriter with a BufferedWriter, data can be written to a buffer first, and then flushed to the file when necessary. This reduces the overhead of frequent disk writes and can significantly enhance the performance of file writing operations.
What is FileReader?
FileReader is an important class in Java that specializes in reading character streams from a file. It is a subclass of the InputStreamReader class, which is responsible for converting byte streams into character streams.
FileReader inherits the functionality of InputStreamReader and provides additional methods specifically designed for reading textual data from a file.
Constructors of FileReader
FileReader offers several constructors that allow for different file access scenarios. These constructors provide flexibility in specifying the file to be read, the character encoding to be used, and the buffer size for efficient reading.
You can choose the appropriate constructor depending on your use case. For example, a FileReader instance can be created by passing a File object, a FileDescriptor, or a String representing the file path.
Methods of FileReader
FileReader provides various methods for reading data from a file. The read() method is the primary method used for reading characters from a file. It returns the next character in the file as an integer value, or -1 if the end of the file has been reached.
FileReader also provides a close() method to release any system resources associated with the FileReader instance. It also allows for handling IOExceptions, which are exceptions that may occur during file reading operations.
Java Code to Demonstrate FileWriter
import java.io.FileWriter;
import java.io.IOException;

public class FileWriterDemo {
    public static void main(String[] args) {
        // Accept a string
        String str = "FileWriter is a class in Java used for writing character-based data to a file.";

        // attach a file to FileWriter
        try (FileWriter fw = new FileWriter("output.txt")) {
            // read character wise from string and write into FileWriter
            fw.write(str);

            // message when writing successful
            System.out.println("Writing successful");
        } catch (IOException e) {
            e.printStackTrace();
        }
    }
}
Hands-On Exercises and Real-World Applications
How to Write to a File using FileWriter
Task: Create a program to write a list of students' names to a text file.
import java.io.FileWriter;
import java.io.IOException;
import java.util.Arrays;
import java.util.List;

public class WriteStudentsList {
    public static void main(String[] args) {
        List<String> students = Arrays.asList("Alice", "Bob", "Charlie");

        try (FileWriter writer = new FileWriter("students.txt")) {
            for (String student : students) {
                writer.write(student + "\\n");
            }
            System.out.println("Student list written to file.");
        } catch (IOException e) {
            e.printStackTrace();
        }
    }
}
Exercise: Modify the program to append new students to the existing list without overwriting the current data.
How to Read from a File using FileReader
Task: Create a program to read the contents of the "students.txt" file created above and display them on the console.
import java.io.FileReader;
import java.io.IOException;

public class ReadStudentsList {
    public static void main(String[] args) {
        try (FileReader reader = new FileReader("students.txt")) {
            int character;
            while ((character = reader.read()) != -1) {
                System.out.print((char) character);
            }
        } catch (IOException e) {
            e.printStackTrace();
        }
    }
}
Now, let's look at some practical code examples for common pitfalls in file handling using Java's FileWriter and FileReader classes, along with solutions:
File Not Found:
- Pitfall: Attempting to read from or write to a file that doesn't exist.
- Solution: Always check if the file exists before performing read/write operations. Use the
Fileclass to create a new file if it does not exist.
import java.io.File;
import java.io.FileWriter;
import java.io.IOException;

public class CheckFileExists {
    public static void main(String[] args) {
        File file = new File("example.txt");
        if (!file.exists()) {
            try {
                file.createNewFile(); // Create the file if it does not exist
            } catch (IOException e) {
                e.printStackTrace();
            }
        }
        try (FileWriter writer = new FileWriter(file)) {
            writer.write("Hello, world!");
        } catch (IOException e) {
            e.printStackTrace();
        }
    }
}
Incorrect File Paths:
- Pitfall: Using incorrect file paths leading to
FileNotFoundException. - Solution: Use absolute paths for clarity or ensure the relative path is correct. Pay attention to cross-platform path separators.
public class IncorrectFilePath {
    public static void main(String[] args) {
        String filePath = "/absolute/path/to/file.txt"; // Use absolute path
        // Rest of the file handling code
    }
}
Resource Leakage:
- Pitfall: Not closing
FileWriterorFileReaderproperly, which can lead to resource leakage. - Solution: Use try-with-resources to ensure that file resources are automatically closed.
import java.io.FileReader;
import java.io.IOException;

public class AutoCloseFile {
    public static void main(String[] args) {
        try (FileReader reader = new FileReader("example.txt")) {
            int character;
            while ((character = reader.read()) != -1) {
                System.out.print((char) character);
            }
        } catch (IOException e) {
            e.printStackTrace();
        }
    }
}
Overwriting File Content:
- Pitfall: Accidentally overwriting existing file content.
- Solution: Use the
FileWriterconstructor that allows for appending content (new FileWriter("filename.txt", true)).
import java.io.FileWriter;
import java.io.IOException;

public class AppendToFile {
    public static void main(String[] args) {
        try (FileWriter writer = new FileWriter("example.txt", true)) { // Append mode
            writer.write("\\nMore content");
        } catch (IOException e) {
            e.printStackTrace();
        }
    }
}
Character Encoding Issues:
- Pitfall: Issues with character encoding leading to corrupted file data.
- Solution: Be aware of the platform's default charset. Specify charset explicitly if handling non-text files or special character sets.
import java.io.OutputStreamWriter;
import java.io.FileOutputStream;
import java.io.IOException;
import java.nio.charset.StandardCharsets;

public class CharsetExample {
    public static void main(String[] args) {
        try (OutputStreamWriter writer = new OutputStreamWriter(new FileOutputStream("example.txt"), StandardCharsets.UTF_8)) {
            writer.write("Text with UTF-8 encoding");
        } catch (IOException e) {
            e.printStackTrace();
        }
    }
}
Buffering for Performance:
- Pitfall: Inefficient file writing/reading operations.
- Solution: Use
BufferedWriterorBufferedReaderfor efficient reading and writing operations.
import java.io.BufferedWriter;
import java.io.FileWriter;
import java.io.IOException;

public class BufferedWriterExample {
    public static void main(String[] args) {
        try (BufferedWriter writer = new BufferedWriter(new FileWriter("example.txt"))) {
            writer.write("Efficient writing using BufferedWriter");
        } catch (IOException e) {
            e.printStackTrace();
        }
    }
}
These examples demonstrate practical solutions to overcome common challenges encountered in file handling in Java.
File handling is a fundamental aspect of programming, and in Java, it can be effectively accomplished using the FileWriter and FileReader classes.
FileWriter is specifically designed for writing character-based data to a file, offering convenient methods for writing characters, character arrays, and strings. On the other hand, FileReader specializes in reading character streams from a file, providing additional methods for reading textual data.
Byte Streams vs Character Streams
In this section, you'll learn about the concept of streams in Java. Streams are an essential part of the Java I/O (Input/Output) model, allowing the transfer of data between a program and an external source or destination.
There are two main types of streams in Java: Byte Streams and Character Streams.
Byte Streams are used for 8-bit byte operations and are commonly employed for reading and writing binary data. They are particularly useful when dealing with files or streams that contain non-textual information, such as images or audio files.
Examples of key Java classes associated with Byte Streams include FileInputStream and FileOutputStream.
On the other hand, Character Streams are designed for 16-bit Unicode operations and are primarily used for reading and writing textual data. They are especially suitable when working with text files or when you need to handle character-based input or output.
Important Java classes for Character Streams include FileReader and FileWriter.
Advantages and Limitations of Byte and Character Streams
To effectively utilize Byte Streams and Character Streams in your Java programs, here are some practical recommendations:
- Choose the appropriate stream type based on the nature of your data. If you are working with binary data or non-textual information, Byte Streams provide efficient operations for handling such data. But if your application primarily deals with textual data, such as log files or user-generated content, Character Streams are the recommended choice.
- Use the appropriate Java classes associated with each stream type. For Byte Streams, use classes like
FileInputStreamandFileOutputStreamfor reading from and writing to files. For Character Streams, use classes likeFileReaderandFileWriterfor reading and writing text data. - Handle exceptions properly and close streams to avoid resource leaks. This ensures smooth data transfer and manipulation, enhancing the overall performance and reliability of your Java applications.
Byte Stream and Character Stream Code Examples
Here's an advanced code example that demonstrates the use of Byte Streams and Character Streams in Java:
import java.io.*;

public class StreamExample {
    public static void main(String[] args) {
        String inputFilePath = "input.txt";
        String outputFilePath = "output.txt";

        // Example using Byte Streams
        try (FileInputStream fis = new FileInputStream(inputFilePath);
             FileOutputStream fos = new FileOutputStream(outputFilePath)) {

            byte[] buffer = new byte[1024];
            int bytesRead;
            while ((bytesRead = fis.read(buffer)) != -1) {
                // Process the binary data
                // Example: Encrypt the data
                byte[] encryptedData = encryptData(buffer, bytesRead);

                // Write the encrypted data to the output file
                fos.write(encryptedData);
            }

        } catch (IOException e) {
            e.printStackTrace();
        }

        // Example using Character Streams
        try (FileReader fr = new FileReader(inputFilePath);
             FileWriter fw = new FileWriter(outputFilePath)) {

            BufferedReader br = new BufferedReader(fr);
            BufferedWriter bw = new BufferedWriter(fw);

            String line;
            while ((line = br.readLine()) != null) {
                // Process the text data
                // Example: Convert the text to uppercase
                String processedLine = line.toUpperCase();

                // Write the processed line to the output file
                bw.write(processedLine);
                bw.newLine();
            }

        } catch (IOException e) {
            e.printStackTrace();
        }
    }

    private static byte[] encryptData(byte[] data, int length) {
        // Example encryption logic
        // This is just a placeholder and does not represent a secure encryption algorithm
        byte[] encryptedData = new byte[length];
        for (int i = 0; i < length; i++) {
            encryptedData[i] = (byte) (data[i] + 1);
        }
        return encryptedData;
    }
}
In this code example, we have two sections: one demonstrating the use of Byte Streams and another demonstrating the use of Character Streams.
For Byte Streams, we use FileInputStream to read binary data from an input file (input.txt). We read the data in chunks using a byte buffer and process the data (in this case, encrypting it). Then, we use FileOutputStream to write the encrypted data to an output file (output.txt).
For Character Streams, we use FileReader to read text data from the same input file. We read the data line by line using a BufferedReader, process the data (in this case, converting it to uppercase), and use FileWriter and BufferedWriter to write the processed data to the output file.
These examples showcase the practical use of Byte Streams and Character Streams for handling binary and textual data, respectively.
Remember to handle exceptions properly and close the streams after use to ensure efficient and reliable stream-based operations in your Java programs.
When choosing between Byte Streams and Character Streams in Java, consider the nature of your data and the specific requirements of your application.
For non-textual or binary data, use Byte Streams. For textual data, use Character Streams. Handle exceptions properly and close streams after use.
By understanding the advantages and limitations of each stream type, you can make informed decisions and ensure efficient data processing in your Java applications.
How to Handle Exceptions in I/O
Java Exception Basics
In the realm of Java programming, understanding exceptions is crucial for writing reliable and maintainable code. Exceptions in Java refer to conditions that disrupt the normal flow of a program. They are classified based on their nature to handle errors or exceptional situations that arise during runtime.
Java handles exceptions using "try-catch" blocks, allowing programmers to isolate and manage error conditions effectively. This understanding is key to anticipating and addressing potential issues, leading to more robust code.
Familiarity with the wide range of Java exceptions is important for precise error reporting and targeted handling. Best practices in throwing exceptions include adhering to Java’s syntax and guidelines, and judicious use of custom exceptions to improve code clarity and maintainability.
Exception handling extends beyond "try-catch" blocks. The "finally" block is used for cleanup operations, ensuring resource release regardless of exception occurrence. Nested try-catch structures provide fine-grained control over error management.
Anatomy of a Java Exception
In Java, we can use the try-catch blocks to isolate and handle exceptions. Here's an example:
try {
    // Code that might throw an exception
    // ...
} catch (Exception e) {
    // Exception handling code
    // ...
}
By catching the exception, we can gracefully recover from error conditions and prevent our program from crashing.
Java provides a wide range of exception types to choose from. Let's say we have a method that reads data from a file. We can handle specific exceptions that might occur, such as FileNotFoundException and IOException. Here's an example:
try {
    // Code that reads data from a file
    // ...
} catch (FileNotFoundException e) {
    // Handle file not found exception
    // ...
} catch (IOException e) {
    // Handle IO exception
    // ...
}
By handling specific exceptions, we can provide more precise error reporting and targeted exception handling.
In addition to try-catch blocks, we can use the finally block for cleanup operations. For example, if we open a file in the try block, we can ensure that the file is properly closed in the finally block, regardless of whether an exception occurs. Here's an example:
FileWriter fileWriter = null;
try {
    fileWriter = new FileWriter("output.txt");
    // Code that writes data to the file
    // ...
} catch (IOException e) {
    // Handle IO exception
    // ...
} finally {
    if (fileWriter != null) {
        try {
            fileWriter.close();
        } catch (IOException e) {
            // Handle exception while closing the file
            // ...
        }
    }
}
Nested try-catch structures provide fine-grained control over error management. We can handle exceptions at different levels, depending on the specific needs of our program. Here's an example:
try {
    // Outer try block
    // ...
    try {
        // Inner try block
        // ...
    } catch (Exception e) {
        // Handle exception from inner try block
        // ...
    }
} catch (Exception e) {
    // Handle exception from outer try block
    // ...
}
By understanding these concepts and applying best practices, we can write robust and error-resistant Java code.
Remember to keep code simplicity in mind. By applying practical advice and taking action, reliable and maintainable Java applications can be built.
Throwing Exceptions
When it comes to handling exceptions in Java, it is essential to understand the syntax for throwing exceptions, creating custom exceptions, and following best practices.
To throw an exception in Java, you can use the throw keyword followed by the exception object. This allows you to explicitly indicate that a specific error condition has occurred. For example:
throw new IOException("File not found");
By throwing exceptions, you can provide more detailed and meaningful error messages to assist in troubleshooting and debugging.
Creating custom exceptions in Java enables you to handle specific error scenarios in a more precise and targeted manner. By extending the Exception class or one of its subclasses, you can define your own exception types. For example:
public class CustomException extends Exception {
    // Constructor and additional methods
}
Custom exceptions can be useful for encapsulating complex logic or specific error conditions within your code. They improve code readability and make it easier to identify and handle exceptional situations.
To ensure effective exception handling, it is important to follow best practices. Here are a few recommendations:
- Be specific in exception handling: Catch exceptions at the right level of abstraction to handle them appropriately. Consider the specific exception types that can be thrown and handle them accordingly.
- Provide meaningful error messages: Exception messages should clearly indicate the cause and context of the error. This helps developers understand and resolve issues more efficiently.
- Keep exception handling minimal: Only catch exceptions that you can handle effectively. Rethrowing or propagating exceptions may be necessary in some cases to allow higher-level code to handle them appropriately.
- Clean up resources: Use the
finallyblock to release resources that were acquired within atryblock, ensuring proper cleanup regardless of whether an exception occurs. - Log exceptions: Logging exceptions helps in diagnosing and troubleshooting issues. Include relevant information such as stack traces, input values, and any other contextual details that may assist in resolving the problem.
Here's an advanced code example that demonstrates exception handling in Java:
public class FileProcessor {
    public void processFile(String fileName) throws IOException {
        try (BufferedReader reader = new BufferedReader(new FileReader(fileName))) {
            String line;
            while ((line = reader.readLine()) != null) {
                // Process each line of the file
                // ...
            }
        } catch (FileNotFoundException e) {
            System.err.println("File not found: " + fileName);
            throw e; // Rethrow the exception to allow higher-level code to handle it
        } catch (IOException e) {
            System.err.println("Error reading file: " + e.getMessage());
            throw e; // Rethrow the exception to allow higher-level code to handle it
        }
    }
}

public class Main {
    public static void main(String[] args) {
        FileProcessor fileProcessor = new FileProcessor();
        try {
            fileProcessor.processFile("input.txt");
        } catch (IOException e) {
            System.err.println("An error occurred while processing the file: " + e.getMessage());
        }
    }
}
In this example, the FileProcessor class has a method processFile() that reads lines from a file. It uses a try-with-resources block to automatically close the BufferedReader after processing the file. If the file is not found or an error occurs while reading the file, the corresponding exceptions (FileNotFoundException and IOException) are caught and handled. The exceptions are also rethrown to allow the higher-level code (in this case, the main() method) to handle them if needed.
Unchecked Exceptions
Unchecked exceptions are exceptions that do not require explicit handling by the programmer. They are subclasses of the RuntimeException class or its subclasses.
Unchecked exceptions are often caused by programming errors or unexpected conditions that may occur during runtime. Examples of unchecked exceptions include NullPointerException, ArrayIndexOutOfBoundsException, and IllegalArgumentException.
When dealing with unchecked exceptions, it is important to follow best practices to prevent these exceptions from occurring. This includes validating inputs and ensuring proper error handling and defensive programming.
Checked Exceptions
Checked exceptions are exceptions that must be explicitly handled or declared in the method signature using the throws keyword. They are subclasses of the Exception class (excluding subclasses of RuntimeException).
Checked exceptions are typically used for conditions that are beyond the control of the program, such as I/O errors or network failures. Examples of checked exceptions include IOException, SQLException, and FileNotFoundException.
When handling checked exceptions, it is important to consider the appropriate handling strategy based on the specific situation. This may involve wrapping the checked exception in a custom unchecked exception, logging the exception, or propagating the exception to higher-level code for handling.
Example Code – Unchecked and Checked Exceptions
Here are additional examples that demonstrate the handling of unchecked and checked exceptions:
Unchecked Exception Example:
public class DivisionCalculator {
    public double divide(int dividend, int divisor) {
        if (divisor == 0) {
            throw new ArithmeticException("Divisor cannot be zero");
        }
        return dividend / divisor;
    }
}
In this example, the divide method calculates the result of dividing the dividend by the divisor. If the divisor is zero, an unchecked exception of type ArithmeticException is thrown. This ensures that the code explicitly handles the case where division by zero occurs.
Checked Exception Example:
public class FileReader {
    public String readFile(String fileName) throws IOException {
        BufferedReader reader = null;
        try {
            reader = new BufferedReader(new java.io.FileReader(fileName));
            StringBuilder content = new StringBuilder();
            String line;
            while ((line = reader.readLine()) != null) {
                content.append(line).append("\\\\n");
            }
            return content.toString();
        } finally {
            if (reader != null) {
                reader.close();
            }
        }
    }
}
In this example, the readFile method reads the contents of a file specified by the fileName parameter. The method declares that it may throw an IOException (a checked exception) using the throws keyword. This allows the caller of the method to handle the exception or propagate it further up the call stack.
Understanding the differences between unchecked and checked exceptions is essential for effective exception handling in Java. By following best practices, handling exceptions appropriately, and considering the specific needs of your application, you can write robust and reliable Java code.
Remember to continuously improve your exception handling skills and stay up to date with industry best practices to ensure the highest quality in your code.
Real-World Examples of Exception Handling:
Here are some additional code examples for each of the topics we've just discussed:
Practical Applications in Java Applications:
// Example 1: Exception handling in file processing
try {
    FileReader fileReader = new FileReader("input.txt");
    // Code to process the file
    // ...
} catch (FileNotFoundException e) {
    System.err.println("File not found: " + e.getMessage());
} catch (IOException e) {
    System.err.println("Error reading file: " + e.getMessage());
}

// Example 2: Exception handling in network communication
try {
    Socket socket = new Socket("localhost", 8080);
    // Code to communicate over the network
    // ...
} catch (UnknownHostException e) {
    System.err.println("Unknown host: " + e.getMessage());
} catch (IOException e) {
    System.err.println("Error communicating over the network: " + e.getMessage());
}

// Example 3: Exception handling in database operations
try {
    Connection connection = DriverManager.getConnection("jdbc:mysql://localhost:3306/mydatabase", "username", "password");
    // Code to perform database operations
    // ...
} catch (SQLException e) {
    System.err.println("Database error: " + e.getMessage());
}
Common Scenarios for Exception Handling:
// Example 1: Handling division by zero
int dividend = 10;
int divisor = 0;

try {
    double result = dividend / divisor;
    System.out.println("Result: " + result);
} catch (ArithmeticException e) {
    System.err.println("Error: " + e.getMessage());
}

// Example 2: Handling array index out of bounds
int[] numbers = {1, 2, 3};

try {
    int value = numbers[3];
    System.out.println("Value: " + value);
} catch (ArrayIndexOutOfBoundsException e) {
    System.err.println("Error: " + e.getMessage());
}

// Example 3: Handling null pointer exception
String name = null;

try {
    int length = name.length();
    System.out.println("Length: " + length);
} catch (NullPointerException e) {
    System.err.println("Error: " + e.getMessage());
}
Learning from Real-World Cases:
// Example 1: Handling file processing errors
try {
    FileReader fileReader = new FileReader("input.txt");
    // Code to process the file
    // ...
} catch (IOException e) {
    System.err.println("Error processing file: " + e.getMessage());
}

// Example 2: Handling database connection errors
try {
    Connection connection = DriverManager.getConnection("jdbc:mysql://localhost:3306/mydatabase", "username", "password");
    // Code to perform database operations
    // ...
} catch (SQLException e) {
    System.err.println("Error connecting to database: " + e.getMessage());
}

// Example 3: Handling network communication errors
try {
    Socket socket = new Socket("localhost", 8080);
    // Code to communicate over the network
    // ...
} catch (IOException e) {
    System.err.println("Error communicating over the network: " + e.getMessage());
}
These examples demonstrate various scenarios where exception handling is commonly applied in Java applications. The comments in the code provide explanations and instructions for each scenario.
Remember to adapt the code to your specific needs and handle exceptions according to your application's requirements.
Advanced Exception Handling Techniques
When it comes to advanced exception handling techniques in Java, there are several key aspects to consider.
Utilizing the throws Keyword: The throws keyword is used to indicate that a method may throw a particular exception. By declaring checked exceptions in the method signature, we can ensure that the calling code handles or propagates the exception.
This has a significant impact on code design and maintenance. Proper use of the throws keyword promotes clarity and forces developers to consider exception handling requirements upfront. It also allows for more modular and flexible code, as exceptions can be handled at different levels in the call stack.
public class FileProcessor {

    // This method declares that it may throw an IOException
    public void readFile(String fileName) throws IOException {
        FileInputStream file = new FileInputStream(fileName);
        // Read and process the file
        file.close();
    }
}
Exception Chaining and Cause Analysis: Exception chaining involves linking exceptions together to provide a comprehensive view of the error chain. By utilizing exception chaining, we can identify the root cause of an exception and facilitate effective troubleshooting.
Techniques such as logging stack traces and analyzing exception causes enable us to gain insights into the underlying issues.
Real-world use cases for exception chaining include debugging complex scenarios and providing detailed error reports to aid in issue resolution.
public class DatabaseConnector {

    public void connectToDatabase() {
        try {
            // Database connection logic
        } catch (SQLException e) {
            // Chaining the exception with a custom message
            throw new DatabaseConnectionException("Failed to connect to database", e);
        }
    }
}

class DatabaseConnectionException extends Exception {
    public DatabaseConnectionException(String message, Throwable cause) {
        super(message, cause);
    }
}
Familiarize yourself with various best practices: Writing robust and error-resistant code involves following best practices for exception handling. It is important to handle exceptions at the appropriate level of abstraction, providing meaningful error messages and logging relevant information.
Avoiding common mistakes, such as catching exceptions unnecessarily or swallowing exceptions, ensures that exceptions are properly addressed.
public class DataProcessor {

    public void processData(File dataFile) {
        try {
            // Code to process data
        } catch (DataFormatException e) {
            // Log and throw a custom exception with meaningful message
            System.err.println("Data format error: " + e.getMessage());
            throw new ProcessingException("Invalid data format in file: " + dataFile.getName(), e);
        }
    }
}

class ProcessingException extends Exception {
    public ProcessingException(String message, Throwable cause) {
        super(message, cause);
    }
}
Logging and Diagnosing Exceptions: Logging exceptions plays a vital role in diagnosing and troubleshooting issues. By integrating logging with exception handling, we can capture valuable information such as stack traces, input values, and contextual details. This facilitates efficient debugging and helps in resolving problems effectively.
Utilizing tools and strategies for effective logging and diagnosis enhances the error analysis process and aids in producing actionable insights.
public class NetworkUtils {

    private static final Logger logger = Logger.getLogger(NetworkUtils.class.getName());

    public void sendDataOverNetwork(String data, String endpoint) {
        try {
            // Code to send data
        } catch (NetworkException e) {
            // Log the stack trace and details
            logger.log(Level.SEVERE, "Failed to send data to " + endpoint, e);
        }
    }
}
Advanced Scenarios: By employing techniques such as multi-catch blocks or handling exceptions at different levels, we can effectively manage multiple exceptions.
Resource management in exceptions is another crucial aspect, ensuring that resources are properly released even in the presence of exceptions.
Exception handling in concurrent programming requires careful synchronization and error handling strategies to maintain data integrity and prevent race conditions.
public class ResourceHandler {

    public void handleResources() {
        Resource resource1 = null;
        Resource resource2 = null;
        try {
            resource1 = new Resource("Resource1");
            resource2 = new Resource("Resource2");
            // Work with resources
        } catch (ResourceException | AnotherResourceException e) {
            // Handle multiple types of exceptions
            System.err.println("Resource handling error: " + e.getMessage());
        } finally {
            // Ensure resources are closed
            closeResource(resource1);
            closeResource(resource2);
        }
    }

    private void closeResource(Resource resource) {
        if (resource != null) {
            try {
                resource.close();
            } catch (ResourceException e) {
                System.err.println("Failed to close resource: " + e.getMessage());
            }
        }
    }
}

class Resource implements AutoCloseable {
    private String name;

    public Resource(String name) throws ResourceException {
        this.name = name;
        // Initialization logic
    }

    public void close() throws ResourceException {
        // Clean-up logic
    }
}
Advanced and Custom Exception Handling Case Studies:
Analyzing real-world examples of exception handling can provide valuable insights. By studying industry cases, we can learn from successful approaches and identify common patterns. Analyzing exception handling patterns allows us to apply proven techniques and adapt them to our specific needs.
By solving complex problems with exception handling, we can develop expertise in handling challenging scenarios and build robust applications.
Remember, when writing code, it is important to keep it simple and concise. Use clear and straightforward examples to illustrate concepts. By applying practical advice and continuously improving your exception handling skills, you can develop reliable and maintainable Java applications.
Here's an example code snippet that demonstrates the use of custom exceptions and exception handling techniques:
public class FileValidator {
    public void validateFile(String fileName) throws FileValidationException {
        try {
            // Code to validate the file
            if (!isFileValid(fileName)) {
                throw new FileValidationException("Invalid file: " + fileName);
            }
        } catch (IOException e) {
            throw new FileValidationException("Error validating file: " + fileName, e);
        }
    }

    private boolean isFileValid(String fileName) throws IOException {
        // Code to validate the file contents
        // ...
    }
}

public class Main {
    public static void main(String[] args) {
        FileValidator fileValidator = new FileValidator();
        try {
            fileValidator.validateFile("data.txt");
            System.out.println("File validation successful");
        } catch (FileValidationException e) {
            System.err.println("File validation failed: " + e.getMessage());
        }
    }
}
In this example, the FileValidator class demonstrates the use of a custom exception, FileValidationException, which is thrown when a file fails validation. The validateFile method catches any IOException that occurs during file validation and rethrows it as a FileValidationException to provide a clear and meaningful error message. The Main class demonstrates the handling of the custom exception, allowing for specific error reporting and appropriate exception handling.
By applying these techniques and principles, you can effectively handle exceptions in Java and develop high-quality code. Remember to always strive for simplicity, clarity, and continuous improvement in your exception handling practices.
Chapter 3: Deadlocks and How to Avoid Them
Deadlock is a situation in Java multithreading where two or more threads are blocked forever, waiting for each other to release resources. Understanding deadlock is crucial for writing robust concurrent code.
There are four necessary and sufficient conditions for a deadlock to occur: mutual exclusion, hold and wait, no preemption, and circular wait.
- Mutual exclusion means that a resource can only be used by one thread at a time.
- Hold and wait refers to a situation where a thread holds a resource and is waiting to acquire another resource.
- No preemption implies that resources cannot be forcefully taken away from a thread.
- Circular wait occurs when a cycle of threads exists, where each thread is waiting for a resource that is held by another thread in the cycle.
To better illustrate this concept, consider the following code snippet:
class DeadlockExample {
    private static final Object resource1 = new Object();
    private static final Object resource2 = new Object();

    public void method1() {
        synchronized (resource1) {
            // Do something with resource1
            synchronized (resource2) {
                // Do something with resource2
            }
        }
    }

    public void method2() {
        synchronized (resource2) {
            // Do something with resource2
            synchronized (resource1) {
                // Do something with resource1
            }
        }
    }
}
In this example, two threads call method1 and method2 concurrently. If one thread acquires resource1 and waits for resource2, while the other thread acquires resource2 and waits for resource1, a deadlock occurs.
To avoid deadlocks, it is essential to carefully manage resources and their acquisition order. One practical approach is to ensure a consistent and predefined order for acquiring locks. By avoiding circular wait and ensuring a consistent lock ordering, deadlocks can be prevented.
Remember to always minimize lock contention and unnecessary locks. Additionally, utilize concurrency utilities such as ReentrantLock and Semaphore to manage locks effectively.
Deadlock Example
Complex deadlock scenarios involve intricate situations where multiple threads and resources are entangled, making detection and resolution more challenging. Let's explore an example to better understand this concept in the context of Java programming.
Consider the following code snippet that demonstrates a potential deadlock scenario:
class DeadlockExample {
    private static final Object resource1 = new Object();
    private static final Object resource2 = new Object();
    private static final Object resource3 = new Object();

    public void method1() {
        synchronized (resource1) {
            // Perform operations with resource1
            synchronized (resource2) {
                // Perform operations with resource2
                synchronized (resource3) {
                    // Perform operations with resource3
                }
            }
        }
    }

    public void method2() {
        synchronized (resource3) {
            // Perform operations with resource3
            synchronized (resource2) {
                // Perform operations with resource2
                synchronized (resource1) {
                    // Perform operations with resource1
                }
            }
        }
    }
}
In this example, three threads, let's call them Thread A, Thread B, and Thread C, call method1 and method2 concurrently. If Thread A acquires resource1 and waits for resource2, Thread B acquires resource2 and waits for resource3, and Thread C acquires resource3 and waits for resource1, a complex deadlock occurs. All threads are stuck in a state of indefinite waiting, unable to proceed.
To avoid such complex deadlocks, it becomes even more crucial to carefully manage resources and their acquisition order.
One practical approach is to establish a consistent and predefined order for acquiring locks. By doing so, we can prevent circular wait conditions and ensure a smooth execution of concurrent code.
To solve this issue, you need to ensure that all methods acquire the locks in the same order. Here’s the corrected code:
class DeadlockExample {
    private static final Object resource1 = new Object();
    private static final Object resource2 = new Object();
    private static final Object resource3 = new Object();

    public void method1() {
        synchronized (resource1) {
            // Perform operations with resource1
            synchronized (resource2) {
                // Perform operations with resource2
                synchronized (resource3) {
                    // Perform operations with resource3
                }
            }
        }
    }

    public void method2() {
        synchronized (resource1) {
            // Perform operations with resource1
            synchronized (resource2) {
                // Perform operations with resource2
                synchronized (resource3) {
                    // Perform operations with resource3
                }
            }
        }
    }
}
In this corrected code, both method1 and method2 acquire locks on resource1, resource2, and resource3 in the same order, which prevents the deadlock. This strategy is known as lock ordering — a simple yet effective way to prevent deadlocks.
It’s a good practice to always acquire locks in the same order throughout your program. This way, if a thread holds one lock and requests another, you can be sure that no other threads are holding or requesting locks in the opposite order. This eliminates the circular wait condition, and thus, the deadlock.
Remember, the order of releasing the locks doesn’t matter in preventing deadlocks. It’s the order of acquiring locks that’s crucial.
To resolve the potential deadlock in the provided example, we can modify the order of acquiring locks in either method1 or method2. By consistently acquiring resources in the same order across all methods, we eliminate the possibility of circular wait and mitigate the risk of deadlock.
How to Detect and Analyze Deadlocks
To detect deadlocks in Java, you can analyze thread dumps. Thread dumps provide valuable information about the state of threads, including their locks and waiting conditions. By carefully examining the thread dump, you can identify if any threads are stuck in a deadlock situation.
One useful tool for deadlock detection is the jstack command. This command allows you to generate a thread dump of a Java application. You can then analyze the thread dump to identify any potential deadlocks.
Here's an example of how you can use the jstack command to detect deadlocks in a Java application:
$ jstack <pid>
In this command, <pid> represents the process ID of the Java application. By running this command, you will obtain a thread dump that can be analyzed for deadlock situations.
By being proactive in detecting deadlocks and utilizing tools like jstack, you can quickly identify and address potential issues in your Java code.
Remember, when it comes to deadlocks, prevention is key. Be mindful of your resource acquisition order and avoid circular wait conditions. Additionally, consider using concurrency utilities like ReentrantLock and Semaphore to manage locks effectively.
How to Resolve Deadlocks
To resolve deadlocks, there are two main strategies you can employ: breaking the deadlock cycle and refactoring the code to eliminate circular wait conditions.
Breaking the deadlock cycle involves identifying the resources involved in the deadlock and implementing a strategy to break the cycle.
One approach is to define a global ordering of resources and ensure that all threads acquire resources in the same order. By doing so, you eliminate the possibility of circular wait and allow the threads to proceed without deadlock.
Here's an example of how you can break the deadlock cycle:
class DeadlockResolver {
    private static final Object resource1 = new Object();
    private static final Object resource2 = new Object();

    public void method1() {
        synchronized (resource1) {
            // Do something with resource1
            synchronized (resource2) {
                // Do something with resource2
            }
        }
    }

    public void method2() {
        synchronized (resource1) {
            // Do something with resource1
            synchronized (resource2) {
                // Do something with resource2
            }
        }
    }
}
In this example, we have modified the code to ensure that both method1 and method2 acquire resources in the same order: resource1 followed by resource2. By maintaining this consistent lock ordering across all methods, we break the deadlock cycle and allow the threads to execute without deadlock.
Another strategy is to refactor the code to eliminate circular wait conditions. This involves restructuring the code to remove the dependency between resources that leads to deadlock. By carefully analyzing the resource dependencies and redesigning the code, you can eliminate the possibility of circular wait and prevent deadlocks.
Here's an example:
class DeadlockResolver {
    private static final Object resource1 = new Object();
    private static final Object resource2 = new Object();

    public void method1() {
        synchronized (resource1) {
            // Do something with resource1
        }
        synchronized (resource2) {
            // Do something with resource2
        }
    }

    public void method2() {
        synchronized (resource1) {
            // Do something with resource1
        }
        synchronized (resource2) {
            // Do something with resource2
        }
    }
}
In this refactored code, we have removed the nested locks and ensured that each resource is acquired and released independently. By doing so, we eliminate the possibility of circular wait and mitigate the risk of deadlock.
How to Prevent Deadlocks
Avoiding Nested Locks:
To prevent deadlock conditions, avoid using nested locks in your code. Nested locks occur when a thread acquires a lock while holding another lock. This can lead to a situation where multiple threads are waiting for each other to release the locks they hold, resulting in a deadlock.
Instead of using nested locks, consider restructuring your code to acquire locks in a more organized and controlled manner. By acquiring locks one at a time and releasing them promptly, you can minimize the chances of deadlocks occurring. Let's take a look at an example:
class DeadlockPreventionExample {
    private static final Object lock1 = new Object();
    private static final Object lock2 = new Object();

    public void method1() {
        synchronized (lock1) {
            // Perform operations with lock1
        }
    }

    public void method2() {
        synchronized (lock2) {
            // Perform operations with lock2
        }
    }
}
In this example, the code has been refactored to eliminate nested locks. Each method now acquires and releases a single lock independently. This approach ensures that threads can execute their operations without getting stuck in a deadlock situation.
Lock Ordering:
Consistent ordering of lock acquisition is another effective technique to prevent deadlocks. By establishing a predefined order for acquiring locks across all threads, you eliminate the possibility of circular wait conditions.
When designing your code, carefully analyze the dependencies between resources and determine a logical order for acquiring locks. By consistently following this order, you ensure that threads acquire locks in a predictable manner, minimizing the risk of deadlocks.
Consider the following example:
class DeadlockPreventionExample {
    private static final Object lock1 = new Object();
    private static final Object lock2 = new Object();

    public void method1() {
        synchronized (lock1) {
            // Perform operations with lock1
            synchronized (lock2) {
                // Perform operations with lock2
            }
        }
    }

    public void method2() {
        synchronized (lock1) {
            // Perform operations with lock1
            synchronized (lock2) {
                // Perform operations with lock2
            }
        }
    }
}
In this code snippet, both method1 and method2 acquire locks in the same order: first lock1 and then lock2. By consistently following this lock acquisition order across all methods, you eliminate the possibility of circular wait conditions and ensure a smooth execution of concurrent code.
Timeouts and Try-Lock:
Using timeouts and try-lock mechanisms can help you avoid indefinite waiting, which can potentially lead to deadlocks.
By setting a timeout on lock acquisition attempts or using try-lock methods, you can prevent threads from waiting indefinitely for a lock to become available.
Consider the following example:
class DeadlockPreventionExample {
    private static final Object lock1 = new Object();
    private static final Object lock2 = new Object();

    public void method1() throws InterruptedException {
        if (tryLock(lock1)) {
            try {
                // Perform operations with lock1
                if (tryLock(lock2)) {
                    try {
                        // Perform operations with lock2
                    } finally {
                        unlock(lock2);
                    }
                }
            } finally {
                unlock(lock1);
            }
        }
    }

    public void method2() throws InterruptedException {
        if (tryLock(lock2)) {
            try {
                // Perform operations with lock2
                if (tryLock(lock1)) {
                    try {
                        // Perform operations with lock1
                    } finally {
                        unlock(lock1);
                    }
                }
            } finally {
                unlock(lock2);
            }
        }
    }

    private boolean tryLock(Object lock) throws InterruptedException {
        // Attempt to acquire the lock with a timeout
        return synchronized(lock) {
            return true;
        }
    }

    private void unlock(Object lock) {
        synchronized(lock) {
            // Release the lock
        }
    }
}
In this revised code, the methods method1 and method2 use a try-lock mechanism to acquire locks. If a lock is not immediately available, the thread does not wait indefinitely but proceeds to perform other operations. This approach helps prevent deadlocks by ensuring that threads do not get stuck waiting for locks indefinitely.
By following these practical techniques, such as avoiding nested locks, establishing consistent lock ordering, and utilizing timeouts and try-lock mechanisms, you can significantly reduce the risk of deadlocks in your Java multithreading code.
Best Practices for Avoiding Deadlocks
To minimize lock contention and avoid unnecessary locks, it is important to follow best practices in Java multithreading. By using these techniques, you can improve the efficiency and performance of your concurrent code.
Minimize the Scope of Locks
One effective practice is to minimize the scope of locks. Only synchronize the critical sections of code that require exclusive access to shared resources. By reducing the number of code blocks that are synchronized, you can minimize the chances of contention and improve the overall throughput.
Use Thread Joins Wisely
Another useful practice is to use thread joins wisely. Thread joining is a mechanism that allows one thread to wait for the completion of another thread.
But it's important to be cautious when using thread joins, as incorrect usage can lead to deadlocks. Make sure to avoid situations where threads are waiting indefinitely for each other to complete, as this can result in a deadlock. Instead, carefully design your code to ensure proper synchronization and coordination between threads.
Use Concurrency Utilities
Java provides several concurrency utilities, such as ReentrantLock, Semaphore, and other synchronization classes, that can help manage locks effectively. These utilities offer more flexibility and control over locking mechanisms compared to traditional synchronized blocks.
For example, ReentrantLock allows for finer-grained locking and enables features like fairness and interruptibility. Similarly, Semaphore provides a convenient way to control access to shared resources by limiting the number of threads allowed to enter a critical section simultaneously.
Here's an example code snippet that demonstrates the use of ReentrantLock:
import java.util.concurrent.locks.ReentrantLock;

class LockExample {
    private final ReentrantLock lock = new ReentrantLock();

    public void performTask() {
        lock.lock();
        try {
            // Critical section
            // Perform operations with shared resources
        } finally {
            lock.unlock();
        }
    }
}
In this example, the ReentrantLock is used to synchronize the critical section of code. By acquiring the lock before entering the critical section and releasing it afterward, you ensure exclusive access to shared resources.
Advanced Deadlock Topics
Deadlocks can occur not only within a single JVM but also in distributed systems. It is important to broaden our understanding of deadlocks to include their occurrence in distributed environments. In such scenarios, multiple processes or nodes may compete for shared resources, leading to potential deadlocks.
To address deadlocks in distributed systems, it is crucial to carefully design the communication and coordination mechanisms between nodes.
One effective approach is to utilize message-based communication protocols, such as asynchronous messaging or event-driven architectures. These protocols can help minimize the chances of resource contention and reduce the risk of deadlocks.
Also, modern Java features and frameworks offer valuable tools to address deadlock and concurrency issues.
For example, the CompletableFuture class provides a convenient way to handle asynchronous computations and avoid blocking threads. By leveraging CompletableFuture and other similar features, you can ensure efficient and non-blocking execution of concurrent code.
Let's take a look at an example code snippet that demonstrates the use of CompletableFuture:
import java.util.concurrent.CompletableFuture;

class DeadlockAvoidanceExample {
    public CompletableFuture<String> performTaskAsync() {
        return CompletableFuture.supplyAsync(() -> {
            // Perform asynchronous computations
            return "Result";
        });
    }
}
In this example, the CompletableFuture class is used to perform asynchronous computations. By using the supplyAsync method, you can execute the computations in a separate thread and obtain a CompletableFuture object that represents the result. This approach helps minimize the chances of deadlocks by avoiding the blocking of threads.
Chapter 4: Java Design Patterns
Imagine you're an architect tasked with building a variety of houses, from simple one-bedroom homes to complex mansions with intricate designs.
Just like in architecture, where a set of blueprints offers proven solutions for building robust and aesthetically pleasing structures, Java Design Patterns provide software developers with time-tested methodologies and blueprints for crafting efficient and scalable software applications.
Why Java design patterns are still important in Software Development:
- Universal Blueprint for Problem-Solving: Think of design patterns as the Swiss Army knife in a developer's toolkit. They are like those secret recipes that chefs pass down through generations – each pattern is a recipe for solving a specific design problem in a proven way.
- Timeless Relevance: Like the classic principles of art that never go out of style, Java Design Patterns have stood the test of time. They are like the underlying principles of physics that remain constant, irrespective of the evolving technological landscape.
- Enhances Communication: Using design patterns is akin to musicians using sheet music. They provide a universal language for developers. This shared vocabulary cuts through complexity, much like a well-drawn map simplifies navigation in unknown terrain.
- Principles of Good Design Embedded: These patterns are more than just templates – they are a manifestation of wisdom gathered over decades, much like the principles of good governance that stand the test of time in societies.
- Maintenance and Evolution: Imagine building with LEGO blocks. Design patterns allow software to be as adaptable and maintainable as rearranging LEGO structures, ensuring that systems can evolve gracefully as requirements change.
Overview of Java Design Patterns
- Singleton Pattern: Like a unique key to an exclusive club, this pattern ensures that there's only one instance of a class, providing a single point of access to it.
- Factory Method Pattern: Picture a master artisan who creates a template for an artifact. Subsequent artisans follow this template but add their unique touch, much like this pattern allows for creating objects with a common interface.
- Abstract Factory Pattern: This pattern is like a blueprint for a series of factories; each factory creates objects that, while different, share some common traits.
- Builder Pattern: Imagine a kit for building a model airplane. You can choose different parts for different versions of the plane. The Builder pattern lets you construct complex objects step-by-step, like using such a kit.
- Prototype Pattern: This is like having a master copy, and instead of building from scratch, you make duplicates of this master copy as needed.
- Adapter Pattern: Think of this as a travel adapter that lets you charge your phone anywhere in the world; the Adapter pattern allows otherwise incompatible interfaces to work together.
- Composite Pattern: Much like a painter who sees no difference between a single brushstroke and a complex mosaic, this pattern lets you treat individual objects and compositions uniformly.
- Proxy Pattern: Like a gatekeeper who controls access to a VIP, the Proxy pattern acts as an intermediary, controlling access to another object.
- Observer Pattern: It’s like a news alert service; whenever something newsworthy happens, you get notified. This pattern allows objects to notify others about changes in their state.
- Strategy Pattern: Imagine you’re a strategist in a game, constantly changing your tactics based on the situation. The Strategy pattern lets software change its algorithms dynamically, much like a strategist adapts their approach to shifting conditions on the battlefield.
Each of these design patterns is a tool in the software developer's toolbox, ready to be deployed to tackle specific types of problems. By understanding and utilizing these patterns, developers can create software that is not only robust and efficient but also elegant and easy to maintain.
Just like the right tool can make a difficult task easy, the right design pattern can simplify complex coding challenges and lead to more effective and maintainable code.
Let's explore each of these patterns in more detail in the following sections, uncovering the secrets of their enduring power and versatility in the world of software development.
1. Singleton Pattern
 The Singleton pattern
The Singleton pattern addresses the problem of managing access to a resource that should have only one instance, such as a database connection. It ensures that only one instance of a class is created and provides a global access point to that instance. The Singleton pattern restricts object creation for a class to a single instance, which is managed by the class itself.
Singleton pattern is like having a key that unlocks a special treasure room. The key is unique and there can only be one key to access the treasure room. No matter how many people have the key, they all have access to the same treasure room. This ensures that everyone uses the same instance of the treasure room and prevents multiple instances from being created.
In Java, you can implement the Singleton pattern using a private constructor, a static method to return the instance, and a private static field to hold the single instance. Here's an example:
public class Singleton {
    private static Singleton instance;

    private Singleton() {
        // Private constructor to prevent instantiation
    }

    public static Singleton getInstance() {
        if (instance == null) {
            synchronized (Singleton.class) {
                if (instance == null) {
                    instance = new Singleton();
                }
            }
        }
        return instance;
    }

    // Other methods and attributes...
}
Using the Singleton pattern provides controlled access to the single instance, ensuring that all parts of the system use the same instance. However, it can be challenging to debug due to its global nature.
When using the Singleton pattern, consider its impact on a multi-threaded environment. Synchronization is necessary to make the getInstance() method thread-safe and prevent multiple instances from being created concurrently.
Keep in mind that design patterns are not strict rules to follow, but rather guidelines that can be adapted to fit your needs. Use them wisely and consider the trade-offs they entail in terms of complexity and maintainability.
2. Factory Method Pattern
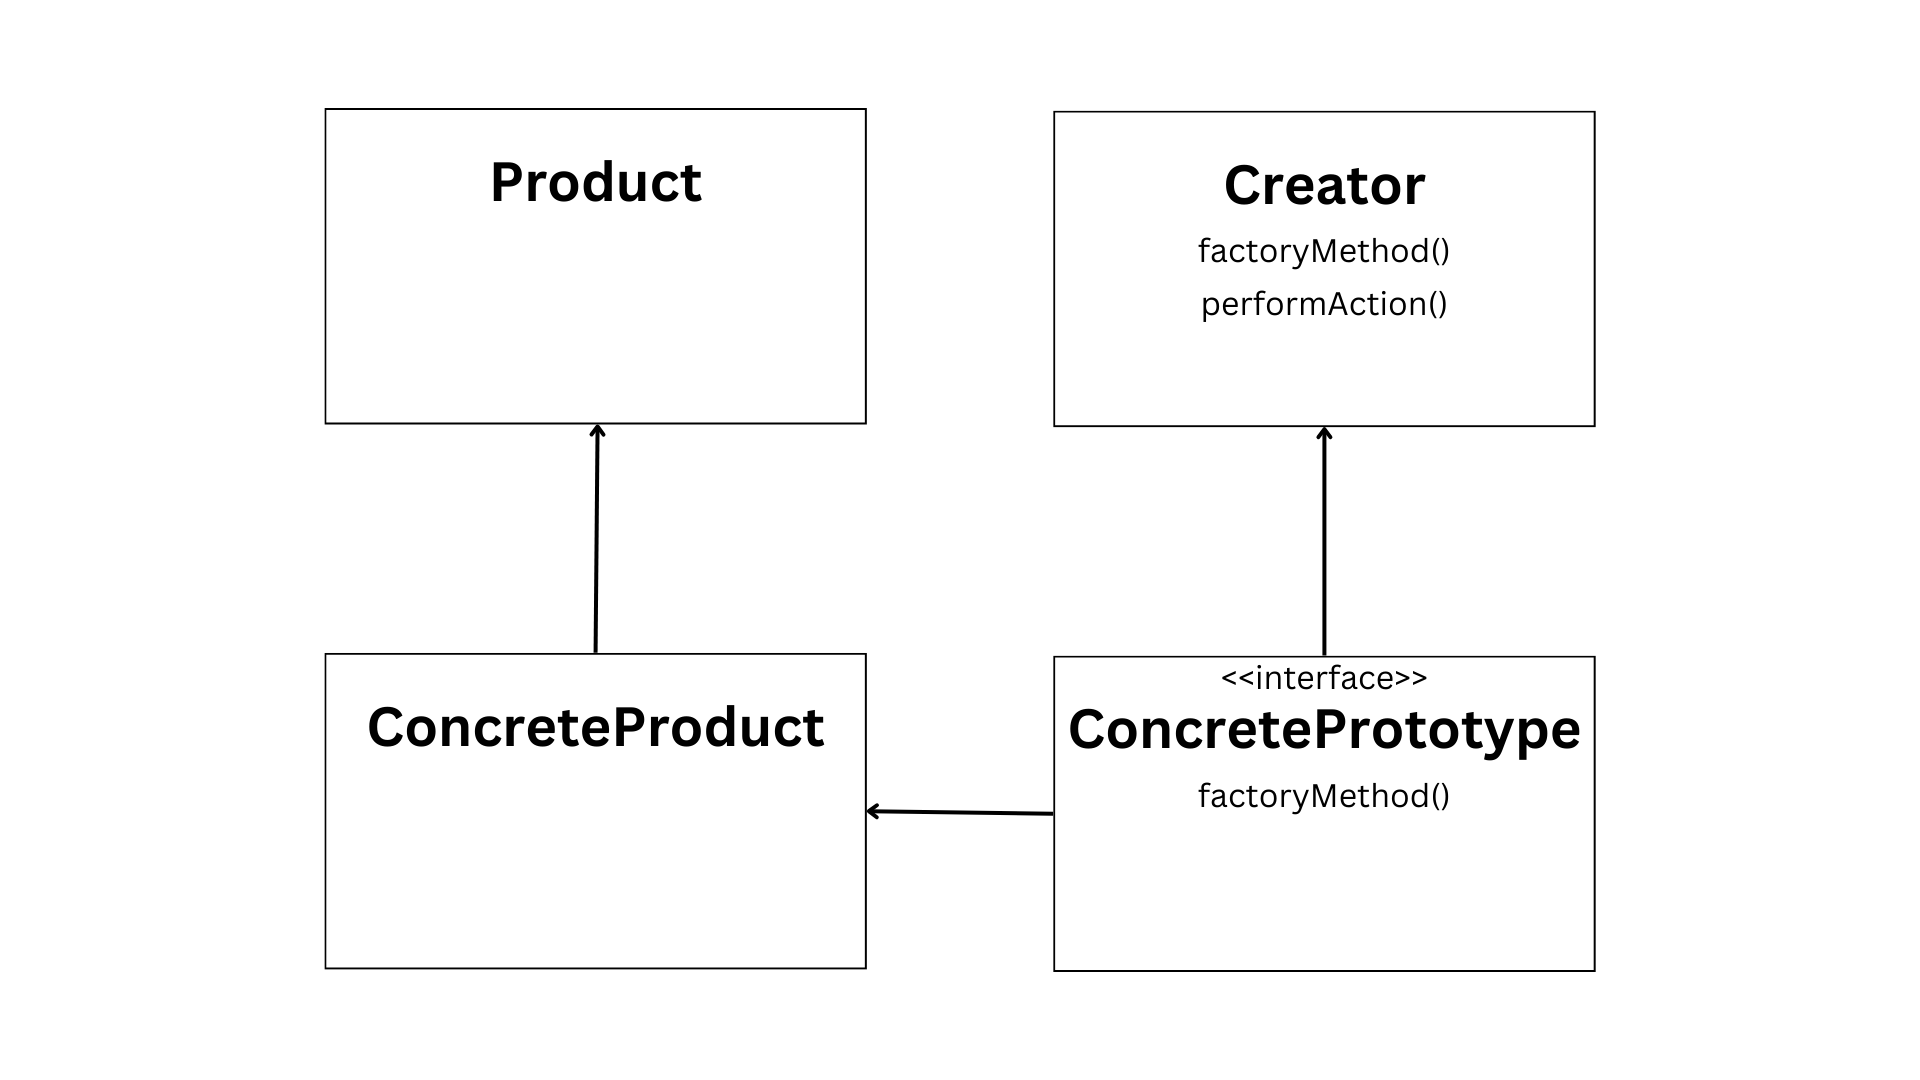 The Factory Method pattern
The Factory Method pattern addresses the need for creating objects through an interface while allowing subclasses to determine the specific type of objects to be instantiated. It promotes loose coupling by delegating the responsibility of object creation to subclasses.
Imagine a scenario where different chefs are preparing their own versions of a dish. Each chef represents a subclass in the Factory Method pattern, and the dish represents the object being created. The interface acts as the recipe or guidelines for creating the dish.
Here's an example in Java:
interface Product {
    void use();
}

class ConcreteProductA implements Product {
    @Override
    public void use() {
        System.out.println("Using ConcreteProductA");
    }
}

class ConcreteProductB implements Product {
    @Override
    public void use() {
        System.out.println("Using ConcreteProductB");
    }
}

abstract class Creator {
    public abstract Product createProduct();

    public void doSomething() {
        Product product = createProduct();
        product.use();
    }
}

class ConcreteCreatorA extends Creator {
    @Override
    public Product createProduct() {
        return new ConcreteProductA();
    }
}

class ConcreteCreatorB extends Creator {
    @Override
    public Product createProduct() {
        return new ConcreteProductB();
    }
}

public class Main {
    public static void main(String[] args) {
        Creator creatorA = new ConcreteCreatorA();
        creatorA.doSomething(); // Creating and using ConcreteProductA

        Creator creatorB = new ConcreteCreatorB();
        creatorB.doSomething(); // Creating and using ConcreteProductB
    }
}
In this example, the Product interface defines the method use(), which represents the behavior of the created objects. The ConcreteProductA and ConcreteProductB classes implement this interface and provide their own implementations of the use() method.
The Creator class is an abstract class that acts as the factory. It declares the createProduct() method, which is responsible for creating the specific type of product. The doSomething() method demonstrates how the factory method is used to create and use the product.
By using the Factory Method pattern, you gain flexibility in object creation. You can easily introduce new subclasses to create different types of products without modifying the existing code. But keep in mind that introducing too many subclasses can introduce complexity and make the code harder to maintain.
An analogy for the Factory Method pattern is like having a restaurant with different chefs specializing in various dishes. The restaurant provides the interface, specifying the general guidelines for creating the dishes. Each chef represents a subclass that creates their unique version of the dish based on the provided guidelines.
Design patterns are not strict rules to follow, but rather guidelines that can be adapted to fit your needs. Use them wisely, considering the trade-offs they entail in terms of complexity and maintainability.
3. Abstract Factory Pattern
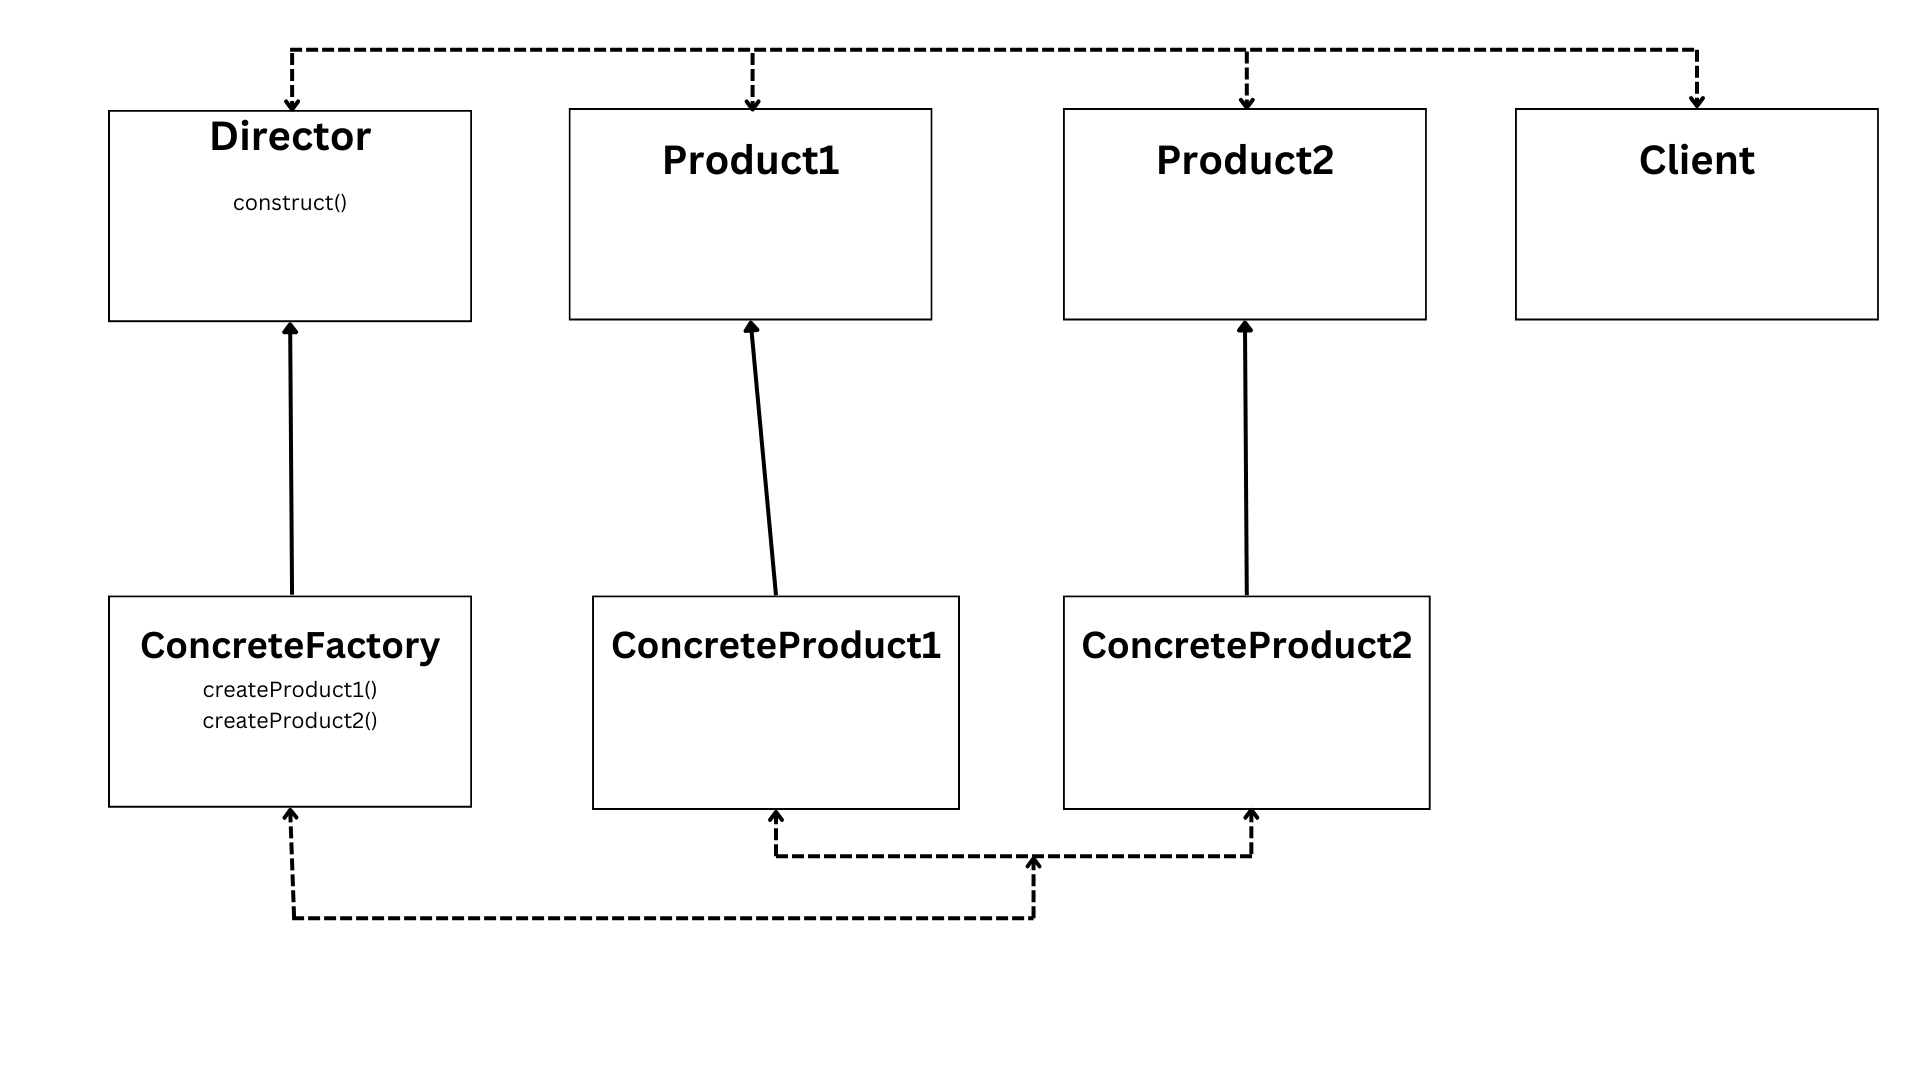 Abstract Factory pattern
The Abstract Factory pattern addresses the problem of creating families of related or dependent objects without specifying their concrete classes. It allows the creation of objects through interfaces, promoting consistency among products while allowing flexibility in their implementation.
Imagine different car factories producing various car models. Each factory represents a concrete factory in the Abstract Factory pattern, and the car models represent the related objects being created. The abstract factory acts as the blueprint or guidelines for creating these car models.
To implement the Abstract Factory pattern in Java, you can define an abstract factory interface that declares methods for creating the related objects. Each concrete factory implements this interface and provides its own implementation of the creation methods. The product interfaces represent the different types of objects that can be created by the factories.
Here's an example in Java:
interface AbstractFactory {
    ProductA createProductA();
    ProductB createProductB();
}

interface ProductA {
    void use();
}

interface ProductB {
    void consume();
}

class ConcreteFactory1 implements AbstractFactory {
    @Override
    public ProductA createProductA() {
        return new ConcreteProductA1();
    }

    @Override
    public ProductB createProductB() {
        return new ConcreteProductB1();
    }
}

class ConcreteFactory2 implements AbstractFactory {
    @Override
    public ProductA createProductA() {
        return new ConcreteProductA2();
    }

    @Override
    public ProductB createProductB() {
        return new ConcreteProductB2();
    }
}

class ConcreteProductA1 implements ProductA {
    @Override
    public void use() {
        System.out.println("Using ConcreteProductA1");
    }
}

class ConcreteProductA2 implements ProductA {
    @Override
    public void use() {
        System.out.println("Using ConcreteProductA2");
    }
}

class ConcreteProductB1 implements ProductB {
    @Override
    public void consume() {
        System.out.println("Consuming ConcreteProductB1");
    }
}

class ConcreteProductB2 implements ProductB {
    @Override
    public void consume() {
        System.out.println("Consuming ConcreteProductB2");
    }
}

public class Main {
    public static void main(String[] args) {
        AbstractFactory factory1 = new ConcreteFactory1();
        ProductA productA1 = factory1.createProductA();
        productA1.use(); // Using ConcreteProductA1
        ProductB productB1 = factory1.createProductB();
        productB1.consume(); // Consuming ConcreteProductB1

        AbstractFactory factory2 = new ConcreteFactory2();
        ProductA productA2 = factory2.createProductA();
        productA2.use(); // Using ConcreteProductA2
        ProductB productB2 = factory2.createProductB();
        productB2.consume(); // Consuming ConcreteProductB2
    }
}
In this example, the AbstractFactory interface declares methods for creating ProductA and ProductB objects. The ConcreteFactory1 and ConcreteFactory2 classes implement this interface and provide their own implementations of the creation methods.
The ProductA and ProductB interfaces represent the different types of objects that can be created by the factories. The ConcreteProductA1, ConcreteProductA2, ConcreteProductB1, and ConcreteProductB2 classes implement these interfaces and provide their own implementations of the behavior.
By using the Abstract Factory pattern, you can create families of related objects without specifying their concrete classes. This promotes consistency among the created objects and allows for easy interchangeability between different implementations. But keep in mind that introducing too many concrete factories and products can increase complexity, so use this pattern judiciously.
4. Builder Pattern
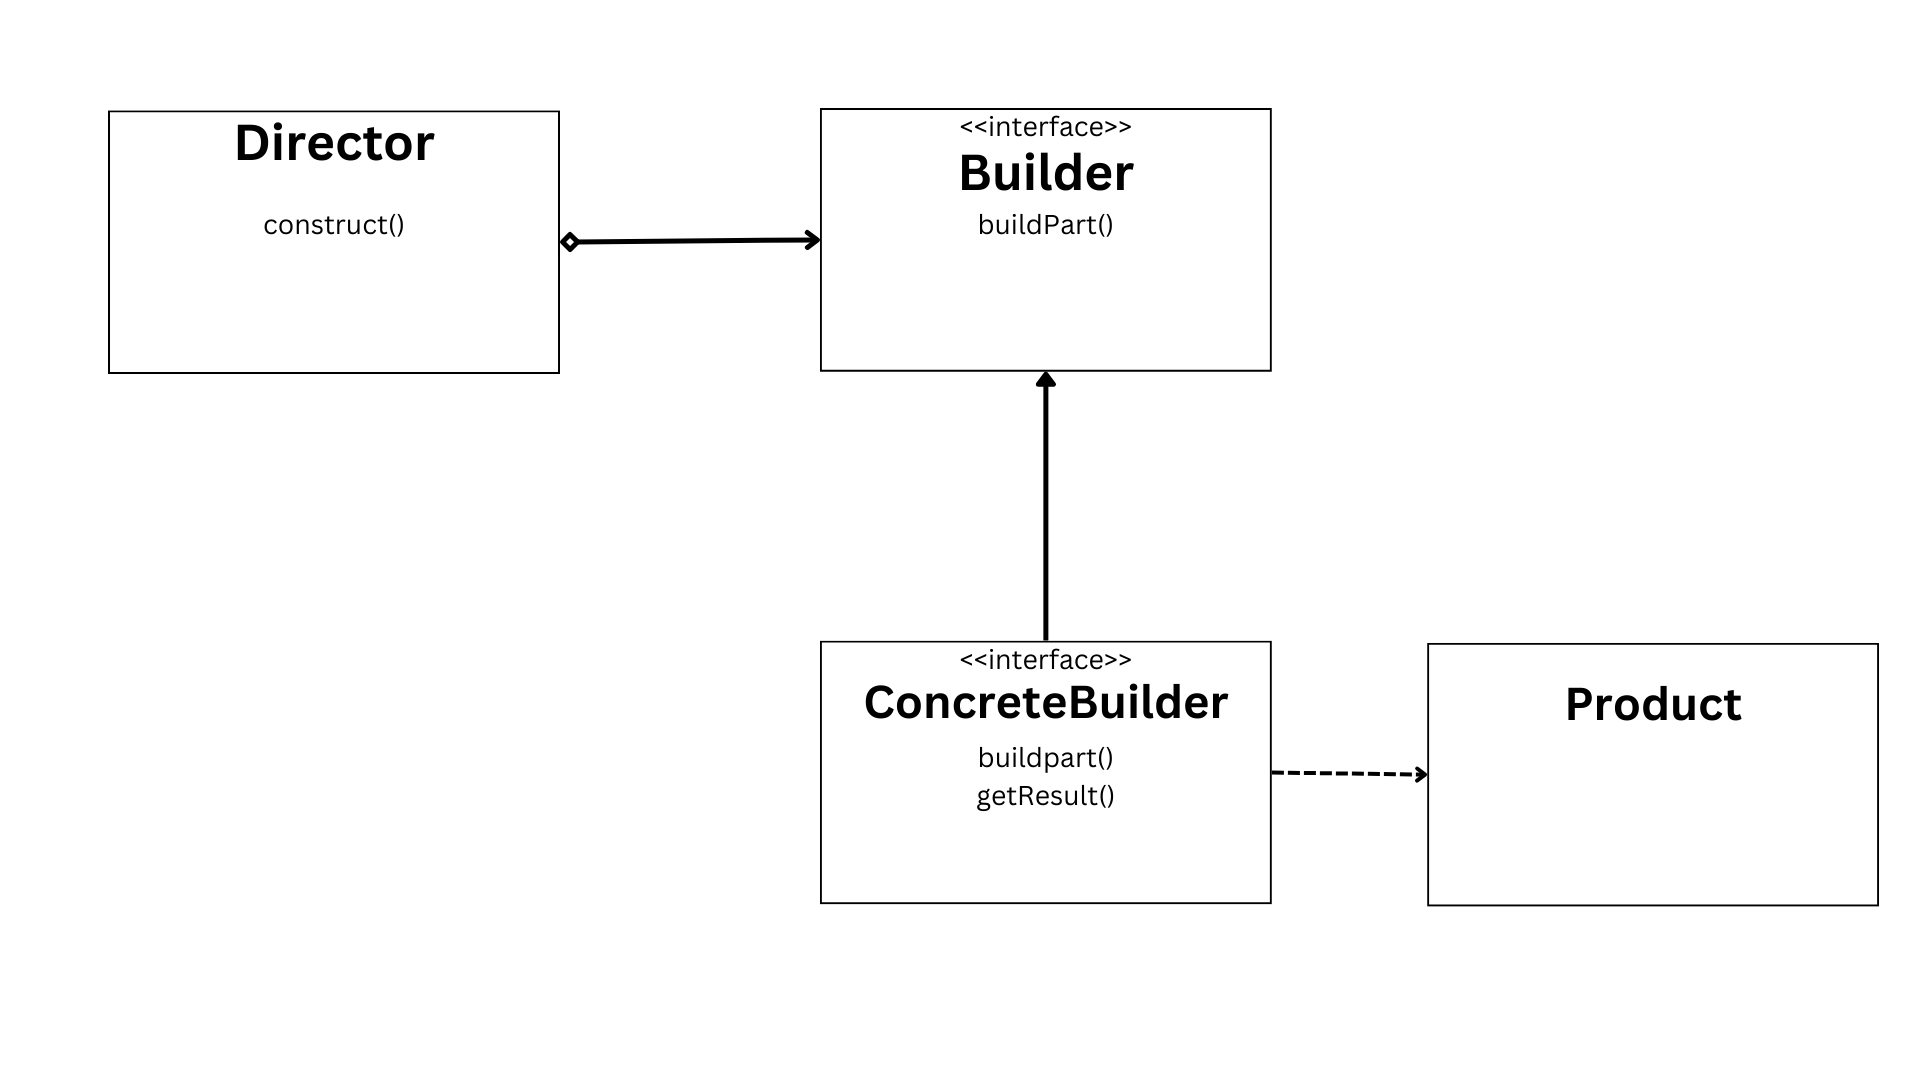 The Builder pattern
The Builder pattern is a creational design pattern that solves the problem of creating complex objects with multiple parts and configurations. It separates the construction of an object from its representation, allowing step-by-step creation of complex objects.
Imagine building a house with different construction plans. Each plan represents a concrete builder in the Builder pattern, and the house represents the complex object being created. The director acts as the blueprint or guidelines for constructing the house.
To implement the Builder pattern in Java, you can define a builder interface that declares methods for building different parts of the object. Each concrete builder implements this interface and provides its own implementation of the construction methods. The director class coordinates the construction process by invoking the builder's methods.
Here's an example in Java:
public interface Builder {
    void buildPart1();
    void buildPart2();
    void buildPart3();
    // Other construction methods...

    ComplexObject getResult();
}

public class ConcreteBuilder implements Builder {
    private ComplexObject complexObject;

    public ConcreteBuilder() {
        this.complexObject = new ComplexObject();
    }

    @Override
    public void buildPart1() {
        // Build part 1 of the complex object
    }

    @Override
    public void buildPart2() {
        // Build part 2 of the complex object
    }

    @Override
    public void buildPart3() {
        // Build part 3 of the complex object
    }

    // Implement other construction methods...

    @Override
    public ComplexObject getResult() {
        return this.complexObject;
    }
}

public class Director {
    private Builder builder;

    public Director(Builder builder) {
        this.builder = builder;
    }

    public void construct() {
        builder.buildPart1();
        builder.buildPart2();
        builder.buildPart3();
        // Call other construction methods...
    }
}

public class ComplexObject {
    // Define the complex object with its parts and configurations
}

public class Main {
    public static void main(String[] args) {
        Builder builder = new ConcreteBuilder();
        Director director = new Director(builder);

        director.construct();

        ComplexObject complexObject = builder.getResult();
        // Use the constructed complex object
    }
}
In this example, the Builder interface declares methods for building different parts of the complex object. The ConcreteBuilder class implements this interface and provides its own implementation of the construction methods. The Director class coordinates the construction process by invoking the builder's methods in a specific order.
By using the Builder pattern, you have more control over the construction of complex objects, allowing you to build them step by step. This pattern is particularly useful when creating objects with many optional or varied parts. However, keep in mind that introducing too many builders can increase complexity, so use this pattern judiciously.
5. Prototype Pattern
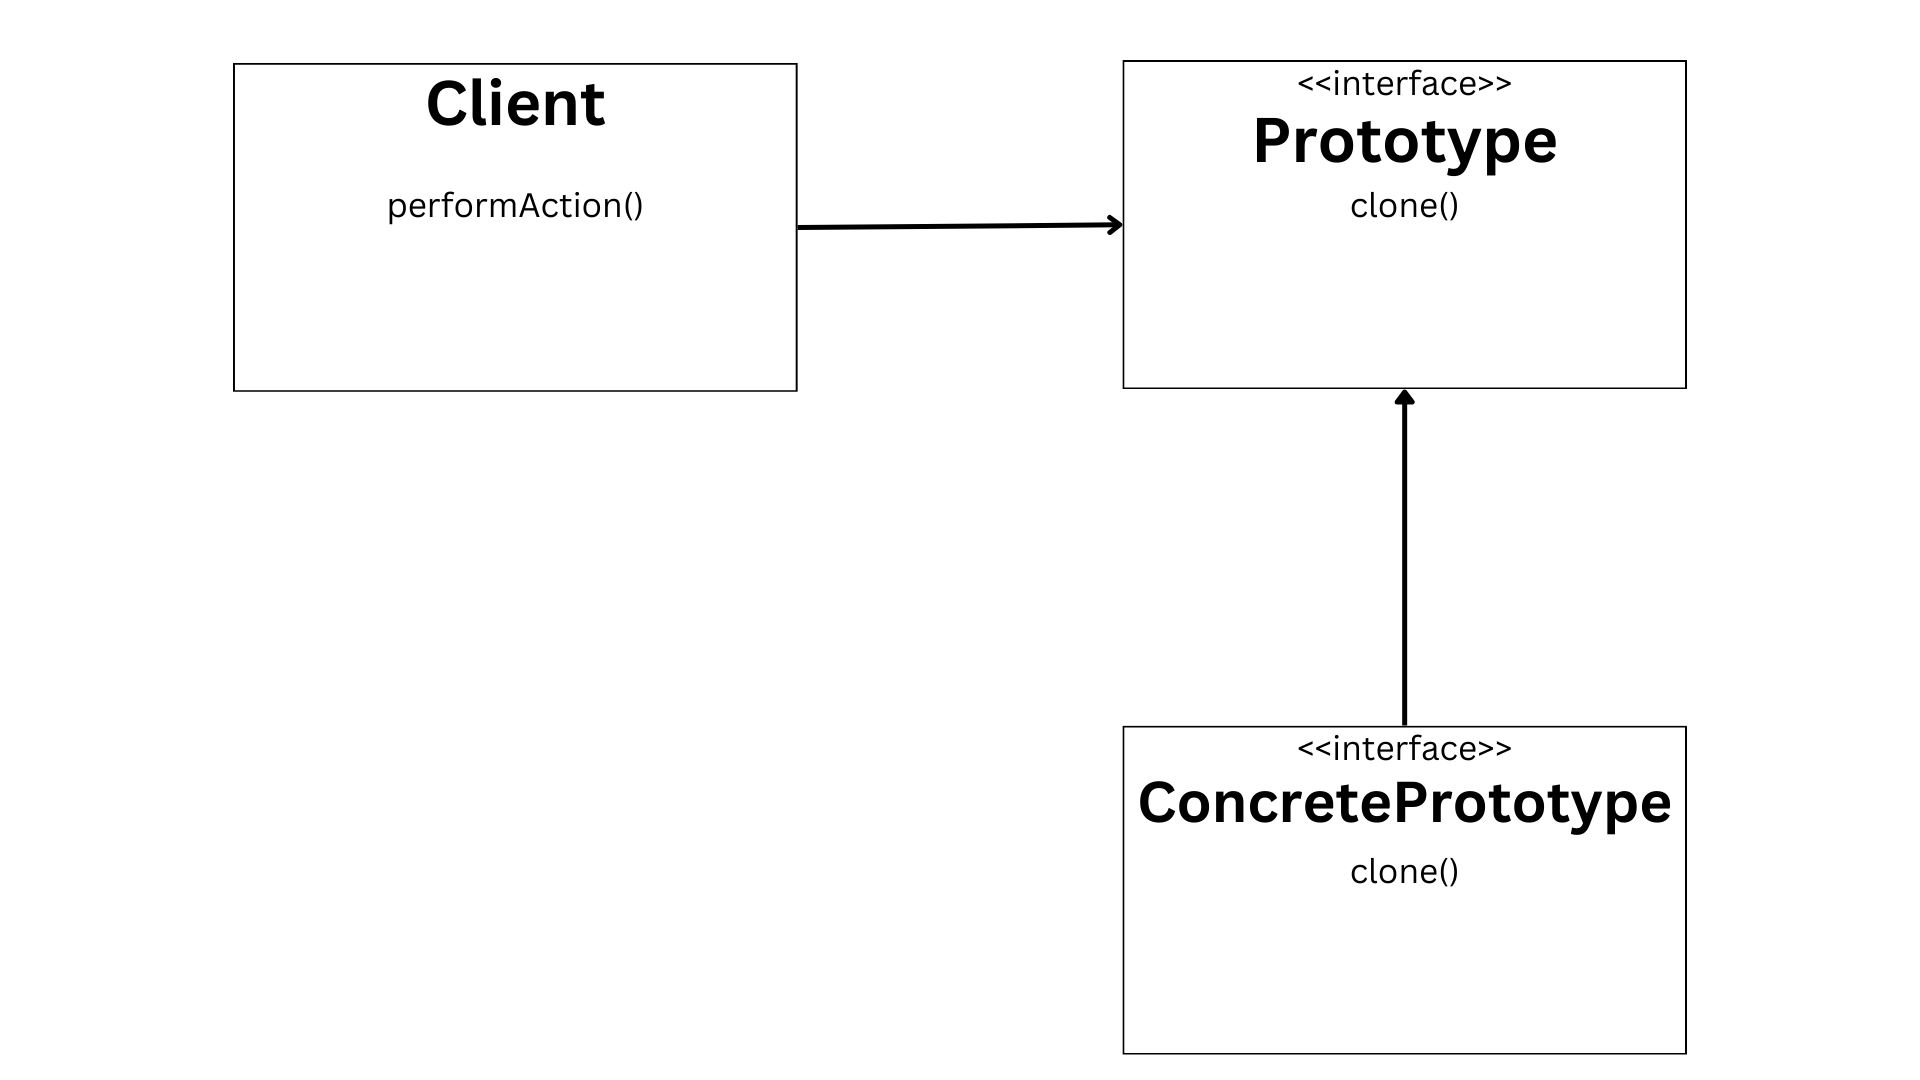 The Prototype pattern
The Prototype pattern addresses the need for copying or cloning objects instead of creating new instances. It allows for the creation of new objects by copying an existing object, utilizing a prototype instance. This pattern consists of a prototype interface and concrete prototypes that implement the interface.
To understand the Prototype pattern, think of it as making photocopies of a document. The original document serves as the prototype, and the copies are created by simply duplicating the original. Similarly, the Prototype pattern allows for efficient cloning of objects by utilizing an existing instance as a blueprint for creating new instances.
In Java, you can implement the Prototype pattern by defining a prototype interface that declares a method for cloning the object. Each concrete prototype class then implements this interface and provides its own implementation of the cloning method. Here's an example:
public interface Prototype extends Cloneable {
    Prototype clone();
}

public class ConcretePrototype implements Prototype {
    @Override
    public Prototype clone() {
        try {
            return (Prototype) super.clone();
        } catch (CloneNotSupportedException e) {
            // Handle clone exception
            return null;
        }
    }
}

public class Main {
    public static void main(String[] args) {
        Prototype prototype = new ConcretePrototype();
        Prototype clone = prototype.clone();
        // Use the cloned object
    }
}
In this example, the Prototype interface declares the clone() method for cloning the object. The ConcretePrototype class implements this interface and overrides the clone() method to perform a shallow copy of the object. The Main class demonstrates how to use the Prototype pattern by creating a concrete prototype and cloning it to obtain a new instance.
When using the Prototype pattern, keep in mind that the cloning process can become complex when involving deep cloning, where all the object's references are also cloned. It's important to handle any clone exceptions that may occur.
6. Adapter Pattern
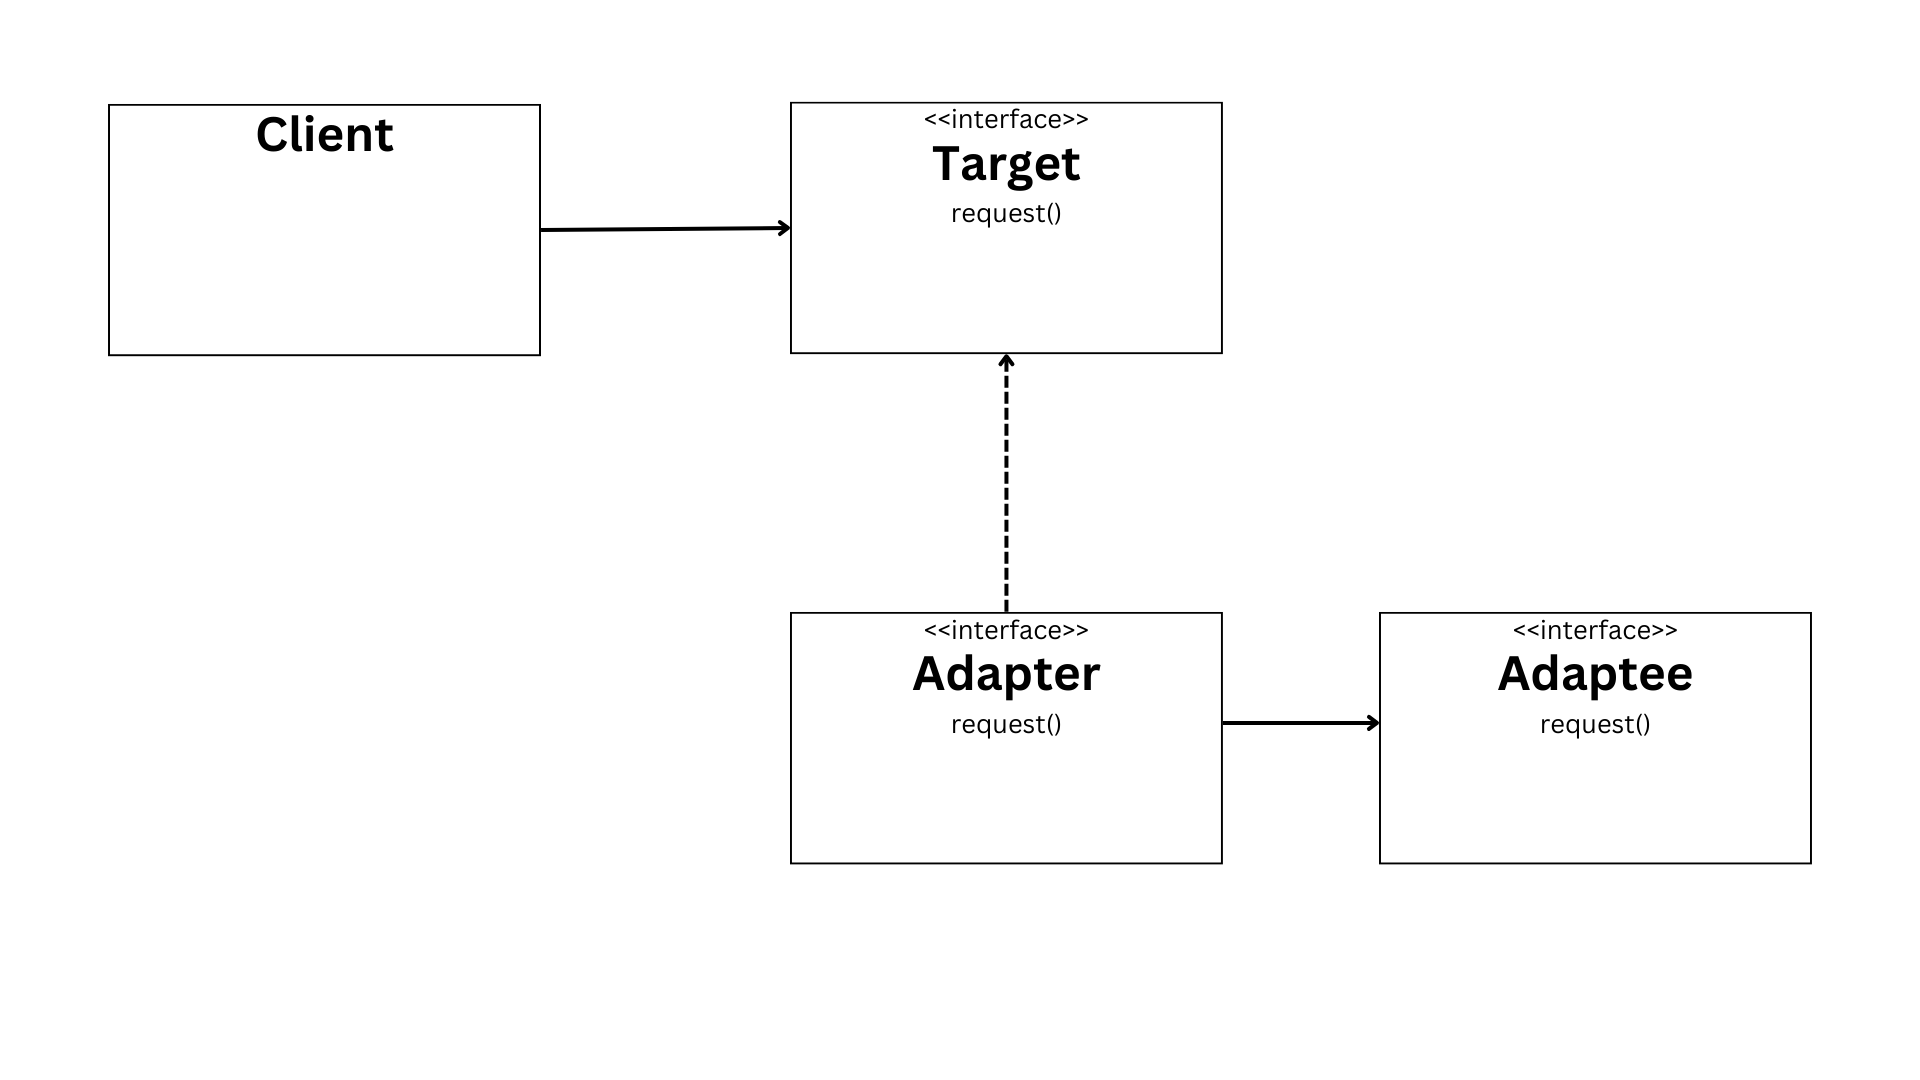 The Adaptor pattern
The Adapter pattern solves the problem of incompatible interfaces between classes, allowing them to collaborate effectively. It achieves this by adapting one interface to another using a middle layer called the adapter. The components involved in this pattern are the Adapter, Adaptee, and Target interface.
To understand the Adapter pattern, consider power socket adapters for different country plugs. The adapter serves as a bridge between the incompatible plug and the socket, allowing them to work together.
Similarly, the Adapter pattern enables collaboration between classes with incompatible interfaces by providing a common interface through the adapter.
Here's an example of how the Adapter pattern can be implemented in Java:
// Adaptee interface
public interface LegacyCode {
    void legacyMethod();
}

// Adaptee implementation
public class LegacyCodeImpl implements LegacyCode {
    @Override
    public void legacyMethod() {
        // Implementation of legacy method
    }
}

// Target interface
public interface NewCode {
    void newMethod();
}

// Adapter implementation
public class Adapter implements NewCode {
    private LegacyCode legacyCode;

    public Adapter(LegacyCode legacyCode) {
        this.legacyCode = legacyCode;
    }

    @Override
    public void newMethod() {
        // Adapt the new method to the legacy code
        legacyCode.legacyMethod();
    }
}

// Client code
public class Client {
    public static void main(String[] args) {
        LegacyCode legacyCode = new LegacyCodeImpl();
        NewCode newCode = new Adapter(legacyCode);
        newCode.newMethod();
    }
}
In this example, the LegacyCode interface represents the existing code with its own legacy method. The LegacyCodeImpl class implements this interface and provides the implementation of the legacy method.
The NewCode interface represents the desired new interface for the client code. The Adapter class implements this interface and contains a reference to the LegacyCode object. It adapts the new method to the existing legacy code by invoking the legacy method inside the new method.
By using the Adapter pattern, you can integrate legacy code or collaborate with classes that have incompatible interfaces. The adapter acts as a translator, enabling communication between the different components. Remember to choose meaningful names for the classes and interfaces to improve code readability.
When applying the Adapter pattern, consider the trade-offs it entails. While it allows collaboration between incompatible interfaces, it introduces an additional layer of complexity. Use this pattern judiciously and consider the specific needs of your project.
7. Composite Pattern
 The Composite pattern
The Composite pattern addresses the problem of treating individual objects and compositions of objects uniformly. It allows us to create tree-like structures to represent part-whole hierarchies.
In this pattern, we have two types of objects: composite objects and leaf objects. Composite objects can contain other objects, including both composite objects and leaf objects. Leaf objects, on the other hand, are the building blocks of the hierarchy and cannot contain other objects.
To understand this pattern, imagine a file system where we have nested folders. The folders represent composite objects, while the files represent leaf objects. By treating folders and files uniformly, we can perform operations on them regardless of their specific type.
Here's an example implementation in Java:
public interface Component {
    void operation();
}

public class Composite implements Component {
    private List<Component> children = new ArrayList<>();

    public void add(Component component) {
        children.add(component);
    }

    public void remove(Component component) {
        children.remove(component);
    }

    @Override
    public void operation() {
        for (Component component : children) {
            component.operation();
        }
    }
}

public class Leaf implements Component {
    @Override
    public void operation() {
        // Perform the operation on the leaf object
    }
}

public class Main {
    public static void main(String[] args) {
        Composite composite = new Composite();
        composite.add(new Leaf());
        composite.add(new Leaf());

        composite.operation(); // Perform the operation on the composite object and its children
    }
}
In this example, the Component interface declares the operation() method that represents the operation to be performed on both composite objects and leaf objects. The Composite class implements this interface and contains a list of child components. It provides methods to add and remove child components and overrides the operation() method to perform the operation on itself and its children.
The Leaf class also implements the Component interface and provides its own implementation of the operation() method.
By using the Composite pattern, we can simplify client code by treating individual objects and compositions of objects uniformly. But we should be cautious not to make the design overly general, as it may introduce unnecessary complexity.
8. Proxy Pattern
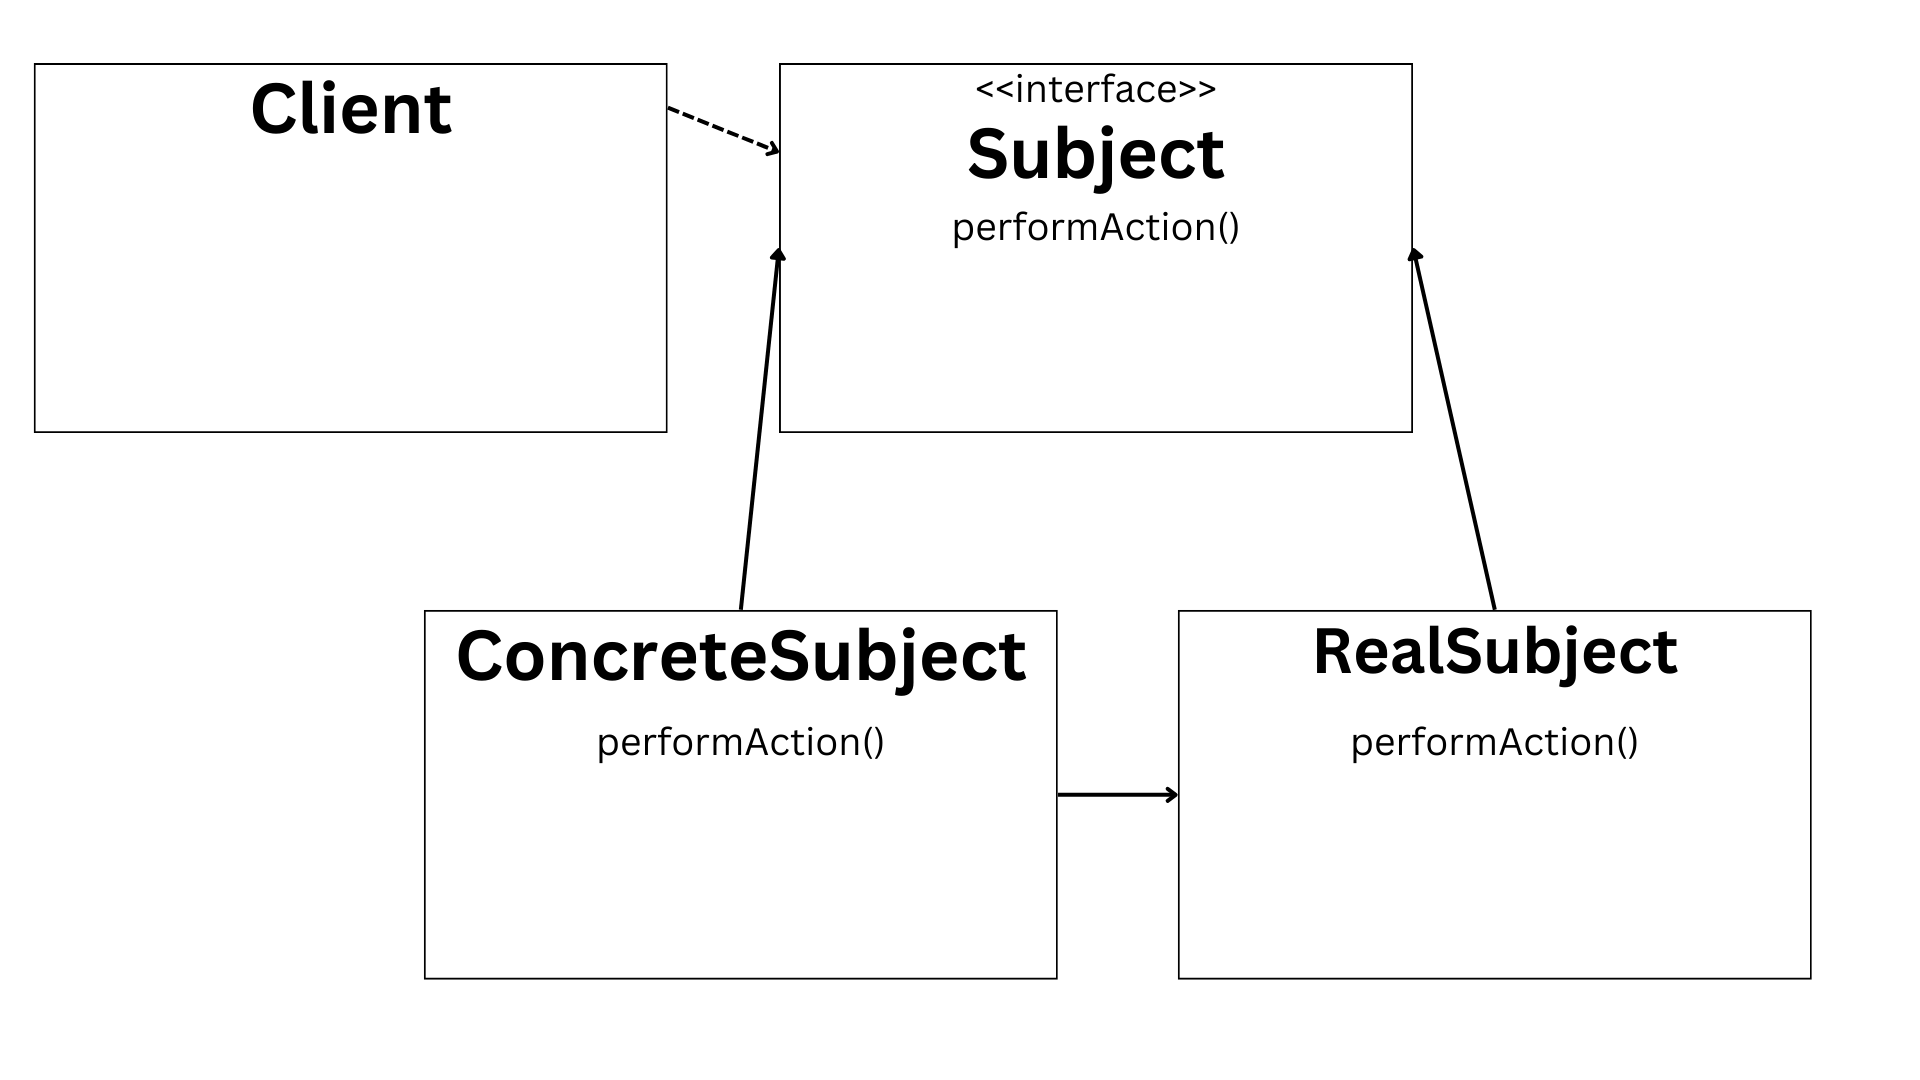 The Proxy pattern
The Proxy pattern is a structural design pattern that provides a placeholder for another object. It is used to control access to an object or delay its instantiation. A common example is a bank teller acting as a proxy for bank account transactions.
To understand the Proxy pattern, let's consider a scenario where we want to access a resource-intensive object, such as a large image or a remote database. Instead of directly accessing the object, we can use a proxy to control the access and provide additional functionality if needed.
In the Proxy pattern, we have three main components: the Proxy, the Subject interface, and the RealSubject. The Proxy class acts as a middleman between the client and the RealSubject. It controls access to the RealSubject and provides any additional logic or checks before delegating the request.
Here's an example implementation in Java:
public interface Subject {
    void request();
}

public class RealSubject implements Subject {
    @Override
    public void request() {
        // Perform the actual request
    }
}

public class Proxy implements Subject {
    private RealSubject realSubject;

    @Override
    public void request() {
        if (realSubject == null) {
            realSubject = new RealSubject();
        }

        // Perform additional checks or logic before delegating the request
        // ...

        realSubject.request();
    }
}

public class Client {
    public static void main(String[] args) {
        Subject subject = new Proxy();
        subject.request();
    }
}
In this example, the Subject interface declares the common method for the request. The RealSubject class implements this interface and provides the actual implementation of the request. The Proxy class also implements the Subject interface and acts as a proxy for the RealSubject.
When the client makes a request through the Proxy, the Proxy checks if the RealSubject has been instantiated. If not, it creates an instance of the RealSubject. The Proxy can also perform additional checks or logic before delegating the request to the RealSubject.
The Proxy pattern provides several advantages, such as controlling access to the real object, delaying the instantiation of the real object until it is actually needed, and providing additional functionality or checks. But it can introduce latency due to the extra layer of indirection.
It's important to note that the Proxy pattern is different from the Adapter pattern, which is used to bridge incompatible interfaces. The Proxy acts as a placeholder or wrapper for the real object, while the Adapter provides a different interface for an existing object.
The Proxy pattern is a powerful tool for controlling access to objects or delaying their instantiation. By using a proxy, you can add extra functionality, perform checks, or provide a simplified interface for the client. Just be cautious of the potential latency introduced by the proxy.
9. Observer Pattern
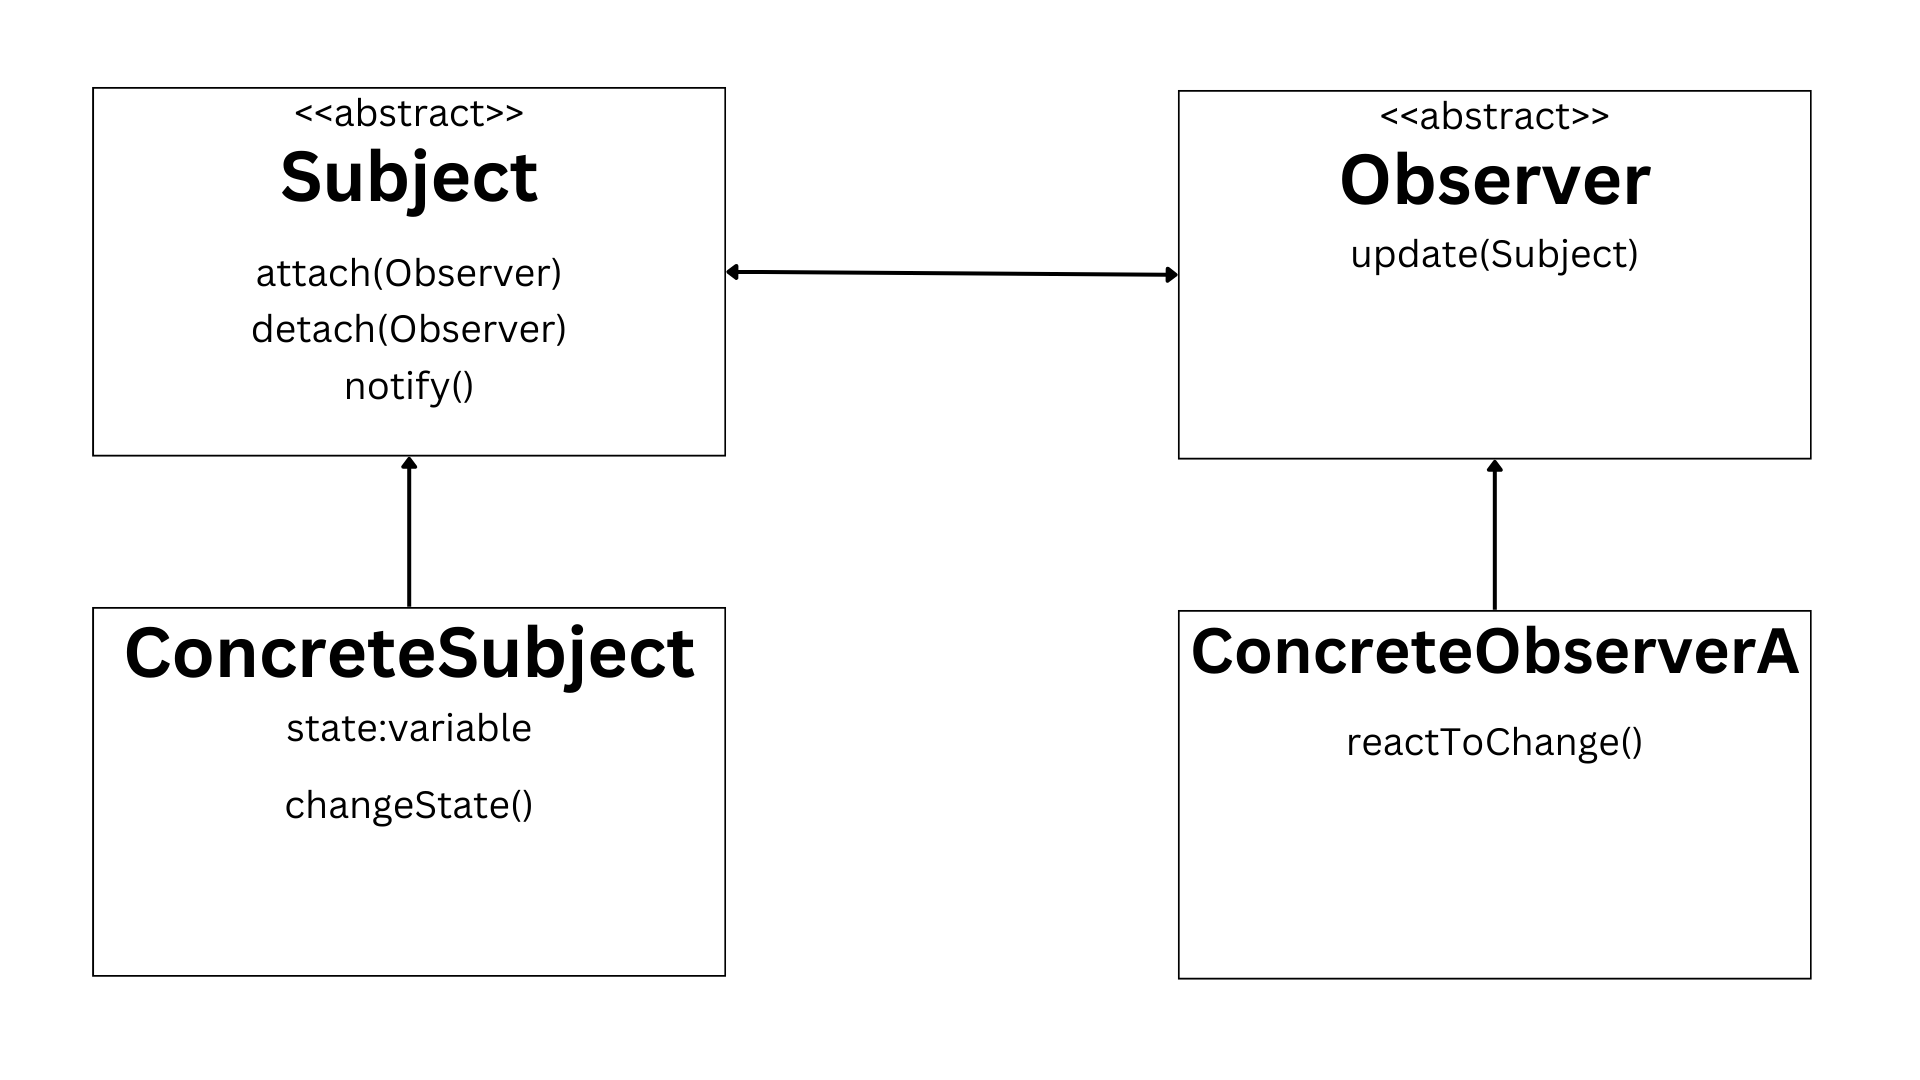 The Observer pattern
The Composite pattern addresses the need to treat individual objects and compositions of objects uniformly, creating a tree-like structure to represent part-whole hierarchies. This pattern is useful when we want to perform operations on objects regardless of their specific type, such as in a file system where we have folders (composite objects) and files (leaf objects).
To implement the Composite pattern in Java, we can define a Component interface that declares an operation() method. The Composite class represents the composite object and maintains a list of child components. It provides methods to add and remove components, as well as an implementation of the operation() method that calls the operation() method on each child component. The Leaf class represents the leaf object and provides its own implementation of the operation() method.
Here's an example code snippet:
interface Component {
    void operation();
}

class Composite implements Component {
    private List<Component> children = new ArrayList<>();

    public void add(Component component) {
        children.add(component);
    }

    public void remove(Component component) {
        children.remove(component);
    }

    @Override
    public void operation() {
        for (Component component : children) {
            component.operation();
        }
    }
}

class Leaf implements Component {
    @Override
    public void operation() {
        // Perform the operation on the leaf object
    }
}

public class Main {
    public static void main(String[] args) {
        Composite composite = new Composite();
        composite.add(new Leaf());
        composite.add(new Leaf());

        composite.operation(); // Perform the operation on the composite object and its children
    }
}
By using the Composite pattern, we can treat individual objects and compositions of objects uniformly, simplifying the code and providing flexibility. But it's important to note that adding too many levels of nesting can make the code more complex and harder to maintain. Therefore, it's important to strike the right balance and use this pattern judiciously.
10. Strategy Pattern
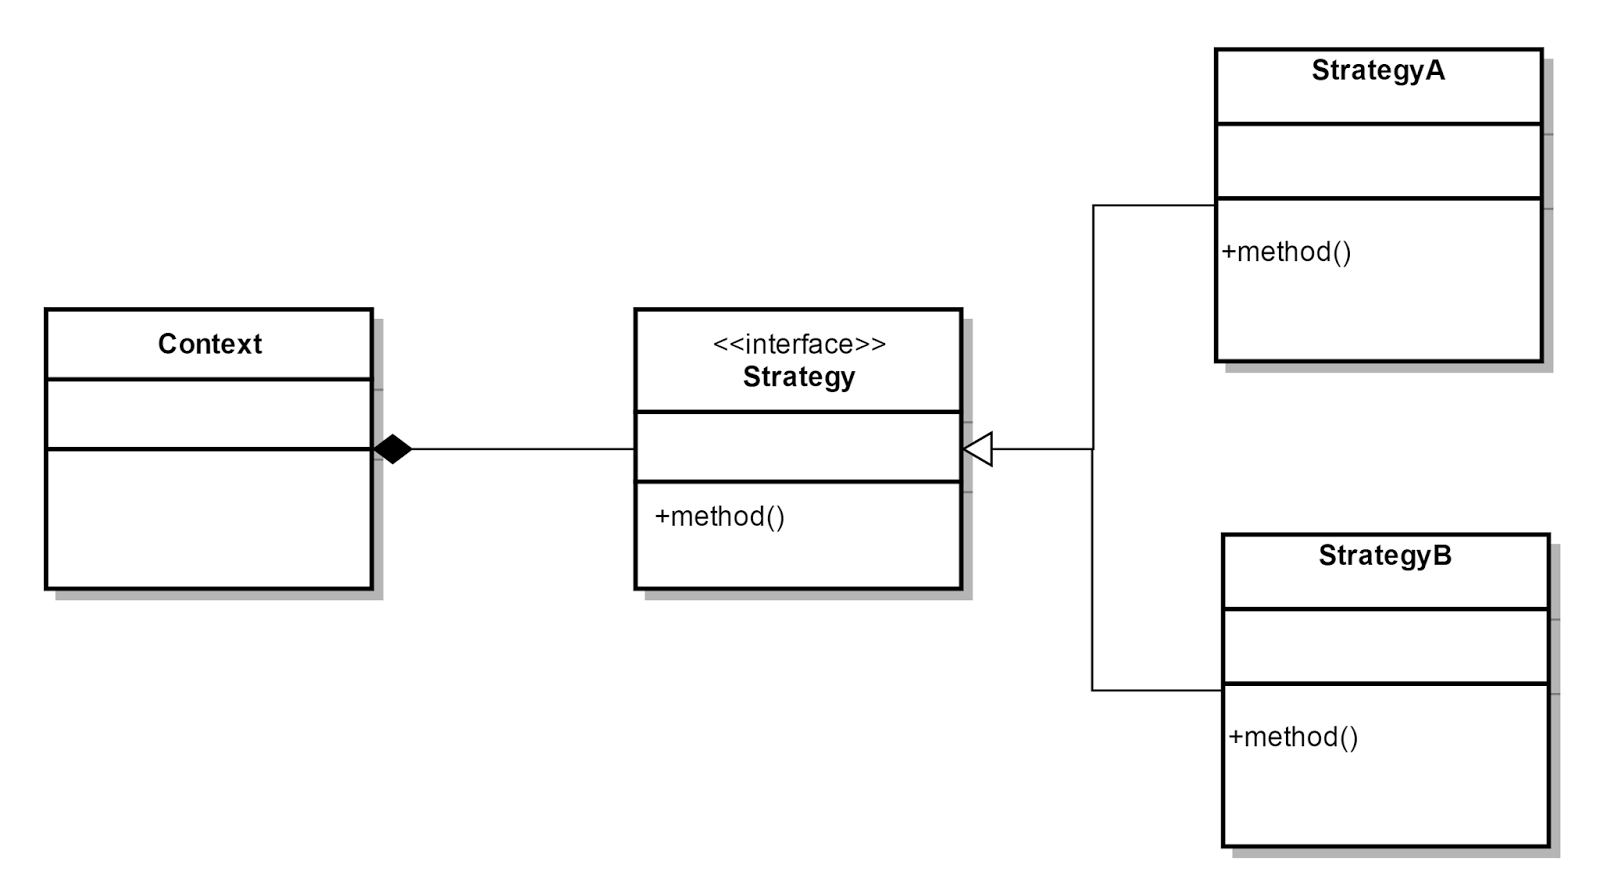 The Strategy pattern
The Strategy pattern is a behavioral design pattern that allows for selecting algorithms or behaviors at runtime. It addresses the need to choose different strategies based on the situation, providing flexibility and interchangeability.
To understand the Strategy pattern, let's consider a real-world example of choosing transportation methods. Depending on the situation, we may need to select a car, a bike, or a bus. Each transportation method represents a strategy, and the situation represents the context.
In Java, we can implement the Strategy pattern by creating a Context class, a Strategy interface, and multiple ConcreteStrategy classes. The Context class encapsulates the algorithms or behaviors and provides a method to change the strategy at runtime. The Strategy interface defines the contract for the different strategies, and the ConcreteStrategy classes implement specific strategies.
Here's an example:
public interface Strategy {
    void performAction();
}

public class ConcreteStrategyA implements Strategy {
    @Override
    public void performAction() {
        // Implement the strategy A
    }
}

public class ConcreteStrategyB implements Strategy {
    @Override
    public void performAction() {
        // Implement the strategy B
    }
}

public class Context {
    private Strategy strategy;

    public void setStrategy(Strategy strategy) {
        this.strategy = strategy;
    }

    public void executeStrategy() {
        strategy.performAction();
    }
}

public class Main {
    public static void main(String[] args) {
        Context context = new Context();

        context.setStrategy(new ConcreteStrategyA());
        context.executeStrategy(); // Perform strategy A

        context.setStrategy(new ConcreteStrategyB());
        context.executeStrategy(); // Perform strategy B
    }
}
In this example, the Strategy interface declares the performAction() method, which represents the behavior of the different strategies. The ConcreteStrategyA and ConcreteStrategyB classes implement this interface and provide their own implementations of the strategies.
The Context class holds a reference to the current strategy and provides methods to set the strategy and execute it. By changing the strategy at runtime, we can easily switch between different behaviors.
When using the Strategy pattern, it's essential to identify the problem and choose the appropriate strategies. Consider the advantages and trade-offs, such as flexibility and potential complexity due to multiple strategy classes.
Chapter 5: How to Optimize Java Code for Speed and Efficiency
Java optimization is a crucial aspect of developing high-performance applications. In this guide, we will explore the various techniques and tools that can help improve the speed and efficiency of your Java code.
When it comes to understanding Java performance, it is essential to grasp the basics. You should be familiar with key performance metrics and be able to identify common performance bottlenecks. By analyzing and addressing these bottlenecks, you can significantly enhance the overall performance of your application.
One effective way to optimize your Java code is through computational optimization. This involves using efficient data structures and algorithms to reduce CPU cycle consumption. By carefully selecting the right algorithms and optimizing their implementation, you can achieve significant performance improvements.
Another important aspect of Java optimization is resource conflict optimization. This involves managing multi-threaded environments and implementing synchronization and locking mechanisms appropriately. By ensuring proper coordination among threads, you can avoid conflicts and improve the efficiency of your code.
Additionally, JVM optimization plays a crucial role in enhancing Java performance. By tuning JVM parameters and configuring garbage collectors, you can optimize memory usage and reduce overhead. Understanding the behavior of garbage collection and leveraging profiling and benchmarking techniques can further aid in optimizing your Java code.
To assist you in the optimization process, there are various tools available. Code analysis tools can help identify potential issues and provide suggestions for improvement. Tools for garbage collection analysis, continuous profiling, JIT compilation analysis, benchmarking, and real-time monitoring can also be valuable in identifying performance bottlenecks and optimizing your code.
In order to achieve the best results, it is important to follow best practices in Java optimization. Writing clean and maintainable code, avoiding common pitfalls, and implementing efficient memory management strategies are essential.
Throughout this chapter, we will explore real-world case studies and provide practical advice based on experience. We will also touch upon advanced topics such as optimizing Java in cloud environments and Java performance in microservices architecture.
By applying these techniques and insights, you can optimize your Java code for speed and efficiency, leading to enhanced performance and better user experiences.
Java Optimization Techniques
When it comes to optimizing your Java code, there are several key areas to focus on: computational optimization, resource conflict optimization, algorithm code optimization, and JVM optimization.
Computational optimization
In computational optimization, one effective approach is to utilize efficient data structures and algorithms.
By carefully selecting the right data structures and algorithms for your specific use case, you can significantly reduce CPU cycle consumption and improve the overall performance of your code.
Let's take a look at an example:
// Example code demonstrating efficient data structures and algorithms
List<String> names = new ArrayList<>();
names.add("John");
names.add("Jane");
names.add("Michael");

for (String name : names) {
    System.out.println(name);
}
Resource conflict optimization
In resource conflict optimization, it is crucial to effectively manage multi-threaded environments and implement synchronization and locking mechanisms.
By ensuring proper coordination among threads, you can avoid conflicts and enhance the efficiency of your code.
Here's an example to illustrate this concept:
// Example code demonstrating resource conflict optimization
public class Counter {
    private int count = 0;

    public synchronized void increment() {
        count++;
    }

    public synchronized int getCount() {
        return count;
    }
}
Algorithm code optimization
Algorithm code optimization involves selecting the right algorithms and leveraging profiling and benchmarking techniques.
By analyzing the performance characteristics of different algorithms and fine-tuning their implementation, you can achieve significant performance improvements.
Here's an example:
// Example code demonstrating algorithm code optimization
public class ArrayUtils {
    public static int findMax(int[] arr) {
        int max = Integer.MIN_VALUE;
        for (int num : arr) {
            if (num > max) {
                max = num;
            }
        }
        return max;
    }
}
JVM Optimization
JVM optimization plays a crucial role in enhancing Java performance. By tuning JVM parameters and configuring garbage collectors, you can optimize memory usage and reduce overhead.
It is essential to understand the behavior of garbage collection and leverage profiling and benchmarking techniques to fine-tune your Java code. Remember, JVM optimization can have a significant impact on the overall performance of your application.
By focusing on these key areas of optimization and applying the techniques discussed, you can greatly improve the speed and efficiency of your Java code.
Java Optimization Tools
When it comes to optimizing your Java code, several key tools deserve your attention. Let's delve into each of them and explore practical advice to improve performance.
Code Analysis Tools like Checkstyle, PMD, and FindBugs (now SpotBugs).
Application: These tools statically analyze your Java code to catch style discrepancies, potential bugs, and anti-patterns.
For instance, Checkstyle can enforce a coding standard by checking for deviations from preset rules. PMD finds common programming flaws like unused variables, empty catch blocks, unnecessary object creation, and so on. SpotBugs scans for instances of bug patterns/potential errors that are likely to lead to runtime errors or incorrect behavior.
Garbage Collection Analysis Tools like VisualVM, GCViewer, and JClarity's Censum.
Application: These tools help in analyzing Java heap dumps and garbage collection logs.
VisualVM can attach to a running JVM and monitor object creation and garbage collection, which helps in tuning the heap size and selecting the appropriate garbage collector. GCViewer can read JVM garbage collection logs to visualize and analyze garbage collection processes. Censum can interpret verbose garbage collection logs to recommend optimizations.
Continuous Profiling Tools like YourKit, JProfiler, and Java Flight Recorder (JFR).
Application: Continuous profiling tools are used to identify performance issues in a running Java application.
YourKit provides powerful on-demand profiling of both CPU and memory usage, as well as extensive analysis capabilities. JProfiler offers a live profiling of a local or remote session, and can track down performance bottlenecks, memory leaks, and threading issues. Java Flight Recorder, part of the JDK, collects detailed runtime information about the JVM which can be analyzed later.
JIT Compilation Analysis Tools like JITWatch, Oracle Solaris Studio Performance Analyzer.
Application: These tools help developers understand the intricacies of the JIT compiler.
JITWatch is a tool that analyzes the Just-In-Time (JIT) compilation process of the HotSpot JVM. It visualizes the compiler optimizations and provides feedback on how the JIT compiler is translating bytecode into machine code. The Performance Analyzer can track the performance of applications and can show how code is being executed, allowing developers to see which methods are being JIT-compiled and how often.
Benchmarking Tools like JMH (Java Microbenchmark Harness), Google Caliper.
Application: Benchmarking tools like JMH are designed for benchmarking code sections (usually methods) to measure their performance.
JMH is specifically tailored for Java and other JVM languages and allows you to define a benchmarking job and measure its performance under different conditions. Google Caliper is another benchmarking framework that's designed to help you record, analyze, and compare the performance of your Java code.
Monitoring Tools like Nagios, Prometheus with JMX exporter, and New Relic.
Application: These tools are used for the real-time monitoring of Java applications.
Nagios can monitor JVM metrics and provide alerts based on thresholds. Prometheus can scrape metrics exposed by JVM using JMX exporter and allows for powerful querying. New Relic provides an APM (Application Performance Management) tool that offers real-time insights into your application's operation, with detailed transaction traces, error tracking, and application topology mapping.
Let's look at how you can use each type of tool to better optimize your Java code.
How to Use Code Analysis Tools
Static code analysis plays a crucial role in identifying potential issues and suggesting improvements in your Java code. By utilizing popular Java code analysis tools, you can gain valuable insights into code quality and ensure adherence to best practices.
Static Code Analysis Example:
// Example code demonstrating static code analysis
public class User {
    private String name;
    private int age;

    public User(String name, int age) {
        this.name = name;
        this.age = age;
    }

    public void printUserInfo() {
        System.out.println("Name: " + name);
        System.out.println("Age: " + age);
    }
}
How to Use Garbage Collection Analysis Tools
Understanding garbage collection in Java is essential for optimizing memory usage and reducing overhead. By employing tools specifically designed for analyzing garbage collection behavior, you can fine-tune your Java code and optimize memory allocation.
Garbage Collection Analysis Example:
// Example code demonstrating garbage collection analysis
public class MemoryIntensiveTask {
    public static void main(String[] args) {
        List<Integer> numbers = new ArrayList<>();
        for (int i = 0; i < 1000000; i++) {
            numbers.add(i);
        }
        // Perform memory-intensive operations
        // ...
        numbers.clear();
    }
}
How to Use Continuous Profiling Tools
Continuous profiling enables you to gather real-time performance data and identify performance bottlenecks in your Java application. By using recommended profiling tools, you can gain insights into CPU usage, memory allocation, and method-level performance, allowing you to make targeted optimizations.
Continuous Profiling Example:
// Example code demonstrating continuous profiling
public class PerformanceAnalyzer {
    public static void main(String[] args) {
        // Start profiling
        Profiler.start();

        // Perform operations to analyze performance
        // ...

        // Stop profiling and print performance report
        Profiler.stop();
        Profiler.printReport();
    }
}
How to Use JIT Compilation Analysis Tools
Just-in-time (JIT) compilation is a crucial component of Java performance. Exploring JIT compilation behavior through dedicated tools allows you to understand how your code is optimized at runtime. By analyzing JIT compilation, you can make informed decisions to improve performance.
JIT Compilation Analysis Example:
// Example code demonstrating JIT compilation analysis
public class LoopExample {
    public static void main(String[] args) {
        for (int i = 0; i < 1000; i++) {
            System.out.println("Iteration: " + i);
        }
    }
}
How to Use Benchmarking Tools
Benchmarking Java applications provides valuable performance data and helps you identify areas for improvement. Effective benchmarking tools allow you to compare different approaches, algorithms, or libraries, enabling you to make informed decisions to enhance performance.
Benchmarking Example:
// Example code demonstrating benchmarking
public class SortingBenchmark {
    public static void main(String[] args) {
        // Generate an array of numbers
        int[] numbers = generateRandomNumbers(1000000);

        // Measure the execution time of different sorting algorithms
        long startTime = System.nanoTime();
        BubbleSort.sort(numbers);
        long endTime = System.nanoTime();
        long bubbleSortTime = endTime - startTime;

        startTime = System.nanoTime();
        QuickSort.sort(numbers);
        endTime = System.nanoTime();
        long quickSortTime = endTime - startTime;

        // Print the results
        System.out.println("Bubble Sort Time: " + bubbleSortTime + " nanoseconds");
        System.out.println("Quick Sort Time: " + quickSortTime + " nanoseconds");
    }

    // Helper method to generate random numbers
    private static int[] generateRandomNumbers(int size) {
        // ...
        return numbers;
    }
}
How to Use Monitoring Tools
Real-time monitoring of Java applications provides crucial insights into system behavior and performance metrics. Top Java monitoring tools enable you to track key performance indicators, detect anomalies, and troubleshoot issues promptly, ensuring optimal performance.
Remember, while utilizing these tools is essential, it's equally important to focus on writing clean and maintainable code, avoiding common pitfalls, and implementing efficient memory management strategies.
Best Practices in Java Optimization
Writing clean and maintainable code is crucial for optimizing Java applications. Adhering to principles of modularity and encapsulation, breaking down code into reusable modules, and encapsulating data and functionality within classes are key practices.
You should also avoid excessive object creation, choose efficient data structures, and employ memory management strategies like lazy initialization and resource cleanup.
Example of clean and maintainable code:
Here's an example code snippet illustrating the importance of clean and maintainable code:
// Example code demonstrating clean and maintainable code
public class OrderProcessor {
    private OrderRepository orderRepository;

    public OrderProcessor(OrderRepository orderRepository) {
        this.orderRepository = orderRepository;
    }

    public void processOrders(List<Order> orders) {
        for (Order order : orders) {
            if (order.isValid()) {
                order.process();
                orderRepository.save(order);
            }
        }
    }
}
The provided Java code is a good example of clean code for several reasons:
- Single Responsibility Principle: The
OrderProcessorclass has a single responsibility – to process orders. This makes the class easier to maintain and test. - Use of meaningful names: The class name
OrderProcessorand method nameprocessOrdersclearly indicate their purpose. The variable names such asorderRepositoryandordersare also self-explanatory. - Dependency Injection: The
OrderRepositoryis passed into theOrderProcessorvia its constructor, which is a form of Dependency Injection. This makes the code more flexible and easier to test. - Code readability: The code is well-structured and easy to read. The use of whitespace and indentation improves readability.
- Error handling: The code checks if an order is valid before processing it, which is a good practice for error handling.
Overall, this code is clean because it is easy to understand, maintain, and extend.
Chapter 6: Concurrent Data Structures and Algorithms for High-Performance Applications
In the fast-paced world of computing, where speed and efficiency are paramount, concurrent data structures and algorithms play a crucial role in achieving high performance.
Concurrency allows multiple tasks to execute simultaneously, maximizing resource utilization and enabling applications to handle complex workloads efficiently.
Understanding the fundamentals of concurrency in computing is essential for developers seeking to optimize their applications. By harnessing the power of parallelism, concurrent data structures and algorithms enable tasks to be executed concurrently, reducing overall execution time and improving responsiveness.
Key Concurrent Data Structures
Lock-based data structures provide a mechanism for ensuring mutual exclusion and data consistency in concurrent applications. They work by acquiring a lock or mutex before accessing shared data, ensuring that only one thread can access the data at a time. Common lock-based structures include locks, mutexes, and semaphores.
Lock-free data structures, on the other hand, offer a way to achieve concurrency without the use of locks. They utilize atomic operations and memory fences to ensure data consistency and avoid the need for explicit locking. Examples of lock-free structures include lock-free queues and lock-free stacks.
Wait-free data structures take concurrency a step further by guaranteeing that every thread makes progress even if other threads are stalled or delayed. They are designed to ensure that no thread is blocked indefinitely, making them suitable for real-time systems and high-performance applications.
We'll see some examples of these in a minute.
Remember, when utilizing lock-based data structures, it is crucial to handle potential issues such as deadlocks and contention. Always aim to strike a balance between concurrency and performance, ensuring efficient utilization of resources.
When working with lock-free and wait-free data structures, it is important to understand their limitations and use them judiciously. These structures can provide significant performance benefits in certain scenarios, but they may also introduce additional complexity and require careful synchronization.
By leveraging the appropriate concurrent data structures and algorithms in your Java applications, you can optimize performance, enhance responsiveness, and achieve efficient resource utilization.
Essential Concurrent Algorithms
In high-performance applications, concurrent data structures and algorithms are essential for achieving optimal speed and efficiency. They enable tasks to be executed simultaneously, maximizing resource utilization and improving responsiveness.
One important aspect of concurrency is task scheduling algorithms. These algorithms play a critical role in managing concurrent tasks. They determine the order in which tasks are executed and ensure efficient utilization of resources.
Here's an example of a round-robin scheduling algorithm implemented in Java:
import java.util.Queue;
import java.util.LinkedList;

public class RoundRobinScheduler {
    private Queue<Task> taskQueue;

    public RoundRobinScheduler() {
        taskQueue = new LinkedList<>();
    }

    public void schedule(Task task) {
        taskQueue.offer(task);
    }

    public void executeTasks() {
        while (!taskQueue.isEmpty()) {
            Task task = taskQueue.poll();
            task.execute();
            taskQueue.offer(task);
        }
    }
}
Synchronization algorithms are crucial for ensuring data consistency in concurrent applications. They prevent data races and conflicts by providing mechanisms for thread synchronization.
Here's an example of using locks for synchronization in Java:
import java.util.concurrent.locks.Lock;
import java.util.concurrent.locks.ReentrantLock;

public class SynchronizedData {
    private int data;
    private Lock lock;

    public SynchronizedData() {
        data = 0;
        lock = new ReentrantLock();
    }

    public void updateData(int value) {
        lock.lock();
        try {
            data = value;
        } finally {
            lock.unlock();
        }
    }

    public int getData() {
        lock.lock();
        try {
            return data;
        } finally {
            lock.unlock();
        }
    }
}
Deadlock detection and resolution are vital for handling potential deadlocks in concurrent applications, as we discussed above. If you remember, deadlocks occur when two or more threads are blocked indefinitely, waiting for each other to release resources.
Here's an example of deadlock prevention using resource ordering in Java:
public class DeadlockPrevention {
    private Object resource1 = new Object();
    private Object resource2 = new Object();

    public void executeThread1() {
        synchronized (resource1) {
            // Critical section 1
            synchronized (resource2) {
                // Critical section 2
            }
        }
    }

    public void executeThread2() {
        synchronized (resource2) {
            // Critical section 1
            synchronized (resource1) {
                // Critical section 2
            }
        }
    }
}
By leveraging the appropriate concurrent data structures, algorithms, and synchronization techniques, you can optimize the performance of your Java applications. Remember to consider the limitations and complexities of concurrent programming and aim for simplicity and efficiency in your implementation.
Examples of Lock-based, Lock-free, and Wait-free Data Structures
Concurrent data structures and algorithms play a crucial role in achieving high performance in the fast-paced world of computing. By allowing multiple tasks to execute simultaneously, concurrency maximizes resource utilization and enables efficient handling of complex workloads.
Lock-based data structure
Lock-based data structures, such as locks, mutexes, and semaphores, ensure mutual exclusion and data consistency by acquiring locks before accessing shared data.
For example, in Java, you can use a lock-based data structure like the following code snippet:
// Importing the necessary classes from the java.util.concurrent.locks package
import java.util.concurrent.locks.Lock;
import java.util.concurrent.locks.ReentrantLock;

// Defining a public class named Counter
public class Counter {
    // Declaring a private integer variable 'count'
    private int count;
    // Declaring a private Lock object 'lock'
    private Lock lock;

    // Defining the constructor for the Counter class
    public Counter() {
        // Initializing 'count' to 0
        count = 0;
        // Initializing 'lock' as a new ReentrantLock object
        lock = new ReentrantLock();
    }

    // Defining a public method 'increment' to increment the count
    public void increment() {
        // Locking to ensure thread safety
        lock.lock();
        try {
            // Incrementing the count
            count++;
        } finally {
            // Unlocking after incrementing
            lock.unlock();
        }
    }

    // Defining a public method 'getCount' to return the current count
    public int getCount() {
        // Returning the current count
        return count;
    }
}
The lock variable is an instance of the ReentrantLock class from the java.util.concurrent.locks package, which is a reentrant mutual exclusion Lock with the same basic behavior and semantics as the implicit monitor lock accessed using synchronized methods and statements, but with extended capabilities.
The ReentrantLock allows more flexible structuring, may have completely different properties, and may support multiple associated Condition objects.
The use of ReentrantLock helps to ensure that the increment() operation is thread-safe. This is crucial in a multi-threaded environment to prevent race conditions.
Lock-free data structure
On the other hand, lock-free data structures, such as lock-free queues and lock-free stacks, achieve concurrency without the use of locks. They employ atomic operations and memory fences to ensure data consistency.
import java.util.concurrent.atomic.AtomicReference;

// Node class to hold the data and the reference to the next node
class Node<E> {
    final E item;
    Node<E> next;

    public Node(E item) {
        this.item = item;
    }
}

// Lock-free Stack class
public class LockFreeStack<E> {
    // AtomicReference to the top of the stack
    private AtomicReference<Node<E>> top = new AtomicReference<>();

    // Method to push an item onto the stack
    public void push(E item) {
        Node<E> newHead = new Node<>(item);
        Node<E> oldHead;
        do {
            oldHead = top.get();
            newHead.next = oldHead;
        } while (!top.compareAndSet(oldHead, newHead));
    }

    // Method to pop an item from the stack
    public E pop() {
        Node<E> oldHead;
        Node<E> newHead;
        do {
            oldHead = top.get();
            if (oldHead == null) return null;
            newHead = oldHead.next;
        } while (!top.compareAndSet(oldHead, newHead));
        return oldHead.item;
    }
}
In this code, AtomicReference is used to ensure that the operations on the top of the stack are atomic. The push and pop methods use a loop with compareAndSet to ensure that the operation is retried if the top was modified by another thread in the meantime.
This is a simple example of a lock-free data structure that achieves concurrency without the use of locks. But it’s important to note that while lock-free data structures can improve performance in multi-threaded environments, they can be more complex to implement correctly and may not always provide the best solution depending on the specific requirements of your application. It’s always important to understand their limitations and use them judiciously.
Wait-free data structure
Wait-free data structures guarantee that every thread makes progress, even if other threads are stalled or delayed. They are suitable for real-time systems and high-performance applications.
import java.util.concurrent.atomic.AtomicReference;

// Node class to hold the data and the reference to the next node
class Node<E> {
    final E item;
    AtomicReference<Node<E>> next;

    public Node(E item, Node<E> next) {
        this.item = item;
        this.next = new AtomicReference<>(next);
    }
}

// Wait-free Queue class
public class WaitFreeQueue<E> {
    private AtomicReference<Node<E>> head, tail;

    public WaitFreeQueue() {
        Node<E> dummy = new Node<>(null, null);
        head = new AtomicReference<>(dummy);
        tail = new AtomicReference<>(dummy);
    }

    // Method to add an item to the queue
    public void enqueue(E item) {
        Node<E> newNode = new Node<>(item, null);
        while (true) {
            Node<E> curTail = tail.get();
            Node<E> tailNext = curTail.next.get();
            if (curTail == tail.get()) {
                if (tailNext != null) {
                    // Queue in intermediate state, advance tail
                    tail.compareAndSet(curTail, tailNext);
                } else {
                    // In quiescent state, try inserting new node
                    if (curTail.next.compareAndSet(null, newNode)) {
                        // Insertion succeeded, try advancing tail
                        tail.compareAndSet(curTail, newNode);
                        return;
                    }
                }
            }
        }
    }

    // Method to remove an item from the queue
    public E dequeue() {
        while (true) {
            Node<E> curHead = head.get();
            Node<E> curTail = tail.get();
            Node<E> headNext = curHead.next.get();
            if (curHead == head.get()) {
                if (curHead == curTail) {
                    if (headNext == null) {
                        return null; // Queue is empty
                    }
                    // Queue in intermediate state, advance tail
                    tail.compareAndSet(curTail, headNext);
                } else {
                    E item = headNext.item;
                    if (head.compareAndSet(curHead, headNext)) {
                        return item;
                    }
                }
            }
        }
    }
}
In this code, AtomicReference is used to ensure that the operations on the head and tail of the queue are atomic.
The enqueue and dequeue methods use a loop with compareAndSet to ensure that the operation is retried if the head or tail was modified by another thread in the meantime.
This is a simple example of a wait-free data structure that guarantees that every thread makes progress, even if other threads are stalled or delayed. But it’s important to note that while wait-free data structures can improve performance in multi-threaded environments, they can be more complex to implement correctly and may not always provide the best solution depending on the specific requirements of your application. It’s always important to understand their limitations and use them judiciously.
In real-world applications, concurrent structures find applications in scenarios where high-performance and efficient resource utilization are critical. Learning from successful implementations can provide valuable insights and practical advice for optimizing your own applications.
Chapter 7: Fundamentals of Java Security
Understanding the importance of Java security is crucial in today's digital landscape. Over the years, Java security has evolved to address emerging threats and provide robust protection for applications and data. Let's delve into these key concepts and explore their practical implications.
When it comes to Java security, you'll want to prioritize the safety of your applications and the sensitive information they handle. By implementing strong security measures, you can safeguard against unauthorized access, data breaches, and malicious attacks.
To illustrate the significance of Java security, consider the following example code snippet:
import java.security.MessageDigest;
import java.security.NoSuchAlgorithmException;
import java.util.HashMap;
import java.util.Scanner;
import java.util.logging.Logger;
import java.util.logging.Level;

public class SecureApplication {
    private static final Logger LOGGER = Logger.getLogger(SecureApplication.class.getName());
    private static final HashMap<String, String> userDatabase = new HashMap<>();

    static {
        // Ideally, passwords should be hashed using a secure algorithm with a salt
        userDatabase.put("user1", hashPassword("password123"));
        userDatabase.put("admin", hashPassword("adminSecure!"));
    }

    public static void main(String[] args) {
        try (Scanner scanner = new Scanner(System.in)) {
            System.out.print("Enter username: ");
            String username = scanner.nextLine();
            System.out.print("Enter password: ");
            String password = scanner.nextLine();

            if (authenticate(username, password)) {
                LOGGER.info("User authenticated successfully.");
                if (isAuthorized(username)) {
                    performSecureOperations();
                } else {
                    LOGGER.warning("Access Denied: User does not have the necessary permissions.");
                }
            } else {
                LOGGER.severe("Authentication Failed: Invalid username or password.");
            }
        } catch (Exception e) {
            LOGGER.log(Level.SEVERE, "An error occurred", e);
        }
    }

    private static boolean authenticate(String username, String password) {
        return userDatabase.containsKey(username) && userDatabase.get(username).equals(hashPassword(password));
    }

    private static boolean isAuthorized(String username) {
        // Implement authorization logic
        // For example, only 'admin' has access to perform secure operations
        return "admin".equals(username);
    }

    private static void performSecureOperations() {
        // Secure operations
        System.out.println("Performing secure operations...");
        // Operations go here
    }

    private static String hashPassword(String password) {
        try {
            MessageDigest md = MessageDigest.getInstance("SHA-256");
            byte[] hashedPassword = md.digest(password.getBytes());
            return bytesToHex(hashedPassword);
        } catch (NoSuchAlgorithmException e) {
            LOGGER.log(Level.SEVERE, "Hashing algorithm not found", e);
            return null;
        }
    }

    private static String bytesToHex(byte[] bytes) {
        StringBuilder hexString = new StringBuilder();
        for (byte b : bytes) {
            String hex = Integer.toHexString(0xff & b);
            if (hex.length() == 1) hexString.append('0');
            hexString.append(hex);
        }
        return hexString.toString();
    }
}
This Java code sample illustrates the significance of Java security in several ways:
- Hashing Passwords: The
hashPasswordmethod uses theMessageDigestclass from thejava.securitypackage to hash passwords using the SHA-256 algorithm. Hashing passwords is a critical security practice because it means that even if an attacker gains access to the password hash, they cannot easily determine the original password. - User Authentication: The
authenticatemethod checks if the entered username exists in theuserDatabaseand if the hashed version of the entered password matches the stored hashed password. This is a basic form of user authentication, which is crucial for protecting user accounts and data. - User Authorization: The
isAuthorizedmethod checks if the authenticated user has the necessary permissions to perform secure operations. This is an example of user authorization, which is important for ensuring that users can only perform actions they are allowed to. - Exception Handling: The code includes exception handling to deal with potential errors, such as the
NoSuchAlgorithmExceptionthat might be thrown when getting an instance ofMessageDigest. Proper exception handling is important for both security and reliability. - Secure Operations: The
performSecureOperationsmethod is a placeholder for operations that should only be performed by authorized users. Ensuring that only authorized users can perform sensitive operations is a key aspect of application security. - Logging: The code uses a
Loggerto record information about authentication and authorization processes. Logging is important for monitoring and troubleshooting security-related events.
These security features are all critical for building secure Java applications. But it’s important to note that this is a simplified example and real-world applications would require additional security measures.
Through regular updates and patches, Java vulnerabilities are addressed, and new features are introduced to mitigate emerging risks. Staying up to date with the latest security practices and incorporating them into your development process is essential for maintaining a secure Java environment.
Let's dive into security principles and best practices in more detail.
What Is Java Security?
Java security refers to the measures and mechanisms in place to safeguard applications and data from unauthorized access, breaches, and malicious attacks. It encompasses a range of practices, including authentication, authorization, encryption, secure coding, and more.
By implementing robust security measures, you can create a secure environment that inspires user confidence and protects valuable information.
Core Principles of Java Security
Java security is built upon several core principles that guide the development and implementation of secure applications:
Authentication
Authentication is a fundamental aspect of cybersecurity. It serves as the first line of defense in securing sensitive resources and functionalities by ensuring that only verified users gain access. In the context of Java, there are several ways to implement authentication, each with its own significance.
Validating usernames and passwords is the most basic form of authentication. It involves checking the entered credentials against a database of registered users.
While simple, this method is susceptible to various attacks such as brute force or dictionary attacks. So it’s crucial to store passwords securely, often as hashed values rather than plain text. Java provides several libraries for secure password hashing, such as Bcrypt.
Example Code:
import org.springframework.security.crypto.bcrypt.BCryptPasswordEncoder;

public class PasswordHashingExample {
    public static void main(String[] args) {
        BCryptPasswordEncoder passwordEncoder = new BCryptPasswordEncoder();
        String hashedPassword = passwordEncoder.encode("myPassword");

        System.out.println(hashedPassword);
    }
}
Multi-factor authentication (MFA) adds an extra layer of security. It requires users to provide two or more verification factors to gain access. These factors could be something the user knows (like a password), something the user has (like a hardware token or phone), or something the user is (like a fingerprint or other biometric trait).
MFA significantly improves security because even if an attacker obtains one factor (like the user’s password), they still need the other factor(s) to gain access.
External authentication systems, such as OAuth2 or OpenID Connect, allow users to authenticate using an external trusted provider (like Google or Facebook). These systems can provide a secure and user-friendly way to handle authentication, as they offload the responsibility of secure credential storage to the external provider. Java has several libraries, like Spring Security, that provide out-of-the-box support for these systems.
Authorization
Access control is a critical aspect of cybersecurity, particularly in Java applications. It involves defining and enforcing policies that determine which users have permissions to access specific resources or perform certain operations within the application.
In a typical Java application, access control can be implemented at various levels. For instance, at the method level, developers can use Java’s built-in access modifiers (public, private, protected, and package-private) to control which other classes can call a particular method. However, for more granular and dynamic access control, developers often turn to frameworks like Spring Security.
Spring Security provides a comprehensive security solution for Java applications. It includes support for both authentication (verifying who a user is) and authorization (controlling what a user can do).
For example, consider a web application where only authenticated users should be able to access certain pages. With Spring Security, developers can annotate controller methods with @PreAuthorize to specify access control rules. Here’s an example:
import org.springframework.security.access.prepost.PreAuthorize;
import org.springframework.stereotype.Controller;
import org.springframework.web.bind.annotation.GetMapping;

@Controller
public class MyController {

    @PreAuthorize("hasRole('ADMIN')")
    @GetMapping("/admin")
    public String adminPage() {
        return "admin";
    }
}
In this code, the @PreAuthorize annotation ensures that only users with the ‘ADMIN’ role can access the ‘admin’ page. If a user without the ‘ADMIN’ role tries to access this page, Spring Security will block the request.
This is just one example of how access control can be implemented in Java. The key is to carefully define access control policies that align with the application’s requirements and to enforce these policies consistently throughout the application. This helps to ensure that sensitive resources and operations are protected from unauthorized access, thereby enhancing the overall security of the application.
Secure Coding
Secure coding practices are essential in Java cybersecurity. They help eliminate vulnerabilities and prevent common exploits, thereby enhancing the overall security of Java applications.
Input validation is one such practice. It involves checking the data provided by users to ensure it meets specific criteria before processing it.
This is crucial because unvalidated or improperly validated inputs can lead to various types of attacks, such as SQL injection, cross-site scripting (XSS), and command injection.
In Java, you can perform input validation using various methods, such as regular expressions, built-in functions, or third-party libraries.
Here’s an example of basic input validation in Java:
public boolean isValidUsername(String username) {
    String regex = "^[a-zA-Z0-9_]+$";
    return username.matches(regex);
}
In this code, the isValidUsername method checks if the provided username only contains alphanumeric characters and underscores, which is often a requirement for usernames.
Output encoding is another important secure coding practice. It involves encoding the data before sending it to the client to prevent attacks like XSS, where an attacker injects malicious scripts into content that’s displayed to other users.
Java provides several ways to perform output encoding, such as using the escapeHtml4 method from the Apache Commons Text library to encode HTML content.
Parameterized queries, also known as prepared statements, are used to prevent SQL injection attacks.
SQL injection is a technique where an attacker inserts malicious SQL code into a query, which can then be executed by the database. By using parameterized queries, you ensure that user input is always treated as literal data, not part of the SQL command.
Here’s an example of a parameterized query in Java using JDBC:
String query = "SELECT * FROM users WHERE username = ?";
PreparedStatement pstmt = connection.prepareStatement(query);
pstmt.setString(1, username);
ResultSet rs = pstmt.executeQuery();
In this code, the ? is a placeholder that gets replaced with the username variable. Because the username is automatically escaped by the PreparedStatement, it’s not possible for an attacker to inject malicious SQL code via the username.
Following secure coding practices like input validation, output encoding, and using parameterized queries is crucial for preventing common exploits and enhancing the security of Java applications.
Encryption
Protecting sensitive data, both at rest and in transit, is a cornerstone of cybersecurity. Encryption plays a vital role in this protection. It involves converting plaintext data into ciphertext using an encryption algorithm, rendering it unreadable to anyone without the decryption key.
In Java, the Java Cryptography Extension (JCE) provides functionalities for encryption and decryption. It supports various encryption algorithms, including AES (Advanced Encryption Standard), which is widely recognized for its strength and efficiency.
Here’s an example of how you might use AES encryption to protect data at rest in Java:
import javax.crypto.Cipher;
import javax.crypto.KeyGenerator;
import javax.crypto.SecretKey;
import java.util.Base64;

public class AESEncryptionExample {
    public static void main(String[] args) throws Exception {
        // Generate a new AES key
        KeyGenerator keyGen = KeyGenerator.getInstance("AES");
        keyGen.init(256);
        SecretKey secretKey = keyGen.generateKey();

        // Create a cipher instance and initialize it for encryption
        Cipher cipher = Cipher.getInstance("AES");
        cipher.init(Cipher.ENCRYPT_MODE, secretKey);

        // Encrypt the data
        String plaintext = "Sensitive data";
        byte[] ciphertext = cipher.doFinal(plaintext.getBytes());

        // Print the encrypted data
        System.out.println(Base64.getEncoder().encodeToString(ciphertext));
    }
}
In this code, we first generate a new AES key. We then create a Cipher instance and initialize it for encryption using the generated key. Finally, we encrypt the plaintext data and print the resulting ciphertext.
When it comes to protecting data in transit, secure communication protocols like HTTPS (HTTP over SSL/TLS) are commonly used. These protocols use encryption to protect data as it travels over the network. In Java, you can use the HttpsURLConnection class or libraries like Apache HttpClient to send and receive data over HTTPS.
Managing encryption keys is another critical aspect of data protection. Keys need to be securely generated, stored, and managed. They should be rotated regularly and revoked if compromised. In Java, you can use the Java KeyStore (JKS) to securely store cryptographic keys.
Encryption is a powerful tool for protecting sensitive data in Java applications. By using strong encryption algorithms and properly managing encryption keys, you can significantly enhance the security of your data, both at rest and in transit.
Logging and Monitoring
Implementing comprehensive logging and monitoring systems is a crucial aspect of cybersecurity in Java applications. These systems serve as the eyes and ears of your application, providing visibility into its operations and helping to detect and respond to security incidents effectively.
Logging involves recording events that occur in your application. These events can include user actions, system events, or errors. Logs can provide valuable information for troubleshooting issues, understanding user behavior, and detecting security incidents.
In Java, there are several libraries available for logging, such as Log4j, SLF4J, and java.util.logging.
Here’s an example of how you might use Log4j in a Java application:
import org.apache.logging.log4j.LogManager;
import org.apache.logging.log4j.Logger;

public class LoggingExample {
    private static final Logger logger = LogManager.getLogger(LoggingExample.class);

    public static void main(String[] args) {
        logger.info("This is an info message");
        logger.warn("This is a warning message");
        logger.error("This is an error message");
    }
}
In this code, we first create a Logger instance. We then use the info, warn, and error methods to log messages at different levels. These messages will be recorded in the application’s log file, where they can be reviewed later.
Monitoring, on the other hand, involves continuously observing your application to track its performance, identify issues, and detect potential security breaches.
Monitoring can help you identify suspicious activities, such as repeated failed login attempts, unexpected system behavior, or significant changes in traffic patterns, which could indicate a security incident.
Java provides several tools and libraries for monitoring, such as JMX (Java Management Extensions) for monitoring and managing Java applications, and third-party solutions like New Relic or Dynatrace for application performance monitoring.
By adhering to these core principles and incorporating them into the development process, developers can build robust and secure Java applications.
Remember, while these principles provide a solid foundation for Java security, it's essential to stay updated with the latest security practices, frameworks, and libraries. Regularly reviewing and enhancing security measures is crucial to adapt to emerging threats and ensure the ongoing protection of your Java applications.
By focusing on these fundamental aspects of Java security, you can create a secure and reliable environment for your applications and instill confidence in your users.
Here is a final code incorporating all the discussed aspects of Java security:
import java.security.MessageDigest;
import java.security.NoSuchAlgorithmException;
import java.util.HashMap;
import java.util.Scanner;
import java.util.logging.Logger;
import java.util.logging.Level;

public class SecureApplication {
    private static final Logger LOGGER = Logger.getLogger(SecureApplication.class.getName());
    private static final HashMap<String, String> userDatabase = new HashMap<>();

    static {
        // Ideally, passwords should be hashed using a secure algorithm with a salt
        userDatabase.put("user1", hashPassword("password123"));
        userDatabase.put("admin", hashPassword("adminSecure!"));
    }

    public static void main(String[] args) {
        try (Scanner scanner = new Scanner(System.in)) {
            System.out.print("Enter username: ");
            String username = scanner.nextLine();
            System.out.print("Enter password: ");
            String password = scanner.nextLine();

            if (authenticate(username, password)) {
                LOGGER.info("User authenticated successfully.");
                if (isAuthorized(username)) {
                    performSecureOperations();
                } else {
                    LOGGER.warning("Access Denied: User does not have the necessary permissions.");
                }
            } else {
                LOGGER.severe("Authentication Failed: Invalid username or password.");
            }
        } catch (Exception e) {
            LOGGER.log(Level.SEVERE, "An error occurred", e);
        }
    }

    private static boolean authenticate(String username, String password) {
        return userDatabase.containsKey(username) && userDatabase.get(username).equals(hashPassword(password));
    }

    private static boolean isAuthorized(String username) {
        // Implement authorization logic
        // For example, only 'admin' has access to perform secure operations
        return "admin".equals(username);
    }

    private static void performSecureOperations() {
        // Secure operations
        System.out.println("Performing secure operations...");
        // Operations go here
    }

    private static String hashPassword(String password) {
        try {
            MessageDigest md = MessageDigest.getInstance("SHA-256");
            byte[] hashedPassword = md.digest(password.getBytes());
            return bytesToHex(hashedPassword);
        } catch (NoSuchAlgorithmException e) {
            LOGGER.log(Level.SEVERE, "Hashing algorithm not found", e);
            return null;
        }
    }

    private static String bytesToHex(byte[] bytes) {
        StringBuilder hexString = new StringBuilder();
        for (byte b : bytes) {
            String hex = Integer.toHexString(0xff & b);
            if (hex.length() == 1) hexString.append('0');
            hexString.append(hex);
        }
        return hexString.toString();
    }
}
This code integrates the discussed principles of Java security, such as authentication, authorization, secure coding, encryption, and logging. It provides a foundation for building secure Java applications and protecting sensitive information.
Remember to adapt and enhance the code based on specific application requirements and the latest security practices. Regularly review and update the code to address emerging threats and vulnerabilities, ensuring the ongoing security of your Java applications.
Java Language Features for Security
When it comes to Java security, several key language features play a crucial role in ensuring the safety and protection of applications and data. Let's explore these features and understand their significance in securing Java code.
Static Data Typing: Enforcing Type Safety
One fundamental aspect of Java security is static data typing. By enforcing type safety, Java helps prevent common programming errors and vulnerabilities.
Static typing ensures that variables are declared with specific data types and that only compatible operations can be performed on them. This reduces the risk of type-related security issues, such as type confusion or type casting vulnerabilities.
For example, consider the following code snippet:
int userId = getUserInput();
String userName = getUserInput();

// By enforcing static typing, the compiler detects type mismatches and prevents potential vulnerabilities
In this example, the compiler will detect any attempts to assign an integer value to the userName variable, preventing potential security risks.
Access Modifiers: Controlling Visibility and Accessibility
Access modifiers in Java, such as public, private, and protected, allow developers to control the visibility and accessibility of classes, methods, and variables. This plays a crucial role in ensuring the security of Java code by restricting access to sensitive information or functionalities.
For example, consider the following code snippet:
public class SecureApplication {
    private String sensitiveData; // Accessible only within the class

    public void processSensitiveData() {
        // Accessing the sensitive data within the class
    }
}

// By using access modifiers appropriately, sensitive data and operations can be protected from unauthorized access
In this example, the sensitiveData variable and the processSensitiveData method are declared as private, ensuring that they can be accessed only within the SecureApplication class.
Automatic Memory Management: Mitigating Memory-Related Vulnerabilities
Java's automatic memory management, enabled by the garbage collector, plays a significant role in enhancing security by mitigating memory-related vulnerabilities.
By automatically deallocating memory that is no longer in use, Java helps prevent issues such as memory leaks and buffer overflows that can lead to security vulnerabilities.
For example, consider the following code snippet:
void processUserInput() {
    String userInput = getUserInput();
    // Process the user input
    // Java's garbage collector automatically frees the memory occupied by the userInput variable
}
In this example, Java's garbage collector ensures that the memory occupied by the userInput variable is automatically reclaimed after it is no longer needed, reducing the risk of memory-related vulnerabilities.
Bytecode Verification: Ensuring Safe Code Execution
Java's bytecode verification process plays a critical role in ensuring the safe execution of code.
When Java code is compiled, it is transformed into bytecode, which is then executed by the Java Virtual Machine (JVM). Before executing the bytecode, the JVM performs bytecode verification to ensure that it adheres to specific safety requirements.
This process helps prevent common security risks, such as stack overflow or buffer overflow vulnerabilities.
For example, consider the following code snippet:
void processInput(byte[] inputData) {
    // Process the input data
}

// By performing bytecode verification, the JVM ensures that the processInput method operates safely without causing buffer overflow or other security vulnerabilities
In this example, the JVM verifies the bytecode of the processInput method to ensure that it operates safely, preventing potential security vulnerabilities.
By leveraging these language features, you can enhance the security of your Java code. But it's important to remember that these features alone are not sufficient to guarantee complete security. It is crucial to follow secure coding practices, apply encryption where necessary, and implement other security measures as required by your specific application and environment.
Security Architecture in Java
Overview of Java Security Architecture
Java security architecture is designed to provide a secure environment for Java applications. It includes various components such as the Java Development Kit (JDK), Java Runtime Environment (JRE), and Java Virtual Machine (JVM).
The architecture ensures the enforcement of security policies, handling of permissions, and management of cryptographic services.
Role of Provider Implementations in Java Security
In Java, a provider refers to a package or a set of packages that supply a concrete implementation of a subset of the cryptography aspects of the Java Cryptography Architecture (JCA) and the Java Cryptography Extension (JCE). They supply the actual program code that implements standard algorithms such as RSA, DSA, and AES.
Provider implementations are indeed crucial in Java security. They provide the necessary cryptographic algorithms and services that are used for various purposes such as generating key pairs, creating secure random numbers, and creating message digests.
Java includes several built-in providers. For instance, SunJCE (Java Cryptography Extension) is a provider that offers a wide range of cryptographic functionalities including support for encryption, key generation and key agreement, and Message Authentication Code (MAC) algorithms.
SunPKCS11 is another provider that offers a wide range of cryptographic functionalities. It provides a bridge from the JCA to native PKCS11 cryptographic tokens. PKCS11 is a standard that defines a platform-independent API to cryptographic tokens, such as hardware security modules (HSM) and smart cards, and names the API itself “Cryptoki”.
While the built-in providers offer a wide range of cryptographic functionalities, Java also allows for custom providers. This means you can implement your own provider to extend the security capabilities of your Java applications.
This is particularly useful when you need to use cryptographic services that are not offered by the built-in providers or when you want to use a device-specific implementation.
Implementing a custom provider involves extending the java.security.Provider class and implementing the required cryptographic services. Once implemented, the provider can be dynamically registered at runtime by calling the Security.addProvider() method.
Understanding Cryptographic Algorithms in Java
Java supports a comprehensive set of cryptographic algorithms for various purposes, including encryption, digital signatures, and hash functions. These algorithms ensure the confidentiality, integrity, and authenticity of data. Some commonly used algorithms include AES, RSA, and SHA-256.
To illustrate the usage of cryptographic algorithms in Java, consider the following example code:
import javax.crypto.Cipher;
import java.security.Key;
import java.security.KeyPair;
import java.security.KeyPairGenerator;
import java.security.NoSuchAlgorithmException;

public class CryptographyExample {
    public static void main(String[] args) {
        try {
            // Generate a key pair for asymmetric encryption
            KeyPairGenerator keyPairGenerator = KeyPairGenerator.getInstance("RSA");
            KeyPair keyPair = keyPairGenerator.generateKeyPair();
            Key publicKey = keyPair.getPublic();
            Key privateKey = keyPair.getPrivate();

            // Encrypt data using the public key
            Cipher cipher = Cipher.getInstance("RSA");
            cipher.init(Cipher.ENCRYPT_MODE, publicKey);
            byte[] encryptedData = cipher.doFinal("Hello, world!".getBytes());

            // Decrypt the encrypted data using the private key
            cipher.init(Cipher.DECRYPT_MODE, privateKey);
            byte[] decryptedData = cipher.doFinal(encryptedData);

            System.out.println("Decrypted data: " + new String(decryptedData));
        } catch (NoSuchAlgorithmException | NoSuchPaddingException | InvalidKeyException | IllegalBlockSizeException | BadPaddingException e) {
            e.printStackTrace();
        }
    }
}
In this example, we generate a key pair using the RSA algorithm, encrypt the data using the public key, and then decrypt it using the private key.
By understanding Java security architecture, provider implementations, and cryptographic algorithms, you can effectively implement secure solutions in your Java applications.
Cryptography in Java
In Java Cryptographic Architecture (JCA), you have access to a wide range of cryptographic functionalities to enhance the security of your Java applications. Let's explore some key concepts and techniques that can be implemented in Java code.
Introduction to Java Cryptographic Architecture (JCA)
To ensure the confidentiality, integrity, and authenticity of data, JCA provides a framework for implementing cryptographic algorithms and services. It includes classes and interfaces that allow you to perform various cryptographic operations, such as encryption, decryption, digital signatures, and message digests.
How to Implement Digital Signatures and Message Digests
Digital signatures provide a way to verify the authenticity and integrity of data. By generating a digital signature, you can ensure that the data has not been tampered with during transmission or storage.
Message digests, on the other hand, create a fixed-size hash value representing the input data. This hash value can be used to verify the integrity of the data.
Here is an example of generating a digital signature and verifying it using Java code:
import java.security.*;
import java.util.Base64;

public class DigitalSignatureExample {
    public static void main(String[] args) {
        try {
            // Generate key pair
            KeyPairGenerator keyPairGenerator = KeyPairGenerator.getInstance("RSA");
            KeyPair keyPair = keyPairGenerator.generateKeyPair();
            PrivateKey privateKey = keyPair.getPrivate();
            PublicKey publicKey = keyPair.getPublic();

            // Generate a digital signature
            Signature signature = Signature.getInstance("SHA256withRSA");
            signature.initSign(privateKey);
            byte[] inputData = "Hello, world!".getBytes();
            signature.update(inputData);
            byte[] digitalSignature = signature.sign();

            // Verify the digital signature
            signature.initVerify(publicKey);
            signature.update(inputData);
            boolean verified = signature.verify(digitalSignature);

            System.out.println("Digital Signature Verified: " + verified);
        } catch (NoSuchAlgorithmException | InvalidKeyException | SignatureException e) {
            e.printStackTrace();
        }
    }
}
Symmetric vs. Asymmetric Ciphers
Symmetric ciphers use the same key for both encryption and decryption, while asymmetric ciphers use different keys for these operations.
Symmetric ciphers are generally faster but require a secure method of key exchange. Asymmetric ciphers provide a secure way to exchange keys but are slower than symmetric ciphers.
Here is an example of using symmetric and asymmetric ciphers in Java:
import javax.crypto.*;
import javax.crypto.spec.SecretKeySpec;
import java.security.*;

public class CipherExample {
    public static void main(String[] args) {
        try {
            // Symmetric encryption and decryption
            SecretKey secretKey = generateSymmetricKey();
            String plainText = "Hello, world!";
            byte[] encryptedData = encryptSymmetric(plainText, secretKey);
            String decryptedData = decryptSymmetric(encryptedData, secretKey);

            System.out.println("Symmetric Encryption and Decryption:");
            System.out.println("Plain Text: " + plainText);
            System.out.println("Encrypted Data: " + new String(encryptedData));
            System.out.println("Decrypted Data: " + decryptedData);

            // Asymmetric encryption and decryption
            KeyPair keyPair = generateAsymmetricKeyPair();
            byte[] encryptedDataAsymmetric = encryptAsymmetric(plainText, keyPair.getPublic());
            String decryptedDataAsymmetric = decryptAsymmetric(encryptedDataAsymmetric, keyPair.getPrivate());

            System.out.println("\\\\nAsymmetric Encryption and Decryption:");
            System.out.println("Plain Text: " + plainText);
            System.out.println("Encrypted Data: " + new String(encryptedDataAsymmetric));
            System.out.println("Decrypted Data: " + decryptedDataAsymmetric);
        } catch (NoSuchAlgorithmException | NoSuchPaddingException | InvalidKeyException | BadPaddingException | IllegalBlockSizeException e) {
            e.printStackTrace();
        }
    }

    private static SecretKey generateSymmetricKey() throws NoSuchAlgorithmException {
        KeyGenerator keyGenerator = KeyGenerator.getInstance("AES");
        keyGenerator.init(128);
        return keyGenerator.generateKey();
    }

    private static byte[] encryptSymmetric(String plainText, SecretKey secretKey) throws NoSuchAlgorithmException, NoSuchPaddingException, InvalidKeyException, BadPaddingException, IllegalBlockSizeException {
        Cipher cipher = Cipher.getInstance("AES");
        cipher.init(Cipher.ENCRYPT_MODE, secretKey);
        return cipher.doFinal(plainText.getBytes());
    }

    private static String decryptSymmetric(byte[] encryptedData, SecretKey secretKey) throws NoSuchAlgorithmException, NoSuchPaddingException, InvalidKeyException, BadPaddingException, IllegalBlockSizeException {
        Cipher cipher = Cipher.getInstance("AES");
        cipher.init(Cipher.DECRYPT_MODE, secretKey);
        byte[] decryptedData = cipher.doFinal(encryptedData);
        return new String(decryptedData);
    }

    private static KeyPair generateAsymmetricKeyPair() throws NoSuchAlgorithmException {
        KeyPairGenerator keyPairGenerator = KeyPairGenerator.getInstance("RSA");
        keyPairGenerator.initialize(2048);
        return keyPairGenerator.generateKeyPair();
    }

    private static byte[] encryptAsymmetric(String plainText, PublicKey publicKey) throws NoSuchAlgorithmException, NoSuchPaddingException, InvalidKeyException, BadPaddingException, IllegalBlockSizeException {
        Cipher cipher = Cipher.getInstance("RSA");
        cipher.init(Cipher.ENCRYPT_MODE, publicKey);
        return cipher.doFinal(plainText.getBytes());
    }

    private static String decryptAsymmetric(byte[] encryptedData, PrivateKey privateKey) throws NoSuchAlgorithmException, NoSuchPaddingException, InvalidKeyException, BadPaddingException, IllegalBlockSizeException {
        Cipher cipher = Cipher.getInstance("RSA");
        cipher.init(Cipher.DECRYPT_MODE, privateKey);
        byte[] decryptedData = cipher.doFinal(encryptedData);
        return new String(decryptedData);
    }
}
Key Generators and Factories
In Java, you can use key generators and factories to generate and manage cryptographic keys. Key generators provide a way to generate secret keys for symmetric ciphers, while key factories are used to generate public and private keys for asymmetric ciphers.
Here is an example of using key generators and factories in Java:
import javax.crypto.KeyGenerator;
import javax.crypto.SecretKey;
import java.security.NoSuchAlgorithmException;
import java.security.PrivateKey;
import java.security.PublicKey;
import java.security.KeyFactory;
import java.security.spec.PKCS8EncodedKeySpec;
import java.security.spec.X509EncodedKeySpec;

public class KeyGenerationExample {
    public static void main(String[] args) {
        try {
            // Generate a secret key for symmetric encryption
            SecretKey secretKey = generateSecretKey();
            System.out.println("Symmetric Key: " + Base64.getEncoder().encodeToString(secretKey.getEncoded()));

            // Generate public and private keys for asymmetric encryption
            KeyPair keyPair = generateKeyPair();
            PublicKey publicKey = keyPair.getPublic();
            PrivateKey privateKey = keyPair.getPrivate();
            System.out.println("Public Key: " + Base64.getEncoder().encodeToString(publicKey.getEncoded()));
            System.out.println("Private Key: " + Base64.getEncoder().encodeToString(privateKey.getEncoded()));
        } catch (NoSuchAlgorithmException e) {
            e.printStackTrace();
        }
    }

    private static SecretKey generateSecretKey() throws NoSuchAlgorithmException {
        KeyGenerator keyGenerator = KeyGenerator.getInstance("AES");
        keyGenerator.init(128);
        return keyGenerator.generateKey();
    }

    private static KeyPair generateKeyPair() throws NoSuchAlgorithmException {
        KeyPairGenerator keyPairGenerator = KeyPairGenerator.getInstance("RSA");
        keyPairGenerator.initialize(2048);
        return keyPairGenerator.generateKeyPair();
    }

    private static PublicKey getPublicKey(byte[] publicKeyBytes) throws Exception {
        X509EncodedKeySpec keySpec = new X509EncodedKeySpec(publicKeyBytes);
        KeyFactory keyFactory = KeyFactory.getInstance("RSA");
        return keyFactory.generatePublic(keySpec);
    }

    private static PrivateKey getPrivateKey(byte[] privateKeyBytes) throws Exception {
        PKCS8EncodedKeySpec keySpec = new PKCS8EncodedKeySpec(privateKeyBytes);
        KeyFactory keyFactory = KeyFactory.getInstance("RSA");
        return keyFactory.generatePrivate(keySpec);
    }
}
By understanding and implementing these cryptographic concepts in Java, you can enhance the security of your Java applications and protect sensitive information effectively.
Public Key Infrastructure (PKI) in Java
When it comes to securing your Java applications, understanding the fundamentals of Public Key Infrastructure (PKI) is essential.
PKI provides a framework for managing keys and certificates. These play a crucial role in establishing secure communication and verifying the authenticity of entities in a networked environment.
In Java, you can leverage the KeyStore and CertStore classes to manage keys and certificates effectively.
The KeyStore class allows you to store and retrieve cryptographic keys, while the CertStore class provides a means to access certificates.
By properly managing keys and certificates, you can ensure the integrity and confidentiality of sensitive information.
Here's an example of using the KeyStore class to load a keystore file and retrieve a private key:
KeyStore keyStore = KeyStore.getInstance("JKS");
char[] keystorePassword = "password".toCharArray();
InputStream keystoreStream = new FileInputStream("keystore.jks");
keyStore.load(keystoreStream, keystorePassword);

String alias = "privateKeyAlias";
char[] keyPassword = "keyPassword".toCharArray();
PrivateKey privateKey = (PrivateKey) keyStore.getKey(alias, keyPassword);

// Use the private key for cryptographic operations
In this example, we load a keystore file in JKS format, provide the keystore password, and retrieve a private key using its alias and the associated key password. Once you have the private key, you can use it for various cryptographic operations.
Another important aspect of PKI in Java is the usage of tools such as Keytool and Jarsigner. Keytool is a command-line utility that allows you to manage keys and certificates within a keystore. Jarsigner, on the other hand, is used for digitally signing JAR files, ensuring their integrity and authenticity.
Here's an example of using Keytool to generate a key pair and store it in a keystore:
keytool -genkeypair -alias mykey -keyalg RSA -keystore keystore.jks
In this command, we generate a key pair using the RSA algorithm and store it in a keystore named "keystore.jks" with an alias "mykey". Keytool will prompt you for additional details such as the keystore password, key password, and the owner's information.
These tools provide essential functionalities for managing keys and certificates, enabling you to establish a secure environment for your Java applications. By incorporating these practices into your development process, you can enhance the security of your applications and protect sensitive data.
Authentication in Java
When it comes to Java security, understanding authentication mechanisms is crucial. Java provides various authentication mechanisms that can be implemented to ensure the safety and protection of applications and data. Let's explore some of these mechanisms and how they can be implemented in Java code.
Understanding Authentication Mechanisms in Java
In Java, authentication is the process of verifying the identity of a user or entity before granting access to protected resources. Java offers several authentication mechanisms, such as username and password authentication, token-based authentication, and certificate-based authentication.
One common authentication mechanism is username and password authentication. This mechanism involves validating a user's credentials, typically a username and password, to grant access.
To implement username and password authentication in Java, you can use the java.security package and the MessageDigest class to securely hash and compare passwords.
Here's an example code snippet that demonstrates username and password authentication in Java:
import java.security.MessageDigest;
import java.security.NoSuchAlgorithmException;
import java.util.HashMap;
import java.util.Scanner;

public class UserAuthentication {
    private static final HashMap<String, String> userDatabase = new HashMap<>();

    static {
        // Ideally, passwords should be hashed using a secure algorithm with a salt
        userDatabase.put("user1", hashPassword("password123"));
        userDatabase.put("admin", hashPassword("adminSecure!"));
    }

    public static void main(String[] args) {
        try (Scanner scanner = new Scanner(System.in)) {
            System.out.print("Enter username: ");
            String username = scanner.nextLine();
            System.out.print("Enter password: ");
            String password = scanner.nextLine();

            if (authenticate(username, password)) {
                System.out.println("Authentication successful!");
                // Proceed with further operations
            } else {
                System.out.println("Authentication failed: Invalid username or password.");
                // Handle authentication failure
            }
        }
    }

    private static boolean authenticate(String username, String password) {
        return userDatabase.containsKey(username) && userDatabase.get(username).equals(hashPassword(password));
    }

    private static String hashPassword(String password) {
        try {
            MessageDigest md = MessageDigest.getInstance("SHA-256");
            byte[] hashedPassword = md.digest(password.getBytes());
            return bytesToHex(hashedPassword);
        } catch (NoSuchAlgorithmException e) {
            e.printStackTrace();
            return null;
        }
    }

    private static String bytesToHex(byte[] bytes) {
        StringBuilder hexString = new StringBuilder();
        for (byte b : bytes) {
            String hex = Integer.toHexString(0xff & b);
            if (hex.length() == 1) {
                hexString.append('0');
            }
            hexString.append(hex);
        }
        return hexString.toString();
    }
}
In this example, the UserAuthentication class demonstrates username and password authentication. It uses a HashMap to store the user database, where usernames are mapped to their corresponding hashed passwords. The authenticate method checks if the provided username exists in the database and compares the hashed password with the provided password.
Remember, this is a basic example, and in real-world scenarios, you would need to consider additional security measures such as using a salt for password hashing and storing passwords securely.
By implementing these authentication mechanisms in your Java applications, you can ensure the secure verification of user identities and protect sensitive resources.
Pluggable Login Modules: Flexibility and Security
In addition to the username and password authentication mechanism, Java provides a flexible and secure approach to authentication through pluggable login modules. Pluggable login modules allow you to define and implement custom authentication mechanisms based on specific requirements.
To implement pluggable login modules in Java, you can utilize the Java Authentication and Authorization Service (JAAS). JAAS provides a framework for authentication and authorization, allowing you to define and configure login modules to authenticate users.
Here's a simplified example code snippet that demonstrates the use of pluggable login modules in Java:
import javax.security.auth.Subject;
import javax.security.auth.login.LoginContext;
import javax.security.auth.login.LoginException;

public class PluggableAuthentication {
    public static void main(String[] args) {
        try {
            LoginContext loginContext = new LoginContext("SampleLoginModule");
            loginContext.login();

            Subject subject = loginContext.getSubject();
            // Access authenticated subject and perform necessary operations

            loginContext.logout();
        } catch (LoginException e) {
            e.printStackTrace();
            // Handle login exception
        }
    }
}
In this example, the PluggableAuthentication class demonstrates the usage of pluggable login modules. The LoginContext class is responsible for authenticating users using the specified login module, in this case, "SampleLoginModule". Once authenticated, the Subject object can be obtained from the LoginContext to access the authenticated user's information and perform further operations.
By leveraging pluggable login modules, you can customize and extend authentication mechanisms to meet specific security requirements, providing flexibility and enhanced security in your Java applications.
Case Study: How to Implement Username and Password Authentication
To illustrate the implementation of username and password authentication in Java, let's consider a case study. Suppose you are developing a web application that requires user authentication to access certain resources.
To implement username and password authentication in this case, you can utilize Java's Servlet API and the Java Persistence API (JPA). The Servlet API provides functionality for handling HTTP requests and responses, while JPA allows you to interact with a database and store user information securely.
Here's a high-level example code snippet that demonstrates the implementation of username and password authentication in a web application:
@WebServlet("/login")
public class LoginServlet extends HttpServlet {
    private UserService userService;

    @Override
    public void init() throws ServletException {
        userService = new UserService(); // Initialize the user service
    }

    @Override
    protected void doPost(HttpServletRequest request, HttpServletResponse response) throws ServletException, IOException {
        String username = request.getParameter("username");
        String password = request.getParameter("password");

        if (userService.authenticate(username, password)) {
            // Authentication successful
            HttpSession session = request.getSession();
            session.setAttribute("username", username);
            response.sendRedirect("dashboard");
        } else {
            // Authentication failed
            response.sendRedirect("login?error=invalid");
        }
    }
}

public class UserService {
    private UserRepository userRepository;

    public UserService() {
        userRepository = new UserRepository(); // Initialize the user repository
    }

    public boolean authenticate(String username, String password) {
        User user = userRepository.findByUsername(username);
        if (user != null && user.getPassword().equals(hashPassword(password))) {
            return true;
        }
        return false;
    }

    private String hashPassword(String password) {
        // Implement password hashing algorithm
        // Example: return BCrypt.hashpw(password, BCrypt.gensalt());
    }
}
In this example, the LoginServlet class handles the HTTP POST request for the login page. It retrieves the username and password entered by the user and delegates the authentication process to the UserService.
If the authentication is successful, a session is created, and the user is redirected to the dashboard page. Otherwise, an error parameter is appended to the URL, indicating an invalid login attempt.
The UserService class encapsulates the authentication logic and interacts with the UserRepository to retrieve user information from the database. It compares the hashed password stored in the User entity with the provided password using the implemented password hashing algorithm.
Remember, this is a simplified example, and in a real-world scenario, you would need to consider additional security measures such as implementing secure session management, protecting against brute force attacks, and using stronger password hashing algorithms.
Chapter 8: Secure Communication in Java
When it comes to securing client-server communication in Java, there are several protocols and techniques available. Let's explore some of these options:
SSL/TLS Protocols and Java Implementation
To establish a secure connection between a client and a server, the SSL/TLS protocols are commonly used.
In Java, you can utilize the Java Secure Socket Extension (JSSE) to implement SSL/TLS functionality. Here's an example of how to set up a secure connection using JSSE:
import javax.net.ssl.SSLSocket;
import javax.net.ssl.SSLSocketFactory;
import java.io.IOException;

public class SecureClient {
    public static void main(String[] args) {
        try {
            SSLSocketFactory sslSocketFactory = (SSLSocketFactory) SSLSocketFactory.getDefault();
            SSLSocket sslSocket = (SSLSocket) sslSocketFactory.createSocket("example.com", 443);
            // Perform secure communication with the server
        } catch (IOException e) {
            e.printStackTrace();
        }
    }
}
In this example, we create an SSLSocketFactory and an SSLSocket to establish a secure connection with the server at example.com on port 443.
SASL: Securing Client-Server Communication
The Simple Authentication and Security Layer (SASL) is a framework that provides a flexible way to secure client-server communication. It allows clients and servers to negotiate and select authentication mechanisms that suit their requirements.
Here's an example of how to use SASL in Java:
import javax.security.sasl.*;

public class SecureClient {
    public static void main(String[] args) {
        try {
            SaslClient saslClient = Sasl.createSaslClient(new String[]{"PLAIN"}, null, "", "example.com", null, null);
            // Perform secure communication with the server using the SASL client
        } catch (SaslException e) {
            e.printStackTrace();
        }
    }
}
In this example, we create a SaslClient using the PLAIN authentication mechanism for secure communication with the server at example.com.
GSS-API/Kerberos: Advanced Security Protocols
The Generic Security Service Application Program Interface (GSS-API) provides a framework for implementing advanced security protocols, such as Kerberos, in Java. Kerberos is a widely used authentication protocol that enables secure client-server communication.
Here's an example of how to use GSS-API/Kerberos in Java:
import javax.security.auth.Subject;
import javax.security.auth.login.LoginContext;
import javax.security.auth.login.LoginException;

public class SecureClient {
    public static void main(String[] args) {
        try {
            LoginContext loginContext = new LoginContext("KerberosLogin");
            loginContext.login();
            Subject subject = loginContext.getSubject();
            // Perform secure communication with the server using the subject
        } catch (LoginException e) {
            e.printStackTrace();
        }
    }
}
In this example, we use the GSS-API to perform a Kerberos login and obtain a Subject that represents the authenticated client.
Access Control in Java
Java provides several key features and tools to enhance security in your applications. Let's explore the role of SecurityManager, implementing permissions for resource access, and policy files.
Role of SecurityManager in Java
The SecurityManager class plays a vital role in Java security by enforcing fine-grained access control policies. It acts as a gatekeeper, preventing untrusted code from accessing sensitive resources or performing unauthorized operations.
By configuring and utilizing the SecurityManager, you can define and enforce security rules specific to your application's requirements.
Example code:
SecurityManager securityManager = new SecurityManager();
System.setSecurityManager(securityManager);
By setting a SecurityManager instance, you enable the enforcement of security policies within your Java application.
Implement Permissions for Resource Access
Java's permission model allows you to grant or deny specific permissions to code based on its origin or identity.
By defining and enforcing permissions, you can control which resources or operations a piece of code can access. This helps mitigate the risk of unauthorized access or misuse of sensitive resources.
Example code:
FilePermission filePermission = new FilePermission("/path/to/file.txt", "read");
SecurityManager securityManager = System.getSecurityManager();
if (securityManager != null) {
    securityManager.checkPermission(filePermission);
}
In this example, we define a FilePermission to grant read access to a specific file. The SecurityManager's checkPermission method ensures that the code has the required permission before accessing the file.
Policy Files: Defining and Enforcing Security Policies
Policy files provide a flexible and configurable way to define and enforce security policies in Java applications. They allow you to specify permissions, code sources, and associated permissions, granting or denying access based on defined rules.
By customizing and managing policy files, you can tailor the security policies to the specific needs of your application.
Example policy file (example.policy):
grant {
    permission java.io.FilePermission "/path/to/file.txt", "read";
};
In this example, we grant read permission to the file "/path/to/file.txt". To enforce this policy file, you can specify it when launching your Java application using the -Djava.security.policy system property:
java -Djava.security.policy=example.policy MyApp
By leveraging policy files, you can define and enforce security policies without modifying your application's code.
Advanced Java Security Topics
Java provides various security features and tools to ensure the safety and protection of your applications. Let's explore some important concepts and techniques you can implement in your Java code.
XML Signature in Java
XML Signature is a crucial aspect of Java security that allows you to digitally sign XML documents to ensure their integrity and authenticity. By using the Java XML Digital Signature API, you can generate and verify XML signatures.
Here's an example code snippet to demonstrate the usage:
import java.io.FileInputStream;
import java.security.KeyStore;
import java.security.PrivateKey;
import java.security.PublicKey;
import java.security.cert.Certificate;
import java.util.Collections;
import javax.xml.crypto.dsig.XMLSignature;
import javax.xml.crypto.dsig.XMLSignatureFactory;
import javax.xml.crypto.dsig.dom.DOMSignContext;
import javax.xml.crypto.dsig.keyinfo.KeyInfo;
import javax.xml.crypto.dsig.keyinfo.KeyValue;
import javax.xml.crypto.dsig.spec.C14NMethodParameterSpec;
import javax.xml.crypto.dsig.spec.SignatureMethodParameterSpec;

public class XMLSignatureExample {
    public static void main(String[] args) {
        try {
            // Load the keystore
            KeyStore keyStore = KeyStore.getInstance("PKCS12");
            FileInputStream keystoreFile = new FileInputStream("keystore.p12");
            keyStore.load(keystoreFile, "password".toCharArray());

            // Get the private key and certificate from the keystore
            String alias = keyStore.aliases().nextElement();
            PrivateKey privateKey = (PrivateKey) keyStore.getKey(alias, "password".toCharArray());
            Certificate certificate = keyStore.getCertificate(alias);
            PublicKey publicKey = certificate.getPublicKey();

            // Create an XMLSignatureFactory
            XMLSignatureFactory signatureFactory = XMLSignatureFactory.getInstance("DOM");

            // Create the XMLSignature
            XMLSignature xmlSignature = signatureFactory.newXMLSignature(
                    Collections.singletonList(signatureFactory.newReference("#content", // Reference URI
                            signatureFactory.newDigestMethod("<http://www.w3.org/2001/04/xmlenc#sha256>", null))),
                    signatureFactory.newKeyInfo(Collections.singletonList(signatureFactory.newX509Data(Collections.singletonList(certificate)))),
                    signatureFactory.newSignatureMethod("<http://www.w3.org/2001/04/xmldsig-more#rsa-sha256>", null));

            // Create the DOMSignContext
            DOMSignContext signContext = new DOMSignContext(privateKey, document.getDocumentElement());

            // Marshal the XMLSignature into the DOM tree
            xmlSignature.sign(signContext);
        } catch (Exception e) {
            e.printStackTrace();
        }
    }
}
Deprecated Security APIs to Avoid
Java has deprecated certain security APIs due to their vulnerabilities or outdated functionality. It is important to avoid using these deprecated APIs and migrate to the recommended alternatives.
Here are a few examples of deprecated security APIs and their recommended replacements:
java.security.KeyStore: Deprecated in favor ofjava.security.KeyStore.Builder.java.security.SecureRandom: Deprecated in favor ofjava.security.SecureRandom.getInstanceStrong()orjava.security.SecureRandom.getInstance().java.security.KeyPairGenerator: Deprecated in favor ofjava.security.KeyPairGenerator.getInstance().
Always refer to the Java documentation for the complete list of deprecated security APIs and their recommended alternatives.
Security Tools and Commands in Java
Java provides various security tools and commands that can assist you in analyzing and enhancing the security of your applications.
Here are a few commonly used tools and commands:
jarsigner: Thejarsignertool allows you to digitally sign JAR files to ensure their integrity and authenticity.keytool: Thekeytoolcommand-line utility enables you to manage cryptographic keys and certificates in a Java KeyStore.javadoc: Thejavadoctool generates API documentation, including security-related APIs, from Java source code.jps: Thejpscommand-line utility displays information about Java processes running on a system, including their security settings.jinfo: Thejinfocommand-line utility provides configuration information for a running Java process, including security-related properties.
These tools and commands can be valuable in securing your Java applications and ensuring proper configuration and management of security-related components.
Remember to always refer to the official Java documentation and stay updated with the latest security practices and recommendations. Implementing robust security measures and regularly reviewing your code for potential vulnerabilities are essential for maintaining a secure Java environment.
Java Security in Practice
Java security plays a crucial role in today's digital landscape, ensuring the safety and protection of applications and sensitive data. Let's explore some real-world applications where Java security is prominently used and discuss case studies in the banking and e-commerce sectors.
Real-World Applications of Java Security
Java security is extensively utilized in various real-world applications, including banking systems, e-commerce platforms, and government services.
For example, in the banking sector, Java security is crucial for ensuring secure online transactions, protecting customer data, and preventing unauthorized access. Robust authentication mechanisms, encryption algorithms, and secure coding practices are employed to maintain the integrity and confidentiality of financial data.
In e-commerce platforms, Java security plays a vital role in safeguarding sensitive customer information, such as credit card details and personal data. Strict access control, secure communication protocols, and secure coding practices are implemented to prevent data breaches and protect customer privacy.
Let's explore two case studies that illustrate the practical implementation of Java security in the banking and e-commerce sectors.
Case Study: Banking Application
In a banking application, Java security is crucial for protecting customer accounts, preventing fraudulent activities, and ensuring the confidentiality of financial transactions.
To achieve this, the application incorporates several security measures:
- Secure Authentication: The banking application employs strong authentication mechanisms to verify the identity of users. Multi-factor authentication, such as combining passwords with biometric data, adds an extra layer of security.
Example Code:
if (authenticate(username, password)) {
    // User authenticated successfully
} else {
    // Invalid credentials, authentication failed
}
- Secure Communication: The application uses secure communication protocols, such as HTTPS, to encrypt data transmission between the client and the server. This prevents eavesdropping and ensures the integrity of sensitive information.
Example Code:
URL url = new URL("<https://bankingapi.com>");
HttpsURLConnection connection = (HttpsURLConnection) url.openConnection();
// Perform secure communication with the banking API
- Secure Data Storage: Customer data, including account details and transaction history, is securely stored using encryption techniques. Strong encryption algorithms and proper key management ensure the confidentiality of sensitive data.
Example Code:
String encryptedData = encrypt(data, encryptionKey);
// Store the encrypted data securely
Case Study: E-commerce Platform
In an e-commerce platform, Java security is vital for protecting customer data, securing payment transactions, and preventing unauthorized access to user accounts. The platform incorporates various security measures to ensure a safe and trustworthy shopping experience.
- Secure Payment Processing: The e-commerce platform integrates with secure payment gateways, employing encryption and tokenization techniques to protect sensitive payment information. This ensures that customer payment details are securely transmitted and stored.
Example Code:
PaymentGateway paymentGateway = new PaymentGateway();
PaymentResponse response = paymentGateway.processPayment(order, creditCard);
// Securely process the payment transaction
- Secure User Account Management: The platform enforces strong password policies, implements secure password storage techniques such as hashing and salting, and provides multi-factor authentication options to protect user accounts from unauthorized access.
Example Code:
if (authenticate(username, password)) {
    // User authenticated successfully
} else {
    // Invalid credentials, authentication failed
}
- Secure Session Management: The e-commerce platform ensures secure session management by generating unique session IDs, implementing session timeouts, and securely storing session data to prevent session hijacking attacks.
Example Code:
String sessionId = generateSessionId();
SessionManager.setSessionData(sessionId, userData);
// Manage user sessions securely
By implementing these Java security measures, banking and e-commerce applications can provide a secure and trustworthy environment for their users. Remember to adapt these examples to your specific application requirements and consider additional security measures based on industry standards and best practices.
Java Security for Developers
When it comes to writing secure code in Java, it is important to follow best practices to ensure the safety and protection of your applications. By avoiding common security pitfalls and enhancing your skills through developer security training, you can create robust and secure Java applications. Let's explore these concepts in more detail.
How to Write Secure Code: Best Practices
Writing secure code involves adopting best practices that help mitigate security risks. Here are some key practices to consider:
Input Validation: Always validate and sanitize user input to prevent common vulnerabilities such as SQL injection or cross-site scripting (XSS) attacks. Use built-in Java libraries or frameworks to handle input validation effectively.
Example Code:
String sanitizedInput = sanitizeUserInput(userInput);
// Use sanitizedInput securely to prevent vulnerabilities
Secure Communication: Utilize secure communication protocols, such as HTTPS, to encrypt data transmitted between the client and the server. This ensures the confidentiality and integrity of sensitive information.
Example Code:
URLConnection connection = url.openConnection();
if (connection instanceof HttpsURLConnection) {
    ((HttpsURLConnection) connection).setHostnameVerifier((hostname, session) -> true);
    ((HttpsURLConnection) connection).setSSLSocketFactory(trustAllCertificates());
}
Authentication and Authorization: Implement strong authentication mechanisms to verify the identity of users and grant appropriate access privileges. Use secure algorithms for password hashing and consider multi-factor authentication for enhanced security.
Example Code:
if (authenticate(username, password)) {
    // Perform necessary operations
} else {
    // Handle authentication failure
}
Error Handling: Handle errors securely by providing informative error messages to users while avoiding exposing sensitive information that could be exploited by attackers. Log errors appropriately for monitoring and debugging purposes.
Example Code:
try {
    // Perform operations
} catch (Exception e) {
    LOGGER.log(Level.SEVERE, "An error occurred", e);
}
Secure Session Management: Implement secure session management techniques, such as using secure tokens or session IDs, to prevent session hijacking or fixation attacks. Set appropriate session timeouts and invalidate sessions after logout.
Example Code:
HttpSession session = request.getSession();
session.setAttribute("user", user);
session.setMaxInactiveInterval(1800); // Set session timeout to 30 minutes
Common Security Pitfalls and How to Avoid Them
To write secure Java code, it is crucial to be aware of common security pitfalls and take steps to avoid them. Here are some pitfalls to watch out for:
Insecure Direct Object References: Avoid exposing internal object references directly in URLs or hidden fields, as it can lead to unauthorized access to sensitive data. Use indirect references or access control mechanisms to protect confidential information.
Example Code:
String productId = request.getParameter("productId");
Product product = getProductById(productId);
if (product != null && product.isAvailable()) {
    // Display product details
} else {
    // Handle invalid or unavailable product
}
Cross-Site Scripting (XSS) Attacks: Prevent XSS attacks by properly encoding user-generated content and validating input. Utilize frameworks or libraries that automatically handle HTML encoding to mitigate this risk.
Example Code:
String encodedContent = HtmlUtils.htmlEscape(userInput);
// Use encodedContent safely to prevent XSS attacks
Insecure Cryptography: Avoid using weak or outdated cryptographic algorithms, as they can be vulnerable to attacks. Utilize the cryptographic functionalities provided by Java, such as AES or RSA, with secure key management practices.
Example Code:
Cipher cipher = Cipher.getInstance("AES/CBC/PKCS5Padding");
cipher.init(Cipher.ENCRYPT_MODE, secretKey);
byte[] encryptedData = cipher.doFinal(data);
Code Injection: Prevent code injection attacks, such as SQL injection or OS command injection, by utilizing prepared statements or parameterized queries. Avoid constructing queries or commands by concatenating user input.
Example Code:
PreparedStatement statement = connection.prepareStatement("SELECT * FROM users WHERE username = ?");
statement.setString(1, username);
ResultSet resultSet = statement.executeQuery();
Here is an example of an insecure code and the solution to it:
Here’s an example of a Java Servlet that has several security issues related to Insecure Cryptography, Cross-Site Scripting (XSS) Attacks, and Insecure Direct Object References:
import javax.crypto.Cipher;
import javax.crypto.spec.SecretKeySpec;
import javax.servlet.http.*;
import java.security.MessageDigest;
import java.sql.*;

public class InsecureServlet extends HttpServlet {

    private static final String SECRET_KEY = "ThisIsASecretKey";

    protected void doPost(HttpServletRequest request, HttpServletResponse response) throws ServletException, IOException {
        String username = request.getParameter("username");
        String password = request.getParameter("password");

        try {
            // Insecure Direct Object Reference: Using user-supplied input directly
            String query = "SELECT * FROM users WHERE username = '" + username + "'";

            // Insecure Cryptography: Using MD5, which is considered insecure
            MessageDigest md = MessageDigest.getInstance("MD5");
            byte[] hashedPassword = md.digest(password.getBytes());
            String hashedPasswordStr = new String(hashedPassword);

            if (query.equals(hashedPasswordStr)) {
                // Cross-Site Scripting (XSS) Attacks: Directly outputting user-supplied input without sanitization
                response.getWriter().println("Welcome, " + username + "!");
            } else {
                response.getWriter().println("Invalid username or password.");
            }
        } catch (Exception e) {
            throw new ServletException(e);
        }
    }
}
In this code:
- Insecure Direct Object References: The code constructs an SQL query using the user-supplied
usernamedirectly, which can lead to SQL Injection attacks if theusernameis not properly sanitized. - Insecure Cryptography: The code uses MD5 to hash the password, which is considered insecure due to its vulnerability to collision attacks. A stronger algorithm like bcrypt or scrypt should be used instead.
- Cross-Site Scripting (XSS) Attacks: The code directly outputs the user-supplied
usernameto the response without any sanitization or encoding, which can lead to XSS attacks if theusernamecontains malicious scripts.
Here is the solution to it:
import javax.crypto.SecretKeyFactory;
import javax.crypto.spec.PBEKeySpec;
import javax.servlet.http.*;
import java.security.NoSuchAlgorithmException;
import java.security.spec.InvalidKeySpecException;
import java.sql.*;
import java.util.Base64;

public class SecureServlet extends HttpServlet {

    private static final String SECRET_KEY = "ThisIsASecretKey";

    protected void doPost(HttpServletRequest request, HttpServletResponse response) throws ServletException, IOException {
        String username = request.getParameter("username");
        String password = request.getParameter("password");

        try {
            // Use prepared statement to prevent SQL Injection
            String query = "SELECT password FROM users WHERE username = ?";
            PreparedStatement pstmt = connection.prepareStatement(query);
            pstmt.setString(1, username);
            ResultSet rs = pstmt.executeQuery();

            if (rs.next()) {
                String storedPassword = rs.getString("password");

                // Use bcrypt for password hashing
                byte[] salt = new byte[16];
                PBEKeySpec spec = new PBEKeySpec(password.toCharArray(), salt, 65536, 128);
                SecretKeyFactory skf = SecretKeyFactory.getInstance("PBKDF2WithHmacSHA1");
                byte[] hash = skf.generateSecret(spec).getEncoded();
                String hashedPassword = Base64.getEncoder().encodeToString(hash);

                if (storedPassword.equals(hashedPassword)) {
                    // Escape user-supplied input to prevent XSS
                    String safeUsername = org.apache.commons.lang3.StringEscapeUtils.escapeHtml4(username);
                    response.getWriter().println("Welcome, " + safeUsername + "!");
                } else {
                    response.getWriter().println("Invalid username or password.");
                }
            }
        } catch (NoSuchAlgorithmException | InvalidKeySpecException e) {
            throw new ServletException(e);
        }
    }
}
In this revised code, we use a PreparedStatement to prevent SQL Injection attacks. We replace MD5 with bcrypt for password hashing. And we escape the username using StringEscapeUtils.escapeHtml4() from Apache Commons Lang to prevent XSS attacks.
Note that this is a simplified example and real-world applications may have additional complexities and security considerations. Always follow best practices for secure coding to protect your application from these and other security vulnerabilities.
Also, remember to never expose sensitive information like secret keys in your code as done in this example. It’s always recommended to store such information in secure and encrypted environment variables or configuration files.
Developer Security Training: Enhancing Skills
Continuously improving your security skills through developer security training is crucial for writing secure Java code.
Here are some steps you can take to enhance your skills:
- Stay Updated: Keep yourself informed about the latest security threats, vulnerabilities, and best practices by following reputable security resources, attending security conferences, and participating in security-focused communities.
- Training Programs: Explore security training programs and certifications specifically designed for developers. These programs provide in-depth knowledge and practical guidance on secure coding practices, vulnerability assessment, and secure software development.
- Code Reviews: Engage in peer code reviews that include security-focused analysis. Collaborating with experienced developers can help identify potential security weaknesses and learn from their expertise.
- Security Tools: Utilize security analysis tools, such as static code analysis or vulnerability scanners, to identify potential security vulnerabilities in your code. These tools provide automated checks and recommendations for improvement.
By following these practices, avoiding common pitfalls, and continuously enhancing your security skills, you can write secure Java code that protects your applications and user data.
Conclusion
In conclusion, this book has equipped you with advanced Java programming skills crucial for any software engineer.
You've covered key topics ranging from unit testing and debugging to Java security, preparing you to handle real-world software development challenges.
Your journey through these chapters has enhanced your technical expertise, making you adept at creating efficient, secure, and robust software solutions.
Your newfound knowledge opens up a world of opportunities, from advancing in your current role to aspiring for senior developer positions or embarking on your own tech venture. With Java's role in AI, big data, and cloud computing, your skills are more relevant than ever.
As you step forward, remember that mastering Java is about applying these concepts to develop innovative solutions. Continue to grow, adapt to new technologies, and let your passion for programming drive you.
Now, with both the knowledge and confidence, you're ready to make your mark in the world of Java programming. Whether contributing to open-source projects, seeking Java certification, or innovating in your professional endeavors, you are well-prepared for the challenges and opportunities ahead. The path from learning to leading in the Java community awaits.
Resources
If you're keen on furthering your Java knowledge, here's a guide to help you conquer Java and launch your coding career. It's perfect for those interested in AI and machine learning, focusing on effective use of data structures in coding. This comprehensive program covers essential data structures, algorithms, and includes mentorship and career support.
Additionally, for more practice in data structures, you can explore these resources:
- Java Data Structures Mastery - Ace the Coding Interview: A free eBook to advance your Java skills, focusing on data structures for enhancing interview and professional skills.
- Foundations of Java Data Structures - Your Coding Catalyst: Another free eBook, diving into Java essentials, object-oriented programming, and AI applications.
Visit LunarTech's website for these resources and more information on the bootcamp.
Connect with Me:
- Follow me on LinkedIn for a ton of Free Resources in CS, ML and AI
- Visit my Personal Website
- Subscribe to my The Data Science and AI Newsletter
About the Author
I'm Vahe Aslanyan, specializing in the world of computer science, data science, and artificial intelligence. Explore my work at vaheaslanyan.com. My expertise encompasses robust full-stack development and the strategic enhancement of AI products, with a focus on inventive problem-solving.
My experience includes spearheading the launch of a prestigious data science bootcamp, an endeavor that put me at the forefront of industry innovation. I've consistently aimed to revolutionize technical education, striving to set a new, universal standard.
As we close this book, I extend my sincere thanks for your focused engagement. Imparting my professional insights through this book has been a journey of professional reflection. Your participation has been invaluable. I anticipate these shared experiences will significantly contribute to your growth in the dynamic field of technology.