
By Jonathan Cunanan
You've likely heard about Docker terms like containers, images, services, volumes, network, Dockerfile, docker-compose file, right? Or you've watched some videos about what it is, but you're not sure how can it apply to your daily life as a developer?
That's what I first thought after watching videos about Docker. Not only can Docker run web-apps, servers, and databases, but it can also be a local development environment! I wrote this article not only so you can learn how to do it, but also for me, so I won't forget it. Let's get started!
Table of Contents
- Why Docker?
- Installing docker and Ignorefiles
- Dockerfile and Docker-Compose
- Building and Running the Container
- Making new rails app and starting the server
- Cleaning up
- Conclusion and repo
Why Docker?
Why use docker? Why not just install it on your local machine, and install Ruby Version Manager (rvm) or Ruby Environment (rbenv)?
Setting up Ruby On Rails with with these tools is great. It took me over 3 hours of installing, troubleshooting, and searching the documentation to get it working. But recently, I got my mac reformatted. But I didn't list or take note of the websites I've visited to make it work on my machine. I forgot how to install it again and it's a pain to repeat the steps.
This is where Docker shines. Install docker, load your dockerfiles, run a few commands in your terminal, you're already setup! And also, what if you want to uninstall all that you did? It's hard to track what steps to undo. With Docker, it's just a few commands to cleanup.
When I was watching an online tutorial about docker, Dan Wahlin, the teacher, said that one of the benefits of docker is to accelerate developer on-boarding. Dan said in his tutorial:
"Docker can help there because we can make one or more images that can then be converted into running containers, and those containers can run on our different developer, and even designer machines."
Let's say you have a team of developers, designers, and testers, and have an app with a back-end server, database server, and caching server. You have 12 clean slate machines, with a combination of linux and mac computers. Do you really want to go install, troubleshoot, and follow varying installation instructions that depend on the machine? Then make the pieces work, one-by-one on every machine, without the assurance of they won't encounter any varying errors along the way?
This is why I took time to study Docker. With a few commands and a few lines of a configuration file, you're already setup. In the next section, we'll get our hands dirty with docker setup.
Installing Docker and including Ignorefiles
1. Install Docker
I'm not gonna talk much about installing docker, there are many videos out there. But usually, it's just download and open the installer, register an account on dockerhub, and you're good to go. Check out Docker installation docs.
2. Make a .dockerignore file
What is a dockerignore file? Dockerignore file just tells Docker which files to ignore in it's container. An example is when you have a minified assets, js, css files, that gets changed from time to time whenever you change the original code. This also applies to gitignore files. Usually, the list of recommended files to ignore are usually found in the internet. You can copy this gist on your own .dockerignore .
And if you use git, put this snippet of code in your .gitignore.
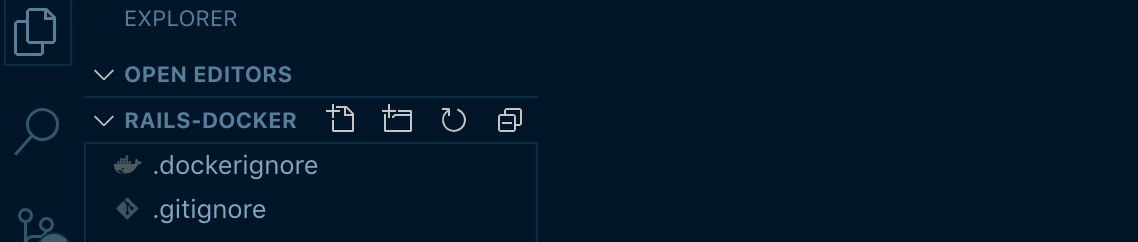 The look of your project folder will look similar to this.
The ignorefiles are a little bit lenghty that's why I just put links.
Dockerfile and docker-compose file
This is where most of the operation happens. Think of these two files as set of instructions Docker follows on how to setup your virtual container. Dockerfile and docker-compose file works hand in hand. You can have multiple Dockerfiles for different services, and one docker-compose file to tie them up together.
3. Make a file named Dockerfile
A Dockerfile is a file with set of rules you'll set that docker will follow. There are pre-built set of rules found on Docker hub. An example is pre-built installation instructions for MySQL, or PHP, or Node.js. After making your Dockerfile, put this code on your Dockerfile. And I'll go through a brief explanation on what does these lines do.
FROM ruby

WORKDIR /home/app

ENV PORT 3000

EXPOSE $PORT

RUN gem install rails bundler
RUN gem install rails
RUN apt-get update -qq && apt-get install -y nodejs

ENTRYPOINT [ "/bin/bash" ]
FROM ruby- this means docker will pull a pre-built setup by ruby. You don't need to think about updating or installing on your machine the latest ruby version. You'll see the list of Docker's pre-built images on their Dockerhub. Think of it as like npm.WORKDIR /home/app- Work directory. Work directory means this is be your default folder location when you start your development environment. You can name it whatever you want.ENV PORT 3000- Environment variable. This will set a variable named$PORTon your bash terminal to be '3000'.EXPOSE $PORT- expose port 3000 (that we've set earlier) of the virtual container to your local machine.RUN- Run commands are some setup instructions that you want the terminal to run before you use it. In our case, we installed ruby on rails, bundler, and node.js before we even use the development environment so it's all ready when we use it.ENTRYPOINT ["/bin/bash"]- this command tells docker what command to execute when we run the container. In our case, we need to run bash terminal so we can have access to rails.
Note that these explanations are only brief. You can see more explanations or you can do your deep-dive on Dockerfile reference docs.
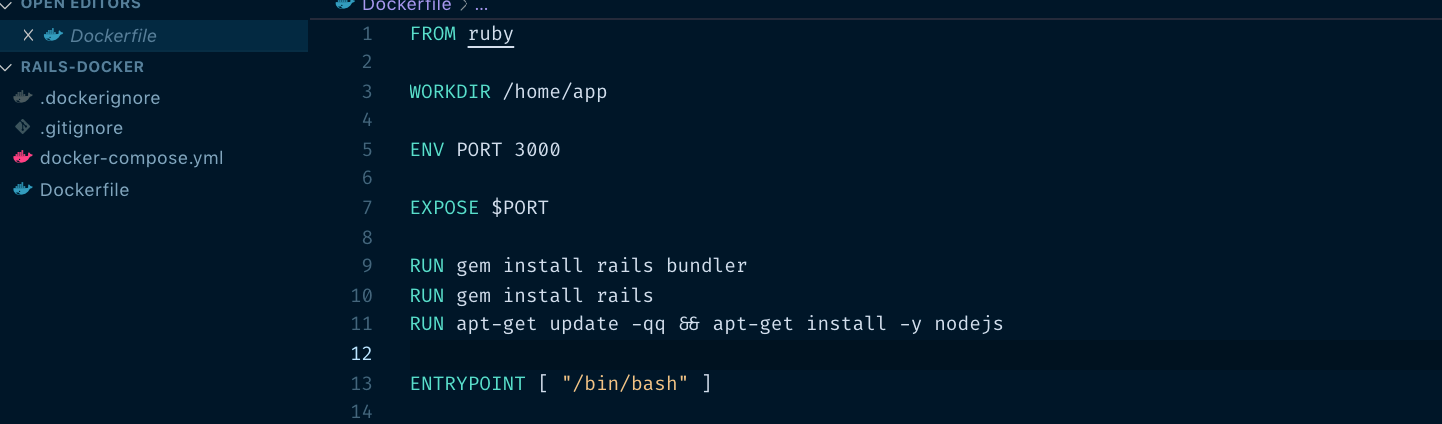 Your Dockerfile will look like something like this.
You can do sorts of cool stuff with Dockerfile. In my case, I've tried to install zsh and oh-my-zsh on my container because it has some cool auto-completion features. But in our example we don't really need it, it will only increase our image size, so I didn't include it.
4. Make a file named docker-compose.yml
Docker compose file is a file that ties up different services together. A good example is when you're wiring up your rails app to different servers like MySQL database server, or redis caching server. You can easily make them work with this file. But for our case, we'll stick to the minimum setup for clarity purposes. A YAML file is a type of markdown file with different rules on how to format your file. Just think of it as a JSON file, without the braces. Put this in your docker-compose.yml file.
version: "3.7"

services:
  ruby_dev:
    build: .
    container_name: ruby_container
    ports:
      - "3000:3000"
    volumes:
      - ./:/home/app
As you can see, it kinda looks like the Dockerfile, but with a little bit of indentation. Let's go through the lines.
version- Through time, docker-compose file went through changes. That's why in docker-compose files, they need to specify which version they are using. In our case we just use the latest version as of this time.services- Specify list of services. As I said earlier, you can have many services like a rails server, and a MySQL server on your project. You can name your services any name you want. I named itruby_dev.build: .- The dot here means a file path where to find the Dockerfile, which is the build instructions.container_name- The name of the container.ports:- these are the ports to expose from the docker container to our host local machine. The pattern here isHOST:CONTAINER. In our case it's "3000:3000". Which means we are letting the default Rails server port (3000) be available in our local machine's "localhost:3000".volumes:- volume means even if we quit or delete Docker, we can specify which files we can keep in our local machine. We put./:/home/appthere because we named in our Dockerfile earlier the workdir to be/home/app.
You can see more explanations on Docker Compose reference docs.
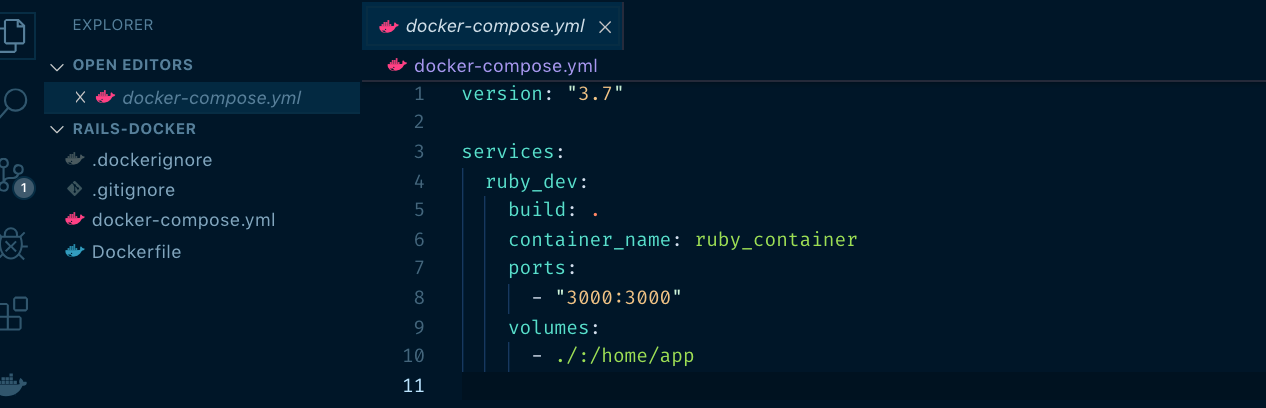 Your docker-compose.yml will look like something like this.
Building and running the container
With all our config files setup, let's build and run the container! After the loads of terms we encountered, building and running the container is way simpler. It will only involve few commands.
5. In your terminal, run docker-compose build
Running this command will get Dockerfile and install all the necessary things to make a rails development environment. Note that the installation may take a while because docker will need to download the necessary packages.
6. In your terminal, run docker-compose run --rm --service-ports ruby_dev
This command will start a bash terminal that will be your rails development environment where the rails commands are available. With only these two commands, and two config files, you already have a rails environment without even going through a log of troubleshooting! Notice that our command has some flags, --rm means remove the container after using it, and --service-ports means use port 3000 in our container so we can see our rails server in action. The name ruby_dev also came from services found at our docker-compose.yml.
 Your terminal might look like this after running the run command. Check if there's rails by running
 rails -v command. Versions might vary.
Test-run a rails app
Now that we've successfully made our rails development environment, we'll test a sample rails app.
1. Run rails new myapp && cd myapp
This command will create a new rails app in a folder named myapp. After that the terminal will go the folder. You can name it whatever you want.
2. Update and install gems. Run bundle update && bundle install
Just make sure you're in the right folder, in myapp, which contains the rails app files. This command will update and install your dependencies.
3. Test the server by running rails server -p $PORT -b 0.0.0.0
Remember the port we specified in our Dockerfile before? This is where we can use it. In our case, rails will use port 3000 to start the server. Don't forget to put -b 0.0.0.0 because you won't see the app on your local machine without this.
 Hello rails splash screen. Yeah rails!!!
4. Stop the server by pressing ctrl-d on your keyboard.
Cleaning Up
After you're done with everything, you can exit on your container by running exit on your container's bash terminal. The --rm flag you typed before will remove the container, but will you get to keep your ruby on rails files.
Run docker-compose down to cleanup
Cleaning up is when you're done with the project, and you want to remove your dev environment so you can save space. If you're really done, you can use this command. Docker will remove all your setup, and the images you downloaded. This so powerful, because, imagine you followed a lot of steps and a lot of installation on your mac. The only way to remove that setup is to uninstall them one by one. With docker on our side, it's just one command. Aww yeah!
Conclusion
Glad you made this far! Let's look at the big picture. Setting up a dev environment in Docker can be broken down in 2 steps:
- List the instructions you need on your Dockerfile and docker-compose file.
- Start or stop or cleanup your dev environment with the
docker-composecommand.
This is a big win for us. You just need to keep the Dockerfile and compose file and whenever you switch machines, you just run two commands! Setup once, and forget.
Repository
You can see the repository on how the setup looks like, and additional commands that you need here by checking out the full github repo here.
If you find the article helpful, or if you have some additional questions, throw it in the comments. I'll be glad to help!
This article was written by Jonathan Cunanan on freeCodeCamp News.