

In this article, you'll get a hands-on practical guide for creating a native splash screen for React Native CLI applications.
Note that this tutorial is not applicable for apps created with Expo.
SVG Icon Image and Background
The first thing you need is an image. It can be in any format, but I recommend using SVG because, from it, you will generate icons of various sizes for different types of Android and iOS devices.
You will also need a background color that complements or contrasts your project's primary color. In my case, I will use #074C4E.
![]() icon imagem and backgorund color
icon imagem and backgorund color
Add the Image to the Project
Next, add the SVG image to your project. It doesn't matter where. The most important thing is remembering the path because you will need to reference it later.
In my case, I placed it in src/assets/svgs/logo-vertical-white.svg.
How to Use the react-native-bootsplash Library
You will use the [react-native-bootsplash](https://github.com/zoontek/react-native-bootsplash) library to create native splash screens. This library will help you in three essential areas to guarantee your users an excellent experience when encountering the splash screen.
- Native Splash Screens: React Native apps have a "JavaScript side" that only loads after the native side is ready. Therefore, to present a splash screen quickly, a native experience is necessary. The good news is that all the code is already inside the library, so you just need to connect it to your project.
- Generation of Images and Files: When creating native splash screens, it is necessary to create specific image files for each platform. This can be done through tools like Xcode and Android Studio. Fortunately, the library comes with a CLI (command-line interface) that allows you to generate these files with just one command!
- Hide at the Right Moment: In many cases, even after the native side has loaded, the app may still not be ready to display content to the user. On the JavaScript side, you still need to load your navigation stack, fetch the user's authentication status, or call the API to fetch some data. With the
react-native-bootsplash, you can choose when to hide the splash screen.
First, let's add the library. As I am using Yarn as my dependency manager, I will execute the command:
yarn add react-native-bootsplash
Since the library has native dependencies, you need to install the pods on the iOS side. Inside the ios folder, run the following command:
pod install
Great, the library installation is complete 😁. In case you're wondering, the native Android dependencies are automatically installed when you run the yarn android command. We'll do this later after finishing the setup.
How to Generate the Splash Screen Files
In addition to installing the library, you need to generate the files and images mentioned earlier and update a few native files after that.
The react-native-bootsplash has a command that helps us create all the necessary native files and images to create a native Android and iOS splash screen.
It's worth mentioning that the library also has a premium option, where you can buy a license key to unlock extra CLI commands, like adding more than one icon on the screen and generating different images for Dark Mode. You will use the simplest splash screen, so you don't need a license key. But I highly recommend it if you have any of the use cases mentioned above and also to support the library's author, who does an incredible job.
To generate the files, you'll need the following to run the command, which you should customize according to your project:
- File path and name:
src/assets/svgs/logo-vertica-white.svg - The background color:
074C4E - The logo width:
105
yarn react-native generate-bootsplash src/assets/svgs/logo-vertica-white.svg \\
   --platforms=android,ios \\
   --background=074C4E \\
   --logo-width=105
After running this command, you will see that the native image files, color, and storyboard have been successfully generated.
 terminal output
How to Connect the Library to the Project
It is time to integrate the library and newly created splash screen with the project by modifying some native files.
iOS - AppDelegate.mm
On iOS, the file where you configure libraries with native dependencies is the AppDelegate.mm.
And you will do this in two steps. First, import the library at the top of the file:
#import "RNBootSplash.h"
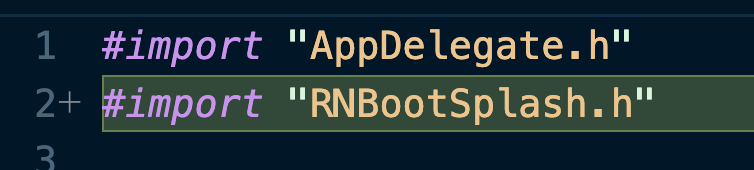 importing BootSplash on AppDelegate
The second change in this file is to add the function that will connect the native and JavaScript sides. Add this snippet at the end of the project before the last @end. The code will be different if you use a react-native version below 0.74.
// ⬇️ Add this before file @end (for react-native 0.74+)
- (void)customizeRootView:(RCTRootView *)rootView {
  [RNBootSplash initWithStoryboard:@"BootSplash" rootView:rootView]; // ⬅️ initialize the splash screen
}

// OR

// ⬇️ Add this before file @end (for react-native < 0.74)
- (UIView *)createRootViewWithBridge:(RCTBridge *)bridge
                          moduleName:(NSString *)moduleName
                           initProps:(NSDictionary *)initProps {
  UIView *rootView = [super createRootViewWithBridge:bridge moduleName:moduleName initProps:initProps];
  [RNBootSplash initWithStoryboard:@"BootSplash" rootView:rootView]; // ⬅️ initialize the splash screen
  return rootView;
}
In my case, I am on react-native 0.73, so my modification looks like this:
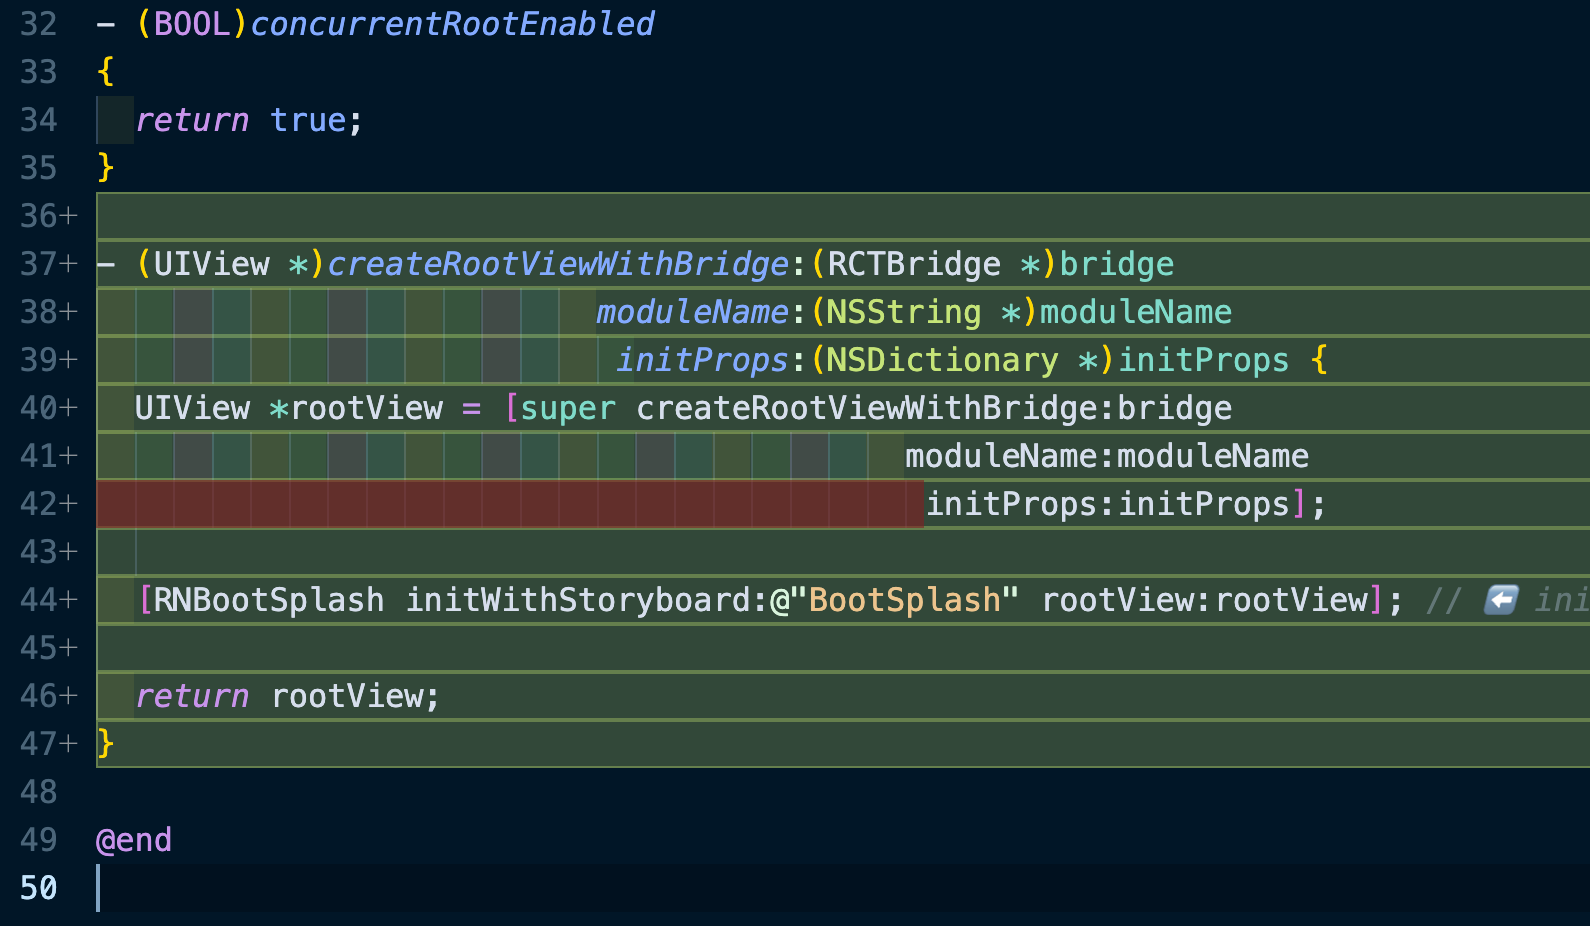 added createRootViewWithBridge (react-native < 0.74)
Android - styles.xml
On Android, you need to change three native files. Let's start with styles.xml.
Inside the android/app/src/main/res/values/styles.xml file, add the following code snippet inside the resources tag. Remember, there is already a style tag within it – do not replace it. Add an extra one.
<style name="BootTheme" parent="Theme.BootSplash">
    <item name="bootSplashBackground">@color/bootsplash_background</item>
    <item name="bootSplashLogo">@drawable/bootsplash_logo</item>
    <item name="postBootSplashTheme">@style/AppTheme</item>
</style>
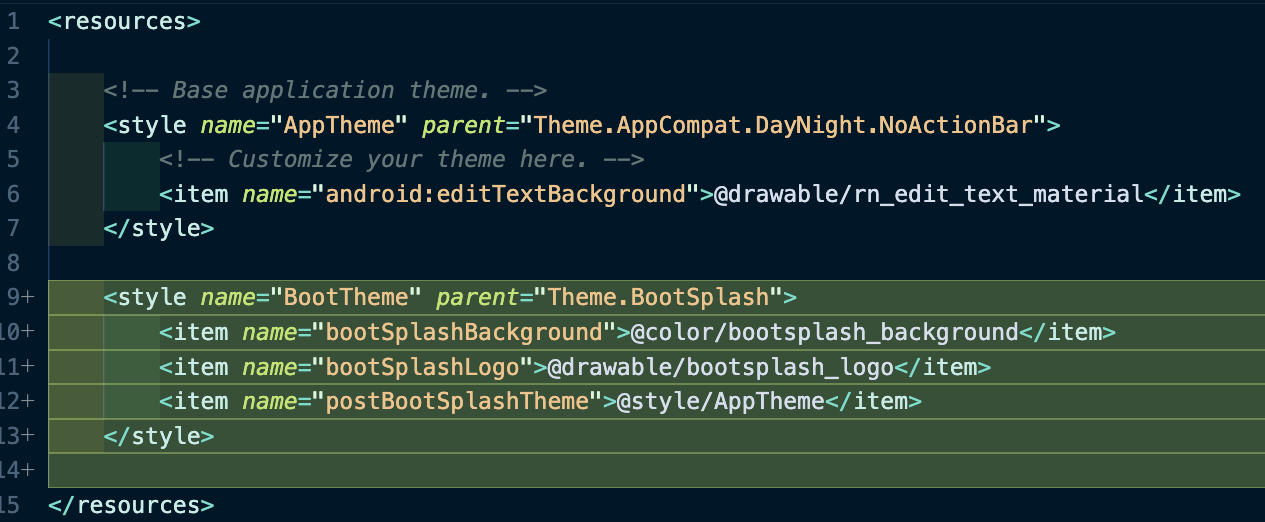 styles.xml
Android - AndroidManifest.xml
To connect the splash screen in the file android/app/src/main/AndroidManifest.xml, you have to add the property android:theme="@style/BootTheme" inside the activity.
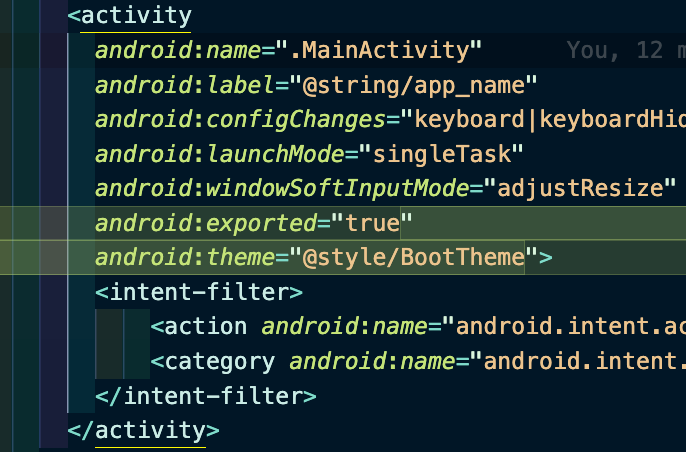 My AndroidManifest.xml
Android - Modify the MainActivity.java/kt
You need to initiate the splash screen within the MainActivity. Depending on your version of React Native, your file may have a Java or Kotlin extension. You have to modify or create the onCreate method if it does not exist.
I literally copied the code below from the library README file, so you don't need to jump there but feel free to check it here.
// Java (react-native < 0.73)
// …

// add these required imports:
import android.os.Bundle;
import com.zoontek.rnbootsplash.RNBootSplash;

public class MainActivity extends ReactActivity {

  // …

  @Override
  protected void onCreate(Bundle savedInstanceState) {
    RNBootSplash.init(this, R.style.BootTheme); // ⬅️ initialize the splash screen
    super.onCreate(savedInstanceState); // super.onCreate(null) with react-native-screens
  }
}
 My final MainActivity.java
Hide the Splash Screen
The implementation is ready for both platforms! But before running the app, you must hide the splash screen at some point on the JavaScript side; otherwise, the app will open and get stuck.
Of course, where to put it depends significantly on what you need to load for your app to be ready to display to the user. A classic example is waiting for React Navigation to load the navigation stack, which is signaled through the onReady callback.
import BootSplash from 'react-native-bootsplash';
// ...

export function Router() {
    // ...
    return (
    <NavigationContainer onReady={() => BootSplash.hide({fade: true})}>
      {Stack}
    </NavigationContainer>
  );
}
You are ready to go!
Your splash screen is ready for use! However, since you modified native files, rebuilding the app is necessary. To do this, run the commands yarn ios and yarn android to see how your implementation works.
Thanks for reading! If you speak Portuguese and would like more content about React Native, subscribe to my YouTube channel here.