By David Nadaski
Introduction
A cover system enables A.I. units to avoid direct fire, taking cover behind various objects on the map. Using a cover system enhances a game’s level of realism and introduces essential tactical elements to any genre. Such systems are composed of two distinct modules: cover generation and cover finding. Cover generation is typically static and is done before the game starts, while finding cover happens in real-time during play.
In this article, I challenge the static nature of cover systems by describing how to build a fully dynamic, real-time cover generation module from scratch in Unreal Engine 4, as well as providing the implementation of a cover finding module.

Creating a robust cover system may seem daunting at first, but once you realize it’s just a set of simple techniques glued together, the task at hand will seem a lot less intimidating.
Whether you’re making a next-generation real-time strategy (RTS) game or want to use this in a first-person shooter (FPS), I hope you will find the information in this article helpful. I recommend downloading the demo project and checking out how it all works when put together.
The project includes a fully functional implementation of all the techniques discussed above, complete with well-commented source code.
Download the demo project and source code.
Tools & Prerequisites
The tutorial uses Unreal Engine 4 (UE4) version 4.18, however it should work with older releases of the engine as well. The example project and source code were written in C++. You need a basic understanding of UE4, C++ and UE4’s Blueprints to understand the sample project and source code.
Design
When designing a cover system, the three most important challenges you will face are as follows:
- Data generation
- Data persistence
- Data usage
Since this article focuses on creating a real-time dynamic cover system where cover may become available or disappear completely at run-time, it is essential to apply an optimized approach to all three.
I cover two data generation methods: navmesh edge-walking and 3D object scanning.
If your cover data is generated synchronously, it causes a noticeable hitch in your game’s performance, resulting in lags in gameplay. I demonstrate how to make use of the Unreal Engine’s excellent multi-threaded APIs to parallelize cover data generation, taking advantage of multi-core processing typically found in modern-day gaming hardware.
Similarly, if access to cover data is too sluggish, your game slows down by a considerable amount, consuming large amounts of CPU and/or GPU cycles on cover queries. To avoid this, it is best to use a data structure that was meant for real-time concurrent lookup of spatial data: the octree. Using octrees appropriately also allows storing custom cover data, for example cover material (stone vs. hay), height, health, and so on with quick and efficient access.
Data usage optimizations — for when your units are actively deciding which cover point to use in real-time — minimize the number of raycasts and ensure the availability of spatial lookup facilities (octrees) as well as support for direct fetch requests (arrays or maps).
In order to project how a unit may step out of cover to open fire, it is necessary to map out its peeking or leaning capabilities. A tank can’t peek out of cover — a foot soldier can. The best way I’ve found to accomplish this without using too many raycasts is to define “leaning offsets” on units. These are just simple floats that get added to the unit’s location upon hit-testing from cover.
The final feature is real-time dynamic updates — whenever a new object is spawned in the game, we generate cover points around (and inside) it using Unreal’s event system via delegates. This ensures that we’re not wasting resources on Tick, which can slow the game down significantly, if care isn’t taken. We hook into Recast’s navmesh tile update events and update cover points in the corresponding tiles only when necessary.
Despite all the techno-speak, it’s actually wonderfully simple: a few trivial for-loops and a couple of missing pages from the UE4 documentation. So let’s get cracking!
Generating Data — Two Avenues
There are multiple strategies for generating cover data, and I cover the two most prominent ones: first, a technique that’s similar to 3D scanning, and then a navmesh edge-walking approach.
3D object scanning relies on a 3D grid that’s created around an object. You typically have 3 main for-loops to do the bulk of the work, one for each axis. You iterate over the points on the grid that are a constant distance apart and check if you hit anything with a raycast.
3D object scanning:
- Distributes cover points more uniformly than edge-walking
- Supports objects that are incompatible with the navmesh, yet provide cover, for example, “force fields”
- Has minimal chance for errors
- Is slower (because of the sheer number of grid points)
- Copes poorly with landscapes
The navmesh-based approach relies mostly on navmesh data and doesn’t deal with objects per se: if a point on the map is NOT covered by any navmesh polygons, then that means it is occupied by something large enough to provide cover.
Navmesh edge-walking:
- Is considerably faster
- Handles rugged landscape topology easily
- Can’t deal with force fields and the like
- Is somewhat more error-prone: tile boundaries, mismatched points
- Does not distribute cover points as uniformly
I cover these in more detail as we go on, so let’s dive into the nitty-gritty of 3D object scanning!
Object-Based Cover Point Generation
Rather than scan the navmesh for holes, we scan the objects themselves. Think of it like scanning an object in 3D: you slice it up along the X, Y, Z axes, divide the slices into a grid and use raycasts to determine where the object’s perimeter — or 3D circumference — meets the ground. This also works well for irregularly-shaped objects, like C-shapes, rings, castles — you name it.
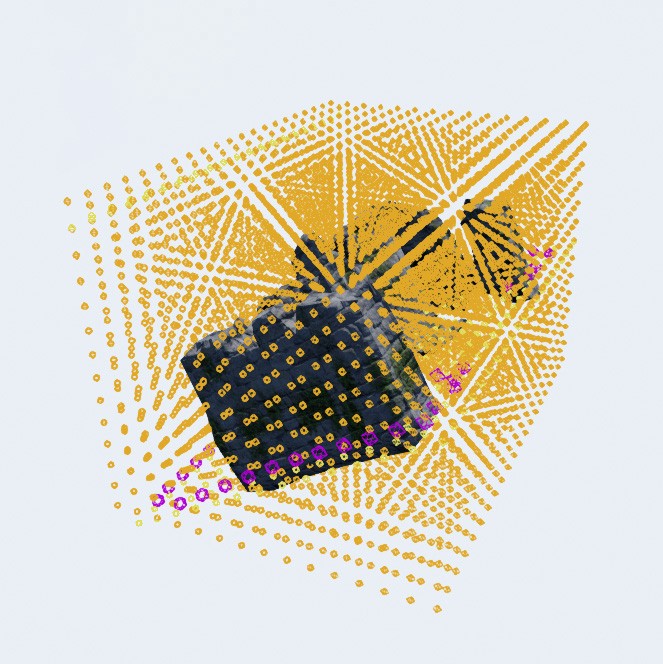
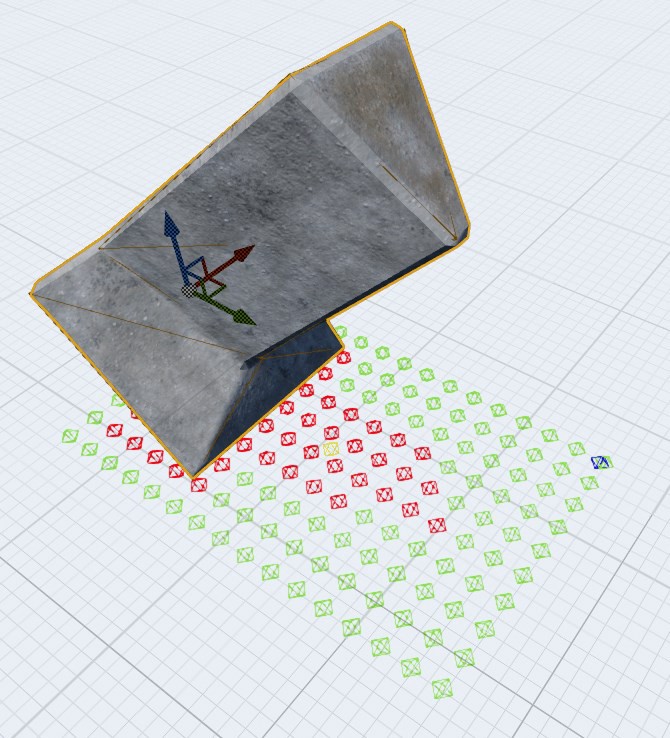
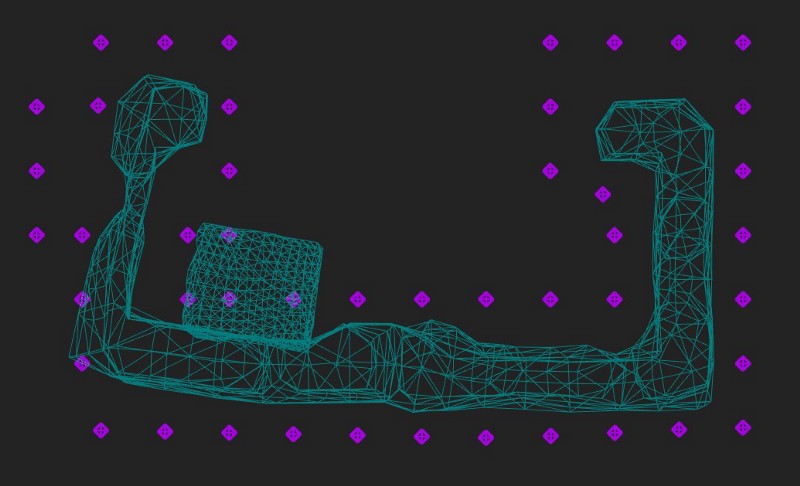
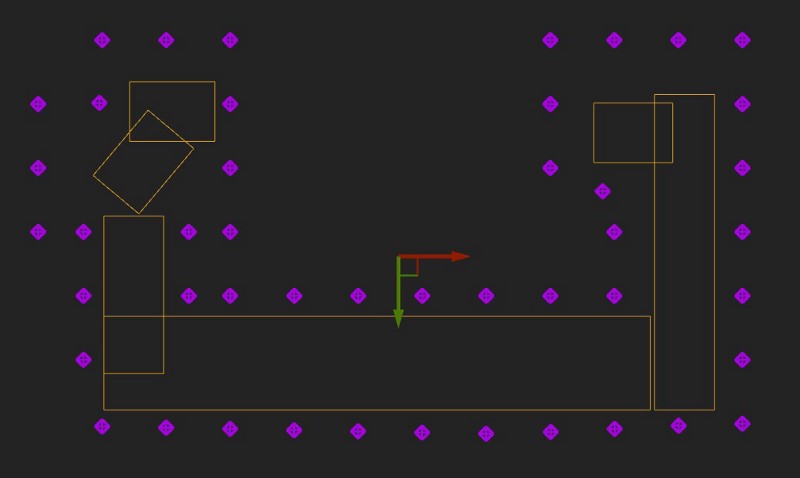
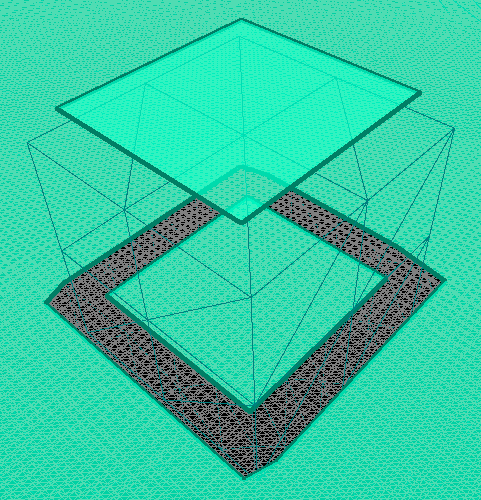
A 3D scan grid looks like this:
This is essentially accomplished by 3 very simple for-loops that just divide the actor’s bounding box into a 3D grid. But there’s a lot of points on the grid, and some of them are not even close to our object, so we have to filter them out.
And why not just use a 2D grid, you might ask? Because of two things:
- Multi-story objects (think of houses with multiple floors)
- Rotated objects on slanted grounds
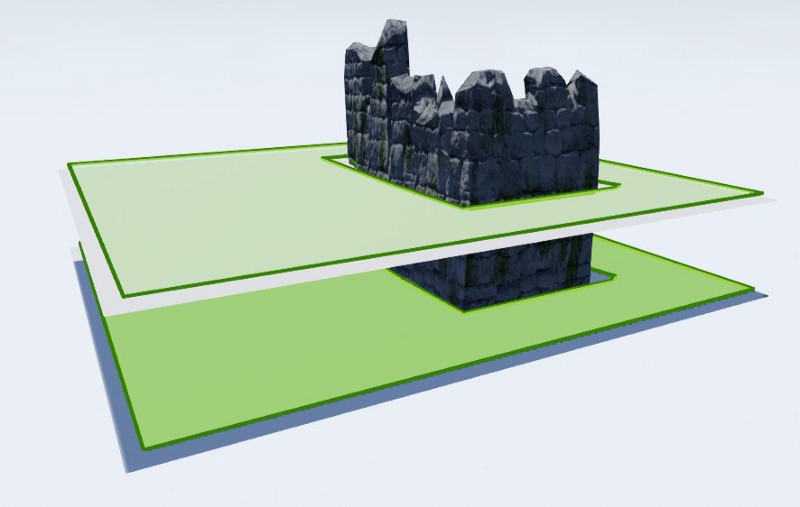
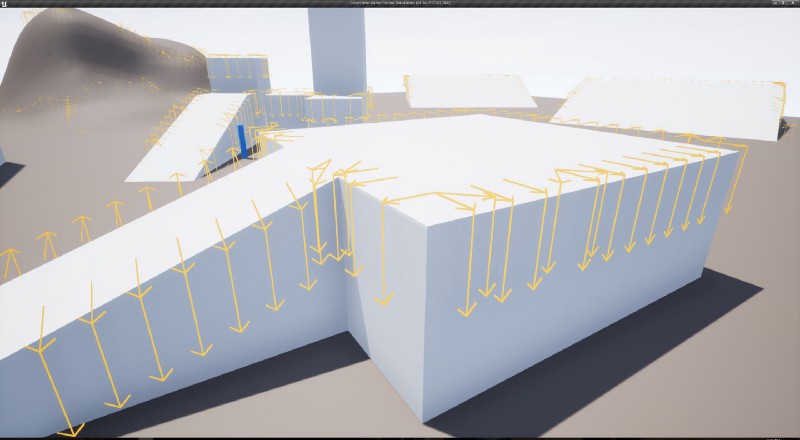
To filter out invalid grid points, we cast a ray from each point downwards in the -Z direction to determine if it is close enough to the nearest ground plane. If it is, then we mark it as valid and continue on to the next one, eventually casting rays down from every single point.
Thankfully, raycasting is very cheap, so we don’t have to worry about single objects — it’s only when we have a multitude of them at run-time that we might start having problems, but we’re going to cross that bridge when we get there.

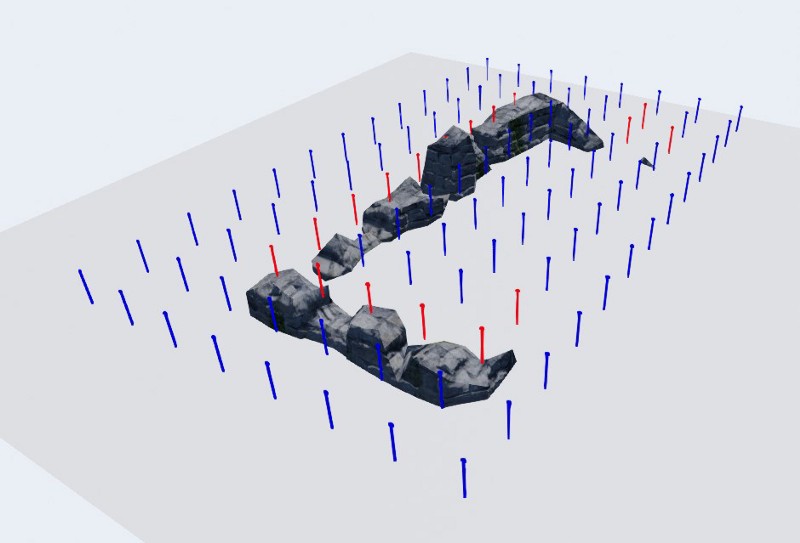
Blue: closer to the ground than the grid point below
Red: farther from the ground than the grid point below
Since we’re only keeping the blue ones, we have many fewer points to worry about in the next pass: checking for minimum ground gap and minimum cover height.

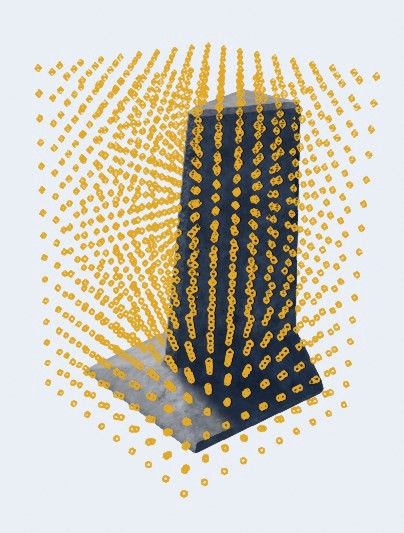
Red: too close to the object
Green: far enough from the object for the smallest unit to fit under
Red: too short
Blue: tall enough or empty
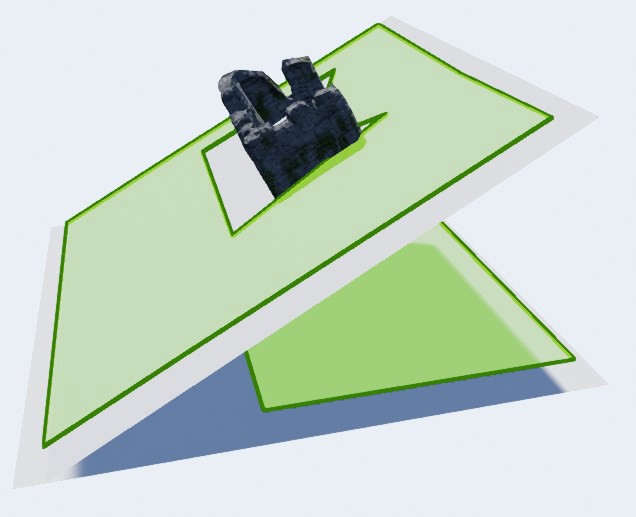
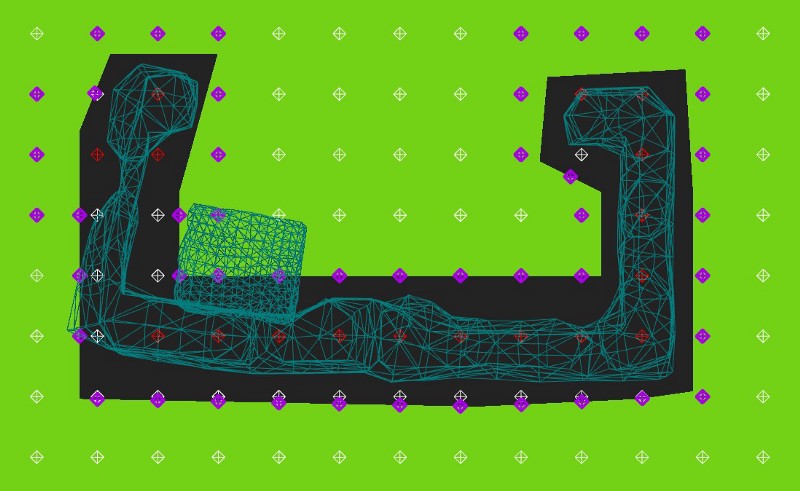
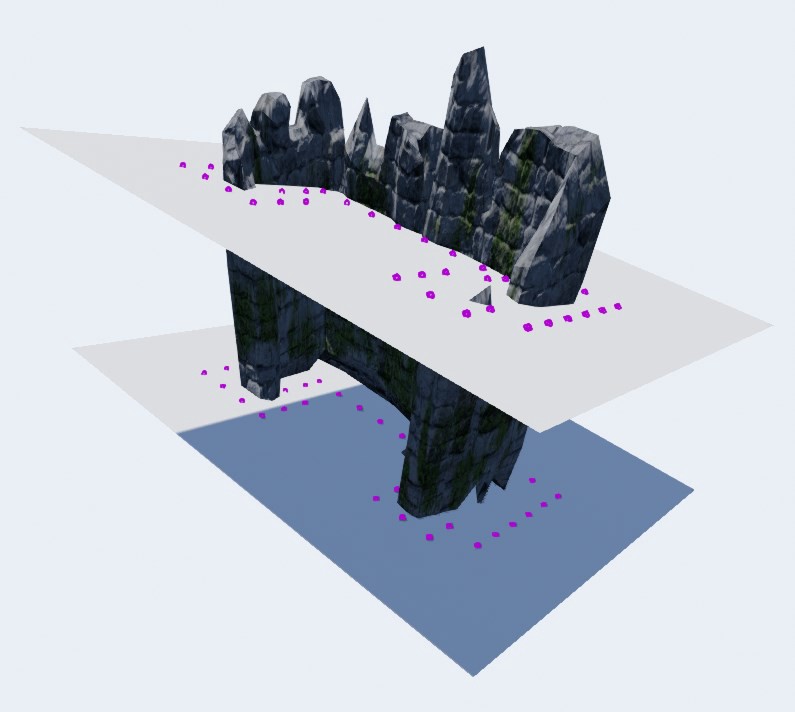
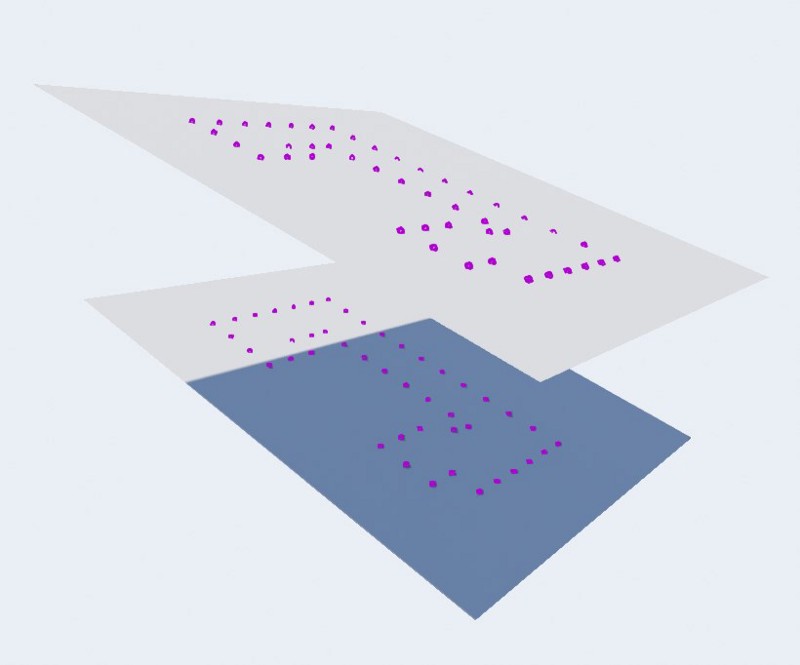
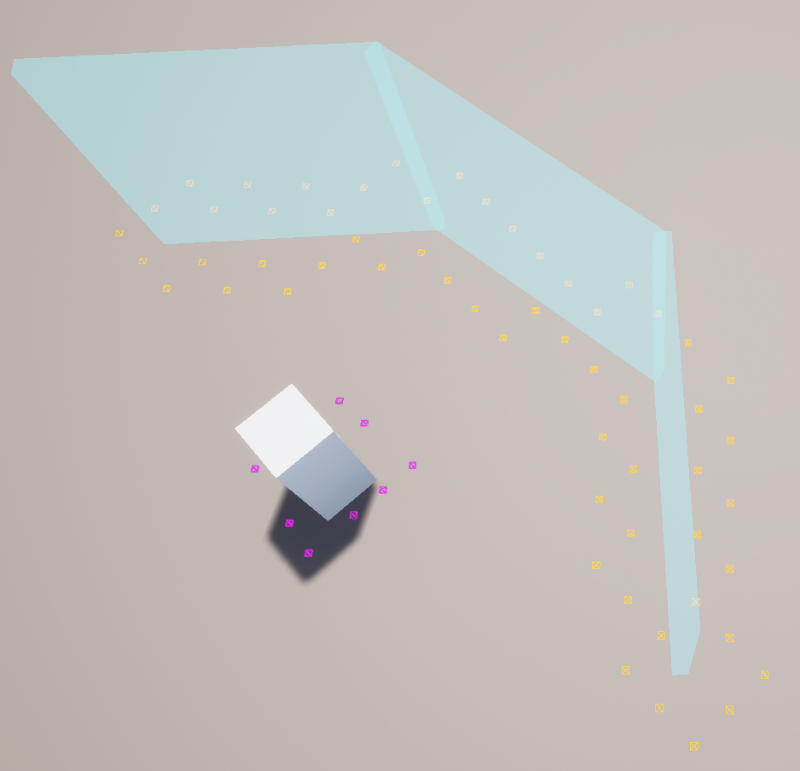
This is how it looks like from the top orthographic view:
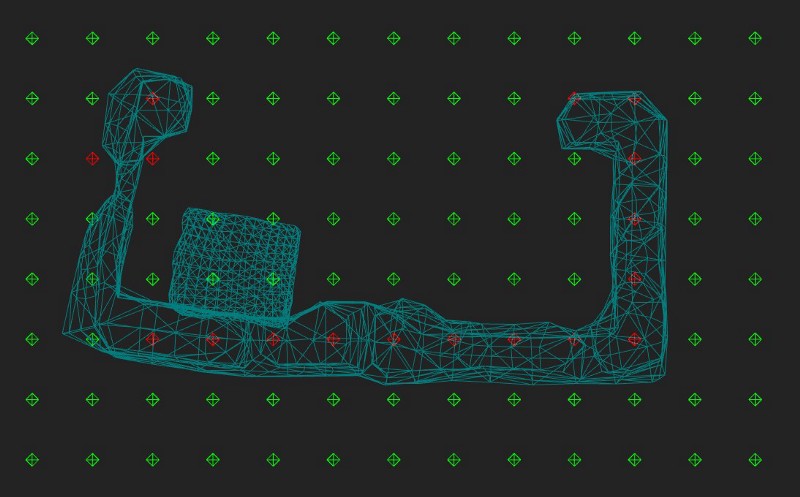
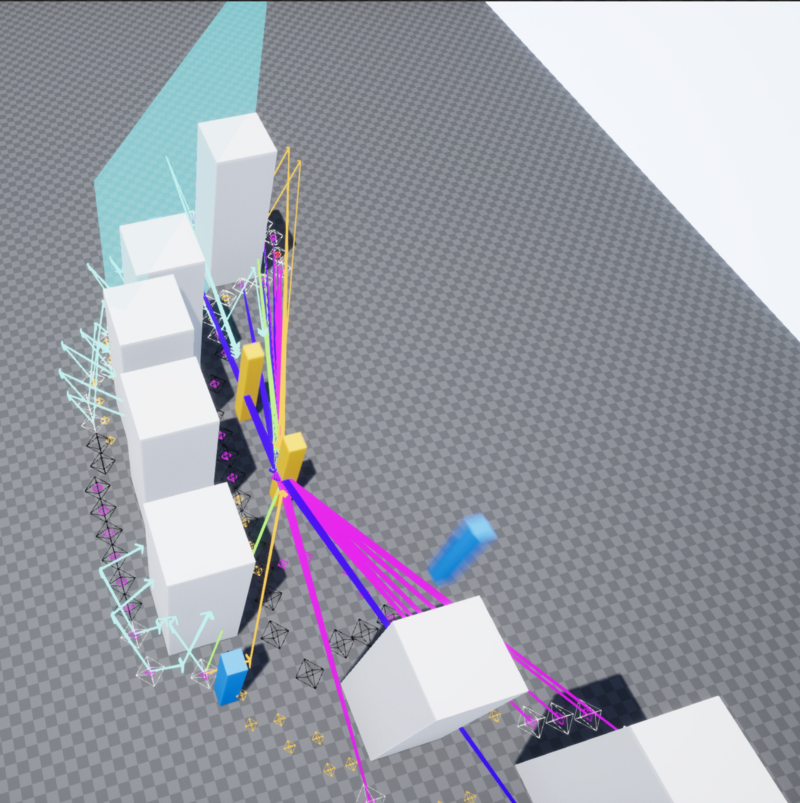
What we’re ultimately looking for are the closest spots to the red markers on the navmesh. These are represented by a subset of the white markers below:
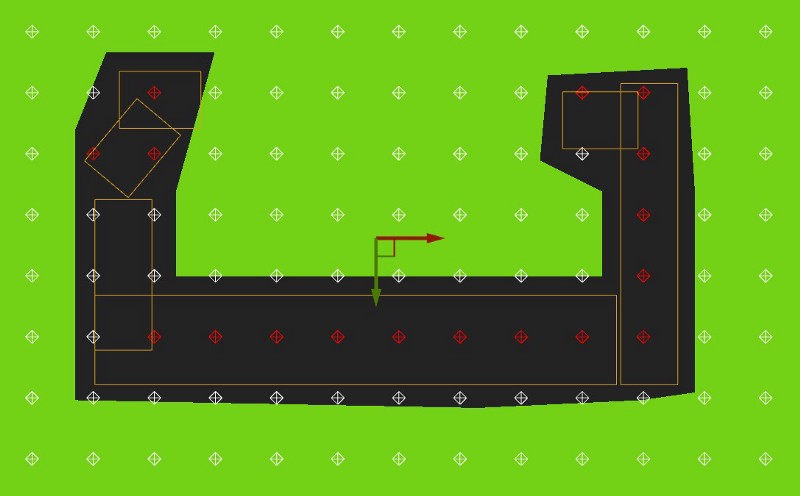
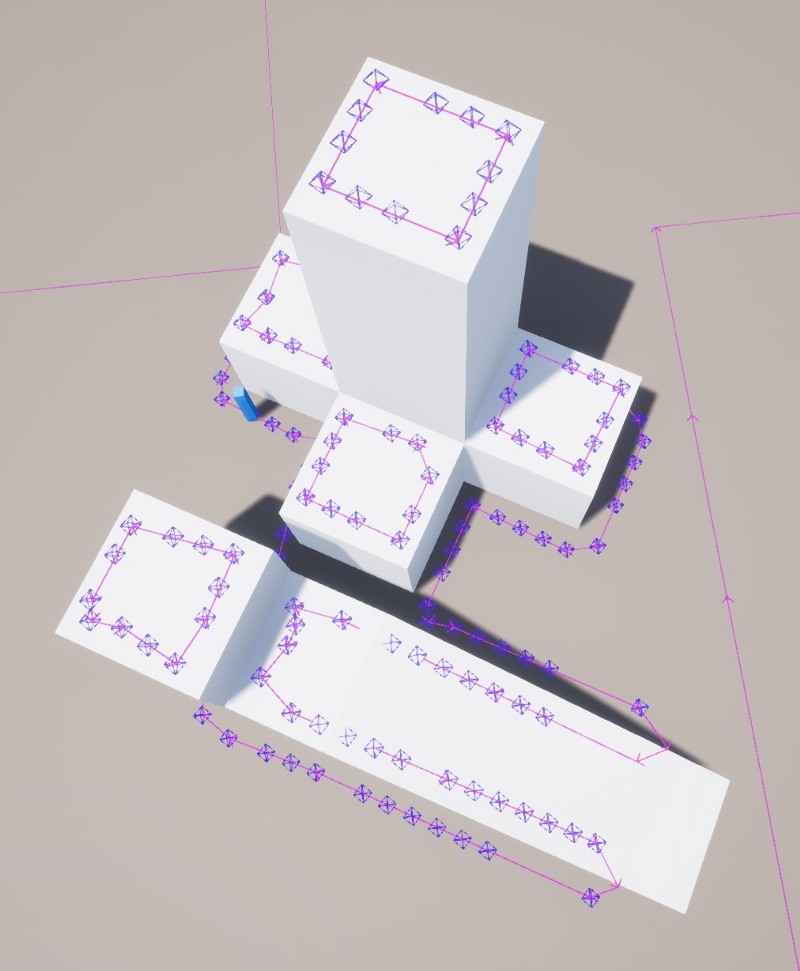
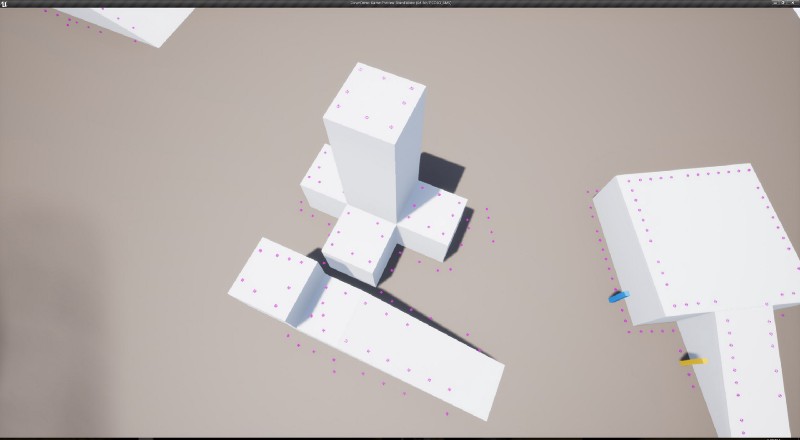
The final cover points are represented by the purple markers below. We iterate over the red markers (above) and choose those white markers that are nearest to the red ones which fall on the navmesh:
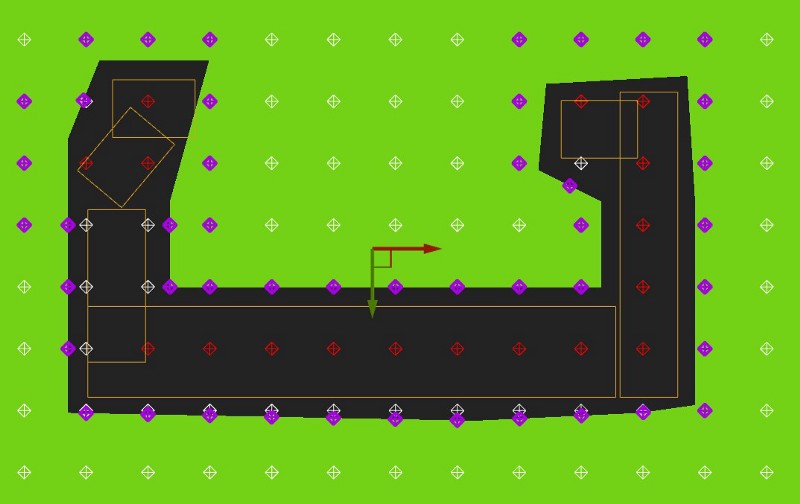
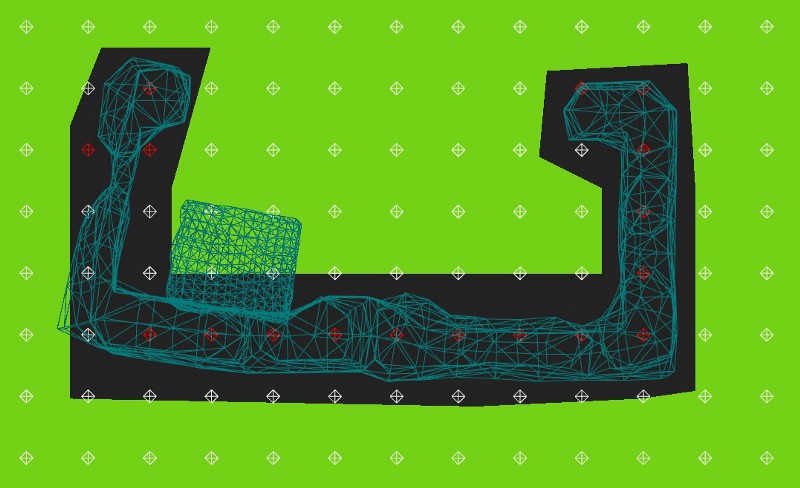
Our final result looks like this:
Here is how a scaled, rotated, multi-story actor on a slanted navmesh looks:
As you can see from the images above, this technique supports both rotation and scaling on the cover object, and on the ground plane as well. It is suitable to any type of geometry, and you don’t have to have level designers manually place a single marker in the scene anymore.
Since this kind of automated point generation sits well with multi-threaded execution, we’re going to lob all the logic inside an asynchronous task which we instruct UE4 to put into a thread pool. The best thing is, this is all supported right out of the box by the engine!
To make it work with any type of actor, we create a custom UActorComponent and spawn our 3D scanning tasks from there. Let’s call it UCoverGeneratorComponent. Add this component to any force field-type actors. Don’t use it for regular objects — the navmesh-based generator that I outline next is our perfect all-purpose solution.
Navmesh Edge-Walking
Time for the heavy-hitter, the generator that covers 90% of your cover system’s needs. So without further ado, let’s start walking the edge!
Cover generation via edge-walking is actually a very simple process: take two vertices, cast a ray perpendicular to the resulting edge in both directions, see if the ray has hit something and if yes, then we’ve found cover.
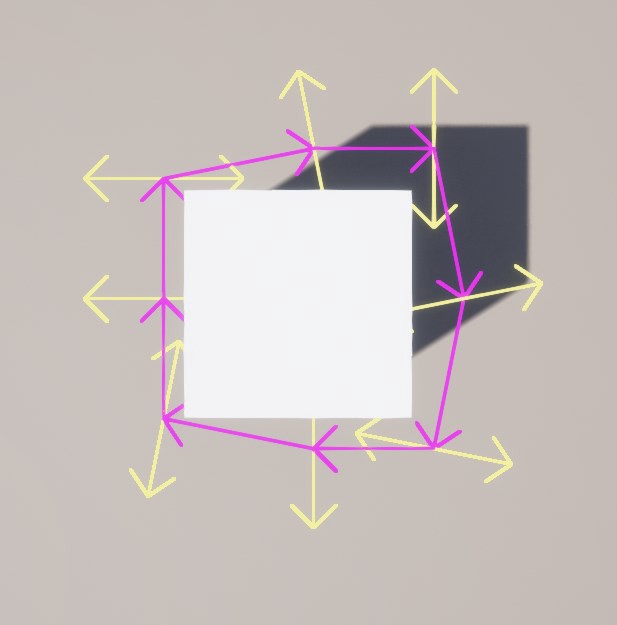
We can complicate things further in terms of ray count by introducing ledge or cliff wall detection:
This, however, adds at least 4 more rays per navmesh vertex, so now we are at 6 in total: 2 for the perpendicular ground rays, 4 for ledge detection. We can even go further and implement slope-tolerance for those nice cliff walls, so that rugged topology such as landscapes gets scanned properly:
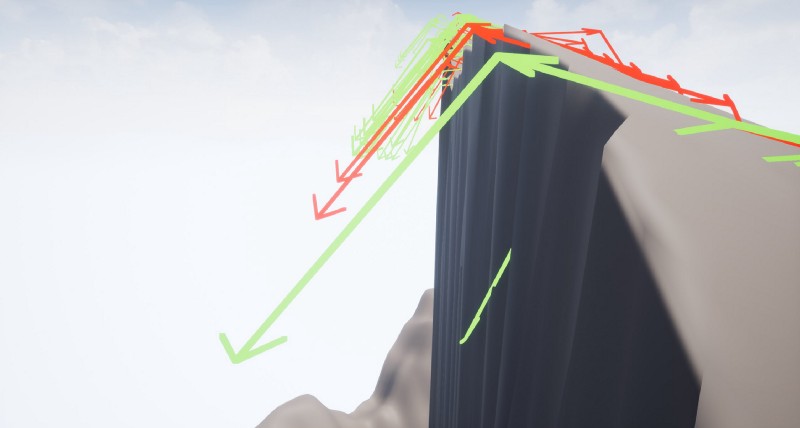
But this is at least one more ray per side, which puts us to 8 total rays in the worst-case scenario. You decide whether this feature is worth the performance cost to your project or not — I tend to leave it on, as most of the generation happens fully asynchronously anyway, and the game can start even while the cover system is busy inspecting all those fancy ledges I’ve put down.

Speed
Walking a few edges is considerably cheaper than slicing even a relatively small object up into grid points. Imagine that most of the grid points cost you at least one raycast, and there could be thousands of them just on a simple mesh. The bigger the bounding box — the costlier it is to work with 3D scanning.
On the other hand, the number of navmesh polys on even a complex object won’t exceed a couple hundred, so the object can be as large as you want it to be. Its bounding box has no influence on its navmesh polycount in any way whatsoever. If you have lots of walkable space on your object, it will most likely get merged into a couple of polys. If you have many minute details on the surface, it might not even get navmesh on it at all. And even if you do manage to build a monster asset, its navmesh polycount most likely pales in comparison to the number of 3D grid points it would take to scan it.
Rugged Landscape Topology
Landscapes are where navmeshes, and by extension Recast, the open-source pathfinding implementation integrated into UE4, shine.
The problem with landscapes and the 3D object scanning approach is that a lot of times, it misidentifies cover points as belonging to the landscape instead of their intended cover object. This is not a problem when using navmesh-based generation, and is the main reason — besides performance gains — why we use this technique wherever we can.
Force Fields (Shields)
Force fields are something that Recast does not traverse, and therefore are the only forte of the 3D object scanner. Since they’re dynamic objects that don’t affect the navmesh at all, I’ve created a boolean flag in the cover point data structure to indicate whether a point belongs to one of these. They are indicated by yellow markers in the demo project. Think of Reinhardt’s shield in Overwatch, but one that doesn’t move. This allows units to shoot through them while at the same time being protected from enemy fire.
Errors
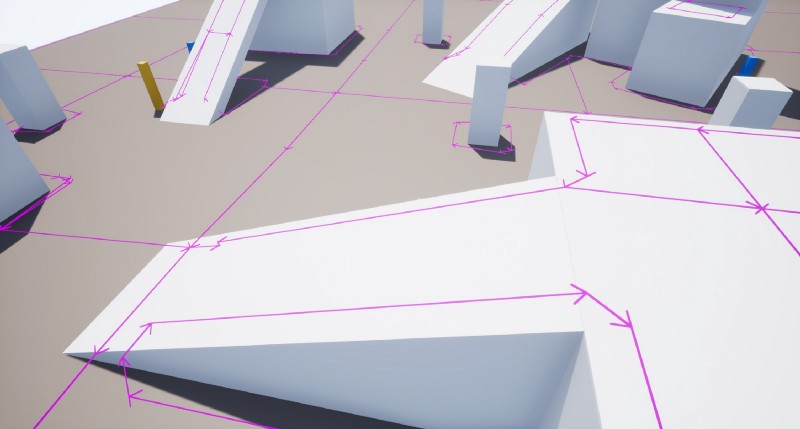
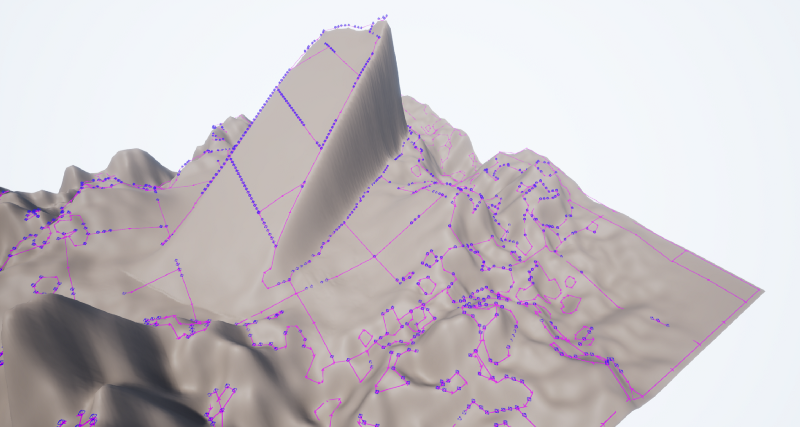
The navmesh-based approach is not without its drawbacks, and for the most part this manifests in unnecessary edges appearing on the tile boundaries of Recast. There’s not much we can do about them, except to cull them out during cover generation.
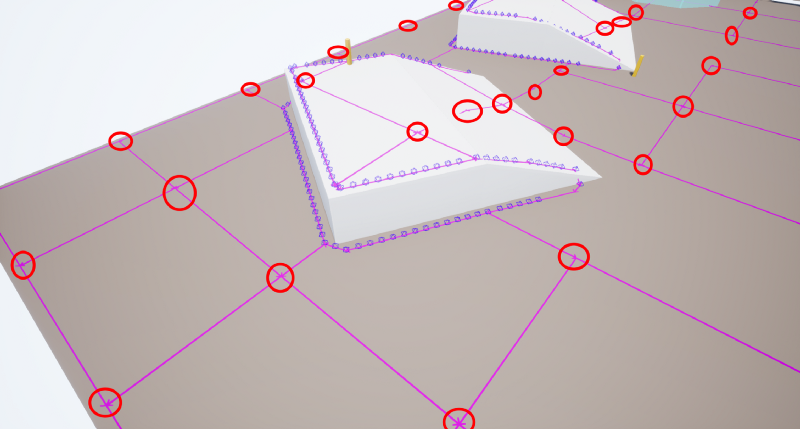
As you can see, there are several excess vertices present, but most of them get discarded during cover point generation. The primary way of dealing with them is to cast rays in the two directions perpendicular to their edge’s XY axes and to do that from a fixed height. If nothing is hit, then our point is just a tile boundary vertex and can be safely discarded. These creep up on your objects as well, but the same culling technique applies.
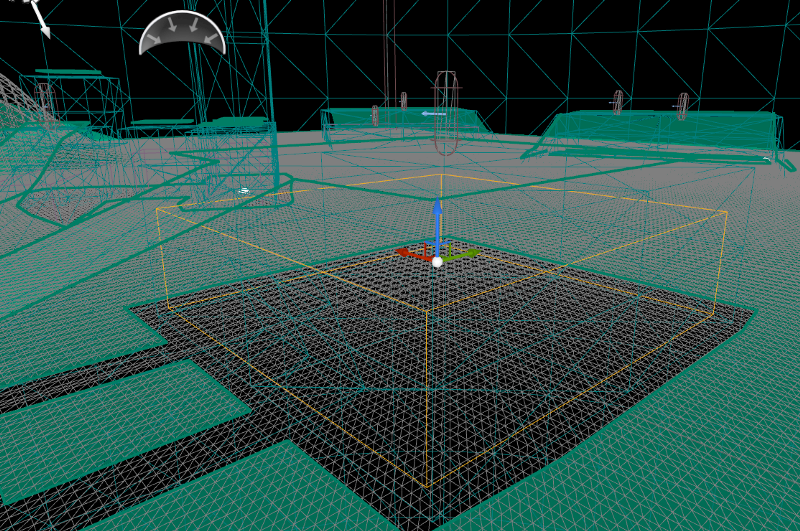
The other type of error comes from the fact that Recast doesn’t distinguish between closed and open spaces, meaning it generates a navmesh inside solid objects, too:
This is obviously no good, and the only way to get around it is to place nav modifier volumes in your map wherever you have larger solid meshes.
This results in correct navmesh generation for the most part. But do note that there are cases where you just won’t be able to hide those inner navmeshes completely. That’s alright though, as our cover system filters out unreachable cover points automatically, so this will only result in some tiny loss of performance. Navmesh pathfinding queries tend to be relatively expensive when compared to the rest of our cover finding code, though, so you should still aim to minimize the number of unreachable navmesh islands.
Next up, we look at how to store our cover points in a data structure that provides rapid and optimized access to spatial data: the octree.
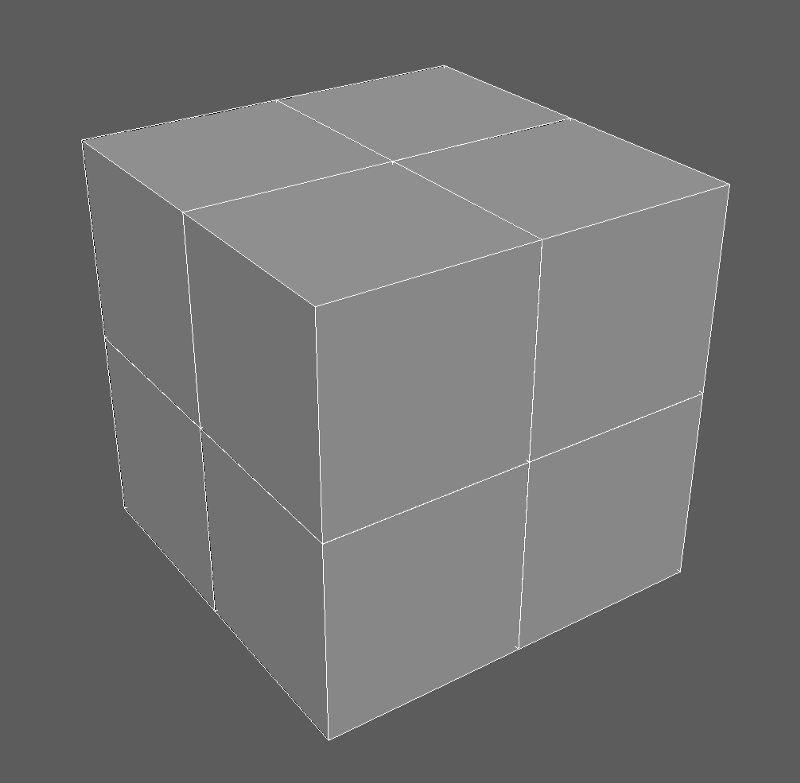
Data Persistence — The Octree
It’s like crossing an octopus with a tree: easy to imagine, but difficult to climb. An octree is nothing more than a fancy way of saying “divide cube into 8 smaller cubes, rinse and repeat.” Likewise, a quadtree is just that — a square divided into four smaller squares that in turn are divided into four even smaller squares, and so on. By storing our entire map of cover points in an octree, we can ensure that our spatial queries are always as efficient as they can get.
The good news is, most of the work has already been done for us by Epic, as UE4 features a fully functioning octree implementation. The bad news: almost no documentation. Fear not though, it won’t get too convoluted and we can always look at FNavigationOctree to see how Epic’s been using their monster.
One peculiarity of the octree is that whenever you want to delete existing data from it, you have to pass in an element id. But these ids aren’t stored in the octree — we must set up our own storage facility for them.
By following in _FNavigationOctree’_s steps, we use a simple _TMap Eleme_ntToID, wher_e the FV_ector is the location of a cover poin_t and FOctreeEle_mentId is Epic’s built-in class that includes a reference to the node that the element is in, as well as its index. We also encapsulate all access calls to the map in thread-safe wrapper methods. Pretty standard stuff.
The radius (size) of our octree should mimic that of our navmesh’s. But for simplicity’s sake, we just set it to 64000, which also happens to be the value that UNavigationSystem uses internally for the navmesh by default.
Real-Time Dynamic Updates
One of the key features of our cover system is the ability to respond to changes in the environment at run-time, as well as to be able to process new geometry on-the-fly.
This is accomplished by hooking into Recast’s tile update event, which we do by subclassing ARecastNavMesh and overriding its OnNavMeshTilesUpdated method. The functionality inside the overridden method is very basic, yet indispensable: notify a custom dynamic multicast delegate whenever a tile was updated. We then subscribe to the delegate from our main cover system class, UCoverSystem (a singleton), and spawn cover point generator tasks accordingly.
We call our subclass AChangeNotifyingRecastNavMesh and we hook it into the game via a custom game mode. The game mode overrides the PostActorCreated() method declared in AActor and uses SpawnActor() to instantiate our AChangeNotifyingRecastNavMesh, as follows:
void ACoverDemoGameModeBase::PostActorCreated(){ Super::PostActorCreated(); GetWorld()->SpawnActor<AChangeNotifyingRecastNavMesh>(AChangeNotifyingRecastNavMesh::StaticClass());}
Since there may be multiple tiles that get updated in a single event, and some of the tiles would also receive multiple updates in a relatively short time span, we time-slice our task-spawning logic so that we don’t update the same tile twice in rapid succession.
You also have to go to _Project Settings ==> Navigation System ==> Agents ==> Supporte_d Agents and add a new entry the_re whose Navigation D_ata Class and Preferred Nav Data should both b_e set to ChangeNotifyingReca_stNavMesh, like so:
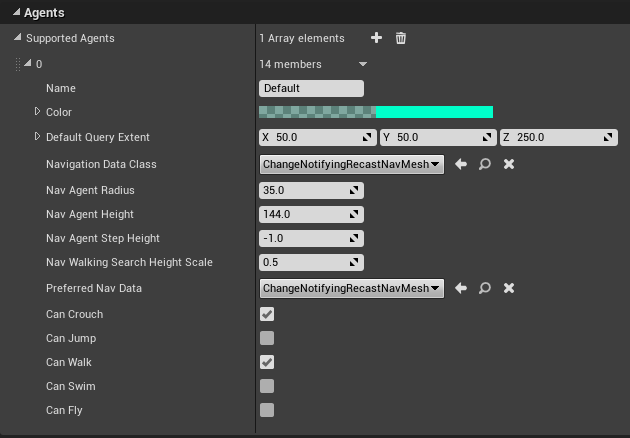
You also need to uncheck Auto Create Navigation Data under Navigation System:
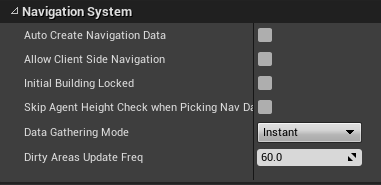
You might have to restart the editor to see the new settings get applied.
Collision Configuration
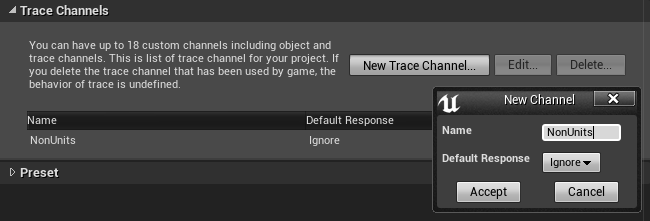
Cover shouldn’t be generated around units like pawns and vehicles, so let’s exclude them by defining a custom trace channel. We can reference it in C++ as _ECCGameTraceChannel1.
Go to _Project Settings… ==> Engine ==> Col_lision and click o_n the New Trace Ch_annel… button.
_Name: No_nUnits
Default Response: Ignore
Now expand the Preset section below Trace Channels and double-click on each of the following presets to set their response against our newly created NonUnits trace channel. Leave the ones not listed below intact — they’re already set to Ignore by default and that’s what we want there.
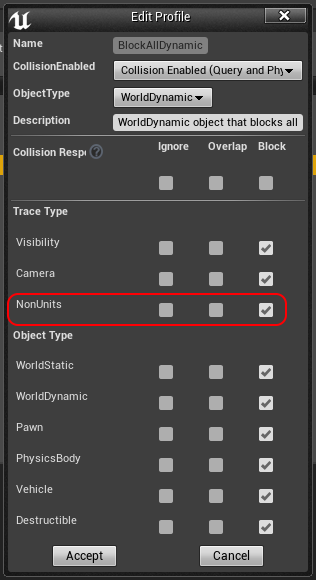
Check the checkbox on Block in the NonUnits row in all the following presets:
- BlockAll
- BlockAllDynamic
- Destructible
- InvisibleWall
- InvisibleWallDynamic
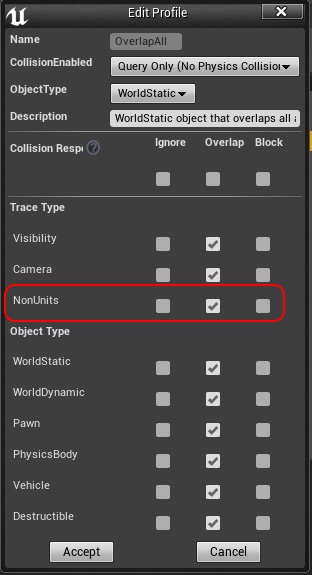
Next, check the checkbox on Overlap in the NonUnits row in all the following presets:
- OverlapAll
- OverlapAllDynamic
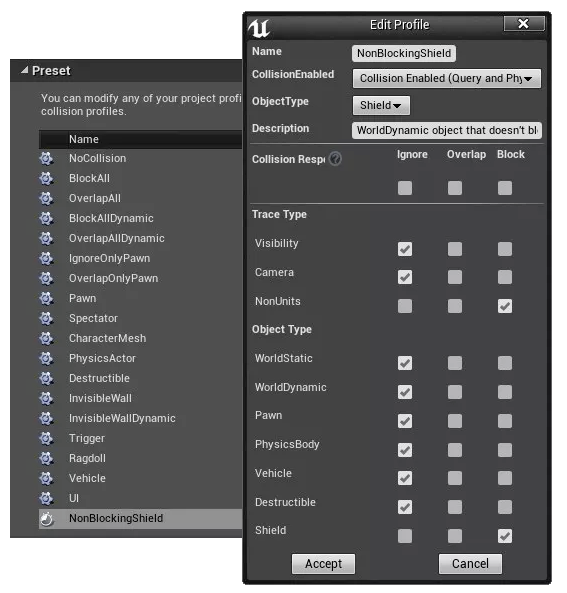
Next, define a new Object Channel called “Shield” or “Force Field”:

And finally, create a custom collision Preset named “NonBlockingShield” or “NonBlockingForceField”:
Finding Cover at Run-Time
So now you’ve got your cover points in your fancy little octree, and everything is efficient and multi-threaded with your custom navmesh passing in all the tile updates… All is good, so now’s the time to start making use of that data!
Your units want to look for cover, probably dozens of units at a time if you’re making an RTS — better yet, a tactics-heavy RTS (technically an RTT) — so how should they best approach that? Well it’s easy: just query the octree, pick a point that suits their needs, reserve the chosen spot, and move there.
I recommend creating a CoverFinder service or task, the parent class being either UBTService or UBTTaskNode. If you go for a task, then you can add a Cooldown decorator to it so that it’s only invoked every x seconds, and doesn’t spam your octree and navmesh with queries, or PhysX with raycasts.
You can also create a UCoverFinder service of UBTService, instead. I’ve created both classes for you in the demo project, but you should note that I do spam the system with cover queries, so you will want to tweak the tick interval of UCoverFinder in your behavior tree so that it consumes fewer resources in your game.
Cover Evaluation
The cover finder evaluates cover points that are between a set distance from the target enemy unit. In the cover demo project, I call these their minimum and maximum attack range, respectively. The finder queries the octree for points within a bounding box whose extent is that of max attack range, and then filters out any points that are closer to the enemy than min attack range. Let’s call this our unit’s optimal range.
It then iterates over cover points in its optimal range until it finds the first one where the following conditions hold true:
- The unit can’t hit the enemy straight from cover
- The unit can hit the enemy by peeking or leaning out of cover
- Line of sight to the enemy isn’t blocked by other units
- The unit can get to the cover point via pathfinding on the navmesh
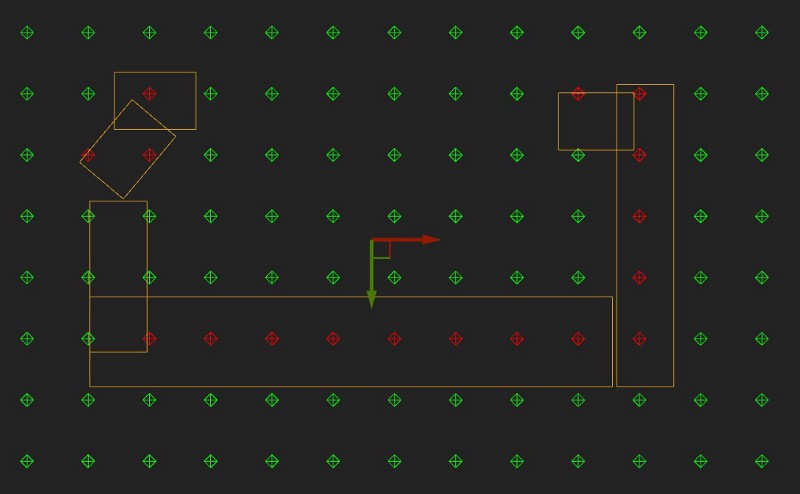
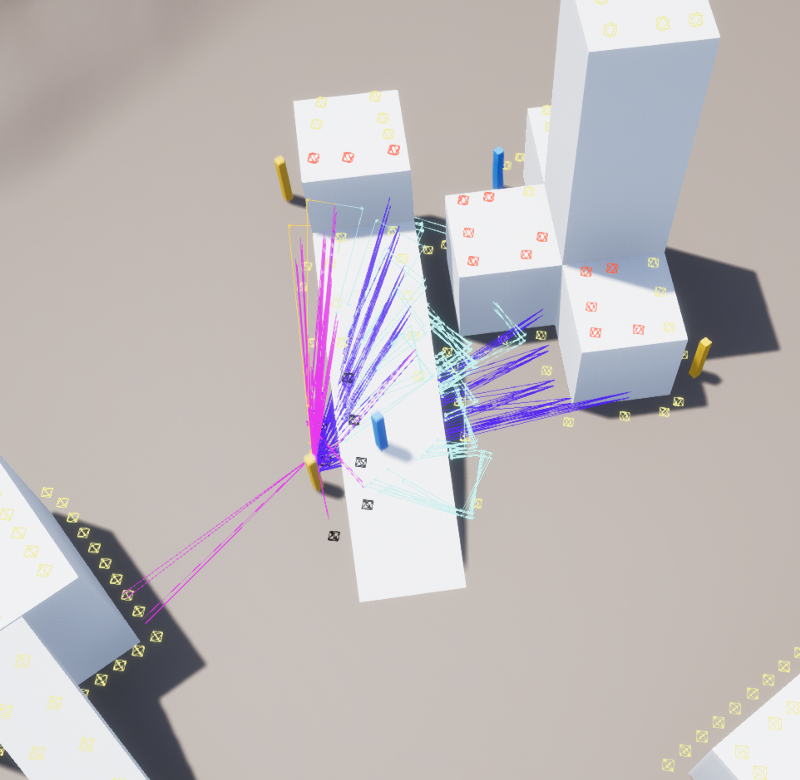
To check whether our unit can hit the enemy by peeking or leaning out of cover, we use two raycasts that are driven by the unit’s leaning (or peeking) capability parameter. This is just a simple float offset that gets added to the unit’s location in a direction perpendicular to where it’s facing.
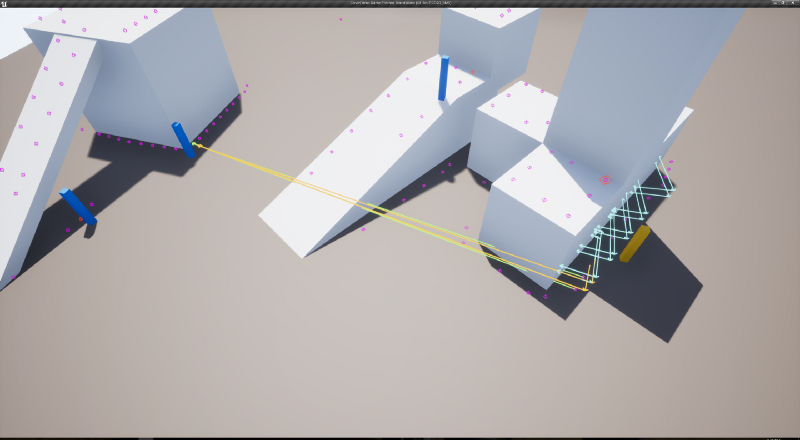
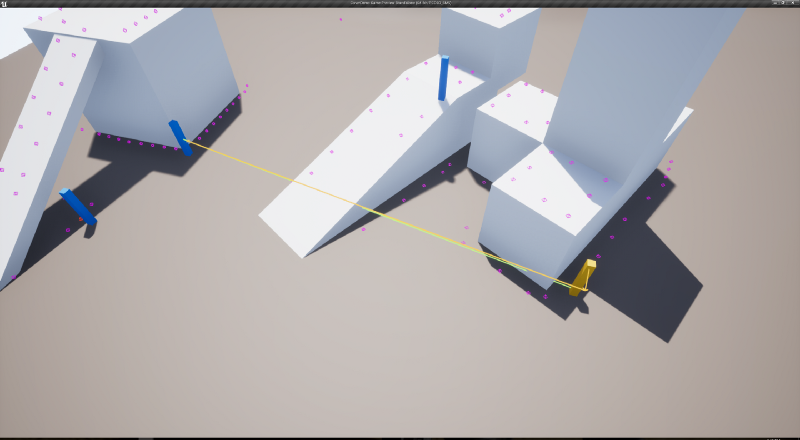
Light blue arrow: can’t hit the enemy by leaning out
Orange arrow: can hit the enemy by leaning out
In the screenshot above, a yellow unit has identified one spot where it can safely hit the blue unit from, so it moves to the corresponding cover point as blue scrambles for cover.
Checking on both sides of the unit is done twice: once from a standing position, and if that fails then from a crouched one. This results in 4 raycasts in the worst-case scenario — standing: left, standing: right, crouched: left, crouched: right.
The same procedure is repeated for each cover point until a good one is found, resulting in _<bad cover points&g_t; x 5 raycasts overall.
With force fields, it’s a little different: the only requirement there is that the unit must be able to hit its enemy from the cover point directly. In other words, no lean/peek checks are performed, but there is one extra check that is necessary: the unit must penetrate through the shield.
For this we have to use our custom NonBlockShield collision preset that uses our Shield object channel under the hood. So, this results in 2 raycasts overall: one against NonUnits and the other against Shields, and both must be successful for force field-type cover to be acceptable.
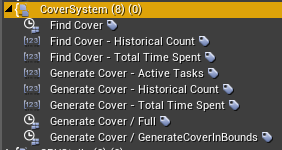
Stats
The cover system comes with its own stat group, aptly named _STATGROUPCoverSystem. It collects the following information:
- Time spent finding cover (cycle counter)
- Total number of calls to FindCover, which equals the number of tasks spawned in total (dword)
- Total time spent finding cover in the game (float)
- Time spent generating cover (cycle counter)
- Total number of cover generation calls (includes both edge-walking and 3d object scanning)
- Total time spent generating cover (includes both methods)
- Number of active tasks (dword)
To see it in action, type stat CoverSystem in the console.
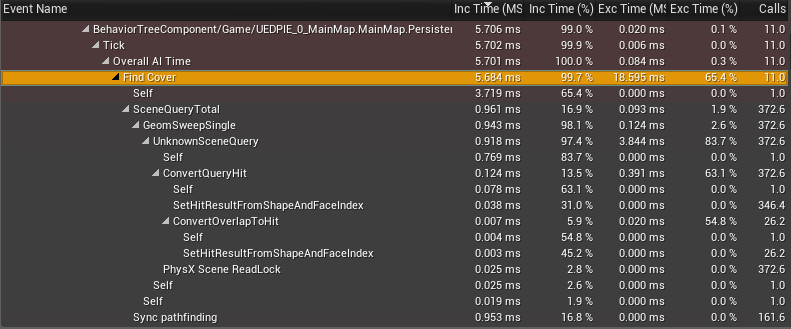
Profiling
Since custom stats are set up, it’s very easy to profile the cover system. Just write stat startfile and stat stopfile in the console and view the resulting log file using the Session Frontend under _Window => Developer To_ols.
Conclusion
In summary, a robust cover system uses two separate techniques for cover generation: 3D object scanning and navmesh edge-walking. The former is best for force field type cover (static shields), while the latter works well for everything else (landscapes, objects, and so on).
Object scanning involves slicing actors up into 3D grids, while navmesh edge-walking takes existing navmesh polys to traverse an area, with optional support for ledge-detection.
Both techniques store data in octrees, which provide efficient spatial lookup facilities.
Real-time dynamic updates are enabled by subscribing to and time-slicing Recast’s tile update events.
Finding cover points at run-time is made more versatile by defining “peeking” or “leaning” offsets for units.
You can increase cover generation performance by disabling ledge-detection, which reduces the number of raycasts.
You should take some extra steps for the navmesh-based technique to work best, like placing nav modifier volumes on the map wherever you have larger objects with navmeshes inside them. Some project set up is necessary as well, for example custom object channels, trace channels and collisions.
I’m sure you’ve had enough of me by now, so why not download the demo project and delve into the source code which includes a fully functional implementation of all the techniques discussed above. If something is unclear or you get stuck, feel free to let me know in the comments section below!
Download the demo project and source code.
If you liked this tutorial, subscribe to our newsletter and get notified of new tutorials and articles.