
Hold an iPhone near a sticker and something happens. A business card lands in your contacts, a focus session ends, or a door opens. The chip costs about twenty pence and holds roughly a hundred and thirty bytes.
Reading one takes two function calls. Earning the right to make those two calls takes considerably longer. And then CoreNFC asks you to earn it a second time.
The first gauntlet is Apple's. A paid developer account, an App ID registered in a web portal, a capability ticked on it, and a provisioning profile regenerated. Get any of it wrong and the build fails with a code-signing error that never says the word "NFC".
The second is CoreNFC's own, and it's the one nobody warns you about. It's a session-based API with delegate callbacks, four nested asynchronous steps, and a set of rules that punish you quietly.
Hold the session in the wrong variable and the system sheet vanishes with no error at all. Let a successful read settle your promise twice and your result is replaced by a failure. Ask for one polling option too many and the whole session refuses to start, without naming the option.
In this handbook, you'll get through both. You'll write an NDEF decoder by hand, which sounds like overkill until you read what the popular library's one actually does to an emoji. You'll write to a tag and discover your business card doesn't fit. You'll build a focus timer you can't stop without walking to another room. You'll delete the NFC dependency entirely and replace it with a native module in Swift. And you'll permanently lock a tag, which is the one thing here that can't be undone.
Two of the things I concluded during this build turned out to be wrong, and both are still in the repository under "superseded" banners. They're in here too, because how I got them wrong is more useful than the what replaced them.
This is an iOS handbook. Everything in the main sections was built, run, and verified on a real iPhone. Android gets its own handbook, and if you can't wait for it there's a preview at the end: the Kotlin counterpart to everything here, with the architectural differences that make the two platforms worth comparing.
Everything below comes from one project, TapCard, which is on GitHub with tagged checkpoints so you can check out the app at any stage and run it.
Table of Contents
Prerequisites
To follow along you'll need:
A physical iPhone, 7 or newer. Core NFC is iPhone-only. Apple's documentation lists iPhone 7 and later, and an Apple engineer on the developer forums puts it directly: "At this time, CoreNFC functionality is only available on iPhones with NFC capability." No iPad supports it.
A paid Apple Developer account. NFC isn't available on a free provisioning profile. This isn't a soft requirement, and there's no way around it.
NTAG213 stickers. Twenty of them cost a few pounds. Buy them before you write any code.
Node 20+ and Xcode. Working knowledge of TypeScript throughout, and of Swift for the last third.
Optional, for the Android preview only: Android Studio and the API 36 SDK.
The versions I used:
| Package or tool | Version |
|---|---|
| Expo SDK | 57.0.20 |
| React Native | 0.86.3 |
| React | 19.2.3 |
| TypeScript | 6.0.3 |
react-native-nfc-manager |
3.17.2 (removed by the end) |
| Xcode | 26.6 |
| JDK | 17 (Zulu), Android preview only |
One line in that table is load-bearing and I'll come back to it: the NFC library is listed because it gets deleted. The finished app has no third-party NFC dependency at all.
What NFC Tags Actually Are
An NFC tag is a chip with a tiny antenna and no battery. Your phone powers it over the air, and in return it hands back a few dozen bytes. That's the whole device.
Those bytes are almost always formatted as NDEF, or NFC Data Exchange Format, which is the thing that makes a tag written by one app readable by every other. An NDEF message is a list of records, and each record has a type and a payload.
The tags in this handbook are NTAG213, the ones you'll get if you buy stickers online. They hold 144 bytes of user memory. That's not the number you can actually use, and it turns out to matter enormously.
Two things a tag is not:
It's not a beacon. It has no power of its own and does nothing until a phone is within a couple cm.
It's not secure by default. Its identifier is world-readable and copyable with cheap hardware. There's a section on this later, because the obvious use of a tag, as a key, is the one most likely to be built wrong.
Where You Have Already Seen This
NFC is in your pocket already, and it's worth separating what you can build from what you can't, because they look identical to a user.
Here are five uses cases you can go and check, each one documented by the company that ships it:
| Where you have seen it | What happens | Source |
|---|---|---|
| Shortcuts, on your own phone | Scan a tag to fire a personal automation | Setting triggers in Shortcuts |
| A lost AirTag | Anyone taps it with an NFC phone and a page opens with the owner's details | Mark an item as lost in Find My |
| Nintendo amiibo | A figure is tapped to a controller. Some games read it, some write your character back onto it | amiibo FAQ |
| A UK visa application | The "UK Immigration: ID Check" app reads the chip inside your passport | Using the app |
| Tap to Pay on iPhone | A shop takes a contactless card payment with no terminal at all | Tap to Pay on iPhone |
The first three are the thing this handbook builds. A chip holds a few bytes, a reader reads them, and software acts. amiibo is the most complete example of the lot, because some games write to the figure as well, which is the second half of what you're about to build.
One detail on that first row is worth pausing on, because it comes back later. Apple's own NFC automation, the one built into every iPhone, says this about the tag you scan:
"Other than the unique identifier, the contents of the NFC tag are ignored."
Apple's feature ignores everything this handbook teaches you to write, and keys on the serial number alone. There's a section later on what that does and doesn't buy you.
Let's go over two caveats about that table. The passport row is NFC but it's not NDEF: a biometric chip speaks ISO 7816 over the same radio, through NFCISO7816Tag and a different entitlement again, with its own cryptography on top. Same antenna, different world, and out of scope here. And the last row is the half you can't build, which is the rest of this section.
Beyond those five use cases, the pattern repeats everywhere a physical thing needs to say one short sentence to a phone, like museum labels that open an exhibit page, conference badges, product-authentication seals on a bottle, transit posters, restaurant table markers, and the little stickers people put on a desk to start a routine.
What you can't build on iOS is the other half: your phone pretending to be a card. Apple Pay, your bank card in Google Wallet, or a hotel key in your Apple Wallet. Those run on the Secure Element, a separate tamper-resistant chip that stores card credentials and answers terminals on its own. On iOS there's no third-party API for it at all. Not restricted: absent. There's a section later on exactly how closed that is.
So when someone says "NFC", they may mean either. This handbook is about the half you can actually write code for, and it'll explain precisely why the other half is closed.
Why There Is No Simulator Path
Don't skip this section, because it changes how you work.
NFC doesn't exist on the iOS Simulator or the Android emulator. It's not partially supported, nor is it behind a flag. The hardware isn't there and the APIs report it as unavailable. Every single thing you build is tested by holding a physical chip against a physical phone.
The consequences go beyond inconvenience. You can't write a test that proves a tag was read. You can't demo it in CI. If your phone is in another room, you're blocked. When my chips went missing in the post, the project stopped for two weeks.
The app says so permanently, because the question kept coming up:
import * as Device from 'expo-device';

// NFC hardware does not exist on the iOS Simulator or the Android emulator,
// and isSupported() is not reliable there. Bail out early and explicitly.
if (!Device.isDevice) return false;
So split your code in two.
One part talks to the NFC hardware. Start a session, read the tag, write to it, and close the session. The only way to test that part is to hold a chip against a phone.
Everything else is just data handling: turning the bytes off a tag into a URL, turning a contact into the bytes you write back, checking whether a message fits, turning a native error code into a sentence a user can read, or deciding whether a tap should start a focus session or end one.
None of that needs NFC. Most of it doesn't even need React Native. It's plain functions: values go in, values come out.
Write it that way and you can test it on your laptop, with no phone in the room. In this project, that came to about 2,240 lines of TypeScript and 293 tests that finish in about a second. The code that actually calls CoreNFC stays as small as I could make it.
This project stalled on hardware three times, including those two weeks waiting on the post. Each time there was still plenty left to build, because most of it never needed a tag. That's the best decision in the codebase, and I didn't make it deliberately. The constraint made it for me.
Checkpoint:
git checkout step-0-scaffold. The app boots on both platforms and does nothing else.
How the iOS Contract Works
Three Apple terms do all the work here, and they're worth pinning down before the steps, because the error messages assume you already know them.
An App ID is the identity your app is registered under on Apple's servers, matching the bundleIdentifier in your config. An entitlement is a line in your app saying "I intend to use this capability", and NFC is one. A provisioning profile is the signed document tying the two together with your developer account, and Xcode embeds it in every build. All three have to agree, or nothing runs on a device.
With that, here's the actual sequence, and every step is important:
A paid Apple Developer account.
An explicit App ID registered at developer.apple.com, not a wildcard.
NFC Tag Reading ticked on that App ID.
A provisioning profile regenerated to include the capability.
Then, in app.json:
{
  "expo": {
    "ios": {
      "bundleIdentifier": "com.yourname.tapcard",
      "infoPlist": {
        "NFCReaderUsageDescription": "TapCard uses NFC to read and write your card to a tag."
      },
      "entitlements": {
        "com.apple.developer.nfc.readersession.formats": ["NDEF", "TAG"]
      }
    }
  }
}
Miss step 2 or 3 and the build fails with this:
Provisioning Profile "iOS Team Provisioning Profile: *" does not support
the NFC Tag Reading capability.
That error points at the wrong machine. Apple forbids special capabilities on a wildcard App ID, and Xcode silently falls back to one when there's no explicit match.
The message blames your local provisioning profile, but the missing half is on Apple's servers, in a web form you haven't filled in. Nothing in it suggests opening a browser.
A second-order trap while you're there: App IDs are globally unique across all Apple accounts, not per-team**.** My first choice was taken by a stranger, and my second was too. I renamed the app's identifier twice.
Those renames were painless, and that's worth a word on how this project is set up. Expo's Continuous Native Generation means the ios/ and android/ folders aren't kept in the repo at all. They're regenerated from app.json by expo prebuild whenever you need them, the way node_modules is regenerated from package.json. So renaming the app was two lines of JSON and one prebuild --clean, which rebuilt the iOS project, the Android package and the entire Kotlin source tree. No Xcode surgery.
For scale, the equivalent on Android is one line in a manifest, with no account, no portal, and no cost:
<uses-permission android:name="android.permission.NFC" />
That contrast isn't a complaint. It's worth internalising early, because it tells you where your time will go on this platform: not in the code, which is short, but in the paperwork around it.
| Android | iOS | |
|---|---|---|
| To read one tag | One manifest line | App ID + capability + paid account + profile |
| Cost | Free | $99/yr, or local equivalent |
| Failure mode | Permission missing | A code-signing error that never says "NFC" |
How to Read Your First Tag
The reading code is short. This is all of it:
import NfcManager, { NfcTech, type TagEvent } from 'react-native-nfc-manager';

export async function readTagOnce(): Promise<TagEvent | null> {
  await NfcManager.requestTechnology(NfcTech.Ndef, {
    alertMessage: 'Hold your iPhone near the NFC tag.',
  });

  try {
    return await NfcManager.getTag();
  } finally {
    // throwOnError: false because we are already unwinding. A failure to
    // close the session must not mask the original error.
    await NfcManager.cancelTechnologyRequest({ throwOnError: false });
  }
}
There are two calls, and they're identical on both platforms. And what the user sees couldn't be more different.
On iOS, requestTechnology hands control to CoreNFC, which draws a system modal sheet. You can't restyle it. Your app isn't on screen.
On Android, nothing is drawn at all. Dispatch is silent. If your app doesn't tell the user to tap a tag, nobody does.
So the scanning UI is conditional, and this pattern recurs through the whole project:
{
  scanning && (
    <View style={styles.scanCard}>
      <ActivityIndicator />
      <Text>
        {Platform.OS === 'android'
          ? 'Hold a tag against the back of the phone.'
          : 'Waiting for the system NFC sheet…'}
      </Text>
      {/* Android draws no system UI, so the app must offer its own way out. */}
      {Platform.OS === 'android' && <Button title="Cancel" onPress={handleCancel} />}
    </View>
  );
}
That Cancel button exists only on Android, because on iOS the system sheet already has one.
Three Things That Will Catch You
1. The antenna is in different places.
On iPhone: the top edge, near the camera. On Android: the middle of the back. "Hold the tag near the phone" isn't actionable, and someone using the wrong end concludes your app is broken. I ended up drawing a small phone outline with the dot in the right place per platform.
2. The sheet doesn't show the string you think it does.
I assumed it displayed NFCReaderUsageDescription from app.json. It doesn't. It shows the alertMessage passed to each requestTechnology() call. The usage description is a privacy-manifest string: it's mandatory, no session starts without it, and it's never shown to a user.
Both strings were configured correctly and spelled properly, and my assumption about which one appeared was still wrong. I found out by holding a phone. It also means the copy can differ per scan. "Hold your iPhone near the tag to write" beats reusing the read copy.
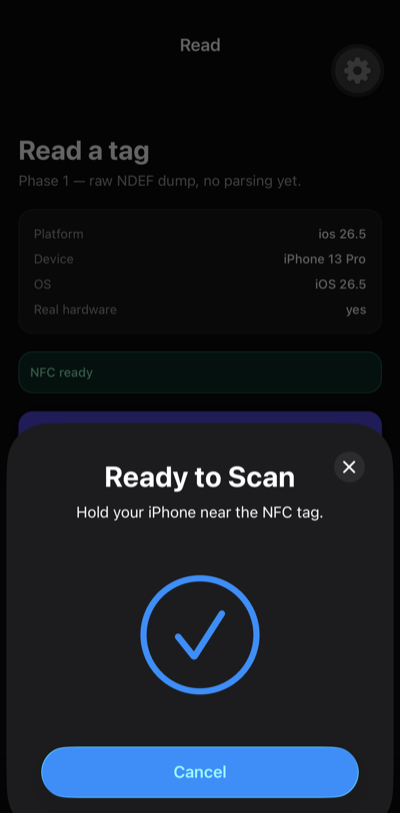
That second line is the alertMessage from the requestTechnology call above, word for word. The usage description from app.json is nowhere on screen.
3. A blank tag reads as an error on iOS.
A factory-fresh NTAG213 is NDEF-formatted but empty, and readNDEF reports that as a failure rather than an empty message. The distinction has to come from the tag's NDEF status, not the read error. Since every tag you buy starts this way, it's the first thing you'll hit.
What Comes Back
Here's the real output from an NTAG213 on an iPhone 13 Pro:
{
  "id": "04C4FC91DF2A81",
  "tech": "mifare"
}
Two fields. That's everything iOS gives you from a read. No size, no technology list, and no NDEF type. Android returns all of them from the same chip.
I drew the wrong conclusion from this: wrote it into three documents, and planned a whole phase of work around it. That comes later, because the mistake is more useful than the fact. Skip ahead if you'd rather have the correction now.
That id is the tag's UID, a unique serial number burned into the chip at the factory and readable by anything that asks. The 04 prefix is NXP's manufacturer code, and a 7-byte UID is the NTAG21x signature, so the tag is what it claimed to be.
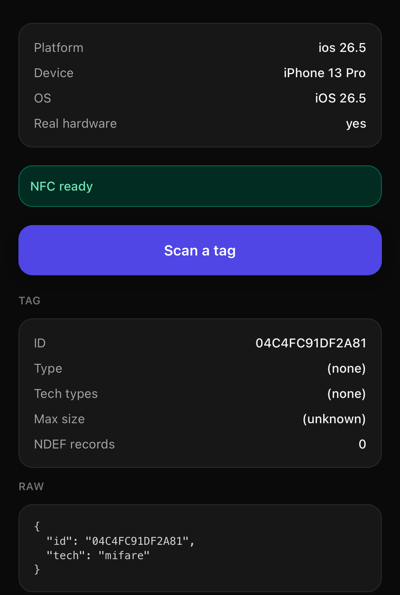
The Max size row is the one to look at. (unknown) is what I built the wrong conclusion on, and it is not what the platform can actually tell you.
Checkpoint:
git checkout step-1-first-read. Entitlements configured, a raw NDEF dump on screen.
What an NDEF Record Actually Is
A tag doesn't store a URL. It stores bytes, and bytes are what your app gets handed. This whole section is about turning those bytes into https://example.com and back, and it's a much smaller job than its reputation suggests.
The unit you work with is a record, and a record is three things:
a payload: the raw bytes of the content
a type: what that payload is, such as a URI or some text
a TNF, or Type Name Format: three bits saying how to read the type field itself
That third one is the one people trip on. Think of the type as a label and the TNF as the rule for reading the label. A type byte of U means "URI", but only because the TNF said "this is a well-known NFC Forum type". The same byte under a different TNF would be the start of a MIME string instead.
Two record layouts carry almost all real traffic, and both are tiny.
A URI Record
04 65 78 61 6d 70 6c 65 2e 63 6f 6d
│  └──────── "example.com" ────────┘
└─ prefix index → "https://"

→ https://example.com
The annotations underneath say which byte does what. Everything after the first byte is ordinary text: example.com. The first byte, 04, is an index into a 36-entry table in the NFC Forum spec, and entry 4 is https://.
So the scheme costs one byte instead of eight. On a tag with 137 usable bytes that isn't a micro-optimisation, it's 5% of your budget.
A Text Record
Text needs two things a URI doesn't: which language it's in, and how it's encoded. Both get squeezed into the first byte.
02 65 6e 48 69
│  └─┬─┘ └─┬─┘
│   "en"  "Hi"
└─ status byte
Read that first byte as a number. Here it's 2, and that's how long the language code is. So the next two bytes are the language: 65 6e, "en". Everything after that is the text: 48 69, "Hi".
The encoding hides in the same byte. If its value is 128 or more, the text is UTF-16 instead of UTF-8. That's all a "status byte" means.
That's the whole format. If you're writing the decoder yourself, mask off the low six bits for the length and test the top bit for the encoding.
Why I Wrote My Own Decoder
You reach past a library for one of two reasons. Either it doesn't give you everything you need, or you work somewhere that builds this kind of thing in-house first and takes dependencies second.
The second is more common than the open-source default makes it sound, and for NDEF it has a short answer: yes, you can write this yourself. It's a few hundred lines of pure functions with no platform calls in them, and the format you just read is the whole specification you need.
The first reason is what actually happened here. The library bundles decoders, I read them before using them, and twenty minutes changed the architecture of the app.
It throws away the language code. In ndef-lib/ndef-text.js:
var languageCodeLength = data[0] & 0x3f; // 6 LSBs
// languageCode = data.slice(1, 1 + languageCodeLength),
// utf16 = (data[0] & 0x80) !== 0; // assuming UTF-16BE

// TODO need to deal with UTF in the future
It measures the language code's length, uses it to skip past the code, and the line that would keep it is commented out. decodePayload returns a bare string, so a caller can't recover the language at all. "Which language is this in?" is precisely the question a record with a language field exists to answer.
That TODO is load-bearing. UTF-16 text records are decoded as UTF-8 regardless, producing interleaved NUL characters.
And the shared byte-to-string helper truncates. In ndef-lib/util.js:
str += String.fromCharCode(ch);
String.fromCharCode only keeps the low 16 bits, and an emoji doesn't fit in 16 bits. So I fed it one:
bytes    : 68 69 20 f0 9f 98 80
expected : hi 😀
library  : "hi " codepoints: 68 69 20 f600     ← U+F600, Private Use Area
U+1F600 became U+F600, an invisible character. Three-byte sequences, such as Arabic and CJK, are fine, so the bug hides until someone uses an emoji.
Its URI decoder, meanwhile, is eight lines and completely correct. That asymmetry is the interesting part. This isn't a bad library. It's a library with two stale corners. The only way to know which is which was to read it.
So I wrote the decoder and kept the library for the part that actually talks to the hardware. About 530 lines, all of it plain TypeScript with no React Native imports, which means it runs in Node and tests in milliseconds.
Its job is to turn a record into one of a few known shapes, and that's what this type describes:
export type NdefView =
  | { kind: 'empty' }
  | { kind: 'uri'; uri: string }
  | { kind: 'text'; text: string; lang: string; encoding: TextEncodingName }
  | { kind: 'mime'; mime: string; text?: string; bytes: number[] }
  | { kind: 'aar'; packageName: string }
  | { kind: 'unknown'; tnf: number; type: string; payload: number[] };
Why a union of shapes, rather than one object with lots of optional fields? Because with optional fields, every screen has to guess which ones are filled in. Here you check kind once and TypeScript knows the rest. On a record where kind is 'text', .uri doesn't exist. So a screen that tries to read it fails to compile instead of rendering undefined to somebody holding a phone.
The unknown case still carries the raw tnf, type, and payload, so a record nothing recognises can at least be shown as a hex dump. A reader that silently drops what it doesn't understand is worse than one that says "I don't know what this is, here are the bytes".
One platform difference is buried inside the decoder itself. A record's type field arrives as raw bytes on Android, and sometimes as an already-decoded string on iOS. So the same URI record turns up as [85] on one platform and 'U' on the other, 85 being the byte for the letter U.
That matters because [85] === 'U' is just false. There's no error and no warning: your comparison quietly fails to match, and a perfectly good URI record falls through to "unknown record". Convert the type to a string before you compare it, on both platforms.
Test Against the Thing You Replaced
This is the technique I'd most like people to steal. The tests come in three groups.
Correctness: the decoder against hand-built payloads.
Agreement: where the library is right, prove we match it exactly. Twelve real URIs encoded by the library and decoded by us, plus all 36 prefix indices. That's the cheap way to be confident about a lookup table you typed out by hand.
Divergence is the strange one. Where the library is wrong, write a test that locks in exactly how it's wrong:
✓ the library discards the language code; we keep it
✓ the library truncates 4-byte UTF-8; we do not
✓ both handle 3-byte sequences, so only characters above U+FFFF break
✓ the library ignores the UTF-16 flag; we honour it
That looks backwards. You're writing tests that pass because a dependency is broken, and normally that's a smell.
Two things earn them their place. Each one is a written record of why your own code exists, sitting next to the code instead of in a commit message nobody reads. And because they assert the library's current behaviour, they start failing the day somebody upstream fixes it.
That failure is the whole point. It isn't a broken test, it's a notification: the reason you wrote your own decoder may have just gone away, and you can go and check. A comment saying "the library is buggy" rots quietly while the library changes around it. A test saying so can't.
One detail decides whether these tests are useful or useless. The emoji test asserts the exact wrong answer, the code point 0xf600, rather than just "the library disagrees with us".
If it only checked for disagreement, a future version with a different bug would still pass, and you would never notice the behaviour had changed. Pinning the specific wrong value means any change at all shows up, whether upstream fixed the bug or replaced it with a new one.
Checkpoint:
git checkout step-2-decode. Own decoder, a Tag Info screen showing every field and the raw bytes.
How to Write a Tag
Now the other direction. Two options, and they're opposite trades rather than variations.
A URL record is tiny, and every phone opens it with no app installed. It's what most commercial NFC business cards do. It also needs something at the other end: a domain that stays renewed, a server that stays up, or a network connection at the moment someone taps.
A vCard is the whole card. text/vcard as a MIME record, no server, works on a plane. It's also much bigger.
I built both and let the user choose, because the numbers make the argument better than copy could.
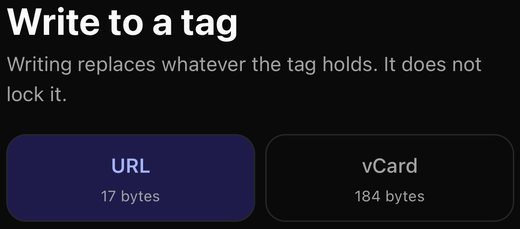
Seventeen bytes against 184, for the same person's contact details. That gap is the entire trade, and it's why the choice sits in front of the user instead of being made for them.
How to Encode a vCard
A vCard is just text. This is what the app actually writes onto the tag:
BEGIN:VCARD
VERSION:3.0
N:Doe;Jane;;;
FN:Jane Doe
ORG:Example Ltd
TITLE:Full-stack engineer
TEL;TYPE=CELL:+15550100
EMAIL;TYPE=INTERNET:jane@example.com
URL:https://example.com
END:VCARD
One field per line: a name, a colon, a value, and a carriage return plus newline at the end of every one. Build that string and you have a working card.
The format is from the 1990s and it shows, though, and three of its rules are easy to get wrong. Your encoder has to handle all three.
1. Fold long lines by octets, not characters.
Any line longer than 75 bytes has to be broken and continued on the next one, starting with a space. The obvious way to do that is line.slice(0, 75), which counts characters rather than bytes, so it can cut a two-byte character in half and leave invalid UTF-8 on the tag. Walk the string by code point instead, tracking the byte cost as you go.
2. Emit N, and be up front that you're guessing.
Look at that N: line. vCard 3.0 wants the name split into Family;Given;Additional;Prefix;Suffix, so emitting FN on its own isn't enough. Splitting a display name into those parts is guesswork, and the guess is wrong for Chinese and Hungarian names, for Spanish names with two surnames, and for anyone who goes by a single name. I take the last token, document that it's a guess, and let FN, which is what importers actually display, carry the name exactly as typed.
3. Escape every semicolon inside a value.
The semicolons on that N: line are structural. If someone's job title were "Engineer; Lagos", writing it straight through would turn one field into two and an importer would read the rest as part of the name instead. It has to reach the tag as Engineer\; Lagos.
Get those three right and the whole encoder is about 170 lines of pure string handling, testable without a tag anywhere near it.
The Escaping Bug That Passed Its Tests
That third rule is where my worst bug lived. My escaper had this line:
.replace(/;/g, '\;') // ← this escapes nothing
vCard wants a literal backslash in front of any semicolon inside a value. '\;' looks like it produces one. It doesn't. JavaScript has no \; escape sequence, so it quietly drops the backslash and hands back a plain ';'. That line was replacing every semicolon with itself.
The fix is '\\;', where the first backslash escapes the second.
Then it got worse. I wrote a test for the escaper and asserted the unescaped output, because I still believed the line worked. The test agreed with the bug, which means it would have failed against correct code.
Then a third test tried to prove a field was absent with not.toContain('N:'). That can never pass. Every vCard starts with BEGIN:VCARD, and BEGIN: ends in N:.
Three mistakes in ten minutes, all the same misunderstanding.
Test-first wouldn't have saved me. The test and the code shared the assumption. String escaping is a domain where they usually do.
Ask the Tag Before You Write to It
A write replaces what's on the chip. The order matters:
1. Query the tag:      is it writable, how big is it really?
2. Refuse early:       read-only, or genuinely too small
3. Write
4. Read it back:       compare with what you sent
Step 2 is the safety property. A refusal before the write leaves the tag untouched, while a failure during one can leave it half-written.
Step 4 exists because a write that reports success and didn't happen is the worst outcome available. Read back inside the same session and compare record content, not raw bytes. A tag may legally return a message whose framing differs from what you sent while carrying identical data.
All four in one session, not four. On iOS each requestTechnology puts a system sheet in front of the user, so splitting them means four sheets and four taps for one logical action. Android wouldn't notice the difference, which is exactly the sort of thing that makes an iOS-shaped design look arbitrary until you see it on the other platform.
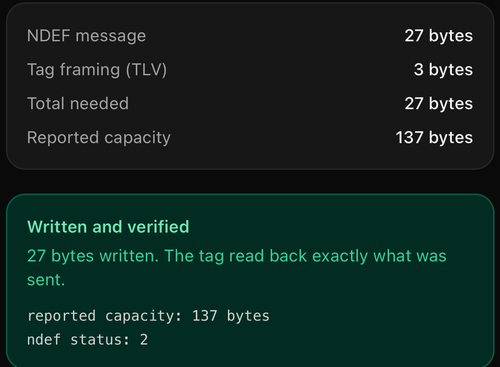
You have all four steps in one screen: the tag was asked, the numbers came back measured rather than assumed, the write went out, and the read-back confirmed it byte for byte.
Checkpoint:
git checkout step-3-write. Profile editor, vCard encoding, writing with a capacity check.
Will It Fit? 137, Not 144
Here's where the project taught me something.
An NTAG213 has 144 bytes of user memory. That number is in every spec sheet: 36 pages of 4 bytes, pages 4 through 39. I built the capacity check around it.
A realistic vCard (name, title, company, phone, email, one link) comes to 184 bytes of text and 202 bytes once it's wrapped as an NDEF message, which is the figure on the toggle a few sections back.
So an ordinary business card doesn't fit on an ordinary tag. That's a genuine product constraint, not a bug, and the app has to say so rather than fail mysteriously.
Except my number was wrong. When I finally asked a real tag how big it was, it said 137.
144 is the chip's user memory. The number that matters to a writer is the maximum NDEF message, which is smaller by the tag's own bookkeeping. I had been seven bytes too generous, in the direction that tells someone their card fits when it doesn't.
The error hid a second one. A tag doesn't store your message bare: it wraps it in a few bytes of its own bookkeeping, called TLV framing, for type, length and value. I'd been adding those bytes to the message and comparing against user memory. Double-counting. Every capacity figure in play (Android's getMaxSize(), iOS's status query, a sensible assumption) is already a message size with framing excluded.
The Bigger Mistake
Worse than the number was what I'd concluded about the platform.
Because iOS's getTag() returns only { id, tech }, I concluded iOS can't report tag capacity. I wrote that in the code, in the platform comparison, and in the app's own UI, and I planned a native module around closing the gap. Here it is, shipped:
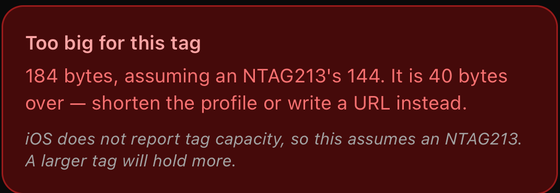
That italic line is the wrong conclusion, stated to the user as fact. Every number in the card above it rests on the guess it forced.
It's false. ndefHandler.getNdefStatus(), which is CoreNFC's queryNDEFStatus, returns both a read/write status and a real capacity, inside the session I was already opening. The capability was one call away from code that had been running for weeks.
Look at the shape of the mistake:
What I saw: one function,
getTag(), hands back two fields and no size. True.What I decided: iOS can't tell you how many bytes fit on a tag. That doesn't follow.
One function not answering a question doesn't mean the platform can't answer it. I tried one door, found it locked, and concluded there was no way into the building.
My rule for this project was that nothing gets written down as fact until I've seen it on a device. I followed it for the thing I measured. I forgot it for the thing I concluded from the measurement.
A conclusion you haven't checked is as dangerous as a number you haven't checked, and harder to catch, because it borrows the credibility of the real measurement sitting underneath it.
So the app now asks the tag, and only assumes when no tag has answered yet. When it assumes, it says so, every time:
Too big for this tag
202 bytes, assuming an NTAG213's 137. It is 65 bytes over.
Shorten the profile or write a link instead.

No tag has reported its size yet, so this assumes an NTAG213.
Tags state their real capacity when you write to them.
The word "assuming" appears whenever the number is assumed. It's repetitive by design: the moment the app stops saying it, a reader starts believing it measured something.
Here's the same card once a tag has answered:
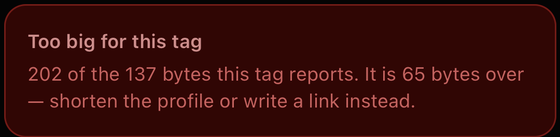
"This tag reports" instead of "assuming an NTAG213's". Same card, same layout, and the one word that changes is the one that says whether the number came from a chip or from me.
A Bug That Made This Harder to Find
My pre-flight check threw the library's own TagSizeTooSmall when a message wouldn't fit. So when a write failed, the error said TagSizeTooSmall, exactly what CoreNFC would have produced if it had rejected the write.
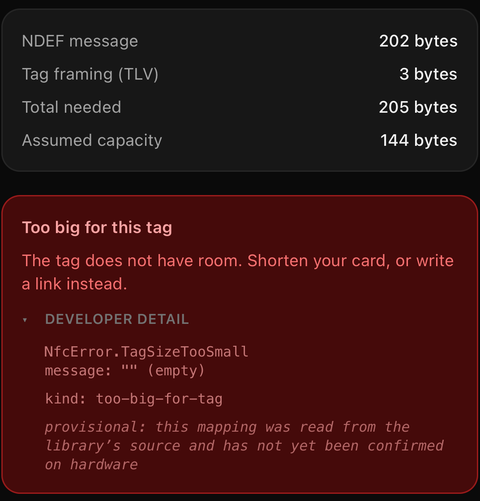
There are two things in that developer panel. NfcError.TagSizeTooSmall is the library's class, raised by my own code before the tag was ever consulted. And message: "" (empty) is the defect behind it: the class carried the entire meaning, and the string a screen would print carried none of it.
Our refusal and the tag's refusal were the same string. The one question I was trying to answer (did the platform report a capacity?) was the one the error had erased.
Never throw a dependency's error type from your own logic. It collapses "we refused" and "they refused" into one signal, and you'll want to tell them apart precisely when something is going wrong.
With a dedicated error type carrying the tag's own numbers, the answer was immediate:
WritePreflightError: too-big
tag reported status 2, 137 bytes
needed 202 bytes
There it was. The platform had been reporting capacity all along.
Same screen, same chip, before and after:
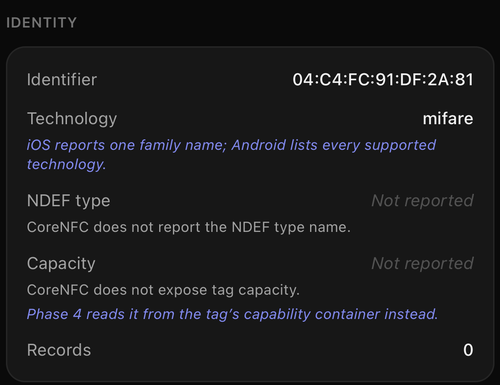
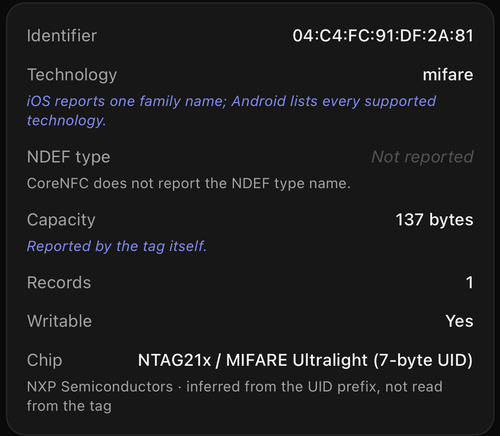
Every word under "Capacity" in the first shot is mine, and the confident one is wrong. The blue line beneath it is worse: a whole phase of native work, scheduled to close a gap that wasn't there.
The second reads a number, annotated reported by the tag itself, and nothing was added to the platform in between. Note what didn't change, though. "NDEF type" still says "Not reported", because that one genuinely isn't available. One question the platform can't answer, sitting directly above one it always could, which is exactly why I believed the wrong thing for so long.
A Focus Session You Can't End Without the Tag
A business card is a fine demo, but it only exercises half of what tags are good for. The other half is using a chip as a physical condition: something that must be true in the real world before software will do a thing.
So the app has a second feature: a focus timer you can't stop without walking to the tag.
You leave the chip somewhere inconvenient. Downstairs, in a drawer, at the back of a cupboard. Tap it to start a session. To end the session, you have to go back to it.
This idea isn't mine. Foqos (open source, on the App Store), TapBlok, nfcGuard, and Focusaur all converge on it, and they converge because the insight isn't about NFC at all:
The friction is geography, not the gesture. Tapping costs a second. What costs you is that the tag is downstairs. The tag's location is the product. NFC is merely what makes a location enforceable.
Three rules follow, and each is a line of code.
1. One tag, two meanings.
The same tap starts a session when idle and ends one when focused. Two tags would be two objects to lose and two habits to build. All of the decision lives in one pure function:
export function verdictForTap(
  scannedTagId: string,
  boundTagId: string | null,
  isFocused: boolean
): TapVerdict {
  if (!boundTagId) return { action: 'bind' };

  if (normaliseTagId(scannedTagId) !== normaliseTagId(boundTagId)) {
    return { action: 'wrong-tag', expected: boundTagId };
  }

  return isFocused ? { action: 'end' } : { action: 'start' };
}
That wrong-tag branch is the rule everything rests on. Accept any tag and the ritual becomes "own a sticker" rather than "go to the place where the sticker lives".
The normalising matters more than it looks. The same physical chip is reported as 04C4FC91DF2A81 by one read path and 04:c4:fc:91:df:2a:81 by another. Treating those as different tags is a maddening bug: the right chip, in your hand, silently refused.
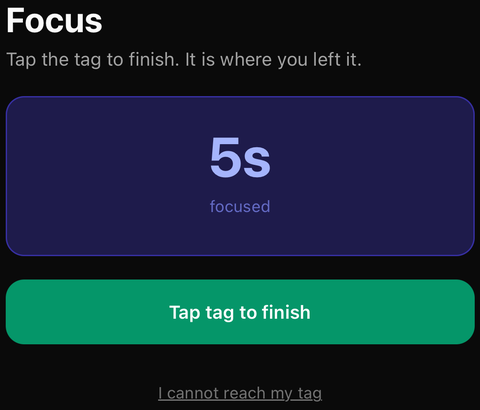
The green button isn't a button that ends anything. It starts a scan, and the scan is what ends the session. Underneath it, deliberately quieter, is the way out for the airport.
2. The timer counts up, never down.
A countdown invites you to wait it out on the sofa, since the session ends whether or not you did anything. Counting up measures what actually happened.
3. A broken session is recorded, not prevented.
And this is where the design gets interesting.
What It Can Actually Enforce
It can't block TikTok. Really blocking another app on iOS requires com.apple.developer.family-controls, a privileged entitlement that Apple reviews individually and grants only to apps whose core purpose is digital wellbeing or parental control, and it's required even for TestFlight. Foqos has it. If you're following this handbook, you likely will not, and promising otherwise would be a promise you couldn't keep.
So it enforces the one thing it actually can: the record.
There's an escape hatch, because a commitment device with no way out is one you uninstall the first time you're genuinely stuck at an airport. Taking it costs a permanent, visible mark: this session will be recorded as ended early. That mark is permanent and you'll see it every time you open this tab.
And the history is the vault, not notes or credentials, but the record itself, because that's the only thing in the app worth protecting from its own user. The protection is asymmetric:
| Reading the record | Always free. The point is that you look at it |
| Adding to it | Only by living through a session |
| Clearing it | Requires the tag |
A history you can wipe at 11pm from the sofa records nothing. Erasing it costs exactly what earning it did: the walk.
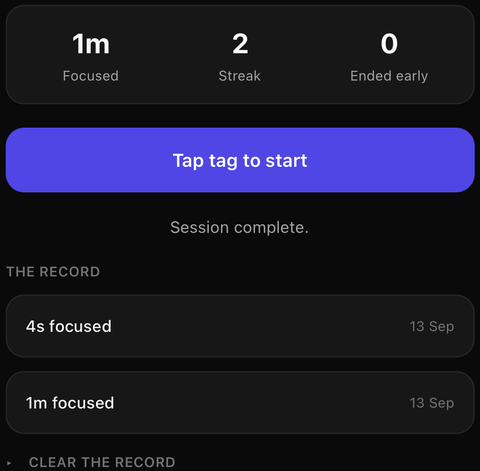
"Ended early" is a column whether or not you have any, which is the point. It sits next to the streak, permanently, so the cost of the escape hatch is visible before you ever use it. And "Clear the record" is the collapsed control at the bottom: the one action in the app that asks for the tag.
Here are two smaller decisions that turned out to matter. A running session survives a relaunch, because it's persisted, so force-quitting isn't a silent way out. The only exits are the tag and the hatch, and one leaves a mark.
And broken sessions still count toward total focused time, because you were focused until you weren't. Zeroing it would be punitive rather than accurate.
The streak, by contrast, is deliberately harsh: one broken session resets it to zero. A number that can't be lost isn't worth looking at.
Two React Bugs the Compiler Caught
Both are general React bugs rather than NFC ones, and neither was caught by me. The React Compiler ships lint rules through eslint-plugin-react-hooks that flag code it can't safely optimise, and two of them fired here. You don't have to adopt the compiler to get them.
const [now, setNow] = useState(Date.now()); // ✗ impure during render
That's the purity rule, and it names this exact case: Date.now() is listed alongside Math.random() and crypto.randomUUID() as an API that "returns a different value for the same inputs". Reading the clock during render makes the component produce different output each time.
The obvious fix (setting it at the top of an effect) trips a second rule. set-state-in-effect puts it plainly: "Setting state immediately inside an effect forces React to restart the entire render cycle", producing "an extra render pass that could have been avoided".
The purity page's own fix is a lazy initialiser, useState(() => Date.now()), and for a clock that starts when the component mounts, that's the right answer. This timer doesn't start at mount, it starts when a session does, so a mount-time stamp would already be stale by then and elapsed would render negative for a frame.
Starting at 0 is both pure and a usable sentinel: falsy means "no tick yet", so the label shows nothing rather than nonsense.
The version that's both correct and clean defers by one task:
useEffect(() => {
  if (!session) return;

  // Deferred rather than called straight away: a synchronous setState inside
  // an effect cascades a second render pass. A zero timeout hands it to the
  // next task, which updates just as promptly without the cascade.
  const first = setTimeout(() => setNow(Date.now()), 0);
  const id = setInterval(() => setNow(Date.now()), 1000);

  return () => {
    clearTimeout(first);
    clearInterval(id);
  };
}, [session]);
Why Your NFC Lock Isn't Secure
The focus feature uses a tag's identifier as a key. So do most NFC "lock" apps. It's worth being blunt about what that is and isn't.
A tag's UID is world-readable and trivially copied. It's not a secret. It's a serial number, broadcast to anything that asks.
This is also what Apple's own Shortcuts automation keys on, as the first section noted, which tells you how the platform itself rates the guarantee: fine for "turn on my desk lamp", never offered as a credential. A £20 device clones one in seconds, and phones can emulate some of them outright. An access system built on "is this UID correct?" is theatre.
For the focus timer, that's completely fine, and worth saying: the threat model is you, being lazy, in your own house. Cloning your own tag to skip a walk is a level of effort that defeats the point of the exercise. Friction is the product, security isn't.
But if you're reaching for a tag as an actual credential (a door, a payment, or a device pairing), the UID is the wrong primitive and you need a chip that can do cryptography.
An NTAG424 DNA is the usual answer. Rather than presenting a static number, it computes a message authentication code over a counter that increments on every tap, using a key that never leaves the chip. Each tap produces a different, signed value, so a captured one is useless a second later. That's the difference between an identifier and an authenticator.
So here's what you take away: A UID answers "which tag is this?" and nothing more. If your security depends on the answer being unforgeable, you need a chip that signs, not one that announces.
Four Gotchas That Cost Me an Evening Each
Each of these looked like a bug in my code and was really a quirk of the platform.
Gotcha 1: The System Sheet Vanishes With No Error
You start a scan. The sheet appears for a moment and disappears. No error, no rejection, and nothing in the console.
This happens because the CoreNFC session was deallocated. Swift frees an object as soon as nothing is holding a reference to it, which is what Automatic Reference Counting, or ARC, does. So if you keep the session in a local variable inside the function that started it, the variable dies when the function returns, and the session goes with it.
To fix this, retain the session on something that outlives the call. In an Expo module, a property:
// Held for the life of the module, not the scan.
private var readSession: Any?
This is the single easiest way to get a CoreNFC integration subtly wrong, and nothing tells you.
Gotcha 2: Your Result Gets Overwritten by the Session Ending
You read a tag successfully, resolve the promise, and JavaScript receives an error instead.
This happens because a successful read also invalidates the session, so didInvalidateWithError fires after your completion handler. If both paths settle the same promise, the later one wins.
To fix this, guard settling so it happens exactly once. One lock, one place:
private func settle(resolving value: [String: Any]) {
  lock.lock()
  defer { lock.unlock() }

  guard let promise else { return }   // already settled: do nothing
  self.promise = nil
  promise.resolve(value)
}
With four nested asynchronous steps and five failure paths, this has to be enforced rather than assumed.
Gotcha 3: Missing required entitlement for an Entitlement You Have
You have NDEF and TAG in your entitlements and the session still refuses to start.
This happens because of polling options, the list of radio standards you tell CoreNFC to listen for when you open a session. Each one is gated by its own entitlement. I asked for [.iso14443, .iso15693, .iso18092], and that last one is FeliCa, a standard used mostly in Japan, which additionally requires com.apple.developer.nfc.readersession.felica.systemcodes. Asking for it without that key fails the entire session, not just that polling mode, and the error never says "FeliCa".
To fix this, ask only for what you can sign for:
pollingOption: [.iso14443, .iso15693],
.iso14443 covers NTAG and MIFARE, which is everything a tag project needs. I'd added the third "so unexpected tags produce better errors". It produced a session that couldn't start.
This is the same lesson as the wildcard-profile error from earlier, arriving from the opposite direction: there, a missing entitlement surfaced as a code-signing failure. Here, an entitlement I never needed surfaced as a runtime one.
Gotcha 4: cannot find 'YourClass' in scope for a File That Exists
You add a Swift file to a local Expo module, build, and the compiler insists the class doesn't exist.
This happens because of how iOS dependencies are wired up. CocoaPods is the package manager that builds them, and each one ships a podspec, a small file listing which sources belong to it. Yours says "every .swift file in this folder", written as **/*.swift.
The catch: CocoaPods expands that pattern once, when pod install runs. It's a list, not a live rule. A file you create afterwards isn't in the Xcode build at all, so the compiler is telling the truth. As far as it knows, your class doesn't exist.
To fix this, remember the rule and stop losing ten minutes to it each time:
Adding a function to an existing file → rebuild. Adding a file →
pod install, then rebuild.
The error message mentions neither.
Why You Can't Build Tap to Pay
This is where the gap between the two platforms stops being a matter of degree. Know it before you promise anything to a product manager.
"Tap to pay" means two different things.
First, there's paying with your phone: Apple Pay, or a bank card in Google Wallet. On iOS the Secure Element is closed. There's no third-party API. Not restricted, not entitled: absent.
Second, there's accepting payments on your phone: Tap to Pay on iPhone, or the ProximityReader framework. This exists, and you still can't just build it:
An organization-level developer account, requested as the Account Holder
Separate TEST and LIVE entitlements, applied for individually
Apple reviews against predefined criteria, and LIVE approval can take weeks
You must integrate through an approved payment service provider: Stripe, Adyen, or Square
Now Android. HostApduService lets any app emulate a card. No approval, no entitlement, and no PSP. Implement processCommandApdu(), register your AID, and you're done. An AID is an Application Identifier, the number a payment terminal asks for to decide which app on the phone should answer.
There's one real gate: AIDs registered under CATEGORY_PAYMENT only work when your app is the default wallet (the Wallet role holder on Android 15+) or is foregrounded and calls setPreferredService. But CATEGORY_OTHER, which covers closed-loop cards, loyalty, access control and stored value, is open and always active.
| iOS | Android | |
|---|---|---|
| Emulate a card | Impossible | HostApduService, no approval |
| Payment AIDs | N/A | Default-wallet gated |
| Non-payment AIDs | N/A | Open |
| Accept payments | Entitlement + PSP + weeks | Open |
Unlike every other difference in this handbook, this isn't a difference of degree or of shape. One platform simply doesn't offer the capability. If your product plan involves a phone pretending to be a card, that plan is Android-only, and it's better to learn it now than after a sprint.
Why You Might Write Your Own Native Module
Up to this point everything has run on react-native-nfc-manager. The last third of this project replaced it, and the reason changed partway through.
The original justification was the capacity gap: iOS can't report capacity, so we need our own native code to read it. That argument evaporated, as you've seen. It was an inference, not an observation.
So rather than quietly keeping the work with its motivation gone, here's the real version: some teams can't take a third-party dependency. Internal-only policies, audit requirements, or simply a package they can't get a fix merged into on any useful timescale. "How would I build this myself?" is worth answering on its own terms.
And for this dependency specifically, the evidence was already gathered, by reading it:
| Finding | Where |
|---|---|
| Text decoder discards the language code it just measured | ndef-lib/ndef-text.js |
UTF-16 flag ignored, an open TODO |
ndef-lib/ndef-text.js |
String.fromCharCode truncates above U+FFFF |
ndef-lib/util.js |
index.d.ts is invalid TypeScript, compiles only because skipLibCheck is on |
index.d.ts |
| Package root throws outside a native runtime | src/NativeNfcManager.js |
Every error class carries an empty message |
src/NfcError.js |
That last one caused a real bug in Phase 1: a failed scan rendered nothing at all, because the screen did setError(err.message), the message was '', and React treats an empty string as falsy. The meaning lived only in the class.
None of these are fixable from JavaScript.
The Scaffolding Is No Longer the Hard Part
npx create-expo-module@latest --local --name NfcNative \
  --package com.you.nfcnative -p apple android --features Function
There are four files, wired into the build automatically by pod install. No Xcode project surgery, RCT_EXPORT_METHOD macros, or hand-written JSI, the C++ layer that lets JavaScript call native code directly. If you last wrote a React Native native module in the bridge era, that's the headline.
There are two snags, and neither are documented: --name sets the native module name, while the directory comes from a positional path argument (so without one it lands in modules/my-module). And the generated podspec declares an iOS deployment target that can silently raise your app's minimum.
Typed Errors That Actually Carry a Message
internal final class NoNfcSettingsException: Exception {
  override var reason: String {
    "iOS has no NFC setting to open. NFC is available whenever the hardware supports it."
  }
}
Expo's Exception gives each one a code and a message, both readable from JavaScript. That's the direct fix for the defect behind the silent failure above.
And here's the part that surprised me: owning the native side doesn't exempt you from error plumbing. Expo wraps your exception:
FunctionCallException: Calling the 'openNfcSettings' function has failed
  → Caused by: NoNfcSettingsException: iOS has no NFC setting to open. …
err.message is now the framework describing its own plumbing. Your sentence is at the end of the cause chain. This is the mirror image of the library's problem. There the message was empty, here it's buried, and both break the same reflex.
Here's that chain rendered in the app, exactly as JavaScript received it:
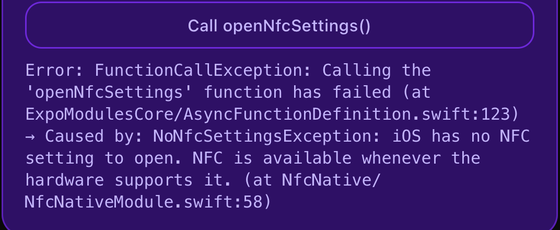
We have three lines of framework before a single word a person could use. The fix isn't in Swift, it's in the screen: walk the cause chain, show the deepest message first, and put the rest behind a disclosure for whoever actually wants it.
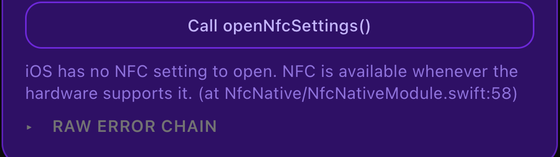
Same failure, same information, with nothing thrown away. The sentence written in Swift is the one that leads, and RAW ERROR CHAIN is one tap away when you need it.
Owning the native side changes which layer surprises you.
The Bug 272 Passing Tests Could Not Catch
After switching the app over, cancelling a scan rendered a red "Could not read the tag" card instead of nothing.
Our Swift throws UserCancelledException. The mapping table was keyed on UserCancelledException. They don't match, because Expo derives the code: strip the trailing Exception, split camelCase, upper-case, prefix ERR_:
UserCancelledException → ERR_USER_CANCELLED
Why every test passed:
const wrapped = (code, message) =>
  new Error(`Calling the 'readTag' function has failed → Caused by: ${code}: ${message}`);
There's no code property, because I didn't know Expo set one. The code and its tests shared a single wrong assumption and agreed with each other perfectly.
A fixture you invented can only prove your code is self-consistent. It took a thumb on a Cancel button.
The fix keeps the table keyed on the Swift class names and derives the ERR_ forms, so there's one source of truth instead of two lists that drift. The regression is now pinned by a test using the verbatim device error, code property and all.
Checkpoint:
git checkout step-4-own-module. The module alongside the library.
How to Prove Parity Before You Switch
Don't swap implementations on faith. Read the same physical tag through both and diff the results.
The design decision that made this useful: "different" isn't one outcome. Our read reports capacity and writability that the library's read path doesn't carry, and scoring that as a mismatch would be actively misleading.
| Status | Meaning |
|---|---|
same |
Both reported it, they agree |
differs |
Both reported it, they disagree. The only bad one |
native-only |
Ours knows more. The reason to switch |
library-only |
We lost something. Also blocks the swap |
neither |
Nothing to conclude |
library-only blocking the swap matters: losing information is a real problem even though it isn't a contradiction.
The result on a real NTAG213: four fields are identical, two are reported only by our module, with zero conflicts. That's the evidence the switch was made on, rather than a feeling that the new code looked right.
What a Config Plugin Was Doing For You
The riskiest part of deleting the dependency wasn't code.
react-native-nfc-manager ships a config plugin, and that plugin was generating the iOS NFC entitlement and NFCReaderUsageDescription. Remove the package and both vanish, and the app loses NFC with no error at all. Nothing fails at build time. The sheet simply never appears again.
So the order was: declare them yourself in app.json, prebuild, verify the output is byte-identical to what the plugin produced, then remove the plugin, verify again, then remove the package.
Removing a dependency means inheriting its build configuration. The code it exports is the visible half.
Keep the Evidence After Deleting the Dependency
The argument for replacing that library rests on defects in a package that no longer exists. Delete it and the tests proving those defects stop running, and the agreement tests go too, leaving a hand-typed 36-entry lookup table unverified.
So the repo keeps a frozen copy under vendor/, with its MIT licence, imported by nothing but one test file, and excluded from ESLint and Prettier, because its value is being wrong in documented ways, and reformatting it would destroy the thing it demonstrates.
✓ every error class is constructed with an empty message
✓ turns U+1F600 into U+F600, a Private Use Area character
✓ discards the language code it just measured
✓ ignores the UTF-16 flag in the status byte
If a future version fixes any of that, these fail, which is the signal to reconsider, not a nuisance.
Checkpoint:
git checkout step-5-no-dependency
How to Lock a Tag Forever
One operation in this whole field can't be undone. It's the only place where getting the interaction design wrong destroys something physical, which is why it comes last.
NFCNDEFTag.writeLock on iOS, Ndef.makeReadOnly() on Android. Both burn the chip's lock bits. The tag can be read forever and never written again: not by your app, or any other app, or any phone. There's no undo and no factory reset.
Real deployments do this constantly. An event badge, a product-authentication seal, or a museum label: anything handed to the public gets locked, because a tag you can rewrite is a tag anyone can rewrite.
The Gate Is the Feature
The native call is four lines. Everything interesting happens before it.
Two taps guards a write in this app, and that's right for a write: a write is reversible, you simply write something else. It's plainly not enough here. So the gate borrows the pattern GitHub uses for deleting a repository: type the thing's name to prove you know which thing you're destroying.
The status it takes is the tag's own NDEF state, the same value the write path asks for: not NDEF at all, read-write, or already read-only.
export function lockGate(tagId, status, typed): LockGate {
  if (!tagId) return { state: 'no-tag' };
  if (status === NDEF_STATUS.READ_ONLY) return { state: 'already-locked' };
  if (status === NDEF_STATUS.NOT_SUPPORTED) return { state: 'not-lockable' };

  return normaliseTagId(typed) === normaliseTagId(tagId)
    ? { state: 'armed', tagId }
    : { state: 'needs-confirmation', expected: tagId };
}
A confirmation dialog measures willingness. Typing the identifier measures attention. The failure mode worth designing against isn't someone who wants to lock a tag. It's someone who wants to lock a tag and is holding the wrong one.
Which is also why the screen won't arm until you've read the tag first, and shows what's currently on it. An unintended chip announces itself before it can be spent.
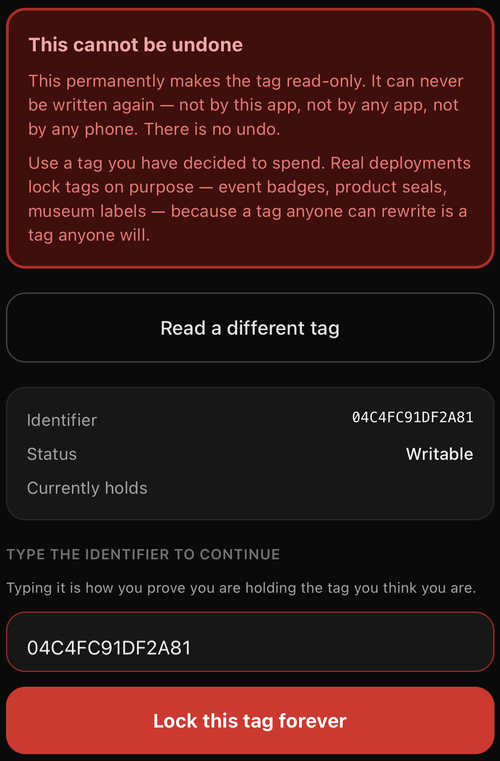
The identifier is on screen and also has to be typed. That looks redundant until you picture the failure it's for: the right person, the wrong chip.
Note the order in that function: already-locked is checked before the typed confirmation, so nobody can type their way into "locking" an already-locked tag and be told it worked. It didn't work. There was nothing to do.
"Nothing to Do" Is Not "Something Went Wrong"
AlreadyLockedException is deliberately distinct from LockFailedException, and the UI renders it green, with no lock button. The tag is in exactly the state you asked for. Reporting that as a failure would alarm someone about a perfectly good chip.
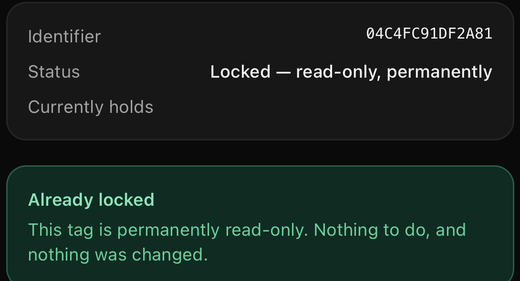
"Nothing to do, and nothing was changed" is doing real work in that sentence. It tells you the app didn't try, which is the part you want to know about an operation that can't be repeated.
This is the same principle as never throwing a dependency's error type from your own logic: two different situations must not arrive as one signal, and the moment you want them apart is the moment something is going wrong.
Verify, Because You Can't Retry to Find Out
Both implementations re-read the status afterwards. That check exists in the write path too, but it carries different weight here:
A failed write is recoverable: write again. A lock that reports success and didn't happen sends a tag into the world believing it's protected, and you can't retry to find out, because retrying is itself the destructive act.
So an unverified lock isn't reported as a soft warning the way an unverified write is. The copy says the chip's state is unknown and to read it before relying on it.
The strongest confirmation comes later, from the tag rather than the app. Try to write to it again and CoreNFC itself refuses, in the system sheet, before your code gets a say:
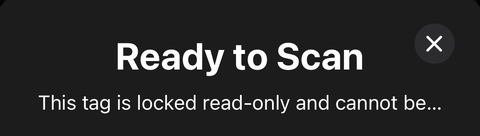
That sentence is written by iOS, not by this app. It's the only proof that really counts, and the one you can never collect twice.
A Separate Class, Not a Flag
NfcLockSession duplicates a fair amount of the write session: setup, delegate, and settle-once discipline. That's deliberate.
The alternative was a lock: Bool on the write session. A boolean parameter that sometimes destroys the tag is exactly what gets passed by accident in a refactor three months later, by someone who has never read the file. Two call sites, two intentions, and no shared branch reachable from the wrong place.
Sometimes the right response to "this is nearly the same code" is to let it be nearly the same code.
And One Test That Was Right While the Code Was Wrong
it('refuses a tag that is not NDEF at all', () => {
  expect(lockGate(TAG, NDEF_STATUS.NOT_SUPPORTED, TAG).state).toBe('armed');
});
The name says refuses. The assertion says armed. It passed, because the code did arm, and writeLock is a method on NFCNDEFTag, so a non-NDEF chip should never have been offered it.
The name was right and the code was wrong. It was caught by reading a passing test's name next to its assertion, which is the only way it could have been caught: a test that agrees with the wrong code is invisible to a test run.
How Would You Actually Ship This?
Everything above was built locally with expo run:ios, Xcode, CocoaPods, and twice, a completely full disk. The alternative is EAS Build, and it deserves an real comparison rather than a recommendation.
Everything below was run: one production build on EAS, plus a deliberately rigged experiment to test the headline claim rather than assume it. The only thing I have not done is install the resulting .ipa. It's an App Store build, so it can't be side-loaded, and every NFC claim in this handbook still rests on locally-built binaries on a real phone.
The Step EAS Would Have Saved
The worst afternoon of this project was this error:
Provisioning Profile "iOS Team Provisioning Profile: *" does not support
the NFC Tag Reading capability.
The fix was manual and undiscoverable from the message: register an explicit App ID in Apple's portal, tick NFC Tag Reading, and regenerate the profile. Nothing in the error suggests opening a browser.
EAS does that step automatically. If a supported entitlement is in your entitlements file, eas build enables the matching capability on the Apple Developer Console and skips it if it's already on. And com.apple.developer.nfc.readersession.formats, exactly the key this app declares, is on the supported list by name.
So the single most painful manual step in the whole handbook is automated by the thing I didn't use.
How to Prove It Rather Than Believe It
Running eas build against TapCard's real bundle identifier can't demonstrate this, and it's worth understanding why before trusting anyone's screenshot of it working:
✔ Bundle identifier registered com.nfccard.tap
✔ Synced capabilities: No updates
No updates, because that App ID already had NFC Tag Reading enabled. I enabled it by hand, in a browser, in the chapter this section is about. All this proves is that EAS agrees with work I already did. Plenty of "EAS handles it for you" claims rest on exactly this output.
The real test needs a bundle identifier that has never existed. So: a throwaway project, com.nfccard.tap.eastest, containing essentially nothing but the entitlement, deliberately kept separate from the real app rather than temporarily renaming its bundle ID, which risks muddling stored credentials.
✔ Bundle identifier registered com.nfccard.tap.eastest
✔ Synced capabilities: Enabled: NFC Tag Reading
That's the claim, observed. An App ID that didn't exist, registered and given the NFC capability from the entitlements file alone, with no browser and no portal. And because the sync runs at the credentials step, that command was eas credentials:configure-build, and it consumed no build.
One practical note if you repeat this: run the real build first. Distribution certificates are account-wide and Apple limits how many you may hold, so doing the throwaway first would burn one on an app you intend to delete. Done in that order, the scratch app offered to reuse the real certificate and only created its own provisioning profile, which is per bundle ID.
What the CLI Actually Does
The mapping isn't magic and it's not buried. It's a lookup table, and NFC has an entry in it (eas-cli/build/credentials/ios/appstore/capabilityList.js):
{
  name: 'NFC Tag Reading',
  entitlement: 'com.apple.developer.nfc.readersession.formats',
  capability: CapabilityType.NFC_TAG_READING,
  // Technically it seems only `TAG` is allowed, but many apps and packages tell users to add `NDEF` as well.
  validateOptions: createValidateStringArrayOptions(['NDEF', 'TAG']),
  getSyncOperation: getDefinedValueSyncOperation,
}
Read that comment again, because it is quietly about you: NDEF may not be a real value. Every tutorial tells you to write ["NDEF", "TAG"], this handbook's own app.json writes ["NDEF", "TAG"], and the person maintaining the mapping table clearly suspects only TAG means anything, but accepts both, because refusing the pair would break everybody. That's what a convention looks like when nobody checks the spec.
getDefinedValueSyncOperation is the other half. The operation keys off whether the entitlement is defined, which is why the sync runs in both directions rather than only adding things.
And one practical detail the documentation doesn't tell you: the sync is triggered by the credentials step, not the build step.
SetUpTargetBuildCredentials.runAsync()
  └─ ensureBundleIdExistsAsync({ entitlements, … })
       └─ syncCapabilitiesAsync()
            → "Synced capabilities: Enabled: NFC Tag Reading"    (or "No updates")
So eas credentials:configure-build --platform ios registers the App ID and syncs the capabilities without consuming a build. If all you want is Apple's side of the setup done correctly, you don't have to pay for a build to get it.
The Trap That Comes With It
The sync runs both ways: if a capability is enabled for your app remotely, but not present in the native entitlements file, running eas build will automatically disable it.
A team that manages capabilities by hand in the portal and builds with EAS will watch EAS switch things off. The entitlements file becomes the source of truth whether you meant it to or not.
EXPO_NO_CAPABILITY_SYNC=1 opts out, with the caveat that opting out means remote changes stop syncing, which produces provisioning-profile mismatches later. Pick one owner for capabilities and let it own them.
What EAS Would Not Have Helped With
"Use EAS" isn't an answer to most of this project's pain, and pretending otherwise would be selling something:
| Problem | Would EAS have helped? |
|---|---|
| NFC Tag Reading capability on the App ID | ✅ automated |
| A full disk, twice | ✅ builds happen elsewhere |
| A Gradle daemon holding memory after the build | ✅ nothing runs locally |
pod install needed after adding a Swift file |
✅ every build is clean |
| The deallocated CoreNFC session | ❌ a code bug |
| Settling a promise twice | ❌ a code bug |
| The FeliCa polling entitlement | ❌ not a capability, a key EAS doesn't manage |
String.fromCharCode truncating an emoji |
❌ a dependency bug |
Expo deriving ERR_USER_CANCELLED |
❌ a wrong assumption |
| Reading a tag at all | ❌ there is no cloud substitute for a chip |
EAS removes machine problems, not NFC problems. Every finding in this handbook that was actually about NFC would have happened identically.
The Trade
Local builds cost disk, memory, and setup. This project filled a 460 GB disk twice, had three background processes killed under memory pressure, and lost a rebuild to a stale Gradle daemon.
EAS costs queue time and a cloud project, and puts your signing credentials on Expo's servers. What it can't shorten is the loop that actually matters here: you still have to walk to a phone and hold a chip against it. A cloud build that goes green tells you nothing about whether the tag read.
For a solo project with a working local toolchain, local wins on iteration speed. For a team, a CI pipeline, or anyone who has just watched their disk hit 100% mid-build, the capability sync alone is a strong argument.
A Sneak Peek at the Android Side
Android deserves its own handbook, and it's getting one. This section is the preview for anyone who doesn't want to wait: the Kotlin counterpart to the Swift above, and the architectural differences that make NFC on the two platforms genuinely different jobs rather than the same job twice.
Read it as a design preview rather than a verified implementation. The Kotlin compiles against the documented API and mirrors Swift that is verified on hardware, so the shapes are right, and the full treatment with a device in hand is the handbook that follows this one.
The differences that matter are visible from the API surface rather than from a device, and they're the ones that decide how you structure the code.
Android Has No Session
iOS hands you a session, and the session is the model: you begin it, the OS draws a sheet, it hands you a tag, and it invalidates itself. Android gives you reader mode: a callback bound to your foreground Activity that fires whenever a tag comes near.
adapter.enableReaderMode(activity, ::onTagDiscovered, flags, Bundle())
Everything the iOS session did for you becomes yours:
| iOS | Android | |
|---|---|---|
| Scanning UI | The OS draws a sheet | The app draws everything |
| Session end | Automatic after one tag | disableReaderMode on every exit path |
| Needs | Nothing on screen | The foreground Activity, not a Context |
| Callback thread | Main | A binder thread |
| Cancelling | The system sheet provides it | Build it yourself |
That last row reaches all the way back into the JavaScript. The cross-platform cancelScan() is a real implementation on Android and a documented no-op on iOS, where the system sheet owns cancelling and the Swift module deliberately doesn't implement the function at all:
export async function cancelScanNative(): Promise<void> {
  if (Platform.OS !== 'android') return;
  await NfcNative.cancelScan();
}
Also: pass FLAG_READER_NO_PLATFORM_SOUNDS, or the OS plays its own discovery sound over an app that is already telling the user what to do.
The Kotlin, and One Design Note
private fun onTagDiscovered(tag: Tag) {
  val ndef = Ndef.get(tag) ?: run {
    stopReaderMode(); rejectOnce(NotNdefException()); return
  }

  try {
    ndef.connect()

    val status = NfcTagInfo.status(ndef)
    val capacity = ndef.maxSize

    messageToWrite?.let { message ->
      // Ask before acting, same order as the Swift: refusing leaves the tag
      // untouched, failing partway through a write may not.
      if (!ndef.isWritable) { … }
      if (message.toByteArray().size > capacity) { … }
      ndef.writeNdefMessage(message)
    }

    // Read back in the same connection. For a write this is verification,
    // for a read it is simply the result.
    val onTag = ndef.ndefMessage
    …
  } finally {
    runCatching { ndef.close() }
  }
}
Android has no equivalent of iOS's NFCNDEFStatus, so the status is derived rather than reported.
fun status(ndef: Ndef?): Int =
  when {
    ndef == null -> 1     // not NDEF: signalled by Ndef.get() returning null
    ndef.isWritable -> 2  // read-write
    else -> 3             // read-only
  }
iOS answers that question directly. Android signals "not NDEF" by Ndef.get() returning null and exposes isWritable on a connected tag. Mapping both onto one set of numbers keeps the TypeScript from ever needing to know which platform it's talking to, which is the entire job of a native module.
If You Port This, the Differences That Will Matter
| iOS | Android | |
|---|---|---|
| Permission model | App ID + capability + paid account | One manifest line, free |
| Failure when misconfigured | Code-signing error that never says "NFC" | Permission missing |
| Entitlement granularity | Per polling option | One permission covers all |
| Scanning UI | System sheet, not restylable | None. You draw everything |
| Capacity from a read | ❌ (ask the status query) | ✅ getMaxSize() |
| Writable from a read | ❌ (ask the status query) | ✅ isWritable |
| Antenna | Top edge | Centre back |
| Card emulation | Impossible | HostApduService, open |
| Permanent locking | writeLock, irreversible |
makeReadOnly(), irreversible |
Two patterns come from that table.
iOS front-loads the pain and Android back-loads it. Portals, entitlements and signing before you read a byte, versus reader mode, Activity lifecycle and building your own cancel once you're running.
And the capacity difference is narrower than it looks. It isn't that iOS tells you less. It's that Android volunteers this on an ordinary read while iOS makes you ask a specific question inside a session. Same data, different price of admission. I got that wrong for three documents, as you've seen.
The Demo Repository
Everything above is one project, TapCard, and it's a single app rather than a snippet dump.
| Layer | Where | What is there |
|---|---|---|
| App | app/(tabs)/ |
Read, Write, Focus and Profile screens, plus a Tag Info route |
| Pure logic | lib/ |
The NDEF decoder and encoder, vCard, capacity, error mapping, focus rules. ~2,240 lines, no React Native imports |
| Native module | modules/nfc-native/ |
~1,010 lines of Swift and ~475 of Kotlin: sessions, typed exceptions, tag conversions |
| State | store/ |
Zustand + AsyncStorage: profile, last tag, focus record |
| Evidence | vendor/ |
The removed dependency, frozen, with the tests that justify its removal |
| Notes | DEVLOG.md, GOTCHAS.md, PLATFORM-NOTES.md |
Every command and error verbatim, 75 traps, the running comparison |
293 tests, 15 suites, about a second, and no hardware. That's the payoff of keeping the decoding pure.
And the tagged checkpoints, so you can read the app at any stage rather than only at the end:
git checkout step-0-scaffold        # boots, no NFC
git checkout step-1-first-read      # entitlements + raw dump
git checkout step-2-decode          # own decoder, Tag Info
git checkout step-3-write           # vCard, capacity checks
git checkout step-4-own-module      # native module alongside the library
git checkout step-5-no-dependency   # library removed
git checkout step-6-android         # Kotlin reader mode
Clone it, buy a pack of stickers, check out step-1-first-read, and hold a chip against your own phone. That loop is the fastest way to make everything above concrete.
What to Know Before You Start
Buy the tags first. There's no simulator. When my chips went missing in the post the project stopped dead for two weeks, and no amount of clever architecture substituted for a chip.
Read your dependencies before trusting them. Twenty minutes with ndef-lib found three real defects and changed the architecture of the app. None of them were in an issue tracker I'd have thought to search.
Assume the failure will be silent. Of the seventy-five traps I logged, roughly a dozen produce no error at all: the deallocated session, the removed config plugin, the unescaped semicolon, the truncated emoji, the empty error message, and the gitignored native module. In NFC work "nothing happened" is the most common symptom, so instrument accordingly and confirm on the real surface rather than trusting a return value.
Put the platform difference in the type, not in a comment. Model "this platform doesn't tell us" as a first-class state:
type Fact = {
  label: string;
  value: string | null; // null = the platform did not report it
  unavailable?: string; // why, in plain language
};
A UI that renders a bare dash for both an absent value and a zero teaches nothing.
And don't let a conclusion inherit the credibility of the observation underneath it. That one cost the most, and it wasn't about NFC at all.
Conclusion
You now have the whole picture on iOS: the entitlement maze, a decoder written by hand because the popular one loses data, a write path that asks the tag before it acts, a focus timer enforced by geography, a native module in Swift, a dependency deleted with its evidence preserved, and a tag locked forever behind a gate that makes you type its name.
Three things are worth exploring next.
Background tag reading: Tap a tag with the app closed. iOS surfaces a notification the user must tap, and only for certain record types. It's the feature that makes NFC feel magic, and the rules around which records qualify are worth a piece of their own.
Cryptographic tags: An NTAG424 DNA signs a counter on every tap. If you ever want a tag to be a credential rather than a label, that's where to start.
And Android, which is the next handbook. The preview above is the map, and the full walkthrough on real hardware is what comes after this one.
The interesting part was never requestTechnology. It was everything the two platforms decline to tell you when you get it wrong.
Sources and Further Reading
Apple, CoreNFC and entitlements:
queryNDEFStatus: the call this project wrongly concluded did not existNear Field Communication Tag Reader Session Formats entitlement
CoreNFC availability on iPad: an Apple engineer confirming the framework is iPhone-only
Android:
Ndef:getMaxSize(),isWritable()
The format:
NFC Forum NDEF and RTD specifications: the URI prefix table and the Text record status byte
RFC 2426: vCard 3.0, including the
Nfield and line folding
Expo and React Native:
eslint-plugin-react-hooks, and the two rules that caught the focus timer:purityandset-state-in-effectiOS capabilities on EAS Build: which entitlements EAS syncs, and
EXPO_NO_CAPABILITY_SYNCexpo-modules-core,ios/Core/Exceptions/CodedError.swift: whereERR_USER_CANCELLEDcomes from
Shipped NFC you can go and check, cited in "Where You Have Already Seen This":
Setting triggers in Shortcuts, Apple. The NFC trigger needs iPhone XS or later and iOS 13.1
amiibo FAQ, Nintendo, on read-only versus read/write figures
Tap to Pay on iPhone and its supported regions, Apple
Prior art for the focus feature:
The library this project replaced:
react-native-nfc-manager: MIT. The defects described here were found in 3.17.2 by reading the source, and a frozen copy lives in the demo repo'svendor/with the tests that pin them.